|
|
|
|
|
|
Hi
I have just done a pre-MOT oil change on the Estelle and found faint traces of glitter in the oil. I cut the filter open and didn't find any chunks.
Its MOT in 10 days, and my plan is to drop the oil after it has hopefully past, pull the sump and do a bit of digging. There are a few potential culprits such as oil pump clearances etc.
However, I would also like to inspect the main and big end bearings. Ideally I would like to do it in-situ by pulling caps one at a time and inspecting the bearings and crank shaft. I have purchased a plastigauge kit so can also check bearing clearances.
Are there any risks or problems in doing that? It feels like it should be fine to take them off one at a time and inspect and measure, but don't want to cause more issues or problems if I find all is good and button it back up again and carry on using it.
Any thoughts or comments would be great. Thanks
Lewis
|
| |
Last Edit: Apr 1, 2024 17:53:03 GMT by lewist123
|
|
|
|
|
|
|
|
|
|
Before you remove anything centre pop to identify to make sure it goes back in the original place and do one at a time. It's probably best to leave well alone and enjoy driving it though.
|
| |
|
|
stealthstylz
Club Retro Rides Member
Posts: 14,960
Club RR Member Number: 174
|
|
|
|
|
You can do the rods 2 at a time (1 and 4, 2 and 3), just mark the caps for number and direction before removal, and do the removal at BDC so you can push the rod up away from the crank and check the upper halves, as they are the loaded side and tend to get damaged first.
Mains you'll only easily be able to see the cap side. Make sure the caps are on the right way round and mark them for number and direction Unless it's only there already. Unless there is obvious damage I wouldn't bother rolling the block halves out as it's more common for people to damage the bearings trying to get them back in.
I wouldn't bother with plastigauge either, as it won't be easy to clean it out.
|
| |
|
|
|
|
|
|
|
|
I had figured that I could see the top bearing on the conrods by rotating the crank out of the way. AIUI, the bottom main bearing should be taking more load than the top bearing, so if the bottom main is OK, it stands to reason the top should also be OK.
Bearing caps are all marked, but yes I will make sure I put them back exactly as they were fitted.
In terms of just leaving it and just driving it, I might be being paranoid, but if the glitter is signs of bearing wear and I drive it until it starts knocking, I might cause some damage to the crank which is really hard to get! Bearings are cheap and available, but crank shafts not so much.
I fitted an oil pressure gauge and pressures are all well within specs so the oil pump is working correctly and there are no blocked oil passages or huge bearing clearances (otherwise I would be getting dodgy pressure readings).
|
| |
|
|
fulvia1436
Club Retro Rides Member
Finally started a thread for my Fulvia life
Posts: 343  Club RR Member Number: 63
|
|
|
|
|
Glitter is not a sign of bearing wear.
That's made evident by grey sludge in the oil, that you'll see when you drain the oil.
Use a magnet to determine the material. It could be from some moving part touching an oil baffle, say. (I'm not familiar with your engine layout)
NEVER centre pop anything!
This risks distortion of the component, and severe derision from the next skilled engineer that sees it!!
Use a scriber or a file to identify the caps and their resp. rods.
Any copper showing on the shells is wear.
Any texture on the journals, felt with a fingernail, is damage, and will trash the new shells quickly.
Journals may polish, but a regrind is more likely.
If it's all good, Plastigage is a very good tool to get an accurate measure of the crank condition. (you do NOT have to worry about cleaning it off ~ it's designed to dissolve harmlessly ~ obviously!)
Good luck!
|
| |
'59 Austin A40, '59 VW Beetle, '63 Mk1 Cortina, '57 Austin Gypsy, '68 Fiat 850 Coupe, '68 Alfa Duetto Spider, '72 Lancia Fulvia 1.3S, '73 Lancia 2000 Sedan ie., '72 Lancia 2000 Sedan, '67 Lancia Fulvia 1.3, '83 VW Passat GL5 Estate, '81 Volvo 245 Estate, '85 Lancia Thema 8V Turbo Estate, '99 Lancia Kappa 20V Turbo Estate, '00 VW Sharan VR6, '06 Fiat Multipla 1.9 JTD, '10 Fiat Multipla 1.9 JTD, '66 Lancia Fulvia 1.3
|
|
stealthstylz
Club Retro Rides Member
Posts: 14,960
Club RR Member Number: 174
|
|
|
|
|
I etch them myself, but when I was bored I actually did a test of the "pop marking can distort a con rod" thing a few years ago, and the forces needed to actually distort the cap were ridiculous, more or less swinging a standard hammer as hard as I could.
Also I've had to rebuild 2 engines that had oil starvation on one bearing due to plastigauge partially blocking the oil hole. It "should" dissolve in warm oil, but apparently sometimes it doesn't dissolve fast enough.
|
| |
|
|
pptom
Part of things
 
Posts: 475 
|
|
|
|
|
How about a totally non invasive approach first and get an oil analysis done. Don't know if you've saved your old oil or if the oil change after the MOT has had enough time to pick much up but it will certainly tell you what the metal is and give you an idea of where it's coming from. I suspect it might even tell you about the state of the shells, if the 'lead' is worn through and there is any copper present etc.
It used to be a bit of a race car only thing back in the day, but I think it's quite a common service now.
|
| |
|
|
|
|
|
|
|
How about a totally non invasive approach first and get an oil analysis done. Don't know if you've saved your old oil or if the oil change after the MOT has had enough time to pick much up but it will certainly tell you what the metal is and give you an idea of where it's coming from. I suspect it might even tell you about the state of the shells, if the 'lead' is worn through and there is any copper present etc. It used to be a bit of a race car only thing back in the day, but I think it's quite a common service now. We have this done on the diesel generators at work as its much cheaper to check the oil and only change it when its needed than to keep replacing it, especially when they only usually run 1 hour a month on test. |
| |
|
|
|
|
|
|
|
|
Thanks for the comments all
I had thought about getting an oil analysis done (and I might still do that, depending on what I find). However, the metal is not magnetic, so it's not steel or iron. The engine has an aluminium block, aluminium head, and the bearings are aluminium coated steel. So if the findings of an oil analysis are that there is aluminium in the oil, it won't necessarily tell me much (I already know the sparkles must be aluminium).
I believe the bearings are bimetallic (ali on steel) so there should be no copper to find or see in the oil.
In terms of marking the caps, they are marked from the factory if I remember correctly, so there should be no issue with making sure they are backwards (but if they are not marked I will do something to make sure they go back correctly). I only intend on removing one cap at a time, so no risk of mixing them up.
In terms of plastigauge - comments noted and if I use it, then I will try and make sure I do it at a crank and bearing position that avoids an oil passage if possible (I could imagine if I squeezed plastic into an oil hole that might lead to issues!).
Thanks again for the comments - the MOT is on Wednesday next week, so once it has passed (keeping positive there), I will go digging and see what I find. If there is any hint of issues, I plan to pull the engine and do a rebuild. However, I do need to get in there first to have a dig and assess any damage and make sure the crank hasn't been reground before or will need a regrind so I can order the correct sized bearings from a supplier in Germany.
If things all look fine with no obvious issues, my plan is to change the oil and filter again to hopefully flush and residue out, then run it for the summer and keep a really close eye on it. Then pull it in autumn for a winter layup engine rebuild to be on the safe side.
Edited to add - I am annoyed I didn't do an oil change in the autumn, as this wouldn't have been a problem - I would have just pulled the engine and done a rebuild to be on the safe site. Timing is poor as we are just getting in to car season and I want to be using it, rather than pulling the engine for no good reason!
|
| |
Last Edit: Apr 3, 2024 19:14:04 GMT by lewist123
|
|
fulvia1436
Club Retro Rides Member
Finally started a thread for my Fulvia life
Posts: 343  Club RR Member Number: 63
|
|
|
|
|
An accurate (capillary) oil pressure sensor/gauge, if not already fitted, is a very worthy investment, especially if you plan to run the car through Summer.
If it shows the correct spec figure, or close, you can relax 😎
|
| |
'59 Austin A40, '59 VW Beetle, '63 Mk1 Cortina, '57 Austin Gypsy, '68 Fiat 850 Coupe, '68 Alfa Duetto Spider, '72 Lancia Fulvia 1.3S, '73 Lancia 2000 Sedan ie., '72 Lancia 2000 Sedan, '67 Lancia Fulvia 1.3, '83 VW Passat GL5 Estate, '81 Volvo 245 Estate, '85 Lancia Thema 8V Turbo Estate, '99 Lancia Kappa 20V Turbo Estate, '00 VW Sharan VR6, '06 Fiat Multipla 1.9 JTD, '10 Fiat Multipla 1.9 JTD, '66 Lancia Fulvia 1.3
|
|
|
|
|
|
|
|
|
|
I have an oil pressure gauge - its not a quality one, but does appear to work reasonably well.
I am getting 27psi at idle, rising to 55psi above about 2k rpm and topping out at 65psi over 4k rpm. AIUI those numbers are exactly by the book.
|
| |
|
|
pptom
Part of things
 
Posts: 475 
|
|
|
|
|
Good oil pressures I would think.
I'd be interested to know what you find when you've had an investigation.
Good luck
|
| |
|
|
|
|
|
|
|
|
Yeah - from what I can find, those numbers are spot on. I think the official line is over 15psi at idle and 55psi at 3k rpm. Mine appears to be better than guidance I can find online (the Haynes manual doesn't offer any numbers).
It also runs fine with no knocking or grumbling. I can hear faint whirring noise from the oil pump/chain area, but they have untensioned, unsupported chains and a bit of noise from that area is not uncommon.
All signs point to it being fine. BUT where have the sparkles come from? That engine wasn't really run much for 10 years so it could be something to do with that, but the particles aren't magnetic so it's not corrosion of steel parts.
When I changed the oil it smelt a bit of petrol so its possible the cam driven block mounted pump has been leaking a tiny bit of fuel into the oil causing some wear. I have ordered a replacement fuel pump which I will fit at the weekend for piece of mind.
|
| |
Last Edit: Apr 4, 2024 20:43:47 GMT by lewist123
|
|
|
|
|
|
|
|
Some manufacturers (Lotus for one) used to specify the big ends be changed as part of the service schedule so it won't do any harm to check, I would be suprised if it is the bearings tough, more likely to be oid pump if it has a alloy housing, something around the timing chain or something that got let in there after previous work.
|
| |
|
|
stealthstylz
Club Retro Rides Member
Posts: 14,960
Club RR Member Number: 174
|
|
|
|
|
As above - fine alloy glitter is usually something catching a housing. Timing chains catching something usually cause glitter that looks like actual glitter. Bearing damage is generally a bit chunkier like swarf. Only other thing that causes fine glitter is when it's wearing the thrust bearings away, but it's not very common.
|
| |
|
|
|
|
|
|
|
|
I see that you wrote "I believe the bearings are bimetallic (ali on steel) so there should be no copper to find or see in the oil".
I have never heard of this as I believe bearing shells are a steel backing with a copper layer then a coating of (grey) white metal or "bearing" metal (which is a lead/tin etc alloy). Hence any copper in the oil indicates that the bearing metal has worn away.
|
| |
|
|
stealthstylz
Club Retro Rides Member
Posts: 14,960
Club RR Member Number: 174
|
|
|
|
I see that you wrote "I believe the bearings are bimetallic (ali on steel) so there should be no copper to find or see in the oil". I have never heard of this as I believe bearing shells are a steel backing with a copper layer then a coating of (grey) white metal or "bearing" metal (which is a lead/tin etc alloy). Hence any copper in the oil indicates that the bearing metal has worn away. It depends on what's in it basically. A lot of OEM's use copper/bronze layers still, but some don't,and most aftermarket bearings don't. Or they use copper in one half and not in the other. |
| |
|
|
|
|
|
|
|
|
I can't say for certain, as my comments are based on info I found online about the bearings for my engine.
The info I found on a Czech supplier's website stated that they are bi-metallic bearings with a steel backing and an aluminium-indium alloy bearing layer. However, I have just re-googled and can't seem to find the website I read that on, so I could well be wrong!
I have some old scrap main bearings out of an old Skoda Favorit 135 (sister engine to the 136 in my Estelle). I will take something pointy to them before I inspect the Estelle to see if there is a copper layer or not!
Thanks
|
| |
|
|
|
|
|
Apr 10, 2024 19:44:49 GMT
|
Hi The Skoda passed its MOT this morning - everything OK. After getting home and letting it cool down, I started having a dig. Oil out... This had been in there for 20 miles or so (I suspect a lot of the glitter was still left in the sump after the last oil change). I managed to grab a picture where you can see the sparkles.  Sump off  A couple of chunks on the pickup screen 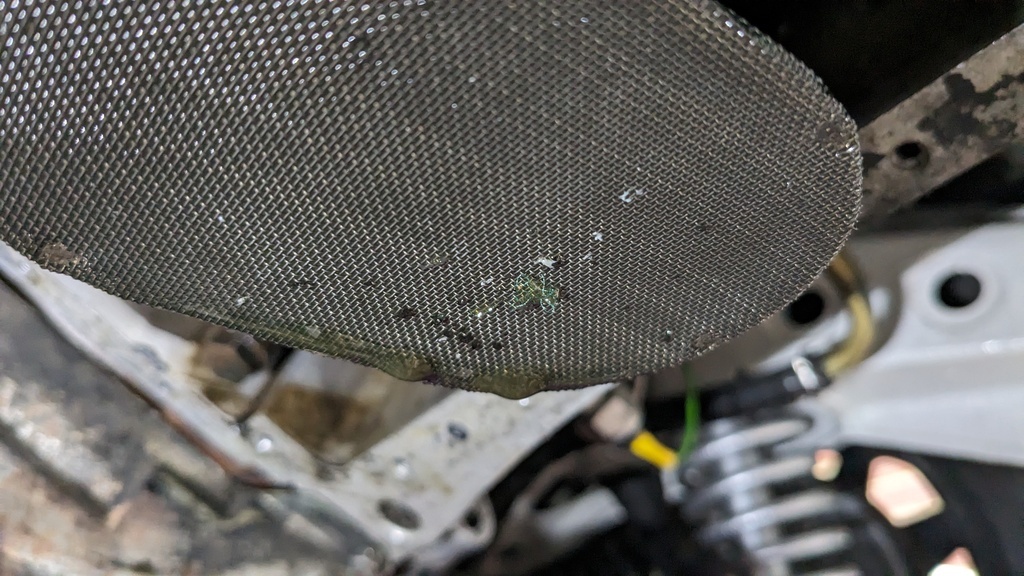 No chunks in the sump, but a very small amount of dark sludge 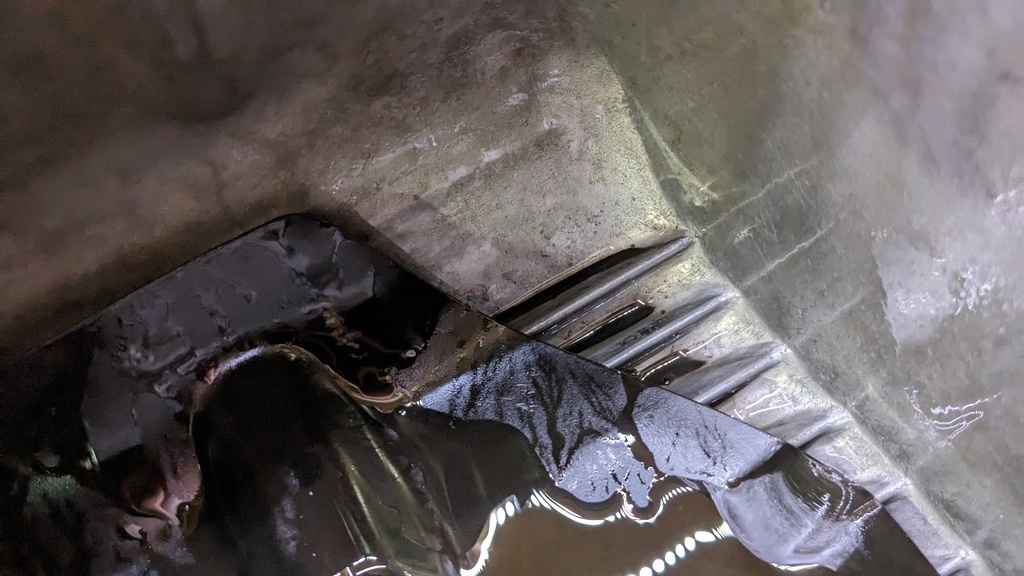 Oil pump out. Evidence of wear on the gears and on the housing. Cap and pickup tube look fine. 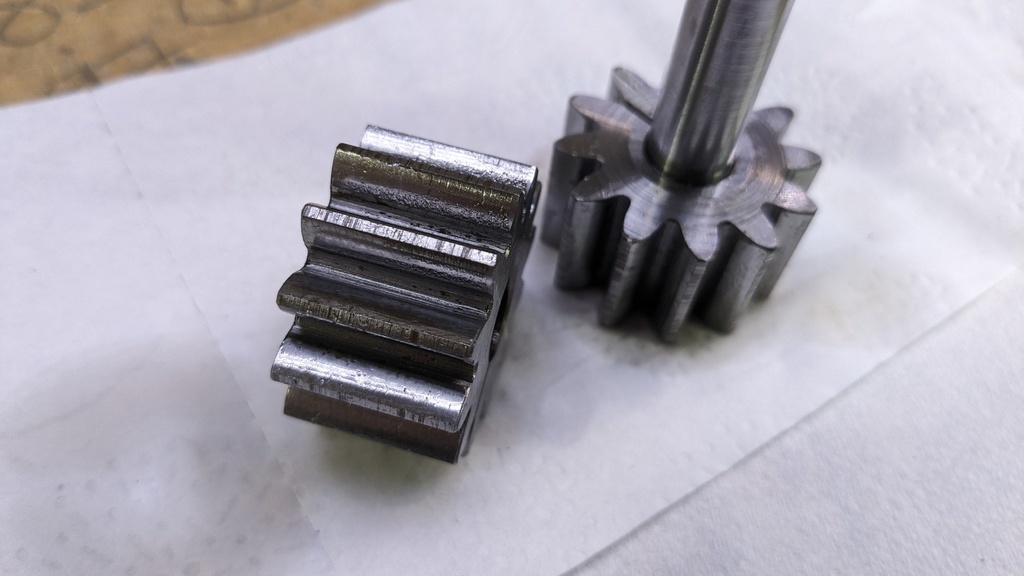 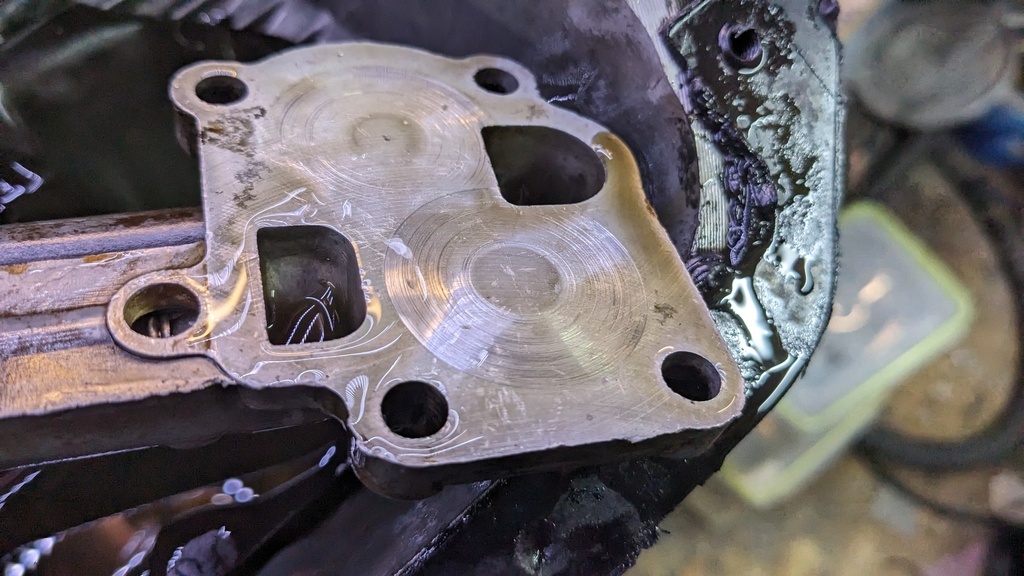  Big ends off - this is No1. Journal looks fine, but there is evidence of wear and some scoring on the bearing. I plastigauged the clearance and is was right in the middle of tolerance. 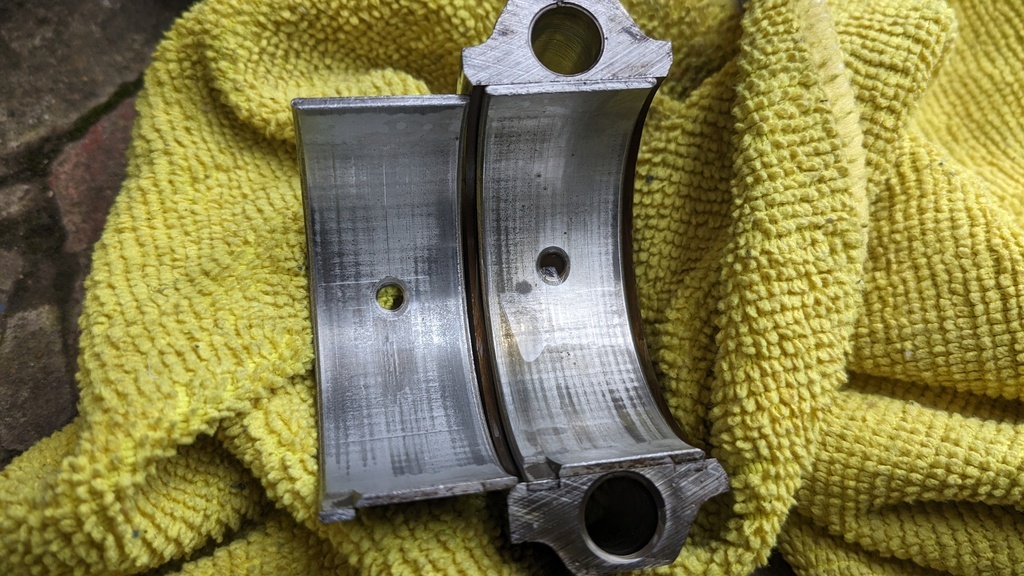 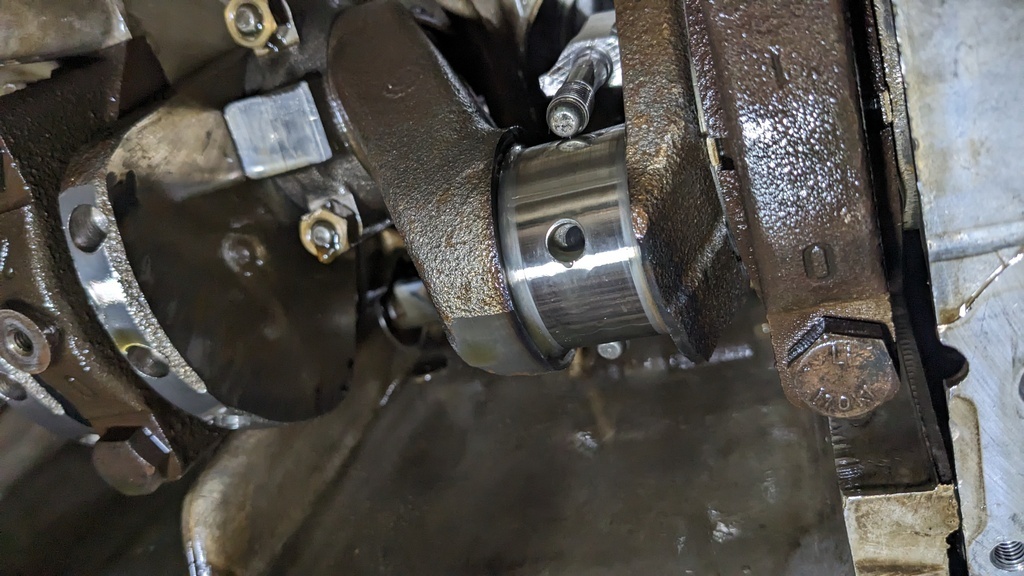 All other big ends looked the same and had the same tolerance. Then i looked at the centre main - not done the front and rear yet as I ran out of time. Again the journal looks fine, but evidence of scoring on the bearing. Again the clearance was bang on in the middle of spec.   So.... looks like the bearings are a bit worn and looks like the oil pump is a bit worn too. |
| |
|
|
pptom
Part of things
 
Posts: 475 
|
|
Apr 10, 2024 20:56:19 GMT
|
|
Just a thought, does the cam / cams run in bearings or directly in the aluminium head / caps?
|
| |
|
|
|
|


