logicaluk
Posted a lot
   Every days a school day round here
Posts: 1,373
|
|
Feb 19, 2023 21:52:29 GMT
|
A some years ago I bought a blasting cabinet, IIRC it was £230 ish. 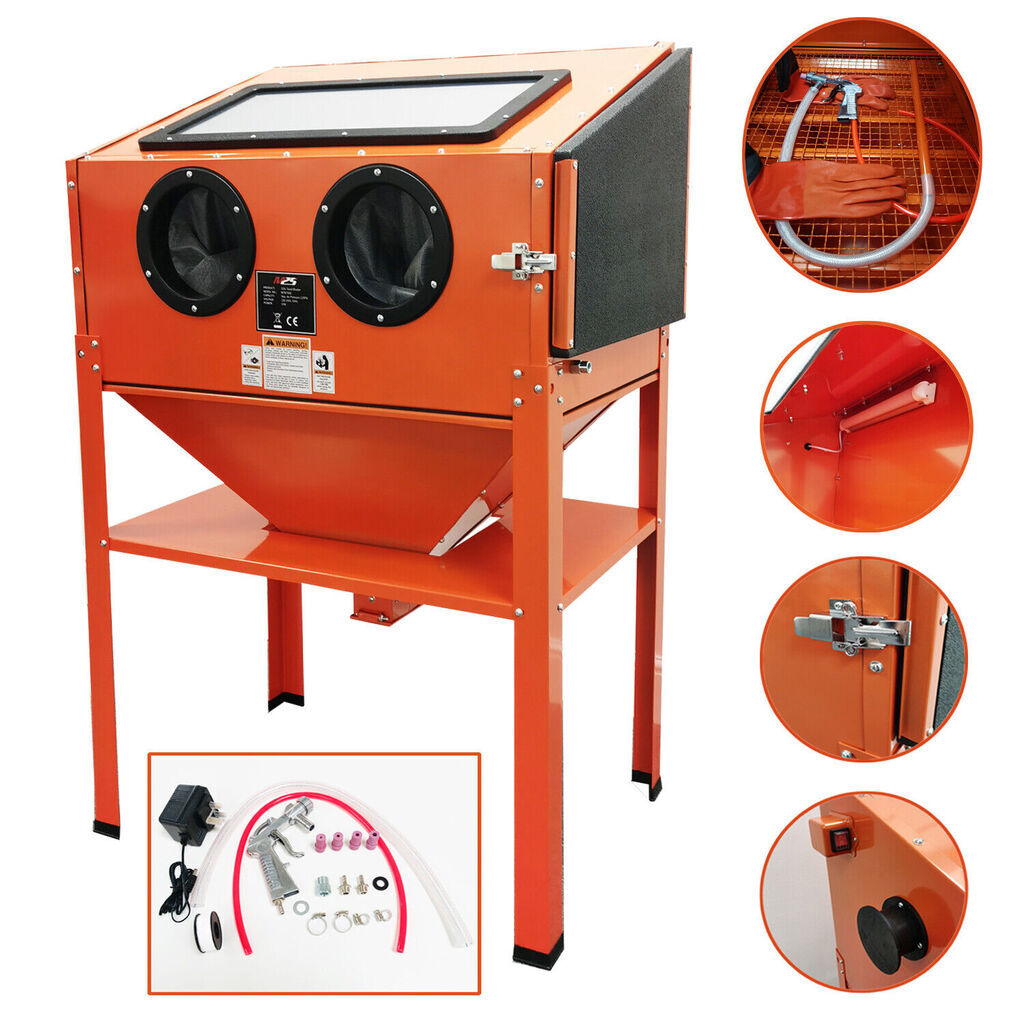 The first thing was to sort out some dust extraction, with a second hand Henry hoover, a £20 cyclone from eBay and bits I had laying about. 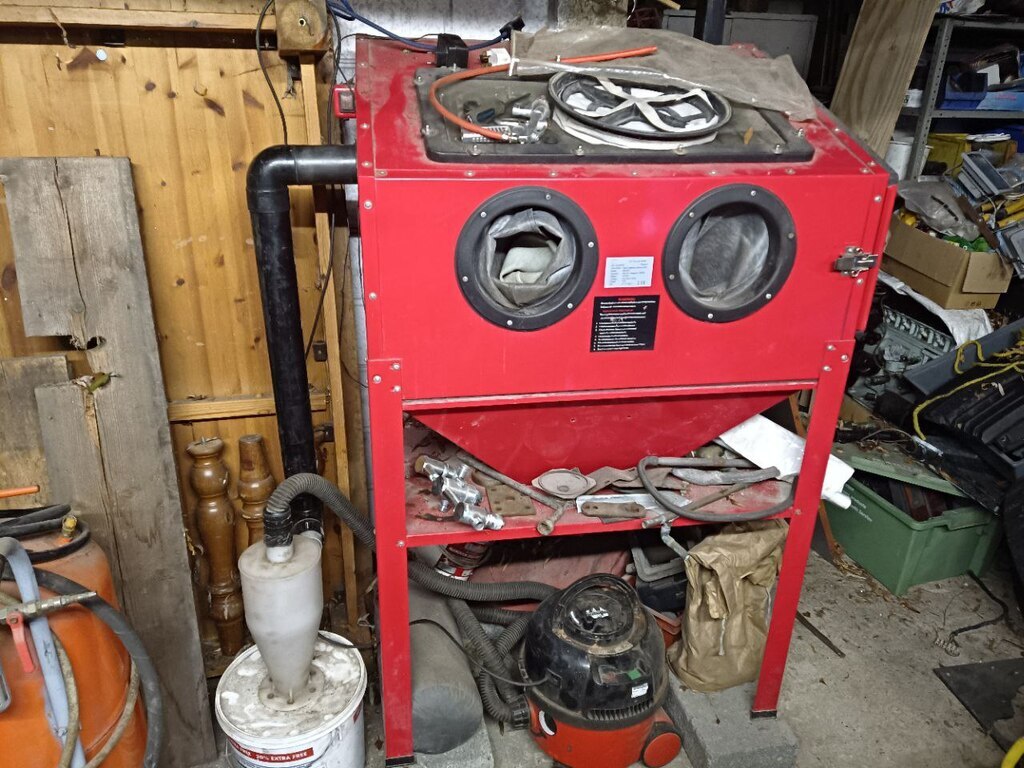 This was pretty good, and I blasted a lot of stuff with it, along the way I binned the glass and plastic viewing window and replaces it with 6mm think toughened glass and made the viewing window frame more easily removable, by fitting the bolts from the inside grinding out some of the frame to fit and using penny washers and acorn nuts. 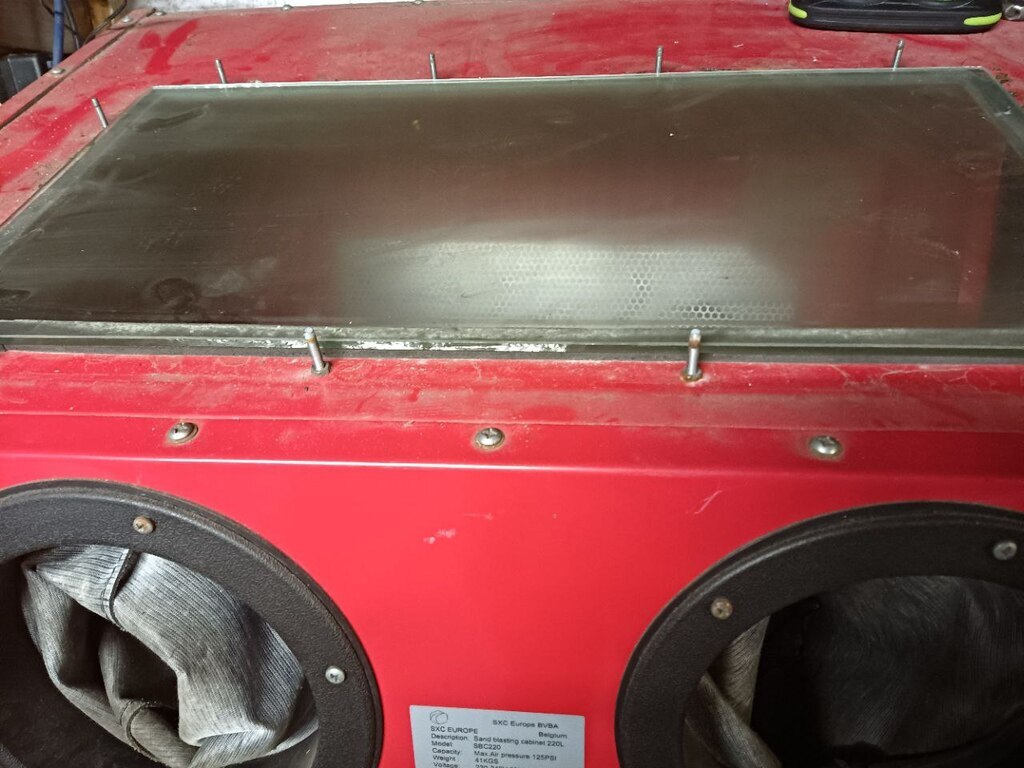 Unfortunately I didn't use the disposable glass protectors and the glass has been etched, It's still usable, but it will need changing. Glass protectors are eye wateringly expensive for what they are, 10x 1ftx2ft glass protectors are £50, if anyone has a cheaper solution I'm all ears. The only issue I've had with it has been intermittently poor media flow, now it's time to resurrect the beast and hopefully improve it. |
| |
|
|
|
|
jimi
Club Retro Rides Member
Posts: 2,223 
|
|
Feb 19, 2023 22:29:07 GMT
|
|
|
| |
Black is not a colour ! .... Its the absence of colour
|
|
pptom
Part of things
 
Posts: 475 
|
|
|
|
|
I just buy new glass for mine when required. Normal 4mm glass, it's about £4.
Non toughened, never broken a pane yet.
|
| |
|
|
|
|
|
|
|
|
I use standard glass in mine and just change it every few months. I grab old panes whenever i can and just cut them to size. even if you were buying new its probably cheaper than buying those protectors.
I also gave up on suction guns a long time ago and now have a pressure pot system sat outside the cabinet and piped in through the side. Makes blasting rusty stuff alot faster than the suction ones if your compressor can keep up.
|
| |
|
|
melle
South West
It'll come out in the wash.
Posts: 2,010
|
|
Feb 20, 2023 13:33:50 GMT
|
The only issue I've had with it has been intermittently poor media flow, now it's time to resurrect the beast and hopefully improve it. The standard pick-up pipes are rubbish. I made my own (google for how-to's), which works much better. If it occasionally gets blocked I pull it out of the media, put my finger on the nozzle and it unblocks with one pull of the trigger. Do you use a water trap in the air line? This is my set-up, the blue cabinet is glass bead for non-ferro, plastics, glass etc, the red cabinet has aluminium oxide for rusty iron:   I use two air compressors that feed a separate receiver through one-way valves (I can hook up four compressors to it if I want, but these two can keep up OK). There's a water trap on the receiver, and one with a pressure regulator on each cabinet. Having dry air makes all the difference! I use a computer fan to create low pressure in the cabinets (there are DIY blast gates in the pipes so it only works on the cabinet that's in use); fine dust gets blown outside through a vent in the window, any media that gets sucked out falls down through the pipes on the side of the cabinets and can be reused. Under the tarp behind the blue air compressor is a big early '50s Westinghouse air compressor with a 300l receiver that is a future restoration project that will power the blast cabinets one day. I have a NOS 2-stage pump for it, which, amazingly, came with it when new. Thank you Marshall Plan! |
| |
www.saabv4.com'70 Saab 96 V4 "The Devil's Own V4" '77 Saab 95 V4 van conversion project '88 Saab 900i 8V
|
|
logicaluk
Posted a lot
   Every days a school day round here
Posts: 1,373
|
|
Feb 20, 2023 18:46:32 GMT
|
Protective Screen options Somehow I had missed, Machine Mart are selling the standard sheet with the adhesive strip around the edge for a couple of quid each, Then there's the film roll option, (thanks jimi this is much more my price range) ranging from, 292mm wide 30m long roll of economy grade 35 micron thick film, for £13. To 292mm wide, 50m roll of premium 100micron thick for £70. I guess these aren't self-adhesive, so would have to be taped on. anyone used either of them. £70 Roll£13 Roll |
| |
|
|
logicaluk
Posted a lot
   Every days a school day round here
Posts: 1,373
|
|
Feb 20, 2023 19:14:32 GMT
|
As for my current set up, I have a Wolf Dakota 100 compressor 3HP, 14CFM, 90L tank connected through this 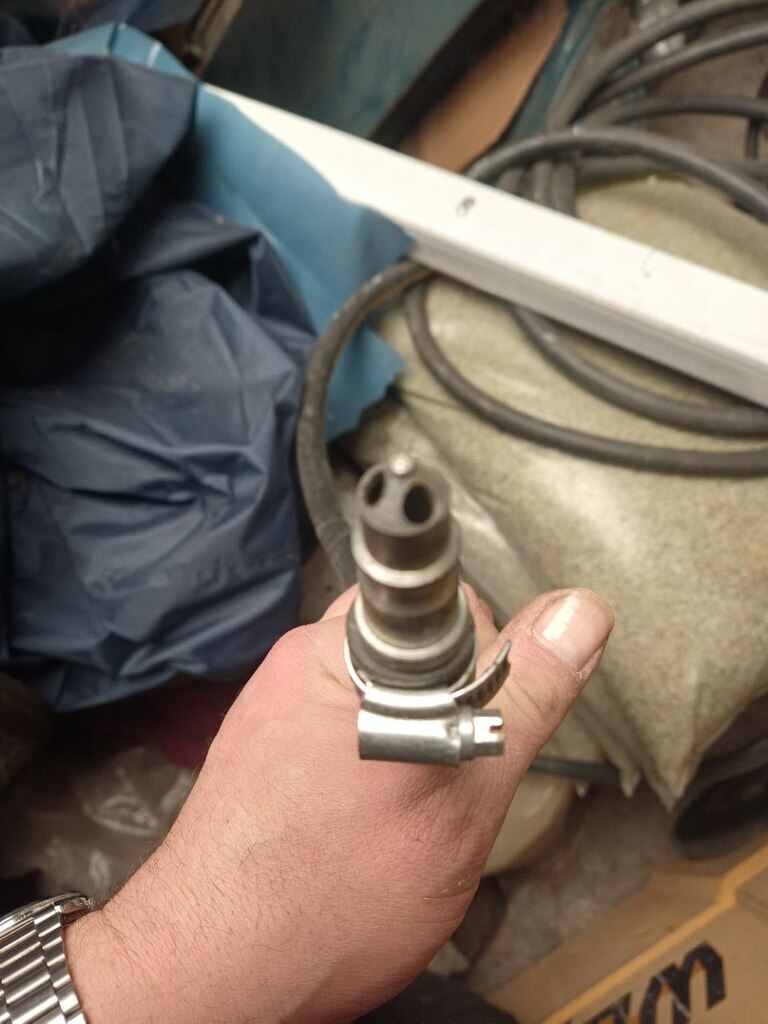 PCL 100 connector and a big hose to this 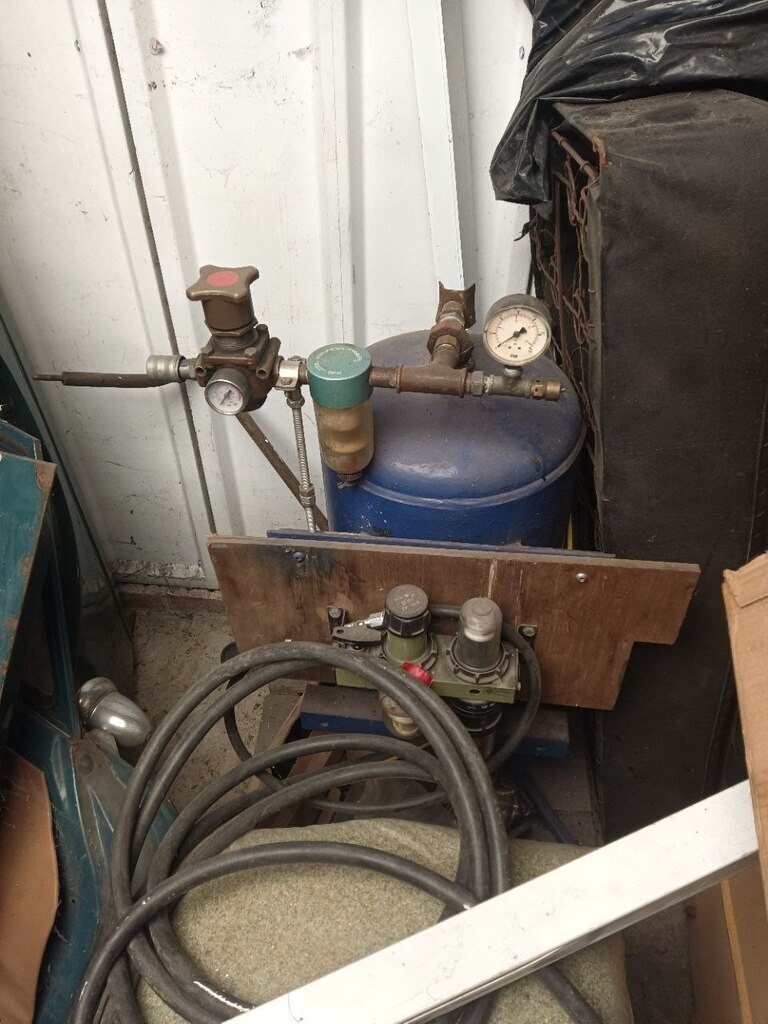 An exBR carriage brake vacuum tank to an air separator, then into a 10mm hose, to the inlet on the cabinet. |
| |
Last Edit: Feb 20, 2023 19:53:22 GMT by logicaluk
|
|
logicaluk
Posted a lot
   Every days a school day round here
Posts: 1,373
|
|
Feb 20, 2023 19:49:47 GMT
|
Wow, melle that's quite a set-up, I am planning on a pickup pipe upgrade But first, looking at the air side there is one glaring issue to me, look at the accessory pack that comes with the cabinet. 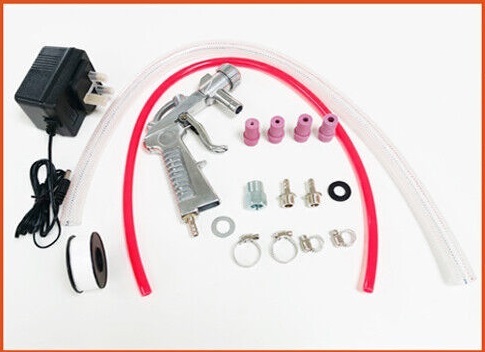 Look at the size of the hose tail adaptors, they neck down the 10mm pipe to 4 maybe 5mm so that's got to go, I'm going to run a 10mm hose direct from the water separator to the gun, that should help. Then there is the pickup pipe, I have read about this mod on an early CJ website, a picture saves a thousand words so look at this 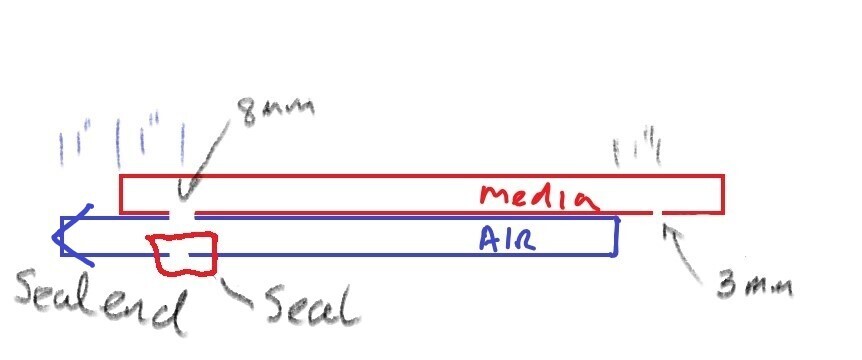 use the 1" offcut from the end of the media pipe cut in half to seal the back of the air pipe after drilling the 8mm hole Drill a 3mm hole 1" up from the top of the air pipe To seal the bottom end of the air pipe, they suggest epoxy glue and crushing it shut. It is also suggested that an air diverter on the outlet, to lower the point at which the air is extracted from, also helps. I'll have a look and see what I can bodge together. |
| |
Last Edit: Feb 20, 2023 20:01:50 GMT by logicaluk
|
|
melle
South West
It'll come out in the wash.
Posts: 2,010
|
|
Feb 20, 2023 20:11:44 GMT
|
That's what my pick-up pipes looks like logicaluk ; I welded the bottom ends shut. The air pipes are fed from outside the cabinets (you can just make out a brass elbow fitting on the front of the red cabinet). My pick-up pipes aren't fastened to the cabinets, this makes it easier to blow them out if required.
I was going to replace the guns that came with the cabinets, but 15 years later I still haven't got around to doing it and they'll probably be there for a while longer I suppose. I did replace the fittings though as you suggest. I also modified the grates so they're easy to remove, which allows the occasional blasting of oddly shaped parts. Another upgrade was lights (LED), it's incredibly useful to be able to see what you're doing!
I still plan to make the glass easier to remove/ replace as you did. I got given a whole load of screen protectors 10 years ago, still working my way through those before considering alternative options.
|
| |
www.saabv4.com'70 Saab 96 V4 "The Devil's Own V4" '77 Saab 95 V4 van conversion project '88 Saab 900i 8V
|
|
logicaluk
Posted a lot
   Every days a school day round here
Posts: 1,373
|
|
Feb 20, 2023 20:32:25 GMT
|
|
Making the frame easier to replace also makes fitting the screen protectors loads easier.
I've ordered a new piece of 6mm plate glass for £10, ill see how long that lasts, I found 1 screen protector whilst tidying the workshop, I might even be ready to blast again before the weekend.
I also got given a fan oven the other week, I was thinking of baking parts to dry out the grease before blasting.
I use crushed glass media, I split a pallet load with a mate a few years ago, and I've got maybe 7 bags left.
Dan
|
| |
|
|
|
|
melle
South West
It'll come out in the wash.
Posts: 2,010
|
|
Feb 20, 2023 20:50:14 GMT
|
|
Yes, always degrease and dry parts before blasting. I won't be buying aluminium oxide grit again, will get something that creates less dust next time, not sure what yet. A mate uses stainless shot at work, but I haven't been able to find that in manageable quantities.
|
| |
www.saabv4.com'70 Saab 96 V4 "The Devil's Own V4" '77 Saab 95 V4 van conversion project '88 Saab 900i 8V
|
|
braaap
Posted a lot
  
Posts: 2,744
|
|
|
|
I have nothing useful to add here, but I am sure I will be using some of these tipps later, when I will get my own blasting gear. But I need to work on a very hidden part of my wagon R's underbody, so no way I will be using a cabinet. I remember plenty of years agon on a scrapyard there was somebody blasting his fintail mercedes freeair, outside a small garage. The owner surely didn't care about the mess made out on his scrapyard, so a little bit of brainstorming on that topic will be my task. Anyway, there was another thread on sandblasting not so long ago and I thought I had bookmarked it like this very thread. But seems I didn't or the thread got deleted. Question to the authorities: couldn't it be made possible that useful posts could be catalogisized and linked to in some sort of index thread? I know HoTWire is more than busy right now, but if You could make a sub section somewhere in the already existing retro guides section, the users could fill it with life themselves? |
| |
Last Edit: Feb 21, 2023 10:01:42 GMT by braaap
|
|
logicaluk
Posted a lot
   Every days a school day round here
Posts: 1,373
|
|
Feb 21, 2023 12:50:45 GMT
|
But I need to work on a very hidden part of my wagon R's underbody I've got a blasting pot that adapts to a jet wash if that's any use. Dan |
| |
|
|
logicaluk
Posted a lot
   Every days a school day round here
Posts: 1,373
|
|
Feb 21, 2023 21:54:01 GMT
|
I had a look through the scrap very useful spare metal pile today, and came out with some gazebo leg and an old BBQ shelf, I added some rivnuts. 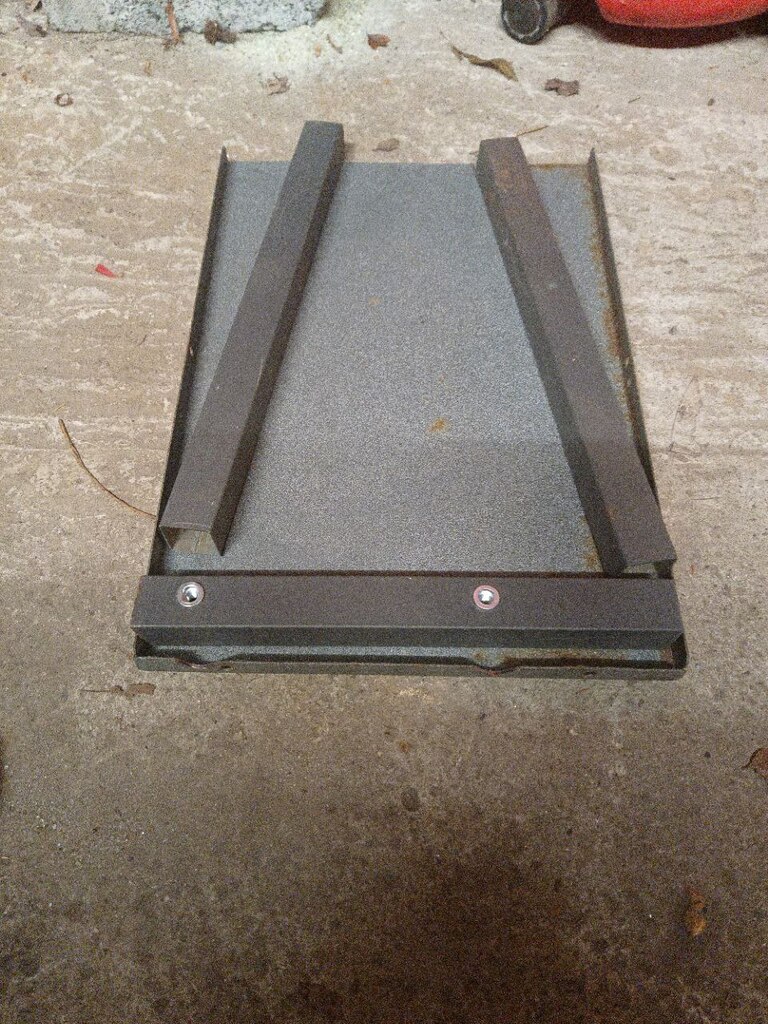 Using the case screws to hold the top bar and some silicone to stick the rest in place. 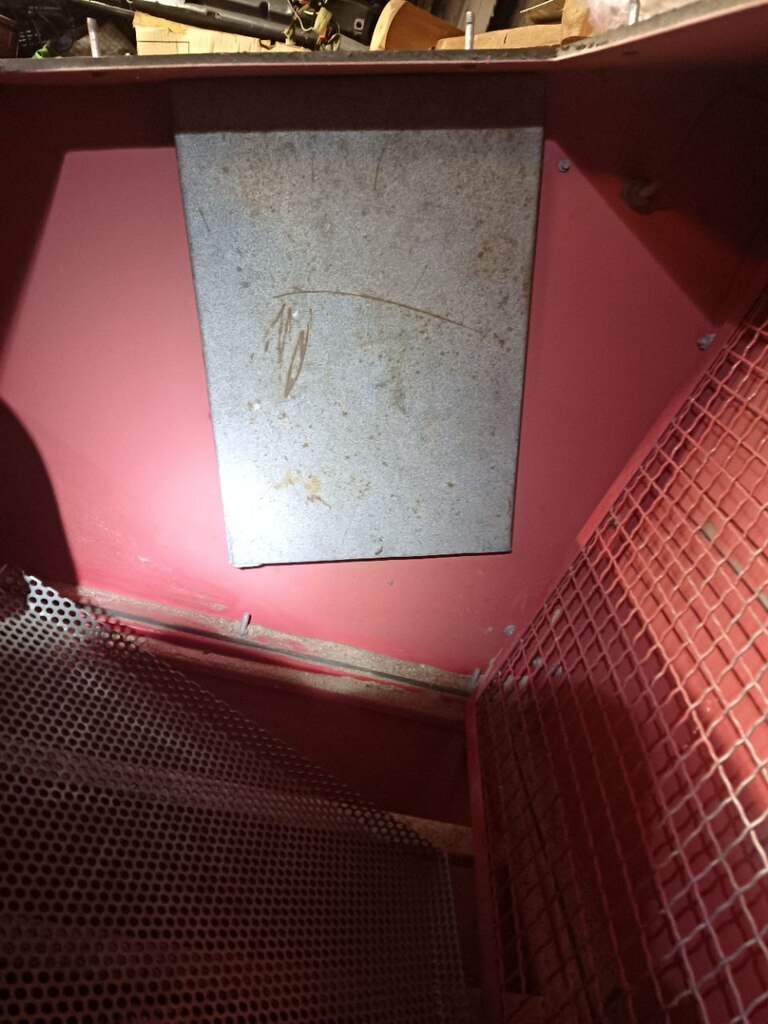 I now have an air diverter. The ones I've seen are a top hat profile and open, top and bottom, so we shall see how this works. |
| |
Last Edit: Feb 21, 2023 21:57:26 GMT by logicaluk
|
|
melle
South West
It'll come out in the wash.
Posts: 2,010
|
|
Feb 21, 2023 22:38:55 GMT
|
|
I think I also made mine with just the bottoms open.
|
| |
www.saabv4.com'70 Saab 96 V4 "The Devil's Own V4" '77 Saab 95 V4 van conversion project '88 Saab 900i 8V
|
|
|
|
|
|
|
|
This video is a bit long at nearly 40 minutes but, it shows a lot of improvements that can be made to these blasting cabinets.
There are more detailed videos for these improvements.
I bought my kit from the Tacoma Company and it has made a vast improvement to the way my cabinet works. You can source a lot of these parts independently and make the upgrades yourself. I use two panes of glass - a thicker "safety" pane and, a thinner sacrificial one. I pay about $5 for the thinner panes and change them out as needed, I find them to be much better than the stick on protectors.
I love that I changed from a siphon feed to gravity as I rarely ever have media flow issues and, the foot pedal helps with fatigue. I also cut down my mesh shelf so it fits lower down in the cabinet and now I can get a 15" steel wheel in there - it's still a bit of a squeeze but, it fits. With all of the suggested improvements I am now blasting at around 40 - 50 psi and getting good results.
Whatever route you choose, good luck to you and happy blasting.
|
| |
|
|
|
|
|
|
|
|
I have the small benchtop blasting cabinet.
My improvements so far.
Vacuum cleaner sucking dust out through a vortex chamber to catch the dust
10w led flood light
Plastic table top protector sheet taped on the inside of the window, cheap and easy to get.
And the best improvement is to remove the sand from the cabinet.
To do this I fitted a galv waterpipe fitting with an elbow through the side of the cabinet this has a plastic hose with a restrictor in the bottom that goes into the bucket of sand.
I sand blast till the sand runs out.
To get the sand oput of the cabinet I unscrew a cap in the bottom and nit drains back into the bucket. To make the drain cap I cut the top off a plastic 20 litre oil drum, cut it down and after hole sawing a hole of appropriate size I rivetted what I had left of the oil drum over the hole and it has a removeable cap.
Simple and effective.
|
| |
Vitesse 6 Saloon
Vitesse Mk2 Convertible
BMW R1150GS
VW Amarok
|
|
|
|
|
Feb 22, 2023 12:40:07 GMT
|
This is what I use. 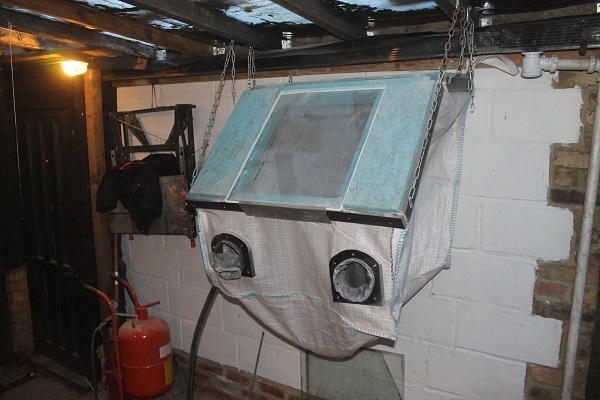 made out of some scrap timber and a 1 ton builders bag, folds plat against the wall 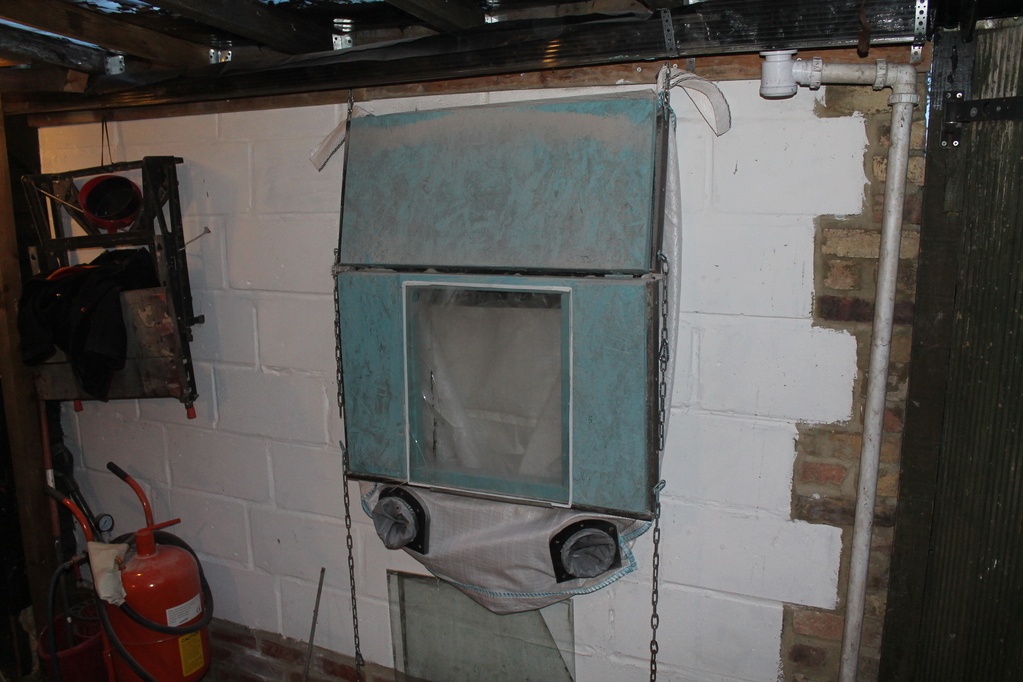 The glass is a std sheet of agricultural glass which just clips in so is easily changed, a couple of clips inside to fit a rechargeable hand held light to exhaust is via an old vacuum cleaner. Air from 2 compressors running in parallel and a via a blast pot, the blast pot is the weak link, it's just about ok on med - fine grit but coarse stuff or any contaminants means it blocks up all the time, a one day project is to re-engineer the thing. |
| |
|
|
melle
South West
It'll come out in the wash.
Posts: 2,010
|
|
Feb 22, 2023 14:06:06 GMT
|
|
|
| |
Last Edit: Feb 22, 2023 14:06:17 GMT by melle
www.saabv4.com'70 Saab 96 V4 "The Devil's Own V4" '77 Saab 95 V4 van conversion project '88 Saab 900i 8V
|
|
logicaluk
Posted a lot
   Every days a school day round here
Posts: 1,373
|
|
Feb 22, 2023 21:13:36 GMT
|
Yes, I agree that's really clever kevins. Something ID completely forgot about when I built the cabinet, I swapped out the standard nuts and washers for serrated flange nuts, it must have made building it the first time a lot easier. 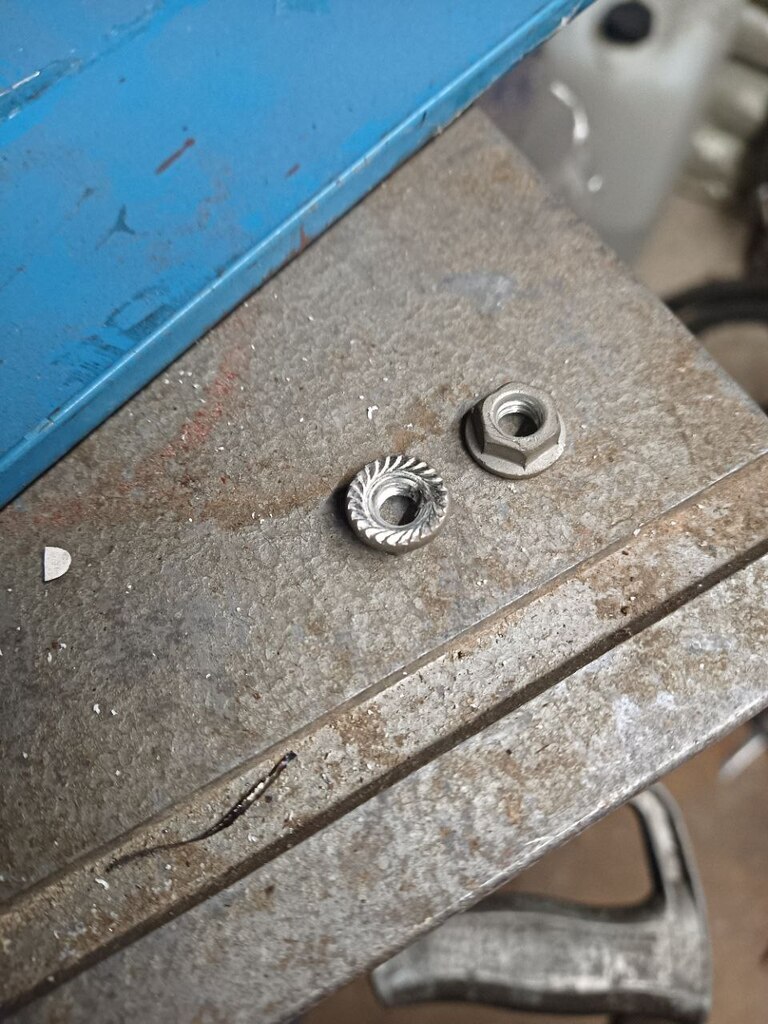 I got some LED channel, and some electrical bits and did this after work 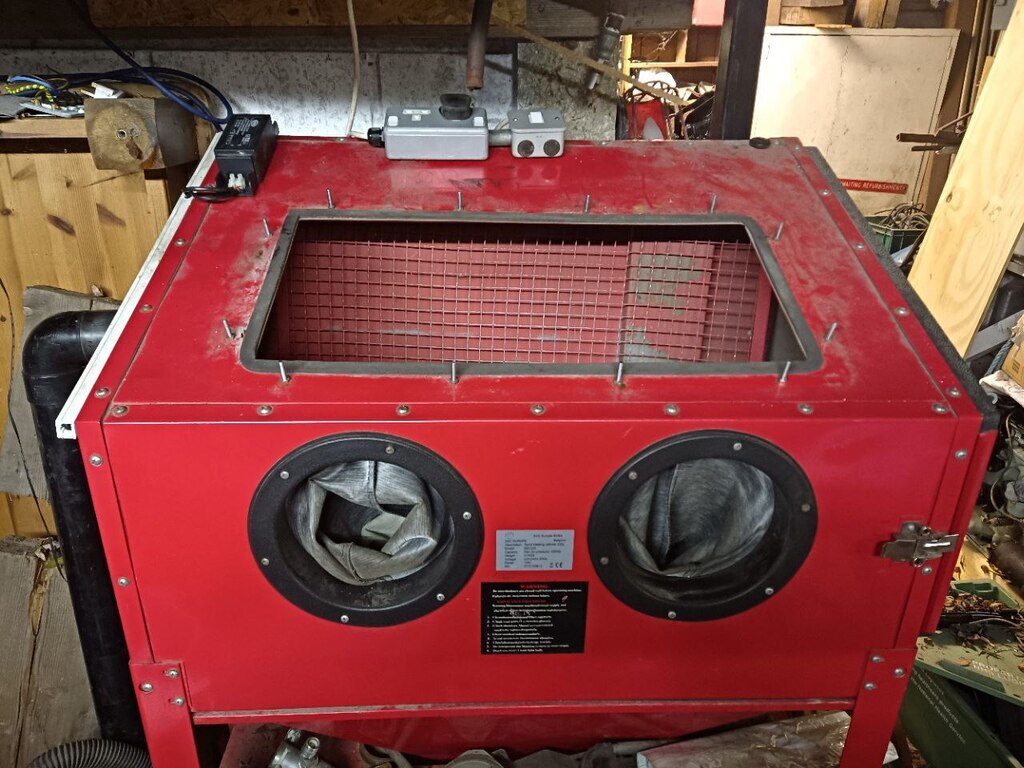 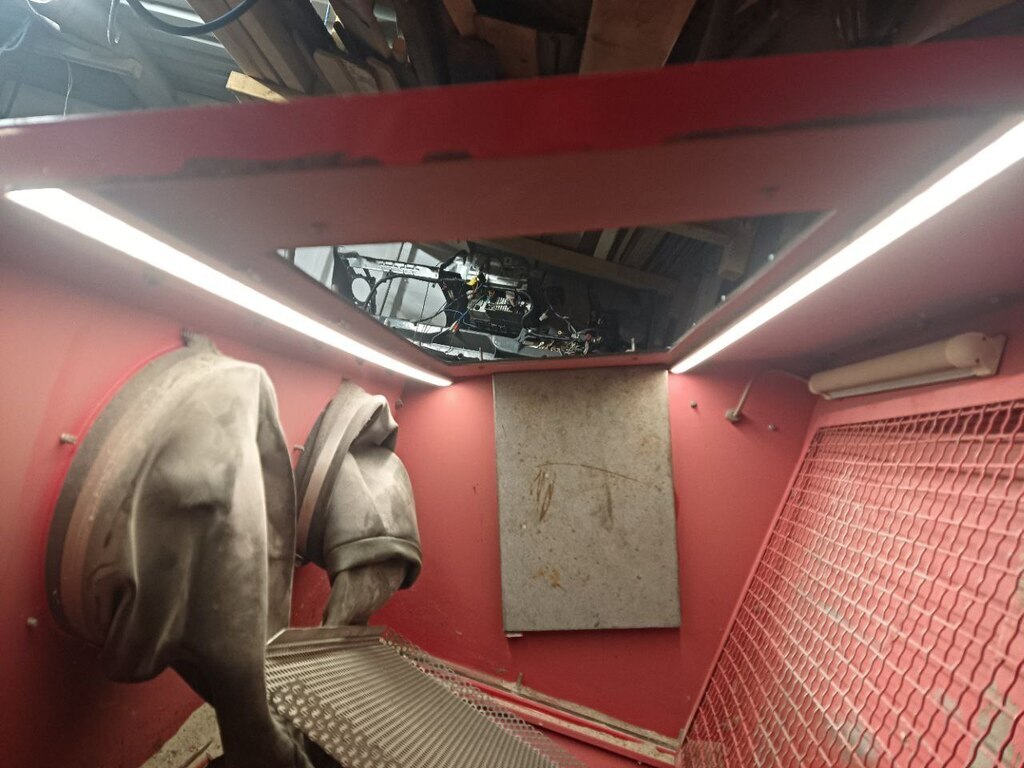 Now the hoover switches on with the light, unfortunately I'm an idiot, and hadn't realized the 12v supply was AC, so there is a huge amount of flicker, Tool station doesn't stock any 12v LED drivers, I hope the electrical wholesalers across the road had from work has one. Dan |
| |
Last Edit: Feb 22, 2023 22:22:38 GMT by logicaluk
|
|
|
|


