Most every older caravan, camper, motorhome or narrowboat will have a 3 way fridge fitted, and generally they are reliable and work very well. They should get as cold as your fridge at home (or near to it) on a hot day, and make ice in the little freezer bit.
When they don't work it can be a real head-scratcher and frustrating (weekend away with sour milk and warm beer anyone?) and there is plenty of information out there on fixing them, but also lots of half truths and hear say from someone who reckons his mate just turns it upside down and it's fixed.
Actually, turning it upside down overnight might work in a few cases, and I'll go into that in a bit.
SAFETY BIT!!!!
You may be working with gas fittings, and potentially 240 volt electrics. Unplug your van from it's hook up, and switch off your gas bottle before doing anything. If you aren't comfortable doing anything I describe here, don't do it. Please.
/SAFETY BIT!!!!
The first step, does it work at all? On 240, 12V, or gas. If the answer to any of these is yes, then the rest is fairly easy. If not, then we might still be ok. Also, check the vents on the outside of the van are clear, and you have't left any winter covers on.
My schoolboy physics is a bit rusty, but basically these fridges warm up ammonia in the tubes at the back, which evaporates. As it cools it condenses, which takes energy (as heat) out of the atmospere (in this case the inside of the fridge, and the sausages and stuff in it).
They like to be operated level, or close to it. If they have been used for any length of time at an angle (for example parked on a big slope) they can boil dry in the tubes, the ammonia then crystalises and blocks up the tube. In real life, parking at such an angle would make for uncomfortable camping, and such cases are rare.
However, this is where the turning it upside down thing comes from. All the coolant inside sloshes around the pipes, hopefully unblocking them. It can work, but for how long until it blocks again I can't say.
The only other thing we can't fix is if the pipes have been damaged and the ammonia has leaked out. The smell will give that away.
Usually the electric side of things work and the gas doesen't, but that isn't always the case.
Some of what I am going to try and describe can be done from the vents behind the fridge, but it's super fiddly at times.
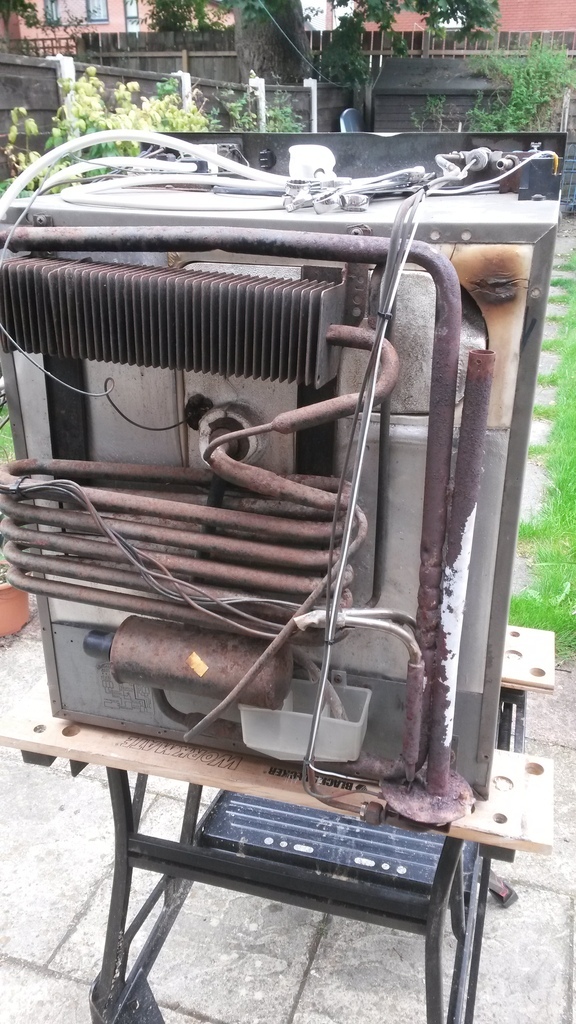
With the fridge out of the van, and the fibreglass insulation taken off the flue, we can see what's what. All these pipes and stuff get covered with cobwebs and dust, and the cleaner it is the better heat can escape (which you want). Compressed air is a boon here, but a couple of paint brushes work well.
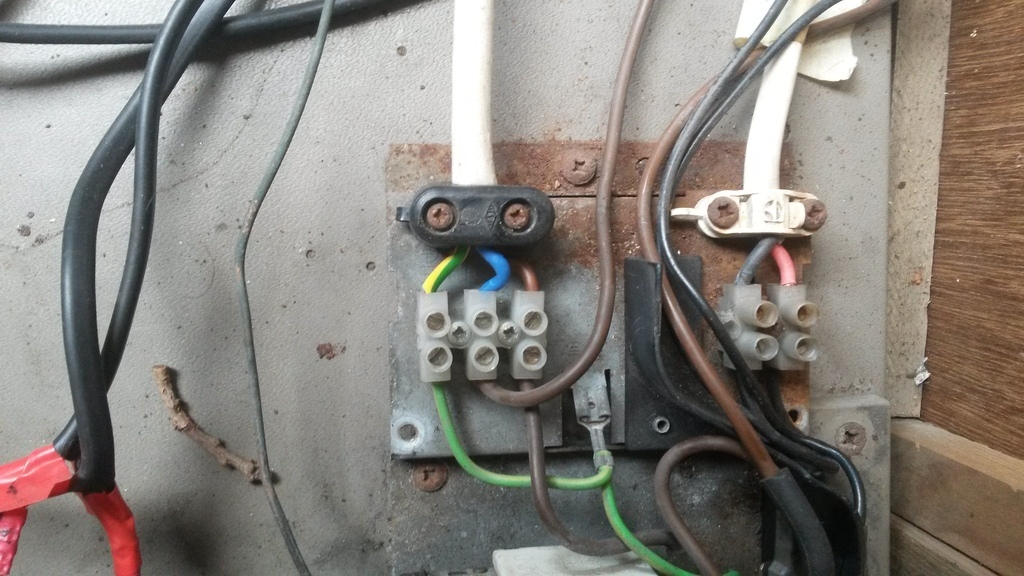
Here, you can see the wires for 12 and 240 going to the switch on the front. It needs to be wired so 12v only works with the engine running, as they suck a lot of juice and will soon flatten a battery. The switches can fail so it's worth checking those.
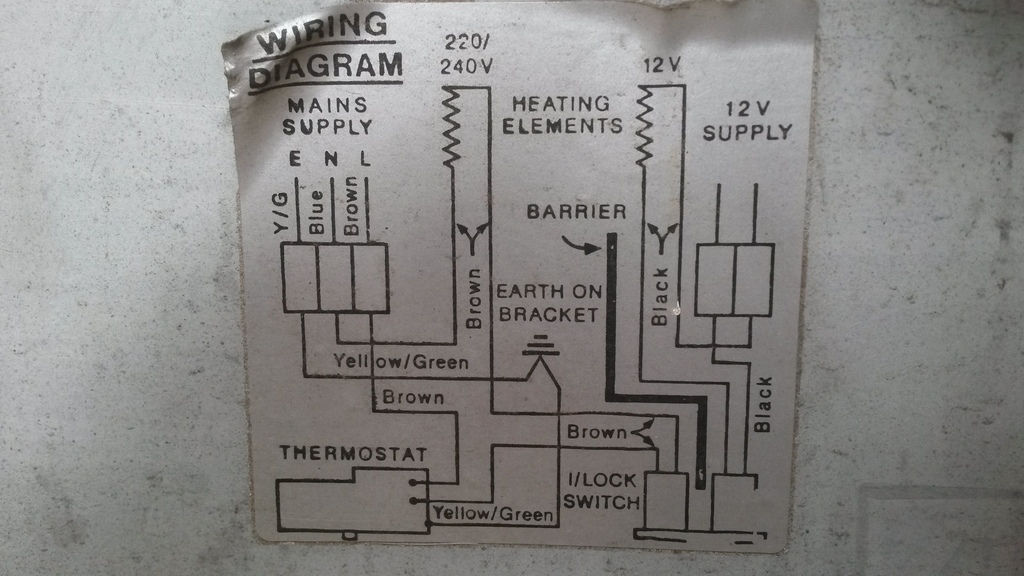
Wiring diagram on a sticker on the back, but often goes missing.
If your fridge has an electric ignitor it will have 2 12v feeds, one for the ignitor from the leisure battery and the other for the element with the engine running.
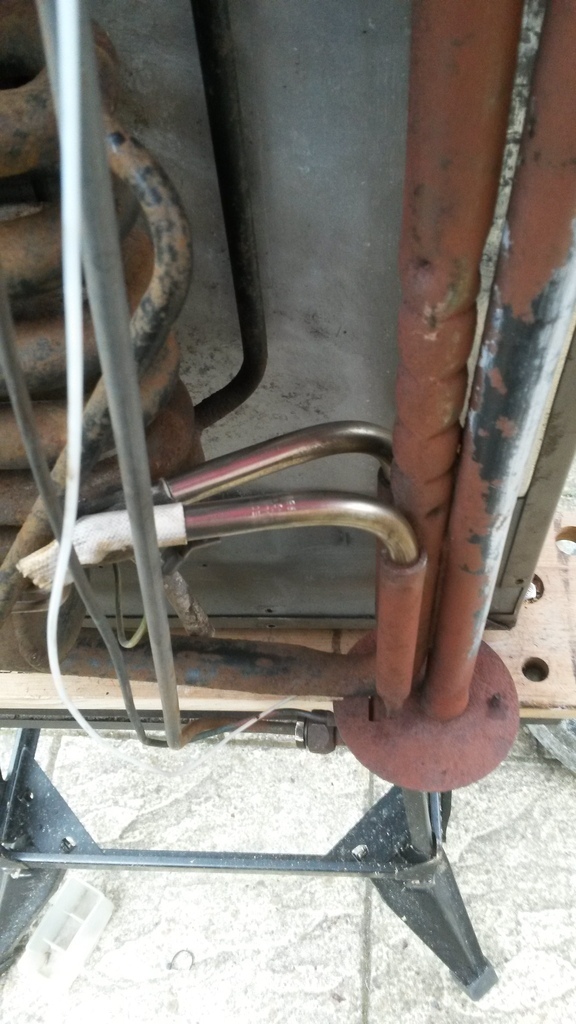
The electric heating elements (240 has the earth spade) should be free to move in their tubes that hold them. If not it's not the end of the world, but it's worth giving them a wiggle to free them off in case you need to get them out at a later date.
The heating elements heat up pretty fast, and get very hot (so be careful when grabbing them with your paw to see if they work). If they aren't working, and they have power to them, replacements are available from ebay or whatever.
So, usually it's gas that gives trouble. Either it won't light, or it lights but won't get cold.
With the lights off, stick your head in the fridge and peer through the little porthole while working the ignitor. You ought to be able to see the spark. In most cases if it doesn't spark rust and crud will have built up and stopped the spark earthing on the burner. The piezzo type sparker things are usually very reliable.
Where my finger is pointing, there is a gas jet. We will come onto that in a minute, but often this blocks up. It will let enough gas through to light the burner, but not to get it hot enough to evaporate the ammonia. So you peer through the porthole, see the flame but it still doesn't work.
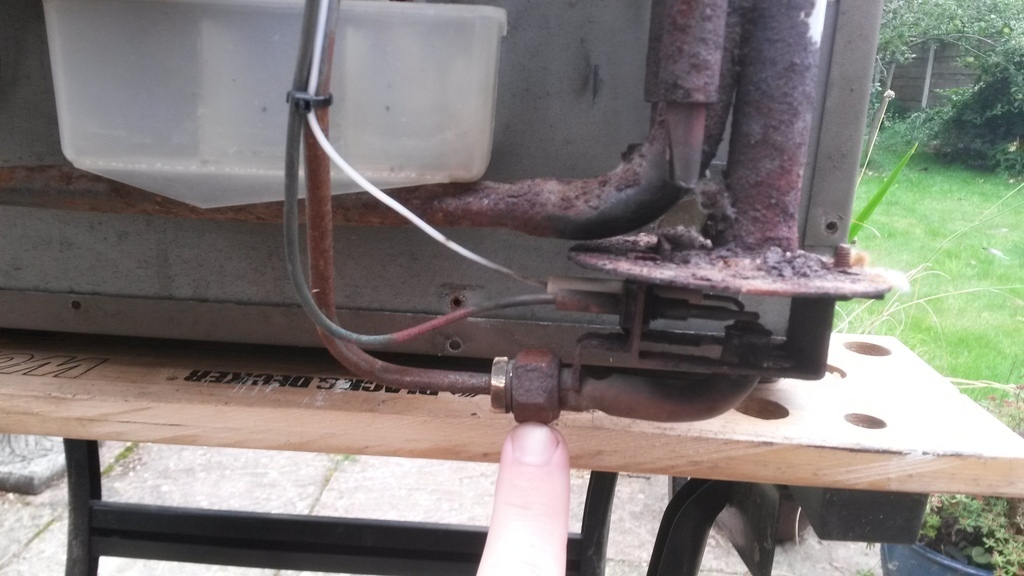
Carefully undo the fitting and gently move the burner out of the way, then give everything a good clean. A brass brush from the poundshop works well here. There are several designs of burners, but they are all basically the same principal.
The white thing is the sparker, make sure it's nice and clean, the other thing is the pyro which shuts off the gas if the flame blows out.

With the burner out of the way, make sure the flue is clean and clear, and shove something down it (wire wool on a stick works well) to scrape all the flakey rust and stuff out.
The fish on a hook looking thing is very important. It swirls the exhaust around and stops all the heat just whooshing away. Give it a wire brush and pop it back in, or source a new one if it's missing for whatever reason. Wierdly, I find they work better, even bench testing, with the t-piece in top of the flue. So if you are testing it, make sure the t piece is on (not pictured).
Next, use a little screwdriver or long nose pliers to CAREFULLY get the gas jet out of the fitting. It should come out easily, but it's hard to get with sausage fingers. Make a note or take a picture of which way it came out/goes back in.
Ignore the scratches on this one, someone has been here before.
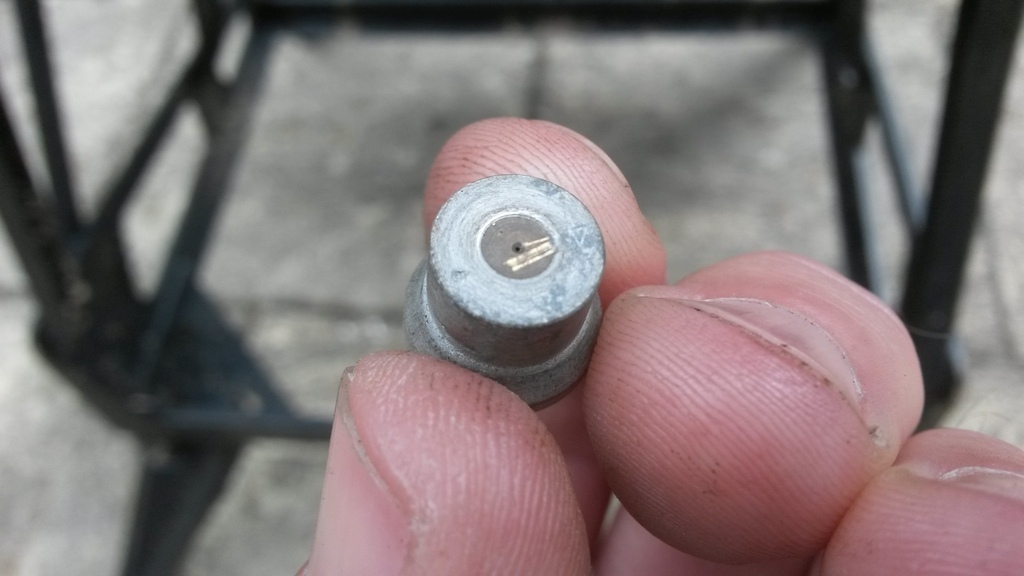
You need to find a fine, nylon ideally, thread to run down the middle. I have, on a campsite trying to help someone out with no tools, used one of Mrs Generallee's hairs. It worked!
You may be able to see light through it, but clean it anyway. DO NOT be tempted to shove anything metal through it or "open it up a bit"
With the jet out, blow air through the burner while its all apart to clean the last of the debris out.
And put it back together!
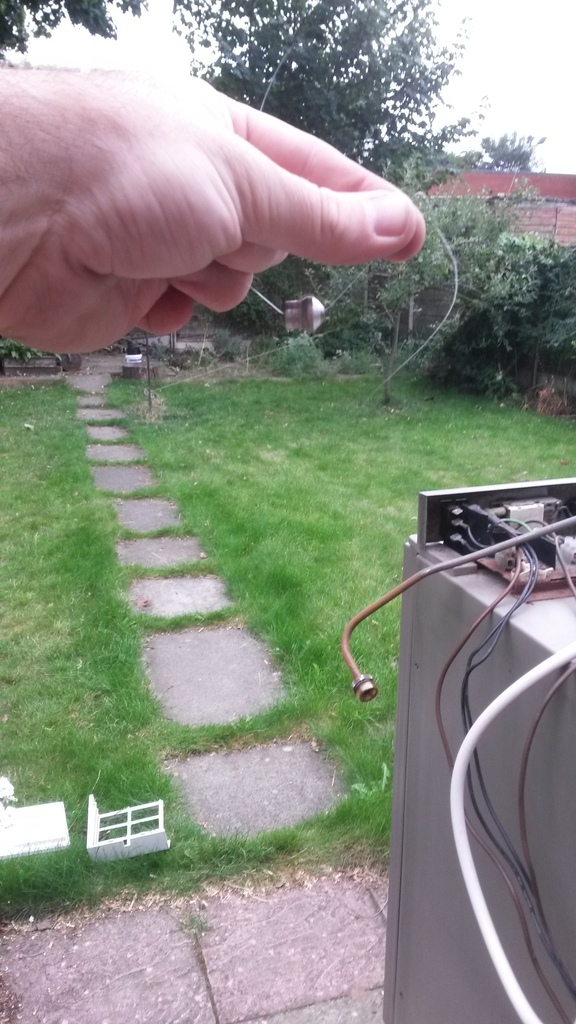
Hopefully now you should have a lovely big flame, which if you are testing out of the van, should be a nice cone shape and the top of the cone should just reach into the bottom of the flue on it's highest setting.
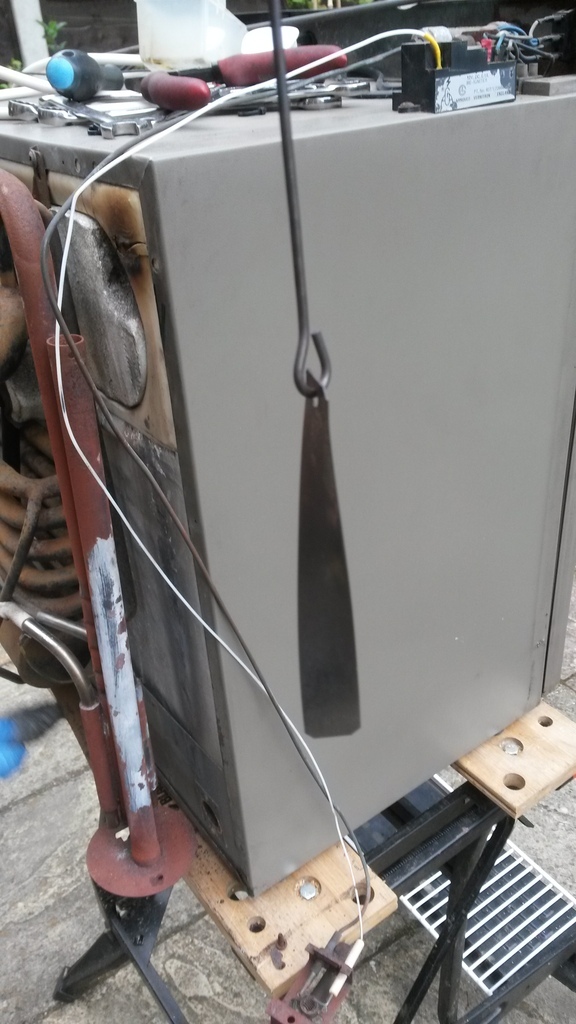
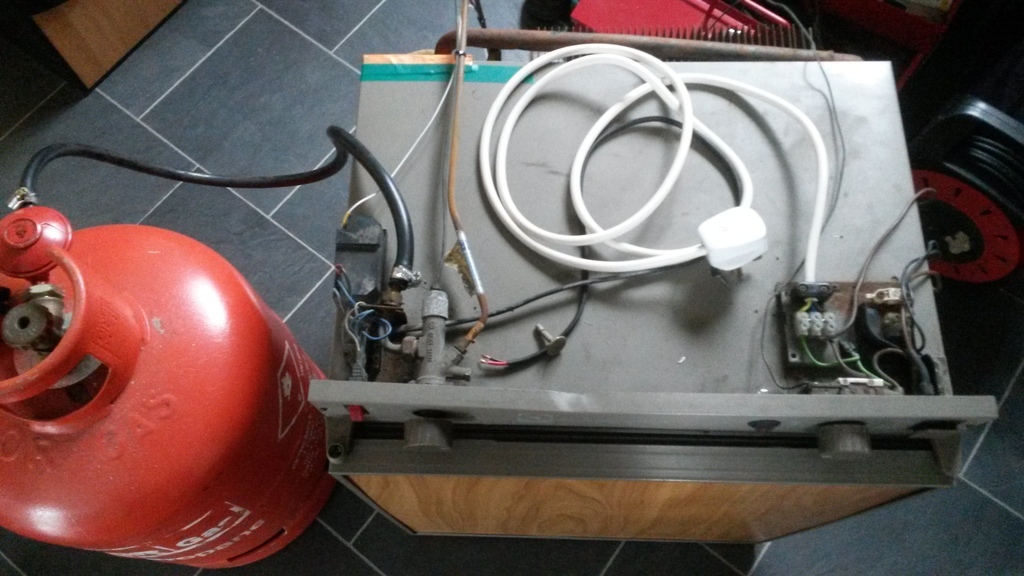
Here is a rudimentary testing set up. Please, please do not copy this unless you are absolutely sure what you are doing, and keep the gas hose away from the hot bits on the back. Keep children and pets away etc etc
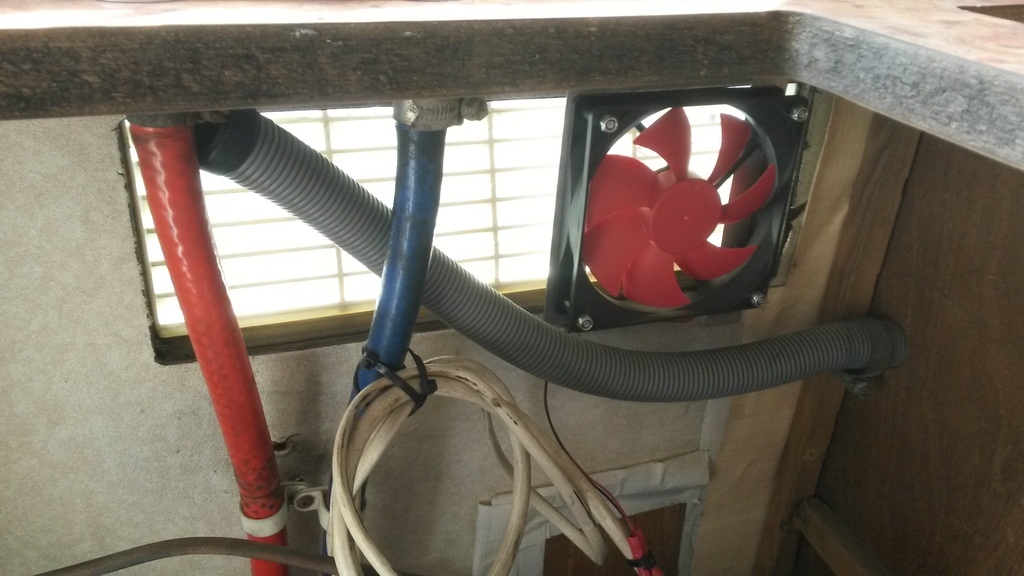
As a small side note, I fitted a computer fan onto the top vent to aid airflow up the back, but it made little difference to cooling inside the fridge. On 240 it stops the kitchen getting so hot above the fridge, but on gas it does something wierd and upsets the exhaust flow out of the vent. I wouldn't recommend it.
What I would recommend if you have it all in bits anyway is taking the fins off inside the fridge and smearing 'Thermal Grease' (used for attatchnig heat sinks on computer CPUs and stuff) between the aluminium fins and the steel pipe. I measured a small drop in fridge temperature (about 1-2*C) in my very non-scientific test.
Modern compressor fridges are very good, and a very good upgrade, but for those of us working with what we have hopefully this will help. I plan on getting a compressor fridge, but solar panels and night heater are first on the list.
I am not a fridge engineer or expert, the information here has just come from my own experience of fiddling with these things.
When they don't work it can be a real head-scratcher and frustrating (weekend away with sour milk and warm beer anyone?) and there is plenty of information out there on fixing them, but also lots of half truths and hear say from someone who reckons his mate just turns it upside down and it's fixed.
Actually, turning it upside down overnight might work in a few cases, and I'll go into that in a bit.
SAFETY BIT!!!!
You may be working with gas fittings, and potentially 240 volt electrics. Unplug your van from it's hook up, and switch off your gas bottle before doing anything. If you aren't comfortable doing anything I describe here, don't do it. Please.
/SAFETY BIT!!!!
The first step, does it work at all? On 240, 12V, or gas. If the answer to any of these is yes, then the rest is fairly easy. If not, then we might still be ok. Also, check the vents on the outside of the van are clear, and you have't left any winter covers on.
My schoolboy physics is a bit rusty, but basically these fridges warm up ammonia in the tubes at the back, which evaporates. As it cools it condenses, which takes energy (as heat) out of the atmospere (in this case the inside of the fridge, and the sausages and stuff in it).
They like to be operated level, or close to it. If they have been used for any length of time at an angle (for example parked on a big slope) they can boil dry in the tubes, the ammonia then crystalises and blocks up the tube. In real life, parking at such an angle would make for uncomfortable camping, and such cases are rare.
However, this is where the turning it upside down thing comes from. All the coolant inside sloshes around the pipes, hopefully unblocking them. It can work, but for how long until it blocks again I can't say.
The only other thing we can't fix is if the pipes have been damaged and the ammonia has leaked out. The smell will give that away.
Usually the electric side of things work and the gas doesen't, but that isn't always the case.
Some of what I am going to try and describe can be done from the vents behind the fridge, but it's super fiddly at times.
With the fridge out of the van, and the fibreglass insulation taken off the flue, we can see what's what. All these pipes and stuff get covered with cobwebs and dust, and the cleaner it is the better heat can escape (which you want). Compressed air is a boon here, but a couple of paint brushes work well.
Here, you can see the wires for 12 and 240 going to the switch on the front. It needs to be wired so 12v only works with the engine running, as they suck a lot of juice and will soon flatten a battery. The switches can fail so it's worth checking those.
Wiring diagram on a sticker on the back, but often goes missing.
If your fridge has an electric ignitor it will have 2 12v feeds, one for the ignitor from the leisure battery and the other for the element with the engine running.
The electric heating elements (240 has the earth spade) should be free to move in their tubes that hold them. If not it's not the end of the world, but it's worth giving them a wiggle to free them off in case you need to get them out at a later date.
The heating elements heat up pretty fast, and get very hot (so be careful when grabbing them with your paw to see if they work). If they aren't working, and they have power to them, replacements are available from ebay or whatever.
So, usually it's gas that gives trouble. Either it won't light, or it lights but won't get cold.
With the lights off, stick your head in the fridge and peer through the little porthole while working the ignitor. You ought to be able to see the spark. In most cases if it doesn't spark rust and crud will have built up and stopped the spark earthing on the burner. The piezzo type sparker things are usually very reliable.
Where my finger is pointing, there is a gas jet. We will come onto that in a minute, but often this blocks up. It will let enough gas through to light the burner, but not to get it hot enough to evaporate the ammonia. So you peer through the porthole, see the flame but it still doesn't work.
Carefully undo the fitting and gently move the burner out of the way, then give everything a good clean. A brass brush from the poundshop works well here. There are several designs of burners, but they are all basically the same principal.
The white thing is the sparker, make sure it's nice and clean, the other thing is the pyro which shuts off the gas if the flame blows out.
With the burner out of the way, make sure the flue is clean and clear, and shove something down it (wire wool on a stick works well) to scrape all the flakey rust and stuff out.
The fish on a hook looking thing is very important. It swirls the exhaust around and stops all the heat just whooshing away. Give it a wire brush and pop it back in, or source a new one if it's missing for whatever reason. Wierdly, I find they work better, even bench testing, with the t-piece in top of the flue. So if you are testing it, make sure the t piece is on (not pictured).
Next, use a little screwdriver or long nose pliers to CAREFULLY get the gas jet out of the fitting. It should come out easily, but it's hard to get with sausage fingers. Make a note or take a picture of which way it came out/goes back in.
Ignore the scratches on this one, someone has been here before.
You need to find a fine, nylon ideally, thread to run down the middle. I have, on a campsite trying to help someone out with no tools, used one of Mrs Generallee's hairs. It worked!
You may be able to see light through it, but clean it anyway. DO NOT be tempted to shove anything metal through it or "open it up a bit"
With the jet out, blow air through the burner while its all apart to clean the last of the debris out.
And put it back together!
Hopefully now you should have a lovely big flame, which if you are testing out of the van, should be a nice cone shape and the top of the cone should just reach into the bottom of the flue on it's highest setting.
Here is a rudimentary testing set up. Please, please do not copy this unless you are absolutely sure what you are doing, and keep the gas hose away from the hot bits on the back. Keep children and pets away etc etc
As a small side note, I fitted a computer fan onto the top vent to aid airflow up the back, but it made little difference to cooling inside the fridge. On 240 it stops the kitchen getting so hot above the fridge, but on gas it does something wierd and upsets the exhaust flow out of the vent. I wouldn't recommend it.
What I would recommend if you have it all in bits anyway is taking the fins off inside the fridge and smearing 'Thermal Grease' (used for attatchnig heat sinks on computer CPUs and stuff) between the aluminium fins and the steel pipe. I measured a small drop in fridge temperature (about 1-2*C) in my very non-scientific test.
Modern compressor fridges are very good, and a very good upgrade, but for those of us working with what we have hopefully this will help. I plan on getting a compressor fridge, but solar panels and night heater are first on the list.
I am not a fridge engineer or expert, the information here has just come from my own experience of fiddling with these things.