|
|
|
|
|
|
|
|
|
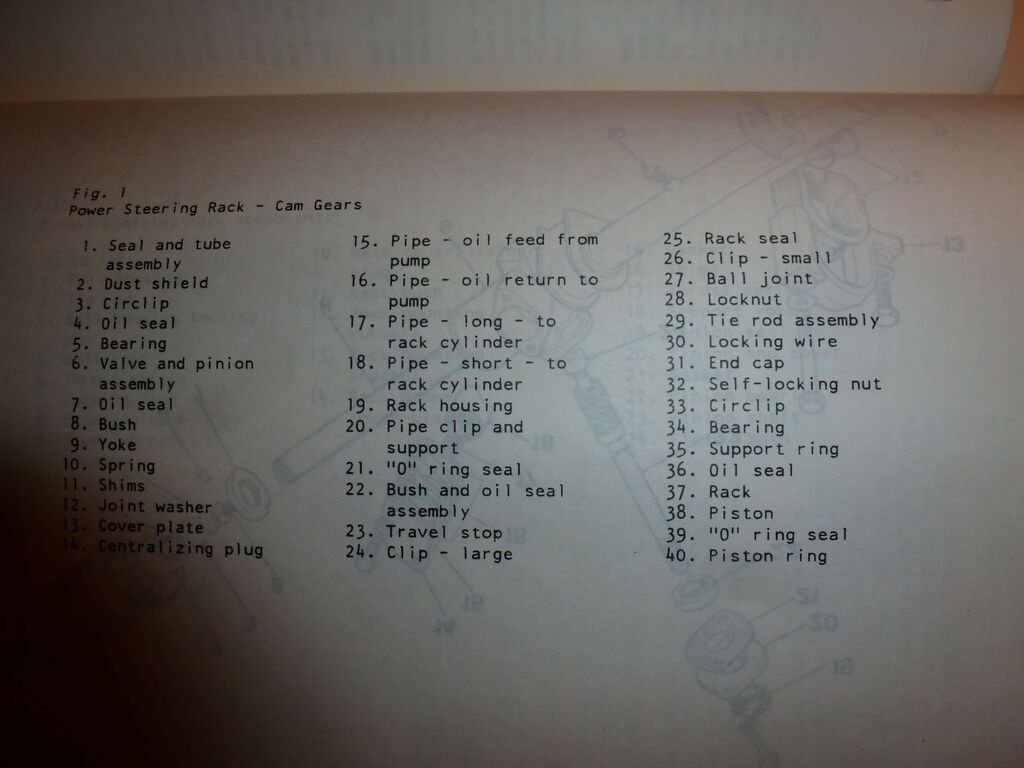
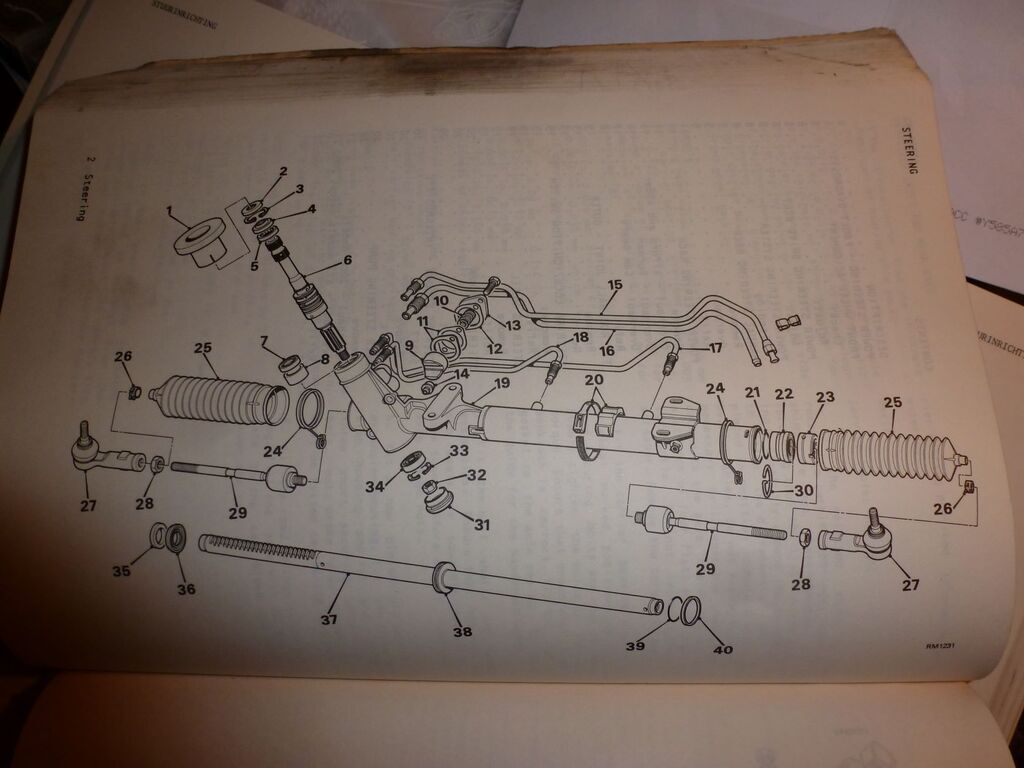
If its any help I have some information on my site from when I replaced my steering rack, tasteslikepetrol.net/2018/01/rover-vitesse-rack-time/I'm fairly sure the "cam gears" power racks are hard mounted to the cross-member, unlike the manual racks with bushes. The hoses kinda just go where they fit. |
| |
|
|
|
|
|
|
|
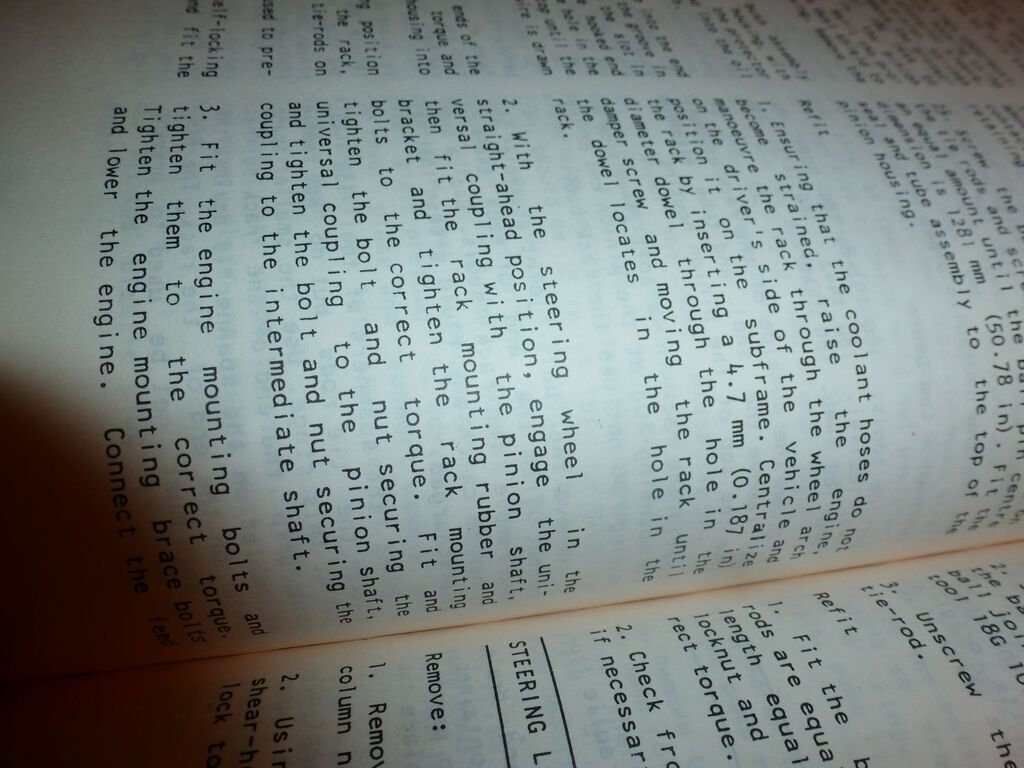
Thanks guys! All been fantastically helpful  threaded the rack into place last night...  ...and started making a list of all the fasteners we think we'll need. This is a bigger task than we thought as evidently someone has been a bit ham-fisted with a number of the fasteners and stripped the threads where the nut seats. 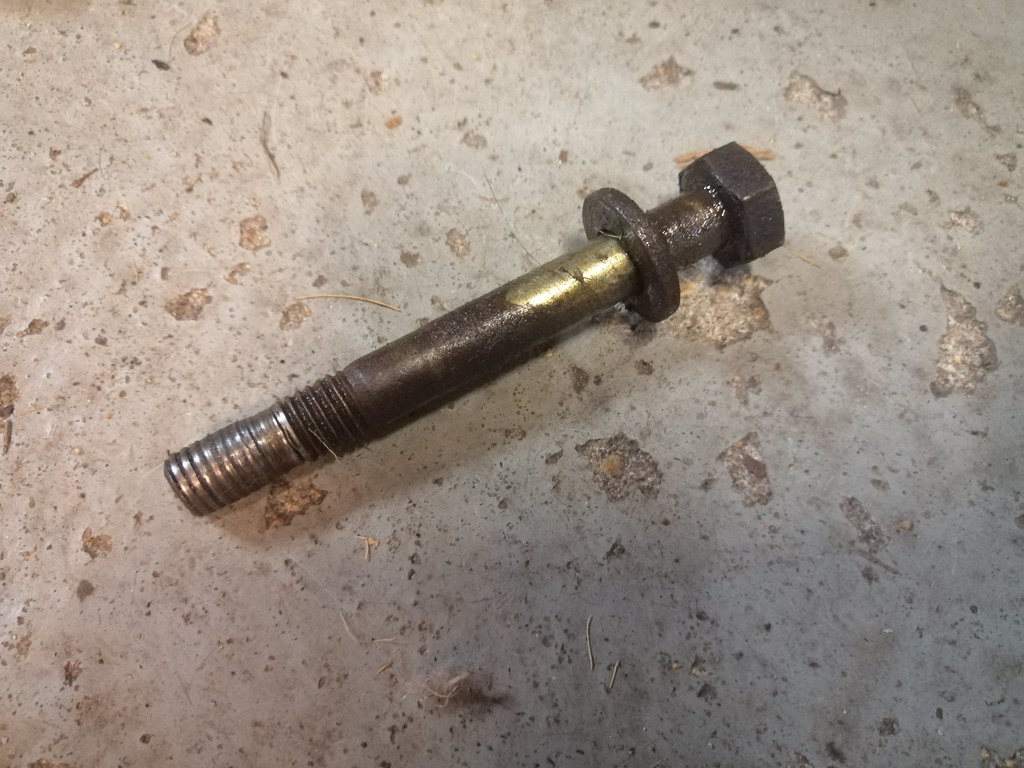 This is the bolt that clamps both the front anti-roll bar bracket and one of the engine mount support bars. It's the third bolt we've found like this... It's also obvious why the rack was so mobile. The bushes were completely shot!  As you say, the powered rack is solid mounted to the subframe so gets rid of all that rubber. That's about as far as we've got in terms of progress (beyond my mate sorting out all the chopped up wiring under the dash). However, I have been properly fangirling about how this car is put together. It's seriously well designed in all sorts of ways that I rank very highly in a design. They're a simple specification in terms of the whole design (live axle and macpherson struts), but how they're actually implemented is very clever. Double CV propshaft which completely eliminates driveline vibration from pinion angle changes that are innate in a live axle design. 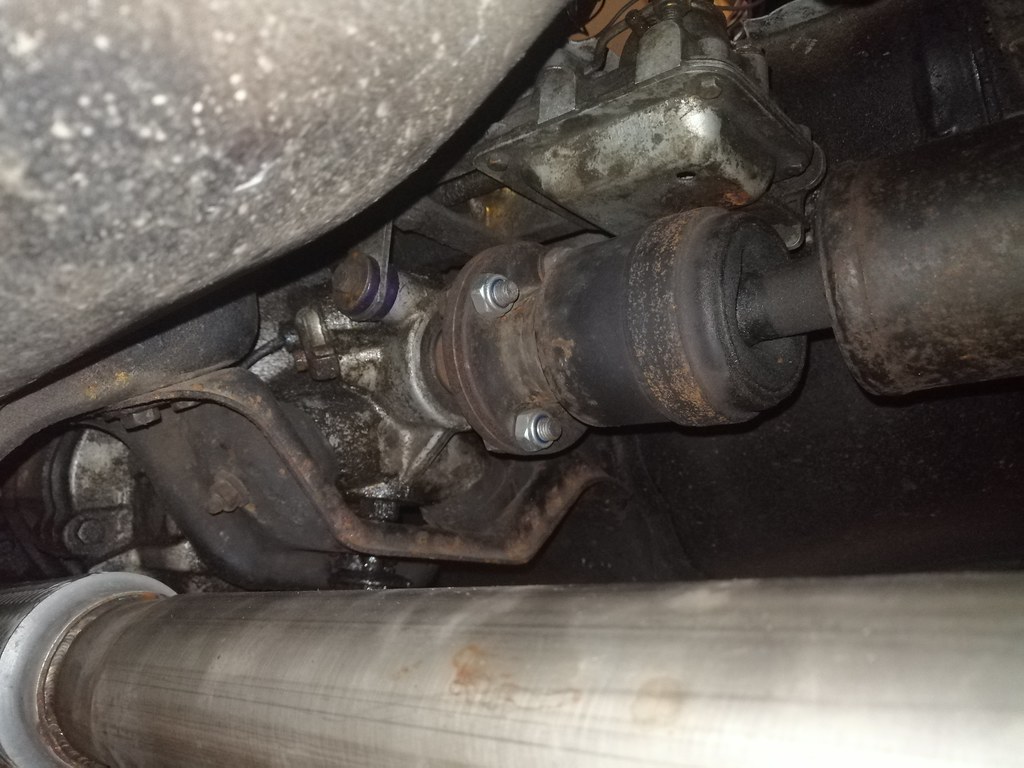 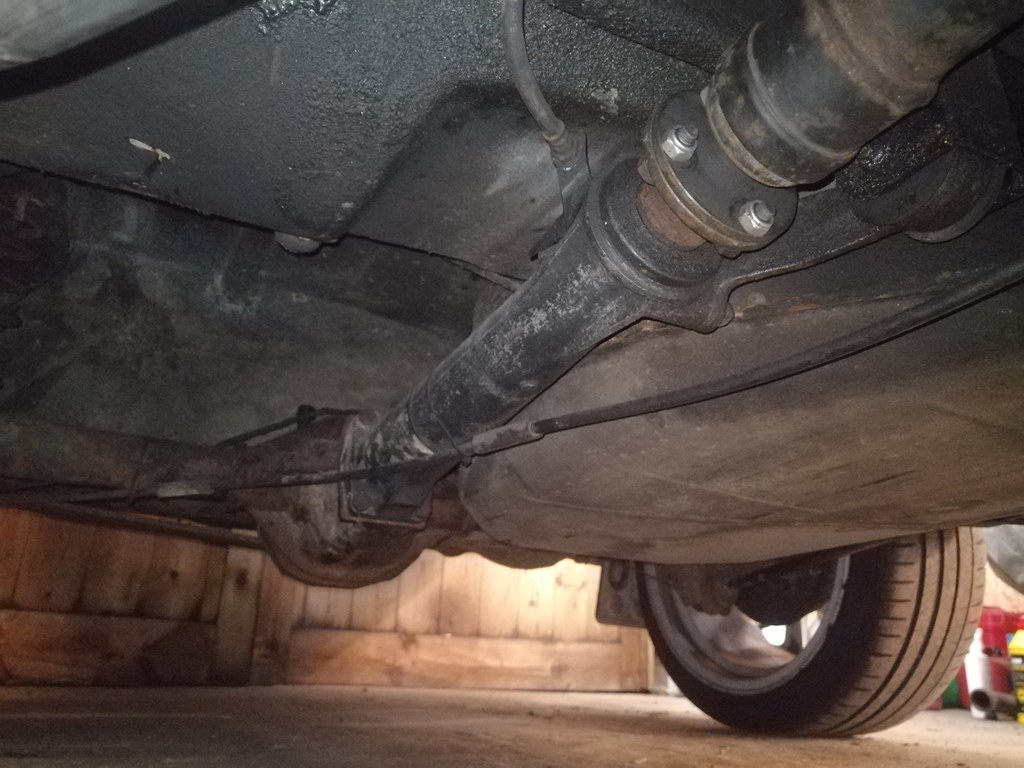 Also visible in the second pic is the ~3ft long torque tube that protrudes from the front of the diff. There's a mounting bush at the front of that which controls the upward movement of the diff nose under load really nicely. You can see how an axle reacts to torque in this video of a Saleen F-150 (which has a much worse design in this respect). At the back is a watts linkage which, again, is nicely designed. You can't quite see in the photos, but the central pivot is mounted below the level of the axle which means it has a nice low roll centre (it could be lower, but not much without compromising ground clearance). 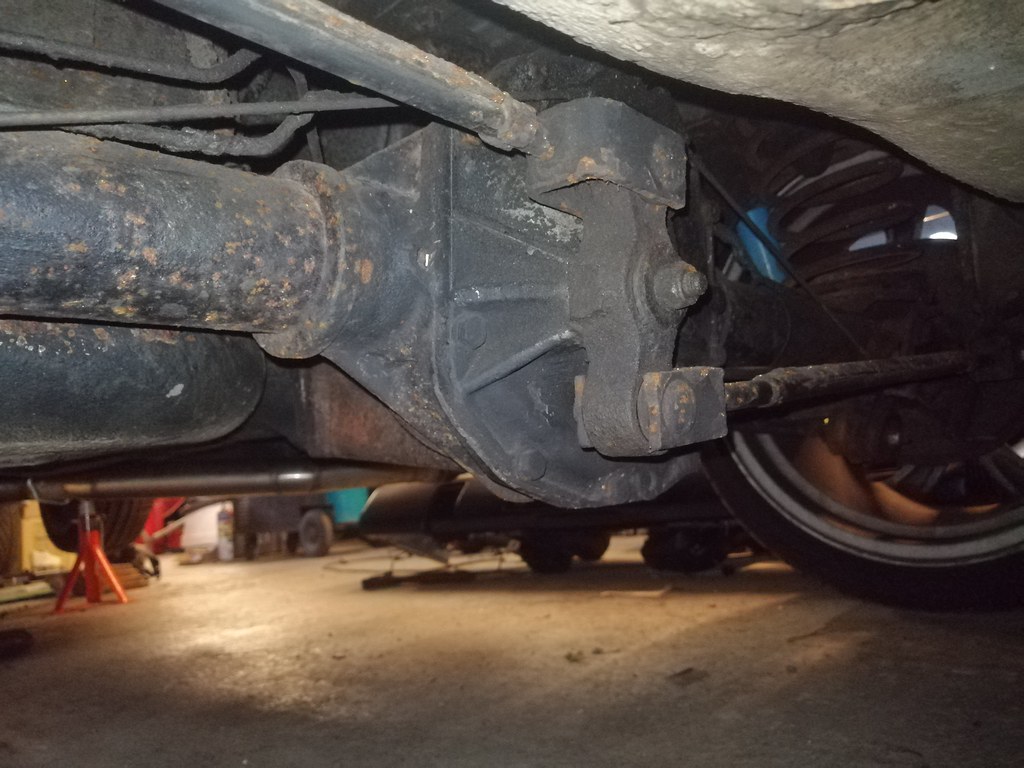 Up front it's got a similar setup to the TR7 with the anti-roll bar doing double duty as the fore-aft location of the strut which saves both weight and cost.   Those two bolts on the anti-roll bar clamp are through-bolts from the top of the subframe which also clamp a supporting bar for the engine mounts. Having fasteners do double-duty again saves weight and cost. Also, little pocket to store bolts while you're working   Proper fangirl  one of those moments where you meet your heroes and they turn out to be better than you expected |
| |
|
|
|
|
|
Oct 19, 2021 12:16:41 GMT
|
So, my mate's been busy on the SD1 when he's had the time. Unfortunately, the hoses that came in the PS kit don't fit at all, and look nothing like the ones that appear in the pictures people have posted. It's almost as if they're expecting the PS pump to be way up over the cam cover (perhaps they're Range Rover hoses):    Unless we've got the pump in the wrong place, but the brackets fit so well where they are we don't think that's it! The rack end didn't fit brilliantly either, but you could at least see they were aiming for the right shape. Luckily it's quite soft metal so the rack end is sortable, and the rest can be chopped up and taken to Pirtek or someone like that for crimping. There's also a big hole where the rusted and cracked clutch mounting point lived:   Tricky panel to form, but he got there and it's tacked in place now: 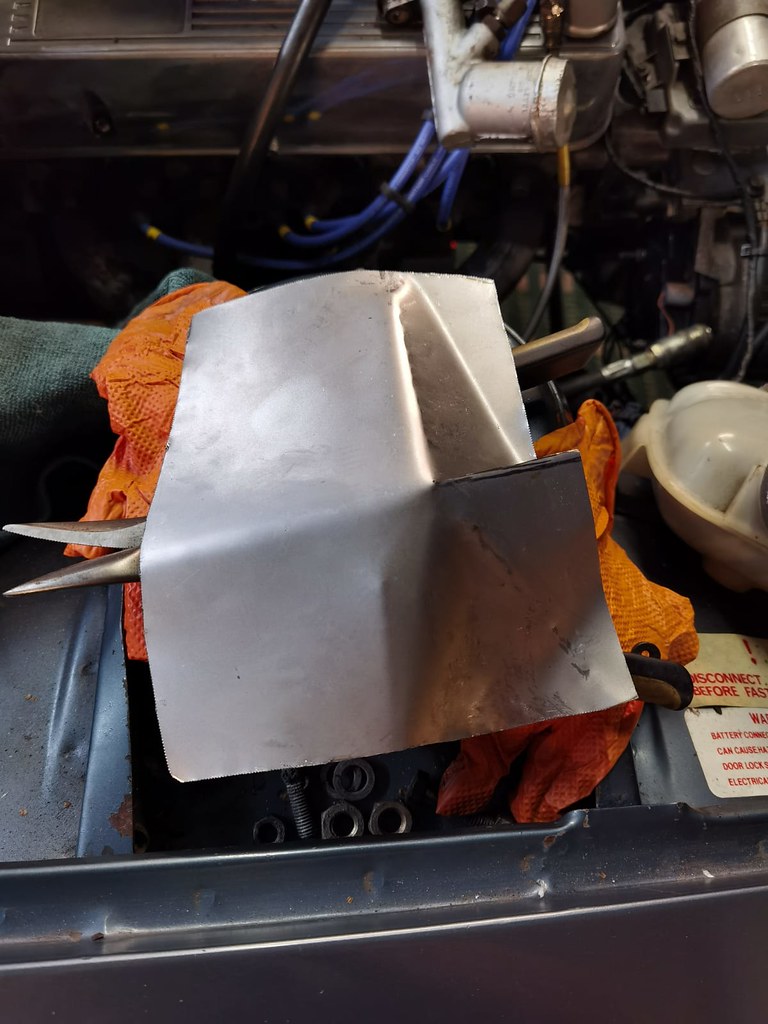   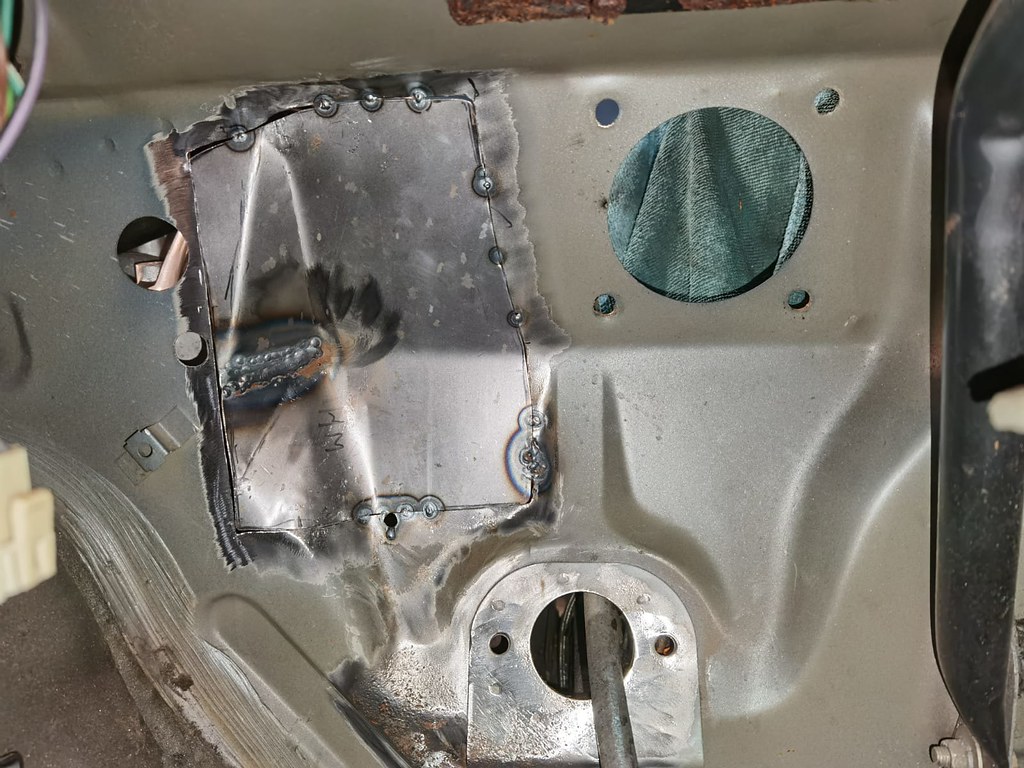 Luckily, because this car was designed from the get-go to use as many components as possible for both RHD and LHD markets, there's a copy of the mounting points for clutch and brake masters on the passenger's side which can produce templates:  The more I find out about this car, the more annoyed I get that they weren't a roaring success. They're just simply but intelligently designed, which is something I value highly. There's an elegance to well thought out simplicity. |
| |
|
|
|
|
|
Oct 19, 2021 23:01:18 GMT
|
The pump is in the correct position, but the pressure line is completely wrong. You can see on my rack that the pressure hose doesn't have the long metal pipe along the rack like yours does, and is mostly soft hose. 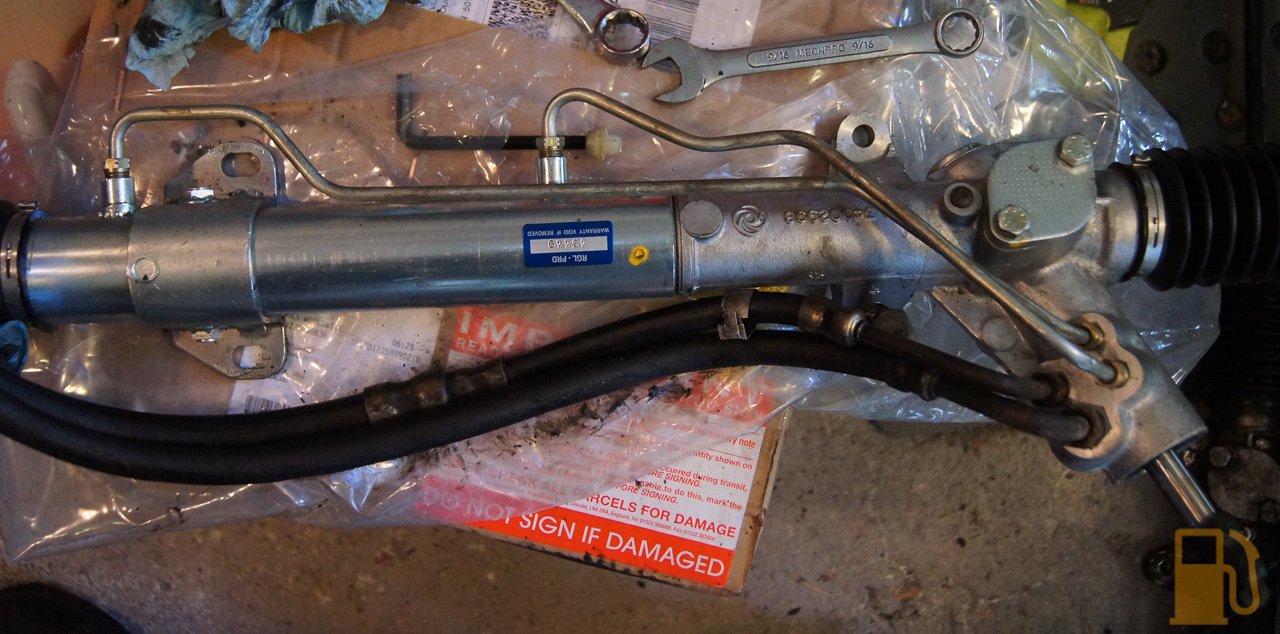 I cant see your return line, but the end of that should be easy to cut down as its just a hose and clamps onto the back of the pump. its not under pressure. |
| |
|
|
|
|
|
Oct 20, 2021 21:30:05 GMT
|
|
i seem to remember from the Leyland manual that 3 different brands of steering racks were used for the Sd1 V8 so this may be the cause the lines do not fit
Peter
|
| |
|
|
|
|
|
|
|
|
Thanks guys, and yes it's completely wrong. I can't even see how a different rack would make it fit, unless it makes the line loop all the way around the back of the sump. Or, perhaps it's from a Range Rover if they have the pump mounted high up for water fording.
|
| |
|
|
|
|
|
Oct 27, 2021 14:21:05 GMT
|
|
Range rover has the pump in virtually the same place but has a steering box on the chassis rail, tr8 uses a similar rack but again has the pump low, could it be SD1 with a straight 6 or diesel?
These and the TR7 (once they junked the marina driveline and fitted the sd1 parts) were for their time very well engineered cars I think it was a combination of poor quality and the press tarring all leyland products with the same brush that did for them.
|
| |
|
|
|
|
|
Oct 28, 2021 10:12:37 GMT
|
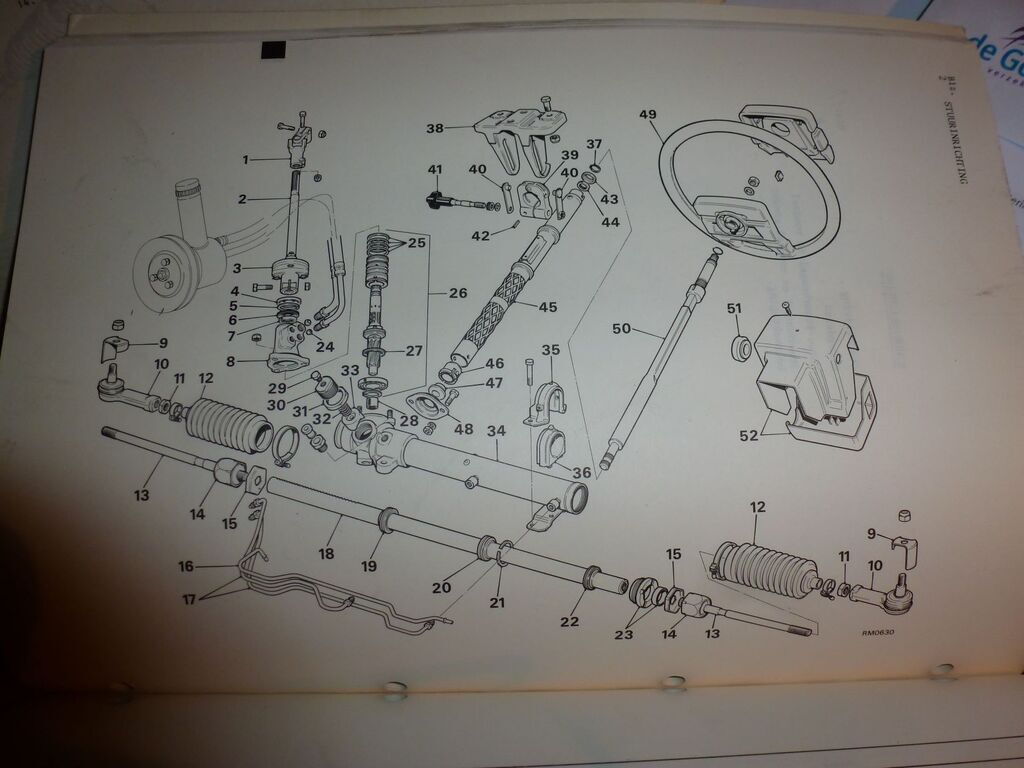
These and the TR7 (once they junked the marina driveline and fitted the sd1 parts) I don't want to be that guy too often, but the TR7 didnt use a "Marina" driveline. The 4 speed gearbox was shared with a Marina, yes, but it was a Triumph box primarily. The rear axle is also quite different, although a Dolomite Sprint axle can be made to fit a Marina. In saying that, the SD1 driveline wasnt without faults. There were various racks used on the SD1, and the one the OP has is the later Cam Gears rack. I believe for the most part all the racks are interchangeable. Looking at the parts diagrams the pipes you have kinda look like the ones for the SD Turbo model (diesel turbo). All RHD V8s should have the same pipes. I have attached the relevant page, with the P/Ns.  |
| |
|
|
|
|
|
Oct 28, 2021 10:59:36 GMT
|
|
Thanks guys, all great information. The SD Turbo one looks a bit more like it, perhaps if the rack side is different between the different rack options (although it still seems way, way too long, like if the pump needs to be mounted higher up or much further back in the engine bay).
If the Rangey steering box is in a different location relative to the engine than the SD1 rack then that might explain it.
It's definitely not a 2600 pipe. One of my 2600 engines has a PS pump attached and that's on the opposite side of the aux setup, directly over the top of the rack hydraulic fittings.
|
| |
|
|
|
|
|
|
|
Oct 28, 2021 11:31:18 GMT
|
|
And yeah, I've heard a lot that the TR7 felt lightyears ahead of the old body-on-frame TR6 and Spitfires.
Did the Marina use the LT77 then? Or did the TR7 use the Triumph single rail box you got in Spitfires and Dolomites? I know very little about Marinas, and only a little more about TR7s.
I do know that the diff carrier bearings were standardised between Marinas and Spitfires at some point, and that the Quaife diffs for Spitfires also fit Marinas and early TR7s (suggesting the carrier is the same). I expect it was the guts of the differentials that were the same, even if the rest of the axle wasn't.
|
| |
|
|
|
|
|
Oct 28, 2021 18:18:46 GMT
|
|
The early ones used a marina based Axle and 4 speed box, none of which was really up to a 2.0 engine, the body construction, wiring and front suspension is very similar to the SD1, later on they moved to the LT77 and a SD1 based axle (no torque tube though,just 4 link with the top arms angled across the car)
It was typical 70's Leyland balls up in fighting between the various teams, apaulling build quality at launch and they engineered it with the v8 and 16v engine in mind then never got round to launching them.
Even then it was still the best selling TR.
|
| |
|
|
|
|
|
Oct 28, 2021 21:32:21 GMT
|
|
Awesome thread and a great car!
|
| |
|
|
|
|
|
|
|
Thanks man  glad you're enjoying it! And interesting on the TR7. Same story with all the late BL stuff, but glad to hear they turned out to be decent cars (even if it happened 5 years too late). Next few steps on the big Rover. The little stiffener plate for the clutch master has been prepped and welded back on, with some studs fitted so you don't need one person in the engine bay and another inside the car to remove it.  PS hose has been cut down and crimped and fits nicely. For now the return has been plumbed directly back from the rack, but at some point a cooler will be fitted.  The main difficulty is that the return pipe on the pump points directly at the high pressure hose, but some tweaking around got it to fit. They'll need to be cable tied together to stop them chafing, but they do fit.  Lastly, we were idly thinking of wheel options for the car which is a bit tricky with the 5x127 PCD these have. We noticed that my dad's 914/6 PCD didn't look a million miles off (which it wasn't, being 5x130) so thought we'd give them a punt.   That actually looks pretty damn good  they fit over the studs (just about), but you'd need a funky wobble-nut setup to seat properly in the tapers. It's not going to happen (for one because Porsche wheels are way more expensive than they should be, and also because the Porsche needs wheels), but you'd probably be the only SD1 rolling around on Fuchs wheels  |
| |
|
|
|
|
|
|
|
So my mate's been hard at work on the Rover, mainly around the exhaust. The completely unsilenced side pipes were really very cool, but are just a little bit too lairy for our area, especially as he leaves quite early for work. Plus, the manifold (while being quite a nice design) is crushed at the bottom from hitting the road as it hangs quite low, and isn't the right bore to seal properly onto the rest of the system. So, it's new exhaust time. New set of stainless manifolds from Rimmers (mainly because they were available at short notice, but also they're not too bad with a bit of tweaking).  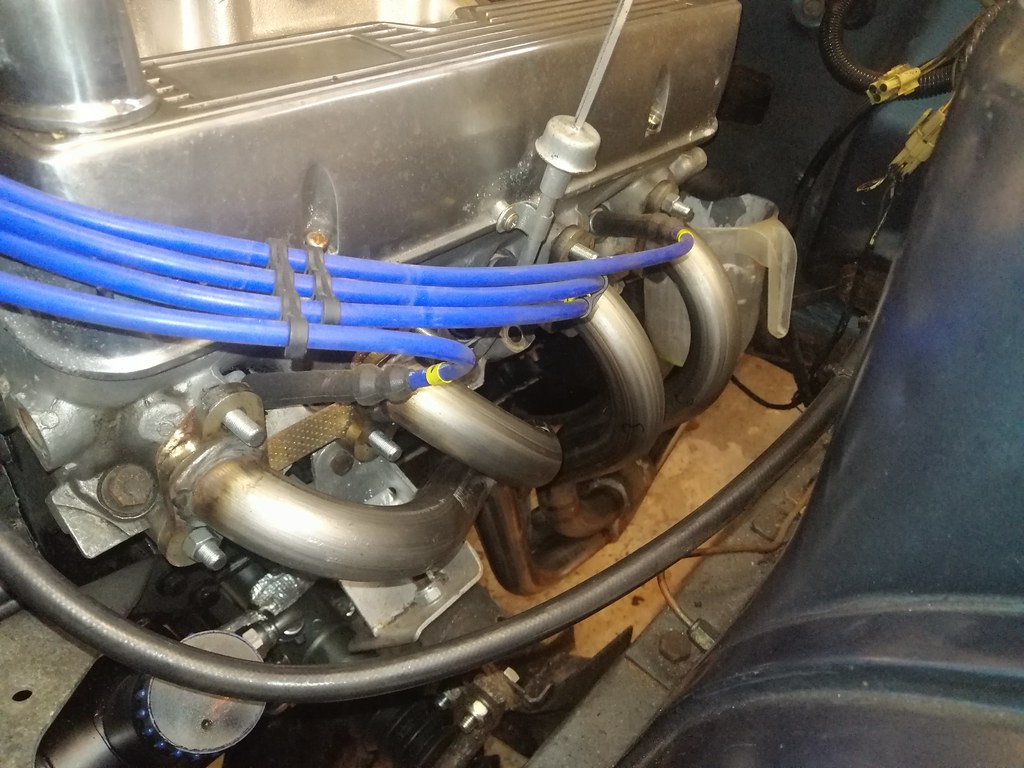  Smaller bore primaries than the existing system, but that might work a little better with the engine in its current state of tune. There's a harsh step down from the collector to the standard pipe size which got cut off at the right level to mate with a 2.25" pipe each side...   ...and then into some flexi sections, before a v-band to the merge pipe.  That then heads into a not yet plumbed up 3" single pipe running back to a void under the rear seat, on the opposite side of the prop to the fuel tank. You can just about squeeze a 14x9x4" silencer in there, with the tailpipe poking out through the sill like so (plus a bit more clearance):   Also modelled here are the new wheels! 16x8 steels for a Jeep, ET20 I think (but I'll check). The sit pretty nicely both at the front and the rear, although it hasn't been down properly to check for rubbing.   Also, despite being steels the wheel+tyre combo with ADO08Rs came out at 24.7kg each vs the 26.5kg of the Team Dynamics alloys. Both on a 225, similar rolling circumference, but the alloys are 18s and wider. He seems to be getting the hang of TIG too. It's even got colours in it!  |
| |
|
|
|
|
|
|
|
|
Oh my god how have I missed this! Great work. I have some power steering racks and hoses out of cars so if you need photos let me know. From memory the little shaft that goes from the column to the rack with the rubber joint might also be different between manual and power racks, or maybe it’s between series 1 and series 2? Can’t remember. Good idea fitting studs for the clutch master they are a proper pain in the but to remove and install single handed.
|
| |
|
|
|
|
|
|
|
Haha my mate says thanks! He also said that your turbodiesel looked familiar, and it turns out he's recently watched one of your youtube videos on the sill repair just by the trailing arm mount on the rear suspension. Very useful stuff! Interesting on the column intermediate shaft thingy. Luckily that was one of the bits of the kit that did actually fit out of the box! Ah we were wondering whether it originally had studs that had come off or if it really was just loose nuts. Seems very unhelpful! We'll be adding in captive nuts/studs all over as there does seem to be a lack of them! I suppose if you haven't got all the dash out to weld without setting fire to things you could pop some rivnuts in there which should let you bolt in from the outside. Oh, we had a couple of questions if anyone knows a bit more about SD1s than we do! - We've seen a few videos of SD1s on adjustable coilovers. I know Rimmers does inserts, but we were wondering if anyone sells them or if it's a matter of modifying a standard coilover with something like this. We've measured the struts and they seem to be 2" diameter which is helpful.
[li]Does anyone have any info about the Jag vented front brakes? I know the calipers fit with some filing out of the mounting lugs, and that you need an adapter ring for the back, but does anyone know the PCD of the SD1 discs? I think I've measured it at about 5x98, but it's been a while and I can't remember if I measured it right! Need to double-check... - Has anyone looked at a rear disc brake conversion? Quite happy to put one together ourselves, but wondering if there's an established route
 - We've noticed that the gearstick seems just a smidge far forward. Are the engine mounts supposed to be bolted to the front side of the brackets on the car-side or the rear? They're currently on the front, but it seems like it would sit in a much better location if it was bolted on behind.
I know there was some more but I can't remember them! |
| |
|
|
|
|
|
|
|
|
|
| |
Last Edit: Dec 9, 2021 9:11:49 GMT by westbay
|
|
|
|
|
|
|
|
Thanks man, the issue is that the the Rover's discs bolt to the back of the hub rather than slip over the studs, and use a smaller PCD. Turns out that's way more common on older cars than I thought! For instance my big Triumph has 4x114.3 wheels studs, but the disc is 4x101.6 (same as a Mini wheel bolt pattern) and bolts to the back of the hub.
|
| |
|
|
|
|
|
|
|
Thanks man, the issue is that the the Rover's discs bolt to the back of the hub rather than slip over the studs, and use a smaller PCD. Turns out that's way more common on older cars than I thought! For instance my big Triumph has 4x114.3 wheels studs, but the disc is 4x101.6 (same as a Mini wheel bolt pattern) and bolts to the back of the hub. I have some new spacers for jag conversion. I want to keep them but can either measure them up or lend them to you to copy? |
| |
|
|
|
|


 threaded the rack into place last night...


