ChrisT
Club Retro Rides Member
Posts: 1,635
Club RR Member Number: 225
|
|
Oct 10, 2020 14:35:15 GMT
|
Since work on the Manta has stopped for a while due to lack of interest I decided it was time to get acquainted with the lathe at work, I've used it for several projects in the past, such as these pointy wheel centres, but very much still a novice with it. This video on Youtube peaked my interest... Not only making a cube on a lathe but then making a cube within a cube within a cube! There's plenty of guides on 'tinterweb on how to calculate the cube sizes, holes and making the tooling to do it so I gave it a go as I'd got some 2" round left over from the wheel centres which, as in the video, is the right size for 35mm cube. Unfortunately I opted not to take any pics during the process so I've only got the end result..... 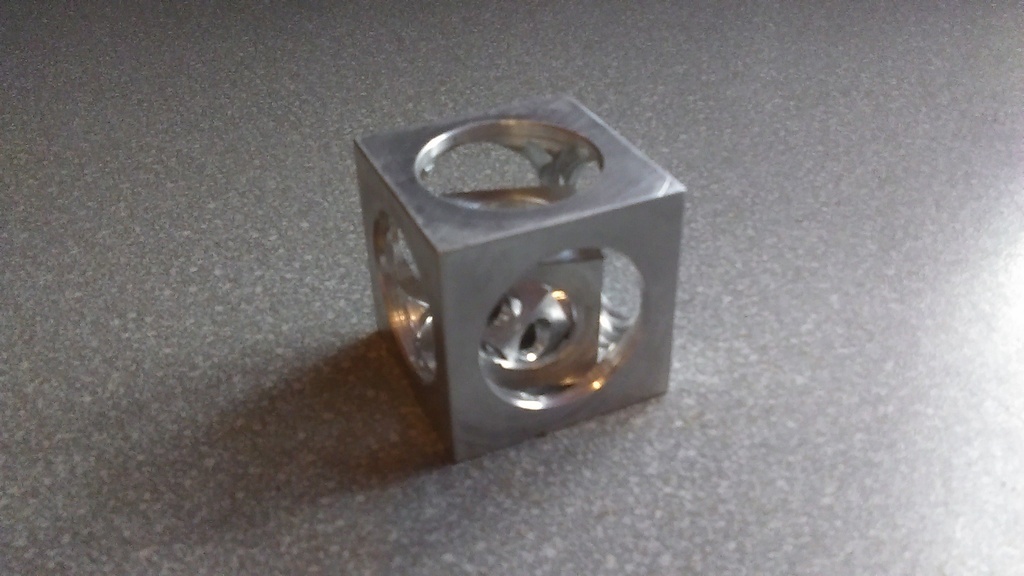 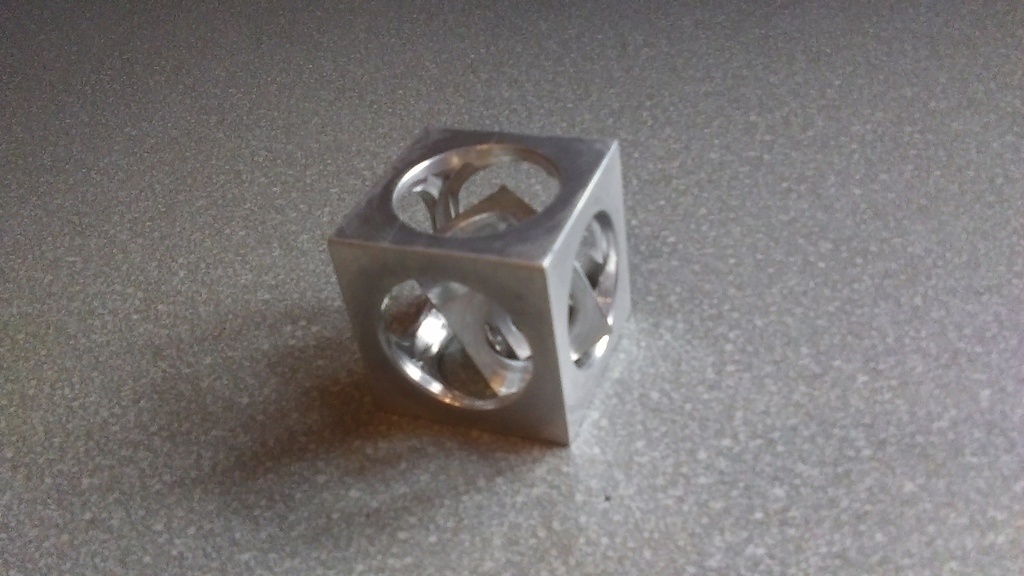 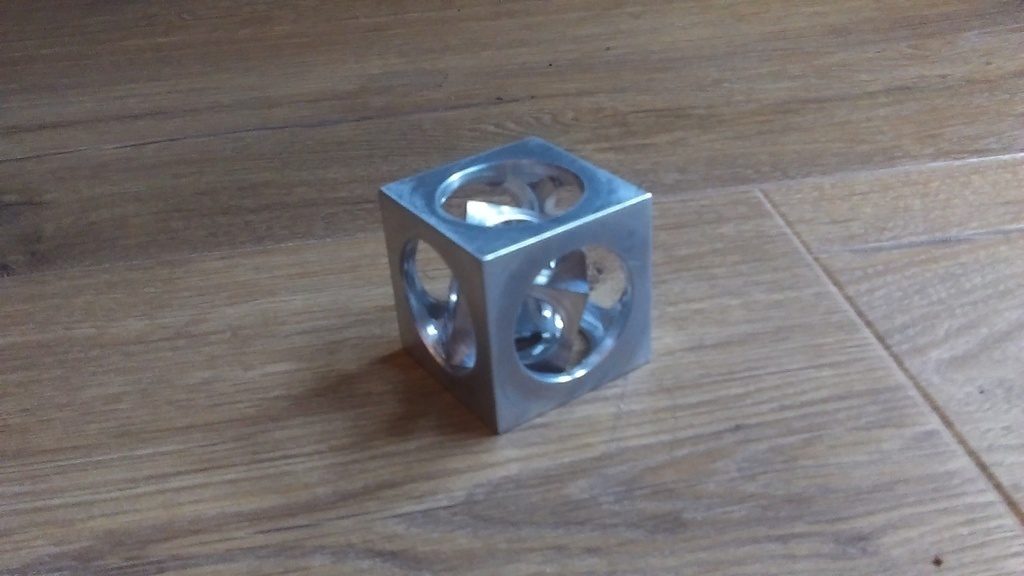 It's been a learning process, which was the idea, certainly got a better understanding of some lathe working, still not got to grips with some of the imperial graduations on it. I will be making another one as there's a couple of problems with this one, the undercut tool I made wasn't quite the right profile so the first side I did opened up one of the middle cube's holes a little too much and the centre cube is slightly undersized on two sides so does actually comes out. Will try and document my 2nd attempt..... |
| |
Last Edit: Oct 17, 2020 7:50:58 GMT by ChrisT
|
|
|
|
|
|
|
|
|
Oct 12, 2020 11:53:44 GMT
|
|
I've been thinking about trying one of these.
What was the hardest part?
|
| |
|
|
|
|
|
Oct 12, 2020 13:27:08 GMT
|
|
Hi, If you want a different challenge try this. -
Colin
|
| |
|
|
ChrisT
Club Retro Rides Member
Posts: 1,635
Club RR Member Number: 225
|
|
Oct 12, 2020 16:57:22 GMT
|
I've been thinking about trying one of these. What was the hardest part? Not sure anything particularly hard about it, once you've got your head round the design and how it works. First side took a lot longer than the others. |
| |
|
|
ChrisT
Club Retro Rides Member
Posts: 1,635
Club RR Member Number: 225
|
|
Oct 12, 2020 17:00:38 GMT
|
Hi, If you want a different challenge try this. Colin Had seen that one, possibly a little beyond me at the moment, maybe just a sphere at some point in the future..... |
| |
|
|
ChrisT
Club Retro Rides Member
Posts: 1,635
Club RR Member Number: 225
|
|
Oct 16, 2020 21:49:06 GMT
|
2nd attempt have looked at the failings of the last one and hopefully addressed them, have adjusted the dimensions slightly which should help. Will be documenting it this time, whether the photos are any good or if it's of any interest is another matter. Bit of aluminium round bar. 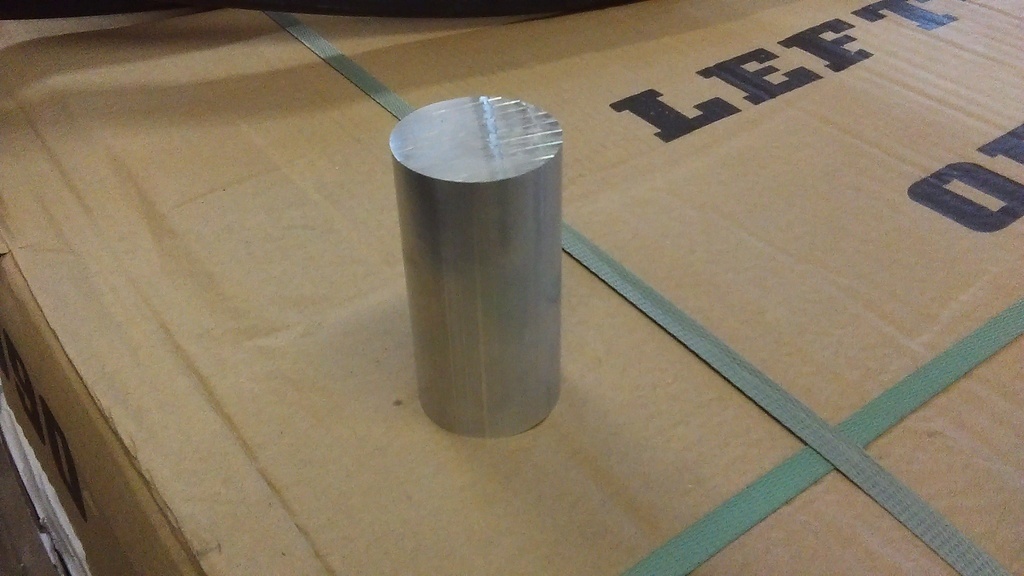 Turn down to 50mm and cut 35mm off the end. 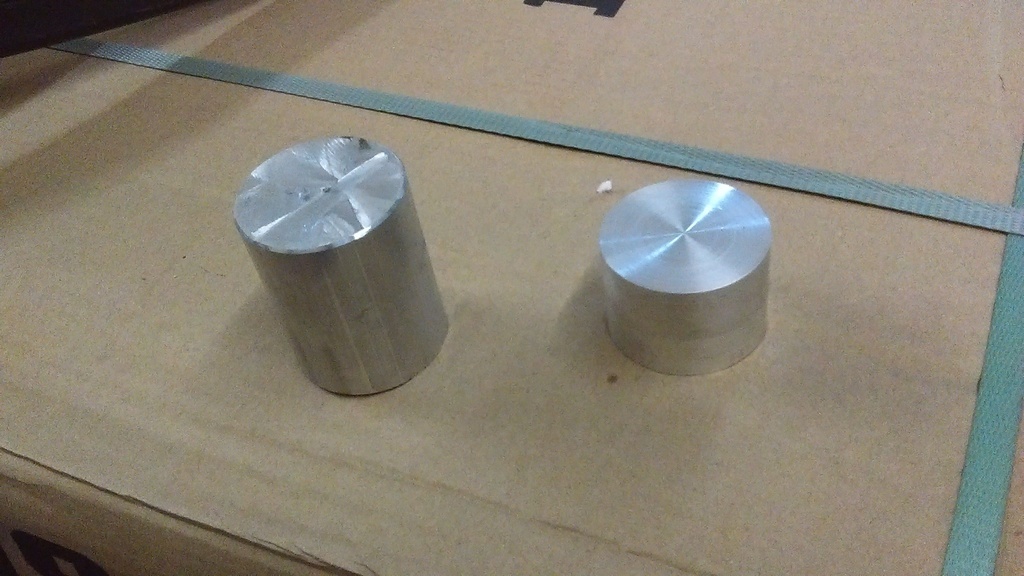 Now to make a cube in a 3 jaw chuck.... Position like so. 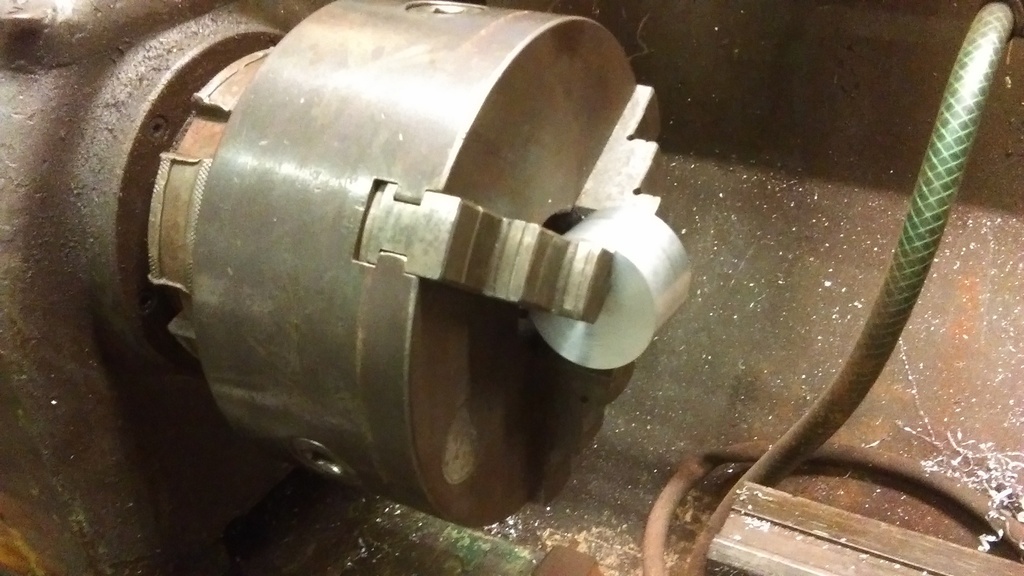 And cut face. 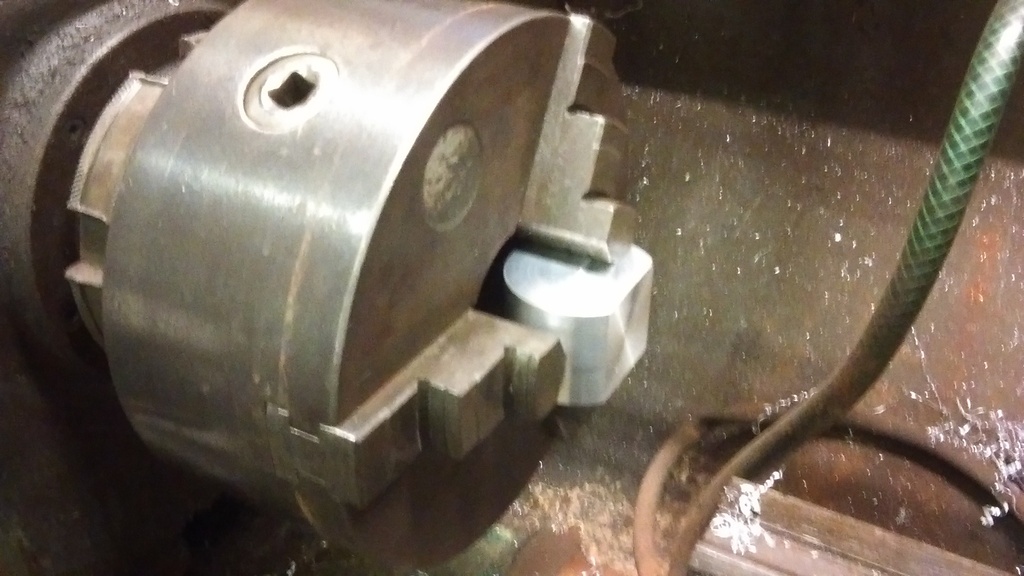 Rotate round.. 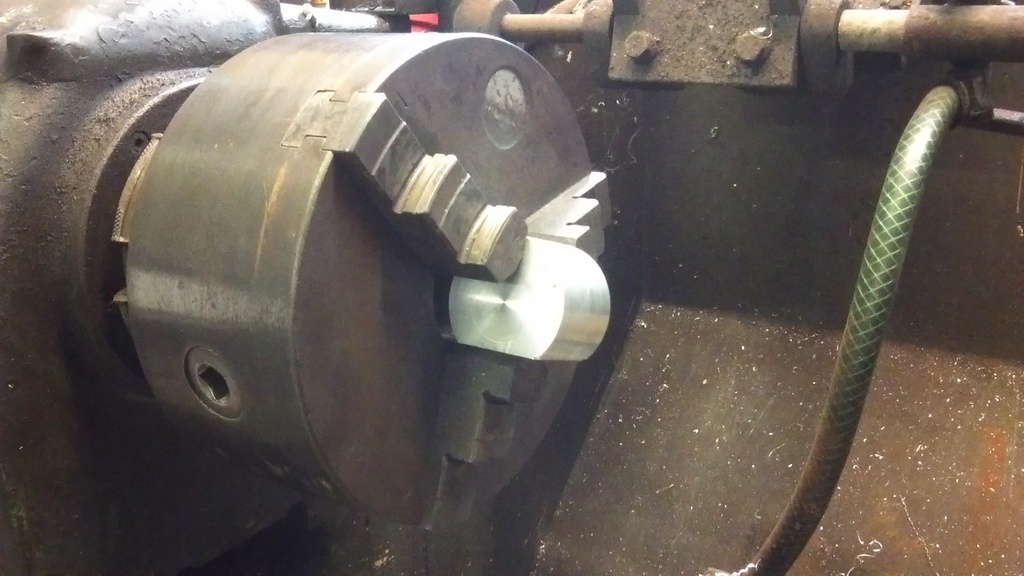 And cut next face 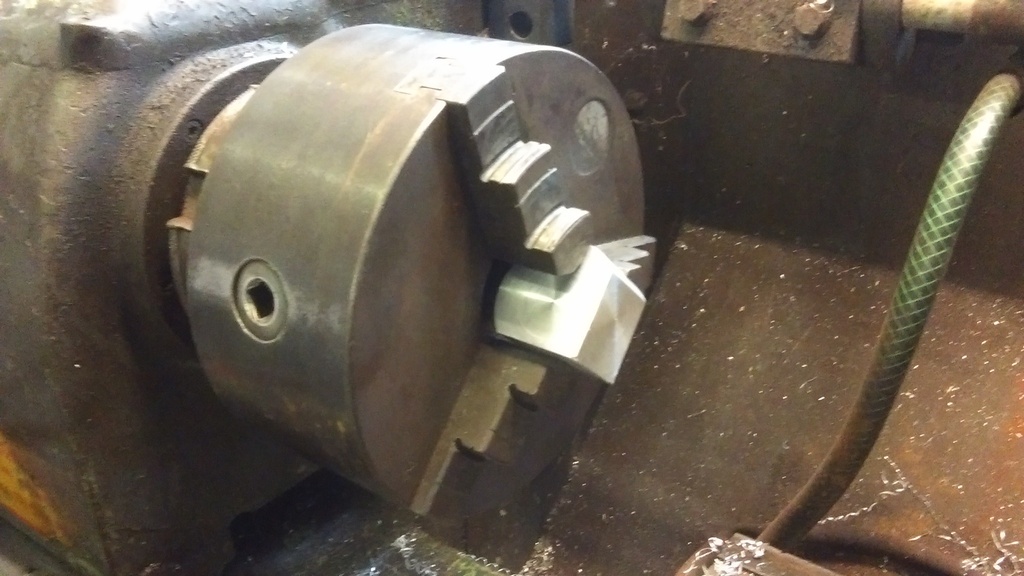 Rinse and repeat. 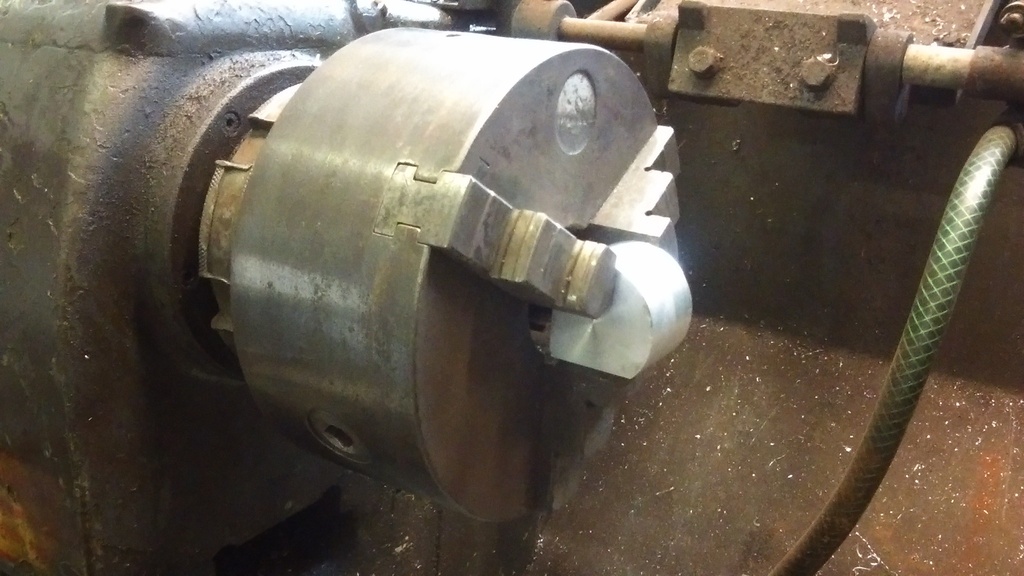 |
| |
Last Edit: Oct 16, 2020 21:51:39 GMT by ChrisT
|
|
|
|
|
|
|
|
This is all very cool..... love the 8 ball. To my surprise I see that I have enough kit to do it in theory......
However moving the gearstick on an MX5 gearbox forward 240mm is proving challenge enough at this point!
Nick
|
| |
1967 Triumph Vitesse convertible (old friend)
1996 Audi A6 2.5 TDI Avant (still durability testing)
1972 GT6 Mk3 (Restored after loong rest & getting the hang of being a car again)
|
|
ChrisT
Club Retro Rides Member
Posts: 1,635
Club RR Member Number: 225
|
|
Oct 17, 2020 14:21:40 GMT
|
This is all very cool..... love the 8 ball. To my surprise I see that I have enough kit to do it in theory...... Nick Thanks, I would have to make the radius turning tool to achieve it, but that's not beyond the realms of possibility according to another Youtube video...... Onwards with the cube, after a couple of more cuts I'm left with this.... 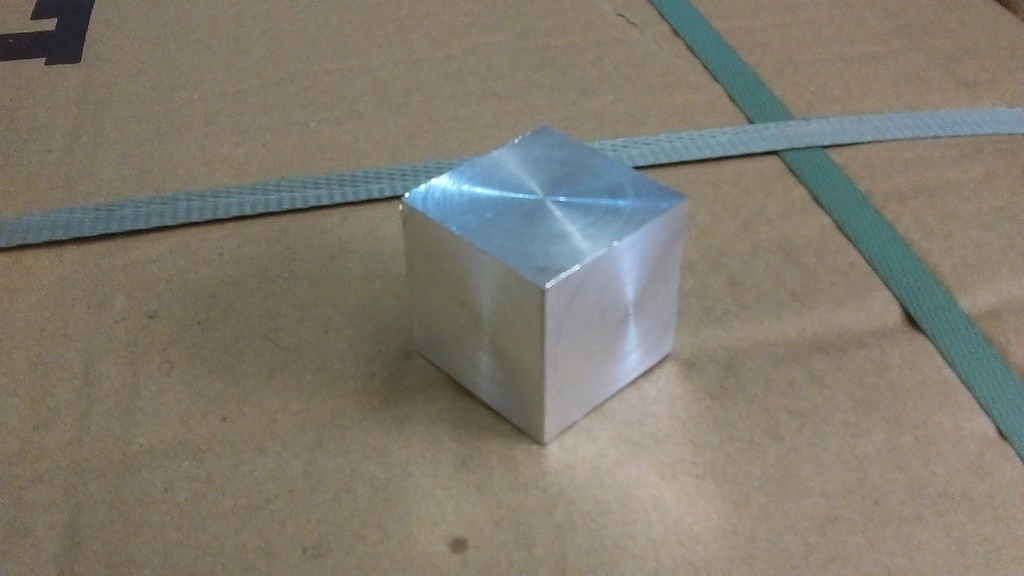 How do you hold a cube centrally in a three jaw chuck? You get another bit of aluminium round bar of slightly bigger diameter (2 1/4" or 2 1/2" I forget which), take the centre out to 50mm and cut a slot in the side.... 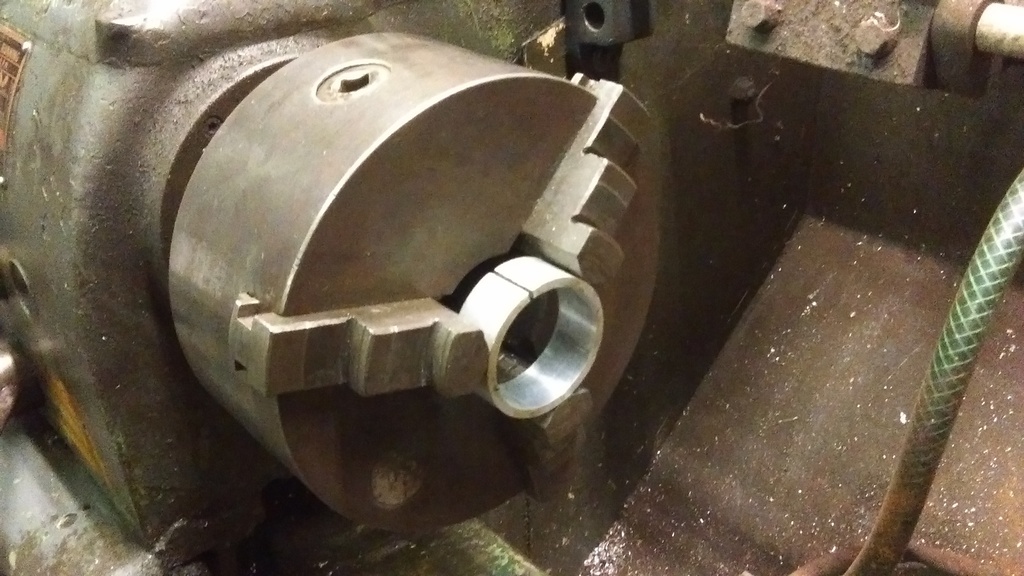 Then mount the cube so.... 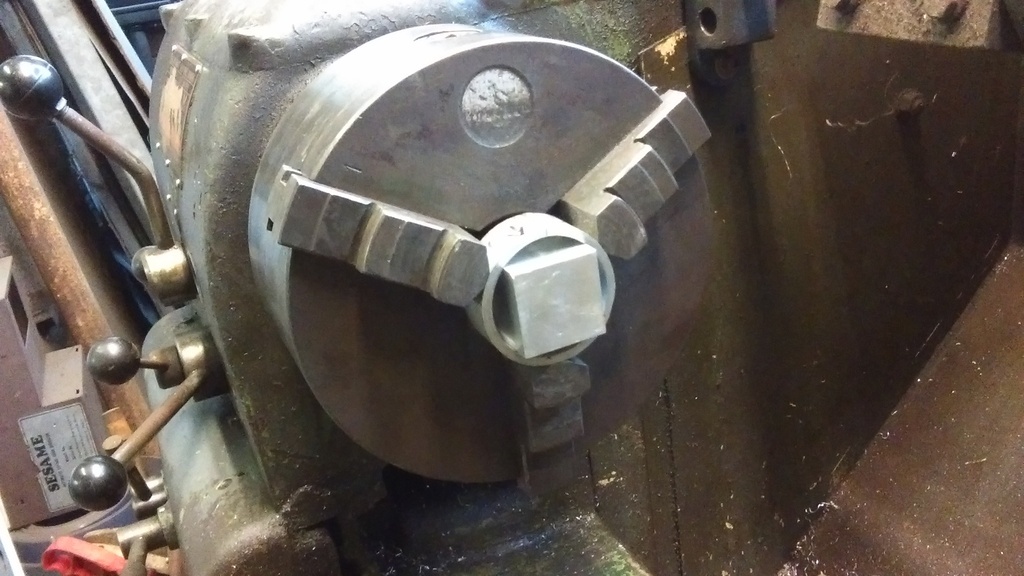 All I need to do now is drill a few holes, bore them out and do some undercutting.. The tools I'll be using will be the boring bar (I believe it's called) and this purpose made undercut tool.... 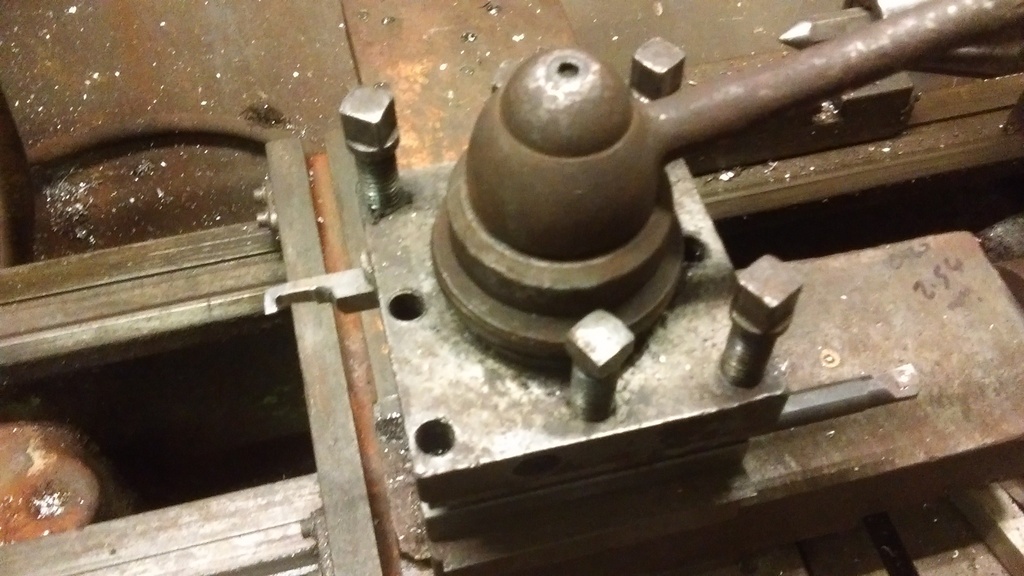 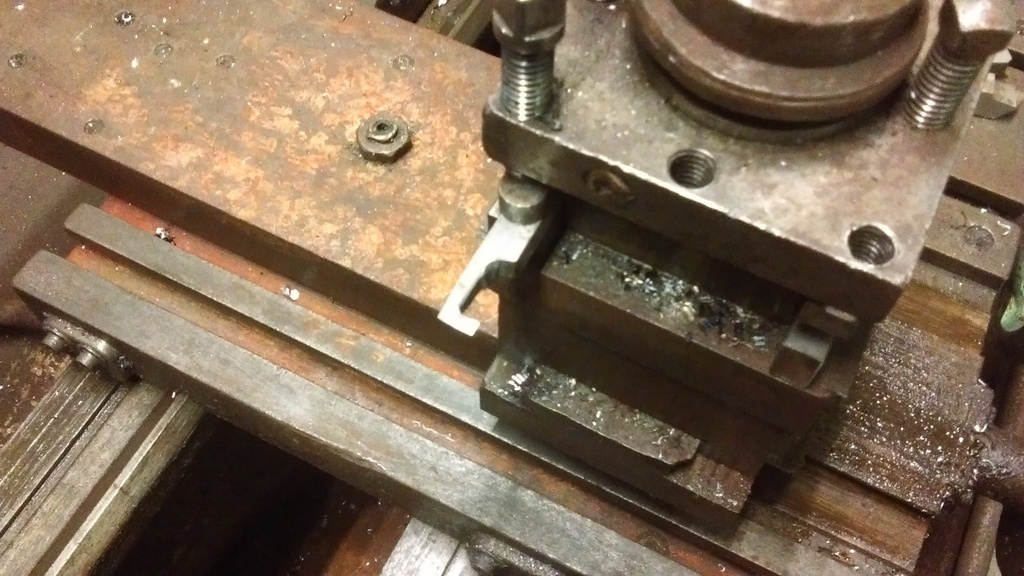 One of the many things I've learnt doing this is to put two tools in the tool post, then just spin it round to change bits rather than undoing the clamping bolts and refitting/realigning the other one. |
| |
Last Edit: Oct 17, 2020 14:22:59 GMT by ChrisT
|
|
Phil H
Posted a lot

Posts: 1,448
Club RR Member Number: 133
|
|
Oct 19, 2020 16:04:10 GMT
|
However moving the gearstick on an MX5 gearbox forward 240mm is proving challenge enough at this point! Nick I moved mine forwards 4" very easily although it was a Mk1 box. Didn't even look if moving it any further was actually possible or not.. |
| |
|
|
|
|
|
|
|
Oct 19, 2020 18:25:18 GMT
|
However moving the gearstick on an MX5 gearbox forward 240mm is proving challenge enough at this point! Nick I moved mine forwards 4" very easily although it was a Mk1 box. Didn't even look if moving it any further was actually possible or not.. Yeah, 4” is really easy, though only on the Mk1 box. 240mm is almost 10” though. You have to scrap the Mazda mech and start again. I think it’s possible, though making reverse difficult to access by mistake is making my head hurt.... Nick |
| |
1967 Triumph Vitesse convertible (old friend)
1996 Audi A6 2.5 TDI Avant (still durability testing)
1972 GT6 Mk3 (Restored after loong rest & getting the hang of being a car again)
|
|
|
|
|
Oct 19, 2020 19:24:56 GMT
|
|
I managed to move it forward 156mm which wasn't too difficult 240 will put the the stick right on top of the selectors.
|
| |
Last Edit: Oct 19, 2020 20:20:10 GMT by kevins
|
|
|
|
|
Oct 20, 2020 12:56:52 GMT
|
I managed to move it forward 156mm which wasn't too difficult 240 will put the the stick right on top of the selectors. Yes, it does. We have a “proof of concept” lash up that selects gears and defines the gates. I’m in the slow process of making it nicely now. If nothing else it’s improving my machining skills, though there’s plenty of room for more of that! Nick |
| |
1967 Triumph Vitesse convertible (old friend)
1996 Audi A6 2.5 TDI Avant (still durability testing)
1972 GT6 Mk3 (Restored after loong rest & getting the hang of being a car again)
|
|
ChrisT
Club Retro Rides Member
Posts: 1,635
Club RR Member Number: 225
|
|
|
|
Excuse the poor quality photos, think the phone lens has seen better days, must get some with a proper camera.... First side cut, not sure if it's been undercut at this point, difficult to tell.... 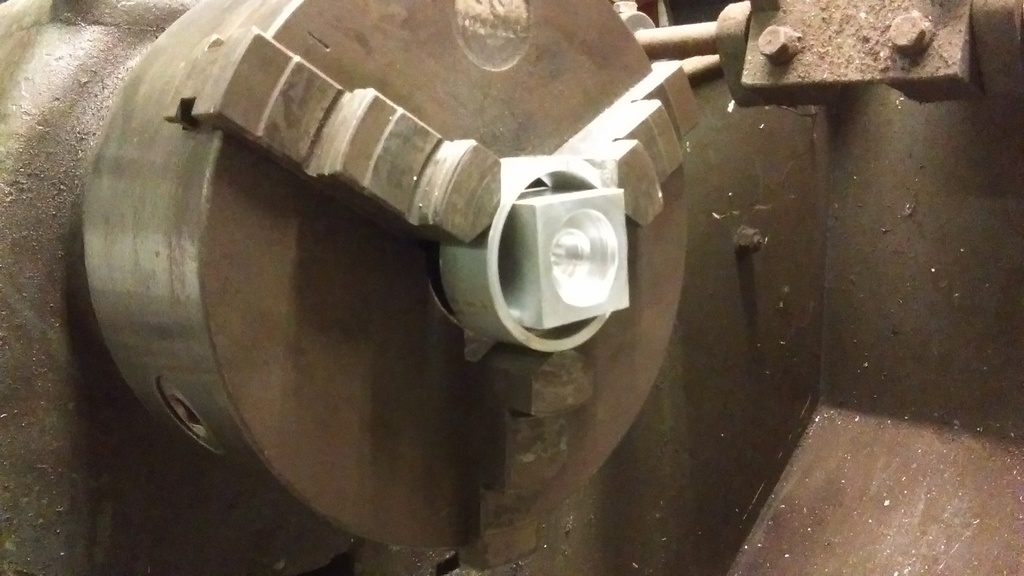 Three sides done.... 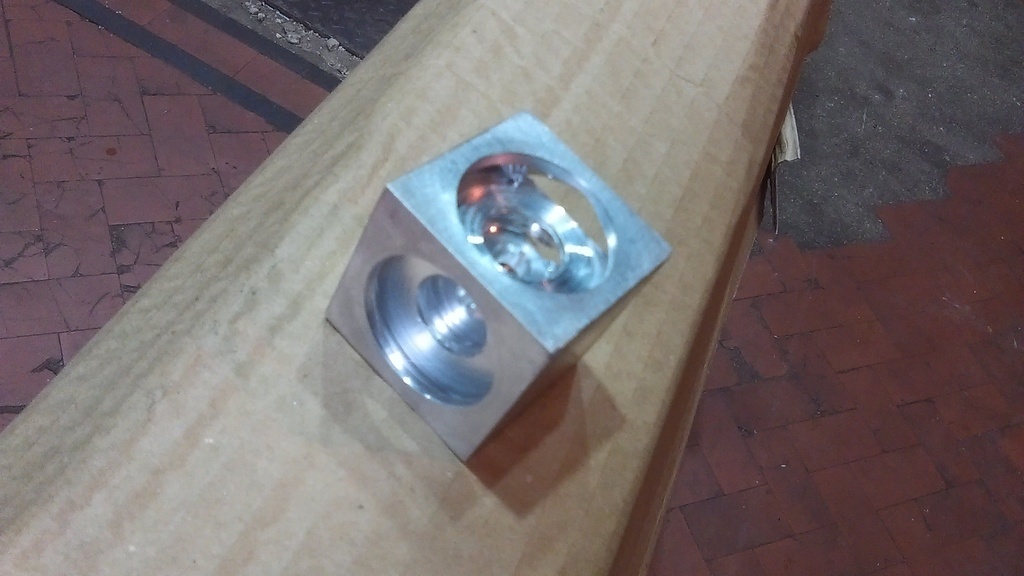  Centre cube is looking squarer than the previous attempt as I'm getting a bit more accurate at cutting. |
| |
|
|
ChrisT
Club Retro Rides Member
Posts: 1,635
Club RR Member Number: 225
|
|
Nov 15, 2020 14:33:21 GMT
|
That's five faces done now...... 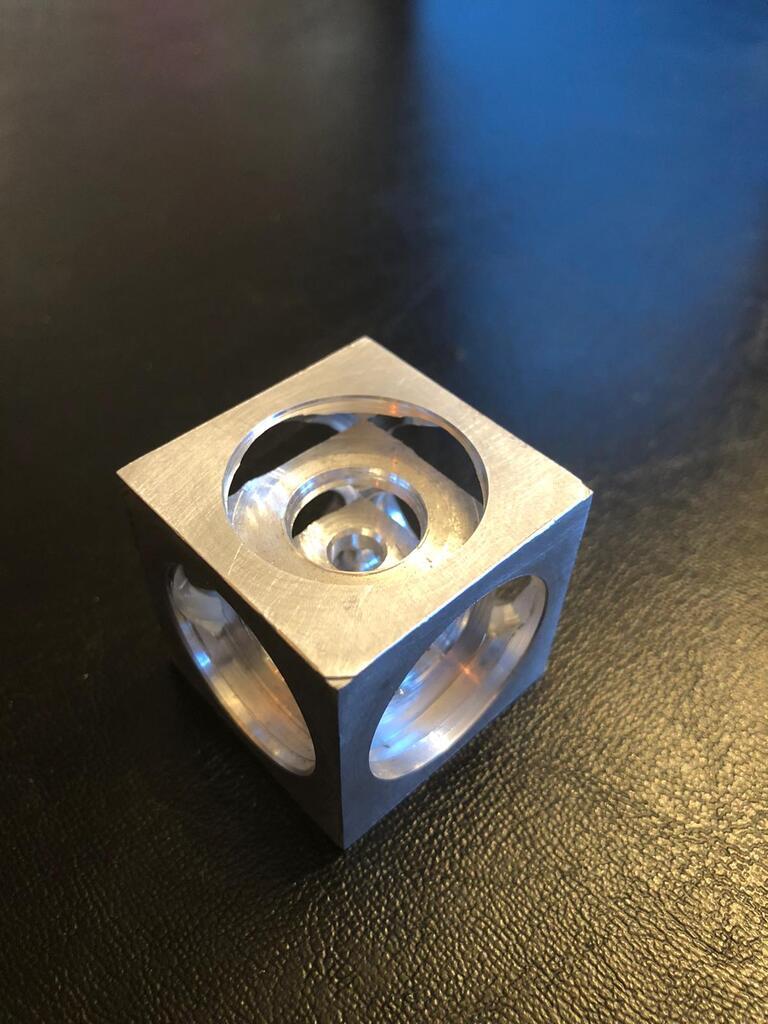 These hi-res pictures really show up the faults, I made a slight miscalculation on the first cut hence the two corners with little cut outs, will address them when finished.  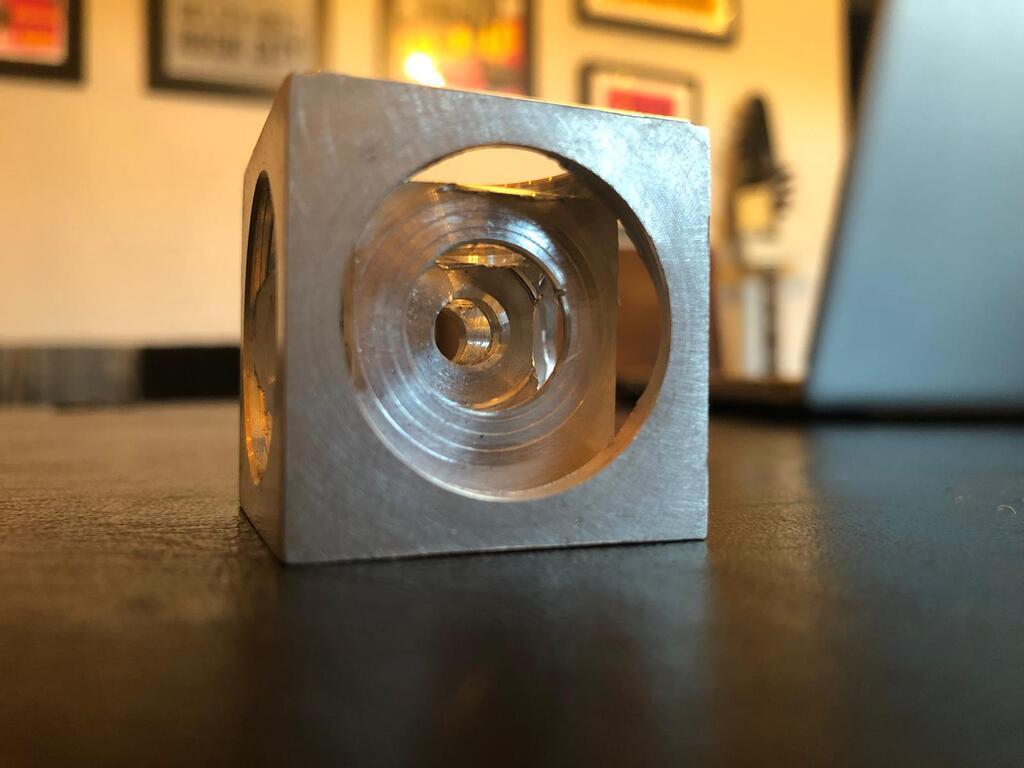 Last face needs a bit of preparation before cutting as the inner cubes should come lose on final under-cut and you don't want them bouncing about inside with the lathe spinning and a cutting tool in there. Other guides suggest filling with hot glue to keep them in place or doing the last bit of the cut at a very slow speed and shutting the lathe off quickly but I opted for putting a bolt and washers/spacers through to keep everything from moving, seemed to work last time, although the bigger inner cube didn't actually free itself and had to be gently broken out with a flat blade screwdriver. |
| |
Last Edit: Nov 15, 2020 14:36:06 GMT by ChrisT
|
|
ChrisT
Club Retro Rides Member
Posts: 1,635
Club RR Member Number: 225
|
|
|
|
Just realized I never got round to finishing this thread, cube's been done since before xmas. Turned out slightly better than first attempt but still not perfect, one of the faces on the inner cube has been cut a little too deep, can be seen in the last photos of the previous post, but at least it doesn't fall out as before. Back to my old phone camera so not the best pictures.... 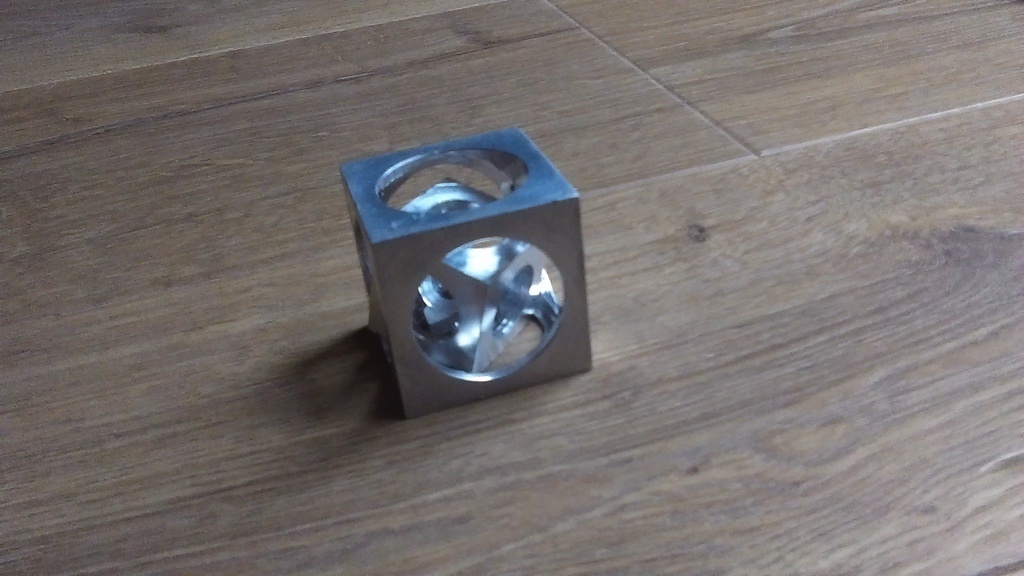 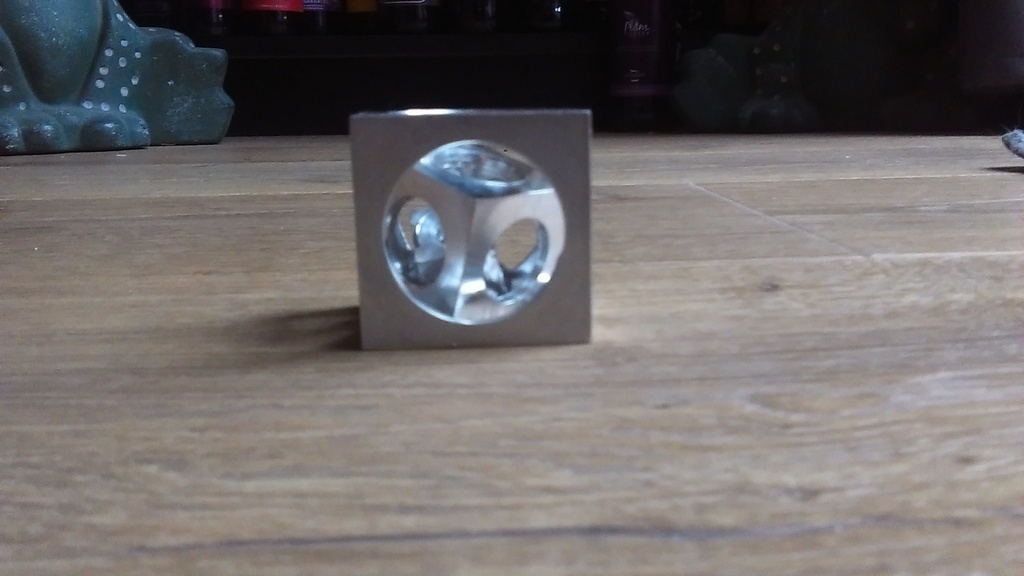 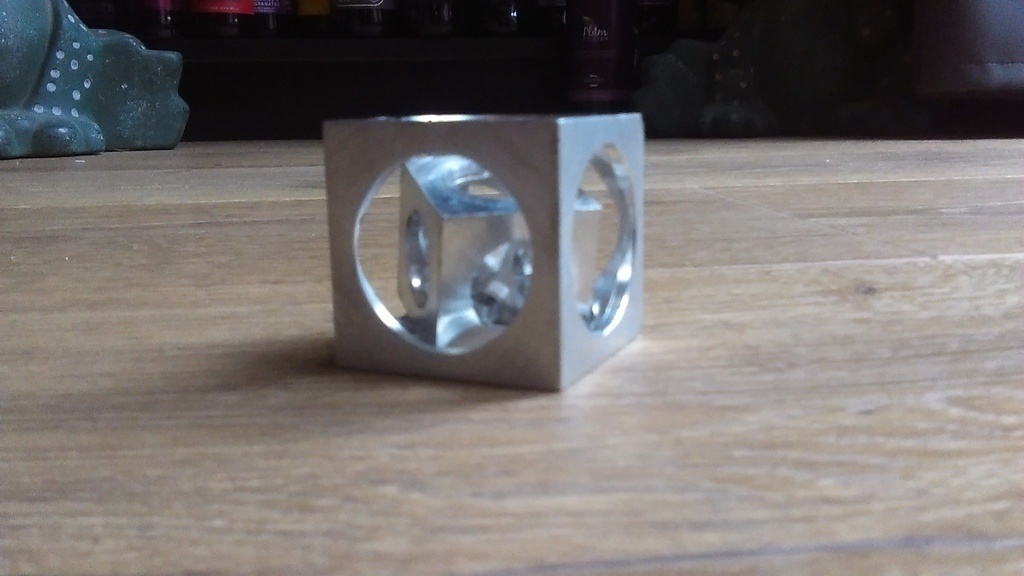 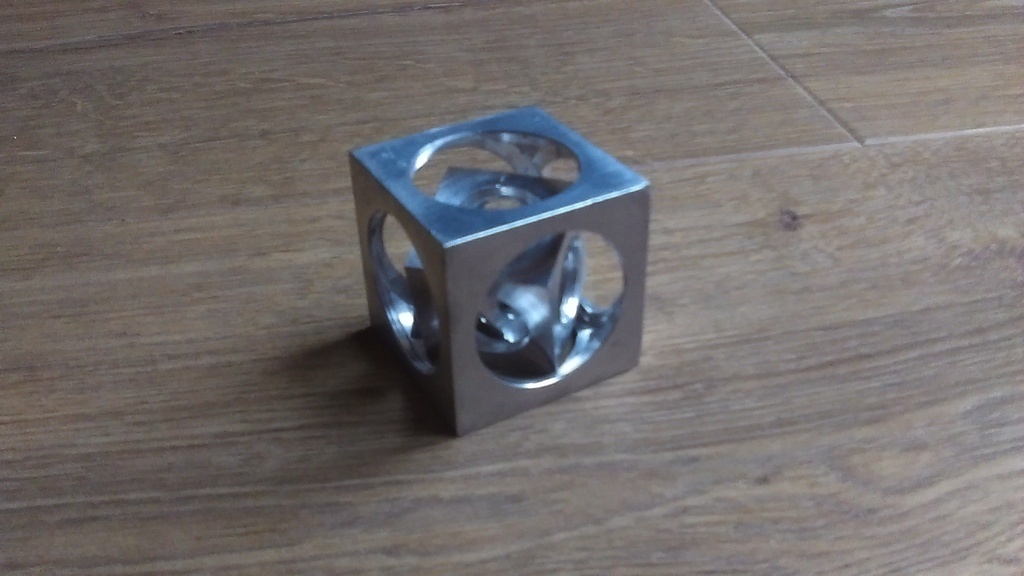 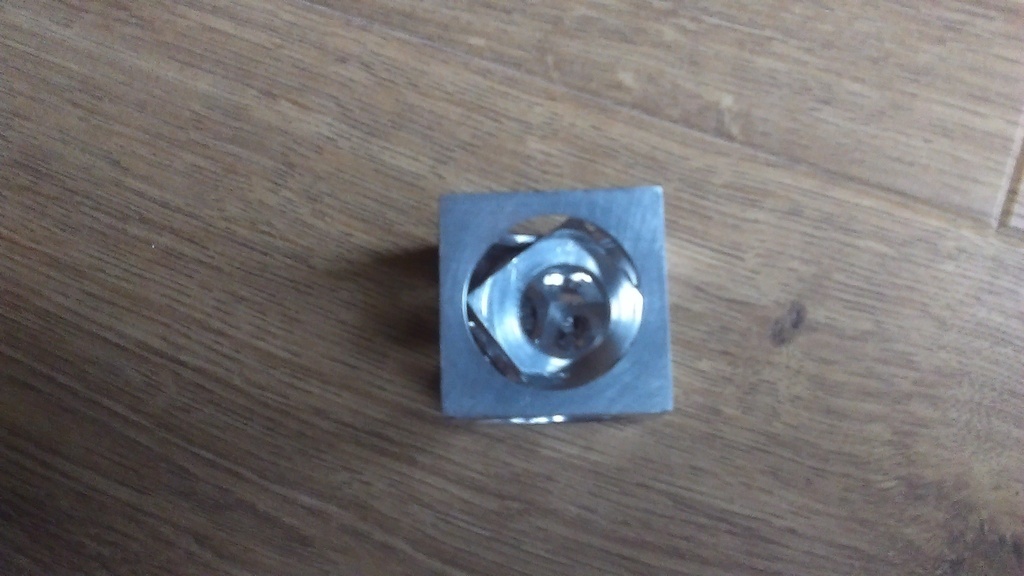 I've learnt a lot about using a lathe while making this so whatever the outcome the gained knowledge is worth it. We've got an old fly press in the workshop now so I think it's time to get to grips with that and make up some tooling for it... |
| |
|
|
|
|
|
|
|
|
Thats very cool, even after watching the video I'm still struggling to understand how it was done!
|
| |
|
|
ChrisT
Club Retro Rides Member
Posts: 1,635
Club RR Member Number: 225
|
|
|
|
Thats very cool, even after watching the video I'm still struggling to understand how it was done! Thanks, yeah, I didn't really either, until I got a few faces done and could see the inner cubes forming. |
| |
|
|
gib
Part of things
Posts: 163
|
|
Feb 12, 2021 21:47:51 GMT
|
|
Bit late to party but when I did my apprenticeship many moons ago. Once you had the basic cube which had to pass both size and surface finish. The next step was about loading and unloading a 3 jaw and 4 jaw and then how and why you centralise work and clamping work off centre. But saying that I can appreciate the time saved clamping it in a split tube.
|
| |
|
|
|
|
|
|
|
I wasn't going to say anything on this subject until I found the proof and here it is one of my early attempts a long time ago  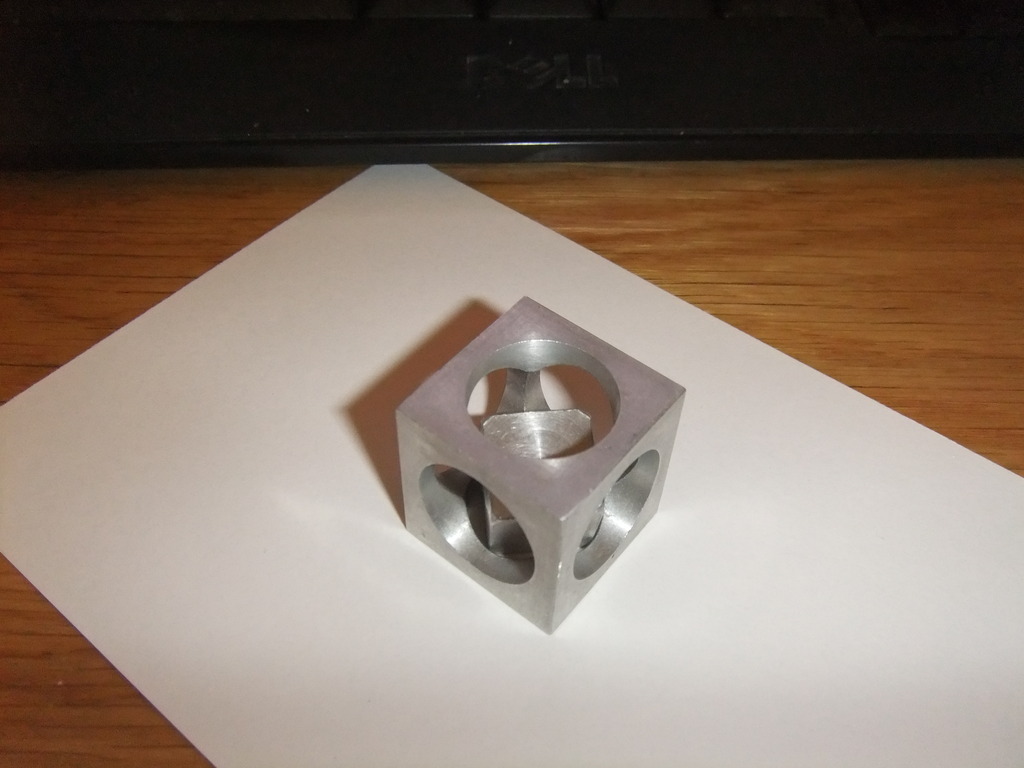 I found it yesterday hiding in a box of Hotwheels motorcycles, what the hell it was doing in there I'll never figure out 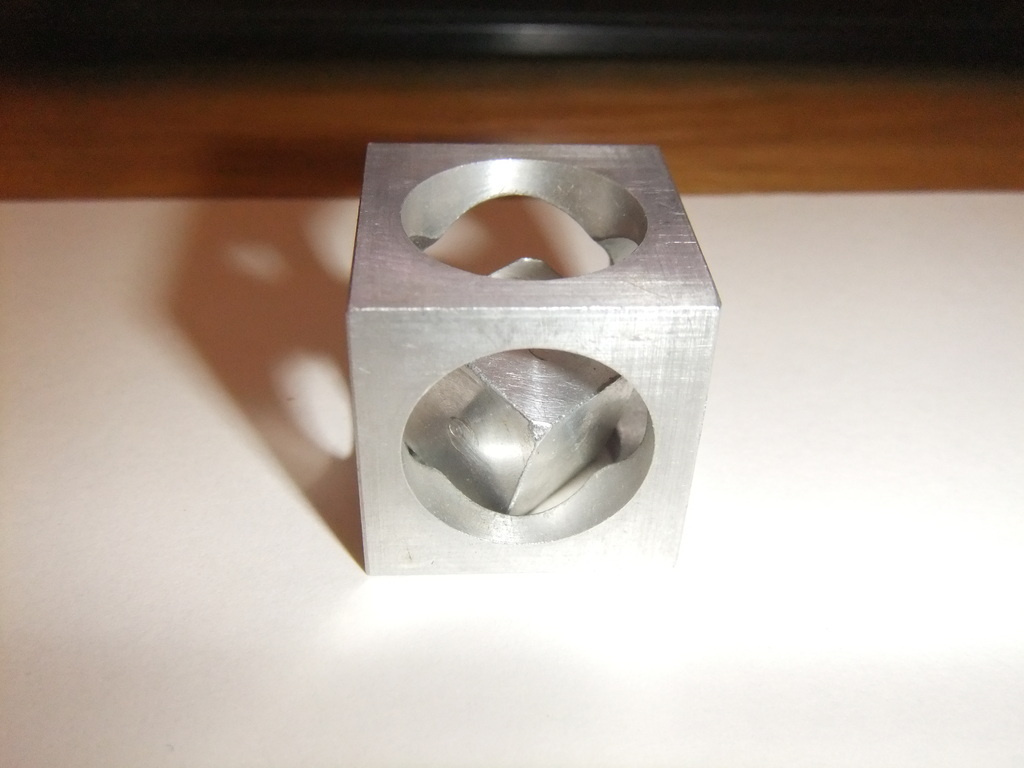 I did this one nearly 50 years ago during my apprenticeship at Hawker Siddeley , Chadderton before it became BAe I seem to remember doing a few at the time but gave the others away to mates, I'm glad I kept one  |
| |
|
|
|
|


