|
|
|
Jun 28, 2019 18:47:34 GMT
|
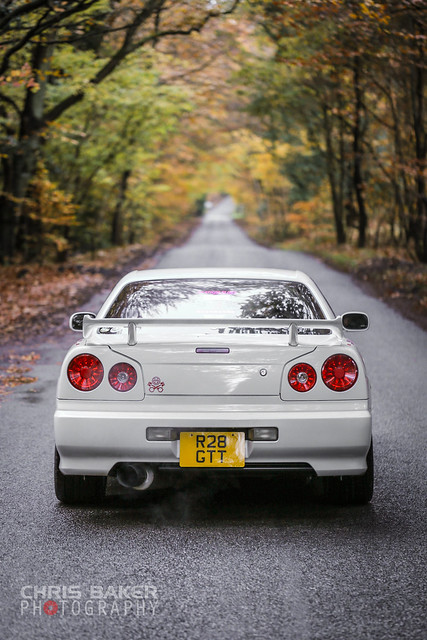
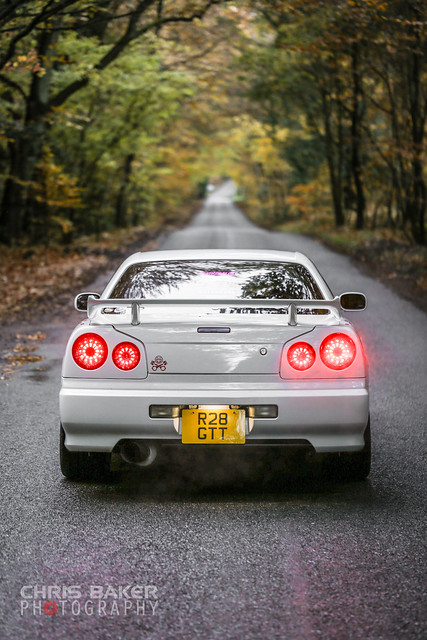
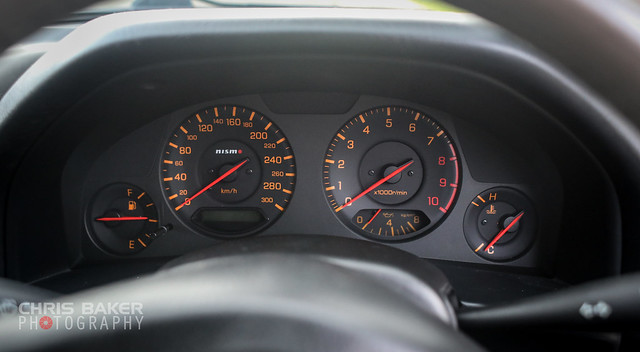
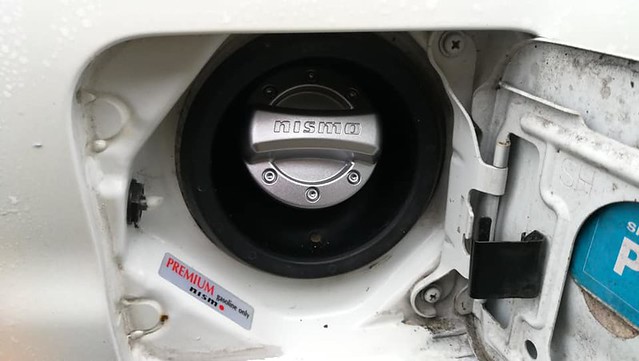
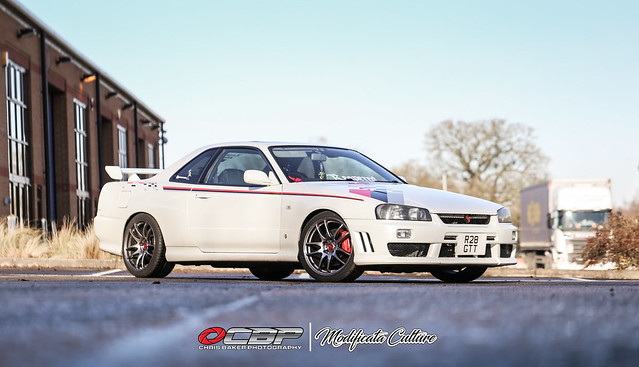
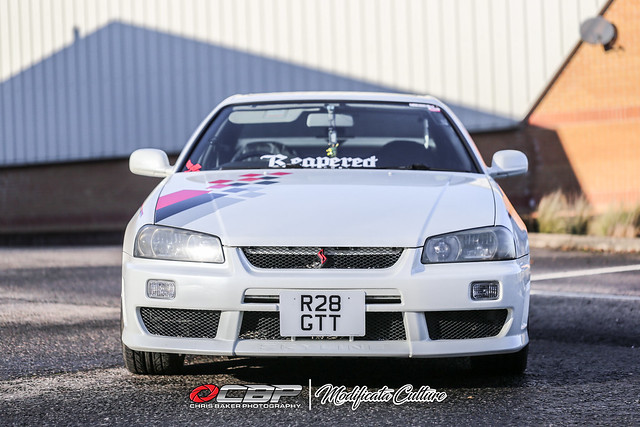
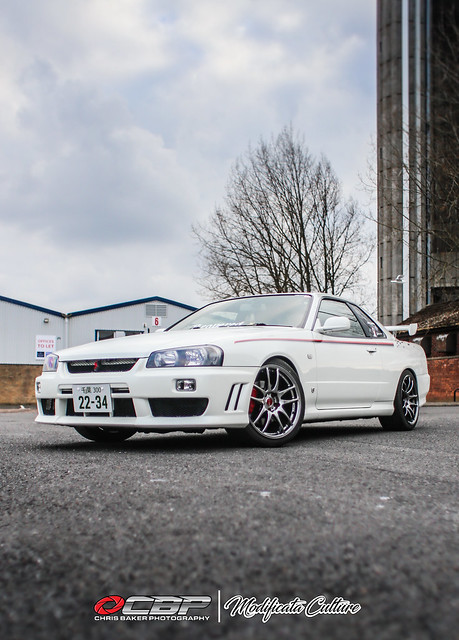
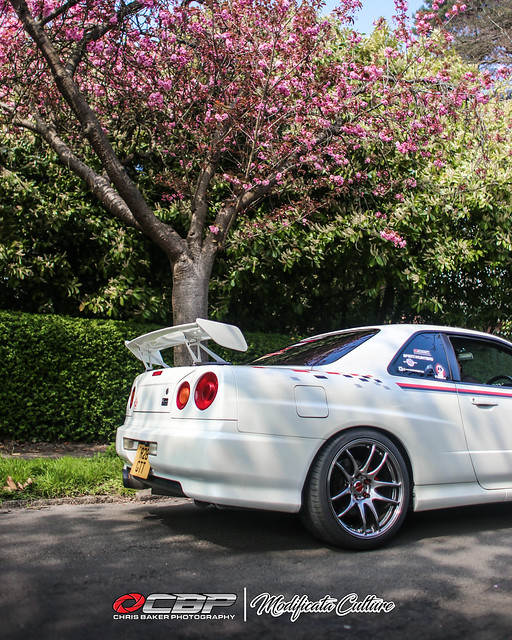
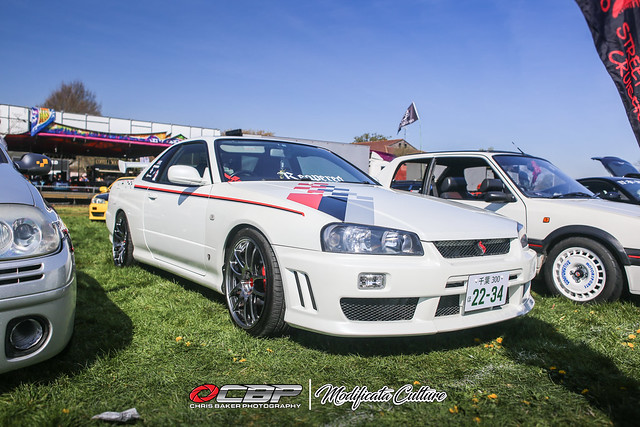
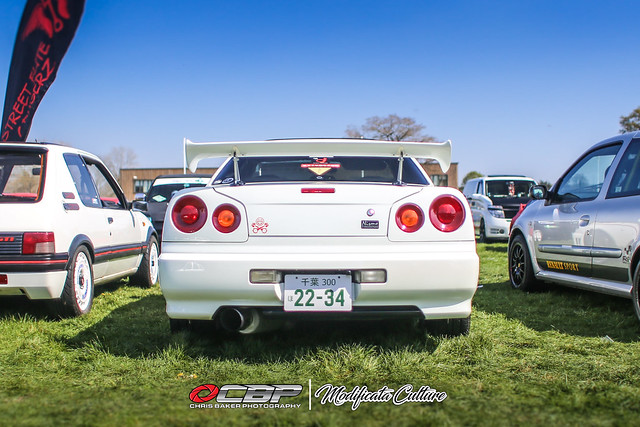
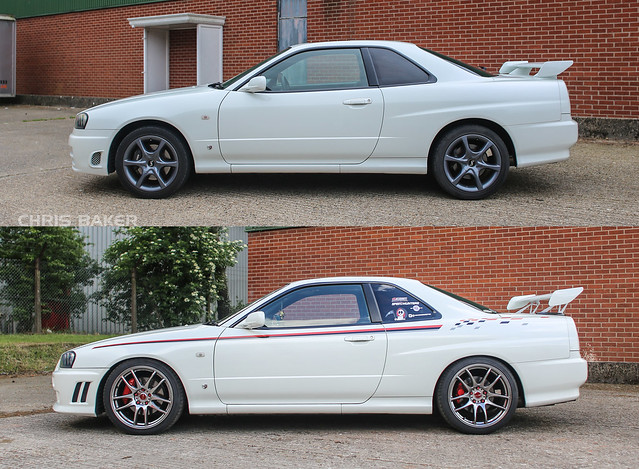
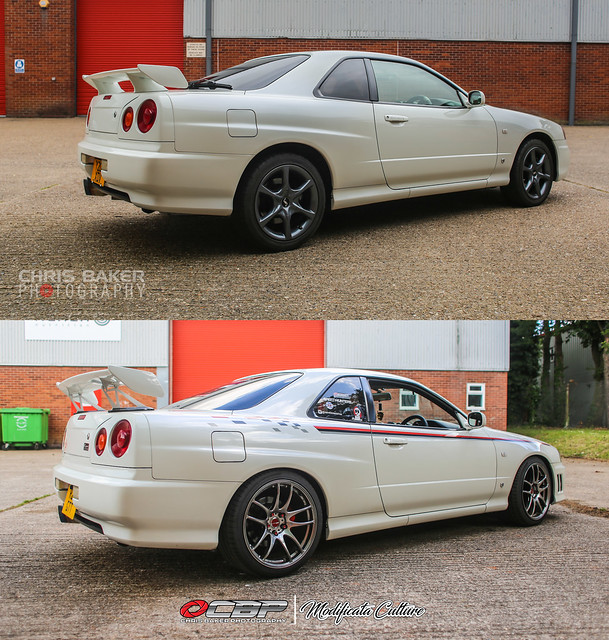
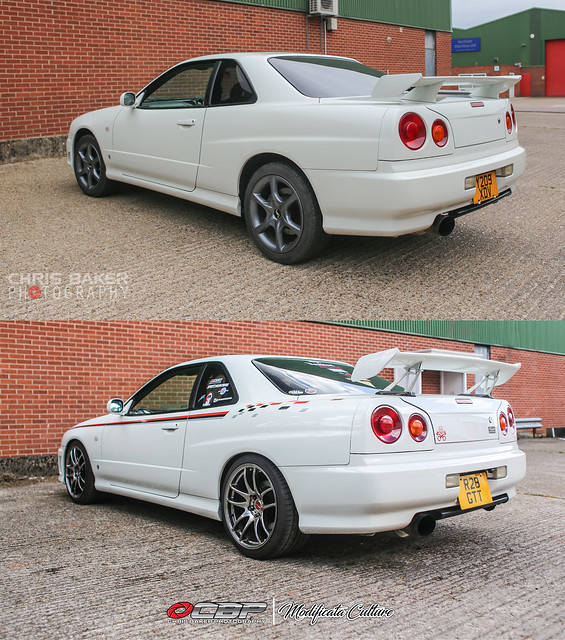
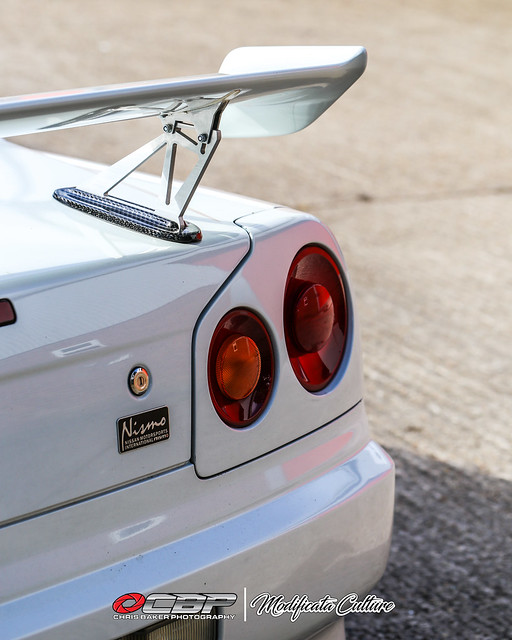
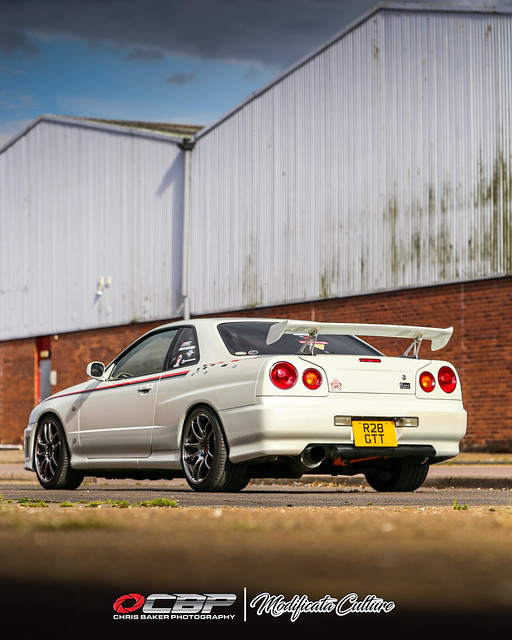
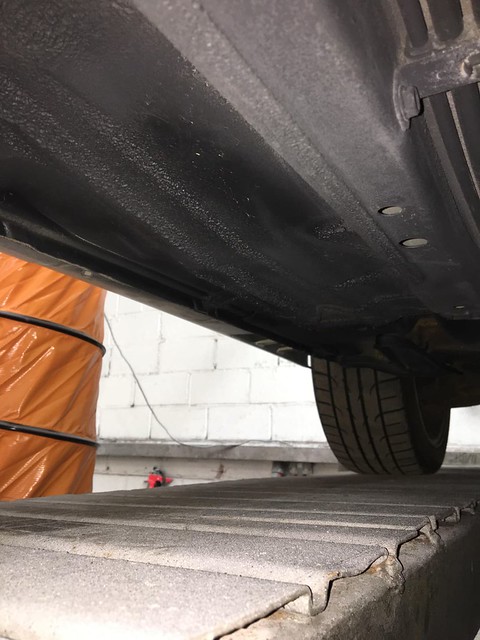
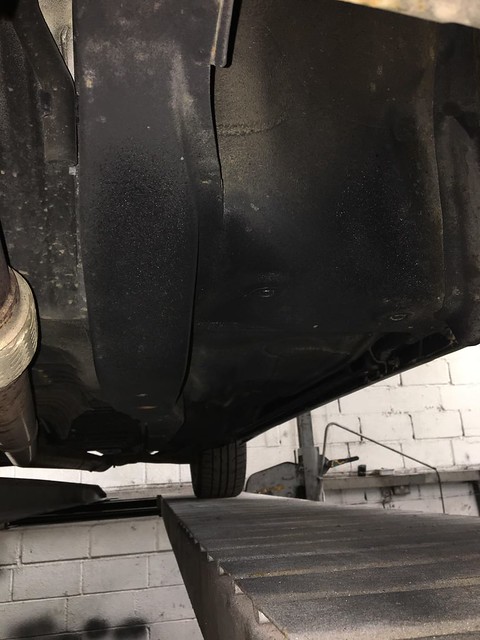
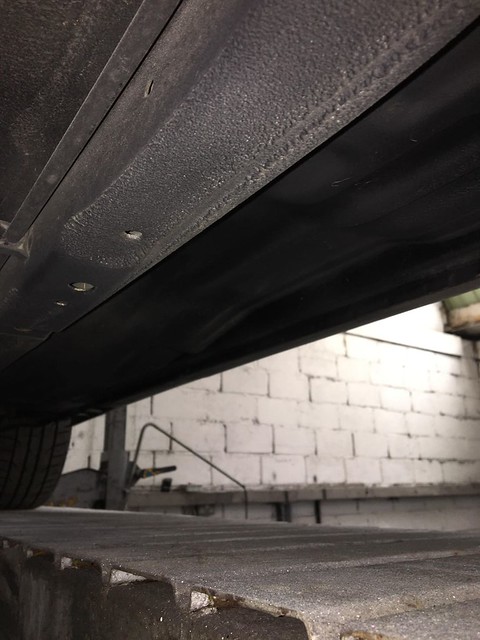
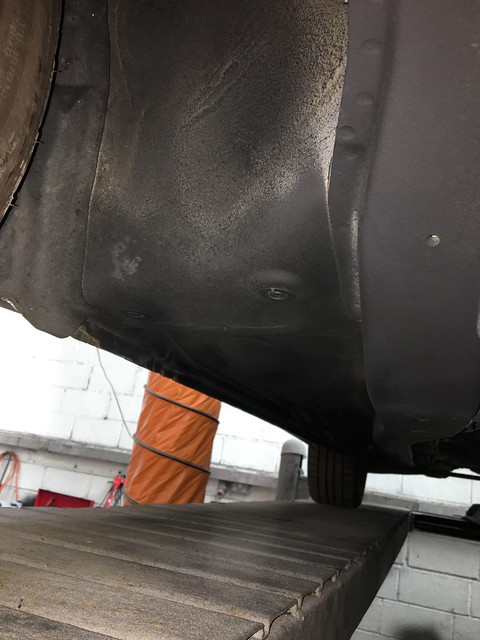
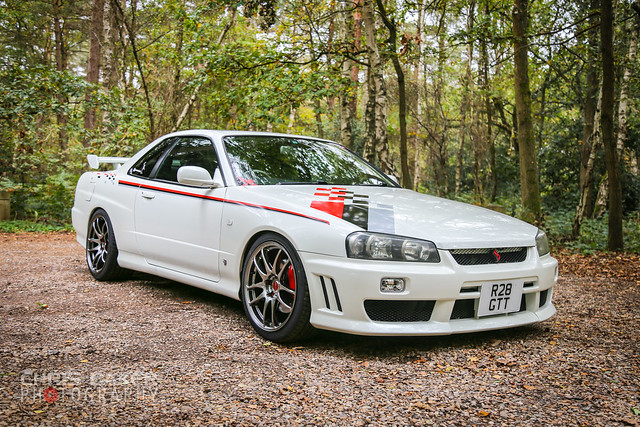
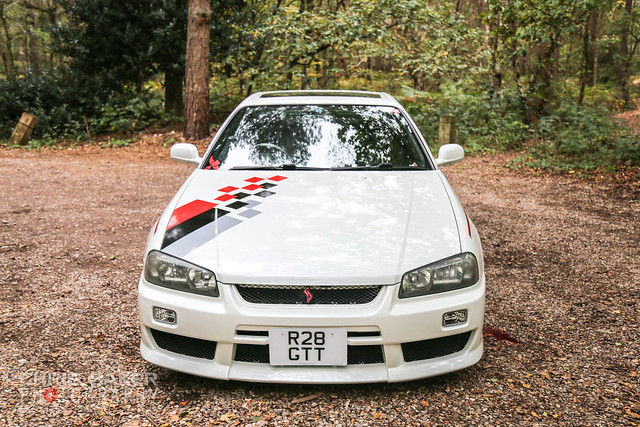
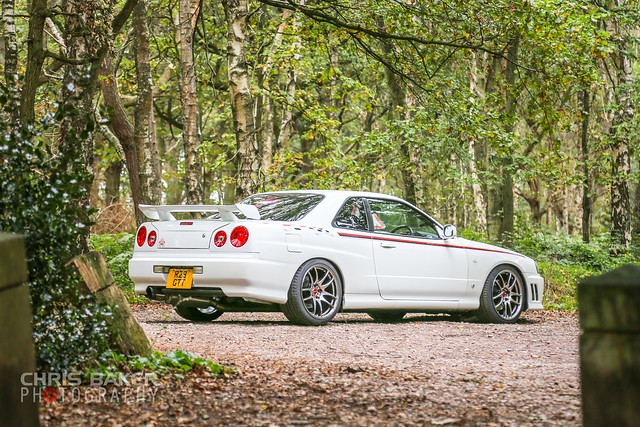
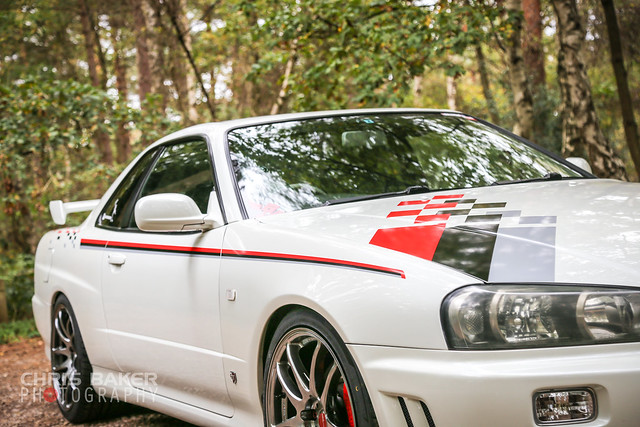
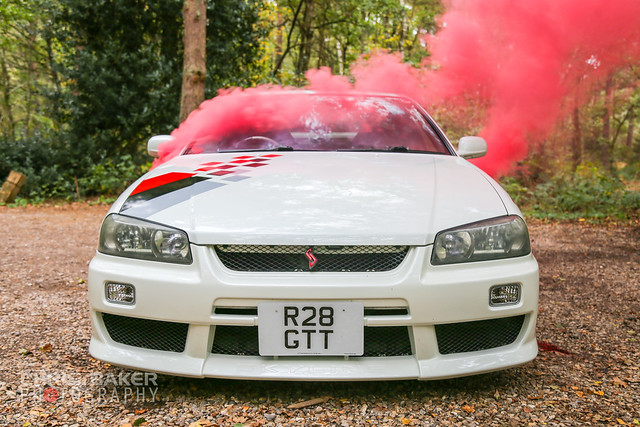
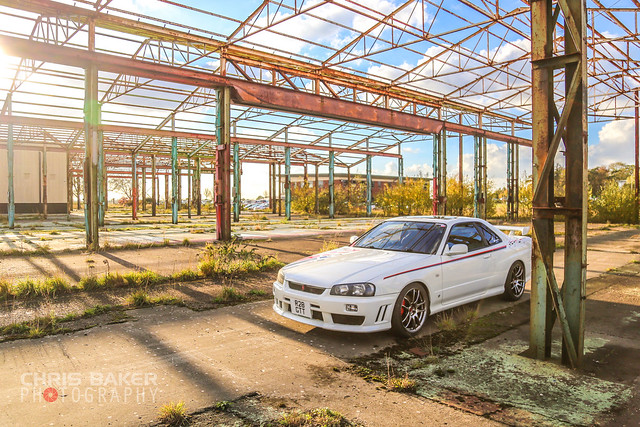
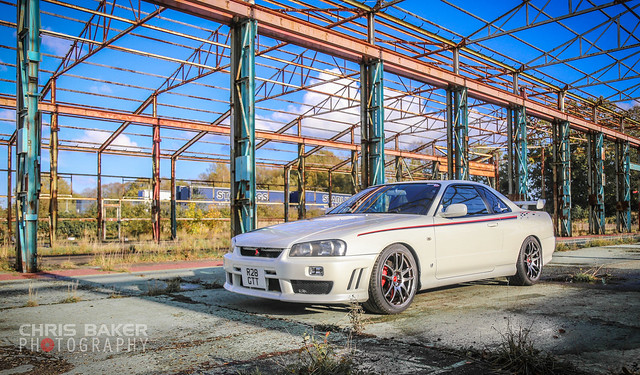
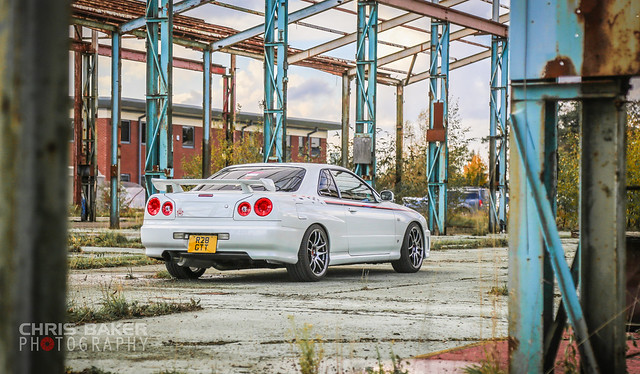
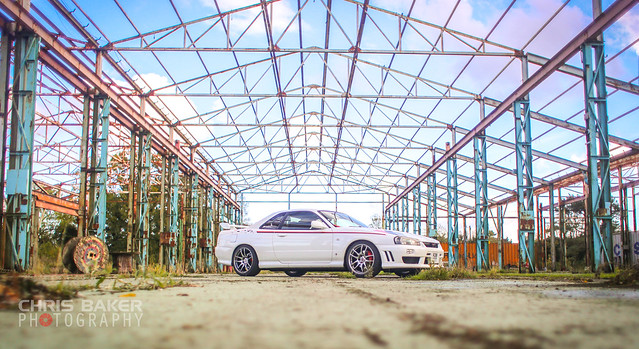
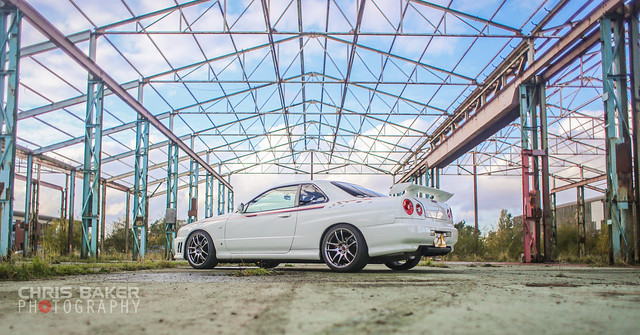
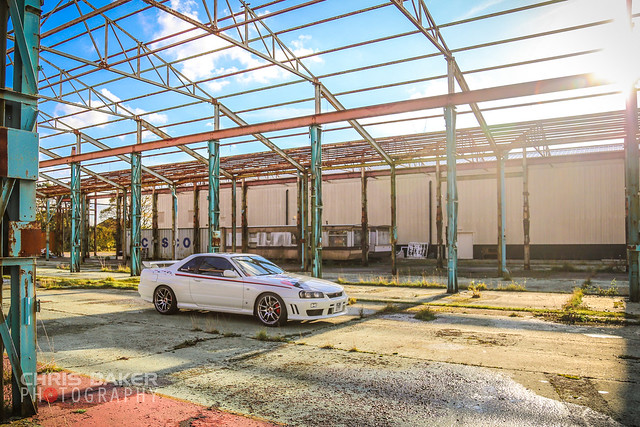
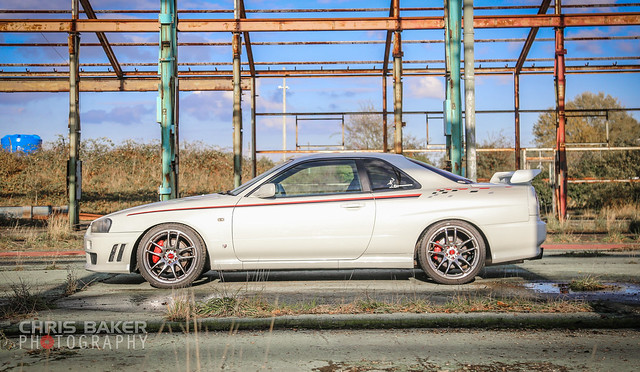
Firstly I would like to apologise if 2001 isn't classed as retro, but these were first manufactured in 1998 so it guess it counts? ** LONG READ ** Some may remember my Supercharged MX5 that I built over a space of 5 years. The car went through several phases/looks, some may argue I ruined the car. I saw it more as a development of style and to push the boundaries of what I was able to do. This is very cliche, but I think most who are of similar age will (hopefully) relate. Growing up with video games such as Gran Turismo and Need for Speed, a particular car of the late 90s grabbed everyone's attention, the Nissan Skyline R34 GTR. With The Fast and The Furious movies making a huge impact aswell, the car became a dream for many many people. Fast forward almost 2 decades and the prices of these cars have rocketed, almost to the point of being unattainable. In 2023 when the R34 becomes legal to import into the US, I've got a strong feeling the market will either dry up or prices will rise even higher. The MX5 was a really fun project and I learnt alot about mechanics,auto electrics and thinking outside the box. Unfortunately for me to be 'happy' with the car (we're never really 100% happy are we?) it needed alot more money throwing at it. The front end needed a repair/repaint for the third time, engine bay needed repainting and the spare engine chucked in. Thats without the cost of a new clutch & flywheel, powder coating of parts etc So I cut my loses and broke the car for parts in September when the insurance and MOT expired. The plan was to gather as much money as possible and then search for a car, whether that's already on UK soil or imported. But things never go the way you want.... I announced the decision in May and of course in the mean time I was doing my research on which chassis is best, engine specs and parts available. Trawling through the typical UK selling sites there wasn't anything that ticked all the boxes. I reached out to a very well known importing company called Torque GT to start the Import process. After a couple of weeks of browsing through the Japanese auctions and getting my head around grades and what meant what, I hadn't found my ideal dream car (I understand this process can take weeks,even months!) While I was waiting for the weekend the pass and Monday's auction listings to go online I carried on the search in the UK, this particular white R34 kept appearing, but something didn't seem right... It had the correct engine with a manual transmission, it looked bone stock and quite clean in the photos. I contacted the seller and answered the questions I was bursting to ask. I requested some photos of the underneath and wheel arches to which he supplied me with the following day. The next day (Sunday 17th June) we were due to attend a car show, instead we skipped that and travelled 3.5hrs to go view the car. Everything was correct and the car was as clean underneath as it was on top. On the test drive there was a knocking from the rear driver side, I managed to get him down on the price thinking it'll be a knackered shock absorber or strut mount. The knocking ended up being the boot spoiler not bolted down on one side! The money was transfered over and I was the new owner of an R34 GTT! All I could put it down to not selling was the facelift front bumper (perhaps because it doesn't look like a Skyline?) Nissan Skyline R34 GTT Series 2 RB25DET NEO 6 Manual Transmission Approx 96k Miles (speedo still in Khm) Imported in 2016 by IBE Cars in Huddersfield Resprayed in original QX1 Pearl White in 2017 Stock except custom de-cat exhaust and HKS air filter 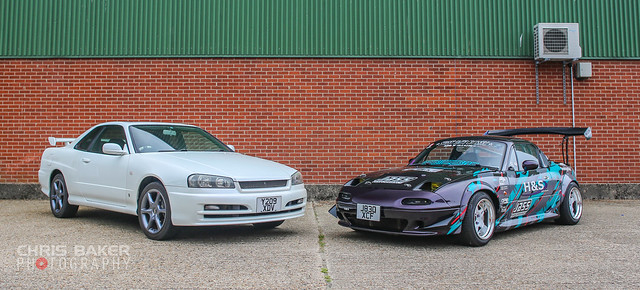  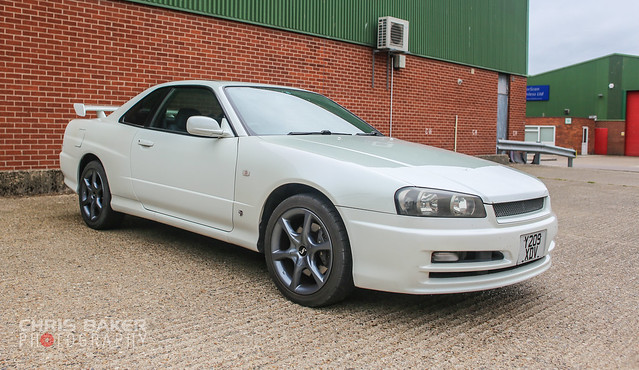 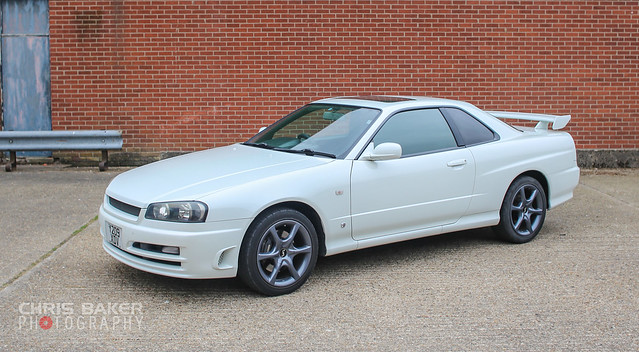 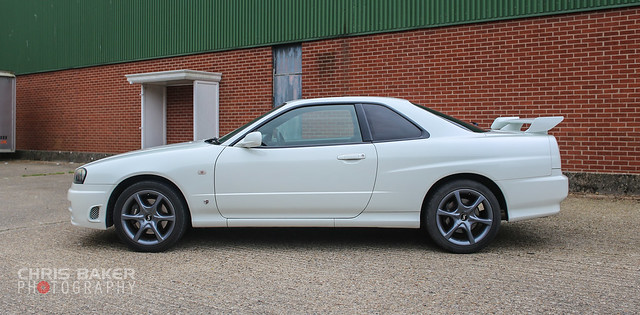 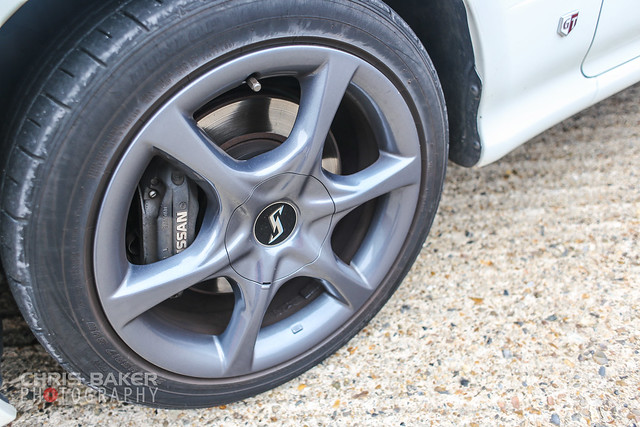 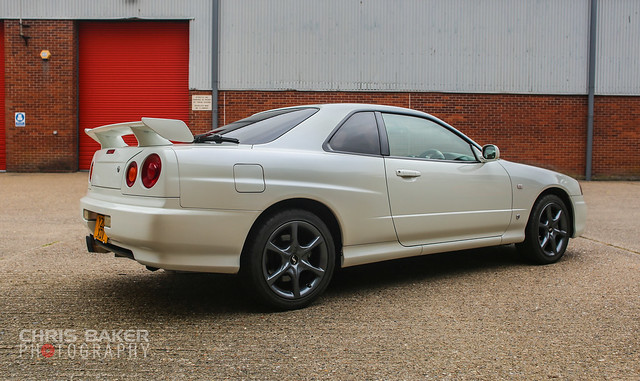  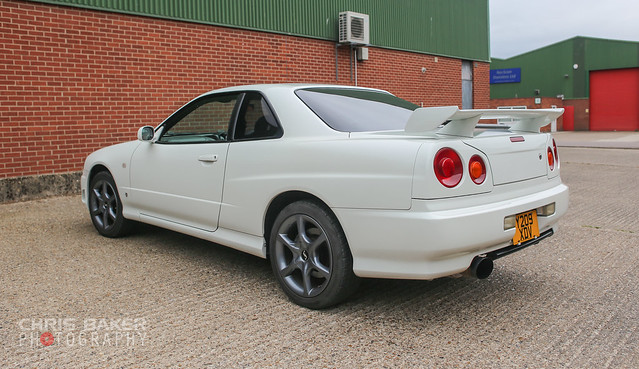 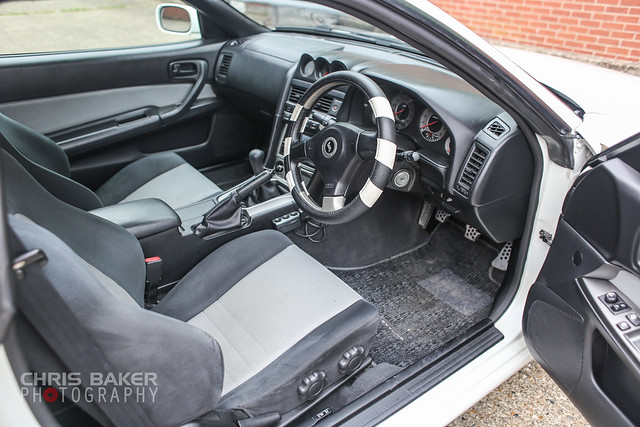 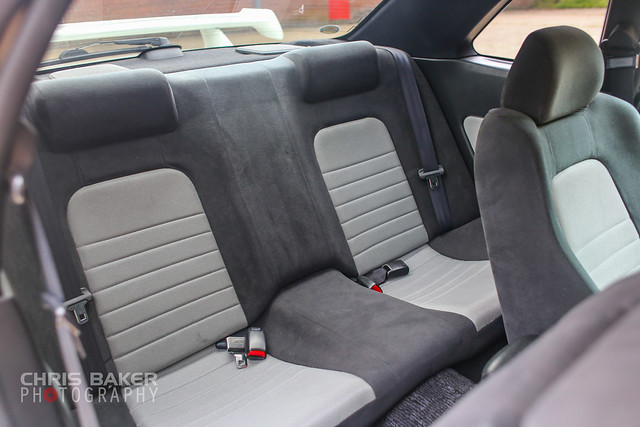 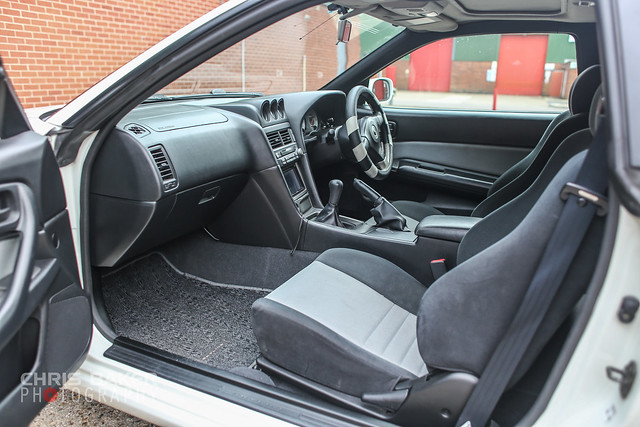 |
| |
|
|
|
|
|
|
|
Jun 28, 2019 18:54:37 GMT
|
|
|
| |
|
|
|
|
|
Jun 28, 2019 19:02:55 GMT
|
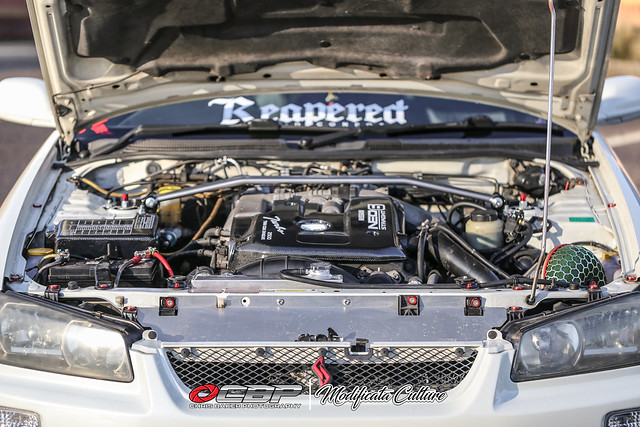
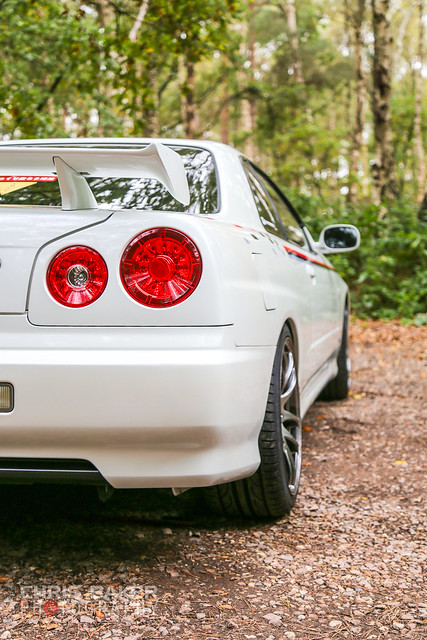
Fast track a couple of months and the following has been done H&S Performance in Norwich have always taken care of my cars so the Skyline was no exception. Oil Change Spark Plugs Fuel Filter Japspeed Radiator Thermostat Drive Belts Cambelt & Tensioners Waterpump Coolant change Gearbox Oil change Diff Oil change Brake Fluid change Meister R Zeta CRD Coilovers Shorter front drop links Wheel arches and suspension turrets undersealed 17" A-Tech Monoblock Alloys refurbed and powdercoated in Bronze,tyres swapped over from original wheel Full alignment OEM Side repeaters re-tangoed HKS SSQV Blow off Valve fitted Calipers painted red Replacement OEM steering wheel sourced from Japan LED Tail Lights 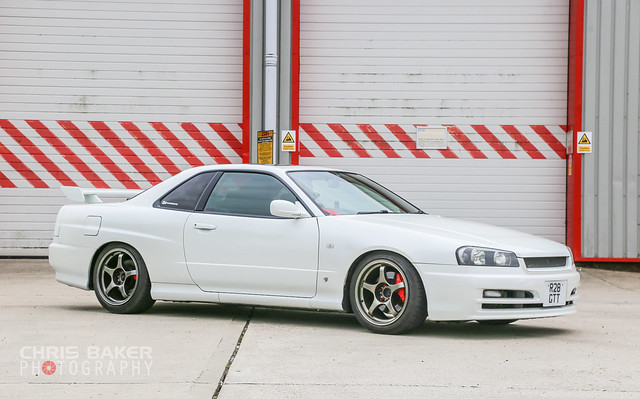 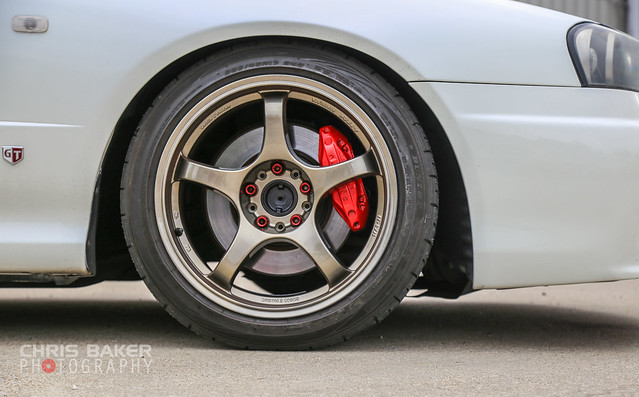 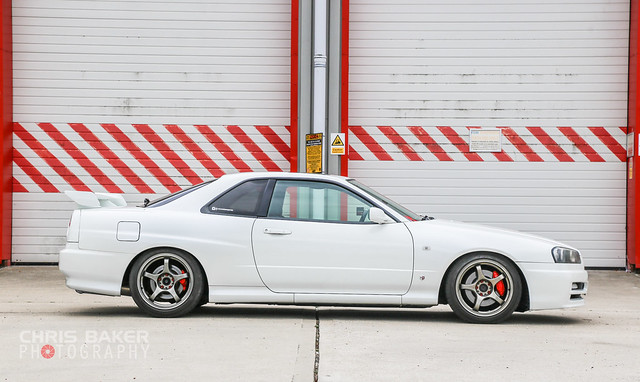 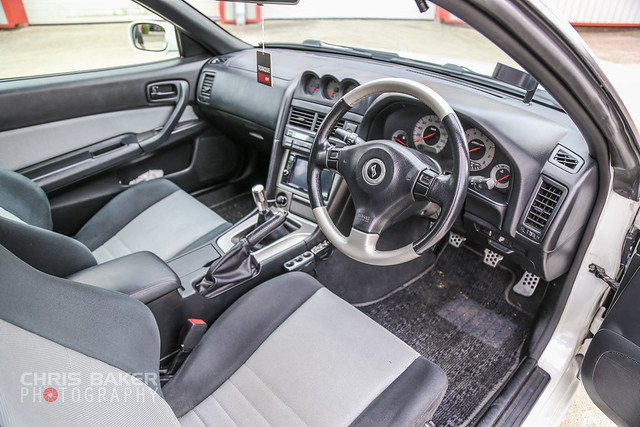 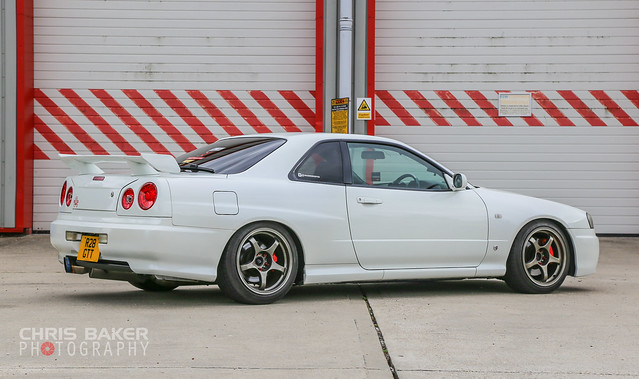 |
| |
|
|
|
|
|
Jun 28, 2019 19:09:08 GMT
|
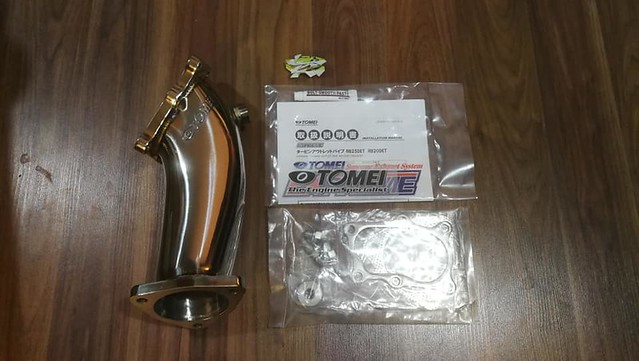
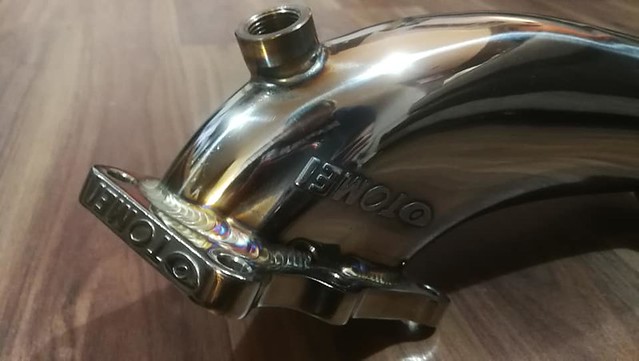
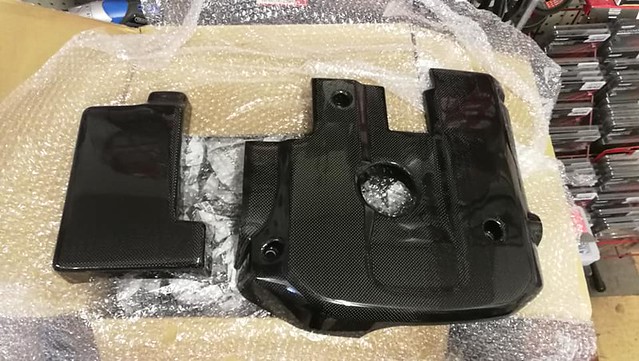
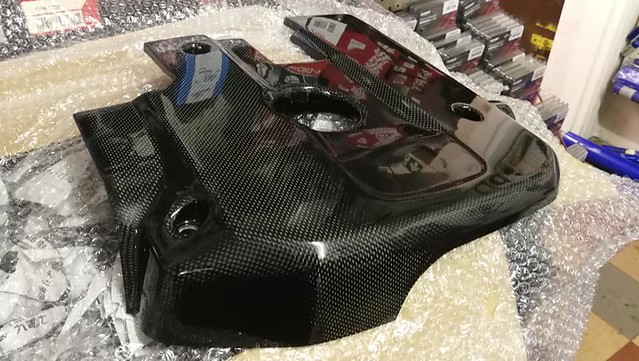
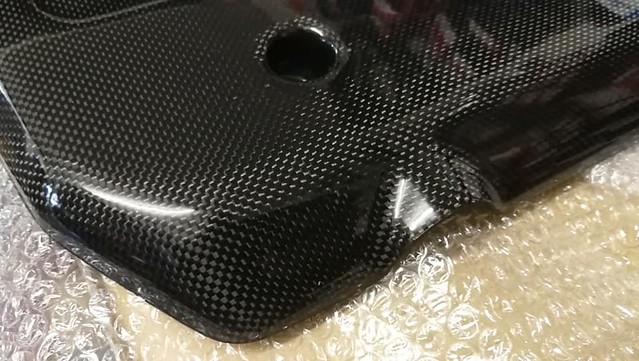
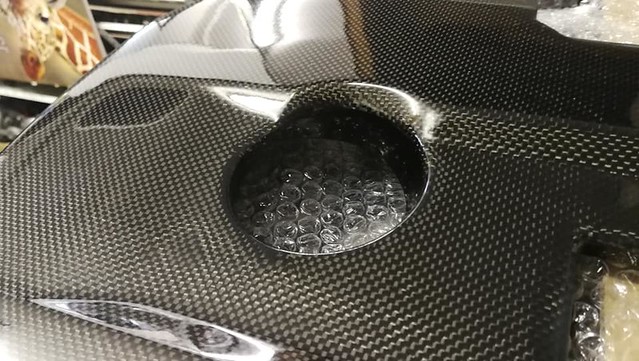
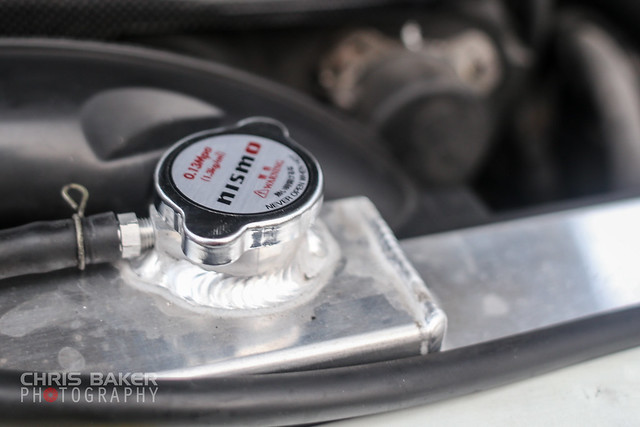
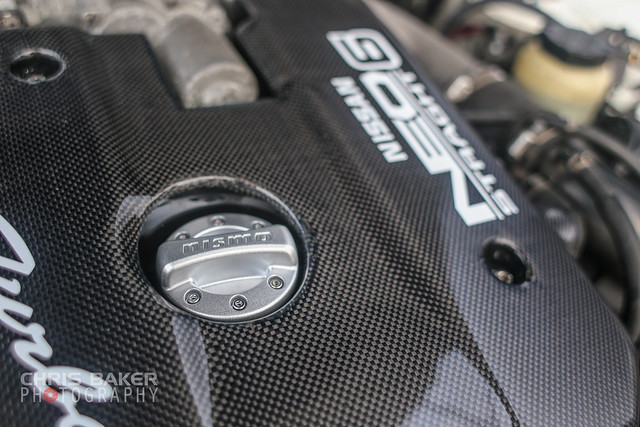
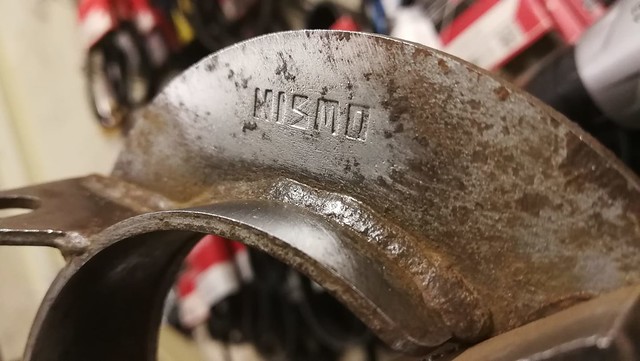
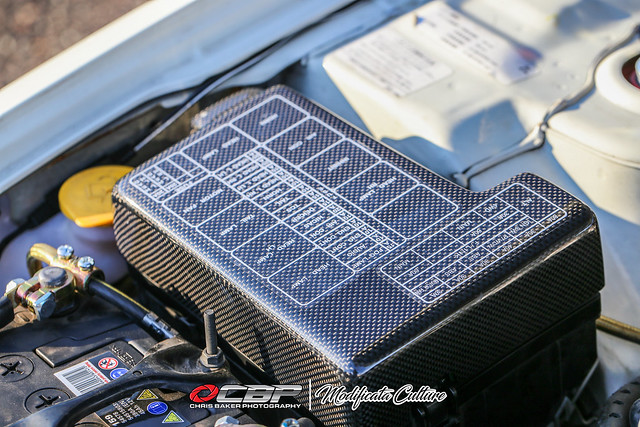
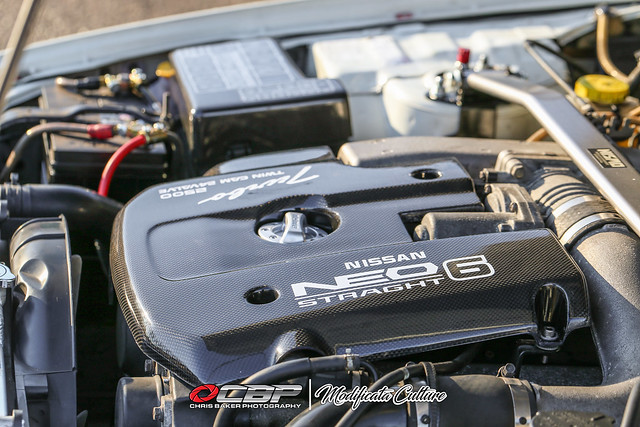
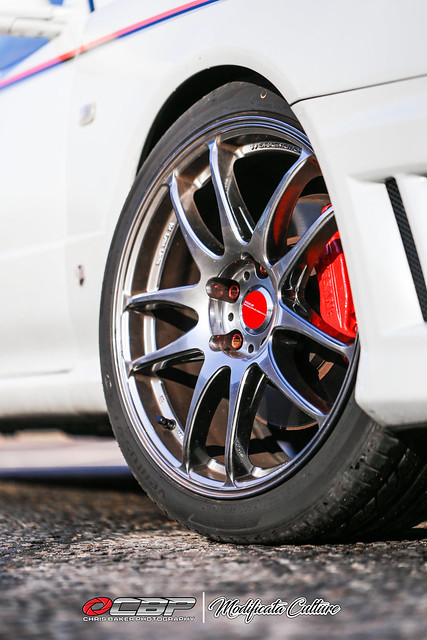
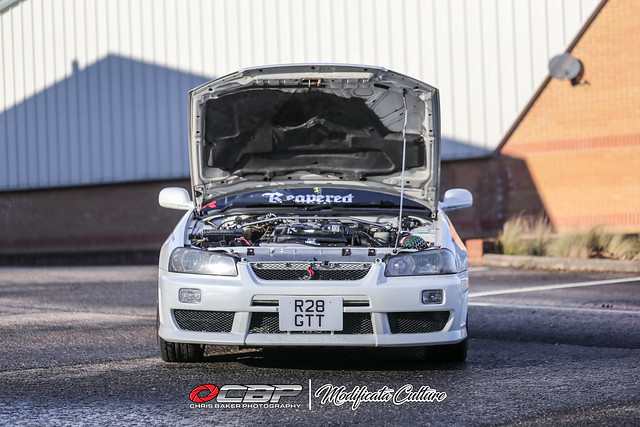
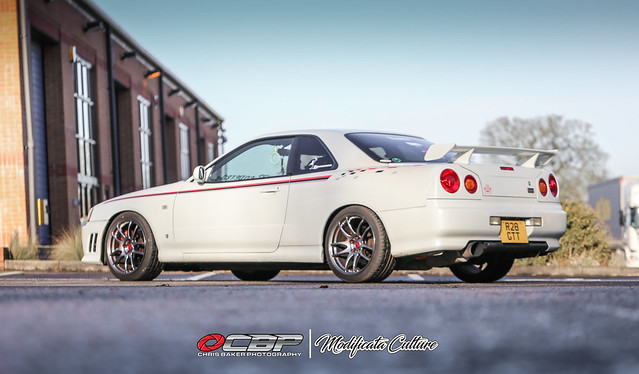
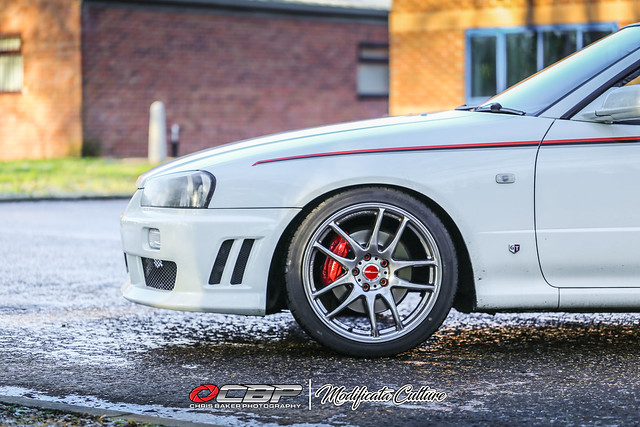
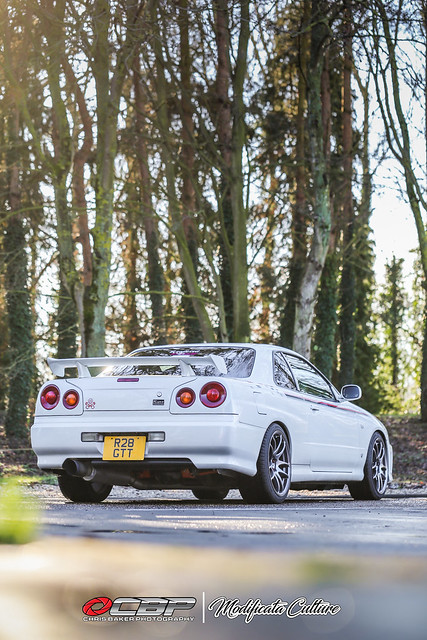
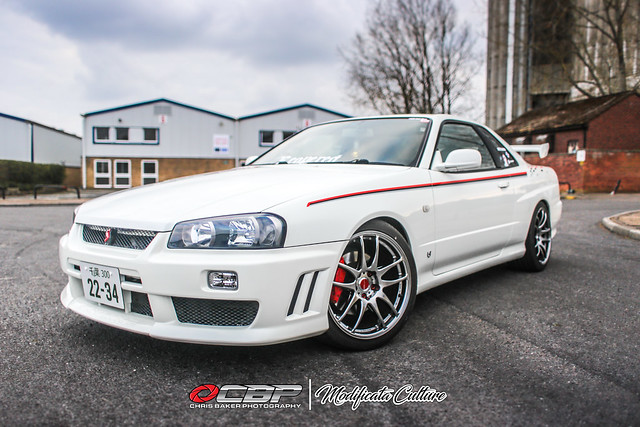
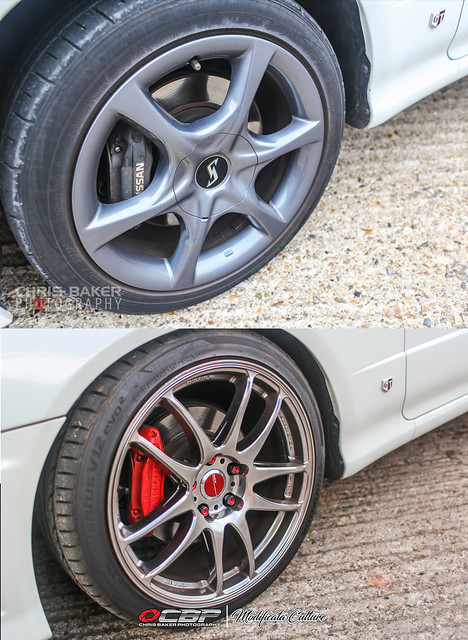
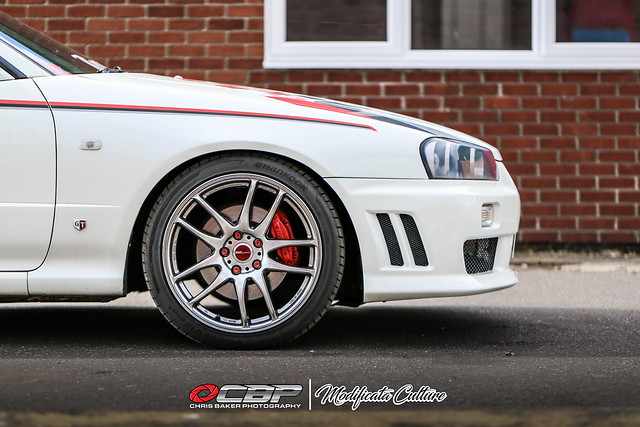
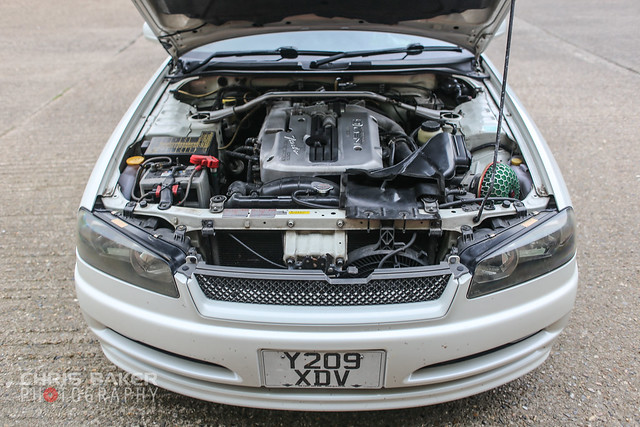
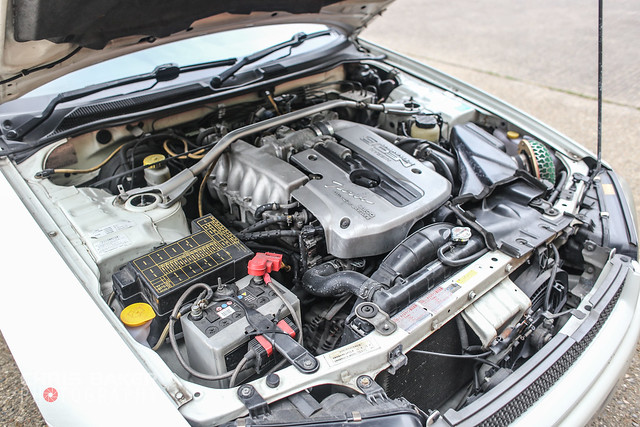
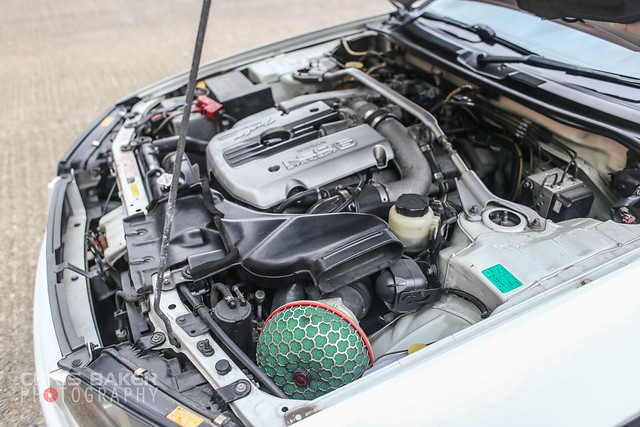
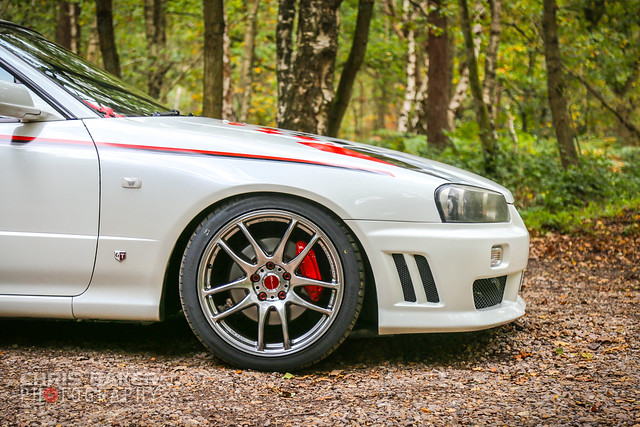
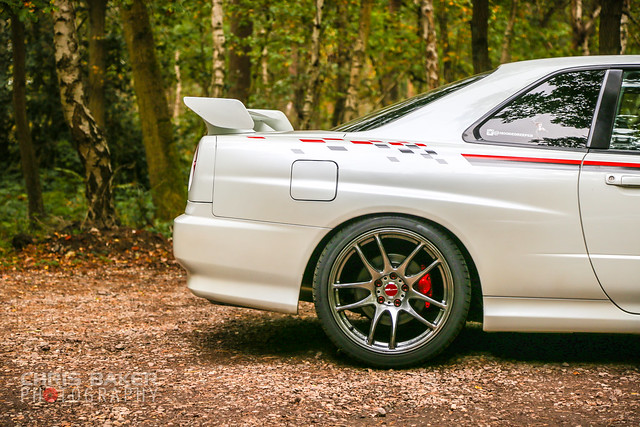
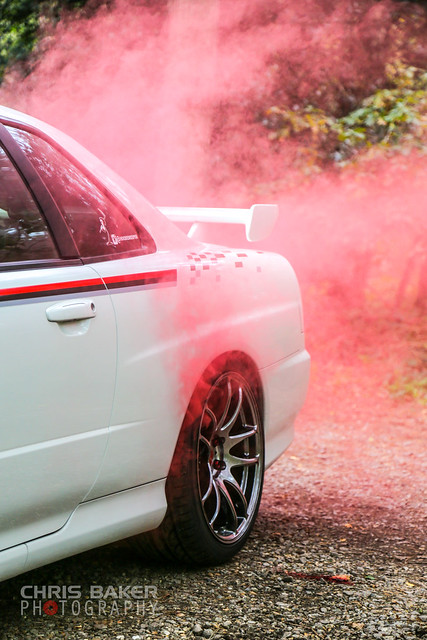
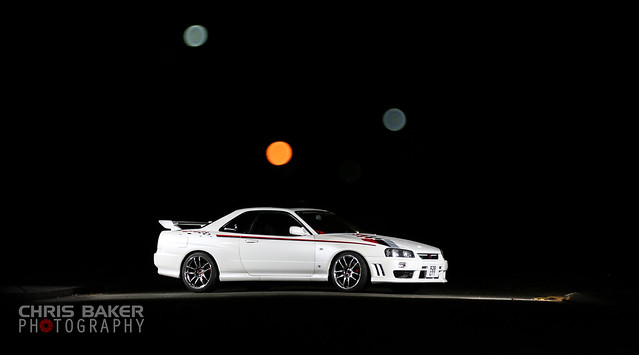
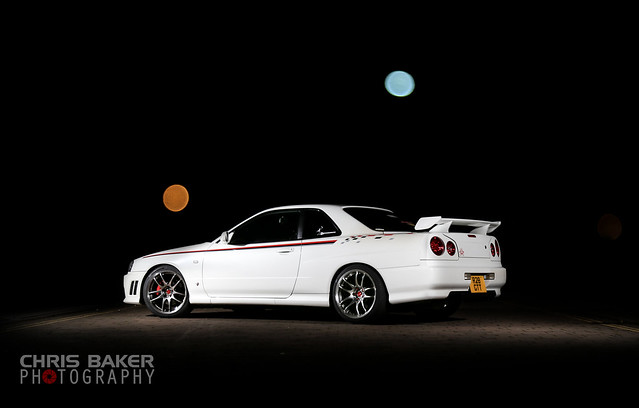
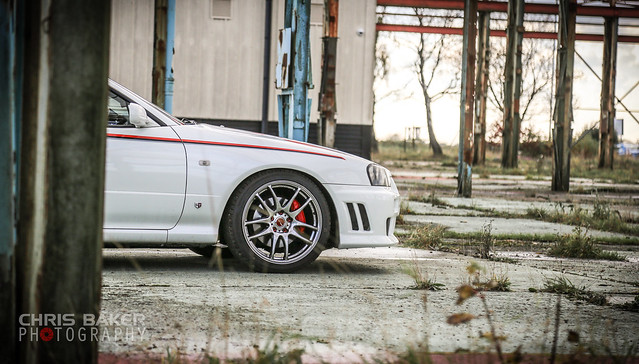
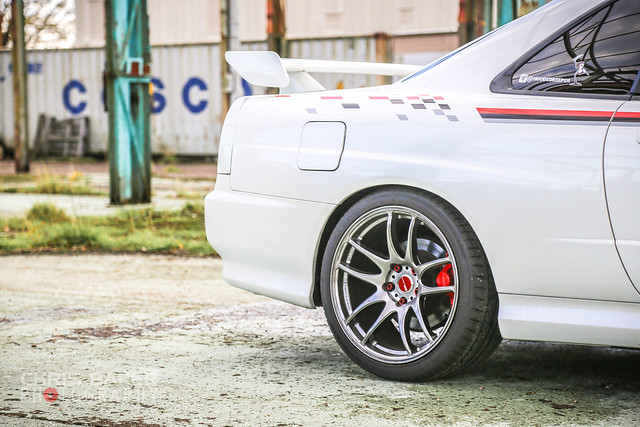
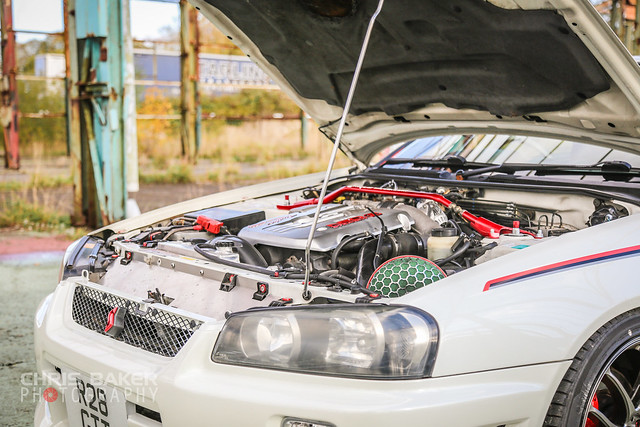
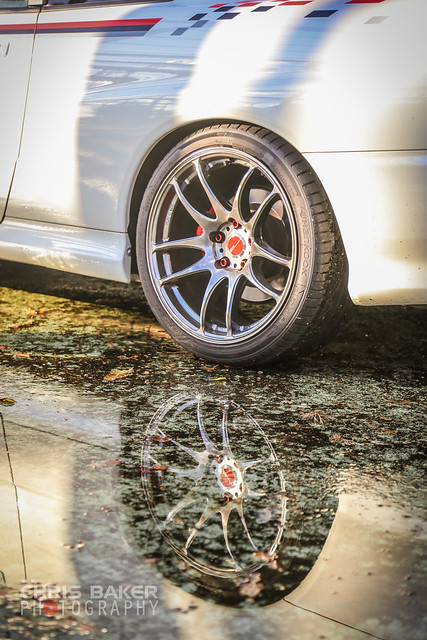
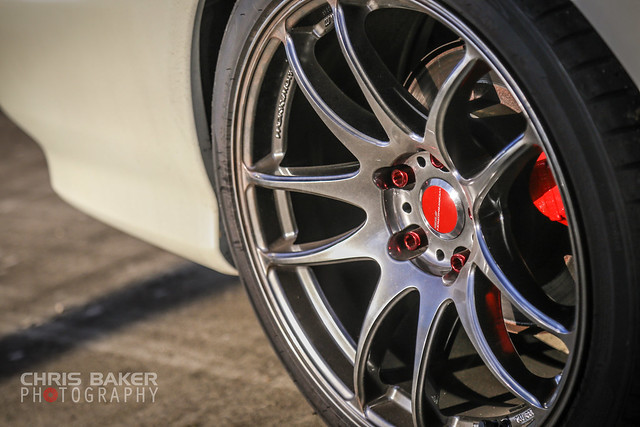
In August I ordered a new set of wheels, I wanted a set of these for the MX5 but they don't make them wide enough in a 15". So I'm very happy to be able to have a set on the Skyline 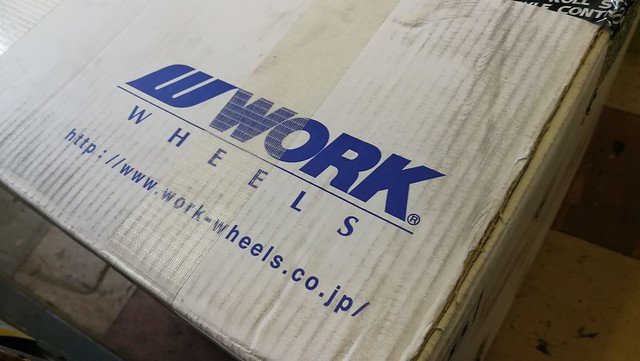 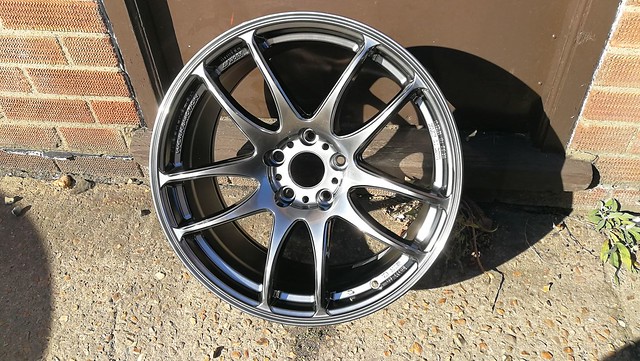 Choosing a wheel design was difficult enough, let alone deciding which fitment to get. I decided on 18x8.5 ET30 and 18x9.5 ET30, playing it safe due to the arches are original and mint, would be a shame to ruin them because of the offset being lower. I believe Nismo recommend this fitment for the GTT, so that was some reassurance Colour choice was also another challenge, the current bronze wheels look awesome against the pearl white and I had my head set on that. But then I saw the GT Silver was an option and well....you can see from the photos that I made the right decision (or did i?) 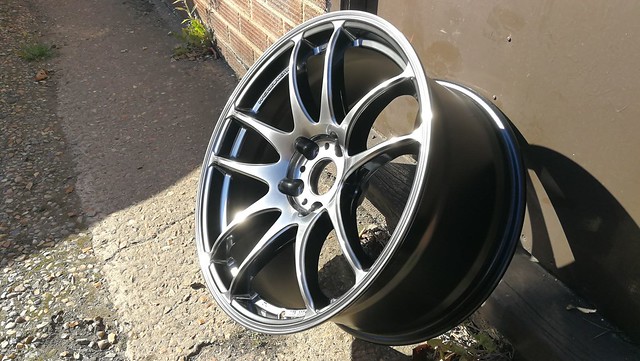 This is one of the rear wheels to help show the concave, the fronts are alot more straight spoked due to the width 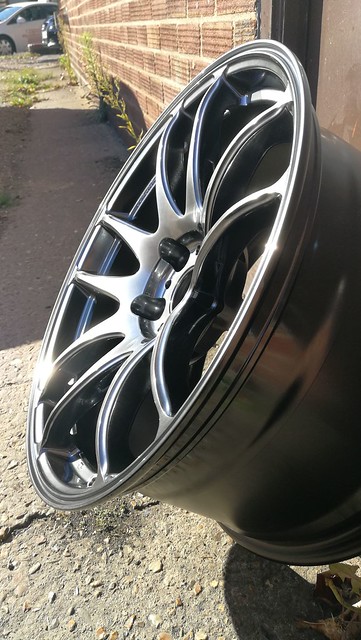 With the bodywork being in mint condition (except the difference in colour on some panels due to the pearl) my attention would be under the bonnet. I can't afford a full forge build,top mount turbo etc so went for a cheaper route. I'd been collecting parts on the quiet and had reached a point where I could finally show what I had been hiding 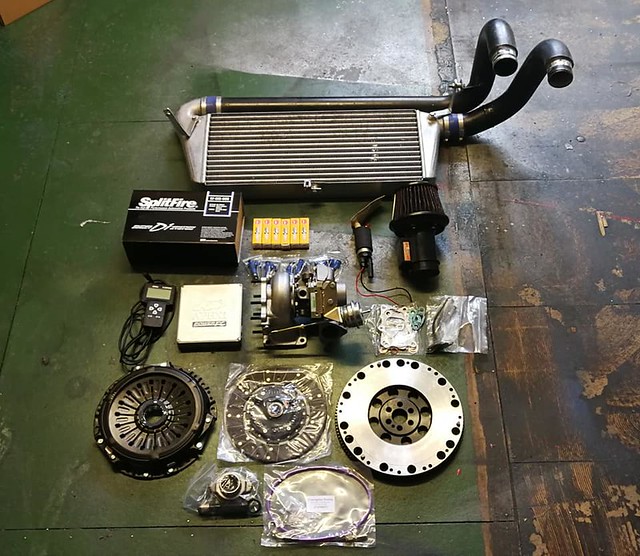 Stock Turbo Stage 3 Hybrid (spec below) (Rebuilt by Universal Turbos) Genuine Gasket Set Tomei Exhaust Elbow (not pictured) Apexi Power FC ECU Z32 MAF R35 GTR 570cc Injectors Walbro 255 Fuel Pump Blitz FMIC NGK BKR7E Plugs Splitfire Coilpacks Competition Clutch Stage 2 Lightened Flywheel Braided Clutch line 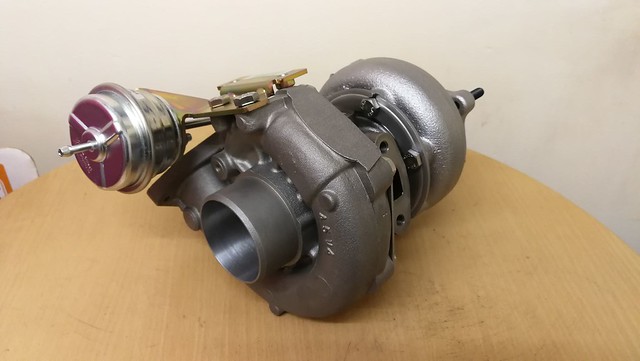 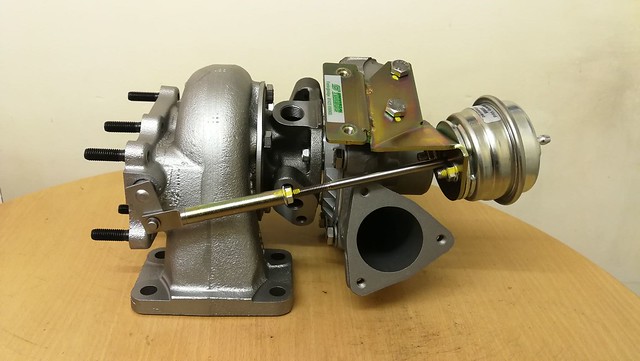 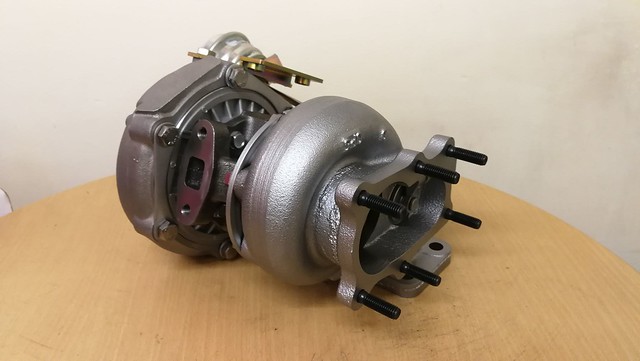 Re-Profiled Compressor Cover T38 Compressor Wheel 360 Degree Thrust Bearing T3 Billet Backplate Modified T3 Bearing Housing Modified Hi-Temp Turbine End Piston Ring Seal T38 Turbine Wheel Re-Profiled Turbine Housing Ported Wastegate and Larger Poppet Valve 1 Bar Actuator Up-Rated Actuator Bracket My aim is 400hp,would be over the moon if it was more |
| |
|
|
|
|
|
Jun 28, 2019 19:11:20 GMT
|
|
|
| |
|
|
|
|
|
Jun 28, 2019 19:12:55 GMT
|
|
|
| |
|
|
|
|
|
Jun 28, 2019 19:15:17 GMT
|
|
|
| |
|
|
|
|
|
Jun 28, 2019 19:16:37 GMT
|
|
|
| |
|
|
|
|
|
Jun 28, 2019 19:20:17 GMT
|
|
|
| |
|
|
|
|
|
Jun 28, 2019 19:21:18 GMT
|
 After reading up on a Speedhunters article by Jordan about his RS4 audio upgrade, I was that impressed I decided to bite the bullet and treat myself to one too.  The DMX7017DAB is a double din mechless unit with a large touch screen display. The minimal buttons along the bottom edge gives it a more modern look without distracting you much. It has the bells and whistles you expect to find on a modern aftermarket stereo like DAB, Bluetooth, rear USB, steering controls etc. What drew me to this was a couple of things. The first being the integrated dash cam.  With the dash cam plugging into the back of the unit, you can view the Camera aswell as play back recorded footage and photos. The camera has a built in shock sensor, a message promptly appears if the car has been hit in your absence, and you can review the footage straight away. 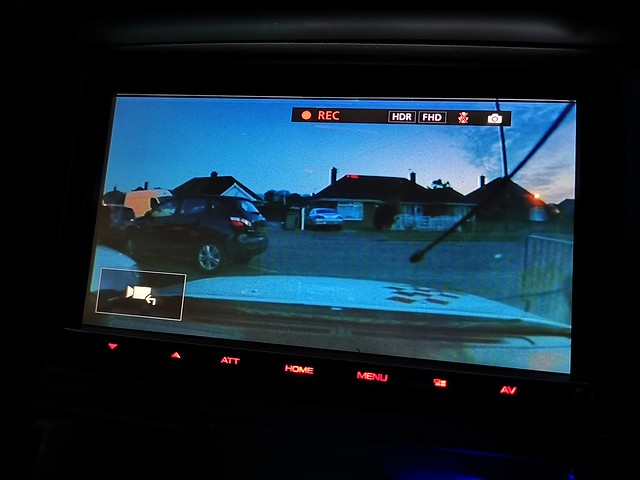 The second feature that I loved was the ability to mirror what my phone does. For Android an app called Android Auto is required. This allows you to mirror Google Maps/Waze onto the stereo, while still being able to listen to Spotify/Google Music and make/receive phone calls! Very handy for those road trips or convoys to car shows  Another feature the Kenwood unit has is a reverse camera. You can pick up a generic camera off eBay or Amazon for not a lot of money but I didn’t want the extra grief of splicing and hoping the built quality would last. So I went with Kenwoods unit and I’m glad I did. Direct plug and play and all I had to do was splice into the reverse light loom 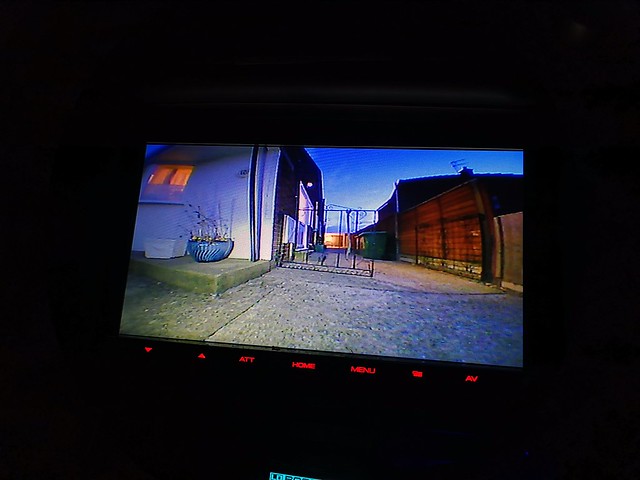 I finished the install when darkness fell so I’m eager to see the quality in the daylight   The rear speakers have been crackling for awhile so this was one job that needed addressing more than anything. I didn’t know what I was letting myself in for until I was half way through it…  The rear seats, door cards and trim had to be removed before I could touch the parcel shelf. The parcel shelf area was covered in a black dust, thinking it was the parcel shelf material disintegrating, I was wrong.  As you can see, there wasn’t much left of the stock Clarion speakers, no wonder the sound quality was so poor! The new speakers dropped in a treat and I managed to reuse the original fixings. At the point I wished I had bought the wiring adapters but nevermind. 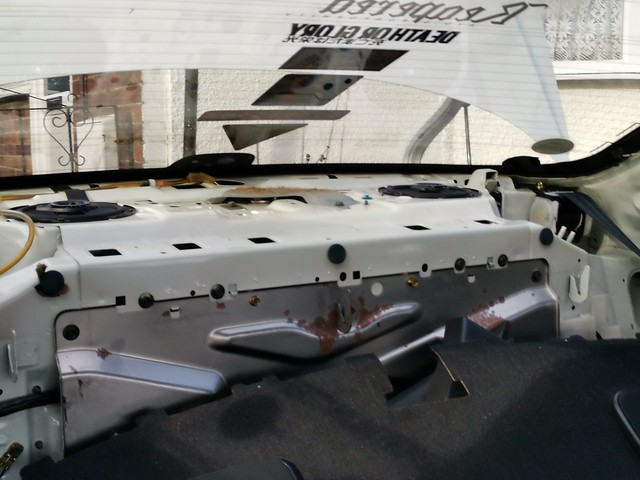 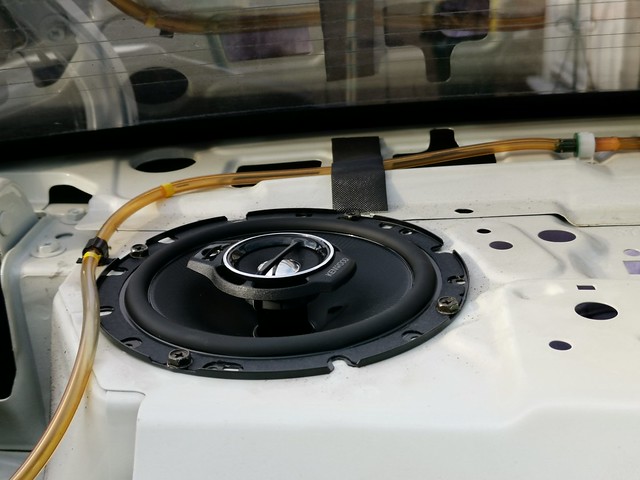 With the rear interior put back together it was time to tackle the front speakers. This was ALOT easier, a few trim clips and screws and access was easy. Luckily the front speakers already had the adapters (weirdly enough) so that was plain sailing. 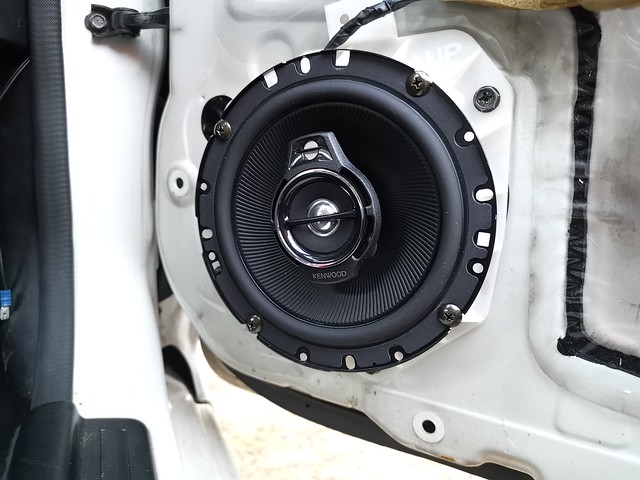 I did buy some sound deadening pads to put on the inside but space is limited and daylight was becoming less and less. I’ll tackle this at a later date. The last thing on the list was to install the slim subwoofer. I was hoping it would fit under the seat, but upon removing it I didn’t realise the centre is humped and tapers down. So I decided to put it behind the seat instead. 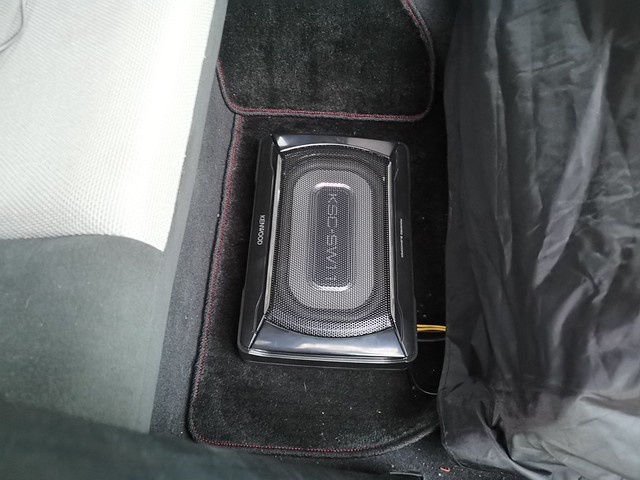 The wiring is a lot simpler, all of the wires go into a single plug, none of those nasty terminal screws we had ‘back in the day’. The hardest part was routing the live cable through the bulk head (wheel and arch liner off and it’s straight forward from there) So there we have it, a full multimedia upgrade! I still need to play around with the equaliser, then I’ll get a video sorted |
| |
|
|
|
|
|
|
|
Jun 28, 2019 19:22:32 GMT
|
|
|
| |
|
|
|
|
|
Jun 28, 2019 19:23:27 GMT
|
|
|
| |
|
|
|
|
|
Jun 28, 2019 19:24:49 GMT
|
|
|
| |
|
|
|
|
|
Jun 28, 2019 19:26:26 GMT
|
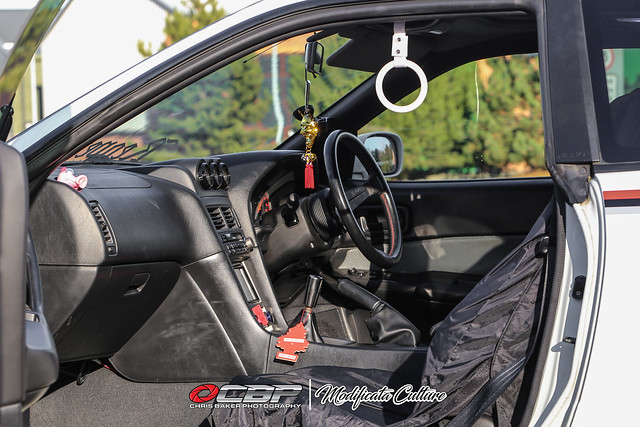
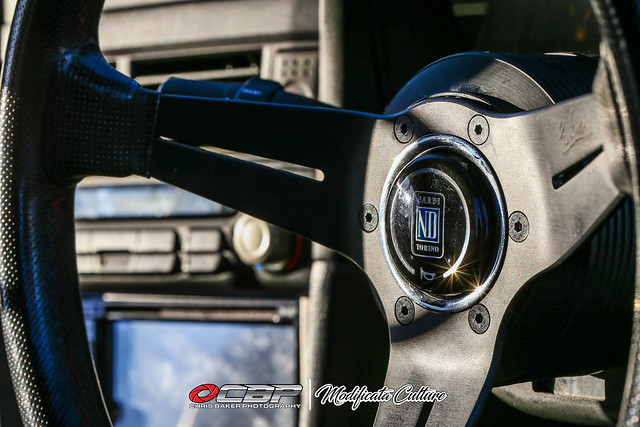
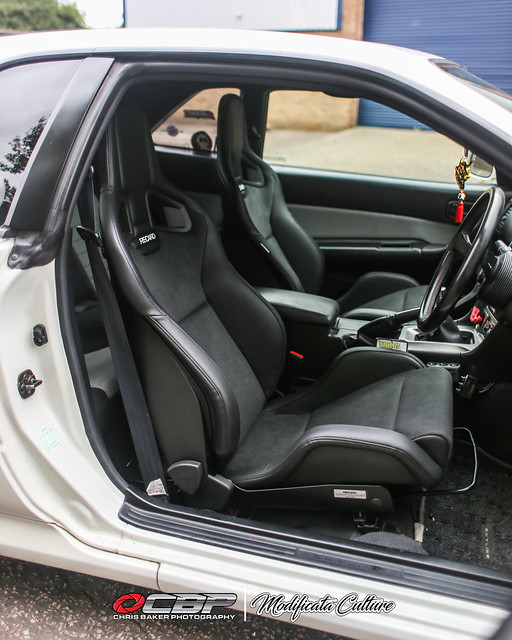
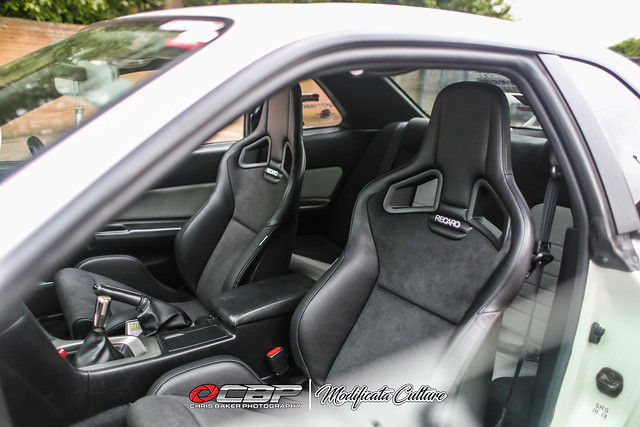
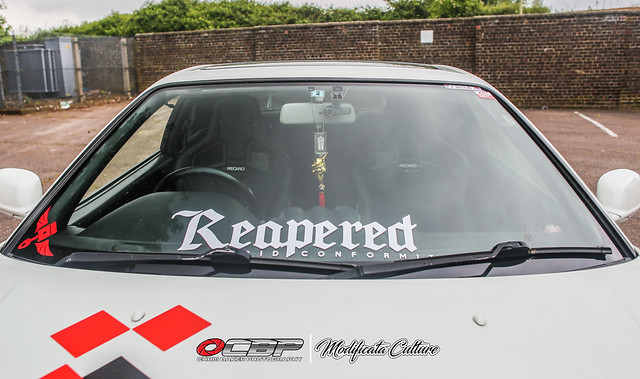
After 24hrs the seats had marked the doorcards quite badly, so I had to sort them out ASAP. I removed the doorcard to have a look, hoping I could modify and retrim the arm rest. But upon a closer look the whole door card would need re-doing and I didn't really fancy all that work. So I adapted the rail mounts instead. I started with the driver side by drilling another hole next to the first one, the seat was still hard pushed against the doorcard. To explain it briefly it required alot more moving over than I first thought. The bracket on the rails was fouling the bottom of the seat so those had to be cut off. The belt buckles were too short to be bolted to the rear inner rail mounting hole so additional brackets had to be made. Then it was a headache trying to hold the seat up to get said bolts in while holding the seat up to line it all up while making sure the belt buckle didnt fall down. *sigh* But I finally got it all sorted and theres still room between the seat and the centre console.  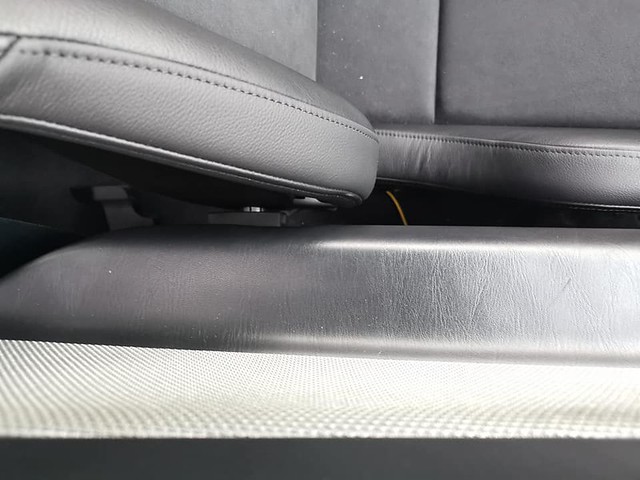 With the seats in I have to admit it was abit of a struggle getting out without brushing against the steering wheel. I decided to go with a quick release steering wheel, but it had to be a slim version. A friend had a Vac Motorsport race quick release for sale which would do the job nicely. The centre of the quick release boss looked too small for a horn button, so he included some Fast and Furious-esque NOS buttons to use as horn buttons. The Nardi deep corn wheel has served me well in pretty much all of my cars, but it was time for it to retire in favour of a smaller, more modern equivalent. I decided on the Sparco L360 in leather, mainly for its 330mm size and it's flat bottom.  Of course,this wasn't going to be an easy job, not with my current luck lol I wanted to mount the horn bracket inbetween the HKB boss and the first half of the quick release. This was to make the wiring neater and hidden. The first half uses a Nardi bolt pattern (whats the problem with that you ask?) Well...the horn button bracket uses a Momo bolt pattern. Even redrilling the bracket would make it lean over to one side and not be central. So the only way was to mount it between the second half and the steering wheel. Luckily theres a gap between the two brackets, the wires were heat shrunk and taped to neaten it all up.     Once it was all mounted together, I lined up the supplied horn button from Sparco and it fits :/ Just my luck lol |
| |
|
|
|
|
|
Jun 28, 2019 19:27:45 GMT
|
|
|
| |
|
|
|
|
|
Jun 28, 2019 19:28:32 GMT
|
|
|
| |
|
|
|
|
|
Jun 28, 2019 19:29:17 GMT
|
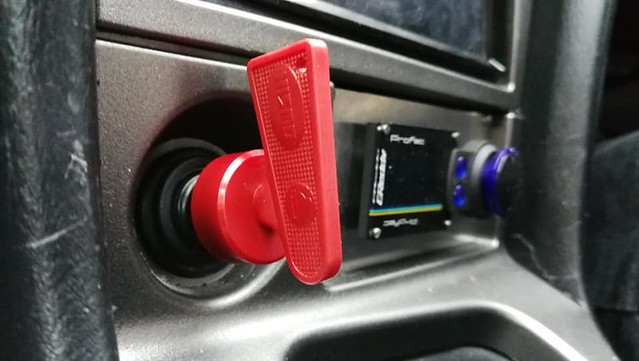
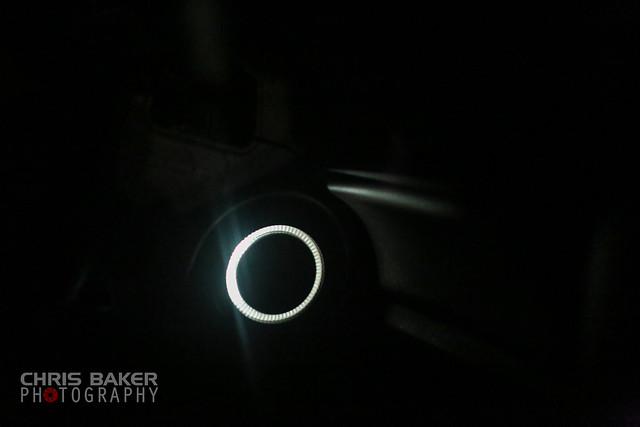
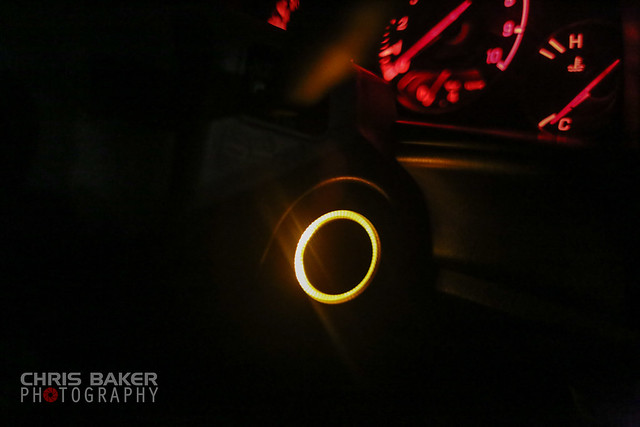
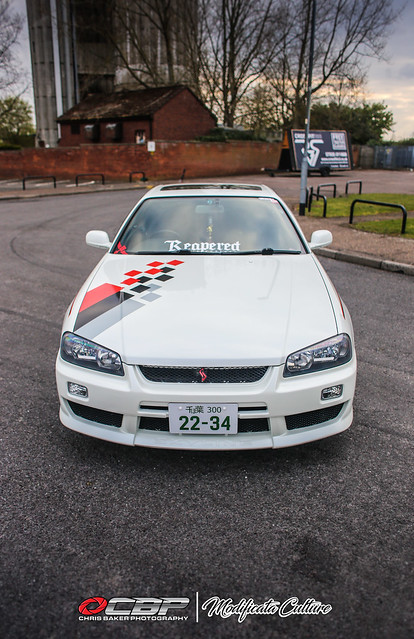
In the future I plan on getting the interior trims skinned in Carbon Fibre. I've decided to paint them instead for the time being. I wanted something subtle but eye catching if seen in the right light. White would have been too much and so would Red, so I decided to go Black, but which one? Working in a Motor Factors it was a bonus to have a rack full of aerosols, along with being able to mix paint if need be. Ford Panther black has always been a favourite,so it was an easy decision      I really need to sort out the lower dash trim to get rid of all of the scratches from the stereo. I can get a brand new one from RHD Japan for £130 + shipping + import, but its not an urgency just yet While I had everything out I replaced the cig lighter bulb for an amber version. This now matches my ignition barrel light (photo further up) 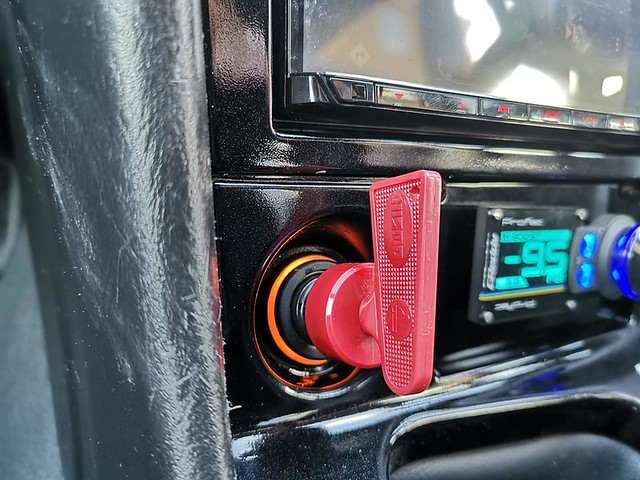 This was also the perfect opportunity to swap the bulbs in the climate control for a better quality LED. After several recommendations these were purchased from an eBay seller in Australia  |
| |
|
|
ada7
Part of things

Posts: 108 
|
|
Jun 28, 2019 19:32:41 GMT
|
|
As GTT’s go that looks great. Liking what you’ve done a lot.
Are you planning to do anything about the front bumper that you mentioned? For me, that kind of lets the style down compared to the GTR one.
Adam
|
| |
Rotaries help make the world go around... And around and around and...
|
|
|
|
|
Jun 28, 2019 19:38:40 GMT
|
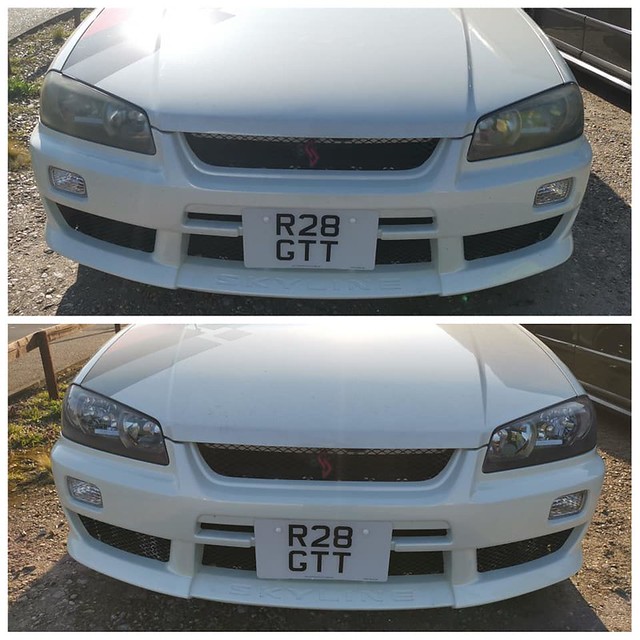
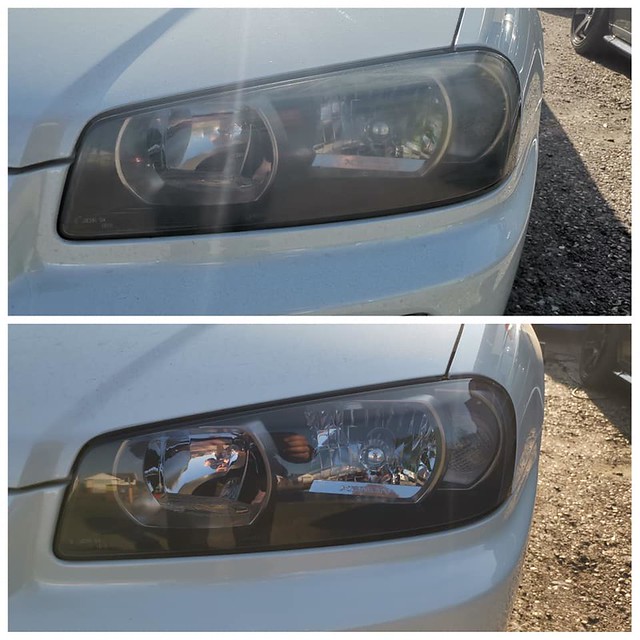
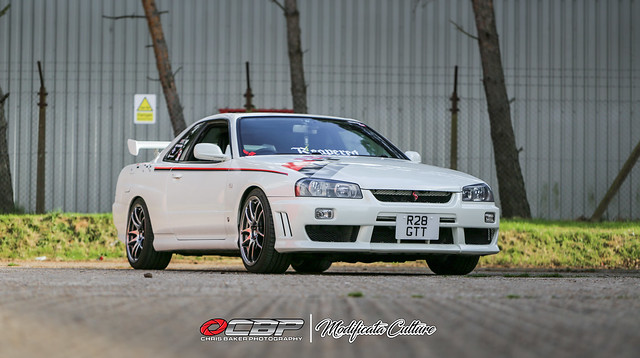
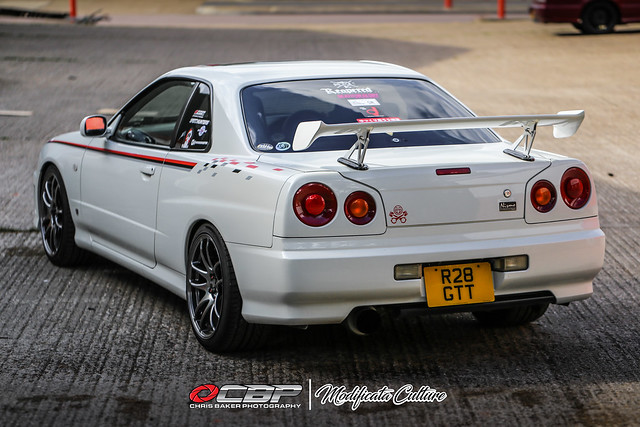
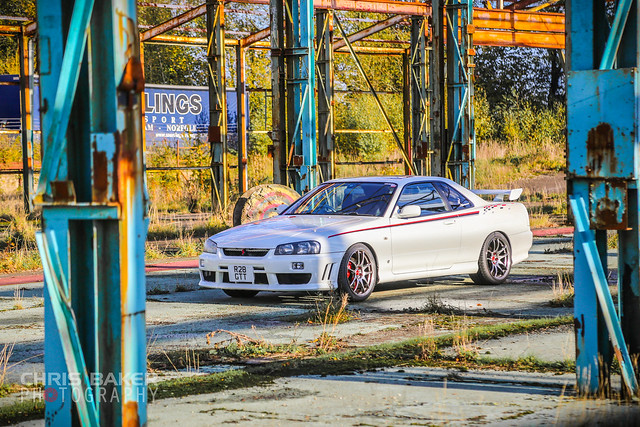
I forgot to mention the bumper got swapped for a factory aero bumper (commonly known as an Altia bumper) when the Nismo stripes got fitted You can see the difference a couple of posts up in the before and after photos |
| |
|
|
tristanh
Part of things
Routinely bewildered
Posts: 990
|
|
Jun 28, 2019 20:14:22 GMT
|
|
I love it, apart from the stickers, but that's cos I'm an old fart. I got a spin in a '34 V Spec II once at a trackday years ago belonging to a mate who had a tuning company, and it was utterly amazing.
What does the key in the cig lighter do?
|
| |
Whether you believe you can, or you cannot, you're probably right.
|
|
|
|


 a
a