MiataMark
Club Retro Rides Member
Posts: 2,961
Club RR Member Number: 29
|
learning to weld...MiataMark
@garra
Club Retro Rides Member 29
|
|
|
In order to sort out the rust in my MX5 I decided (aftwer getting quotes to get the work done) to buy a welder and do it myself. I've separated this out of the build thread as in learning to weld I'll be doing some non MX5 projects. Technical Questions might be a more appropriate placer but hopefully in the fullness of time this will feature some 'things' being made. As a recap this is what I bought; 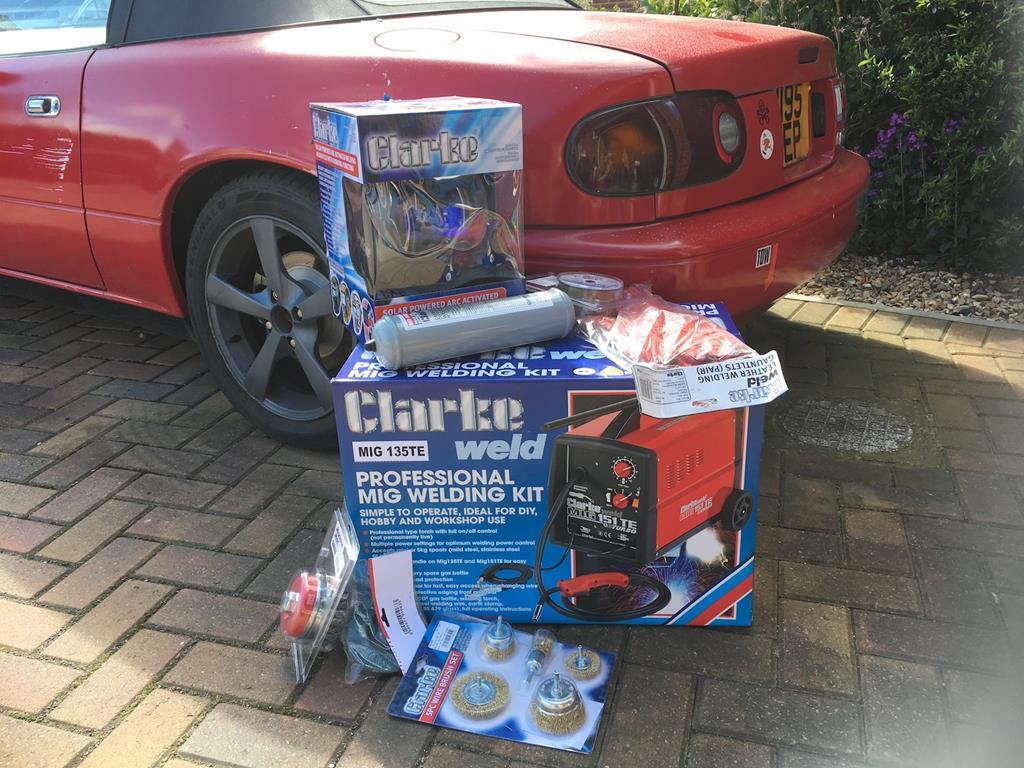 I visited goldnrust and got some great advice and had a pay that convinced me that should be able to weld. So this morning was my first practice. First I wanted a workbench so adapted a piece of blockboard that can be mounted on a workmate 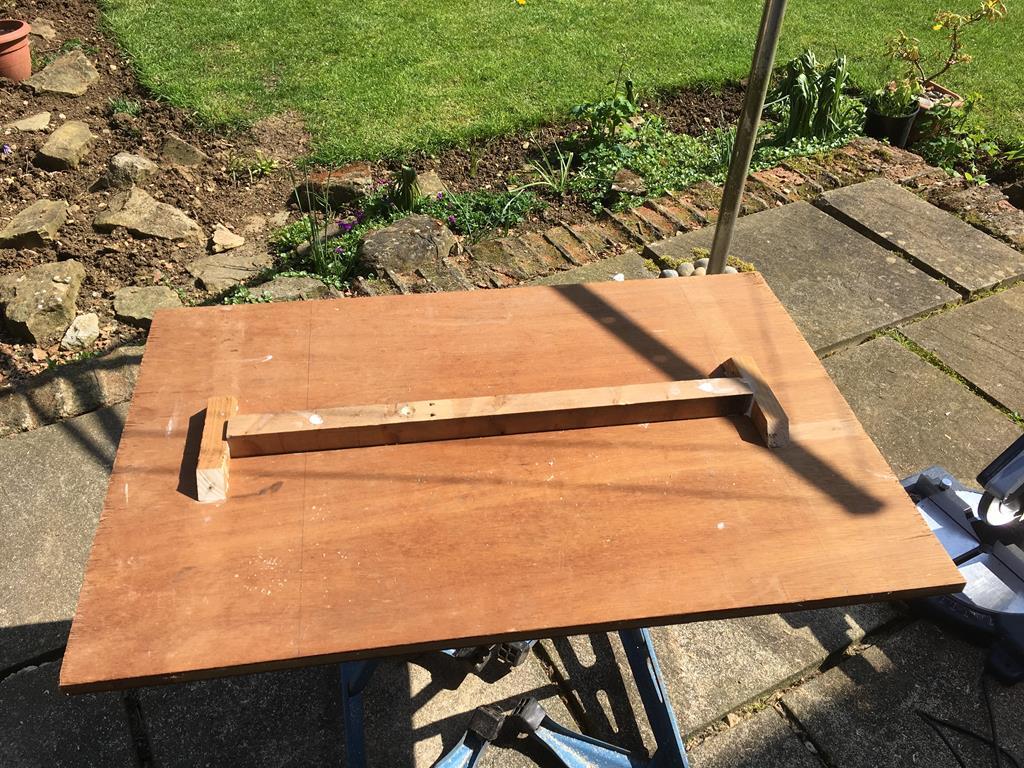 On the way back from walking the dogs I popped into the local agricultural engineers (Newmans in Royal Wootton Bassett, very helpful) who gave me some off-cuts of metal. I also have a pair of car ramps that need beefing up, seen here on the portable workbench 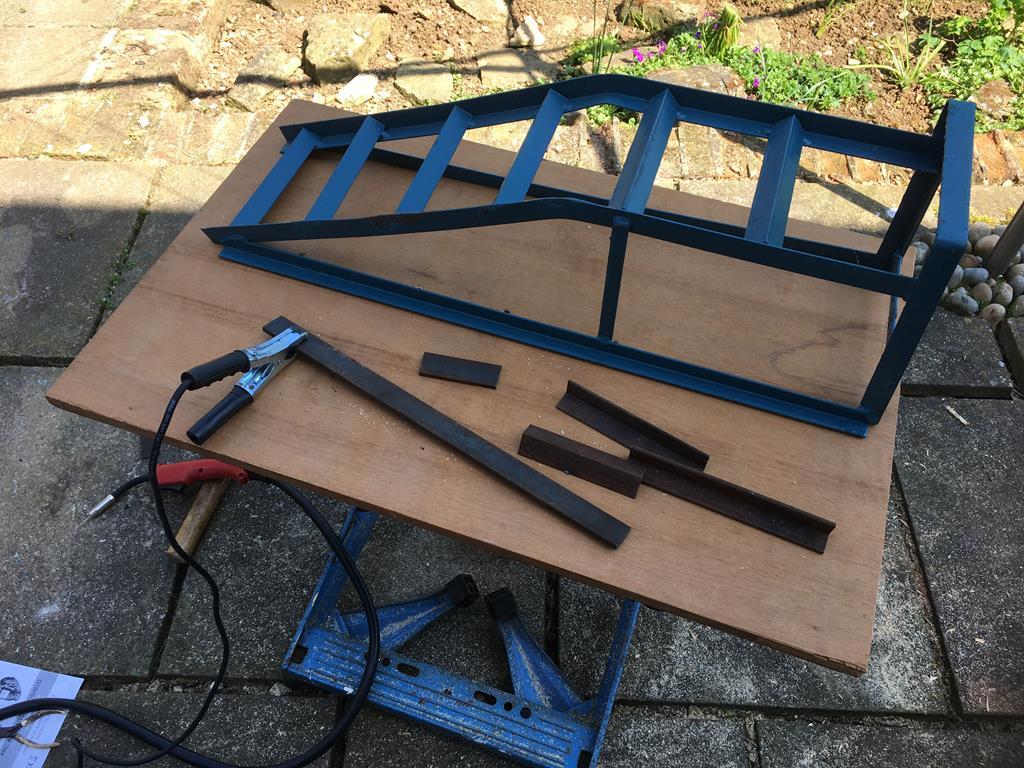 After setting up the welder my first go on a piece of 5mm steel, 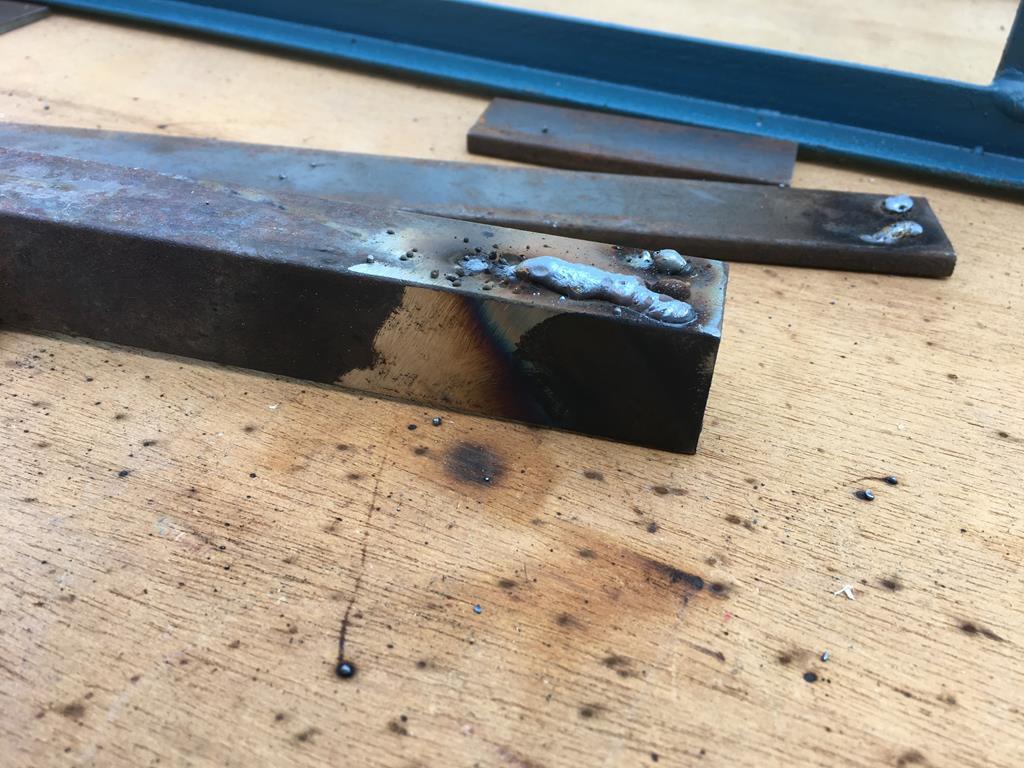 What a mess, first mistake was not turning on the gas, doh, and second not cleaning the metal up, the other mistakes I don't know. I'm not very good at just practising so I moved onto the ramps, that needed a pieces of flat steel added, this was 3mm and all cleaned up with a grinder. 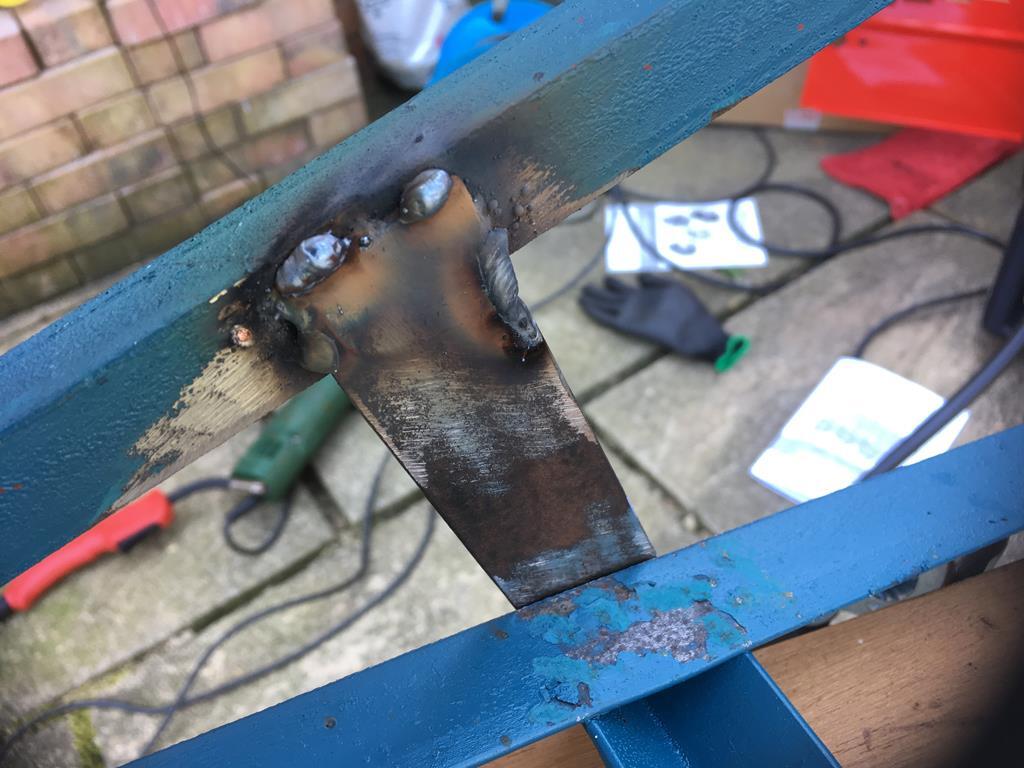 First 'tacks' I could pull apart with my hands, later ones are strong but certainly not pretty. 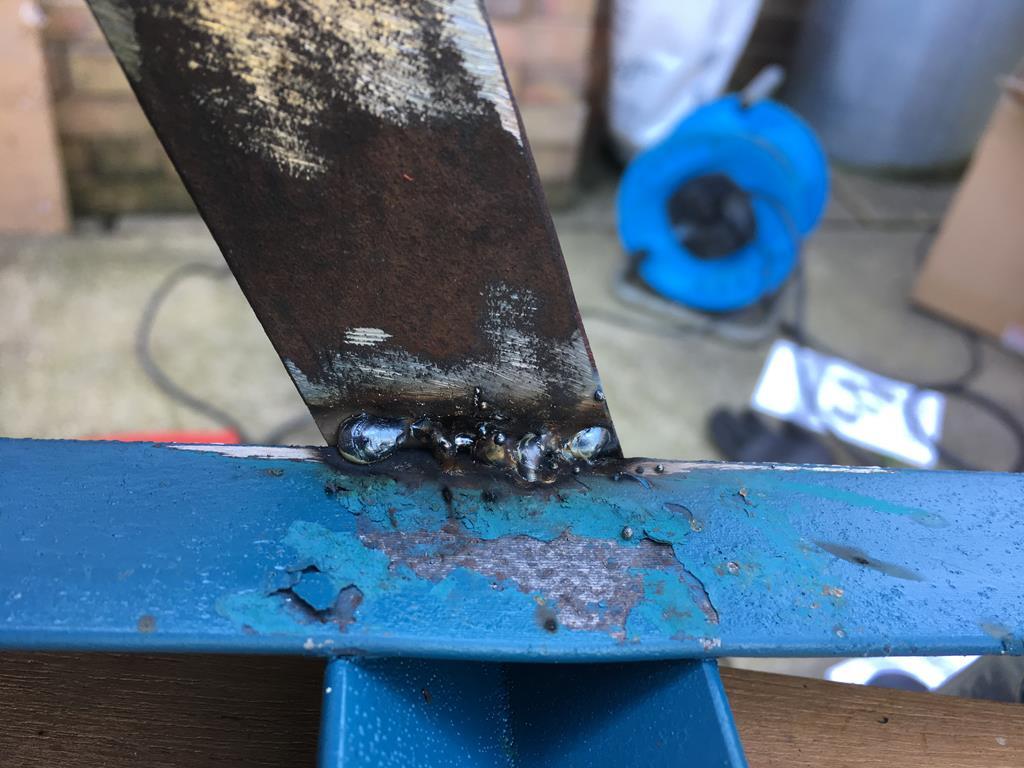 and finally after some grinder action 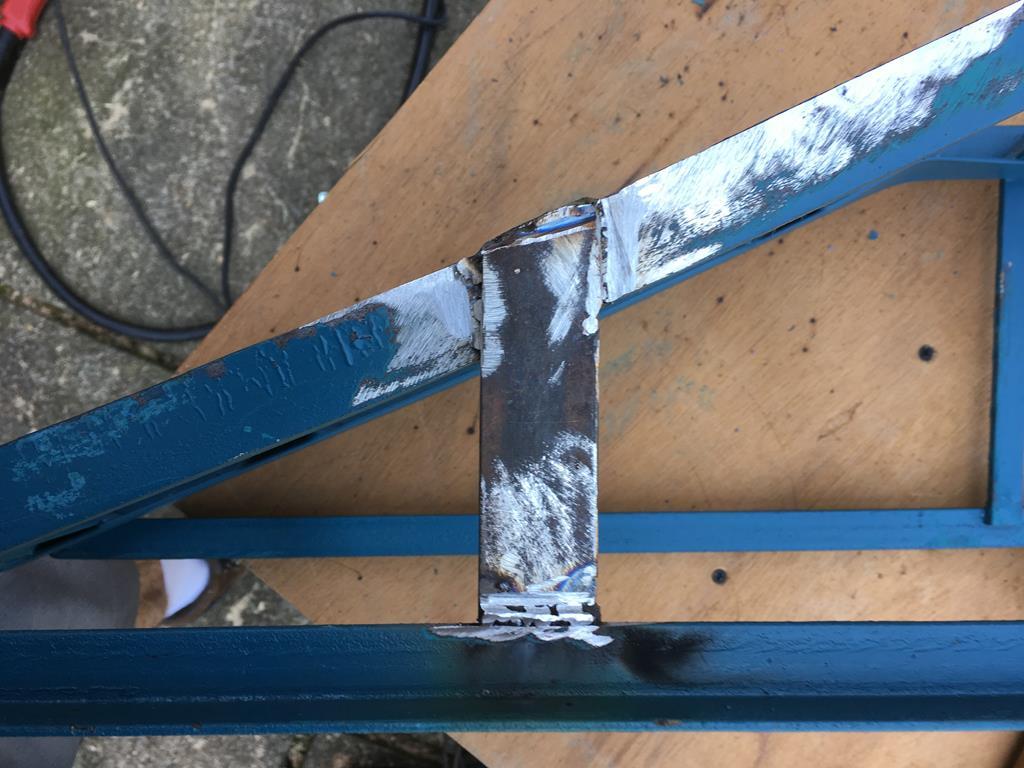 So I need more practice and I probably should practice on some thinner metal, all hints tips etc very welcome! One big issue is actually seeing what I'm doing, in some cases I wandered away from the intended route. |
| |
1990 Mazda MX-52012 BMW 118i (170bhp) - white appliance 2011 Land Rover Freelander 2 TD4 2003 Land Rover Discovery II TD52007 Alfa Romeo 159 Sportwagon JTDm
|
|
|
|
|
|
|
|
|
|
I’m not a ‘welder’ so can’t offer much advice ....
you don’t just want to clean the metal where you are going to weld, the earth clamp likes clean metal as well .... and speaking of which get yourself a decent earth clamp, in my experience the ones you get with such welders lose their clamping force after a while.
Practice on thick steel getting your hand in first,before trying thin stuff ..... i find i am more comfortable moving the weld one way than the other,find what suits you best .....
Oh and get some good welding gloves!
I am sure more competent people than me will be along with better advice,
|
| |
|
|
MiataMark
Club Retro Rides Member
Posts: 2,961
Club RR Member Number: 29
|
learning to weld...MiataMark
@garra
Club Retro Rides Member 29
|
|
|
I’m not a ‘welder’ so can’t offer much advice .... you don’t just want to clean the metal where you are going to weld, the earth clamp likes clean metal as well .... and speaking of which get yourself a decent earth clamp, in my experience the ones you get with such welders lose their clamping force after a while. Practice on thick steel getting your hand in first,before trying thin stuff ..... i find i am more comfortable moving the weld one way than the other,find what suits you best ..... Oh and get some good welding gloves! I am sure more competent people than me will be along with better advice, Good tip re earthing clamp, got good gloves/gauntlets. |
| |
1990 Mazda MX-52012 BMW 118i (170bhp) - white appliance 2011 Land Rover Freelander 2 TD4 2003 Land Rover Discovery II TD52007 Alfa Romeo 159 Sportwagon JTDm
|
|
dazcapri
North East
Enter your message here...
Posts: 1,056
|
|
|
|
|
Where you've ground the weld try welding it again it'll be a much stronger weld.
Also have you tried your local college I did a course a couple of years ago and it was only a couple of hundred quid
|
| |
Last Edit: May 5, 2018 16:56:20 GMT by dazcapri
Mk3 Capri LS
|
|
ChrisT
Club Retro Rides Member
Posts: 1,637
Club RR Member Number: 225
|
learning to weld...ChrisT
@christ
Club Retro Rides Member 225
|
|
|
|
Watch youtube videos and practice, practice, practice...... you'll get there
Looking at those pics of the ramp welds I would say you need to clean back much more of the area before you start welding.
|
| |
|
|
|
|
|
|
|
We need settings. The practice and ramp weld the bead seems to sit on the metal so that could be not enough power or too fast a wire speed. Go back to practicing and adjust everything one thing at a time to see what it does. The thicker the material you are welding the more power it will need (sorry for stating the obvious) Just play and then play some more. Once you have mastered the practice pieces when you go back to the actual thing you want to weld everything will go wrong and that is normal  |
| |
|
|
mad
Part of things

Posts: 126
|
|
|
|
I struggled for years with welding with the disposable bottles of gas and it cost a small fortune in the process. You've invested in a half decent mig now treat yourself to a 10ltr bottle of gas. My local motor factors sold them and it was the best improvement I saw. I don't think those small bottles have enough flow. Especially when welding outside and you'll get through loads of them welding a car. Just my personal advice |
| |
|
|
Darkspeed
Club Retro Rides Member
Posts: 4,697
Club RR Member Number: 39
|
learning to weld...Darkspeed
@darkspeed
Club Retro Rides Member 39
|
|
|
|
Tip no1 - steel requires 40amps per mm of thickness as a rough guide - your 151 if rated at 150amps - will not be at 100 duty cycle so check that as well - duty cycle means the % time per minute it will operate so if if its 50% duty cycle at 150 amps thats 30 seconds every minute so 2 15 second runs per minute . - so 150/40 = around 3.5mm rating at maximum setting so you will need to carry out some good weld preps to successfully weld 5mm steel.
The issue you are having here is that you are not getting enough temperature into the steel thats why its just building up on the top.
As a practice use the grinder to cut a prep into a piece of that 5mm steel 3.5mm deep and 10mm wide and then fill it. Move the torch in a figure 8 - are you leading torch or trailing torch? - I take it that its .8mm wire.? Max power and 1/3rd wire speed - if it fits and starts - gradually increase the wire feed until it buzzes -
A weld needs to be stronger than the parent metal to be strong enough. so do some welds and then try and destroy them if the welds fail before the parent then its a fail.
Another tip - Use 3mm steel maximum - 75% of a good weld is in the preparation so make sure that you spend 75% of your time on the prep - bright clean metal all around and as mentioned electricity and especially high currents can only move through really really clean metal. You need to remove all of that mill scale from the weld area and the weld clamp area.
ETA -
The duty cyce is 10% at 150 amps for that machine and they list it over a 10 minute period so you can weld for 1 minute every 10 minutes at max power - the machine is 100% duty cycle at 55 Amps the min setting.
|
| |
Last Edit: May 5, 2018 19:07:57 GMT by Darkspeed
|
|
awoo
Posted a lot
Posts: 1,504
|
|
|
|
|
couple of things, the welds need to sitting in to the metal rather than sitting above it. you're melting two bits and bridging with filler, the aim is to melt it in to one nice bit, rather than glue two bits together with weld wire. it's all about the fusion
I don't do mig so I don't know about wire feed, I don't know how that would translate in settings other than you need more heat in to the metal.
the other thing would be to clean up the metal more, you're only going to bring impurities in to your weld which will make it weaker and it will be less fun to weld up.
get all the metal up nice and bright and invest in a ltr of acetone to further clean it up.
theres loads of tutorials on youtube. I've found them to be very useful
|
| |
|
|
MiataMark
Club Retro Rides Member
Posts: 2,961
Club RR Member Number: 29
|
learning to weld...MiataMark
@garra
Club Retro Rides Member 29
|
|
|
|
Thanks for advice will read in more detail tomorrow, and look at videos etc. today I just wanted to have a play. Have asked in the past at college but no courses, also I travel a lot for work so it's not really an option.
I get that I need more power and slower wire speed although they were pretty high and low respectively. It's .6 wire, did also buy some .8 to try.
More practice next weekend, Haynes breakfast meet tomorrow and gardening on Monday.
I did blow the 10a fuse in the extension lead... Thought I'd broken the welder took me ages to work out what had happened, so much for fault finding skills.
|
| |
1990 Mazda MX-52012 BMW 118i (170bhp) - white appliance 2011 Land Rover Freelander 2 TD4 2003 Land Rover Discovery II TD52007 Alfa Romeo 159 Sportwagon JTDm
|
|
|
|
Sammo
Club Retro Rides Member
Posts: 1,461  Club RR Member Number: 103
|
learning to weld...Sammo
@sammo
Club Retro Rides Member 103
|
|
|
This is quite interesting to read. I've always fancied learning how to weld but never got around to it. Hopefully this year I'll bite the bullet and buy myself a welder and start doing exactly what you're doing |
| |
Follow Me On Instagram - @parttimecartinkerer
|
|
|
|
|
|
|
|
I did a module as part of my degree, free choice in welding tech and theory. Did Arc, mig tig and oxy. Guys who had been at it forty years teaching really helped. I find as I only weld rarely it takes a few minutes to get back into the rhythm and then all is fine. I use a gas less full cored one at home as all the welding I do is on the drive and its always windy! Not amazing results but it’s only ever exhausts and broken brackets that sort of thing. I need to convert go gas welding at some point but trying to find nylons to supply our bottles not happening here
|
| |
|
|
|
|
|
|
|
|
We are n the same boat, maybe I am 100 yards ahead, we also picked the same mig
|
| |
Bicycle x1
Alfa Giulietta (now wife's)
Alfa 156
BMW 630i
Honda rc36
|
|
MiataMark
Club Retro Rides Member
Posts: 2,961
Club RR Member Number: 29
|
learning to weld...MiataMark
@garra
Club Retro Rides Member 29
|
|
|
We are n the same boat, maybe I am 100 yards ahead, we also picked the same mig Great please contribute to the thread (if only so it's not just me showing bad welding :-) we can share settings. |
| |
1990 Mazda MX-52012 BMW 118i (170bhp) - white appliance 2011 Land Rover Freelander 2 TD4 2003 Land Rover Discovery II TD52007 Alfa Romeo 159 Sportwagon JTDm
|
|
|
|
|
|
|
We are n the same boat, maybe I am 100 yards ahead, we also picked the same mig Great please contribute to the thread (if only so it's not just me showing bad welding :-) we can share settings. Not a chance, I’m still rubbish  My greatest discovery was finding the darkening switch on the outside of my helmet, much easier when you can see......... 1, min and 4 suites me, I’m still on the original bottle which I have at full flow. 👍 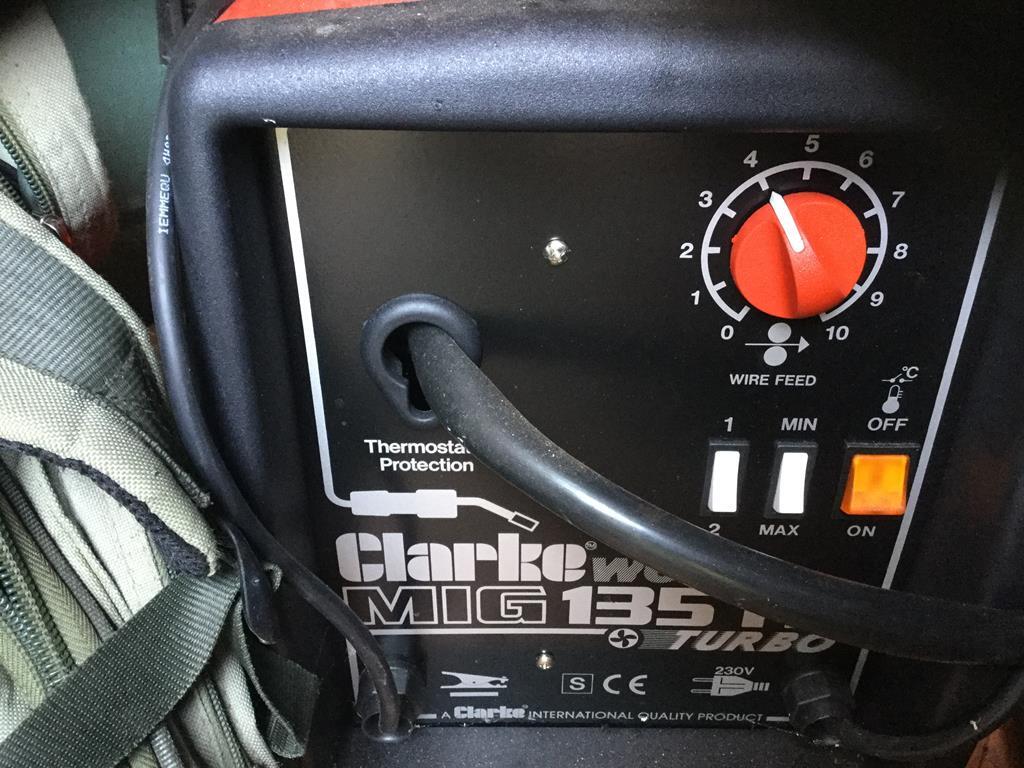 |
| |
Last Edit: May 6, 2018 13:13:19 GMT by waynedear
Bicycle x1
Alfa Giulietta (now wife's)
Alfa 156
BMW 630i
Honda rc36
|
|
|
|
|
|
|
|
make sure you have good shelter, yet also good ventilation, if its windy you'll have the shielding gas blown away, with a larger bottle with flow reg you can compensate to a certain degree with more flow but you'll obviously use a lot more gas.
|
| |
|
|
|
|
|
|
|
|
For welding that flat material you have on your ramp try turning into to max and 2 on the power then experiment with the wire . Do a spot on 2 then say 5 and then 8 and see how each one is different . don't try to move the torch along yet , just do a spot . You want the spot to look flat-ish and like it has penetrated in somewhat rather than sat on the surface .
As for welding car bodywork that is totally the opposite obviously as its thin 1mm ish . Get hold of some 1mm steel from somewhere and have a practice . You will need the power right down and try the same with the wire .Remember you can literally just do a small tack then you have to let it cool before you can add another , aiming into the previous tack weld about a third of the distance in . This means the previous bit of weld absorbs some of the heat and does not burn the sheet metal away .
|
| |
|
|
|
|
|
|
|
|
As for welding car bodywork that is totally the opposite obviously as its thin 1mm ish . Get hold of some 1mm steel from somewhere and have a practice . You will need the power right down and try the same with the wire .Remember you can literally just do a small tack then you have to let it cool before you can add another , aiming into the previous tack weld about a third of the distance in . This means the previous bit of weld absorbs some of the heat and does not burn the sheet metal away .[/quote]
I wish someone had told me that at the start, my expert called me ‘Swiss cheese’
|
| |
Bicycle x1
Alfa Giulietta (now wife's)
Alfa 156
BMW 630i
Honda rc36
|
|
MiataMark
Club Retro Rides Member
Posts: 2,961
Club RR Member Number: 29
|
learning to weld...MiataMark
@garra
Club Retro Rides Member 29
|
|
|
For welding that flat material you have on your ramp try turning into to max and 2 on the power then experiment with the wire . Do a spot on 2 then say 5 and then 8 and see how each one is different . don't try to move the torch along yet , just do a spot . You want the spot to look flat-ish and like it has penetrated in somewhat rather than sat on the surface . Yep, next time I practice I'm going to be a bit more methodical about it, I might even keep notes (or a least a series of images)! |
| |
1990 Mazda MX-52012 BMW 118i (170bhp) - white appliance 2011 Land Rover Freelander 2 TD4 2003 Land Rover Discovery II TD52007 Alfa Romeo 159 Sportwagon JTDm
|
|
|
|
|
|
|
For welding that flat material you have on your ramp try turning into to max and 2 on the power then experiment with the wire . Do a spot on 2 then say 5 and then 8 and see how each one is different . don't try to move the torch along yet , just do a spot . You want the spot to look flat-ish and like it has penetrated in somewhat rather than sat on the surface . Yep, next time I practice I'm going to be a bit more methodical about it, I might even keep notes (or a least a series of images)! Yeah , setting it up for different material is trial and error if your a novice .Different settings a process of elimination thats all . I use a tig welder that stores different settings digitally for different bits your welding ... before that it would be a notebook like you said until you come familiar ! |
| |
|
|
|
|


