autojumbled
Club Retro Rides Member
Posts: 226
Club RR Member Number: 106
|
|
Oct 10, 2019 16:12:58 GMT
|
Hi autojumbled...mate first of all... fantastic work on the gt4! just wanted to ask for a favour pls as i am stuck. I need to change my brake and fuel lines. There are 5 lines in total? could you let me know the sizes in mm for each line pls and if i am changing the lines from the tank to the front do i need to remove the engine? Did you pipe straight in to the brake cylinder and fuel lines under the bonnet or did you create unions? any help would be much appreciated. thanks in advance. Cheers! I didn't actually replace the lines as couldn't be arsed to roll around on the floor in winter doing it! I've got the following photos though that may help you. The hoses are standard sizes of 5mm (3/16?) and 12mm (i think). 5 in total running the length. When the pipes were replaced, I also had the clutch changed so the gearbox was removed at the time - that probably made things easier during the pipe install. Engine wasn't removed but intercooler was out. Pipes are straight into the brake cylinder and fuel filter. No extra unions added - the less connections the better! 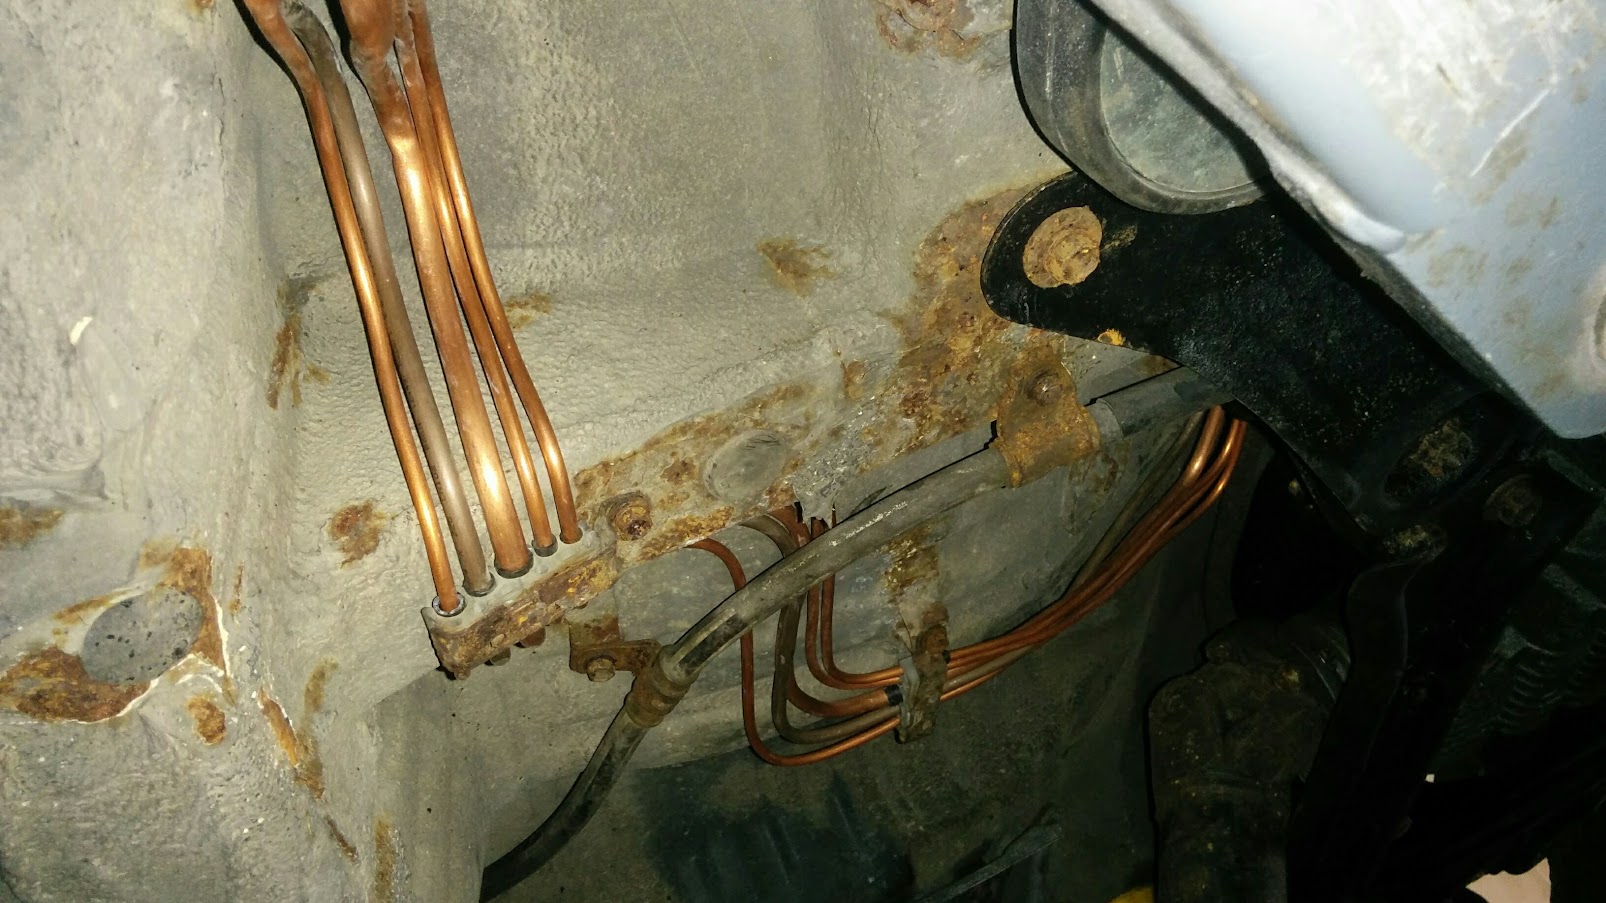 Not sure this helps but the top of the tank...  |
| |
|
|
|
|
|
|
|
Oct 10, 2019 20:44:18 GMT
|
Hi autojumbled...mate first of all... fantastic work on the gt4! just wanted to ask for a favour pls as i am stuck. I need to change my brake and fuel lines. There are 5 lines in total? could you let me know the sizes in mm for each line pls and if i am changing the lines from the tank to the front do i need to remove the engine? Did you pipe straight in to the brake cylinder and fuel lines under the bonnet or did you create unions? any help would be much appreciated. thanks in advance. Cheers! I didn't actually replace the lines as couldn't be arsed to roll around on the floor in winter doing it! I've got the following photos though that may help you. The hoses are standard sizes of 5mm (3/16?) and 12mm (i think). 5 in total running the length. When the pipes were replaced, I also had the clutch changed so the gearbox was removed at the time - that probably made things easier during the pipe install. Engine wasn't removed but intercooler was out. Pipes are straight into the brake cylinder and fuel filter. No extra unions added - the less connections the better!  Not sure this helps but the top of the tank...  |
| |
|
|
autojumbled
Club Retro Rides Member
Posts: 226
Club RR Member Number: 106
|
|
|
|
Did a bit of commuting, everything going well....  Then it wasn't going well....  Overheated on the drive in to work - looks like the rad fan temporary fix I put in didn't hold. Fair enough - topped up with water before I limped it home later that day. Sadly, whilst rolling along in traffic (with temps looking OK), it just stopped. When putting it on the truck to get home, a lot of water came out, assuming from somewhere near the water pump as it looked to be nearer the rear of the engine, rather than the rad or overflow area. Onto the fault-finding! Turning the car over it felt a little free-er than normal so cam belt was the first choice as the problem. I'm still crossing my fingers its not HG failure as I'm not ready to do that job yet. Tested compression and that registered 0 across all 4 cylinders but I assume if the cam belt isn't doing anything then this isn't a particularly helpful test. Sure enough, got the various ancillaries and pulleys removed and found the cam belt has snapped. Not certain when it was last done but I am certain it was some time ago. Good job the 3SGTE is non-interference.  Look at the state of this side of the block though - its covered in schmutz. I do hope this is old oil weeps and leaks over time that I've been sorting since my ownership, ratehr than something more serious that's recently appeared...  Given I've not seen any substantial oil loss or leaks since I sorted the rear cam cover gasket leak of 2014, i'm going with the 'older weeping seals' theory. Sit-rep is currently waiting for it to stop raining so I can get back out and start fitting new parts. I've removed all pulleys and the tensioner in preparation but still need to drain the coolant (whats left of it) and remove the water pump, ready for the new item. Parts list amassed and awaiting fitting is as follows: - Tensioner assembly
- Tensioner pulley
- Idler pulley
- Water Pump
- Thermostat
- Cam belt
- Power steering belt
- Alternator/AC belt
- Crank Oil Seal
Also got the new radiator and fuel filler neck bits to sort too so that can all go on at the same time. Going to be a busy one! One thing I did want to say - anybody who needs to do this job, don't bother unless you have a blow torch as the crank pulley bolt would not come off. Ended up making up a tool out of scrap in order to hold in place, blasted it with heat and then finally managed to get it loose.  |
| |
|
|
autojumbled
Club Retro Rides Member
Posts: 226
Club RR Member Number: 106
|
|
Nov 24, 2019 17:28:49 GMT
|
This curse word car! Its taken me weeks to get the various bits off and prep to refit all the the new parts before getting to the new cam belt. Now I've finally managed to fit the new water pump and thermostat alongside cleaning up the area as I go after it took quite a while to get a retaining screw out that holds the pump to the rest of the assembly. Had to remove the whole assembly in order to finally get it loose.  Anyway, putting new bits on and fit the cam belt tensioner pulley, torquing it up and it all went loose - thought i'd sheared the bolt. Hadn't even reached the correct torque but nope - pulled the threads out the engine instead!   There's no where near enough room with the engine in to be able to re-drill/tap the thread, the engine is going to have to be dropped which is a right PITA. I've been thinking though that i could probably remove the head for less effort - I want to fit a metal head gasket anyway. For reference, it's this bolt (not my engine pictured, sadly) - right in the thick of things   |
| |
|
|
autojumbled
Club Retro Rides Member
Posts: 226
Club RR Member Number: 106
|
|
|
|
Didn't realise the cam belt snapped in November! Time has flown by and I've still not fixed it. Made some progress since last update though as I decided to bite the bullet and pull the whole head off in order to get at the stripped thread. Its now been sat headless for a couple months and I've not had the inclination to put it back together, until this weekend. Engine block face got a clean up in preparation for putting everything back together.... Before:  After:  Spotted some damage to number 4 piston whilst cleaning up too:  Can't see any damage to the head or valves and the cylinder also appears intact with no scratches. I've no intention of replacing pistons so it'll go back together in this state. Need to order up gaskets, head bolts, new exhaust manifold studs etc etc so I can put the damned thing back together now. |
| |
|
|
|
|
|
May 16, 2020 19:01:23 GMT
|
|
Hi , Hope things are going well! quick question, I am trying to source the stainless exhaust like yours. Do you happen to have the link for yours please? cant seem to find any specific ones for the ST185.
|
| |
|
|
autojumbled
Club Retro Rides Member
Posts: 226
Club RR Member Number: 106
|
|
May 19, 2020 14:06:51 GMT
|
Hi , Hope things are going well! quick question, I am trying to source the stainless exhaust like yours. Do you happen to have the link for yours please? cant seem to find any specific ones for the ST185. Replied to your PM - They don't make the eBay JapSpeed special I have (needed some fab work to make it fit properly). IF you want an exhaust for ST185, your best option is the HKS Silent Hi-Power - it's periodically manufactured by HKS so you do have to wait for stock to be available but its one of the best systems avialable off the shelf. I would really like one but would rather spend £600 elsewhere on the car! |
| |
|
|
autojumbled
Club Retro Rides Member
Posts: 226
Club RR Member Number: 106
|
|
|
|
Being a tinkerer, I am unable to just bolt this thing back together and call it done. As I've been going along with this cam belt repair I've tried to tidy and replace stuff where I can, especially where it would be a struggle to do so at a later date. Last update I had the head off and I've since helicoiled the stripped thread that was the cause of the eventual tear-down. This then extended into helicoiling a couple of exhaust manifold stud holes as some of the old studs needed drilling out because they sheared when removing - sent the head off to machine shop to sort that and check the head to make sure it was flat. Everything has had a de-grease, wire wheel and paint where possible, too - even if this thing doesn't work when I eventually get it back together, at least it'll look a million times less crusty.  Pricing up new gaskets and whatnot I came to the conclusion it would be better to get the full engine overhaul gasket kit - this has led to replacing the valve stem seals which wasn't a job I had planned. Also replaced cam shaft oil seals and the crank oil seal. Opted for a Rev3 engine Toyota OEM MLS head gasket as they fit straight on the older Rev2 3S-GTE - definite improvements to be had there for future 'more boost' plans. Parts!   |
| |
|
|
autojumbled
Club Retro Rides Member
Posts: 226
Club RR Member Number: 106
|
|
|
|
Putting things back together..... Head back together with new exhaust manifold studs, valve stem seals, cam shaft oil seals, injector seals and a new overhauled distributor. Everything de-greased to finally rid the engine bay of the years of weeping gaskets and seals. Intake manifold wire wheeled to celan that up and a couple bits painted.  This was after I stretched the bolts securing the hydraulic tensioner as well - I'm going to chuck my torque wrench in the bin and pick up a new one as I clearly over-torqued them. This is the same wrench I was using to tighten the pulley bolt that stripped the threads in the head.....  Other bits were de-greased or wire-wheeled, soaked in Evaporust and painted.. 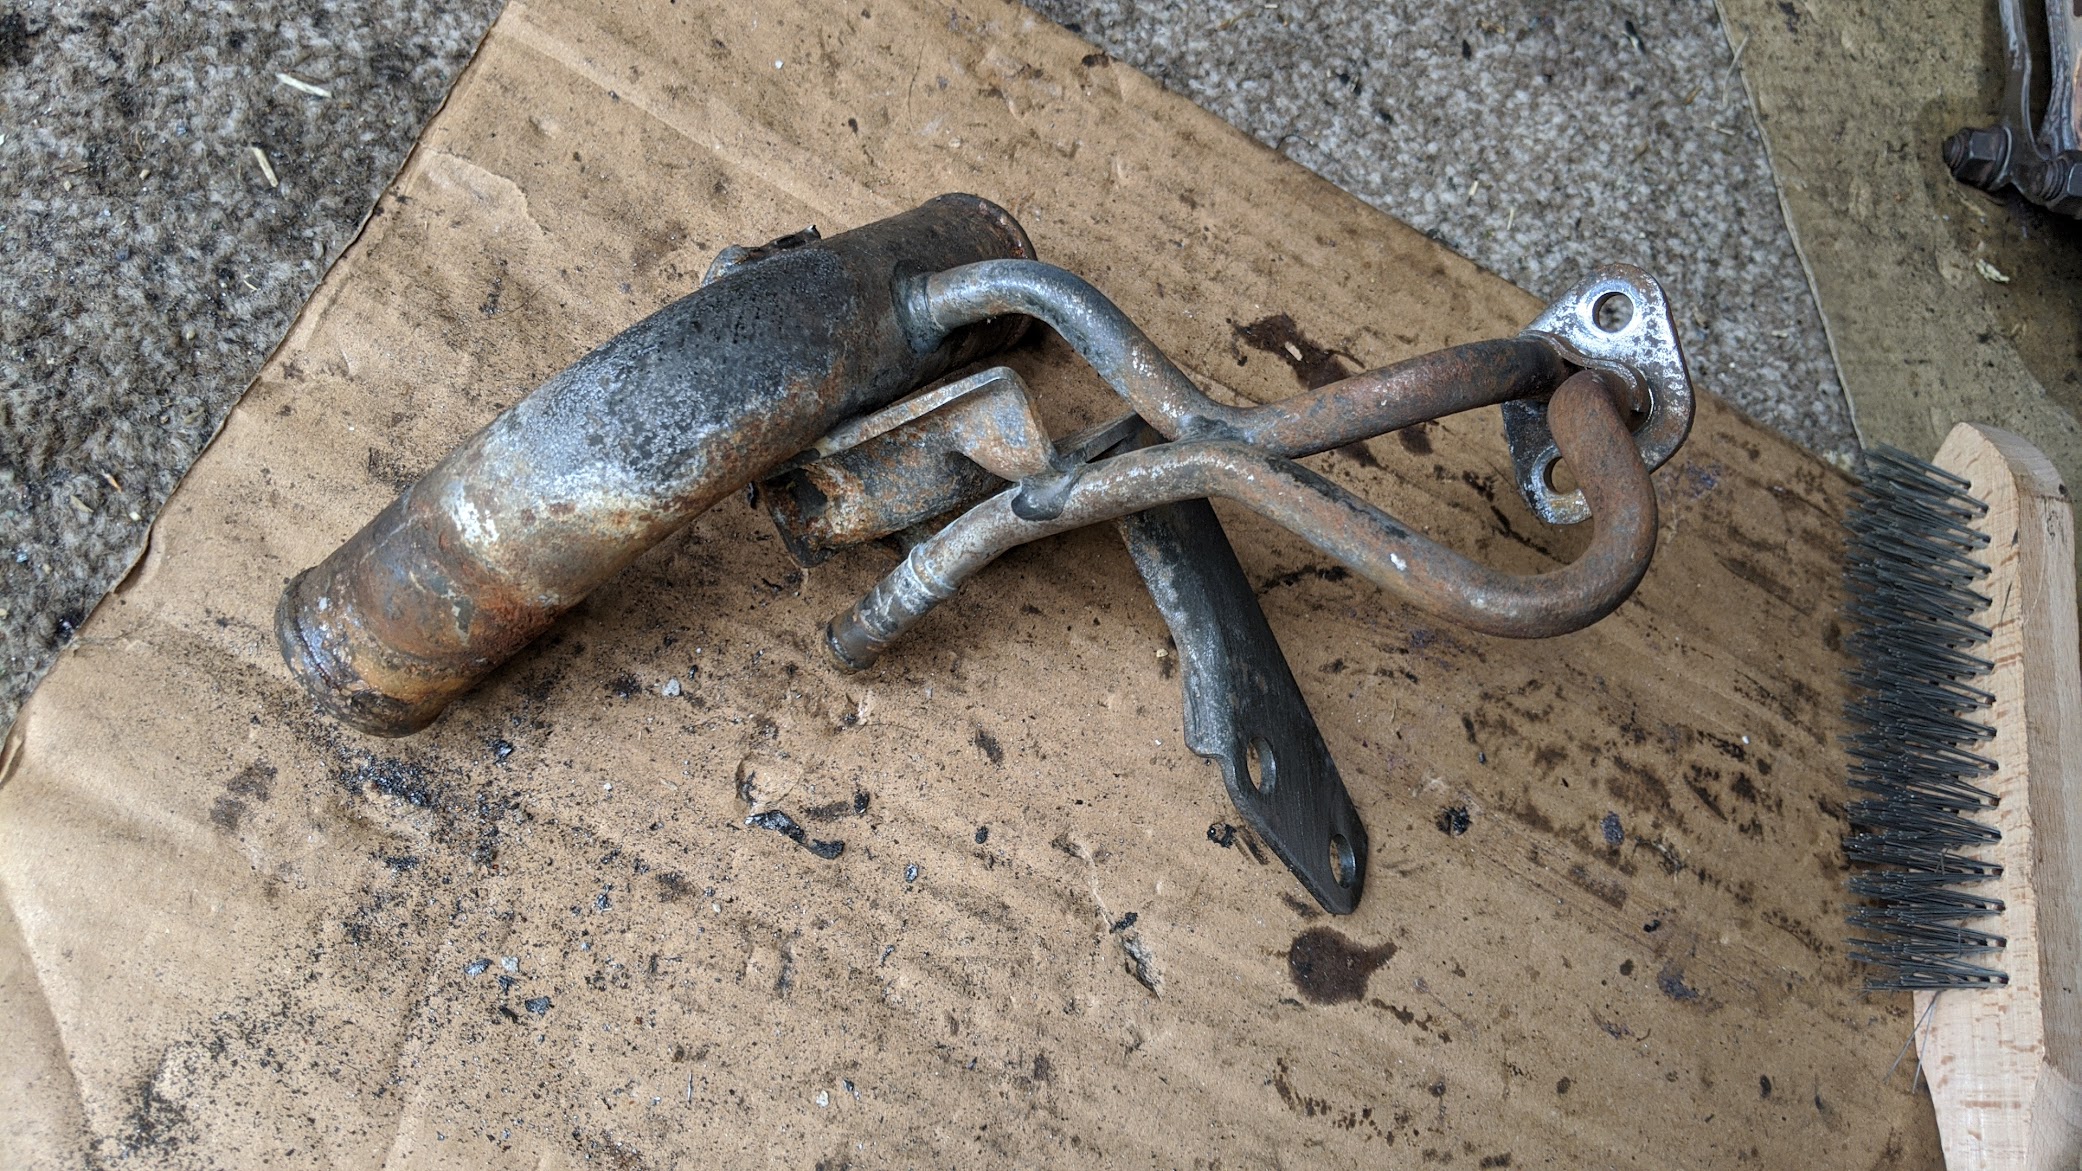 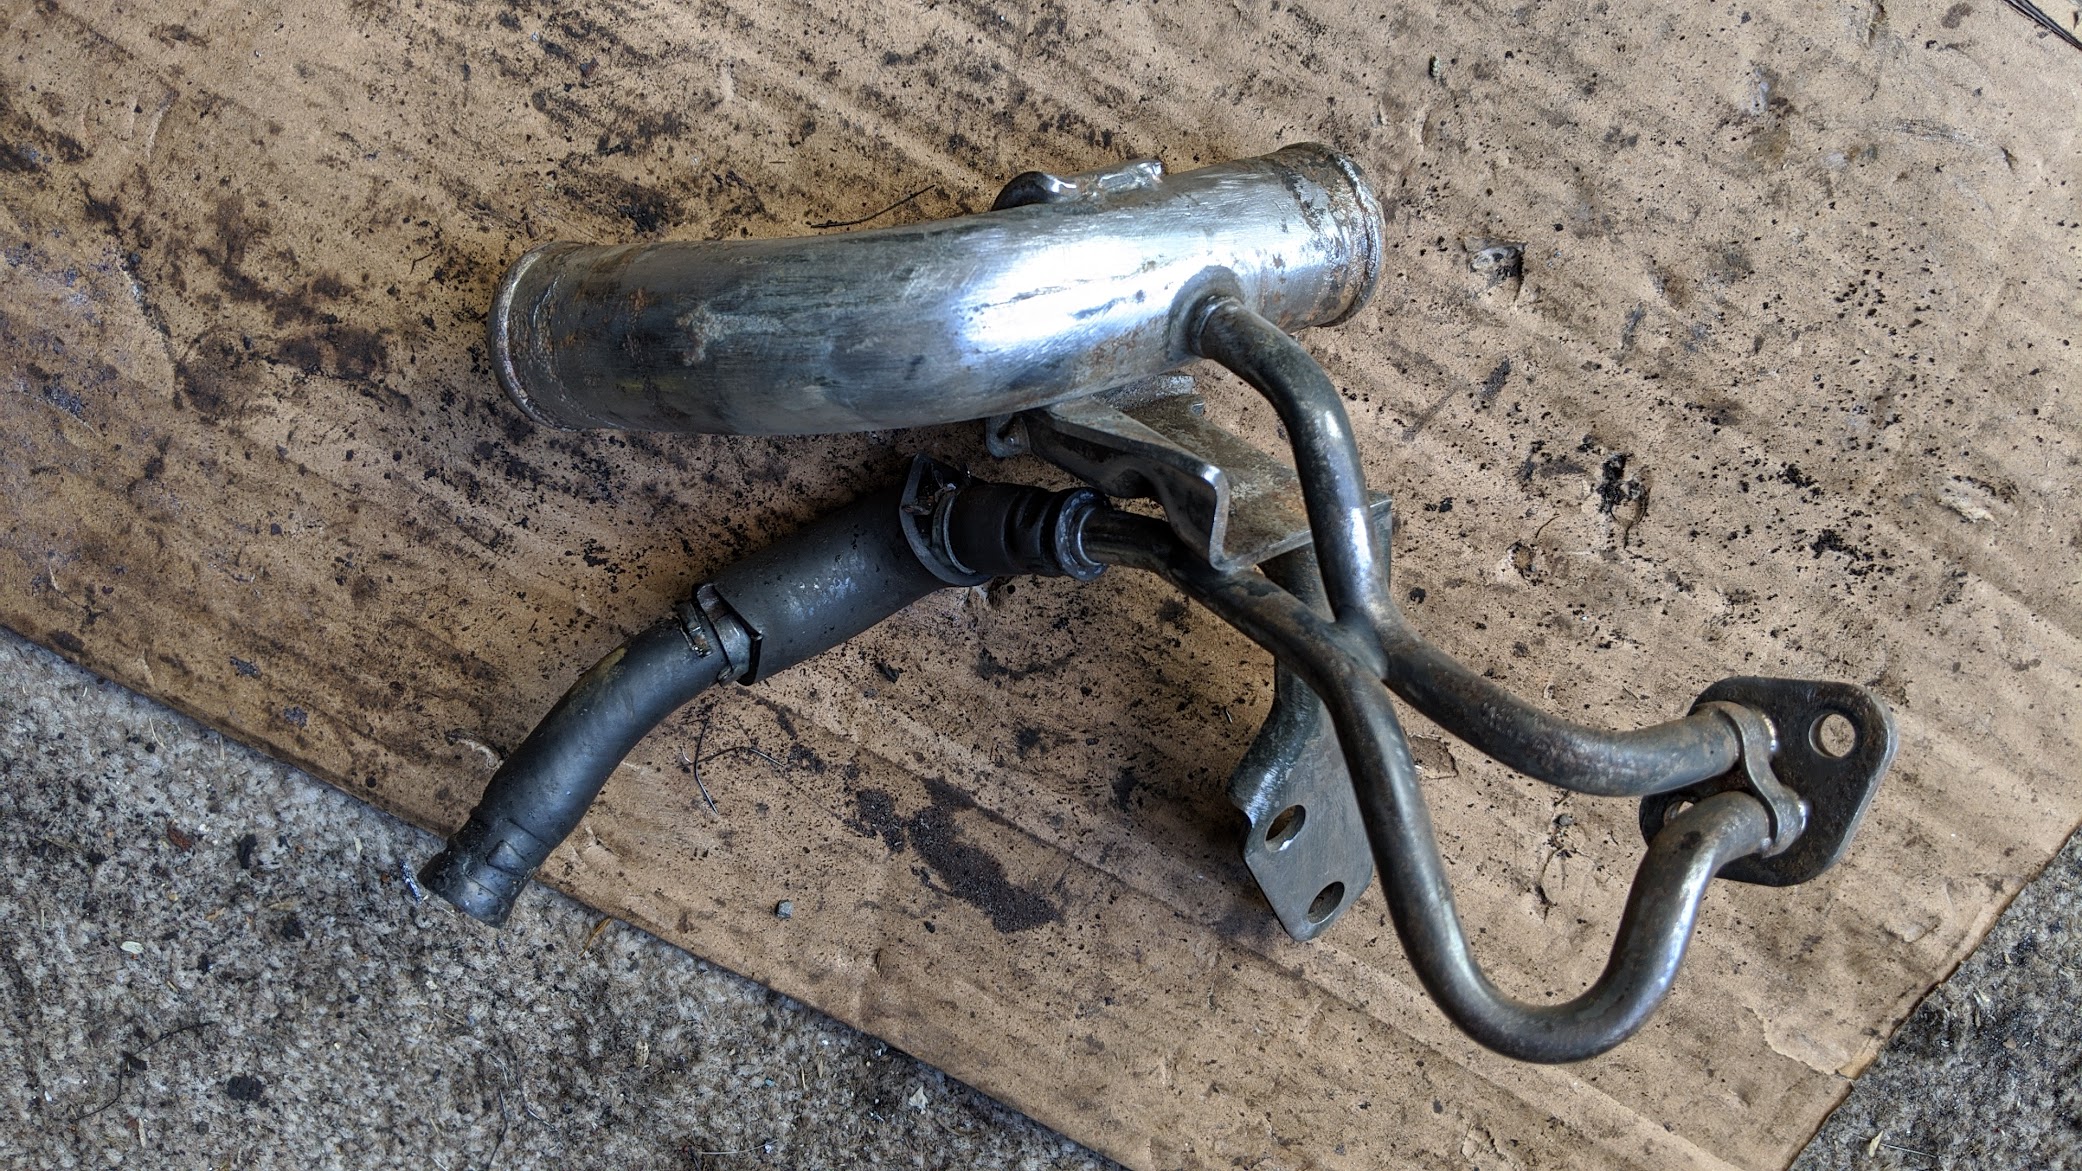   Head back on. New water pump, new idler pulleys and tensioner, along with the new cam belt (and ancillary belts). Pain in the  that job was, getting everything lined up with timing markings and having enough slack to get the belt on. I even went so far as to get a new bearing for the alternator belt tensioner pulley as it felt a little crunchy - measured that up and grabbed whatever came up in that size off ebay.    Another job not on the list but again, I was buying parts from BRD so chucked them on the order. Gear linkage bushes replaced with new poly items and a new 'sugar cube' to smooth out the gear changes. 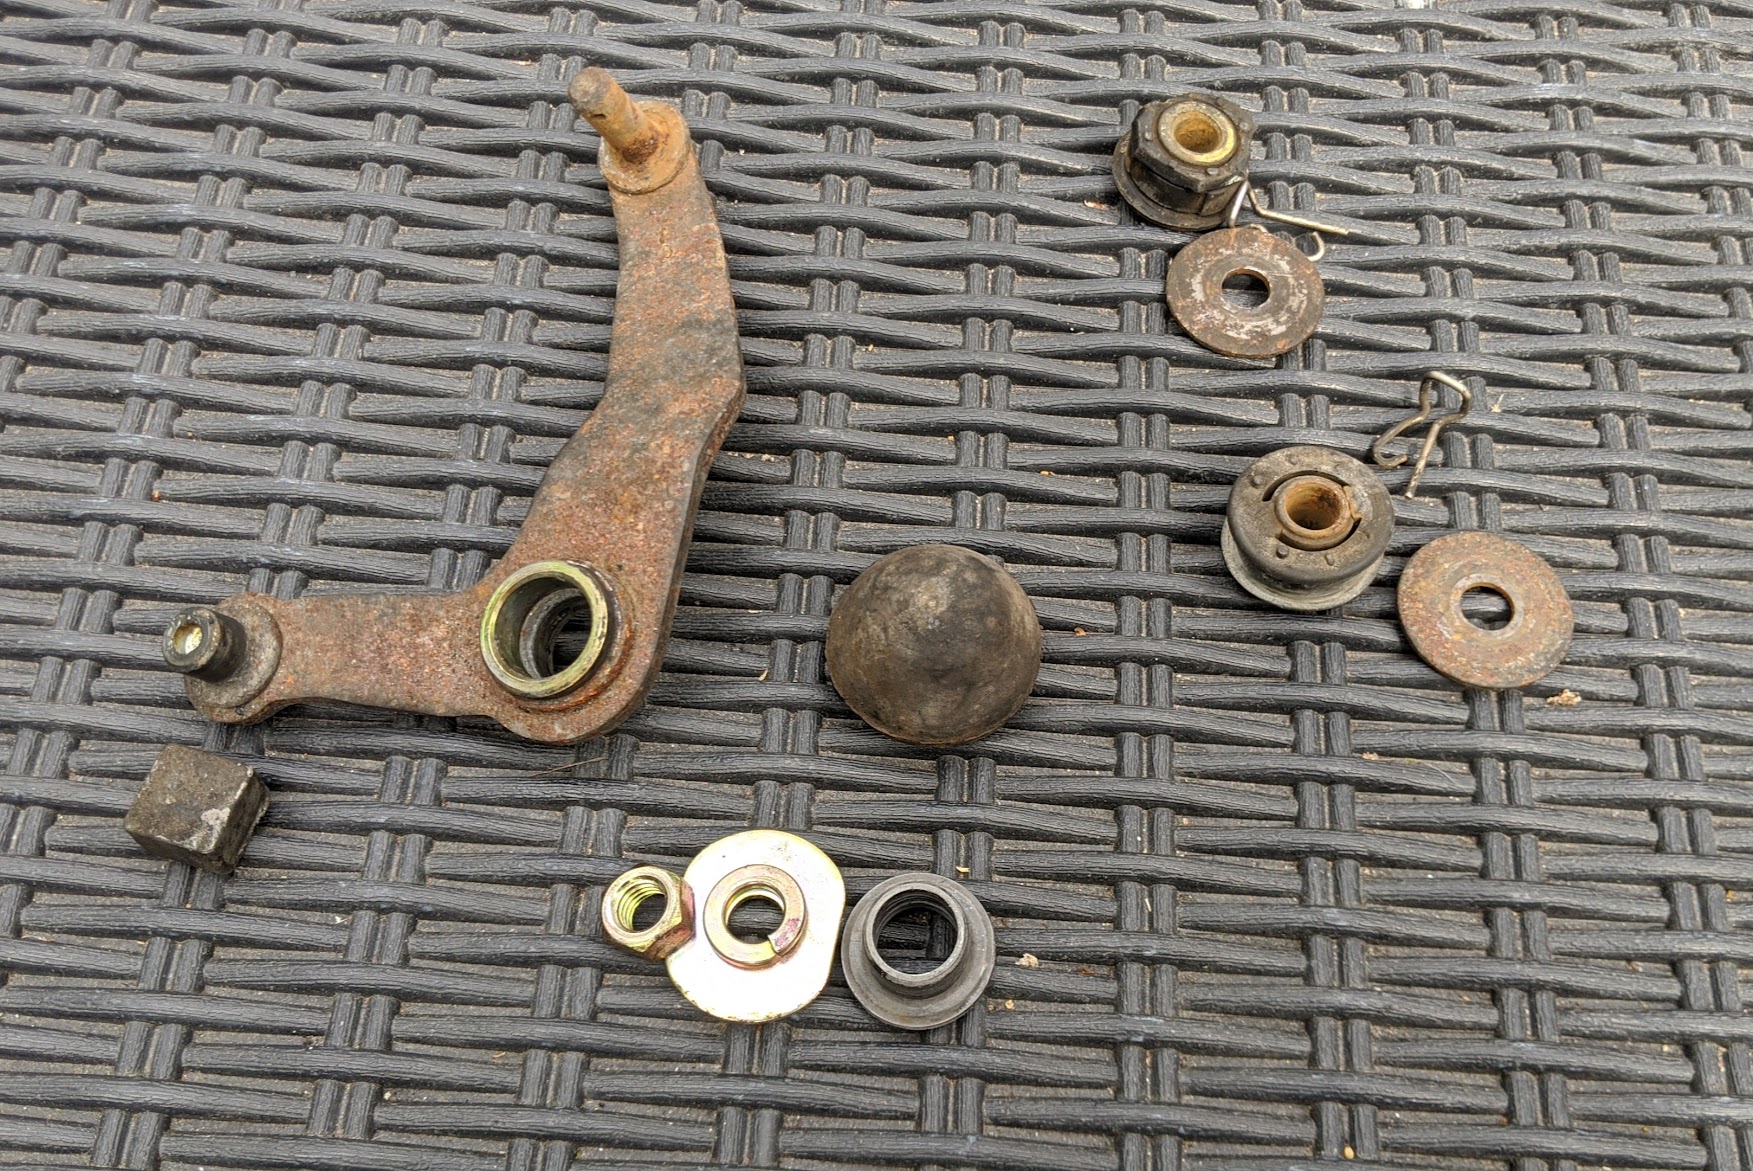  aaaaand another thing I wasn't going to do is the alternator replace. I was ordering bits from GT4-Play so added it to the list whilst I was there  The contacts on the original were rusted through and I thought may as well! 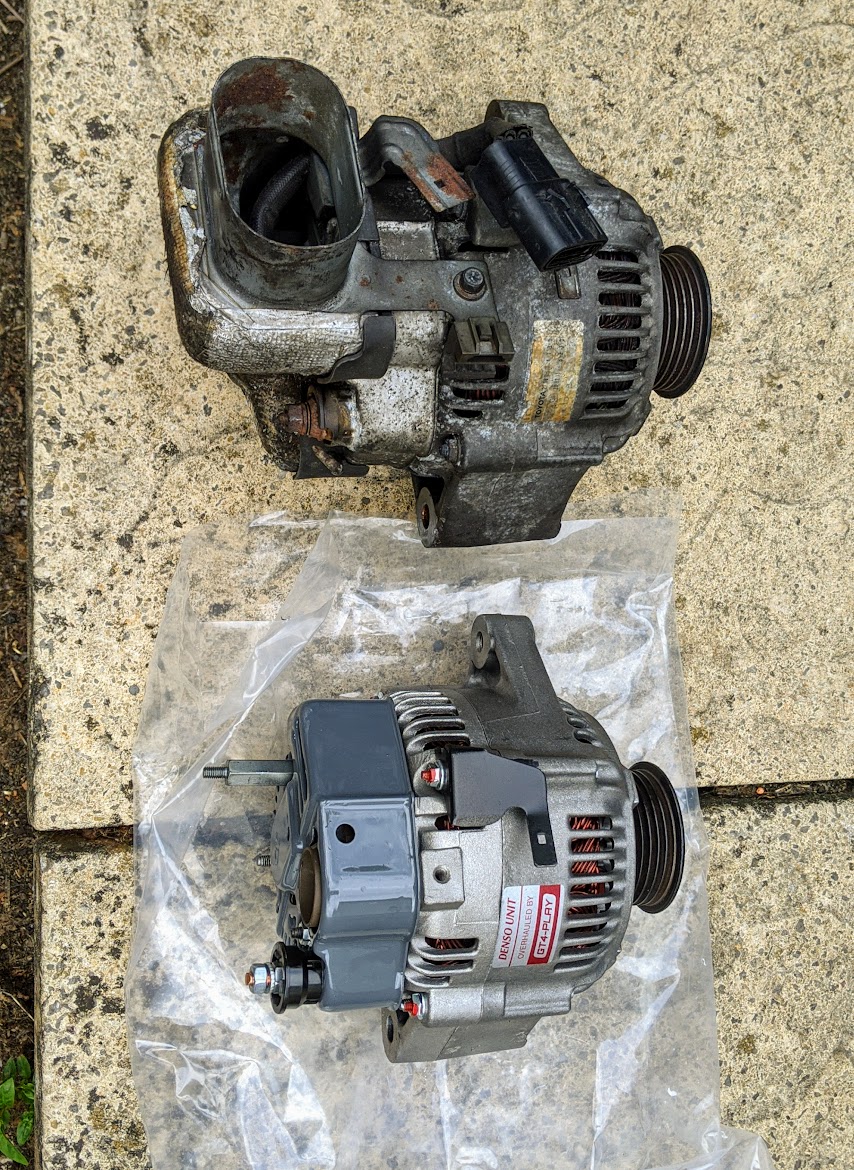 Everything back on so far, only drama was getting the exhaust manifold and turbo combo back on thanks to a slightly wonky re-drilled manifold stud. It may have been me when fitting but it just seemed easier if I removed a couple of the studs, hung the manifold on the 2 I left in-situ and then refit the remaining studs. Did some tidying of the loom as I refit it - some of the electrical tape and wrap was looking a little frayed and grotty so that's been re-taped. Fresh coat of VHT purple on the cam cover as well (in case you couldn't tell!)  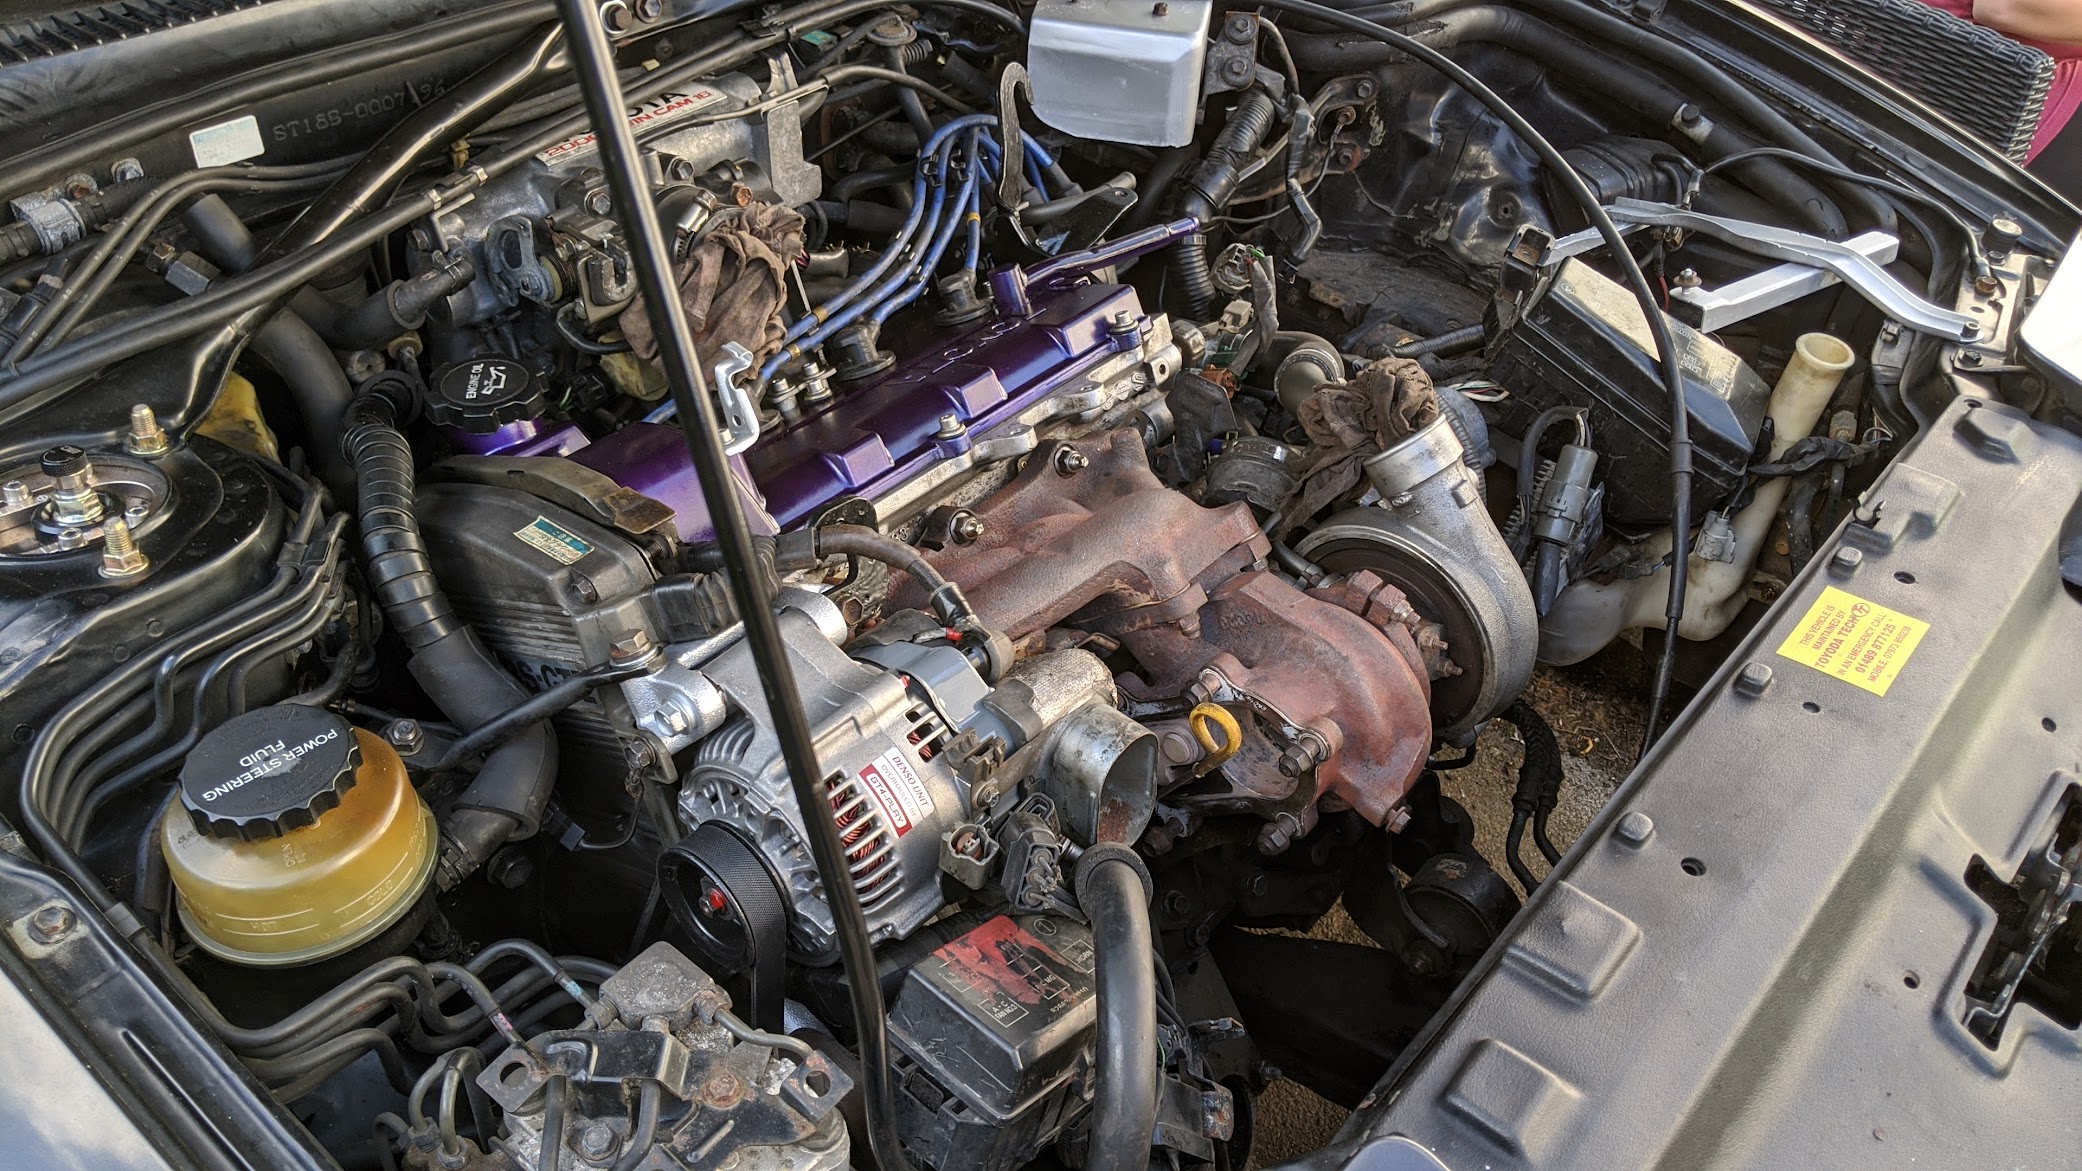 |
| |
|
|
autojumbled
Club Retro Rides Member
Posts: 226
Club RR Member Number: 106
|
|
|
|
When I was refitting the cam belt I was raising the engine up and down on a jack and stupidly forgot to disconnect the front engine mount and by not doing so, I tore the rubber mount. I've now replaced this with a poly mount from BRD. Also from BRD, a new decat pipe. The old pipe had a crack in it and the internal wastegate catches on the pipe, causing weird boost issues occasionally. I figured whilst I was here I would replace the pipe with anew one that doesn't cause gate fouling. Also has a flexi section to hopefully minimise cracking. 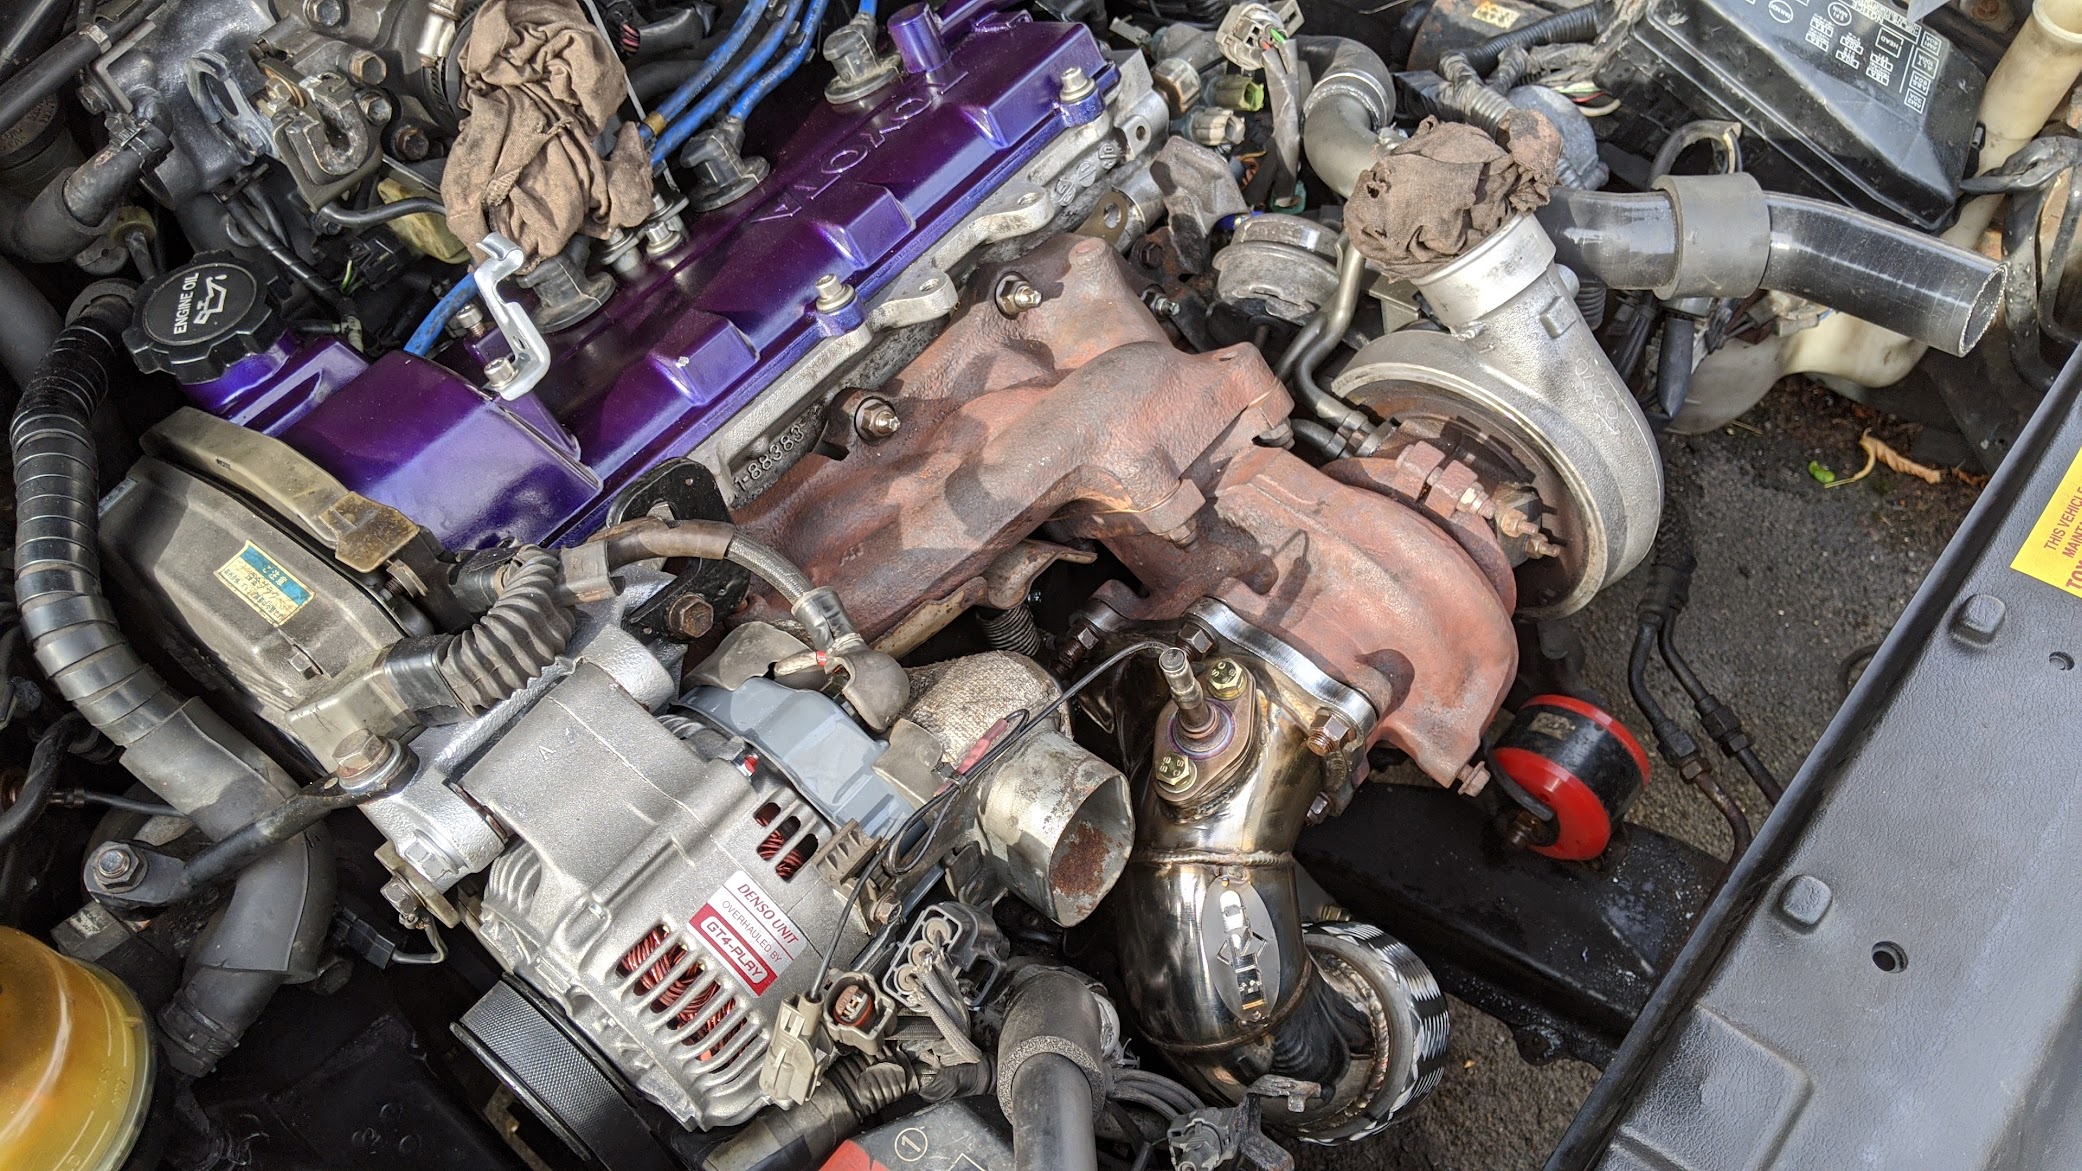 |
| |
|
|
|
|
autojumbled
Club Retro Rides Member
Posts: 226
Club RR Member Number: 106
|
|
|
|
It only bloody runs!! Well chuffed. Finished buttoning up everything in the engine bay. Chucked oil and coolant in, primed it and then went a first start - fired immediately and straight into a steady idle. Pretty happy with that   Since it's been off the road the MOT has lapsed so that'll need doing now. Just got the replace the fuel filler neck first as it leaks when putting vpower in and that stuff is expensive so would rather not drop any on the floor. |
| |
|
|
trimtechniques
Part of things
  Porsche 928 4.7 ltrs of German grunt. Mazda MX-5 MK1 Dakar. VW T4 camper
Posts: 158
|
|
Aug 28, 2020 15:29:04 GMT
|
|
Nice looking car. I like your VHT coloured cam cover and callipers. These are getting rare now and it's nice to see one being kept alive and cared for.
|
| |
|
|
autojumbled
Club Retro Rides Member
Posts: 226
Club RR Member Number: 106
|
|
Sept 15, 2020 16:00:59 GMT
|
Made a start on the fuel filler neck replacement and I'm going to need a few new parts in order to put it all back together. The tank straps are rusty but serviceable but I have sheared all of the tank cover retaining bolts - they hold the plastic cover over the tank and fasten into the tank straps. I've not investigated too much yet but I have 2 options: 1) drill out/remove the sheared bolts from the tank straps, clean up the rust, protect and find some spare 10mm bolts to hold on the cover. 2) Buy new straps and fixings. I know what the cheapest option is! I will take a closer look at the straps first and make sure I'm happy with the state of them before I reuse. Once I'd got the tank off which wasn't actually too much of an ordeal I then set about trying to remove the filler pipe itself - this thing is in a right state.....proper corroded.   I chiselled off as much of the rust I could to get access to the small 8mm bolt heads. Surprisingly, 4 of the 7 bolts came out without issue. Seems is just massive surface rust ratehr than the threads being rusted or damaged. 2 bolts I had to get a good pair of pliers on to remove (after filing some straighter edges onto the bolt heads) and 1 I cannot remove. I have an 8mm Irwin bolt extractor socket arriving this week so I can hopefully remove this final bolt. I've new 8mm bolts already to fit along with a new filler pipe. |
| |
|
|
autojumbled
Club Retro Rides Member
Posts: 226
Club RR Member Number: 106
|
|
Sept 15, 2020 16:03:26 GMT
|
The 8mm Irwin bolt extractor made short work of the final bolt holding the fuel filler neck on the tank. An old vs new pic to highlight the state of the old filler neck...and this is after I've given it a good wire brush to clean up during removal.  Quick check inside the tank whilst I'm here and everything looks great. Walbro 255 pump was installed a couple years ago but hardly seen many miles since!  New fuel filler neck on  I will grab some paint and underseal just to give the whole assembly a coat of protection and top up any areas underneath before this all goes back on the car. The tank straps are the next issue - they're pretty rotten but I have to rescue the brackets at either end as they're all discontinued except for 1 (of 4!). I've got brand new straps from TCB and the single available strap bracket but will need to source new small 8mm bolts that hold the fuel tank cover in place and the larger M12 bolts that are used on the strap brackets, as well as try and recover the remaining brackets from the old straps. Everything has been wire brushed and is now taking a long bath in evaporust to try and see what is salvageable - will sort out pictures once it all comes out of the solution and I know what I'm dealing with.  |
| |
|
|
lightyearman
Part of things
  GYJDM - Grimsby based Japanese car club - Find us on Facebook
Posts: 639
|
|
Sept 15, 2020 17:56:40 GMT
|
|
Looks like a very diligent and methodical build, nice one mate! I've long lusted after one of these
|
| |
'89 Honda CRX siR Glassroof Flint black fully restored track beasty
'90 Nissan S13 Pignose - pass the mig wire
'86 Mini - matt orange, 13" Wellers, Project 2018
'97 LDV Convoy home built camper/tramper van
'04 Saab 9-5 Aero HOT. Anyone want it?
'91 Honda VFR400 NC30 17,000 km from new
'87 Honda XR80 4 stroke baby crosser
'03 Mini Cooper S - honestly, they are fun...
'15 VW T5.1 LWB daily brick
|
|
autojumbled
Club Retro Rides Member
Posts: 226
Club RR Member Number: 106
|
|
Sept 17, 2020 20:41:12 GMT
|
After the tank strap bracketry came out of the evaporust it was pretty clear I wasn't going to be able to re-use the right hand side threaded bracket without some serious work. Thankfully this is the item that is still available from Toyota! The left hand bracket was still very rusty and seized but a little more salvageable. 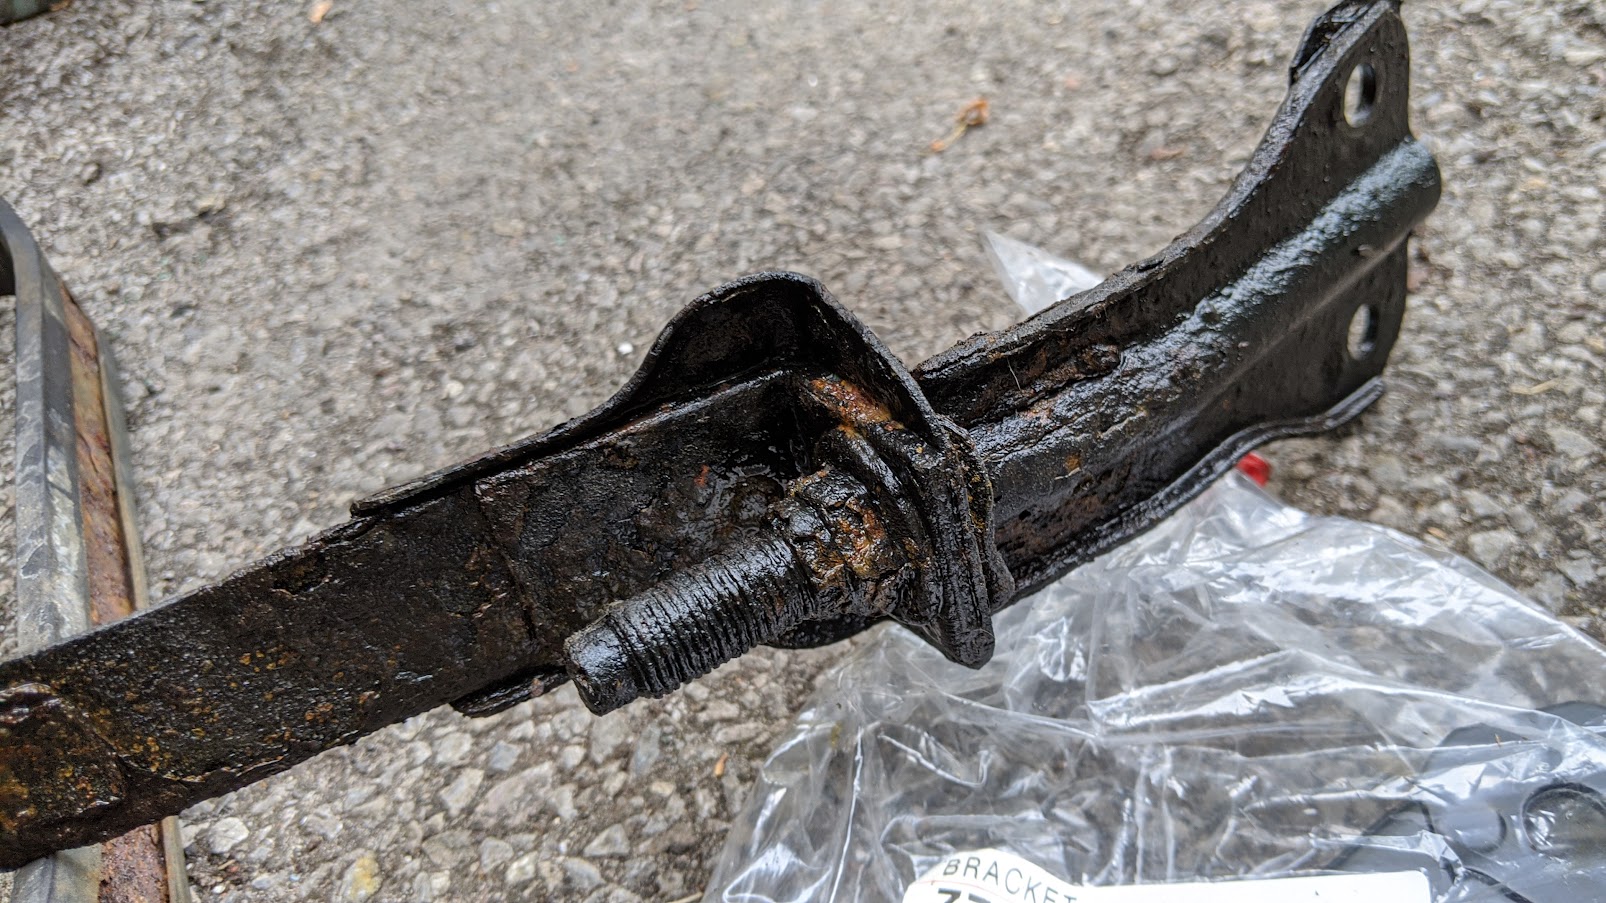 Managed to get the rusted bolt off with plenty of penetrant and careful spannering.  The brackets at the other ends of the straps look like this. Not too bad - will clean up ok. 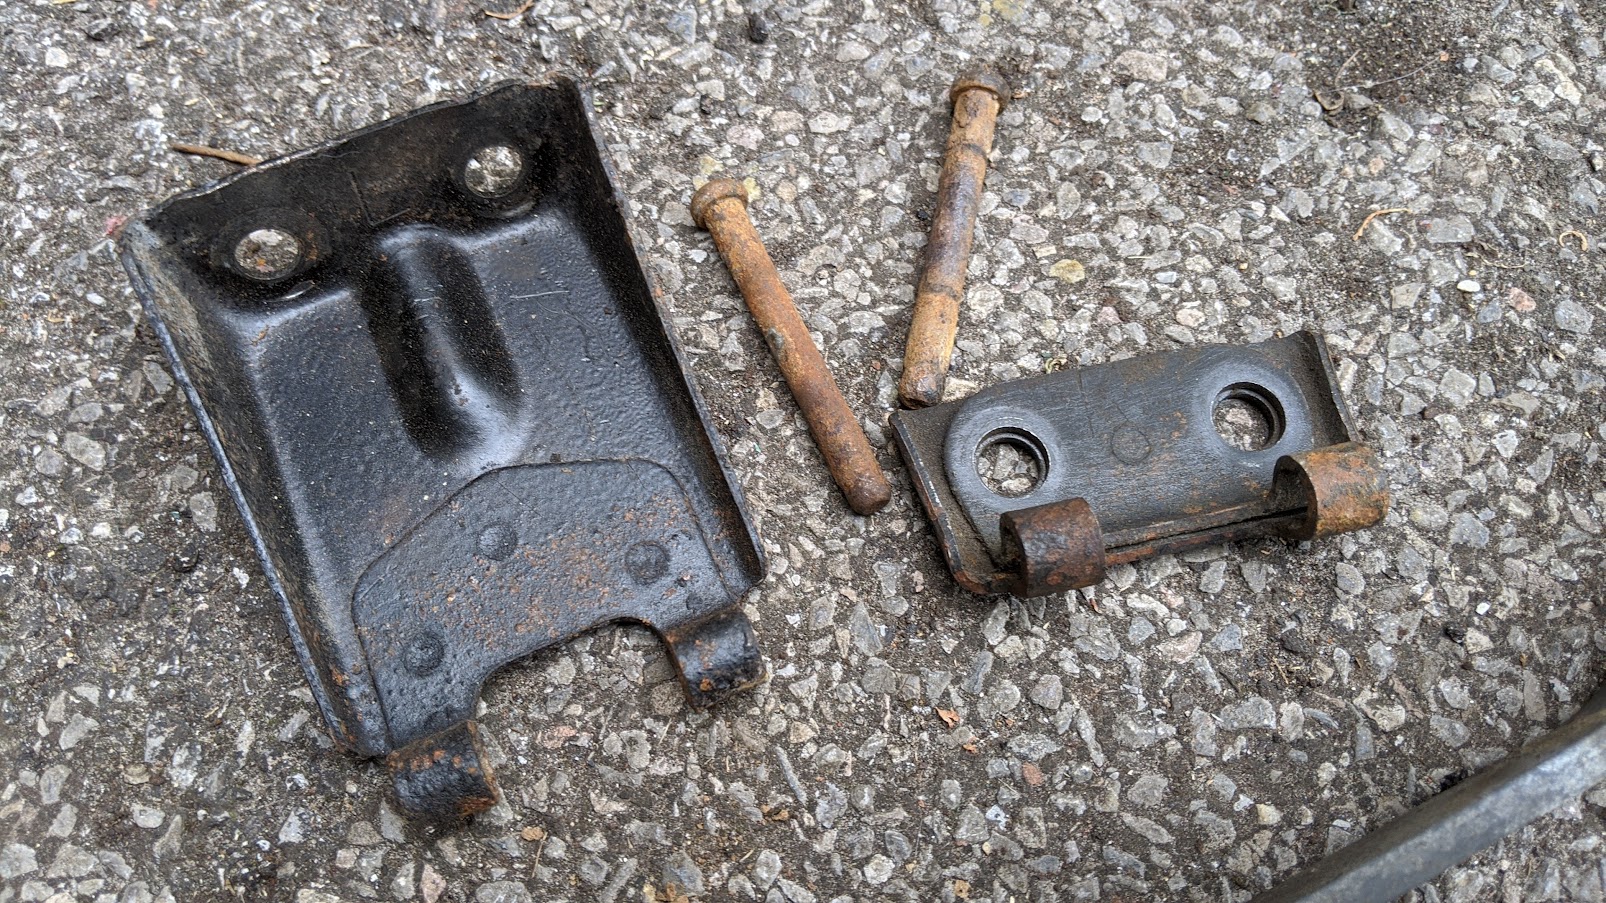 Something I've recently had (limited) access to is a sand blasting cabinet and this has been invaluable for these parts! I've now blasted all the crusty brackets and taken back to bare metal, followed by a primer. Some new stainless nuts also arrived for when I rebuild.  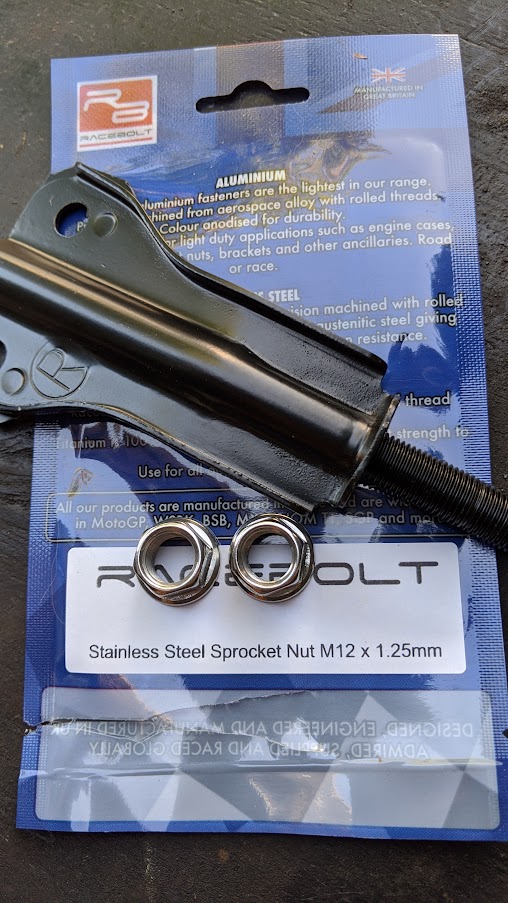 Now all I need to do is finish painting the brackets and find a few other painting products to protect the filler neck and tank, then it can all go back together.  |
| |
|
|
autojumbled
Club Retro Rides Member
Posts: 226
Club RR Member Number: 106
|
|
|
|
With the tank straps all shiny and new I've also given the tank itself a bit of love to hopefully keep it alive for a little while longer. A bit crusty in areas but the majority appears ok:   I went to town with the wire and flappy wheels to get as much surface rust off as possible then used a process of Bilt Hamber Hydrate80, paint and then rubberised underseal for good measure.  Whilst that was all going off I reassembled the straps ready for fitting. 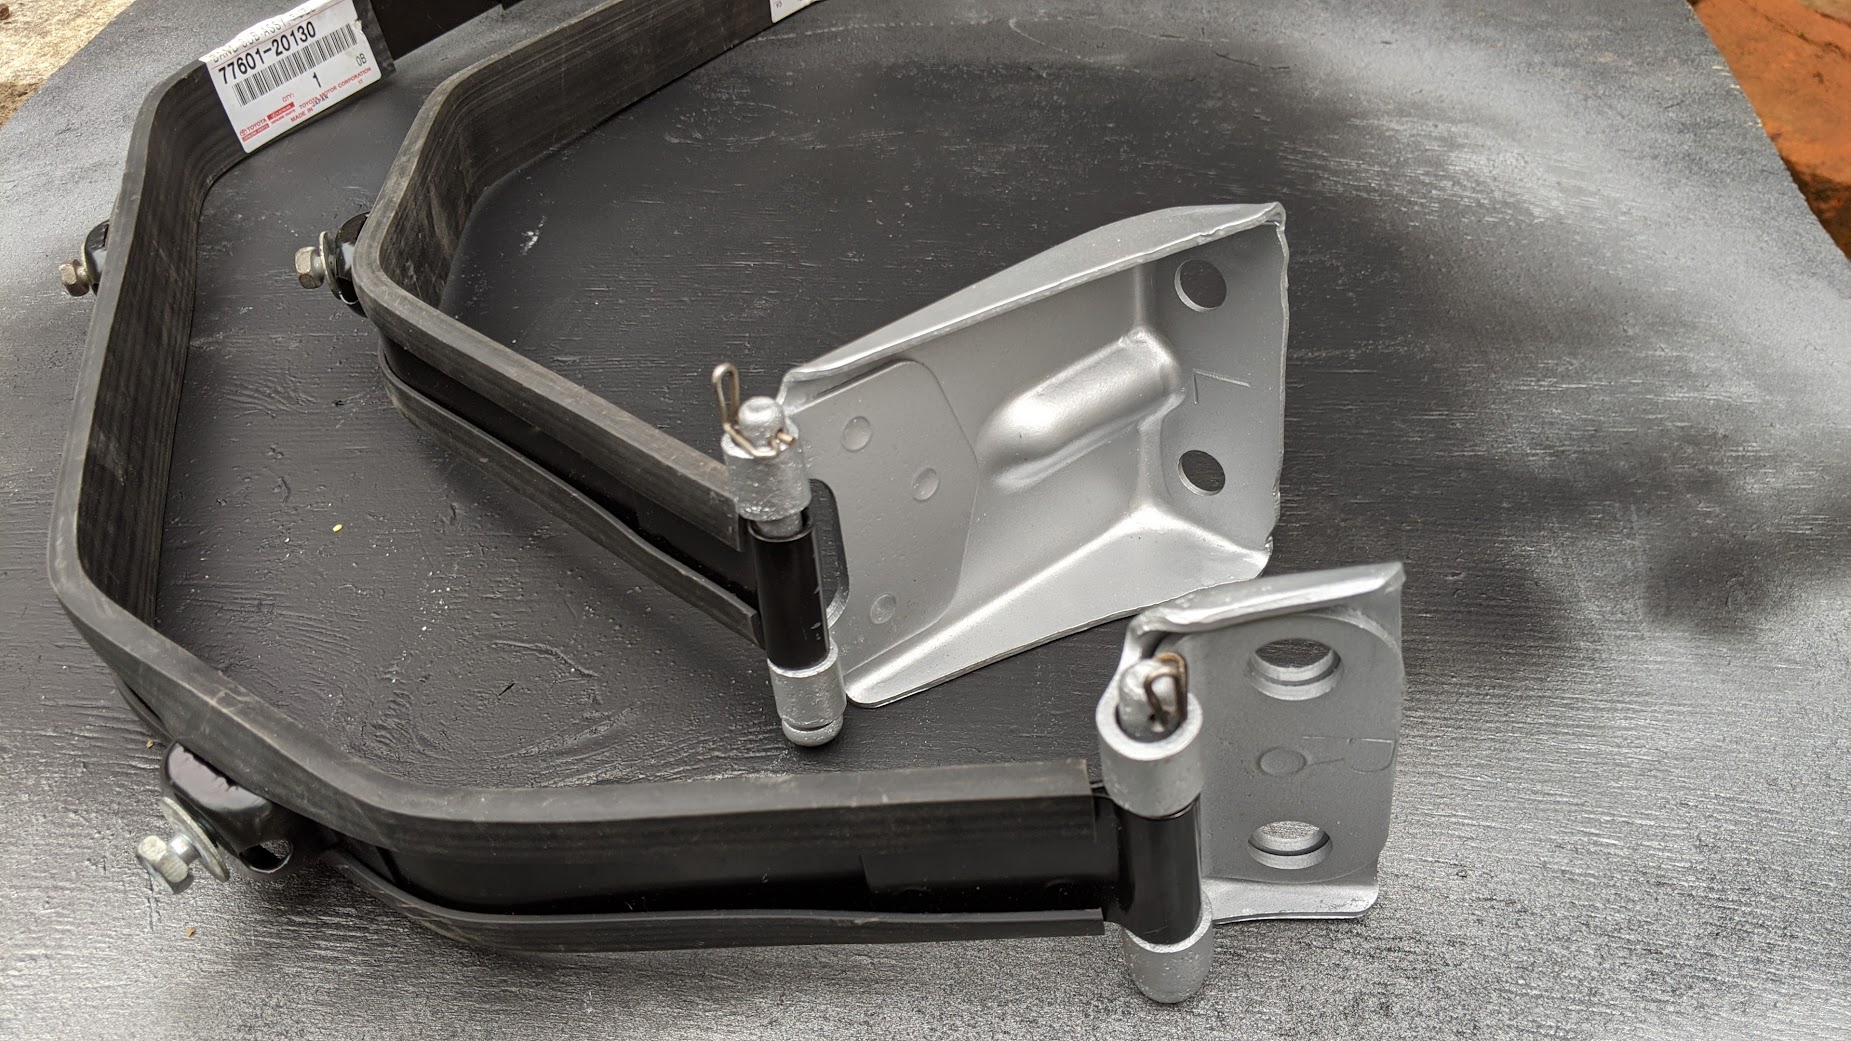 It's now all assembled and back on the car - not much to show in terms of pictures for that as all you can see is the plastic tank cover. Maybe now I can finally finish off setting the timing properly as I've not done that since fitting the new cam belt! |
| |
|
|
autojumbled
Club Retro Rides Member
Posts: 226
Club RR Member Number: 106
|
|
|
|
|
I went ahead and set the ignition timing some time ago but only this past weekend did I actually get chance to get the Celica out of the garage and for a drive round the block to test everything.
Something's not right.
It backfires when booting it, appears to cut fuel and throws an error code (code 12) - idles and drives at low revs/minimal throttle with no issues.
I suspect I have retarded the timing a touch?
Unfortunately I borrow a timing gun so didn't have one to hand to reset it.
I will get another gun and try and set the timing from through the wheel well rather than from above - I'm theorising that the angle at which I was looking down upon the timing marks may mean i was doing it a funky angle?
Alternatively, maybe all the ignition components just need a refresh? I've no idea how old the dizzy, rotor arm and HT leads are.
|
| |
|
|
autojumbled
Club Retro Rides Member
Posts: 226
Club RR Member Number: 106
|
|
|
|
Another frustrating weekend spent with the Celica. Went and picked up a timing light and got to work checking whether the ignition timing was out. It was probably a degree or 2 retarded so perhaps I have helped things by making sure its now bang on 10 BTDC. After sorting that I went ahead and got it all warmed up again and checked to see if the backfire still occurred - when doing this it died on my and then refused to start at all. Long story short, it cranked but wouldn't fire, multitude of error codes but these may have been caused by me unplugging things and checking stuff, put more fuel in it as was low and then left it until Sunday. On sunday's troubleshooting day it would now crank and splutter for a second before dying. More cleaning of AFM and TPS connectors and general tinkering and it eventually spluttered long enough for me to get some revs into it and keep it going. It smoothed out after a short while and now runs and starts OK. I still have a cut-out issue when revving it though. The error code that now gets flagged is related to the starter motor so I'm not convinced that is correct. Pretty sure I need to go get all-new ignition components and make sure everything is in good shape before going down a rabbit hole of troubleshooting. I am a little worried that all this weirdness could indicate there is somethign wrong with the ECU - the older units are known to start blowing and leaking capacitors. I do wonder whether I should pull it and at least double-check for any signs of age-related damage. |
| |
|
|
autojumbled
Club Retro Rides Member
Posts: 226
Club RR Member Number: 106
|
|
|
|
and if you hung around reading all my random notes, have a picture of it abandoned outside the shed on Saturday after I got fed up with it   |
| |
|
|
|
|


 that job was, getting everything lined up with timing markings and having enough slack to get the belt on. I even went so far as to get a new bearing for the alternator belt tensioner pulley as it felt a little crunchy - measured that up and grabbed whatever came up in that size off ebay.

