Darkspeed
Club Retro Rides Member
Posts: 4,880
Club RR Member Number: 39
|
|
Apr 19, 2016 16:43:30 GMT
|
|
Standard with old cast iron Ford heads is to have the guides and the seats just rough formed out of the head material and then machined. The step in the port is just where the original seat throat is cut - There may or may not be ridges where the machine stops depending on the diameter of the port left after the cores were removed.
As inserts and the cast iron of the heads are very different materials itis usually very easy to see an insert even in a iron head especially in the case of this head where it would have had to be aftermarket work.
The seats on the exhaust look to have the typical pitting and pick up you would find with an iron head run fr a bit on unleaded but cant quite make out if they have started to dish - the shaped of the seat on the valve will determine how bad things are.
Inlets look passable and may just need to be seats re-cut and valves refaced. What diameter are the valves?
|
| |
|
|
|
|
|
|
|
Apr 19, 2016 22:08:59 GMT
|
After having another look today and bearing in mind what you have just said ...  looks like it will be going in for seats and guides then. I don't see the point in not doing it while it's apart. Ho Hum... Got a slightly broken Sierra to fix first (snapped drivers side strut and burst damper insert) and the price of escort parts is mental... |
| |
1988 DUTTON LEGERRA MK1 - SPARES DONOR
1989 DUTTON LEGERRA MK2 - CURRENT PROJECT
1990 DUTTON LEGERRA ZS MK2
1990 DUTTON LEGERRA ZS MK2
DUTTON PHAETON S2 - Resting
DUTTON PHAETON S4 - Resting
DUTTON PHAETON S4 - PROJECT X
DUTTON SIERRA S2 - Resting
|
|
Darkspeed
Club Retro Rides Member
Posts: 4,880
Club RR Member Number: 39
|
|
Apr 20, 2016 16:05:08 GMT
|
Having just sold a MK2 RS 2000 dash for repair for over £200 !! I still say my ebay the Ford stuff / Mazda MX5 running gear is the way forward for any old Ford based kit car. If I still had my old Dutton projects none would be rebuilt with shonky old Ford stuff - I would be flogging it for crackers cash for fitting back on blue ovals duffers and fitting newer better engineered MX5 drive trains. See, even the Sierra is rejecting those donor organs now younger better sources of parts are out there. However with the Sierra as a daily you are a bit stuck for quick fixes. I have noticed that even Cortina based Ginetta G26's are fetching quite strong money now and I bet they never see the road again in all thier plastic/Galv wedgie loveliness  |
| |
|
|
|
|
|
|
|
Sierra fixed but at a cost. Coilover struts on 170lb springs all very shiny and worked out cheaper than buying all the replacement standard parts. Made it to Stoneleigh and back on Sunday so can't be that bad. Anyway, bit more done to the Legerra now. These flex like nobodies business when you get in and out, causes the doors to jam on the shuts and ruins the fibreglass in the door aperture. The accepted cure is to brace the chassis underneath. As I got some space back I decided to drag the chassis out and using the trusty engine hoist I lifted the chassis on one side and then carefully lowered it back down. This means the bits that need therapy are higher up so much easier to get to. Gravity also comes in useful as the chassis is supported at either end with axle stands and and natural bend is reversed. 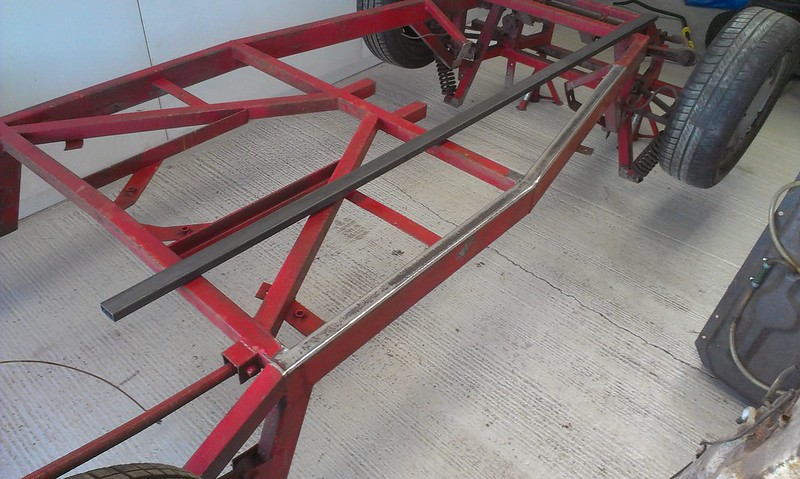 IMAG0526 IMAG0526 by Adrian Southgate, on Flickr I started to run a flap wheel over the lower edge of the rail but it's quite pitted so I'll use a wire brush in the angry grinder and then weld through primer once it's tidy. Sitting on top of the chassis you can see the 20mm x 40mm box thats going to be added. It will need a wedge taking out about halfway to allow it to follow the existing chassis then the whole lot is going to be seam welded together. Looking at the other parts underneath I can see I am going to have to order some more wire brushes. Round two this evening and realised the 'tough paint' was actually an extra fine grit flap wheel  That changed for something with a bit more attitude it took less than ten minutes to remove all the paint and pitting from the area to be welded. Time to get creative. I trimmed a little V out of the end of the box section and 'adjusted it into a curved end which will hopefully match up with the existing chassis and round the new metal off nicely. Bit of a gap to fill but that'll fill with weld. 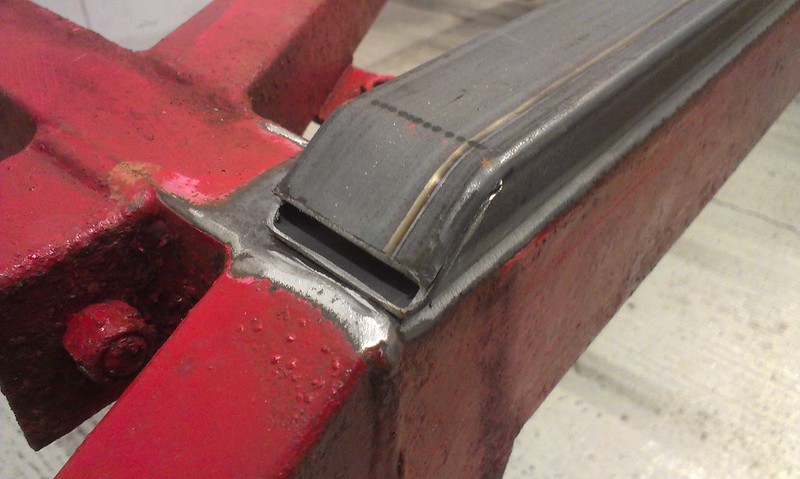 IMAG0533 IMAG0533 by Adrian Southgate, on Flickr Did something similar to the front. 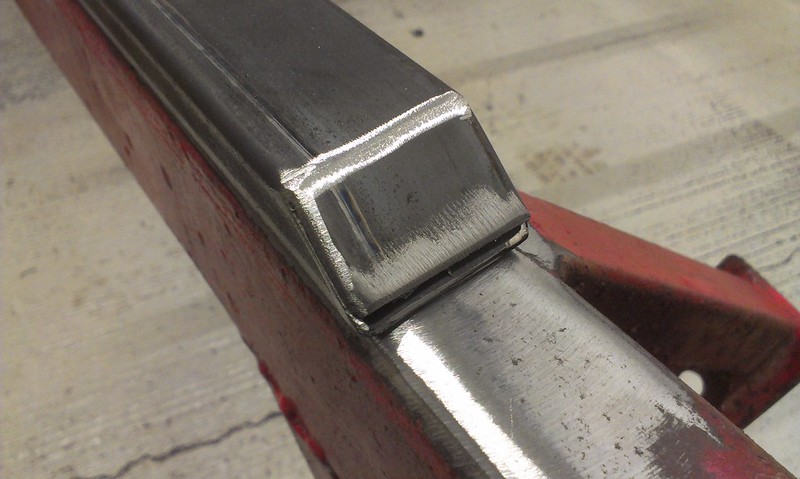 IMAG0535 IMAG0535 by Adrian Southgate, on Flickr Both sides are cut and laid in place but no welding done as I'm having a pro do that. They will need the V shape I cut out in the middle welding up at the right angle before they are welded to the chassis. 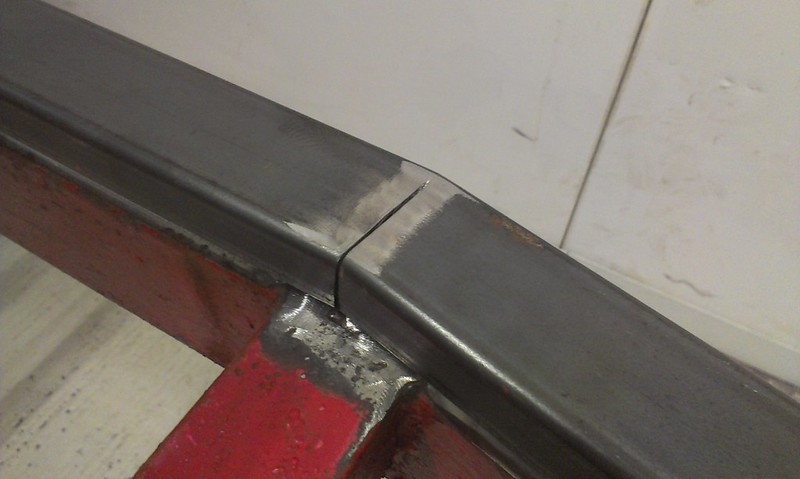 IMAG0536 IMAG0536 by Adrian Southgate, on Flickr The rails fit nicely as they are so hopefully it will be just clamp up and mig on, might have to clean a bit more metal back in places. Plan is for me to sit on the centre of the chassis while they are welded on which will hopefully produce a slight bow in the side rails in the opposite direction to that produced when the car is the right way up and my lardy backside sits in it. Last one for the night is both side rails sitting in place on the bottom of the main chassis rails. 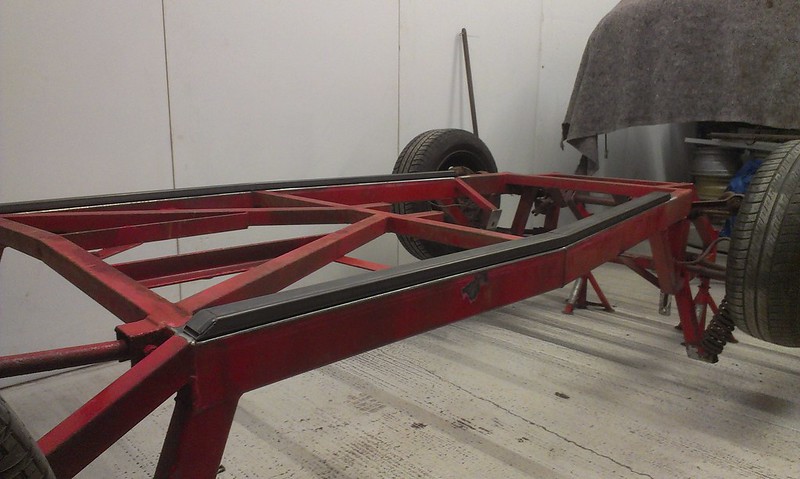 IMAG0532 IMAG0532 by Adrian Southgate, on Flickr |
| |
Last Edit: May 4, 2016 22:28:26 GMT by Rebuilda
1988 DUTTON LEGERRA MK1 - SPARES DONOR
1989 DUTTON LEGERRA MK2 - CURRENT PROJECT
1990 DUTTON LEGERRA ZS MK2
1990 DUTTON LEGERRA ZS MK2
DUTTON PHAETON S2 - Resting
DUTTON PHAETON S4 - Resting
DUTTON PHAETON S4 - PROJECT X
DUTTON SIERRA S2 - Resting
|
|
|
|
|
|
|
Update time. The ARB on ford mk1 and mk2 escorts is what also holds the TCA's parallel and stops the wheel from going back and forward. It also does the same job in the legerra. If it ain't straight then neither are your front wheels. While I've been dismantling this one I found the ARB was slightly skewed and was pushing the passenger side TCA back by about 15mm. This is more visible on my green one with the bigger wheels as it looks like this... 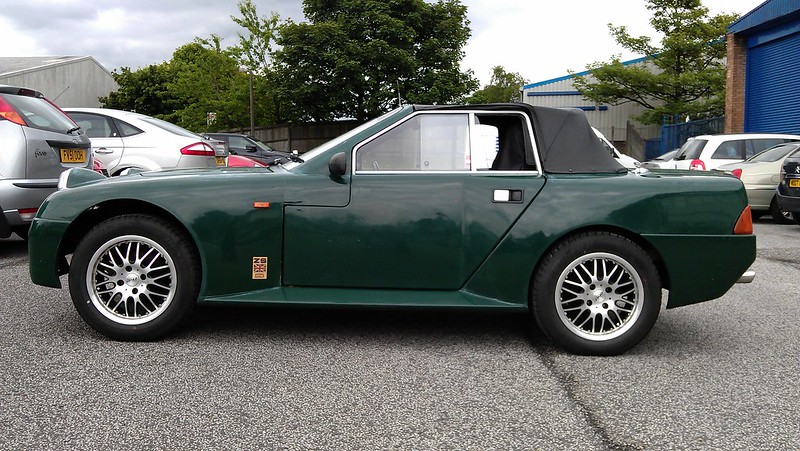 To rectify this I have taken the old mountings off and replaced them with something a little more substantial. This is the old mount, its just two 1/2 inch bolts welded to the chassis rail, and the bush wedges between them when compressed. The mounts are not squared off which allows the bush to move around under stress. 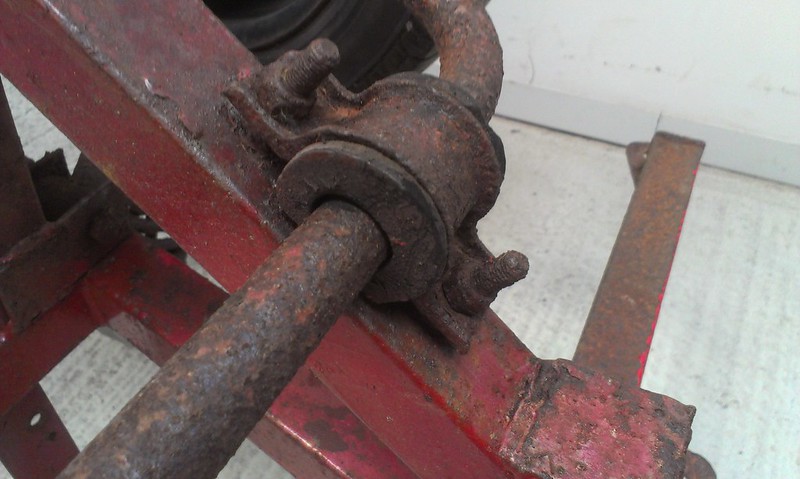 This might have seen better times but now it's just rust... Out with the angry grinder and made some wee alterations... Now I was a bit worried about the chassis being square so out with two tape measures and some uber magnets. Measured the chassis diagonally and its within 2mm, quite impressed... measured lengthwise it is 1mm out so 'within tolerance' on a dutton  Using the ARB that will be fitted to the car (not the original) I fitted the new bushes and clamps bolted it back through the TCAs and spent an hour comparing diagonal measurements, drawing with a dry wipe marker and cutting little square blocks to weld to the chassis to keep the bushes straight. I decided to weld on blocks and then drill and tap them rather than try and weld bolts on in the right place. No exposed thread to go rusty again has got to be a bonus. The other thing is I can fit stainless allen bolts to fill the holes when the chassis gets blasted to stop the blasting media getting into the threads. I was originally planning to make a box section to weld on to do this but that just seemed to be overkill. New blocks cut, welded on and tidied up with the flap wheel. I might try to grind out the holes and fill them with more metal to make it a smooth surface. My excuse is it's the first time I have used a gasless mig ... 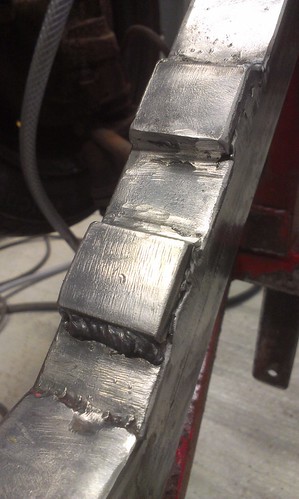 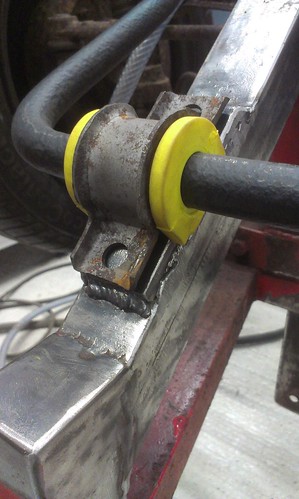 Bush / clamp assembly in place to test fit. I need to take a little more off each block as the clamp is down tight before the bush is fully compressed into place but thats just fine tuning. Holes drilled and tapped this is now bolted into place to test fit again. 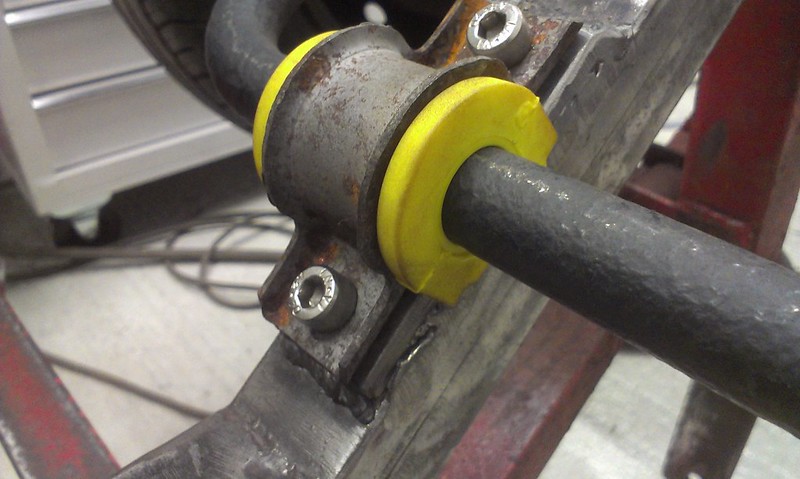
And thats me done for the night. Both sides have been welded on, initial clean up done then drilled and tapped to M8x1.25. There is still a bit of fine tuning to be done in the gap between the two blocks to allow the bushes to sit perfectly. |
| |
Last Edit: May 6, 2016 22:58:14 GMT by Rebuilda
1988 DUTTON LEGERRA MK1 - SPARES DONOR
1989 DUTTON LEGERRA MK2 - CURRENT PROJECT
1990 DUTTON LEGERRA ZS MK2
1990 DUTTON LEGERRA ZS MK2
DUTTON PHAETON S2 - Resting
DUTTON PHAETON S4 - Resting
DUTTON PHAETON S4 - PROJECT X
DUTTON SIERRA S2 - Resting
|
|
|
|
|
May 26, 2016 23:17:10 GMT
|
Ho Hum, another busy couple of weeks doing apparently nothing... Photo's though, oh yes, I know you all like photo's... Bit of welding done... Now I'm not exactly a 'tidy' welder, in fact most of the work i've seen done on here puts me well in the 'rank amateur' class. I'm not trying to show off my welding skills. The original box section has a very rounded edge making the V between the two bits of metal quite deep (5-6 mm) Most of this gap is now full of weld and a lot has been ground back flush rather than leave messy bumps in the metal. I've probably committed overkill on this but I really want it to stay put and not use 'filler'. I'd appreciate any constructive criticism or suggestions on how I could improve or if i've done something horribly wrong. All these bits were tacked, then stitched a bit at a time allowing time to cool between welds, took bloody ages.  Anyroad, here's the evidence. 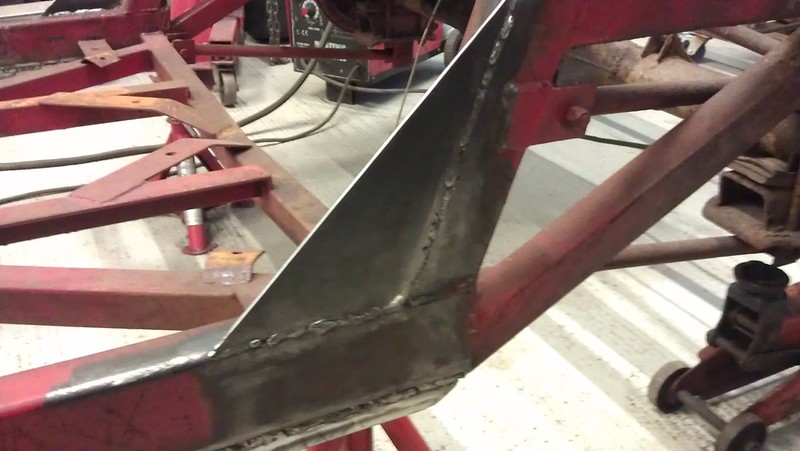 N/S chassis rail, large plate fitted to support the original welded joint. 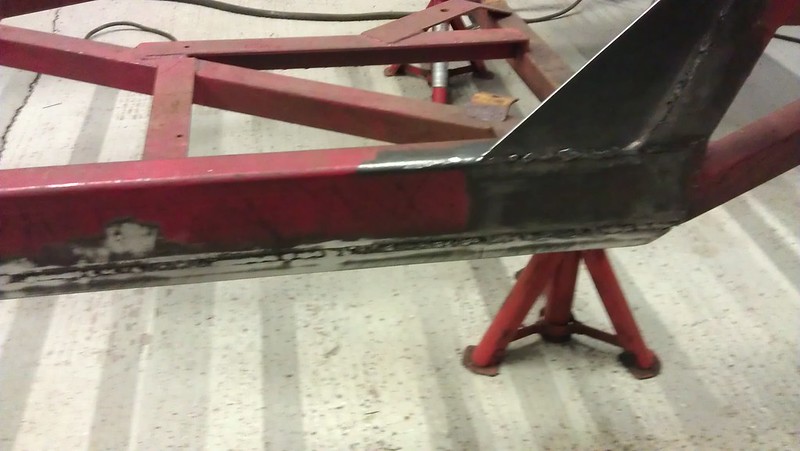 N/S chassis rail, support box, to stop the main rail from flexing  Full length of main rail seam welded, honestly thought i'd never finish this. 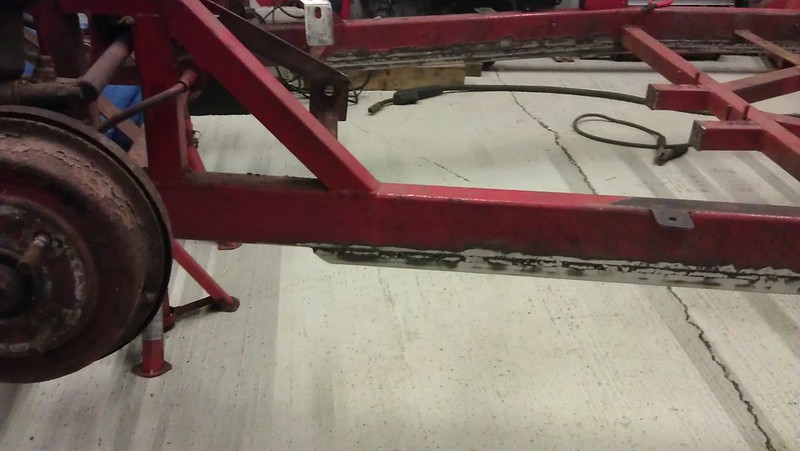 And the front of the rail, this bit is diagonally braced above the rail and may yet be plated as it exposes the side of the engine and starter motor (on the pinto) to spray. Yes, thats a drum... on the front,  There is a set of discs and calipers waiting to be fitted. 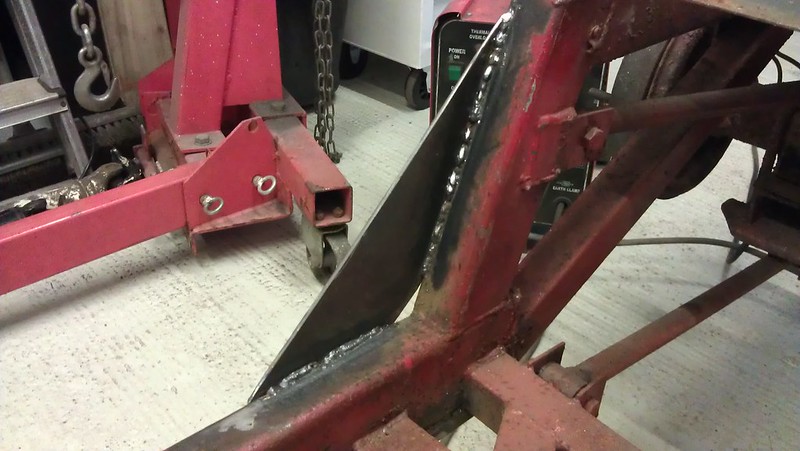 O/S inner edge of the large plate, more 'practice welding' where its not going to be visible. Once the chassis has been blasted i'll be able to touch this up if required (or smooth it off) 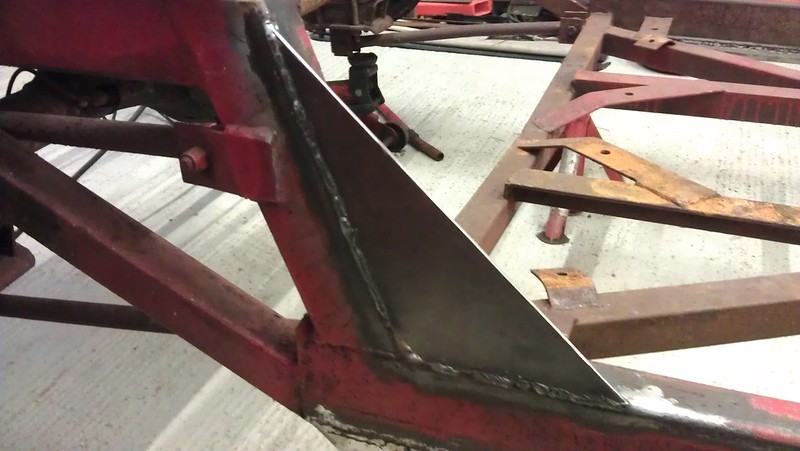 O/S outer face of the same plate, no grinding back yet, just wazzed over with the angry grinder and the wire wheel.  O/S outer face of the main rail, again seam welded down the entire length. It may not be tidy but it's solid. I put axle stands under the front and rear extremities of the chassis and stood on the gearbox mounts. Normally this would cause a measurable deflection in the chassis, thats now gone. Hopefully this will prevent the door shuts fouling when closing as well as stiffening the ride up. |
| |
1988 DUTTON LEGERRA MK1 - SPARES DONOR
1989 DUTTON LEGERRA MK2 - CURRENT PROJECT
1990 DUTTON LEGERRA ZS MK2
1990 DUTTON LEGERRA ZS MK2
DUTTON PHAETON S2 - Resting
DUTTON PHAETON S4 - Resting
DUTTON PHAETON S4 - PROJECT X
DUTTON SIERRA S2 - Resting
|
|
Darkspeed
Club Retro Rides Member
Posts: 4,880
Club RR Member Number: 39
|
|
|
|
|
Looks good Ade,
Are you fitting new uprights as well for the disc conversion? - I have it in mind that there are three or four different strut/upright types and none of them particularly interchangeable with other discs and hubs.
I think the Series 4 that I had early MK1 Escort small discs (for 12" wheel) and both the hub and the stub axle were also small. To go to the larger discs I think I then went for Capri stubs, the axle is mounted higher on the strut so lowers the car 1" and the steering arms have the same steering arm ball joint for the MK1 rack. I then had a complete change and fitted double wishbones and Cortina uprights from a Series 3 car that someone else had fabricated along with the corresponding MK2 rack. The Capri stuff then going back on the Series 3. The main thing I recall now is that it was not straight forward.
|
| |
|
|
|
|
|
May 27, 2016 16:08:55 GMT
|
I have the stubs, hubs and discs from a mk2 already to go on (they came off my green one when I upgraded to vented) They are the later ones but have integral steering arms so take metric track rod ends however they can't cope with vented discs as the steering arm is a knats to close to allow free movement without the risk of the boot on the track rod end touching the disc. The green one looks like this under the front... 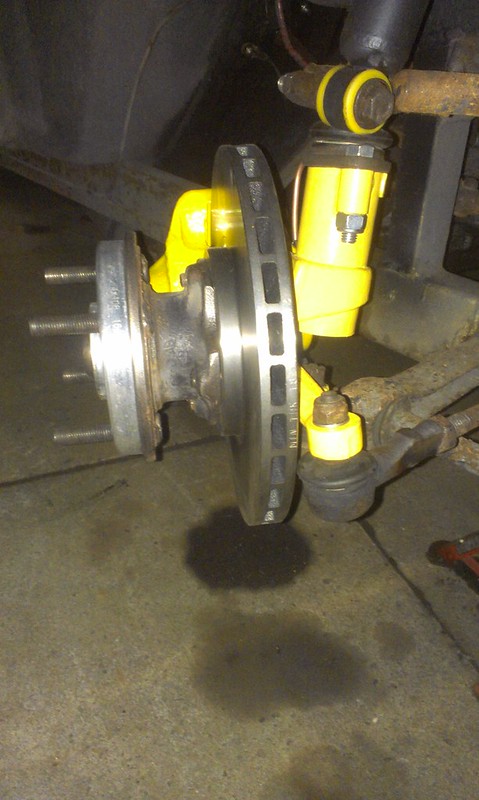 You can see how close the rubber boot is to the disc, these have been changed to a rose joint setup which is a better fit. The old stubs have been blasted, the hubs will be too (once I've sealed the ends) new wheel bearings and new discs to fit as well as refurb calipers. The escort mk2 stainless flexi's are too long for the Legerra and join to the car in a stupidly inaccessible location so I'm going to move that mount as well, from under the chassis in the corner... 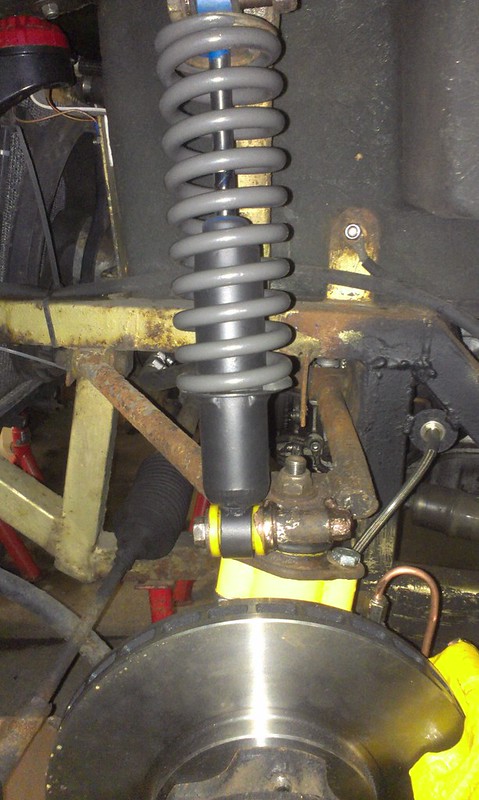 to the inside of the chassis leg where you can get at both parts with no problem. That yellow is Halfords own caliper paint which is a pain in the backside to apply as it's low on pigment content so requires about five or six heavy coats with a brush however it is dot 4 proof as I had a split union which left fluid down the caliper... just wiped it off no harm done to finish at all. |
| |
1988 DUTTON LEGERRA MK1 - SPARES DONOR
1989 DUTTON LEGERRA MK2 - CURRENT PROJECT
1990 DUTTON LEGERRA ZS MK2
1990 DUTTON LEGERRA ZS MK2
DUTTON PHAETON S2 - Resting
DUTTON PHAETON S4 - Resting
DUTTON PHAETON S4 - PROJECT X
DUTTON SIERRA S2 - Resting
|
|
Darkspeed
Club Retro Rides Member
Posts: 4,880
Club RR Member Number: 39
|
|
May 27, 2016 17:58:57 GMT
|
Had the boot disc issue with the Fury and I added a cable tie to the boot to pinch it in away for the IVA test. Although for the sake of weight reduction we went in the other direction, the solids were machined down to minimum thickness and had the mounting hub milled. 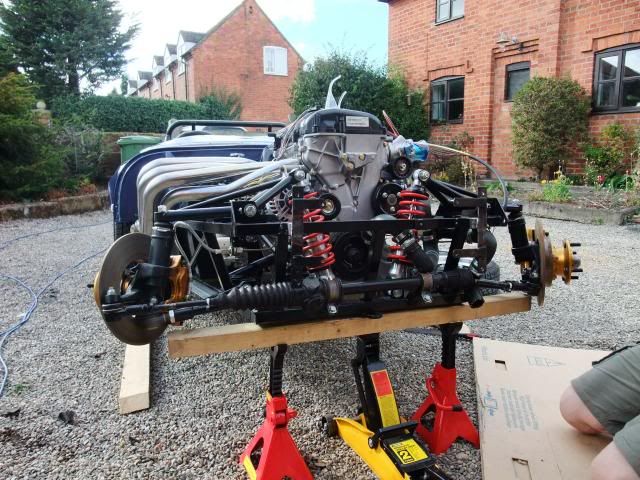 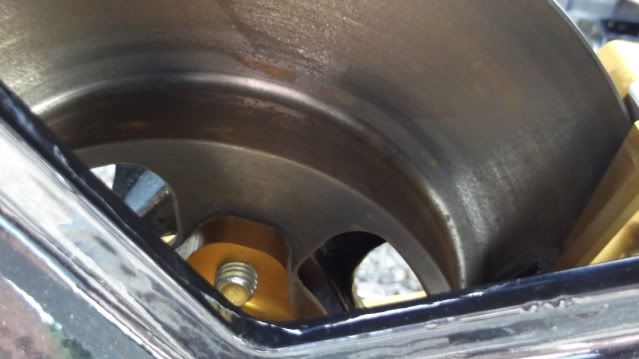 I just buy the parts and make up all my flexi's so that they fit how I want. |
| |
|
|
|
|
|
May 27, 2016 18:17:52 GMT
|
|
your chassis strengthening looks like a sound investment towards handling. looks like an old bedframe before, must be quite twisty ?
|
| |
|
|
|
|
luckygti
Posted a lot
   I need to try harder!
Posts: 4,912
|
|
May 27, 2016 20:06:01 GMT
|
|
Glad to this getting some attention. Definitely going to be stiffer with the extra bracing.
|
| |
|
|
|
|
|
May 29, 2016 10:09:23 GMT
|
The green one has been in constant use since 2007, its got no extra bracing. If you go over a speed ramp with the o/s front wheel the other one normally loses grip/contact with the floor... ARB too stiff? lol The main issue is the frame distorting when you add 75 kg of raw meat right in the middle. Its enough to stop the doors functioning properly as they don't foul when i'm not in it.  Jury is out on the mods until I try it with the body back on and bolted down but it has been done before by others and has worked. Did a bit more yesterday but no pictures .. To allow the chassis to be blasted I wanted to get all the suspension removed, this is the point where you REALLY hope the bloke that built it used grease in the bush tubes to keep the water out, well he didn't. I went round and soaked everything in WD40, anything that would come undone got removed with the wheel gun so that bit was over and done with, going well I thought... The ones that won't come out are going to get grief... After lots of cursing and attacking things with the angry grinder I managed to get the front off. TCA's no problem, shock tops no problem ... Dutton wishbones - stuck fast and the worst possible places to get at with a slitting disc. Managed to get them out eventually but had to bend the brackets, good job Dutton never welded them all the way round ! Dumped all that off to one side and moved everything down to the back end. I'm expecting this to be hassle as its made up of all the same bushes as the front wishbones and they were rusted in. True to form these were too. Shocks came off easy, sods law the lower trailing arm to chassis bolts were solid and they are a pig to get to. Getting this done with the body on would be pretty much an impossibility without cutting the brackets. Some time later... Its off, despite every bush on the back end fighting me its now sitting on the floor awaiting disassembly. Whats worse is knowing I have chosen to do it all again, and again.... Anyway, deconstruction of the back axle now... I took it off with all the bars still attached as the access to the bolt heads is dire. To make it easier I thought i'd take all the brackets off the axle, just 8 bolts under the spring mounting plates, how hard could that be...? In true Dutton style the outboard nuts are 3/4 ... the inboard ones are 11/16ths... REALLY...!! so, air wrench in hand I set about trying to undo the 3/4 ones... wd40, blowlamp at the ready... forget it. After about ten minutes on one bolt, flicking the lever on the gun from forward to reverse and back it finally began to twitch... another ten minutes and it was still just twitching about half a rotation. By this time I gone for the ear defenders... getting a wheel nut off is one thing, getting these undone was something else. Two hours later I got the last one off. half past nine... that's 11 hours just to clear every last nut and bolt off the chassis. More to do tomorrow but at least now I'm looking at cleaning and building rather than trying to undo someone elses nuts... |
| |
1988 DUTTON LEGERRA MK1 - SPARES DONOR
1989 DUTTON LEGERRA MK2 - CURRENT PROJECT
1990 DUTTON LEGERRA ZS MK2
1990 DUTTON LEGERRA ZS MK2
DUTTON PHAETON S2 - Resting
DUTTON PHAETON S4 - Resting
DUTTON PHAETON S4 - PROJECT X
DUTTON SIERRA S2 - Resting
|
|
|
|
|
Jun 13, 2016 19:58:14 GMT
|
Well that put the cat in with the pigeons. I'm not going to turn this into war and peace ranty whinge post but I need to get this off my mind... I sent the V5, and a SORN notice off to Swansea at the beginning of April along with some other documents relating to XSC. As usual, recorded delivery blah blah... As I hadn't heard back from them I decided to give them a call last week. Turns out that even though they had been signed for they had 'gone missing' somewhere inside the DVLA's offices. 'we'll have to investigate' was the comment I was left with.  It was no surprise when today I got a letter back from the DVLA... 'On checking our records a discrepancy has been found. . . . ' No Kidding, REALLY! No chance they were going to put down on paper that they had lost anything huh... I have a V627/1 - built up vehicle report. (yup one of 'those') This asks for serial numbers for all the major components, the donor car's reg and make/model - As all my parts are original I put Dutton and N/A. Very specific answers requested but no guidance notes. I also have a V894 which is innocuously titled Reply Slip. Its asks you to fill in the VIN - the first question is then 'is the VIN/chassis/frame new or used'. Optional answers new or used with no option for 'original', technically the chassis is used but its original, unchanged... Then it asks for the engine number and cc - The second question is then 'Is the engine new or used?' Used implies you are fitting a used replacement, new would imply it's a new replacement, again no option to specify 'orignal' Badly worded and no guidance notes. I was tempted to fill that in as N/A in all boxes but I don't want it returned again. So, a nice full envelope with all the original paperwork (copies), all the new paperwork, photo's etc set to go back to the DVLA tomorrow, I'm really not a happy bunny. Its a genuine car, not seen the road since 1991 and I fell right into the trap. It's not like i'm even trying for historic taxation class. I'll keep you posted, in the mean time I'm going to remove some old hammerite from the axle casing... this could get messy. |
| |
1988 DUTTON LEGERRA MK1 - SPARES DONOR
1989 DUTTON LEGERRA MK2 - CURRENT PROJECT
1990 DUTTON LEGERRA ZS MK2
1990 DUTTON LEGERRA ZS MK2
DUTTON PHAETON S2 - Resting
DUTTON PHAETON S4 - Resting
DUTTON PHAETON S4 - PROJECT X
DUTTON SIERRA S2 - Resting
|
|
|
|
|
Jun 30, 2016 15:17:51 GMT
|
Well whaddya know... The second set of papers I filled in got sent in a pre paid envelope as supplied by the DVLA. I left it a week before I called to allow mr postie time to do his thing and sure enough he did, well he would have if they hadn't gone missing as well.  Had a few calls and some emails back and forth with the DVLA and hopefully it's now in process. Two sets of documents I posted in and they don't seem to be able to locate any of them.  Had to repeat the process by email. Anyway - back on the spanners... Axle is now stripped down, cleaned out and I'm happy with the casing. I've got some paint so that'll keep me busy for a few evenings. Made a stand from a couple of bits of old timber and the two ARB brackets I removed from the axle as they were unused and just 'dead weight'. It all came apart with no real drama apart from freeing the brake drums. Now it's just an empty shell awaiting it's fate. 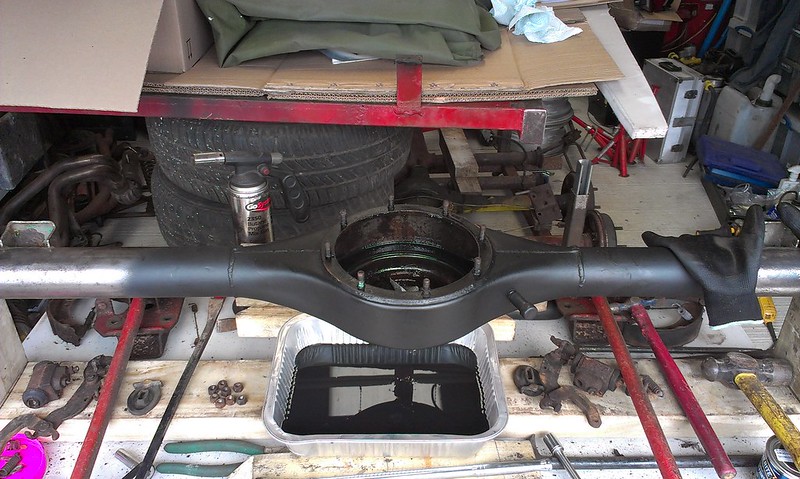 I'm now in a bit of a dilemma as I'm not sure which diff ratio to use. I have currently got 2 x 3.89:1, a 3.88:1 and a 3.54:1.  As its only using a 1600 crossflow and a type 3 box of uncertain ratio's I'm not sure which one will provide the best result for 'general motoring'. I am tempted to use the 3.54:1 just to keep the revs down on the motorway as I expect quite a bit of it's life will be spent there. The 3.88:1 is an odd one though as it has a 9 tooth pinion and a 35 tooth CROWN wheel according to the stamping on the actual CROWN wheel. The 3.89:1 has 10 and 39 stamped in. I knew the 3.89:1's were the most common and the 3.54:1's were rare but hadn't actually come across a 3.88:1 before. Does make me wonder what I will find in the other axles when I eventually get around to sorting them out. |
| |
Last Edit: Jun 30, 2016 17:32:27 GMT by Rebuilda
1988 DUTTON LEGERRA MK1 - SPARES DONOR
1989 DUTTON LEGERRA MK2 - CURRENT PROJECT
1990 DUTTON LEGERRA ZS MK2
1990 DUTTON LEGERRA ZS MK2
DUTTON PHAETON S2 - Resting
DUTTON PHAETON S4 - Resting
DUTTON PHAETON S4 - PROJECT X
DUTTON SIERRA S2 - Resting
|
|
Darkspeed
Club Retro Rides Member
Posts: 4,880
Club RR Member Number: 39
|
|
|
|
|
Keep the options open - try the 3.54 and see if it suits - if not it's not too much of job to pop the shafts and change it for a 3.9. at least you have plenty of options available.
|
| |
|
|
|
|
|
|
|
|
Ahhhhhhh.... the joys of Dutton chassis construction, or lack of. Brought back some 'interesting' memories!
|
| |
Rover Metro - The TARDIS - brake problems.....Stored
Rover 75 - Barge
MGZTT Cdti 160+ - Winter Hack and Audi botherer...
MGF - The Golden Shot...Stored
Project Minion........
Can you see the theme?
|
|
|
|
|
|
|
|
is it feasible to add a transmission tunnel structure like the TVr's do? that would helps stiffness massively.
|
| |
|
|
|
|
|
|
|
Keep the options open - try the 3.54 and see if it suits - if not it's not too much of job to pop the shafts and change it for a 3.9. at least you have plenty of options available. I'll live with that. I did a lot of stuff on 'gearcalc' which gives me loads of theoretical data but as we all know theory doesn't allow for a lack of aerodynamics  I think you're right, the 3.54:1 will give me a good starting place. At some point I will work out the square area of 'intake' surface and make sure I have enough 'outlet' although most of the air that goes in the front escapes through the awful panel gaps...I'd like to make sure it escapes in the right direction not under the body. Ahhhhhhh.... the joys of Dutton chassis construction, or lack of. Brought back some 'interesting' memories! As this was chassis number six thousand and something you would have thought they would have got it right....  is it feasible to add a transmission tunnel structure like the TVr's do? that would helps stiffness massively. This maybe a solution however it would require quite a large amount of metal to be added at the front for the tunnel brace to be fixed to. All the early B types etc had a tunnel frame as the tubs were ally skins riveted on and needed a frame. The semi rigid fibreglass tub removed the requirement for the steel frame so there is no steel between the chassis rails from the front of the seat base forward until you reach the front crossmember under the front pulley...  As this one is going to be as original as possible i'm not going to chop the glass floor of the tub. I do have another (currently designated project Y) which isn't registered. This means it will need an IVA. As the crossflow/pinto era of engines is never going to pass todays emissions tests I have decided on a Zetec mid engine configuration retaining all the donor vehicle parts, much like the more modern kits do today. This will need a tunnel brace and quite a lot more adding, possibly even a full cage. But that as they say is another story... |
| |
Last Edit: Jul 1, 2016 19:24:31 GMT by Rebuilda
1988 DUTTON LEGERRA MK1 - SPARES DONOR
1989 DUTTON LEGERRA MK2 - CURRENT PROJECT
1990 DUTTON LEGERRA ZS MK2
1990 DUTTON LEGERRA ZS MK2
DUTTON PHAETON S2 - Resting
DUTTON PHAETON S4 - Resting
DUTTON PHAETON S4 - PROJECT X
DUTTON SIERRA S2 - Resting
|
|
|
|
|
|
|
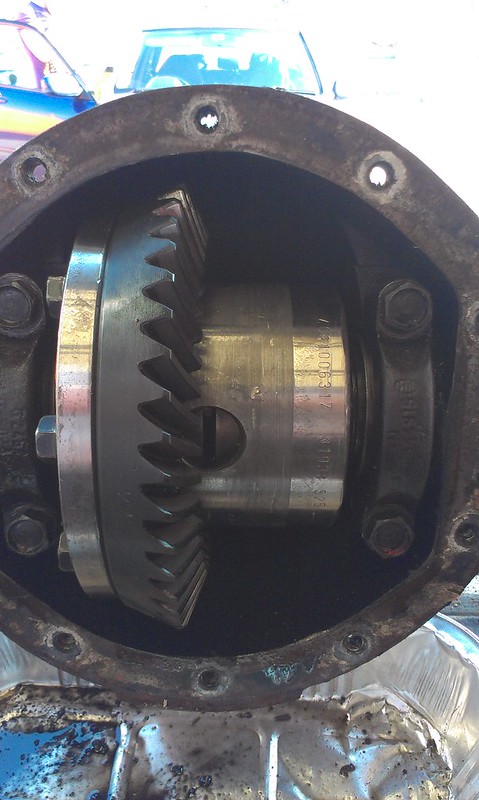 I'll just leave this here until the end of the GP highlights  I split down the other english axles into component form today, another 3.9:1, this one has a fair amount of freeplay between the pinion and the CROWN wheel although the wear pattern is pretty good so it may just need adjusting before it gets used for anything. |
| |
Last Edit: Jul 3, 2016 18:47:42 GMT by Rebuilda
1988 DUTTON LEGERRA MK1 - SPARES DONOR
1989 DUTTON LEGERRA MK2 - CURRENT PROJECT
1990 DUTTON LEGERRA ZS MK2
1990 DUTTON LEGERRA ZS MK2
DUTTON PHAETON S2 - Resting
DUTTON PHAETON S4 - Resting
DUTTON PHAETON S4 - PROJECT X
DUTTON SIERRA S2 - Resting
|
|
Darkspeed
Club Retro Rides Member
Posts: 4,880
Club RR Member Number: 39
|
|
|
|
|
Now that's a nice find - a very nice find - 2.8 Capri? or is it in a narrow case?
|
| |
|
|
|
|


 looks like it will be going in for seats and guides then. I don't see the point in not doing it while it's apart.


