93fxdl
Posted a lot
   Enter your message here...
Posts: 2,019
|
|
|
|
Grinders seem to fall into two distinct categories The quick and dead and the long runners. One of mine is over 20 years old, the spares have died in weeks or days. I hear ya there...this one was nothing special, but lasted quite a while...I used it for many projects and it lasted a good 3 years....I could probably rebuild it if I can find the parts...but I just don't think its worth it..... JP Two modifications i make to power tools are, Open them up and fill gears and bearings with grease, since most are assembled dry. Replace the standard short cable with a longer one, saves tripping over the extension reel Ttfn Glenn |
| |
|
|
|
|
|
|
|
|
|
I hear ya there...this one was nothing special, but lasted quite a while...I used it for many projects and it lasted a good 3 years....I could probably rebuild it if I can find the parts...but I just don't think its worth it..... JP Two modifications i make to power tools are, Open them up and fill gears and bearings with grease, since most are assembled dry. Replace the standard short cable with a longer one, saves tripping over the extension reel Ttfn Glenn Thats a great idea. Another I do is tape the spanner to the cable, where it meets the floor when I'm working. Saves a great deal of searching. |
| |
|
|
|
|
|
|
|
|
The new grinder on-off switch annoyingly needed a rebuild the other day!....I actually used the old switch arm from the dead one...I bought the first one from the hardware store years ago....then the new one from Harbor Freight recently...same exact innards, new housing and relocated switch. I was even able to rotate the grinder head 90 degrees so the switch was on top again....(the new one had the switch on the side....I didnt like it...)
anyhoo...The tensioner pulley unit I recently put in began clicking annoyingly when the truck was put in gear...I had to use a "stethoscope-stick" to locate the source of the noise, refusing at first to believe it could possibly be the new part. (but it was!)...in my annoyance, I modified the set screw groove in the pulley mount, relocating the position of the pulley wheel..its now quiet again....(I did get a new serpentine belt before the mod which did seem to solve the clicking but only for a day or so)
The rear differential was leaking fluid from the pinion seal and has now coated the underside of the truck with smelly 80w/90 gear oil. that was today's project. The tricky part was keeping everything aligned for reassembly, and making sure the pre-load was the same when the pinion-driveshaft mount bolt went back on....(9 turns exactly and about 100ft/lbs)
so far so good...test drive went well...now back to welding that bed!
JP
|
| |
I know its spelled Norman Luxury Yacht, but its pronounced Throat Wobbler Mangrove!
|
|
|
|
|
|
|
|
You really do just keep soldiering on ehhh JP.
Some of your obstacles would have resulted in most of us heading to eBay or Craigslist for a complete replacement truck by now.
Well done.
Respect.
|
| |
|
|
|
|
|
May 30, 2018 18:58:26 GMT
|
Grizz, I have not figured out yet whether I am crazy, stubborn, cheap, or just plain living as my forefathers did. My great grandfather raced Rainier cars in the early 1900ds. All open wheel where the "mechanic" rides on board with the driver. I have some great pics of that, actually. they did all their own wrenching, and because cars were a luxury back then, they fixed them...over and over again. so, I guess you could say that I am historically stubborn! but it is all good, right now....if I can only get that truck bed finished!  JP |
| |
I know its spelled Norman Luxury Yacht, but its pronounced Throat Wobbler Mangrove!
|
|
|
|
|
|
|
|
Crazy.and stubborn you may be, but cheap you are definitely not. This thing will have cost you in time far more than its worth in dollars. But from doing it yourself you've probably made it better than it ever was and gained knowledge, experience, and maybe even had some fun along the way, and you can't put a price on that. Keep up the good work!
|
| |
|
|
|
|
|
Jun 10, 2018 18:42:04 GMT
|
Thanks, Piston! So a bit more done on the inner fender lip. I learned a lot about what I can get away with reasonably with the shrinker/stretcher...... 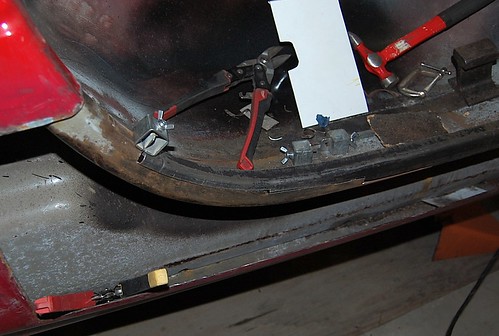 I know I could do this a faster way, but really want to experience actually shaping metal as opposed to patchworking things together. I probably found a somewhat happy medium this time around....there will be small patches to fill in some gaps.... 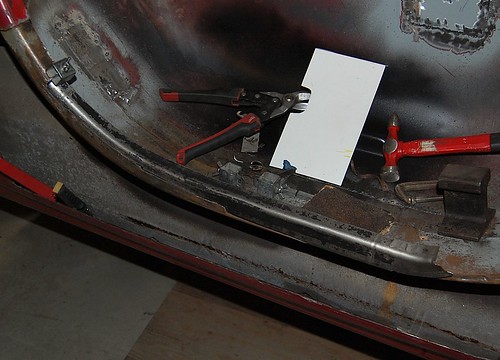 Its coming together and fits nicely. I will have to do a little light tapping here and there once its welded in!  I made a template from thin aluminum. (which you can see in the photos above) It is really hard to know where the outer fender will fit once this is all in place. measuring works okay, but I have to keep going back and forth a million times with the outer panel...it was getting tiring!....so I found that this template locates the flange along the inner profile...as long as my repair piece fits (is shaped) inside the the outer patch panel, I should be in good shape. (as long as my indexing marks don't disappear!) |
| |
I know its spelled Norman Luxury Yacht, but its pronounced Throat Wobbler Mangrove!
|
|
|
|
|
Jun 11, 2018 12:30:42 GMT
|
Started the welding and things went pretty well. It seems like there is a slight learning curve every time I weld....as I don't do this on a regular basis. This time I had ground back to better metal, cleaned both sides of the stuff I was welding, and took my time. I did have much better results. 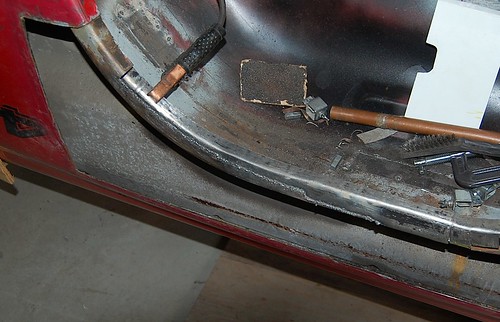 I got a little overconfident here and there, and immediately paid the price with one or two blow throughs, built up weld beads, ect. ( I tried to span a pretty big gap without backer just to see if I could do it. I will be paying the price for that in grinding time later, but I got it to work....)  Adding a copper backer brought things back to normal! I could get 3-4 tacks in one section, then move to another...seemed to work well. thanks for looking JP |
| |
I know its spelled Norman Luxury Yacht, but its pronounced Throat Wobbler Mangrove!
|
|
|
|
|
|
|
So I got that last fender lip piece made up after dinner tonight....and it came out pretty good....I started with more metal than I needed and trimmed quite a bit away. Curves have left me with big gaps in the past by the time I'm finished shaping a repair piece and I didnt want to end up with a small patch piece anywhere..... 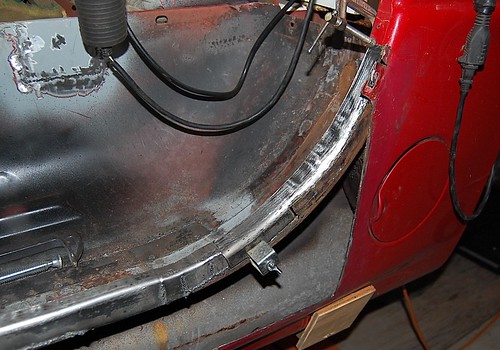 I did end up peeling back a section (upper right of pic) and found more rotted metal, so glad I took the time....Ill see if I can get up early before work tomorrow to start buzzing it in place! JP |
| |
I know its spelled Norman Luxury Yacht, but its pronounced Throat Wobbler Mangrove!
|
|
|
|
|
Jun 16, 2018 23:36:12 GMT
|
Not long after installing my new to me (found on Craigslist) bumper, I numbly backed into a log and proceeded to bend the left side pretty badly... Well, I took it off today, and wanted to see if the same ideas in forming thin metal worked on the thicker stuff...and it does! I got it to go back to its original shape for the most part and am pretty happy with the results. a few touch ups and it will be good to go! your looking at the inside of the bumper upside down..... 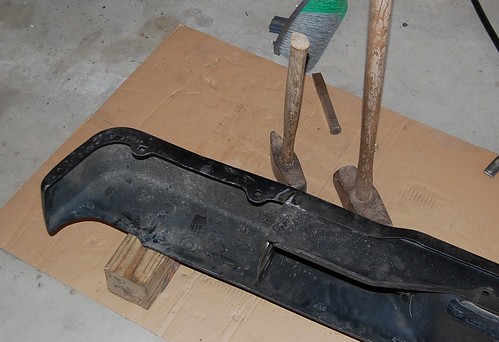 and here it is back on the truck...you can see the crease where it pretty much folded forward and up.... 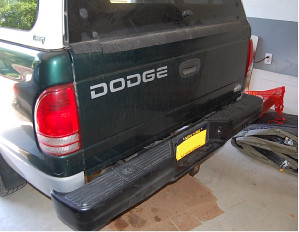 thanks for looking JP |
| |
I know its spelled Norman Luxury Yacht, but its pronounced Throat Wobbler Mangrove!
|
|
|
|
|
|
|
|
|
|
After trying to resolve a leak from the rear axle, (vent tube issues, rear pinion seal) I have concluded that the center housing has rusted so badly that it had developed a crack where the speed sensor screws in on top of the housing. This could only mean that the housing is probably pretty badly compromised structurally and I cant let my kids drive it much less myself in the condition its in.
So I found one locally for less than 200.00. Its a match to what I have, which took some research. 2wd units are different from 4wd units, with the mounting points for the springs. the perches on the 4wd are on the top of the axles, and the 2wd units are on the bottom. my final drive is 3.55, which gets better gas mileage than the 3.92 or 4.11. I also have the bigger brakes which measure in at 11" and, a direct bolt up happens only with axles made from 98-04.....so there you have it....
The axle should be out of the donor truck this week and Ill go pick it up and get some pics posted. other than that, the truck is really running quite well!
JP
|
| |
I know its spelled Norman Luxury Yacht, but its pronounced Throat Wobbler Mangrove!
|
|
|
|
|
|
|
So here it is....needs a little clean up, but looks to be in fairly good shape...Ill swap all the accessories over, the brakes, e-brake cables, lines......then do the swap.... 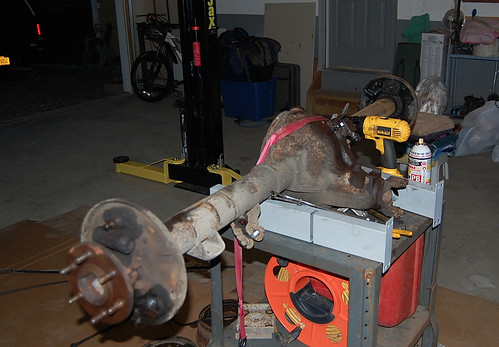  I got the leaf springs and u-bolt brackets with the axle. I will try to make the swap without having to mess with the leaf springs. The through bolts in the bushings are a bear to get out with the bed off, let alone with it in place. If I cannot fit the axles through the leaf springs, Ill have to take the bed off so I can pound the leaf spring bushing bolts out....Then Ill finish welding on the red bed, and put that one in place.... the fun never ends! wish me luck!  JP |
| |
I know its spelled Norman Luxury Yacht, but its pronounced Throat Wobbler Mangrove!
|
|
|
|
|
|
|
|
Is the axle getting a lick of paint before installation, or is it going in as is?
|
| |
|
|
|
|
|
Aug 23, 2018 14:28:48 GMT
|
Is the axle getting a lick of paint before installation, or is it going in as is? several licks, yes! Ive taken all the scale and rust off, removed the brake cylinders, parking brake fittings, shoes, ect....and it is ready for final cleaning and then paint. It will also get some new gear oil...why not, right? JP |
| |
I know its spelled Norman Luxury Yacht, but its pronounced Throat Wobbler Mangrove!
|
|
|
|
|
Aug 24, 2018 15:16:15 GMT
|
after a few licks of galvanizing primer, paint and clear, the basic axle is ready to go...  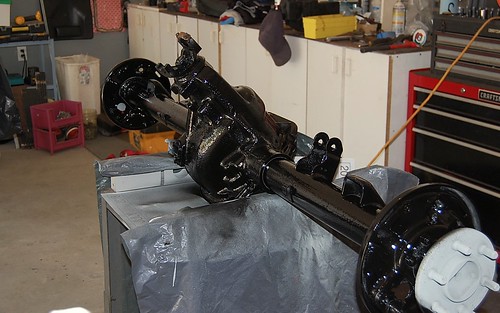 Now to get the old one out! I'm going to try to get the nuts off the U bolts as opposed to dropping one side of the leaf springs...though that would be easier for removing and installing, I may not be able to reach the spring bolts with a hammer to get them out....hmmmm so apart from new brake shoes, a brake kit with new springs, ect, diff oil, and brake lines...anything else to consider? it should be aligned as the spring perches have a locating tab on each side. I cannot do anything about driveshaft balancing, but I don't think its an issue? thanks for looking JP |
| |
I know its spelled Norman Luxury Yacht, but its pronounced Throat Wobbler Mangrove!
|
|
|
|
|
Aug 24, 2018 20:47:31 GMT
|
|
Thats looking pretty good... I tell ya, whoever ends up with your Dakota after you're done with it is going to get a heck of a nice truck!
|
| |
|
|
|
|
|
|
|
Thats looking pretty good... I tell ya, whoever ends up with your Dakota after you're done with it is going to get a heck of a nice truck! my kid better appreciate it, too!  JP |
| |
I know its spelled Norman Luxury Yacht, but its pronounced Throat Wobbler Mangrove!
|
|
|
|
|
Aug 29, 2018 19:32:20 GMT
|
You know, its funny how life never ceases to teach those lessons you thought you already knew or should have known. Sometimes, though, you cannot be totally prepared unless you are a professional. So I did my homework and bought an axle with the same final drive ratio (3.55), from the right production dates (98-03), from the same truck (Dakota 2wd), and measurements basically confirmed I had the right one.... long story short, I do have the right replacement axle. Kinda. Here it is out of the truck. (finally!) 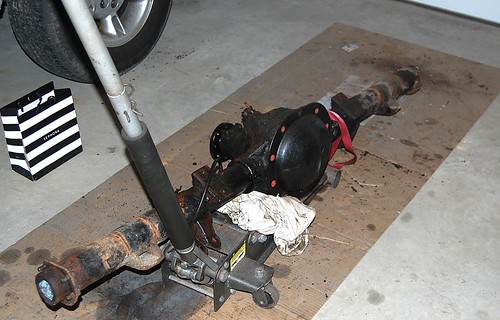 and I thought I would have a peek inside both axles.....  so far, so good....both the same innards and housing, tube diameter, ect....then I began noticing the differences. 1) the new axle has shorter lug nuts! Mine is on the left, new one on the right. luckily, they are the same axle specs. 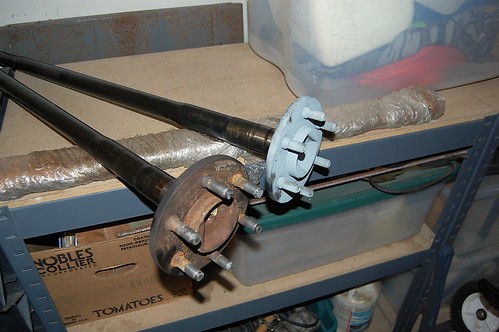 2) different size brakes! here are the mounting plates for the 9" and 11" brakes....I'm going to stick to the 11" that my truck came with....which means, I have to do some swapping. Mine on the left: 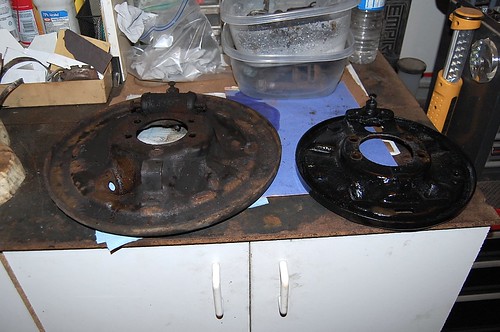 check out the difference in brake shoes! (mine in the back) (and yes, I thought about doing a disc swap...but every kit is quite pricey...and honestly, the rears don't do nearly as much as the fronts..... 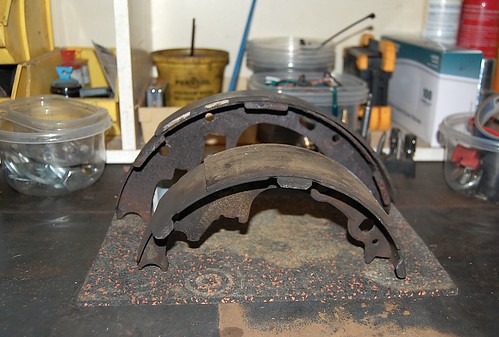 So in short, I did get the right axle....but now have lots of work to do. If there is a silver lining, its the fact that all the hardware associated with my rear brakes was shot! pads coming away from the shoe, pistons leaking, springs about to let go, brake lines super toasty...... For peace of mind its worth the trouble!. anyway, so let that be a lesson to you all....  JP |
| |
I know its spelled Norman Luxury Yacht, but its pronounced Throat Wobbler Mangrove!
|
|
|
|
|
Aug 29, 2018 19:52:37 GMT
|
|
Good job you double checked everything before fitting- the old "measure twice, cut once" thing!
It's all going to be great once you've done it up, and, as you said, it needed doing!
|
| |
|
|
|
|
|
Sept 2, 2018 23:51:38 GMT
|
Ive decided to prep as many parts as I can before my new brake hardware arrives. Ive prepped the backing plates, axle U bolts and brackets and a few other bits and pieces. It took quite some time to bring the backing plates to life again as there are so many nooks and crannies. The passenger side was definitely worse than the drivers side...seems to be a standard issue with road salt building up on roadsides..... anyway...here are a few pics of the progress...... backing plates are primed with galvanizing paint then finished with bedliner material for toughness...I already had a set of pads, and the drums are still good....but I needed all the springs, parking brake hardware, self adjusters, ect...... 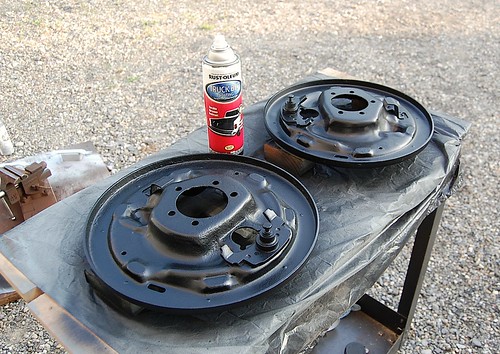 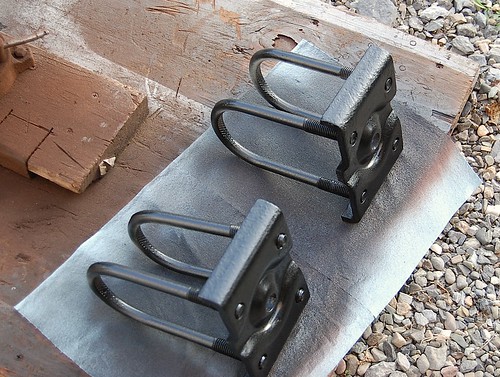 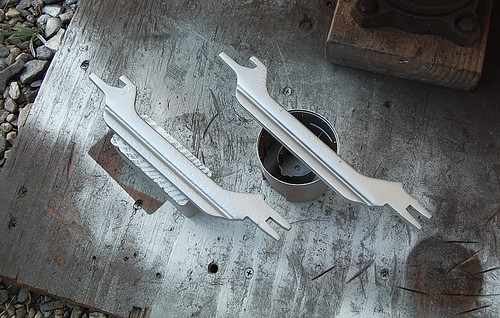 There are one or two adjustments I want to look into making....The "lash" adjustment between the main sprocket and pinion gear seems a bit too loose to me...and I have to switch the pinion output shaft's connector for the driveshaft so it fits my truck.... though its not actually going back together yet, I still feel I'm making some progress.... thanks for looking JP |
| |
I know its spelled Norman Luxury Yacht, but its pronounced Throat Wobbler Mangrove!
|
|
|
|


