MrOtter
West Midlands
"Your car is your story, so don't let someone else write the book." - Moog
Posts: 281
|
|
Jun 11, 2014 23:05:30 GMT
|
Quick one on the headlining then. This is what we started out with, the old material had been ripped off because it was sagging so much and the board still had all the nasty old foam on it. 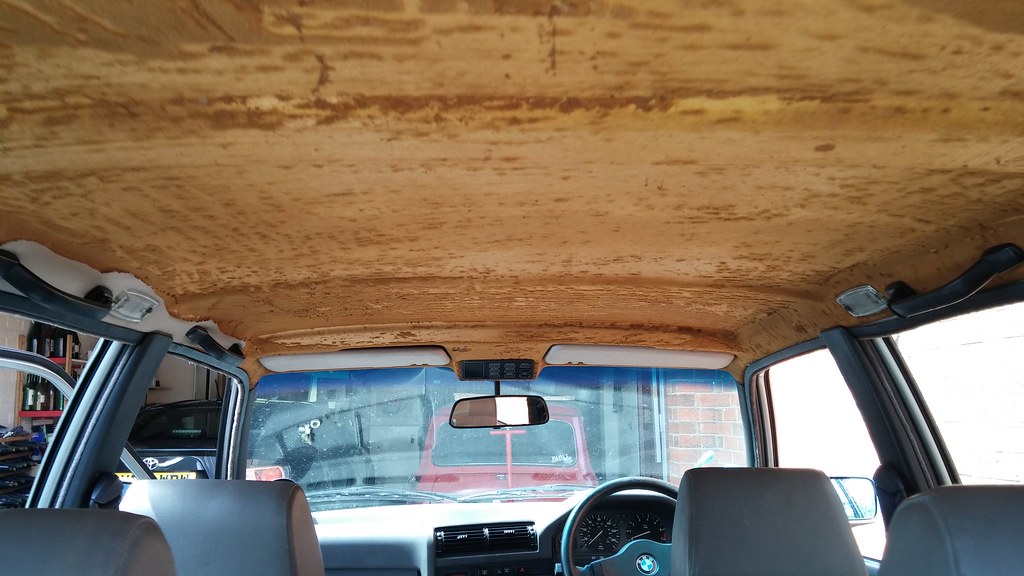 20140521_130049 20140521_130049 by svenicusminimus, on Flickr 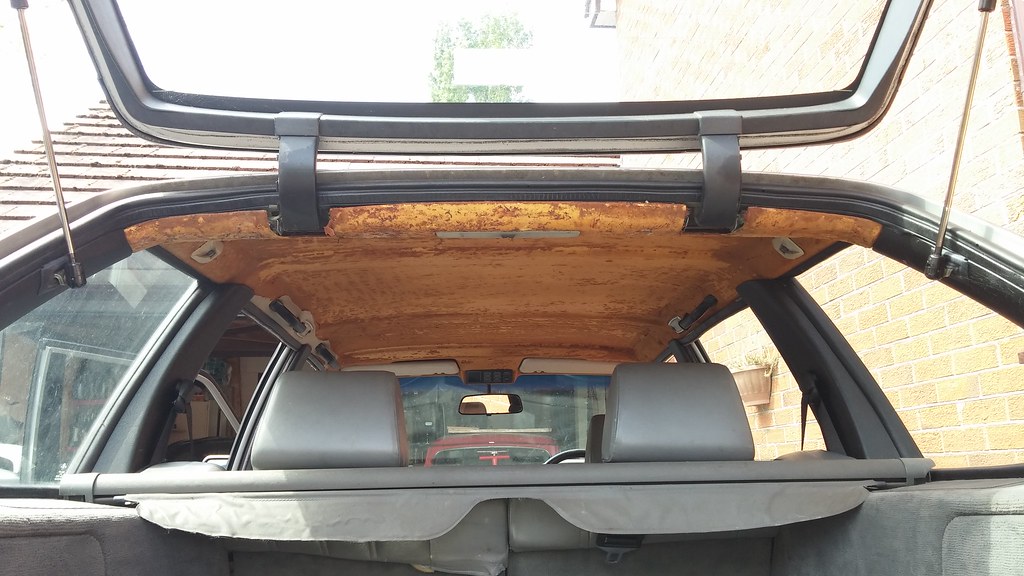 20140521_130059 20140521_130059 by svenicusminimus, on Flickr I'm glad I don't have a sunroof, made the job of pulling out the fibreglass panel pretty straight forward - there's plenty of sound deadening up there! 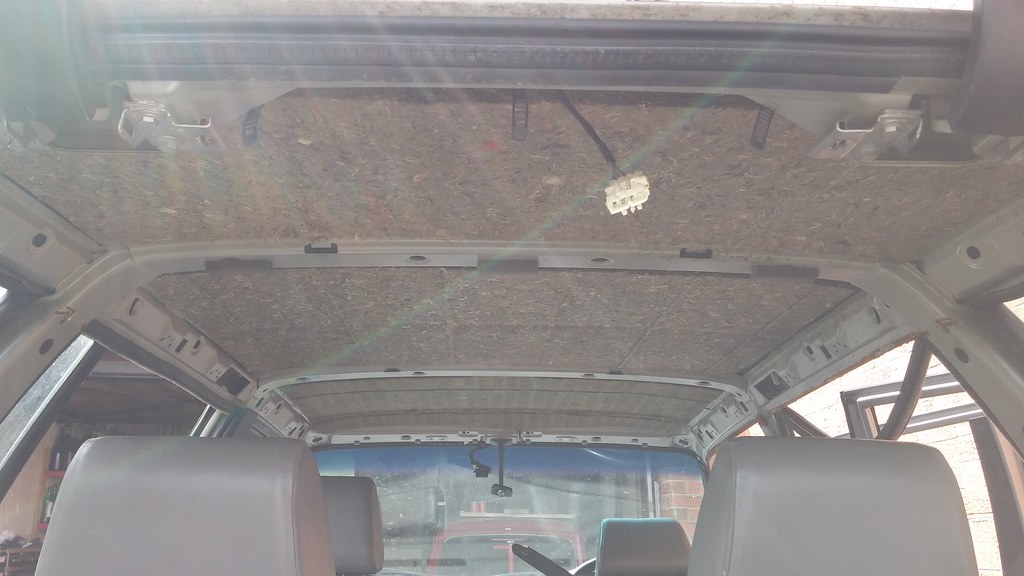 20140521_141857 20140521_141857 by svenicusminimus, on Flickr Here's the panel out of the car - please note the discretely placed phallus on the lower corner. Apparently done by a mate of the previous owner, during a trip home from the pub of course  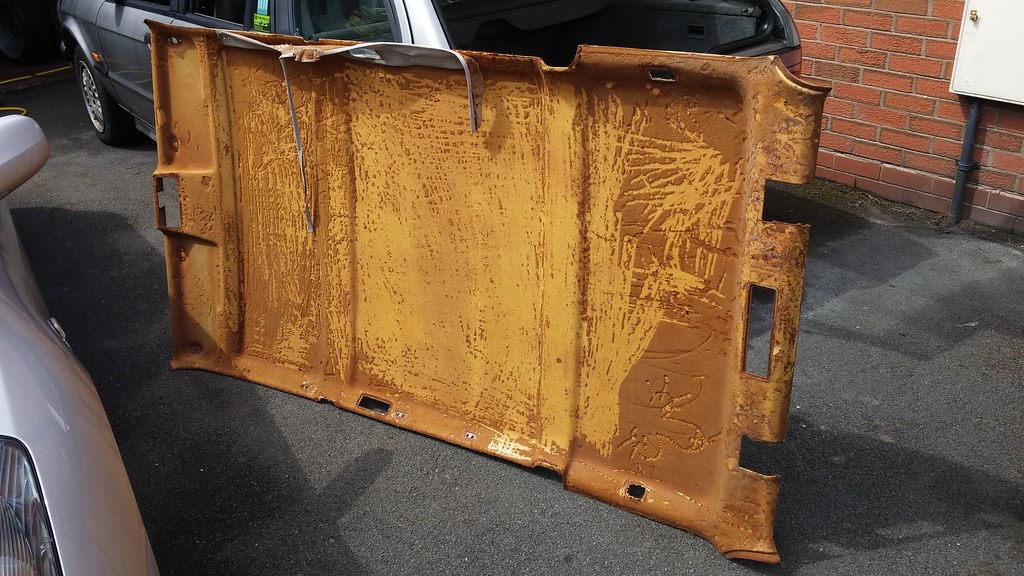 20140521_141920 20140521_141920 by svenicusminimus, on Flickr It took me AAAAGES to scrape off all the old foam. 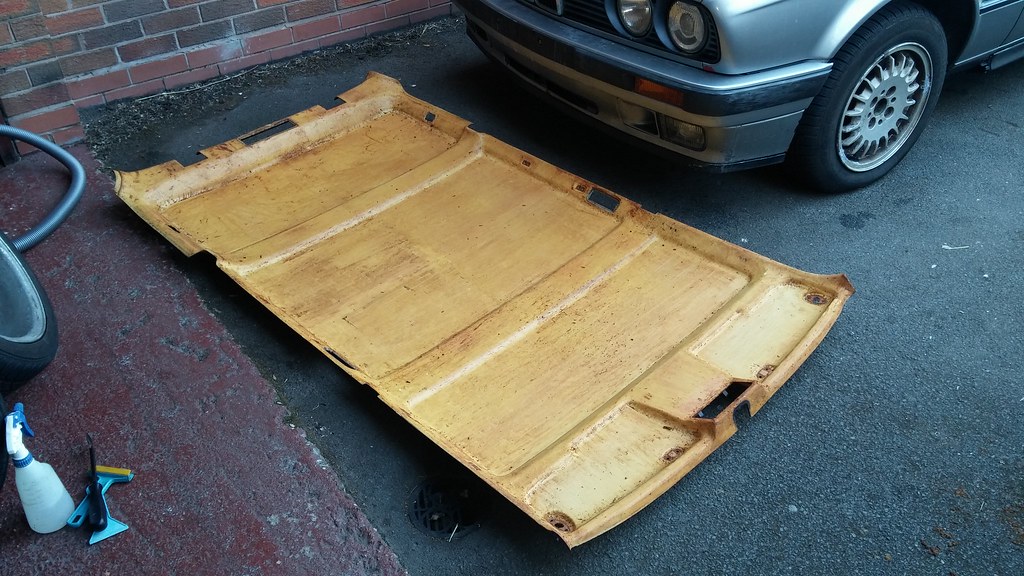 20140521_190359 20140521_190359 by svenicusminimus, on Flickr Then it took me even more AAAAAGES to scrub off all the old glue residue (this is about half way through, clean side on the right obviously). 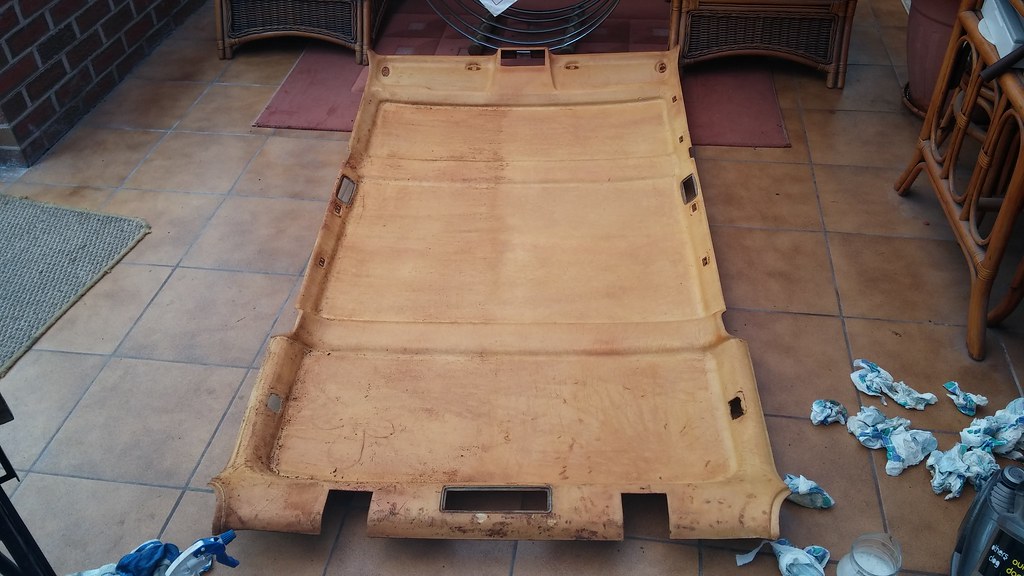 20140522_174802 20140522_174802 by svenicusminimus, on Flickr Then I put some red on it.  20140608_161843 20140608_161843 by svenicusminimus, on Flickr Yes, there are creases everywhere and it doesn't look great; yes, I did it myself; yes, it was the first time I'd ever done anything like this. I'm still happy with my work, it's foam-backed bright red fake seude, how can I not be happy. I'm not sure if it'll really look that good in the car, but the usual choices of beige or black seemed so boring, I wanted to try something different! 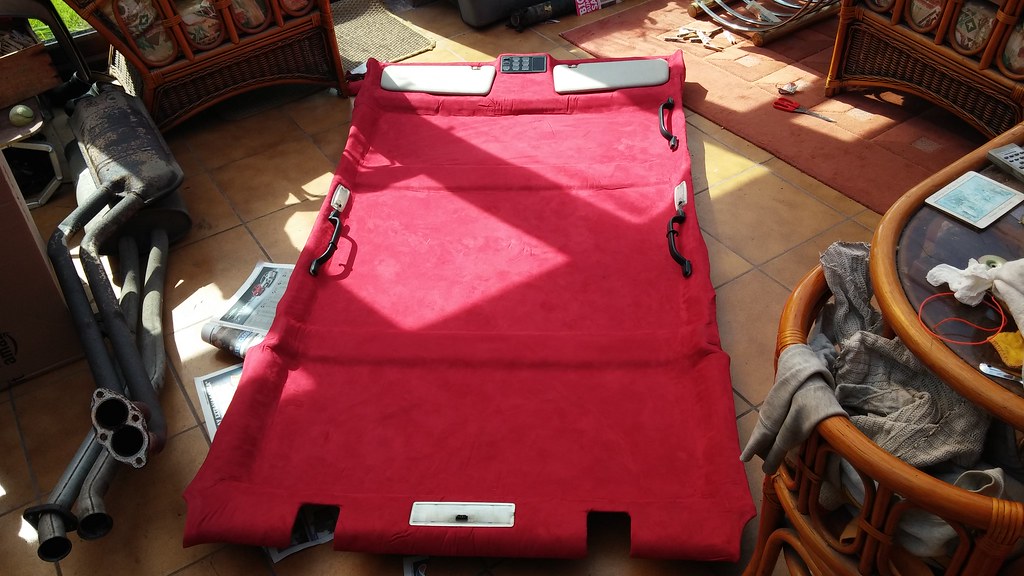 20140608_161831 20140608_161831 by svenicusminimus, on Flickr I'll get it back in the car whenever I finish all the welding and get the car back on the ground, probably in a couple of weeks or so. Then we'll see how long this crappy aerosol adhesive lasts and it starts sagging again...  |
| |
Last Edit: Jun 11, 2014 23:09:34 GMT by MrOtter
|
|
|
|
Rich
Club Retro Rides Member
Posts: 6,254  Club RR Member Number: 160
|
1989 BMW E30 325i TouringRich
@foxmcintyre
Club Retro Rides Member 160
|
Jun 11, 2014 23:11:35 GMT
|
Carbon canister is nothing to do with engine exhaust emissions, it's fuel tank vent 'emissions', the canister is designed to hold the fuel vapour and an electro-valve purges the vapour into the inlet manifold when the engine is running to burn it off. You can leave the hose disconnected, but don't block it completely. It needs to vent. Just so you know  Edited to add- headlining looks cracking mate, that's gonna look awesome once it's back in the car! |
| |
|
|
MrOtter
West Midlands
"Your car is your story, so don't let someone else write the book." - Moog
Posts: 281
|
|
Jun 11, 2014 23:18:14 GMT
|
Carbon canister is nothing to do with engine exhaust emissions, it's fuel tank vent 'emissions', the canister is designed to hold the fuel vapour and an electro-valve purges the vapour into the inlet manifold when the engine is running to burn it off. You can leave the hose disconnected, but don't block it completely. It needs to vent. Just so you know Edited to add- headlining looks cracking mate, that's gonna look awesome once it's back in the car! Cheers for the info buddy, I sort of knew all that already after doing a bit of research last night but it didn't really sink in properly - makes more sense now. I'm only used to the Mini's tank vent, just a piece of hose going from the top of the tank down through the floor - no need for all this carbon canister and vent tank nonsense. |
| |
|
|
|
|
|
Jun 12, 2014 13:04:43 GMT
|
|
You are doing a great job on your estate!.....I would be hesitant to tackle all the issues you are taking care of and am now inspired to make sure my estate stays healthy!
well done
JP
|
| |
I know its spelled Norman Luxury Yacht, but its pronounced Throat Wobbler Mangrove!
|
|
MrOtter
West Midlands
"Your car is your story, so don't let someone else write the book." - Moog
Posts: 281
|
|
Jun 12, 2014 20:47:10 GMT
|
Thanks for the kind words lil wagon I got the end of the driver's side sill welded up today. Excuse the whiteout, it was quite sunny today! 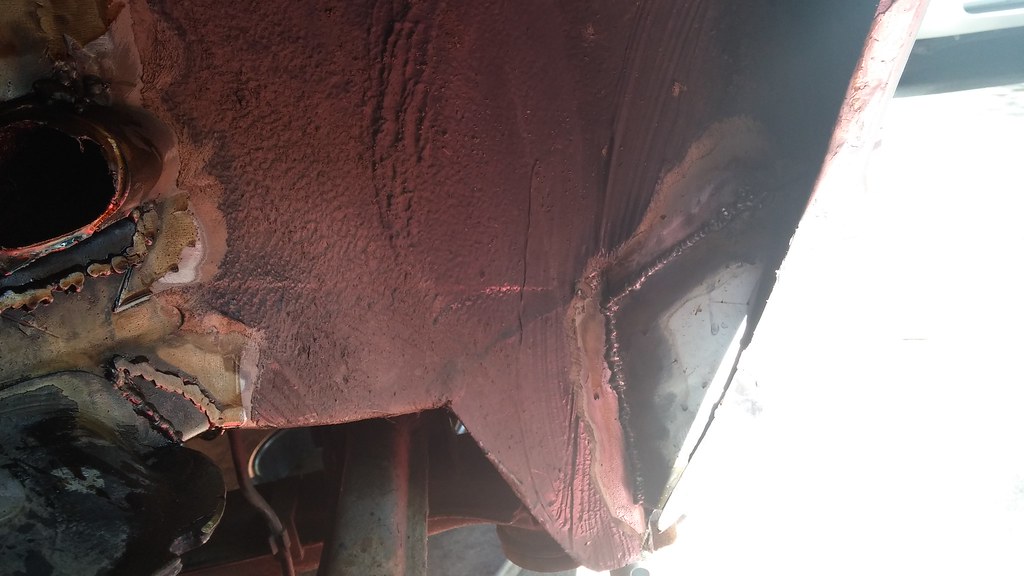 20140612_152147 20140612_152147 by svenicusminimus, on Flickr I also did this little patch on the front jacking point on this side. 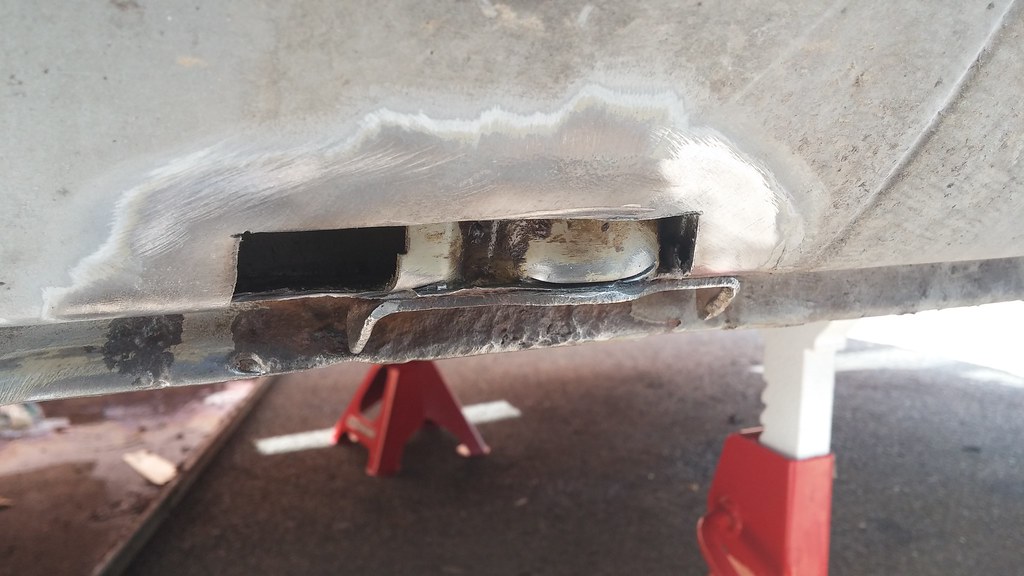 20140612_130857 20140612_130857 by svenicusminimus, on Flickr 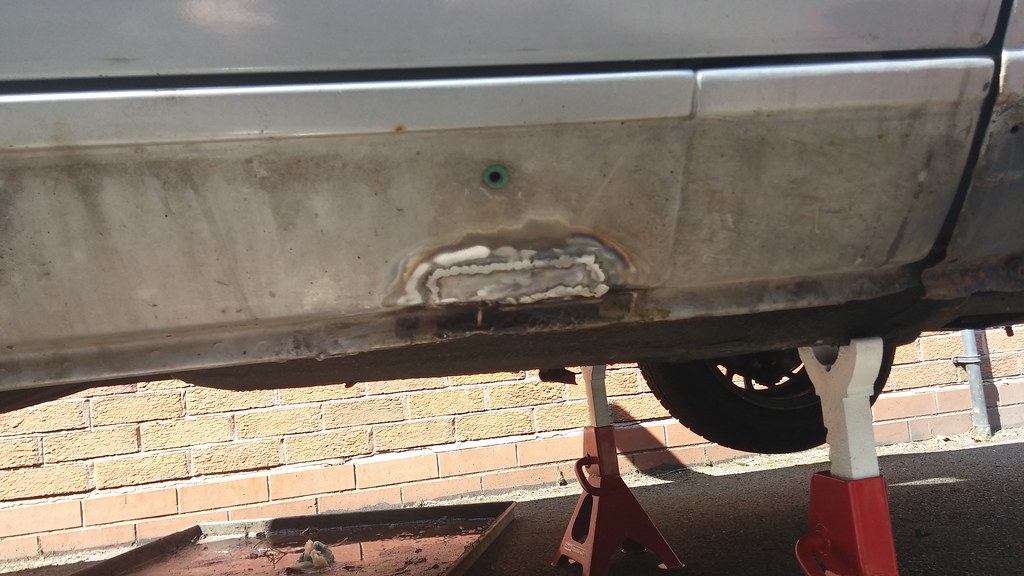 20140612_152159 20140612_152159 by svenicusminimus, on Flickr The rear jacking point had been crudely plated over sometime in the past, but it's good enough for me right now so I just wire wheeled the area back to bare metal and gave it a new coat of paint. Now I'm almost finished with all this damn welding! I've gone over everything apart from the front driver's wheel arch, but that can wait for a while because I'm fed up with doing metal work for now! I managed to fit one side of the rear suspension after I'd finished the welding today. I fitted new top mounts/shock mounts/whatever you want to call them, as the old ones were a bit past it - I guess this is where the squeak was coming from on the rear suspension! The round hole had migrated sideways, and the metal insert was completely loose from the rubber. 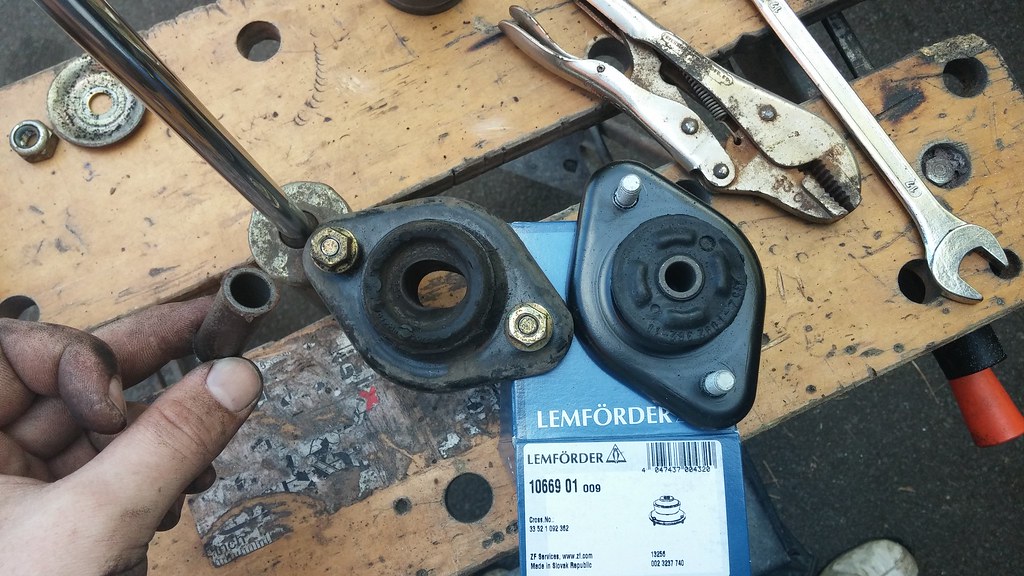 20140612_162110 20140612_162110 by svenicusminimus, on Flickr The other side wasn't quite as bad, but the rubber had started to flake apart on that one, so they definitely need changing. New things! Yay! That's one corner done, just another 3 to go. 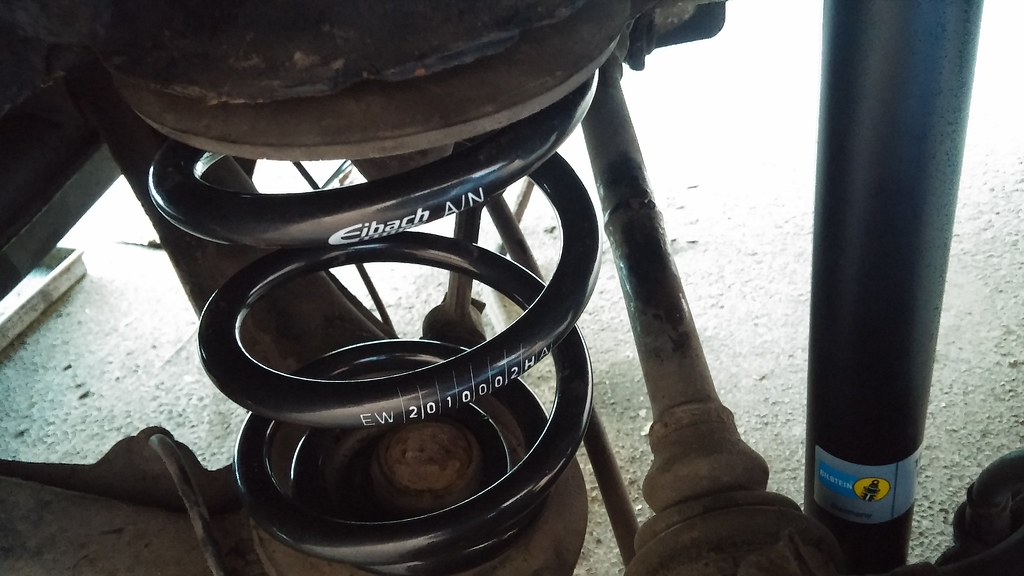 20140612_201516 20140612_201516 by svenicusminimus, on Flickr Sometime last week I had a go at cleaning up and 'linseed oiling' one of the front grill sides. Can you tell the difference? 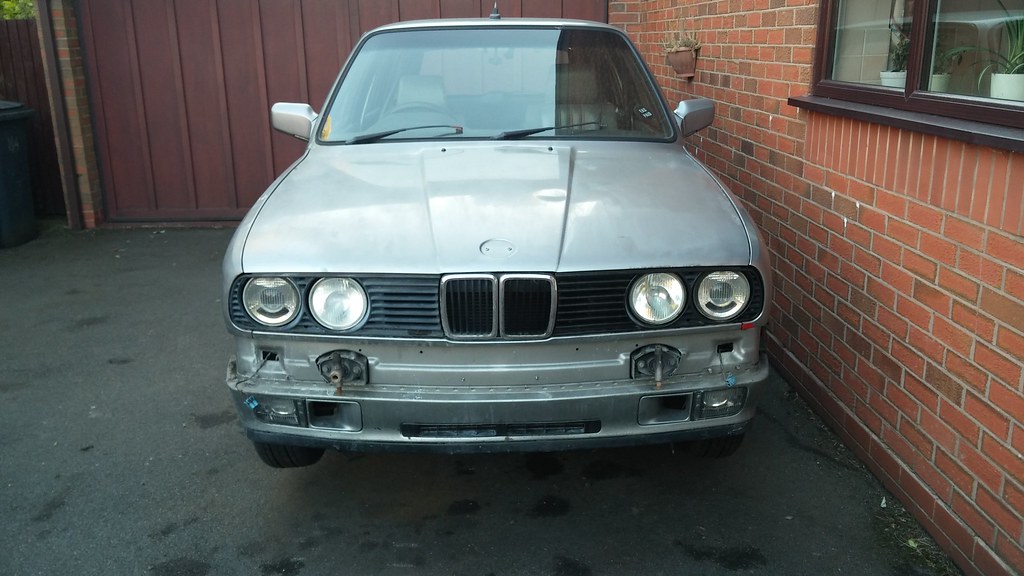 20140612_201559 20140612_201559 by svenicusminimus, on Flickr I'll get round to doing the other side sometime! That's all for now, I'll do another update next week sometime, hopefully after I've got the car back together and on the ground with the new suspension fitted! |
| |
|
|
|
|
|
Jun 12, 2014 22:54:36 GMT
|
|
sweet...I just did the rear suspension on the lil red wagon recently and am happy with the results. I needed new shock mounts too..but now they put those at the bottom....one of them had completely lost its structure and was making quite a racket...(I went with Billies too...)
looking good
JP
|
| |
I know its spelled Norman Luxury Yacht, but its pronounced Throat Wobbler Mangrove!
|
|
|
|
|
Jun 13, 2014 14:49:40 GMT
|
|
This is all coming together very nicely indeed...! Superb stuff...
|
| |
***GARAGE CURRENTLY EMPTY***
|
|
|
|
|
|
|
|
Rear shock top mounts are best replaced with E46 M3 cabby ones
Great thread btw
|
| |
|
|
MrOtter
West Midlands
"Your car is your story, so don't let someone else write the book." - Moog
Posts: 281
|
|
Jun 22, 2014 21:57:00 GMT
|
Well, it's not quite all back together yet, but I'm nearly there! After the last update, I fitted the new handbrake shoes, springs, and pins. It was pretty bloody fiddly, but luckily I've had some experience doing the rear drums on the Mini, so I kind of knew how it was going to pan out anyways.  20140617_133830 20140617_133830 by svenicusminimus, on Flickr Everything squeezed in to place. 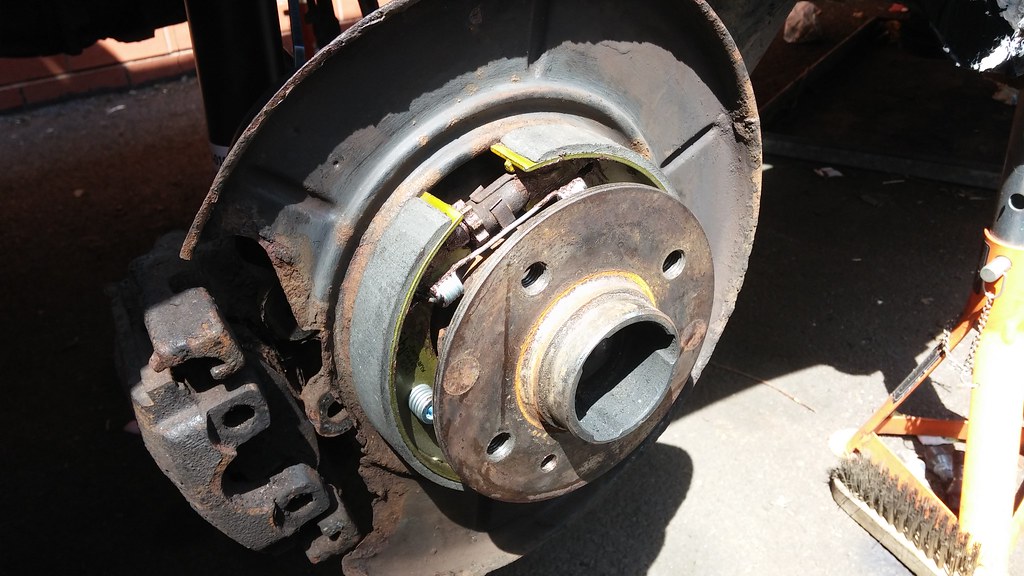 20140617_142659 20140617_142659 by svenicusminimus, on Flickr To combat the issue of the retaining pin holes no longer being slotted (so the pins have nothing to grab on to once you twist them 90 degrees) I squashed some washers in to an oval shape and used them as my new slots. I was going to take the backplates off and try and repair the holes/slots, but it looked like more hassle than it was worth. We'll see how long this bodge lasts!  20140617_142719 20140617_142719 by svenicusminimus, on Flickr I got the new rear suspension stuff fitted on that corner. 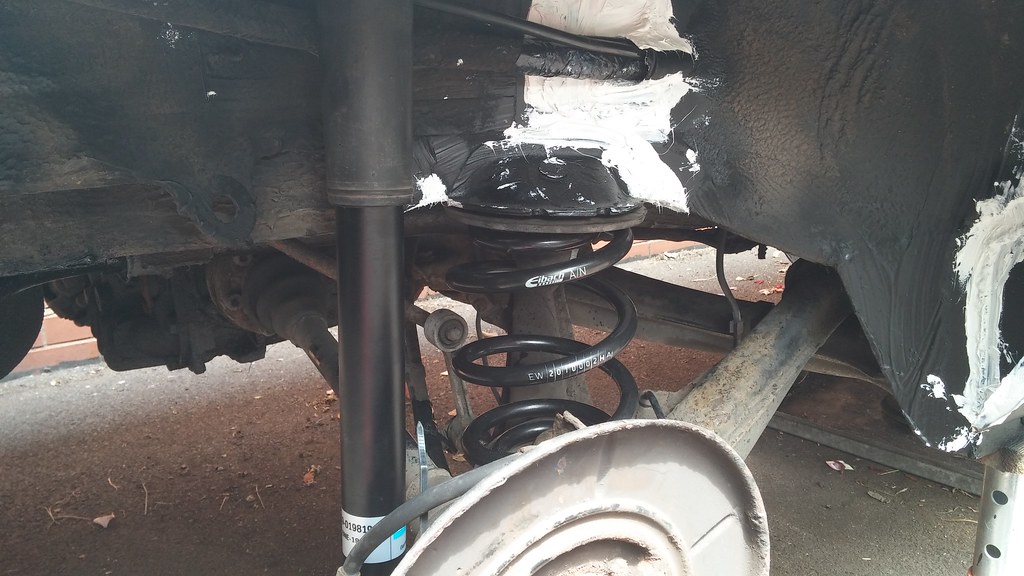 20140617_133900 20140617_133900 by svenicusminimus, on Flickr Whilst I was there and had the access, I wire brushed the fuel filler pipe, then gave it a couple of coats of rust treatment stuff and some paint to try and protect it, because it was pretty rusty before. 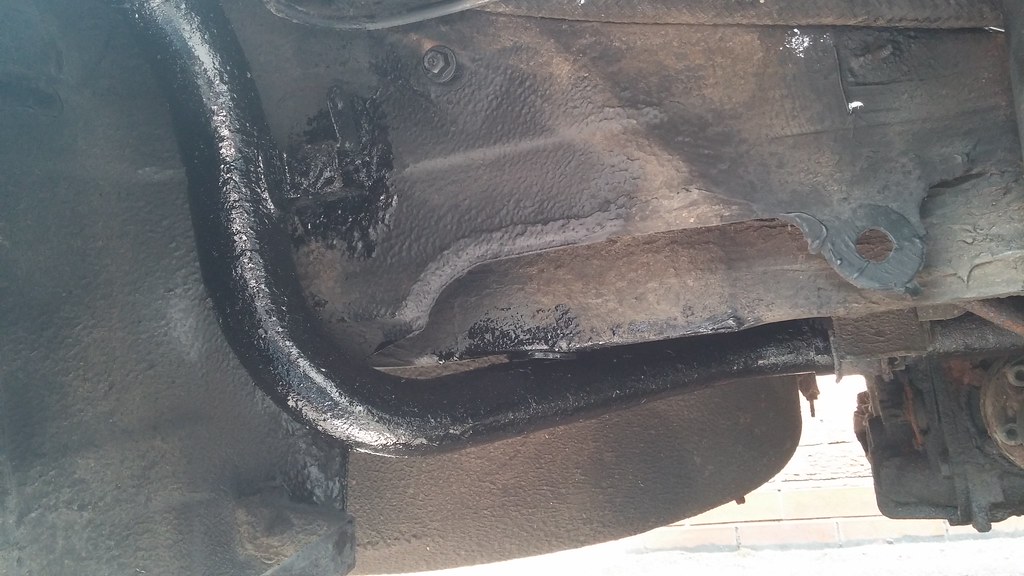 20140617_133917 20140617_133917 by svenicusminimus, on Flickr Later that evening I set about some more headlight work. I got a spare driver's side headlight set from the previous owner when I met up with him at Area 52 last month. The side/dipped beam unit had a massive crack in it, but the high beam unit was perfect. This was good luck for me, as the replacement light set I bought (and fitted previously in this thread) had a chip in the high beam unit. Here's the spare set I picked up from the previous owner - well this is just the massively cracked side/dipped unit because I'd already removed the high beam one. 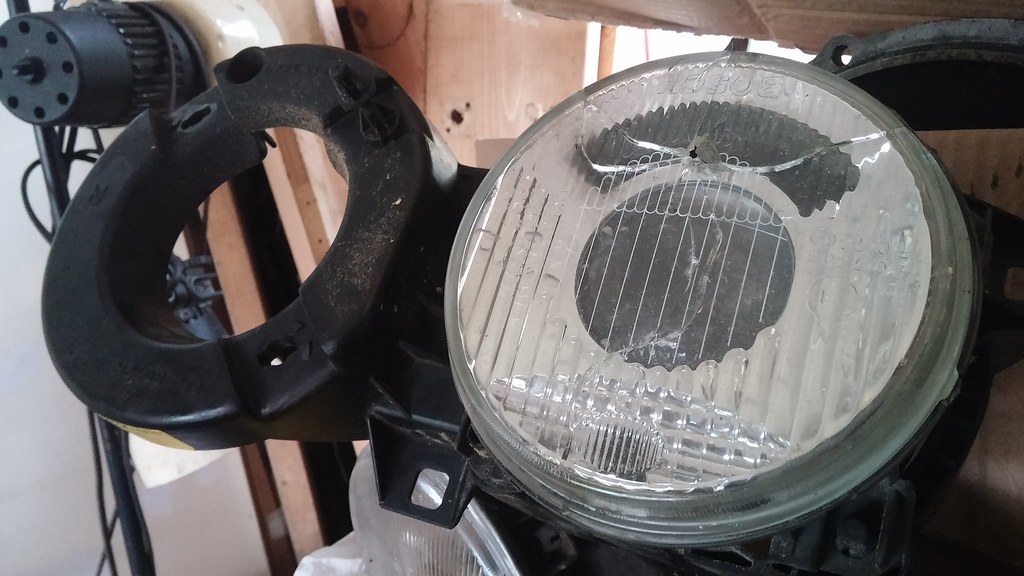 20140618_115110 20140618_115110 by svenicusminimus, on Flickr Here's the good unit next to the bad unit (the chipped one with the fogged up glass). 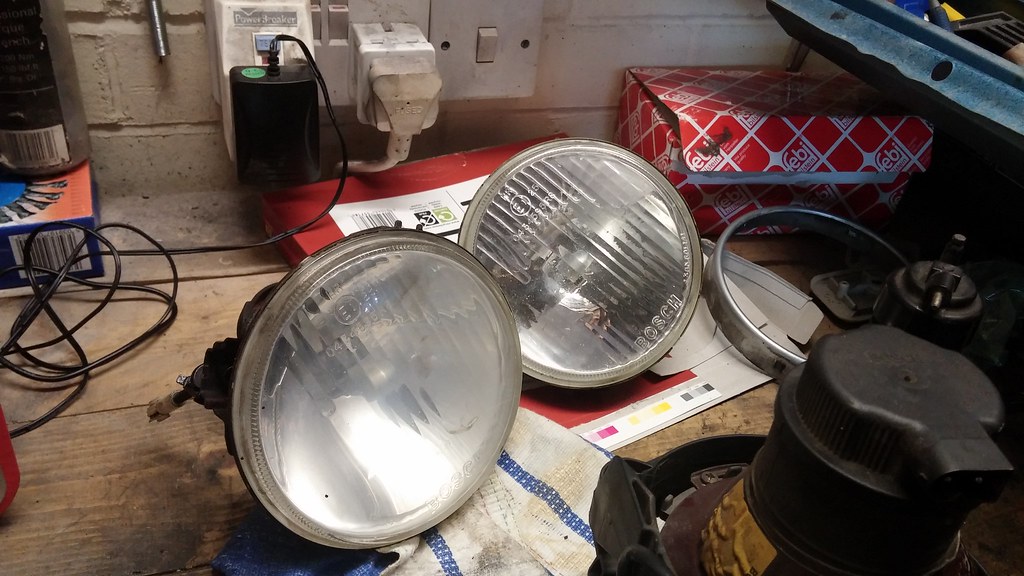 20140618_115056 20140618_115056 by svenicusminimus, on Flickr I got it fitted fine but didn't take any pictures. The headlight is still off the car right now anyway, but you might notice the new light whenever I finally get everything back together and take a picture. Anyway... I cut out the rot on the front driver's inner wing edge. 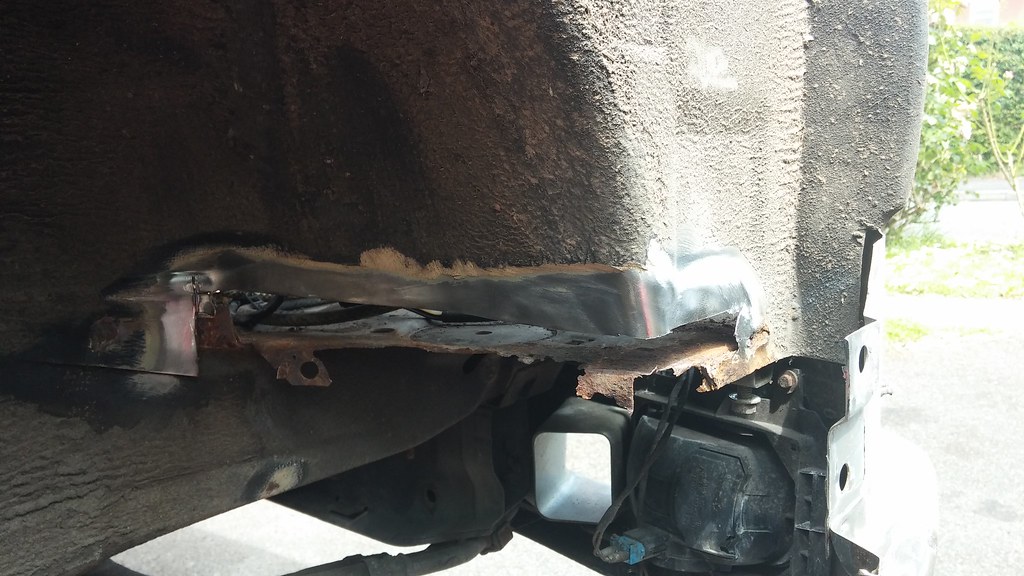 20140618_135010 20140618_135010 by svenicusminimus, on Flickr Along with cutting off the rotten top corner of the valance panel here. 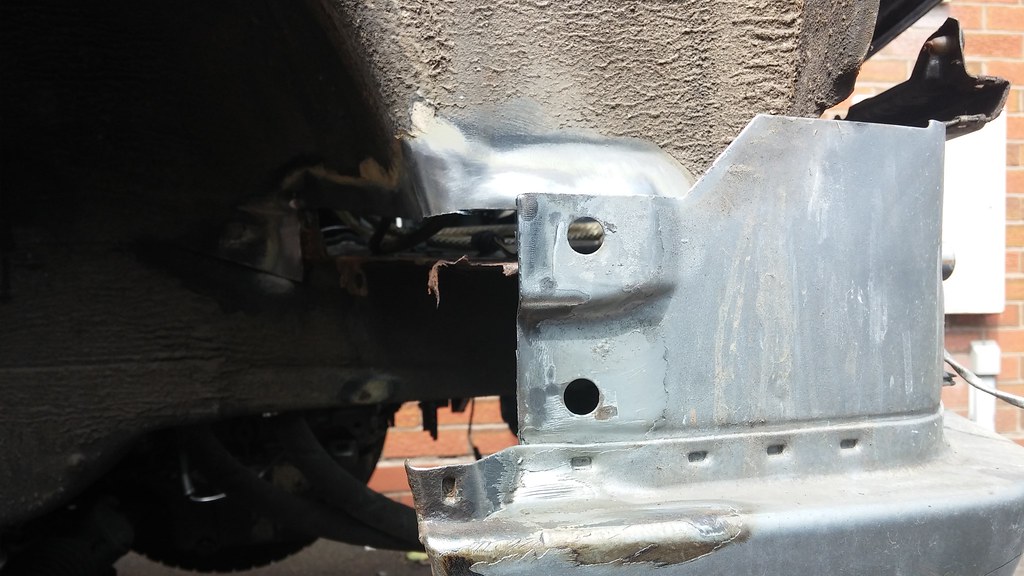 20140618_135021 20140618_135021 by svenicusminimus, on Flickr For reference, this is the passenger's side - what it should look like. 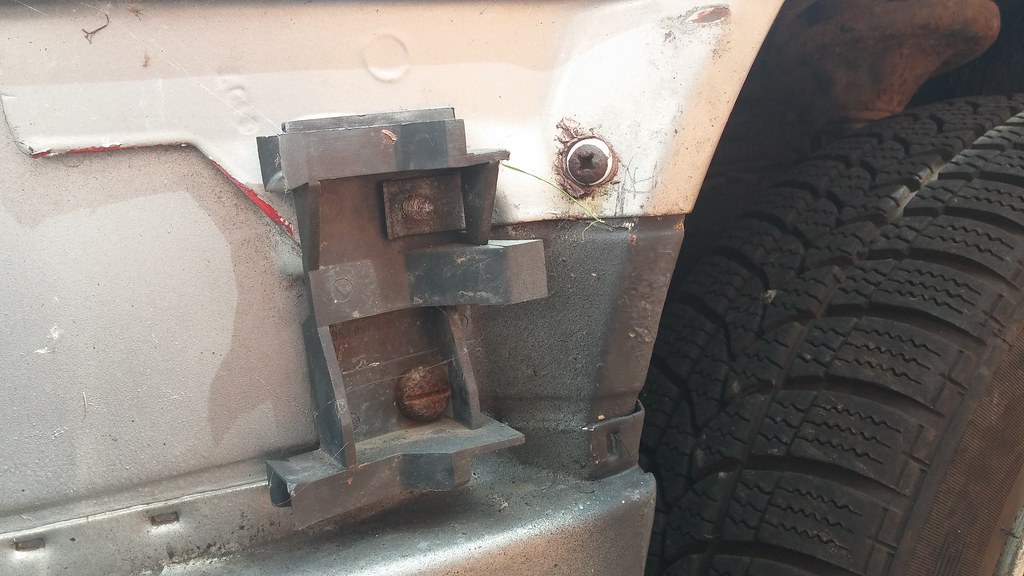 20140618_135040 20140618_135040 by svenicusminimus, on Flickr A few days later I got round to patching these bits up. First I did the big bit on the inner arch. 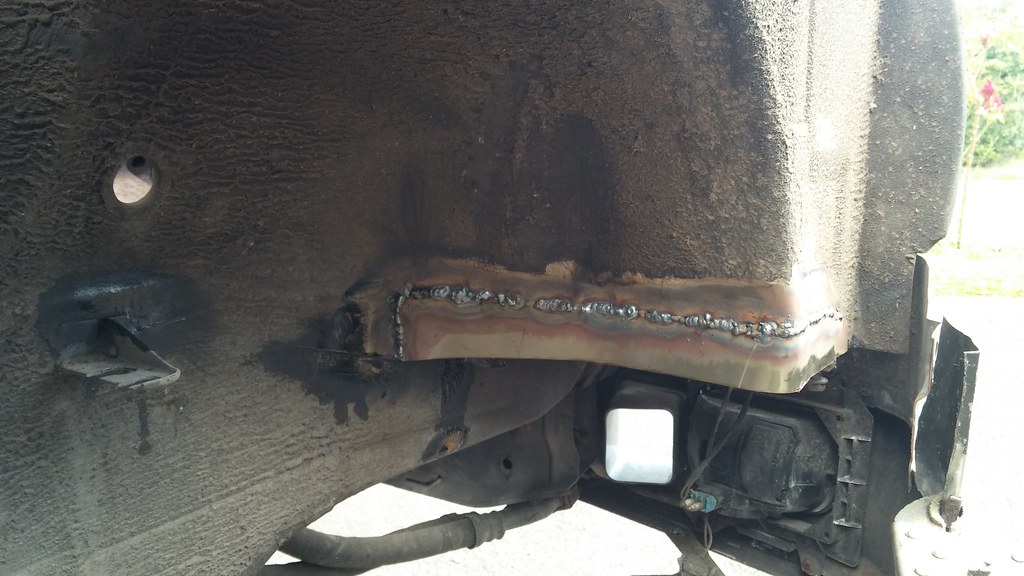 20140621_120206 20140621_120206 by svenicusminimus, on Flickr Then I used a couple of nicely fitting offcuts I had lying around to build up the valance corner.  20140621_124117 20140621_124117 by svenicusminimus, on Flickr 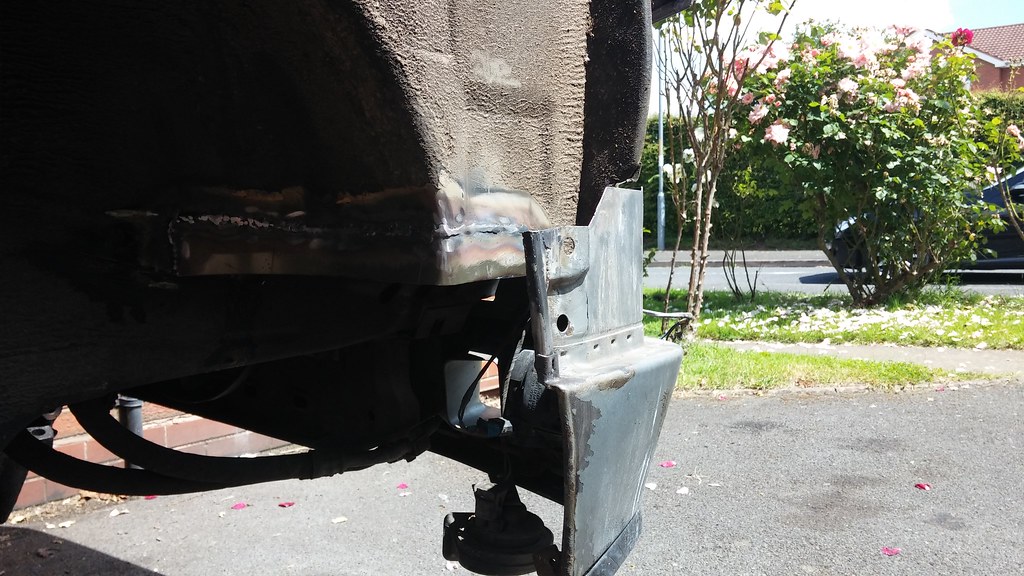 20140621_124123 20140621_124123 by svenicusminimus, on Flickr With the wing clamped in place, I drilled the hole for a retaining screw that should've been here before - if there was any metal there before, for it to grab on to that is...  20140621_124919 20140621_124919 by svenicusminimus, on Flickr With the screw screwed in, and the bumper bracket in place. 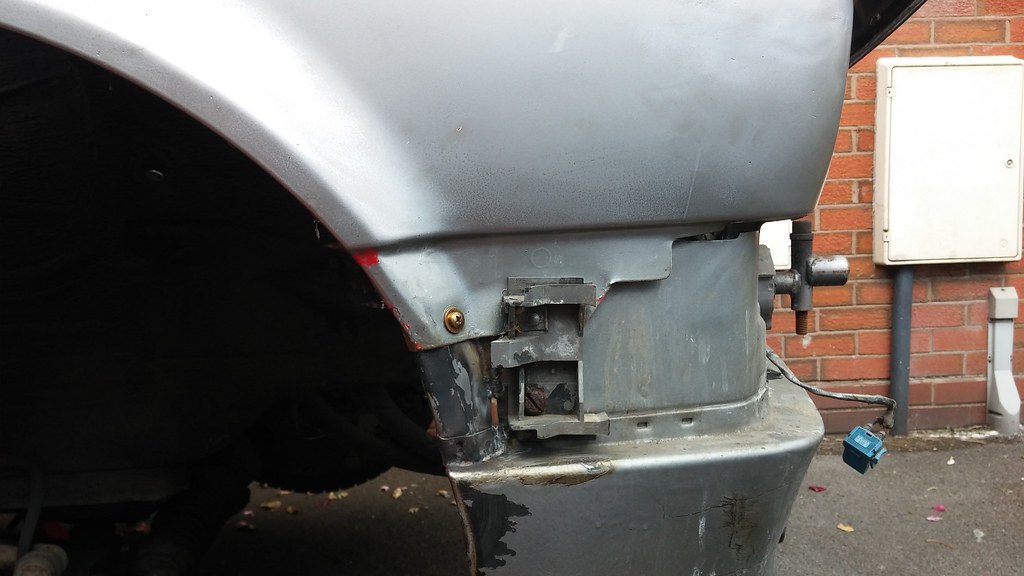 20140621_125512 20140621_125512 by svenicusminimus, on Flickr In between all the rust fixerating, I started fitting the new spring and shock to that side's strut. I got all the old bits off fine, until it came to this infuriatingly rusty retaining collar that holds the shock insert in to the strut tube. 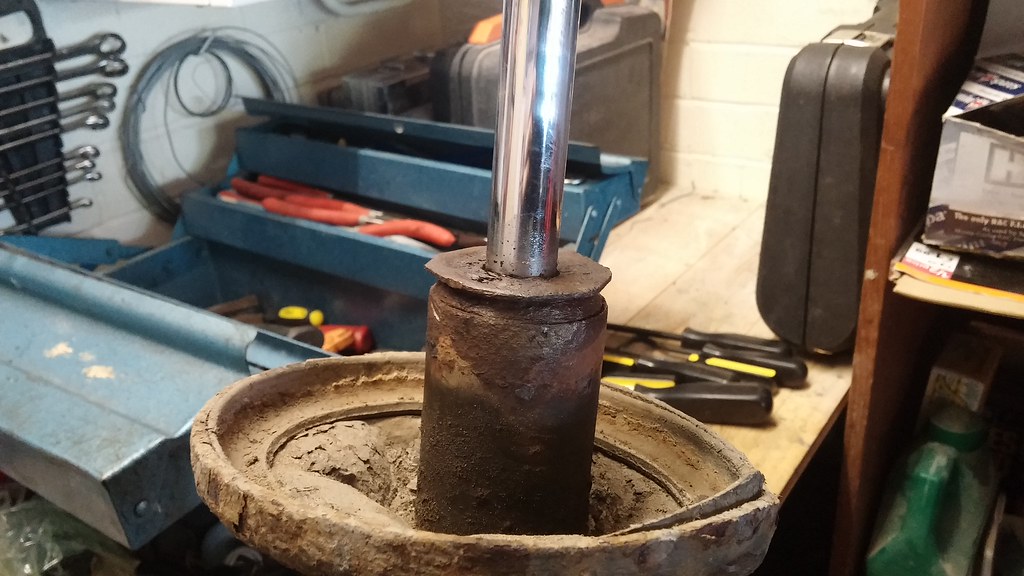 20140618_135109 20140618_135109 by svenicusminimus, on Flickr It obviously wasn't going to budge with a pair of mole grips, which is all I had, so I ordered a more manly tool on the interwebs. So, a few days later, a package arrived and I got to it. It still took me about an hour of beating the new wrench mercilessly with a lump hammer, but eventually the sodding thing came undone! 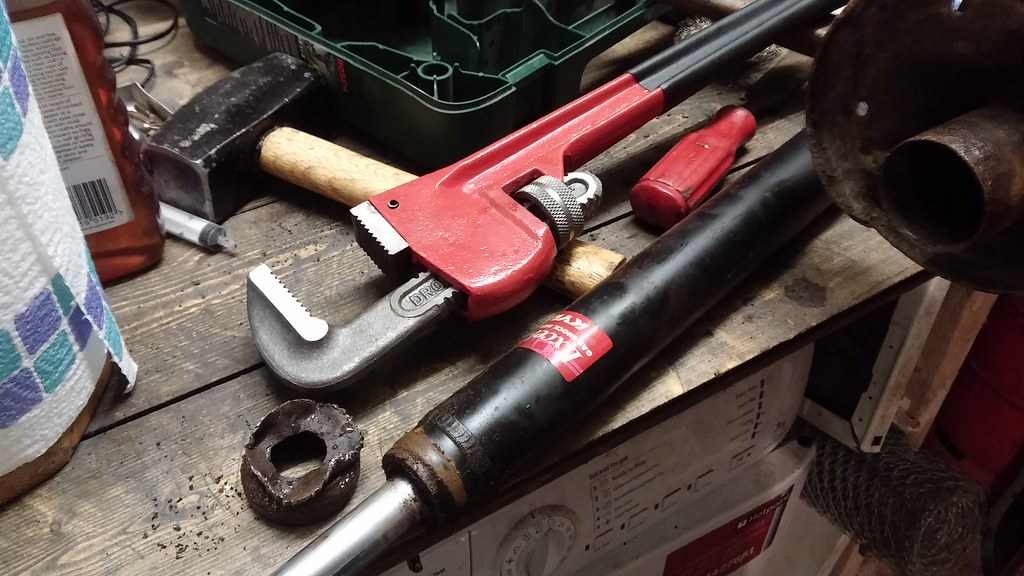 20140621_104039 20140621_104039 by svenicusminimus, on Flickr As you can see above, the insert was a KYB gas shock, I doubt this was a factory fit? Strange that the collar was so rusty if it had been removed or replaced since the car was new... Unfortunately, I had to re-use that mullered retaining collar, as the new Bilstein one that came with the new shock was the wrong type (threads on the inside). Oh well, at least the threads were still there and un-damaged on the old one - it went back together fine. 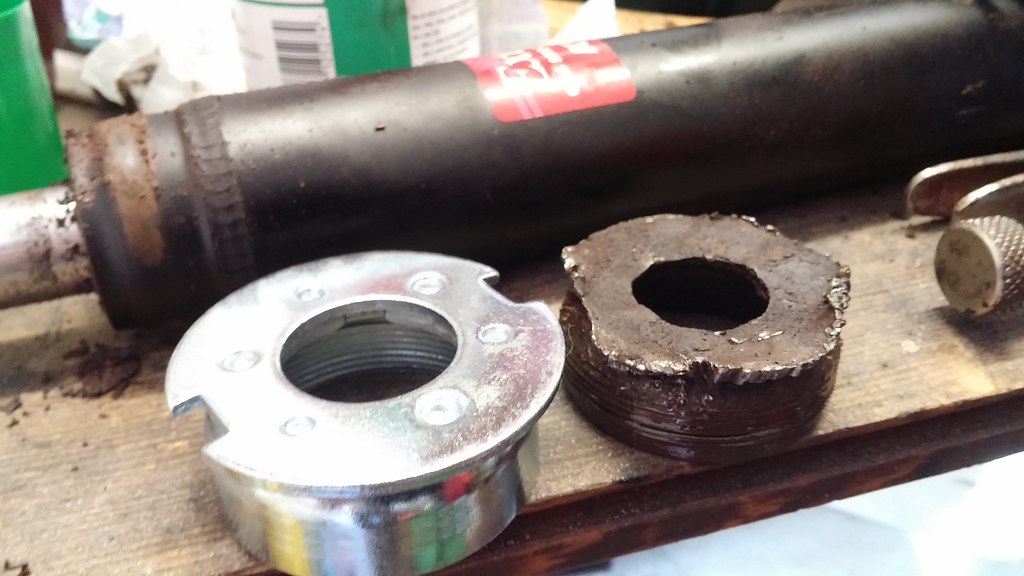 20140621_111456 20140621_111456 by svenicusminimus, on Flickr The other day I also finally got the tank, prop, and exhaust back in/on to the car. Here's the tank after a bit of pre-emptive de-rusting and painting around the seam and filler neck. 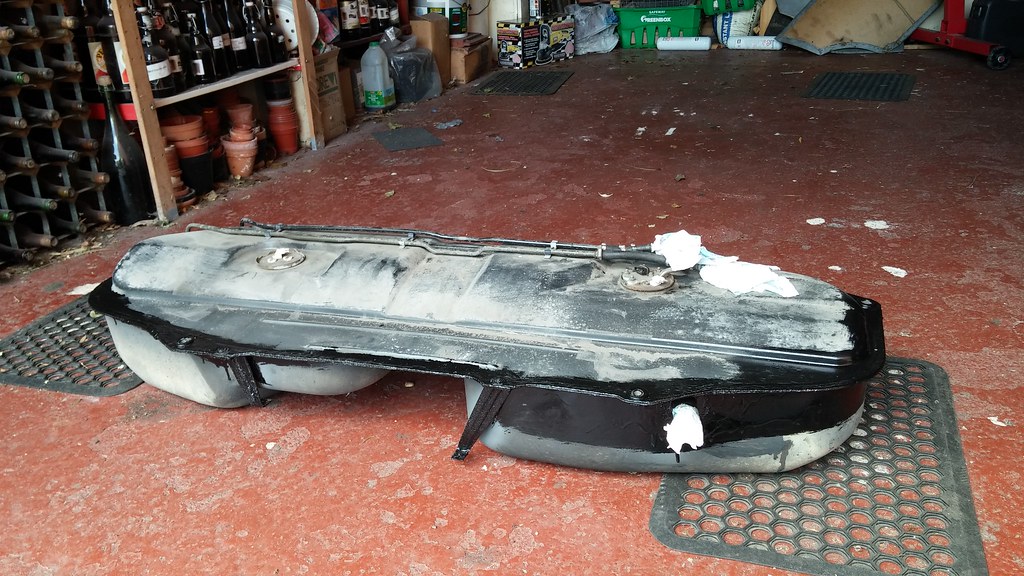 20140620_121642 20140620_121642 by svenicusminimus, on Flickr Whilst I had the tank out, I wire wheeled back a few little rust spots above where the tank sits and got some paint on those areas. Should help the longevity of the car I hope. 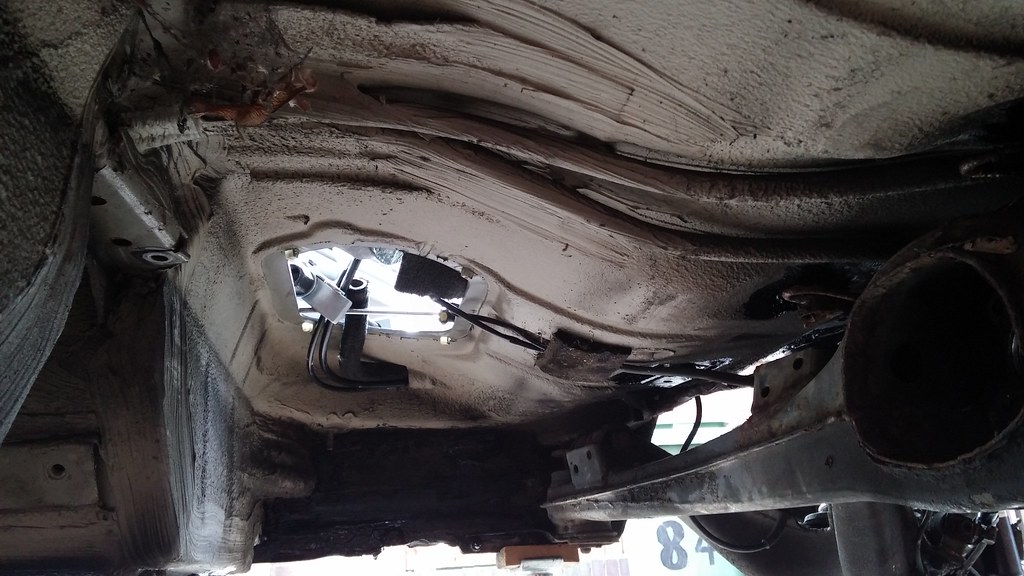 20140620_121751 20140620_121751 by svenicusminimus, on Flickr 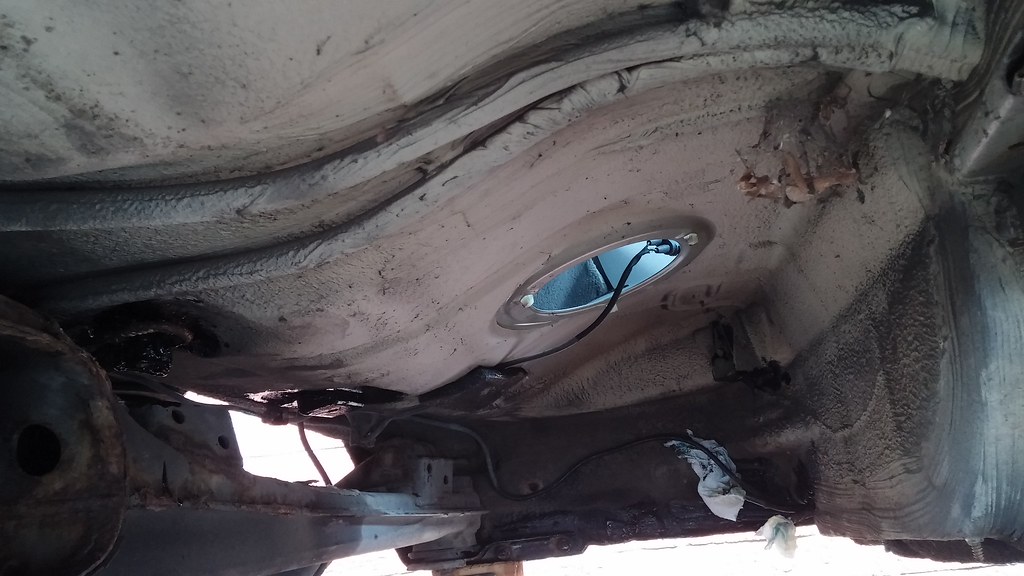 20140620_121804 20140620_121804 by svenicusminimus, on Flickr It was very fiddly to get the tank back in, but a combination of three jacks and lots of strategically placed wood got it in there eventually. It need to go in at quite an angle to get the seam/filler neck stub over the top of the rear suspension beam. Before I got the exhaust back on, I welded up all the rusty holes. I know it's a bit messy, but it did the trick and should get me a bit more time out of this exhaust section. I think it's original, as it's stamped BMW on it, and a new system from them is worth more than the entire car so I doubt it's ever been replaced. 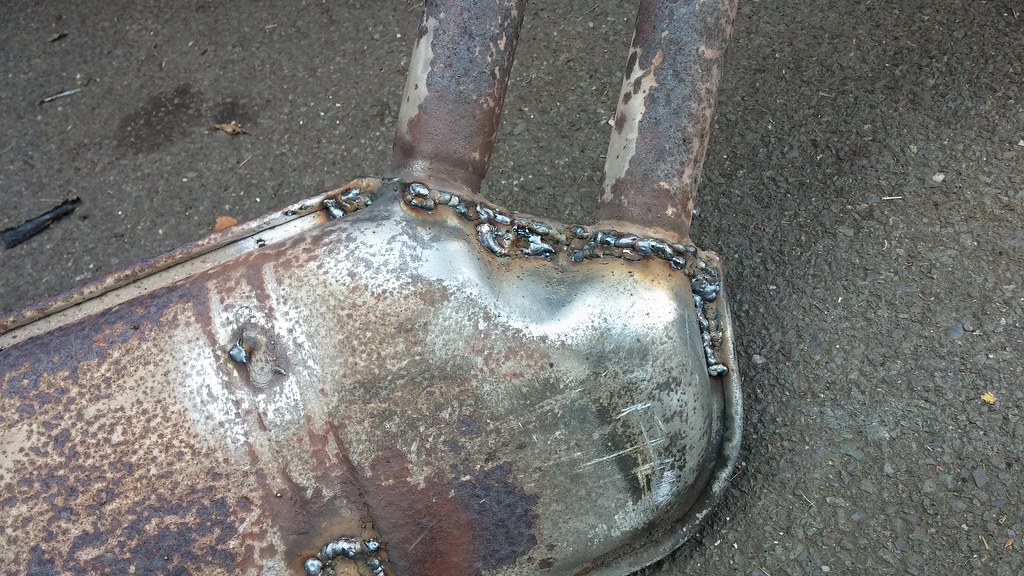 20140620_162447 20140620_162447 by svenicusminimus, on Flickr I also welded on a random offcut of steel to reinforce this mounting bracket. It was very rusty and very nearly snapped off halfway along, so with this extra piece welded on it's got it's strength back. Again, it is very messy, but it does the job and it's underneath and the car where nobody will ever see it anyway. 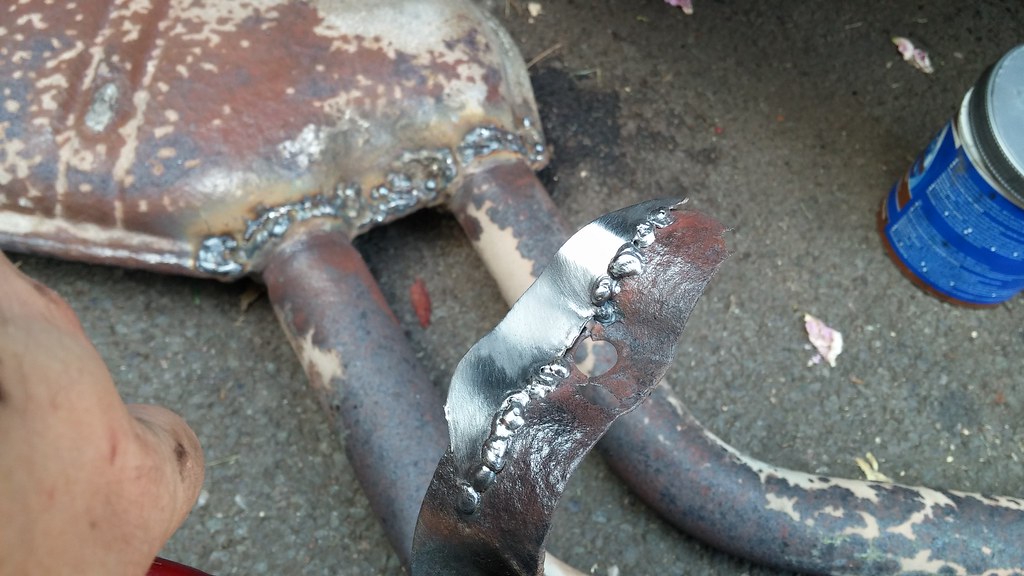 20140620_164926 20140620_164926 by svenicusminimus, on Flickr After all this work taking the fuel tank and exhaust out, I was eager to fire the car up again once it was all back together, to check for leaks and to see if I'd messed anything up in reassembly. Before I fired it up though, I replaced this bit of vacuum hose that had a massive split in it (the old piece is lying loose on the inlet manifold). 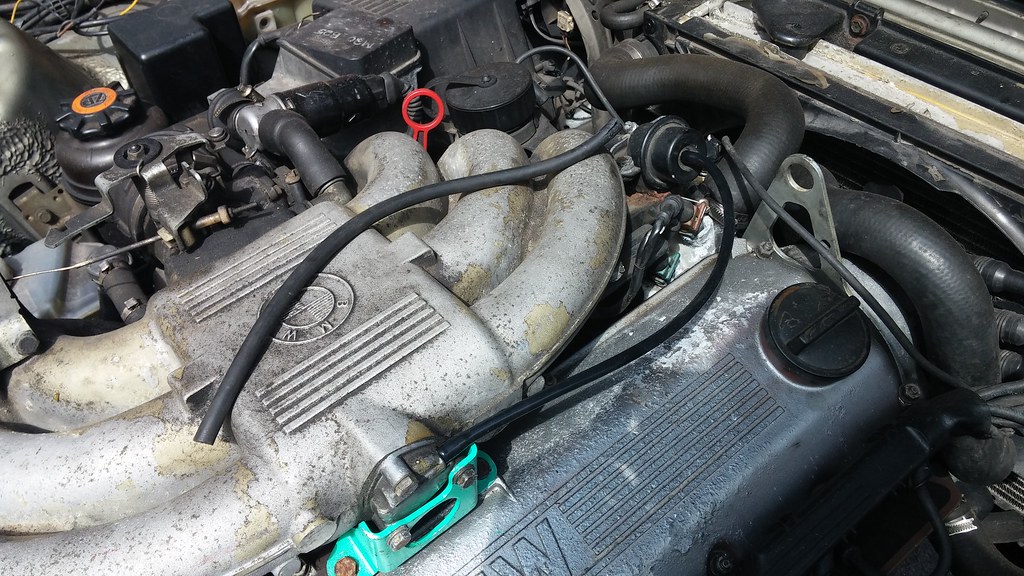 20140621_145839 20140621_145839 by svenicusminimus, on Flickr I'm pleased to report that the car fired up fine, obviously took a bit of cranking to get fuel through the lines again, but once it started it ran luvverly. Sounds even better now that there's no blow on the exhaust too! Later on, I re-assembled the strut with the new shock and spring, and I had to give the thing a lick of paint before it went back in - it was very rusty! 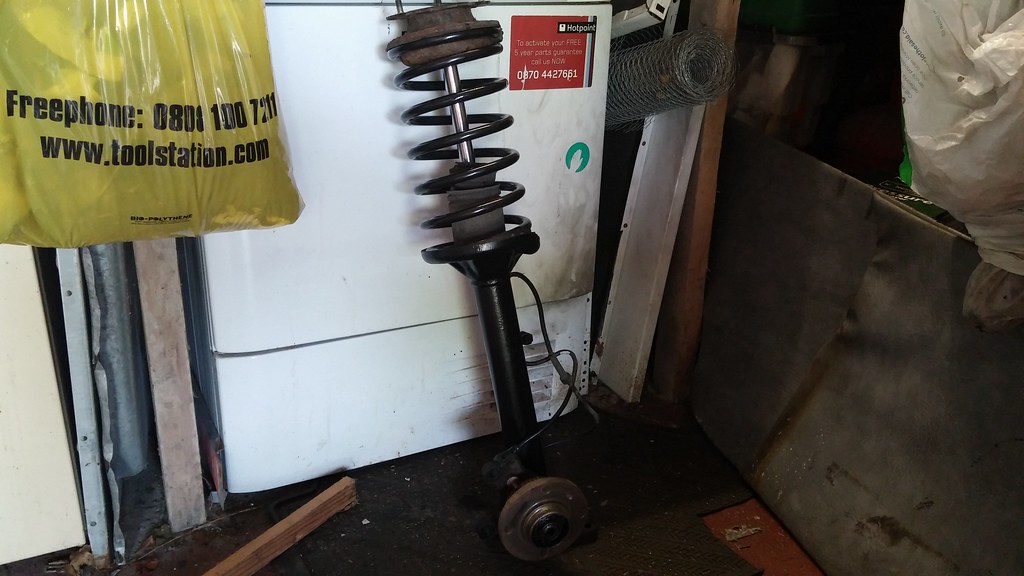 20140621_170008 20140621_170008 by svenicusminimus, on Flickr Today, I finally re-fitted the headlining. It was pretty fiddly and took ages to get all the trim pieces and bits and bobs back in the right place. Even with all the creases, it still looks a damn sight better than crusty yellow foam (in my opinion!). 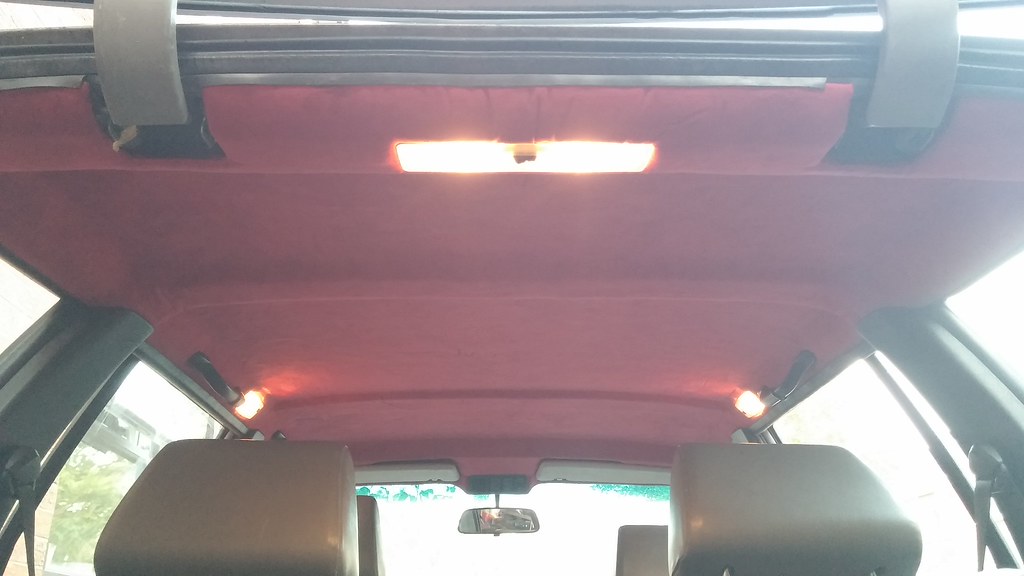 20140622_205001 20140622_205001 by svenicusminimus, on Flickr  20140622_205035 20140622_205035 by svenicusminimus, on Flickr 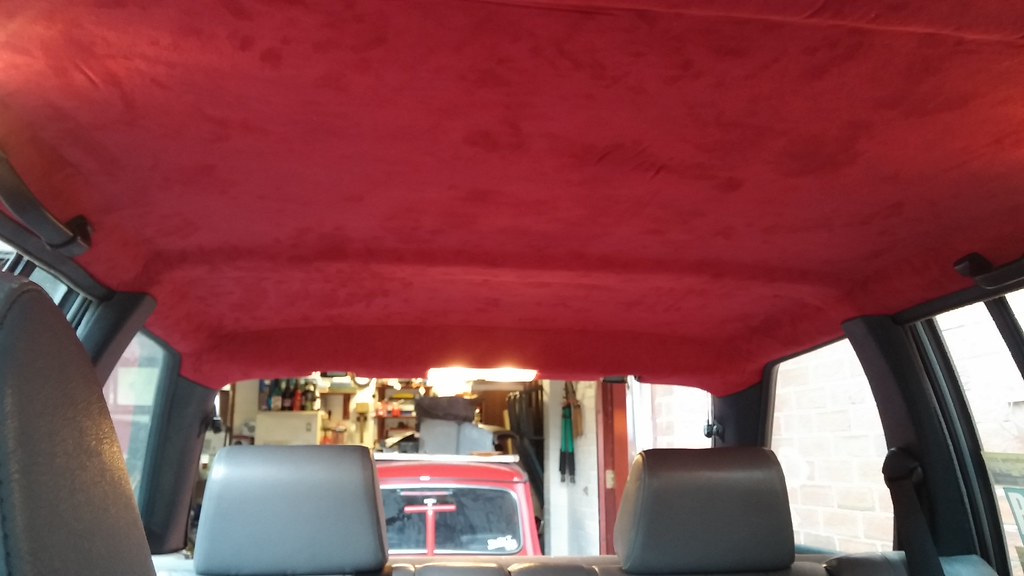 20140622_205049 20140622_205049 by svenicusminimus, on Flickr So, that's where we're up to right now. I should be able to finish the suspension tomorrow and maybe get the car back on the ground in a couple of days once I've properly painted the rust repair patches in the front wheel arch area and gotten the wing back on. Then once all this work is done I can finally look in to the ABS issue that's throwing up a warning light on the dash! Then next month I'll get some tyres fitted to the BBS's and get those on... we're almost there |
| |
|
|
tdk
Part of things

Posts: 958
|
|
|
|
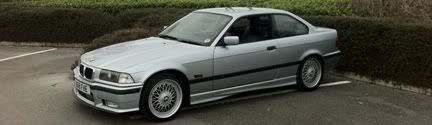
I love these. Here's something very similar I spotted yesterday at the VAG meet at Billing that took my eye:  |
| |
Last Edit: Jun 23, 2014 8:20:04 GMT by tdk
|
|
|
|
|
|
|
Jun 23, 2014 11:32:18 GMT
|
|
It's all coming back together very nicely indeed... Superb!!!
|
| |
***GARAGE CURRENTLY EMPTY***
|
|
|
|
|
Jun 23, 2014 13:24:59 GMT
|
|
wow, thats alot of work!....looking great
JP
|
| |
I know its spelled Norman Luxury Yacht, but its pronounced Throat Wobbler Mangrove!
|
|
MrOtter
West Midlands
"Your car is your story, so don't let someone else write the book." - Moog
Posts: 281
|
|
Jun 27, 2014 21:23:04 GMT
|
Thank you for the comments chaps! tdk, that one does look lovely! Same colour as mine but much tidier and shinier I particularly like the wind deflectors and the wheels, although in my opinion it would look better with some proper size tyres fitted Anyways, I've got the new springs and shocks fitted on both sides at the front now. The passenger's shock retaining collar was, unbelievably, worse than the driver's one. It took one HELL of a beating before it started to move, and even then it didn't move freely. I had to continue to clout the wrench as hard as I could to get the collar to move about one turn, then it finally started to turn a bit easier. Perseverance paid off in the end though, bloody mangled thing... 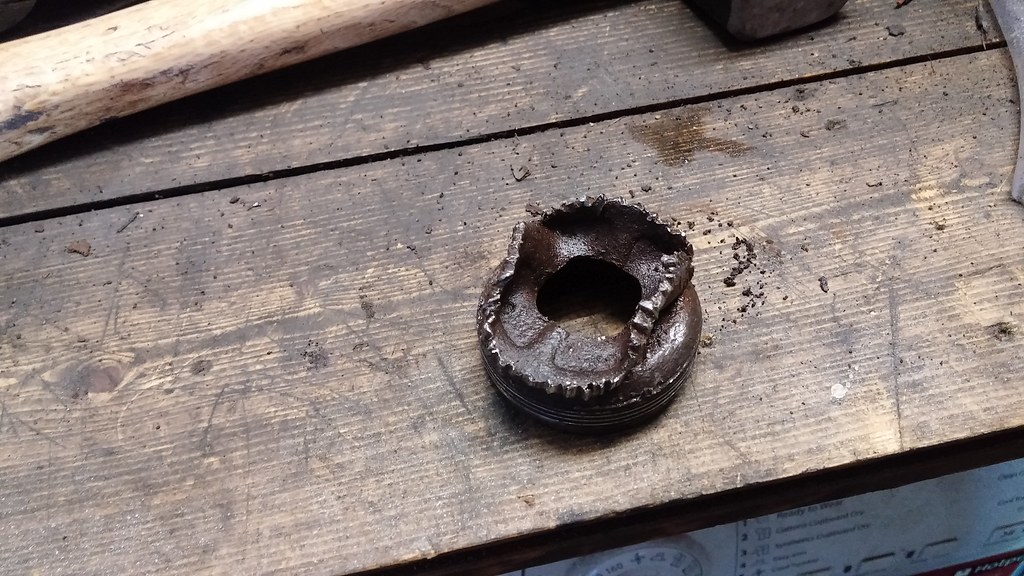 20140623_180103 20140623_180103 by svenicusminimus, on Flickr Before I got that strut back in, I thought I'd have a quick look at the ABS sensors around the car, assuming that that was the problem with the ABS system. I resistance tested all the sensors on the car, and they all gave good readings apart from the front passenger's sensor, which ended up like this when I was trying to inspect the wiring on it. 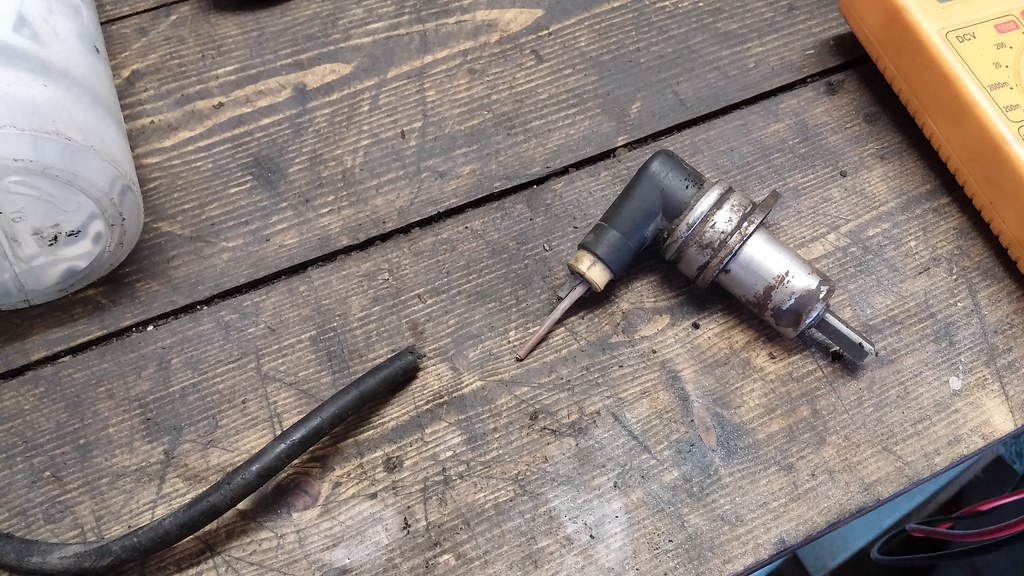 20140623_142906 20140623_142906 by svenicusminimus, on Flickr The actual sensor gave a good resistance reading, it was just the wiring coming out of it that was corroded to curse word. I tried my best to solder some new bits of wire on and salvage the sensor, but it just fell apart when I tried to fit the strut back on to the car. I'm on the look out for a replacement sensor now, but this was my finished repair attempt before it fell apart. 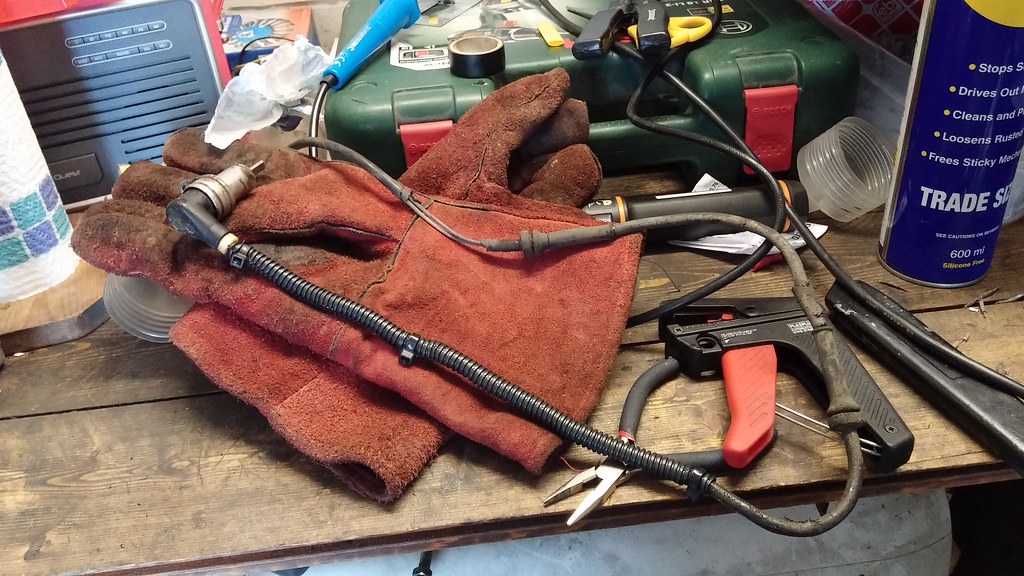 20140623_154124 20140623_154124 by svenicusminimus, on Flickr Strut assembled with new shock and spring, fitted to the car. Gave this one a lick of paint too. 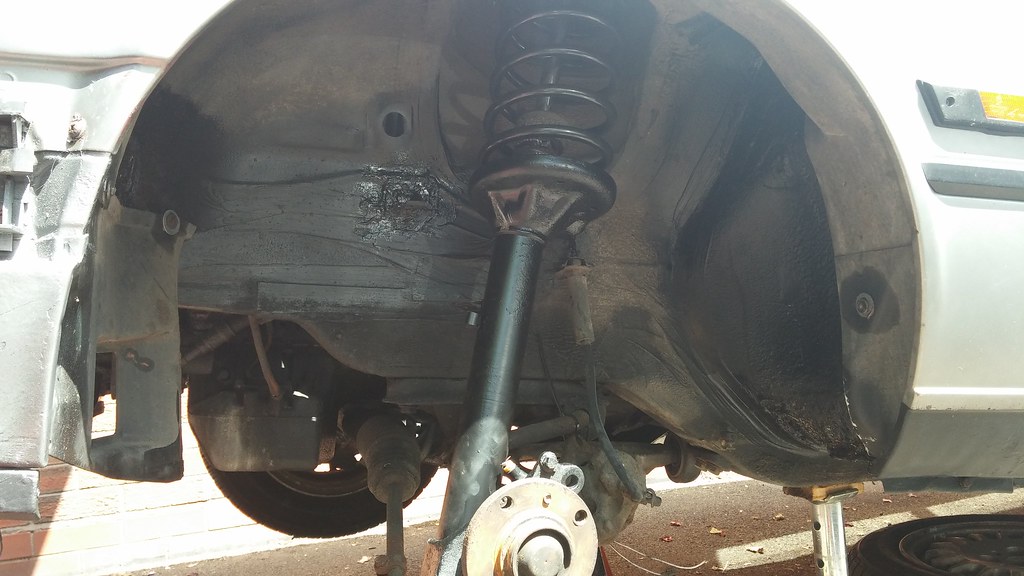 20140624_114728 20140624_114728 by svenicusminimus, on Flickr Back on the ground with new suspension all round! Woo! 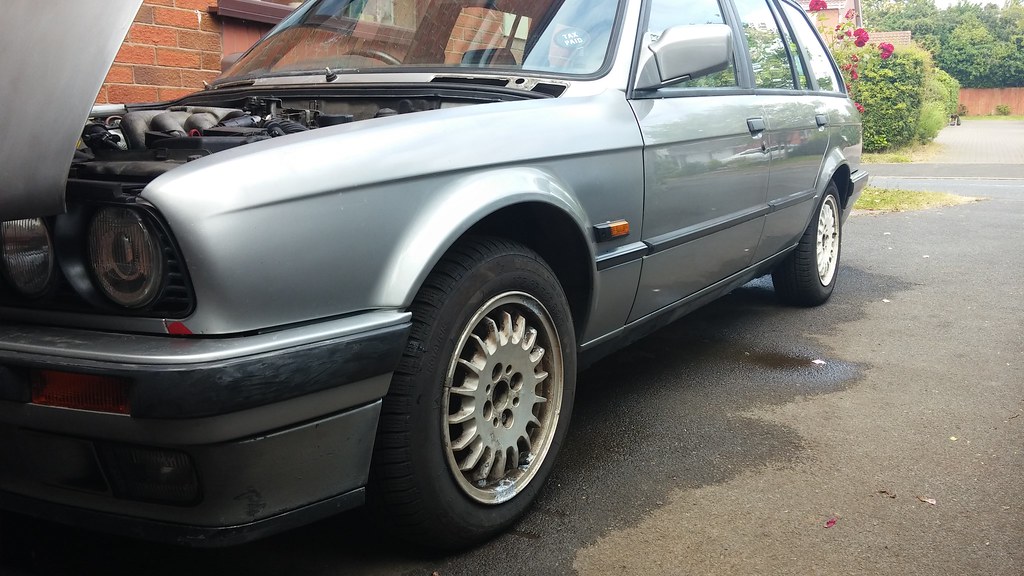 20140624_161740 20140624_161740 by svenicusminimus, on Flickr It didn't turn out quite as low as I hoped (on the front at least), but I did only buy a 40/35 lowering kit (about the smallest drop you can get). This was mainly based on the knowledgeable folk of the E30Zone forum saying that any more of a drop than that will compromise the handling; I'd rather have a car that drives like a dream and looks a bit high, than a slammed car that doesn't drive as well. Who knows, it might settle a teeny bit lower anyway once I start driving it, but I imagine the main cause of not-much-dropness was because the original springs had sagged over the years. Here's a couple more pictures. 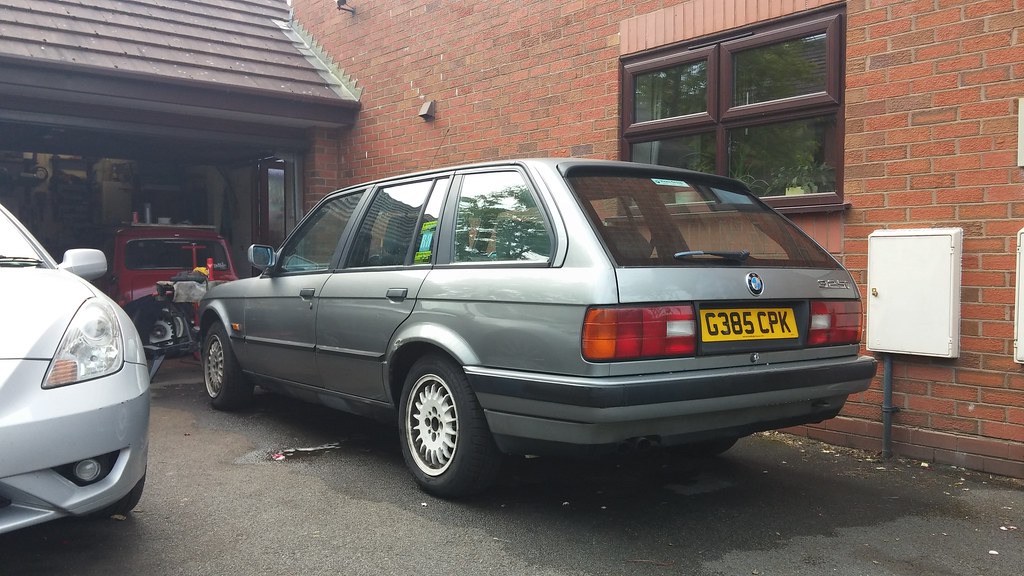 20140624_171922 20140624_171922 by svenicusminimus, on Flickr  20140624_190519 20140624_190519 by svenicusminimus, on Flickr So now that all of the big bits are back together and I have an almost MOT worthy car, I can start looking at all the little things to touch up and make the car look neater. Naturally, the first thing I did was fit a traveller rear washer setup that sticks out like a sore thumb, to replace the broken original stuff. Here's the nozzle that pokes out of the rear window. 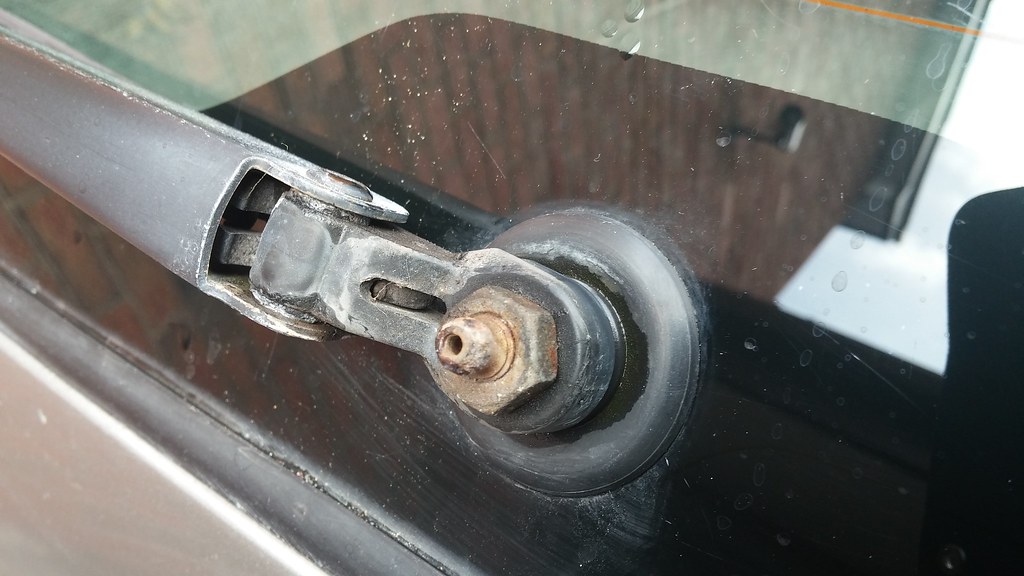 20140625_145032 20140625_145032 by svenicusminimus, on Flickr It's meant to mate up with this little cap that fits on to the end of the wiper arm. It should send the washer fluid through 90 degrees and out of two little nozzles on the side of the cap and on to the window. However, the little cap is broken inside so that the metal nozzle doesn't seal fully and so the washer fluid dribbles out of the big cracked area and doesn't go anywhere near the wiper blade. Excuse the grease, that was me trying my best to make a seal before I realised just how broken it was... 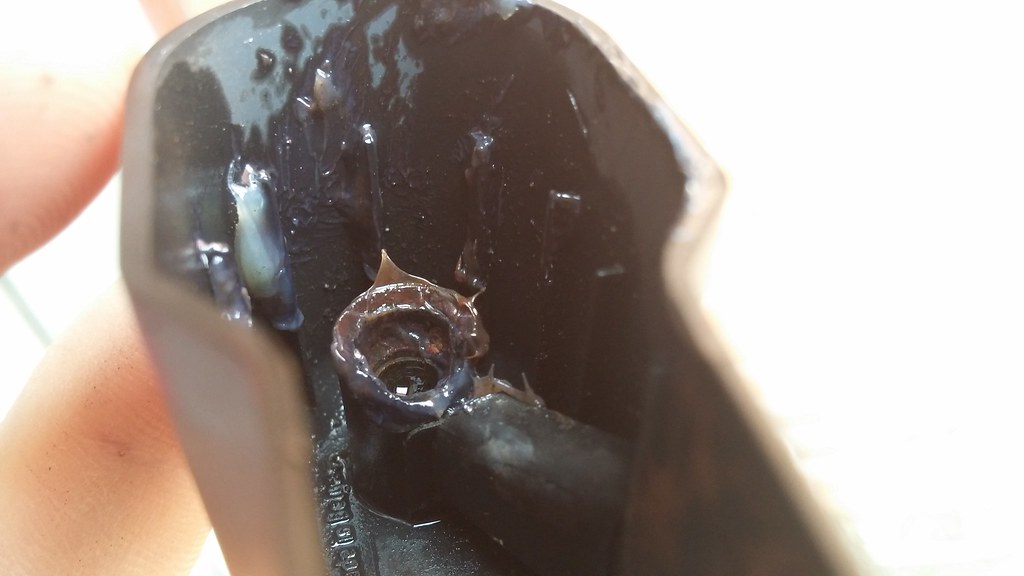 20140625_145114 20140625_145114 by svenicusminimus, on Flickr So, have some washer hose, cable tied to the wiper arm, with a bolt stuck in the end and three little holes drilled in to it to squirt water on the screen. 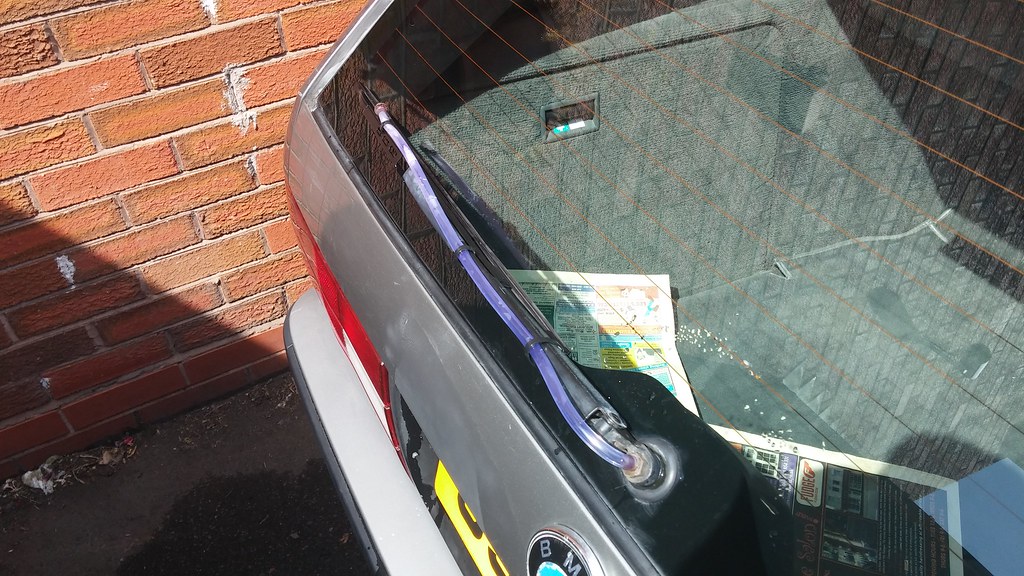 20140625_151030 20140625_151030 by svenicusminimus, on Flickr 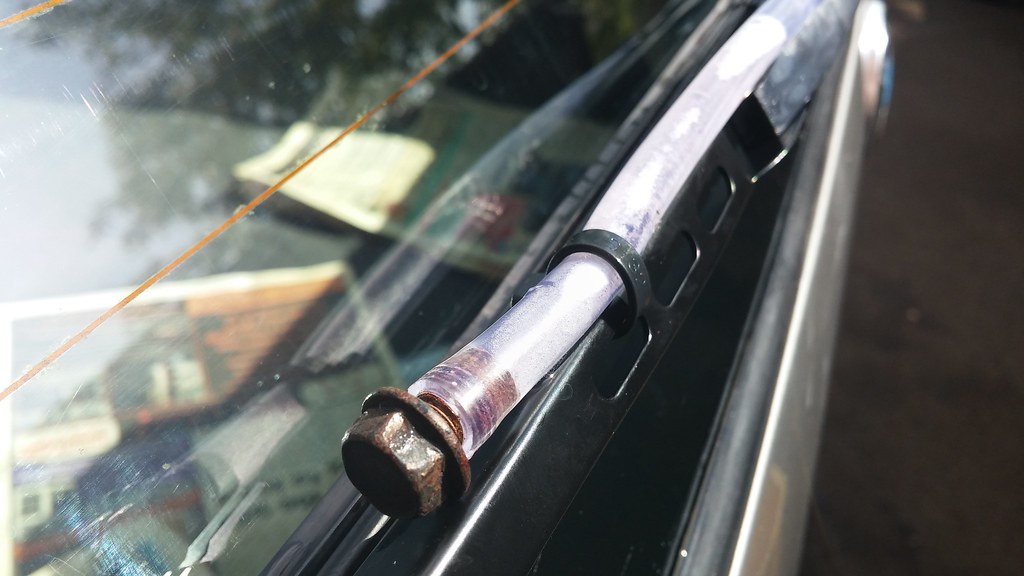 20140625_151112 20140625_151112 by svenicusminimus, on Flickr Looks awful, but it works brilliantly! That reminded me, looking at the rear window there, I spent quite a while with a razor blade and a bottle of polish to make the front and rear screens look nice again. All of the welding and grinding had left a lot of stray spark metal flecks embedded in the glass, despite the fact that everything I'd been doing was underneath the car. After I did the rear screen, I thought that the back end was starting to look nice and tidy, so I thought I should do something to smarten up the black cappings on the bumper. I got the bumper off, masked off the silver bits and sanded down any big scratches as best I could. 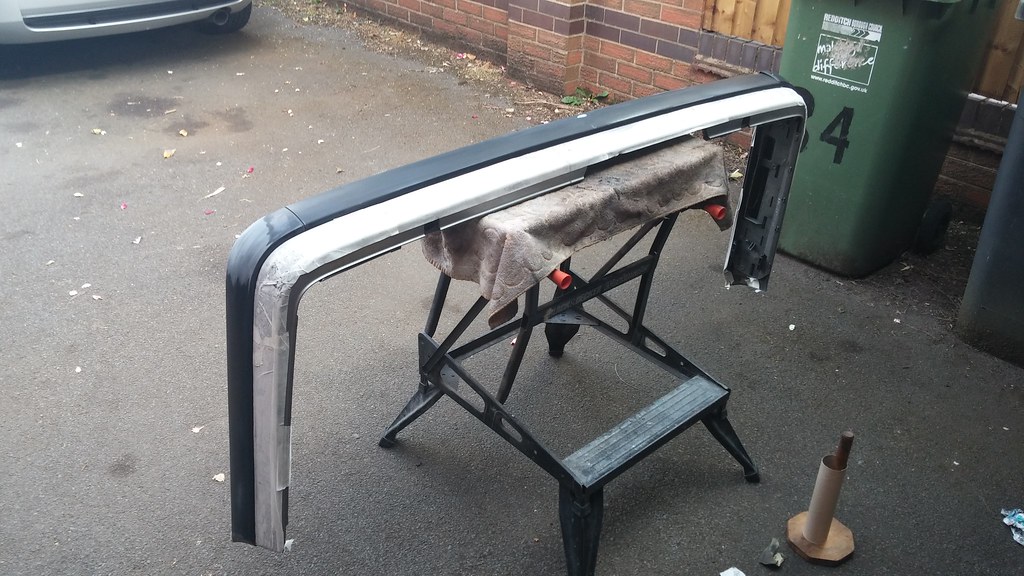 20140625_170902 20140625_170902 by svenicusminimus, on Flickr Coat of primer. 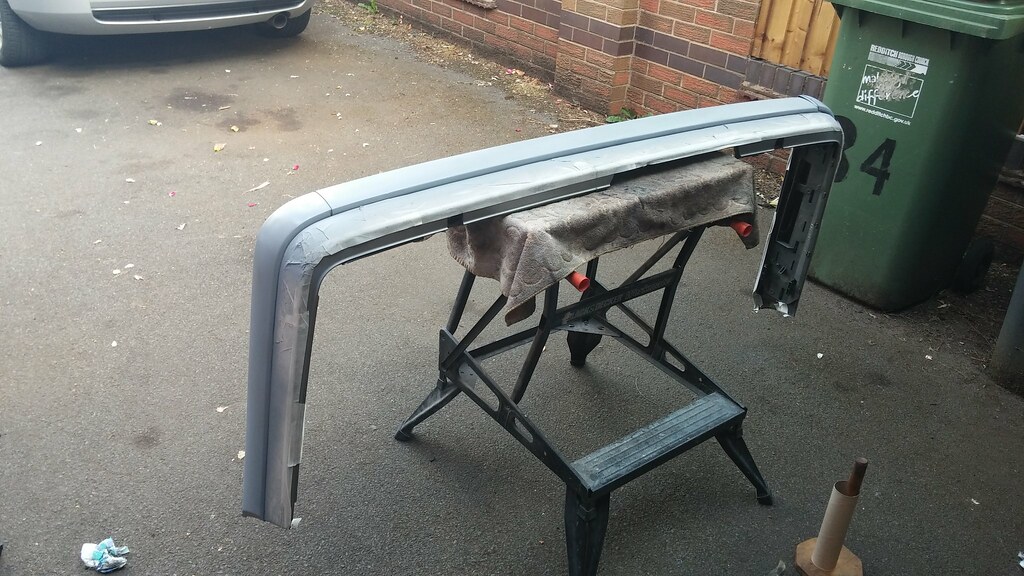 20140625_171244 20140625_171244 by svenicusminimus, on Flickr Then satin black, and back on the car. 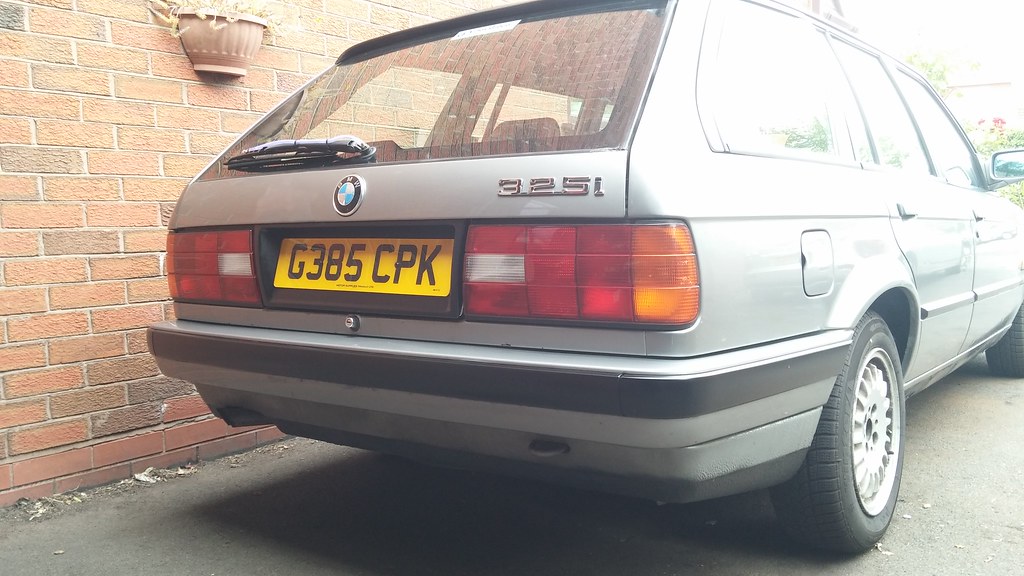 20140626_181452 20140626_181452 by svenicusminimus, on Flickr Looks much better, now I'll have to do the front to match, soon. I've also got more on the ABS problem to finish off this update. Up there ^ you read that I had found the bad sensor that was causing the ABS problem, but there was another hiccup to overcome. The previous owner had known about a problem with the ABS, which was causing funny things to happen with the brakes. So, to tide him over until he had time to fix the issue, he pulled out the two main ABS relays that sit on top of the pump in the engine bay. This meant that the ABS system was completely deactivated and there were no more dangerous problems occurring, but left the light permanently on on the dash. I bought it like this, naturally. Long story short, the previous owner thought he'd given me the ABS relays when I bought the car, but I actually had three completely unrelated ones in my possession. Luckily, he found the right ones in his garage and popped them in the post for me, so I could now power up the system and make sure it was just a sensor problem causing the light on the dash (a permanently on light indicates a more major fault - like a bad pump or ABS ECU, or missing relays...). 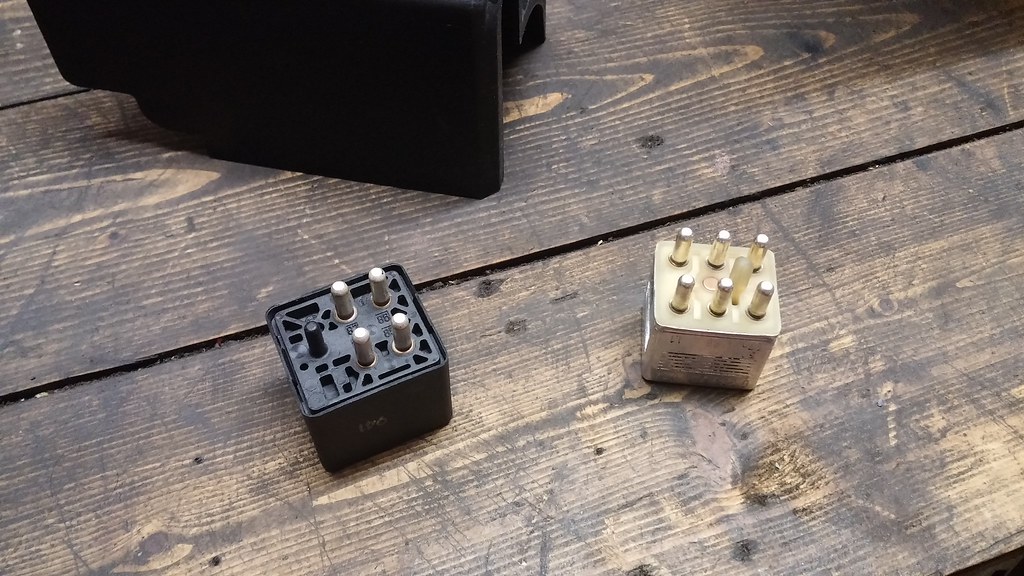 20140627_125527 20140627_125527 by svenicusminimus, on Flickr Thankfully, when the relays arrived (funny 'round pin' ones that are quite expensive on ebay, at least) I plugged them back in to the ABS pump and when I switched the engine on, the ABS light went out! Then when I started moving, it came back on again, indicating a sensor problem (yeah, there's one missing!). SOOOOOO, fingers crossed, replacing this passenger's front sensor should fix the ABS issue, and then I'll finally have an MOT-worthy vehicle on my hands! Hopefully I can source one and get it fitted by this time next week, then I can book the car in for an MOT and pray to the car Gods that it passes. Next update should hopefully contain joys of ABS fixingness, smartened up front bumper, and new rims, y0! Thanks for keeping up with my waffle if you've made it this far! |
| |
|
|
Ian
Part of things
Posts: 977
|
|
Jun 27, 2014 21:37:55 GMT
|
|
Keep going, as you say it's not too far way from the road now. Not too sure on the rear wiper washer system, maybe a smaller diameter black hose?
|
| |
|
|
MrOtter
West Midlands
"Your car is your story, so don't let someone else write the book." - Moog
Posts: 281
|
|
Jun 27, 2014 21:52:13 GMT
|
|
Yeah if it still works in a month or two then I'll get some black stuff and smarten it up, it does look bad but this set-up was more just a proof of concept with bits I had lying around. It works really nicely though!
|
| |
|
|
|
|
|
Jun 27, 2014 22:14:17 GMT
|
|
That's some impressive work you've done there. 'Tis a shame about the ABS sensor though, is it worth giving the soldering another crack? I found that winding some extra wire around the two parts to be joined and clamping with a washer and croc-clips helped a lot. Combined with heat-shrink the repair was fine.
James
|
| |
|
|
MrOtter
West Midlands
"Your car is your story, so don't let someone else write the book." - Moog
Posts: 281
|
|
|
|
That's some impressive work you've done there. 'Tis a shame about the ABS sensor though, is it worth giving the soldering another crack? I found that winding some extra wire around the two parts to be joined and clamping with a washer and croc-clips helped a lot. Combined with heat-shrink the repair was fine. James I did think about trying it again, but the wires were so badly corroded that I just thought it wasn't worth it to keep trying with them. I went on ebay and won a pair of good second hand sensors for the front for only £20, so now I have a spare for the driver's side too. I've been busy doing odd jobs and making the car look nicer for the past few days - makes a nice change from making it solid underneath and ignoring the top side. I finally got round to screwing in the subwoofer that I'd just plonked in the rear bin when I ran the wires for it back when the carpet was out. Only took a couple of screws and a bit of cutting to get it sitting nicely on that plastic liner panel thing that's in there. Nice to have a place to hide it! 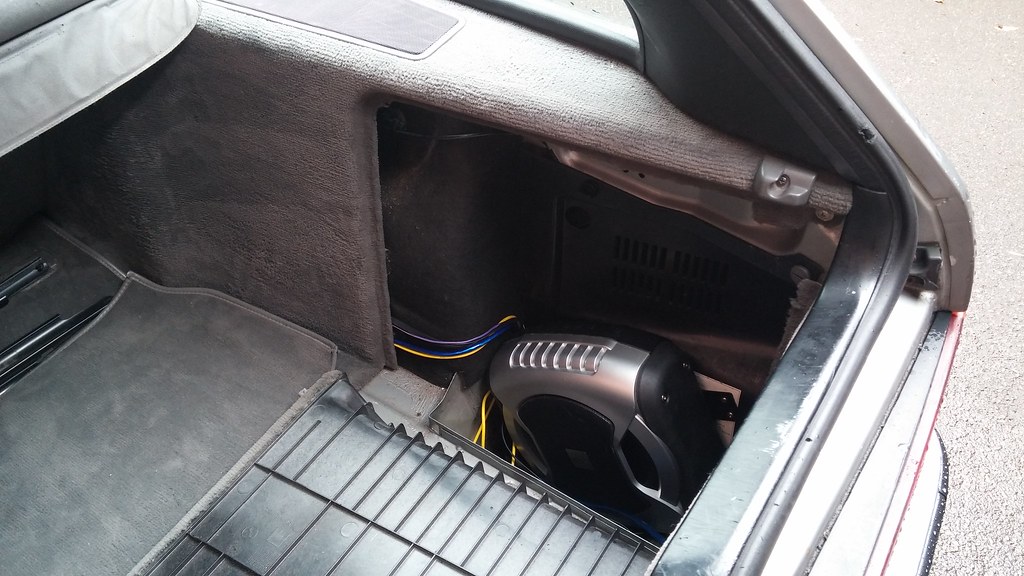 20140628_181625 20140628_181625 by svenicusminimus, on Flickr I got the front bumper off and gave it the same treatment as the rear - rub down, primer and satin black. 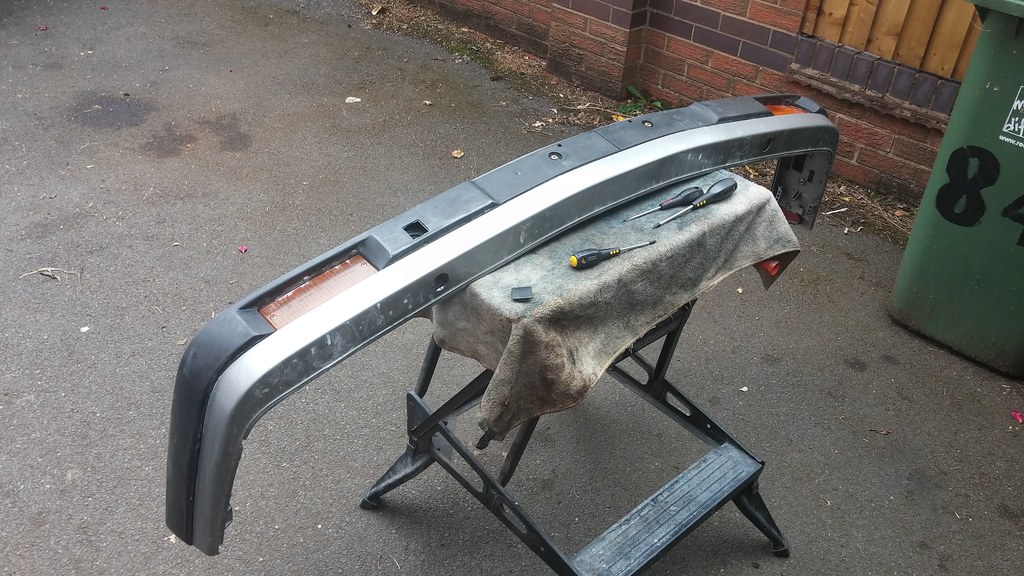 20140630_150337 20140630_150337 by svenicusminimus, on Flickr It did take me a bit longer than the other one though, as someone had used an orbital sander on it some time in the past... as to why, I have no idea  Took more aggressive sanding to get all those swirls out, but I got there in the end. 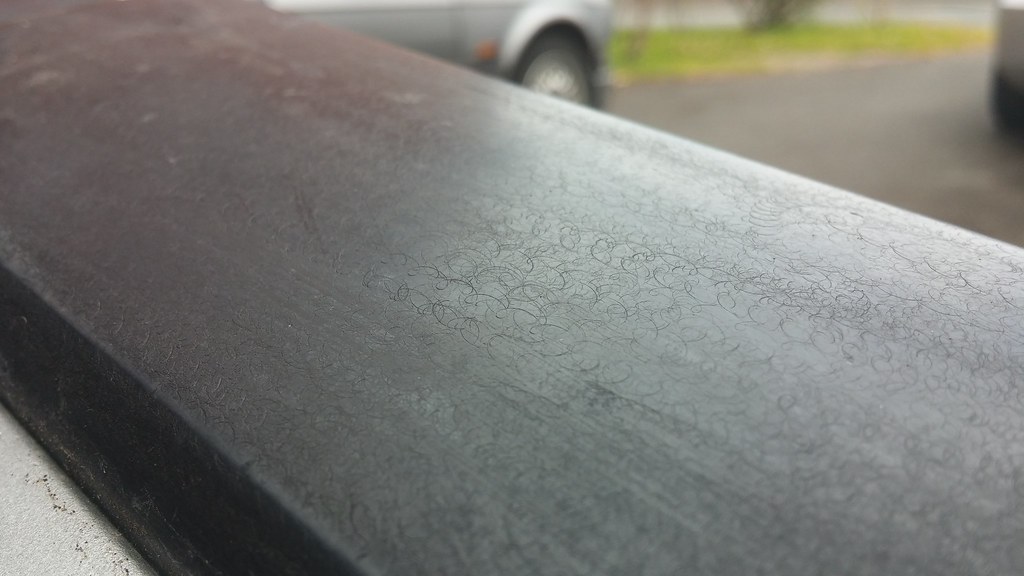 20140630_150348 20140630_150348 by svenicusminimus, on Flickr There's also some funny silver paint on the corner, presumably a not very well painted repair. I'll get round to re-painting this bit and the whole front valance below it sometime. 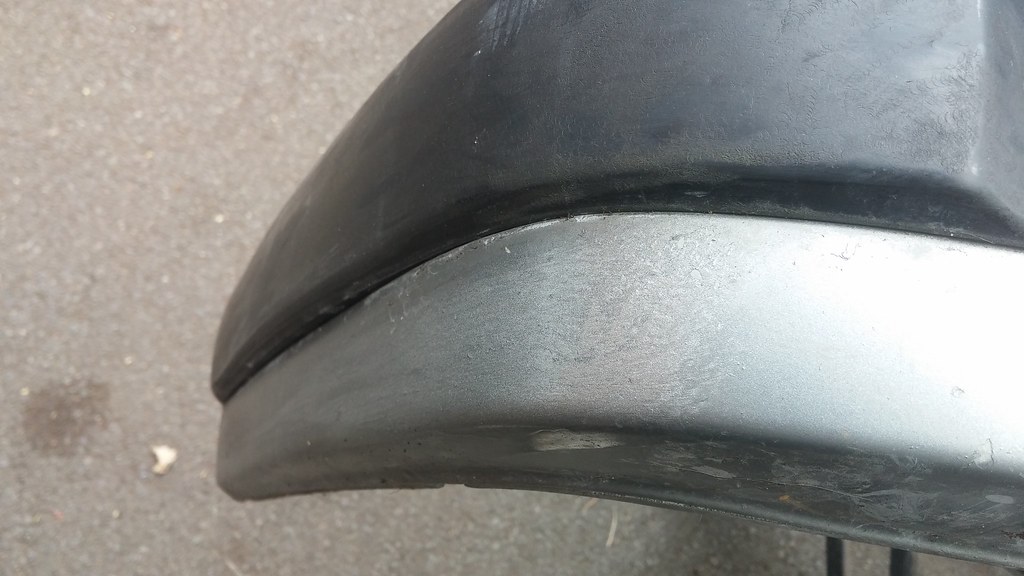 20140630_150403 20140630_150403 by svenicusminimus, on Flickr Finished. 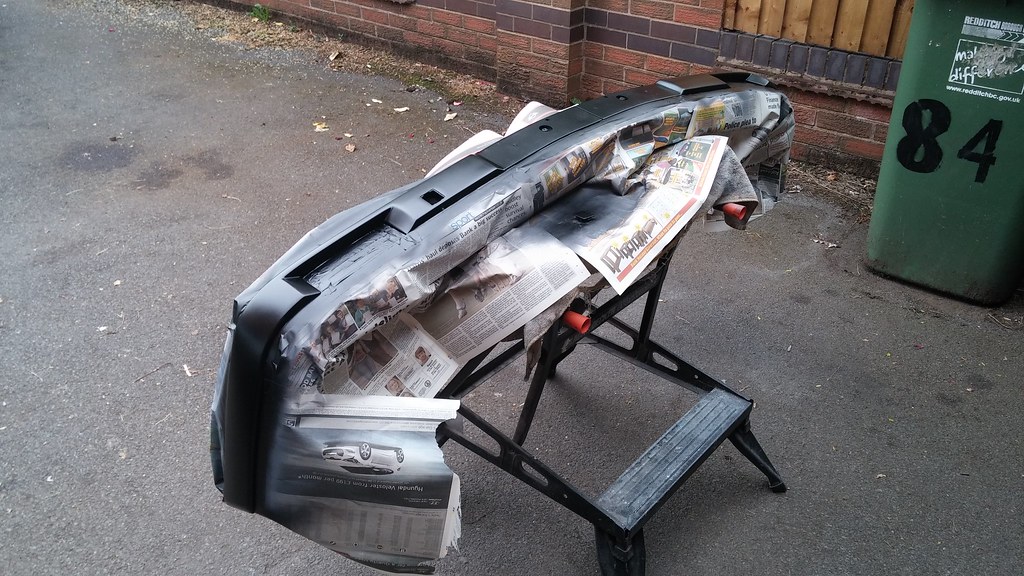 20140702_194254 20140702_194254 by svenicusminimus, on Flickr I'd bought some new tyres a while back to go on the 15" BBS wheels I bought ages ago, and I finally got round to getting them fitted the other day. Loaded everything in to the current daily for a trip to my local garage.  20140630_113416 20140630_113416 by svenicusminimus, on Flickr £20 later and back home. 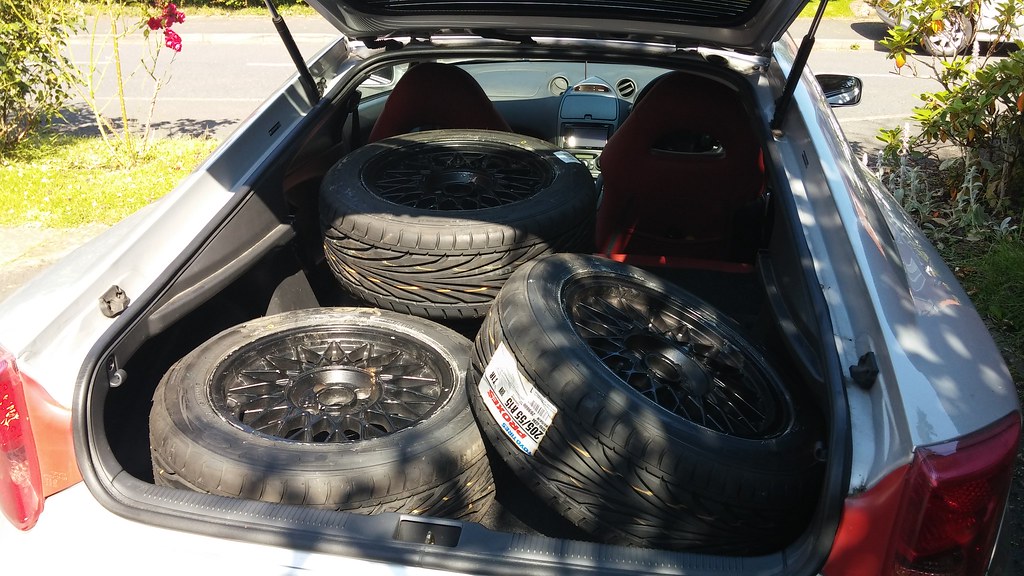 20140701_161059 20140701_161059 by svenicusminimus, on Flickr Halfway through, one side fitted and the other still with the old 14" bottletop on. 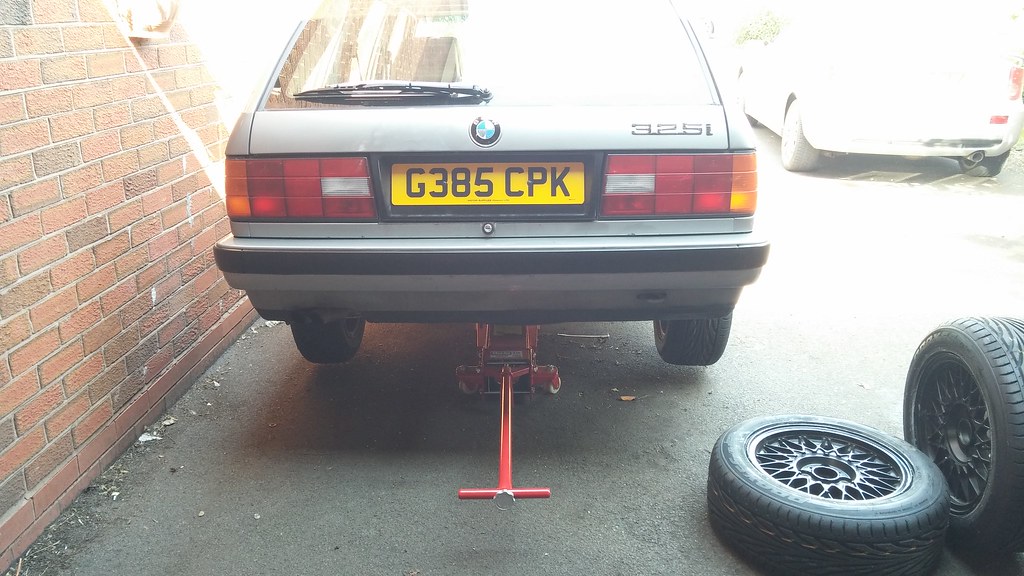 20140701_162305 20140701_162305 by svenicusminimus, on Flickr Ahh, that's more like it, has a bit of purpose about it now! 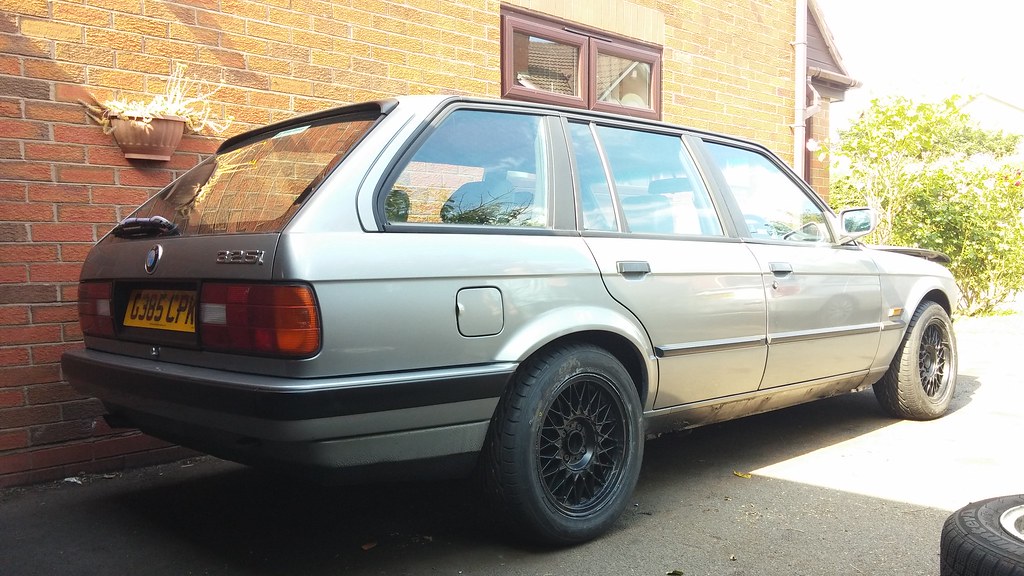 20140701_164440 20140701_164440 by svenicusminimus, on Flickr 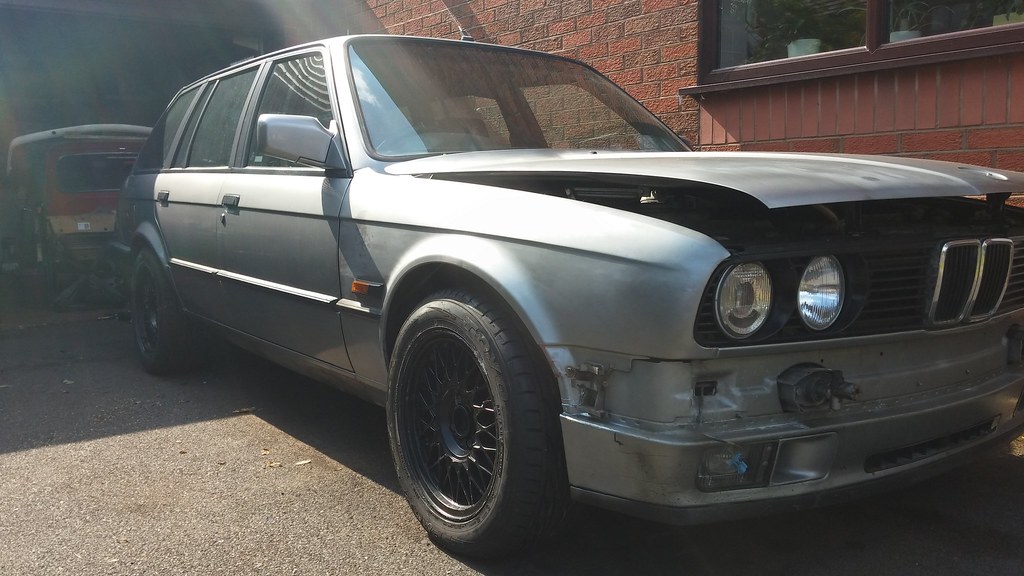 20140701_164500 20140701_164500 by svenicusminimus, on Flickr Re-sprayed bumper back on. 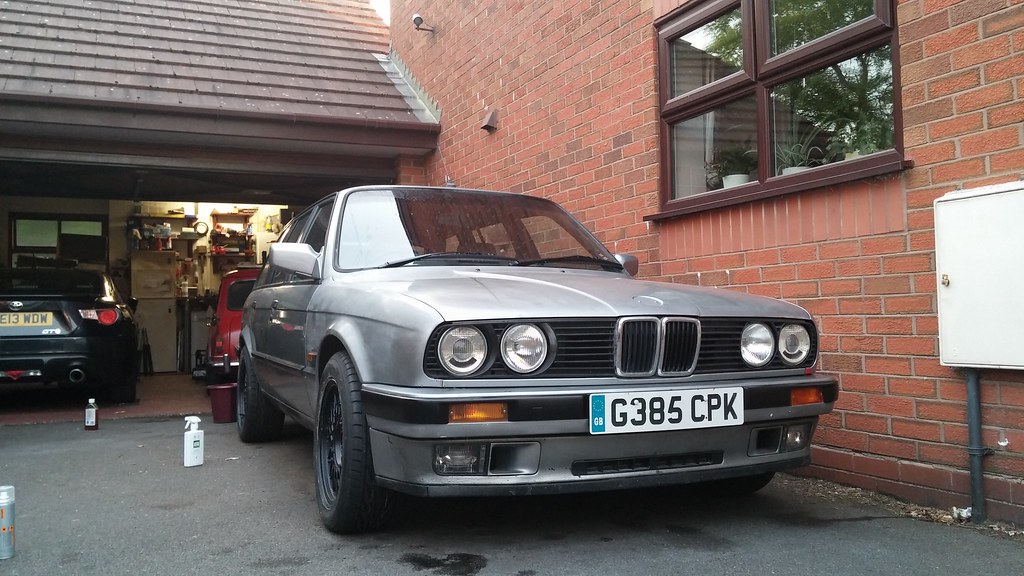 20140702_210046 20140702_210046 by svenicusminimus, on Flickr Whilst I was refurbing the bumper, I re-sprayed the wiper arms, fitted new blades, and gave the scuttle vents a coat of linseed oil. 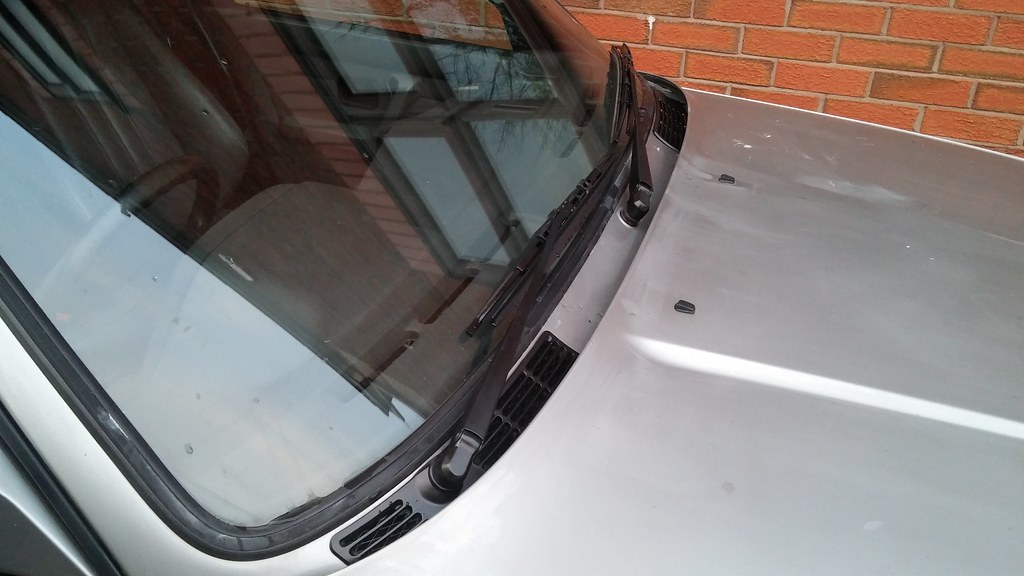 20140702_211805 20140702_211805 by svenicusminimus, on Flickr After reading an update in Mr Vulgalour's thread, where he mentioned the nastiness of his Xantia's steering column stalks, it reminded me that I needed to clean the ones in the BMW... they were pretty disgusting! 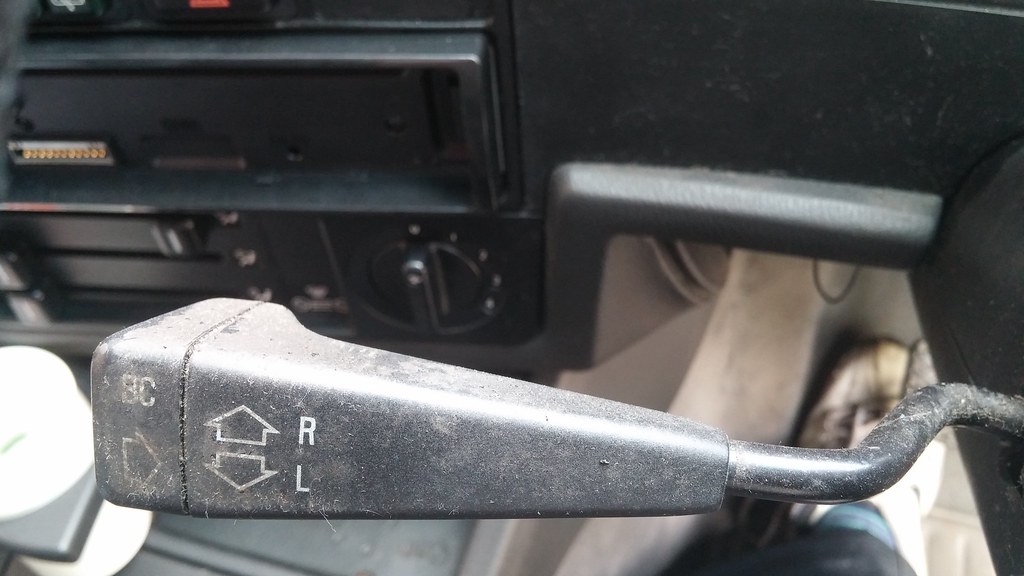 20140630_173738 20140630_173738 by svenicusminimus, on Flickr 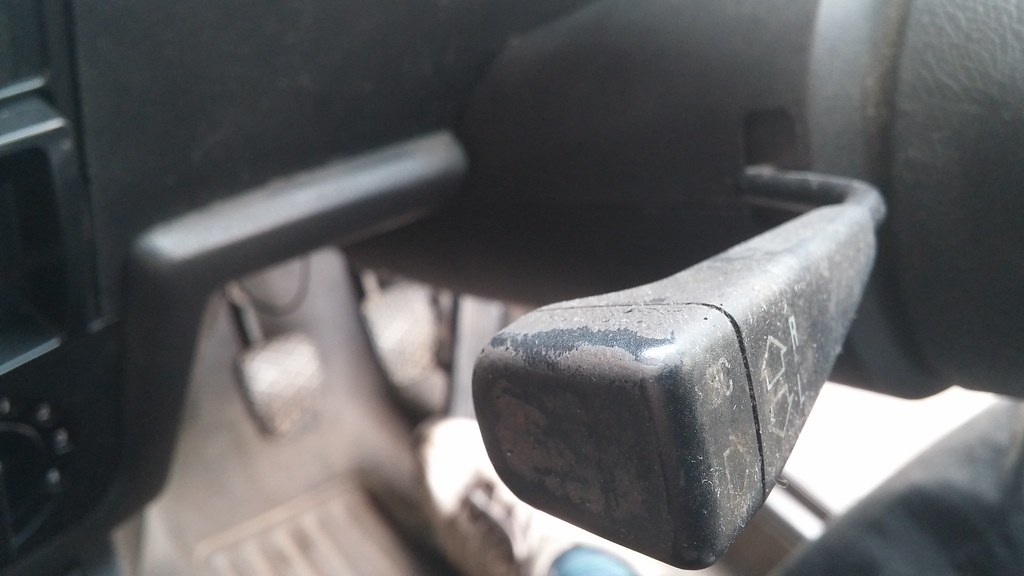 20140630_173916 20140630_173916 by svenicusminimus, on Flickr I assumed that the lettering had faded on them, particularly where it says BC. Nope, the human grime was that thick it was obscuring the letters...  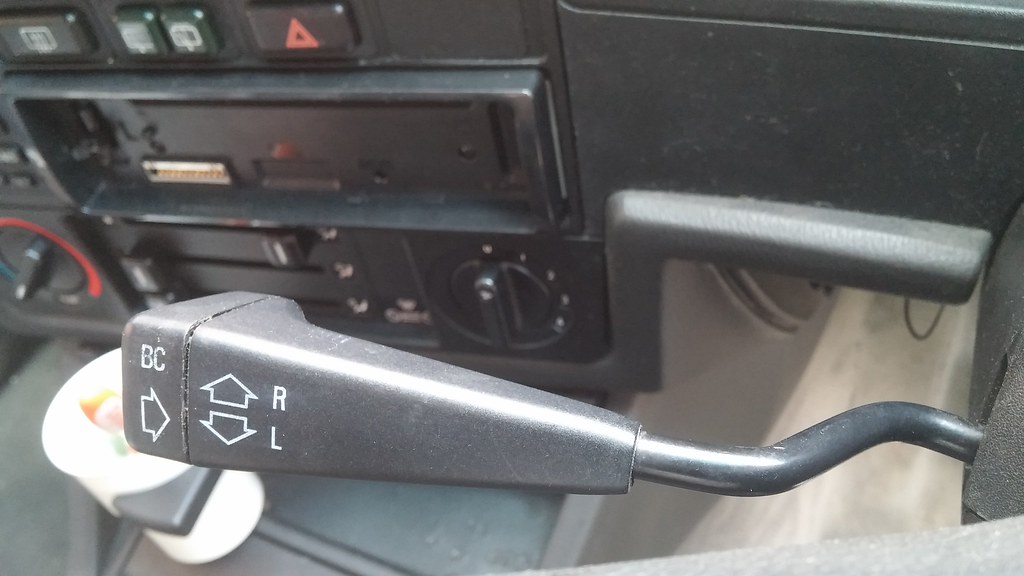 20140630_174441 20140630_174441 by svenicusminimus, on Flickr Did the horn buttons on the steering wheel as well, they came up nice. 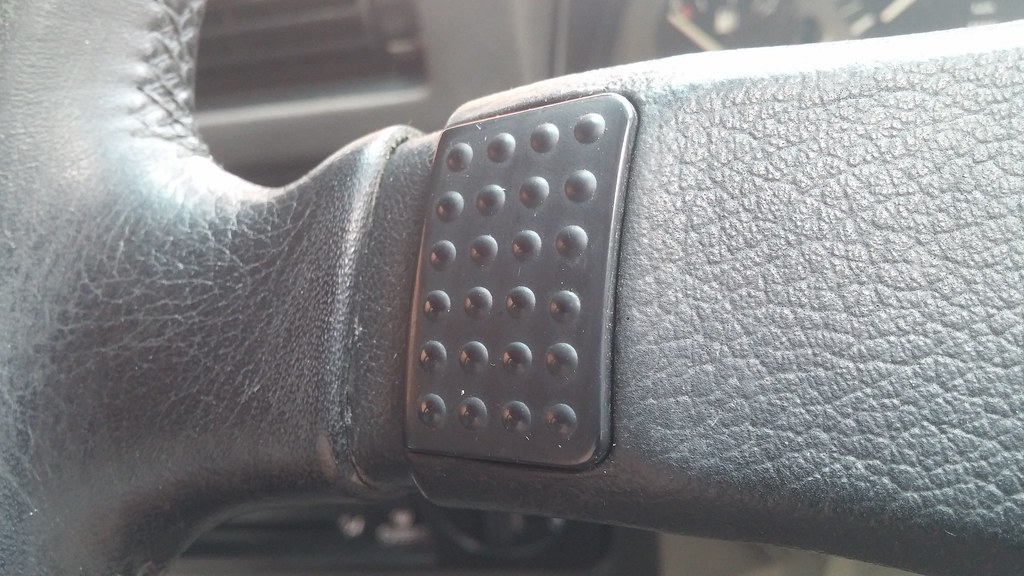 20140630_173808 20140630_173808 by svenicusminimus, on Flickr Cup holder getting it's first proper bit of use 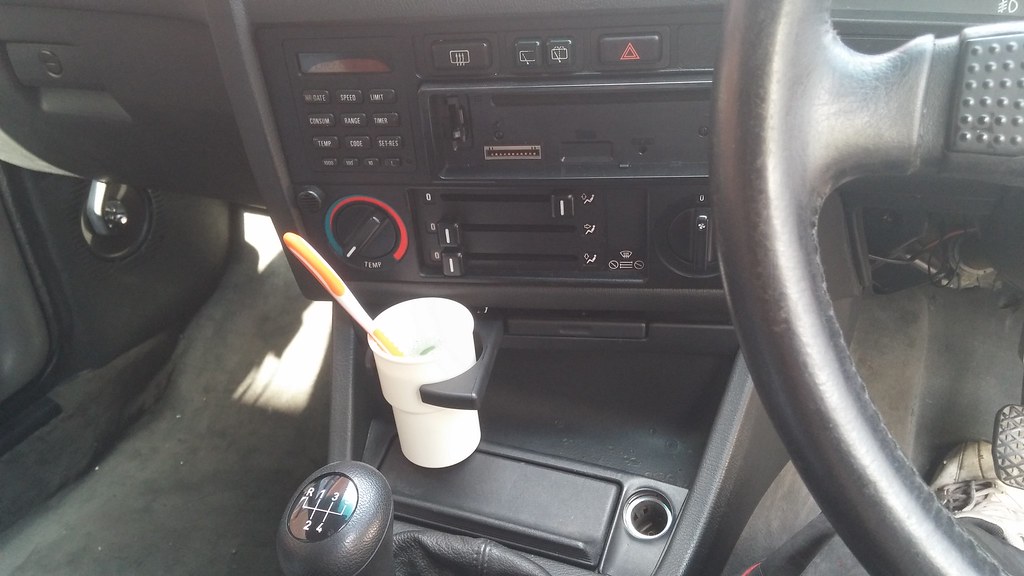 20140630_173843 20140630_173843 by svenicusminimus, on Flickr Back to the exterior - it was about time I re-fitted the side skirts that I took off way back in May I think, to do all the welding along the sills. Gave them a scrub down and a good coating of linseed oil.  20140702_194305 20140702_194305 by svenicusminimus, on Flickr I also drilled a couple of holes and screwed in those little front sections that sit at the bottom of the wings, that were off the car when I bought it. Pretty much all of the mounting points had been snapped off, hence the need to screw them in. 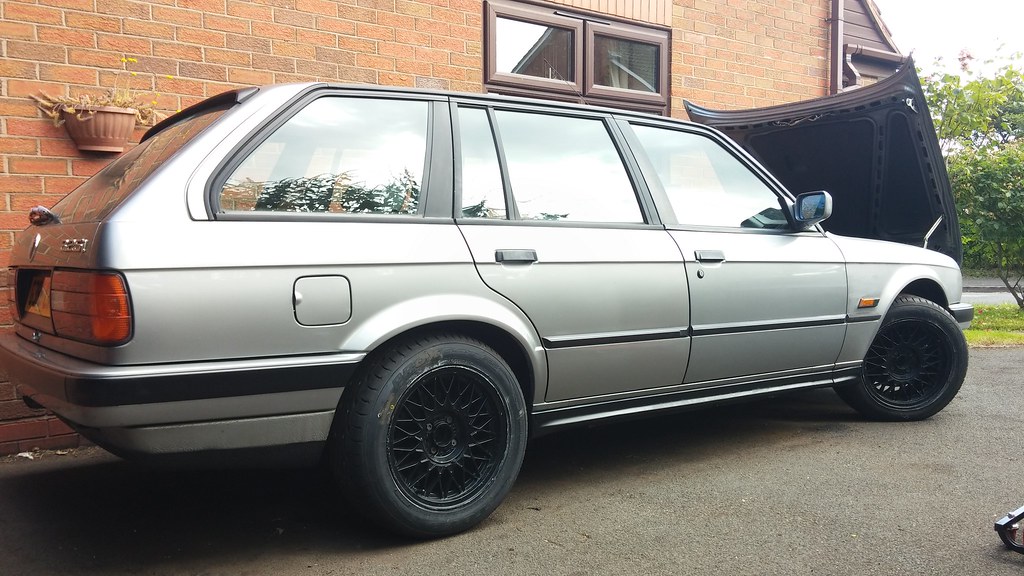 20140703_112653 20140703_112653 by svenicusminimus, on Flickr I also finally managed to fix the glovebox light the other day. The spring inside the plunger switch assembly was too long/stiff so it just blew the whole lot apart when you tried to compress the plunger on the end (like when the glovebox lid closes and presses on it). I cut a bit off the spring and now it works perfectly. Looks a bit naff in there and the light is in an awful place, BMW must've forgotten about the glovebox light until the last minute when they designed the E30! 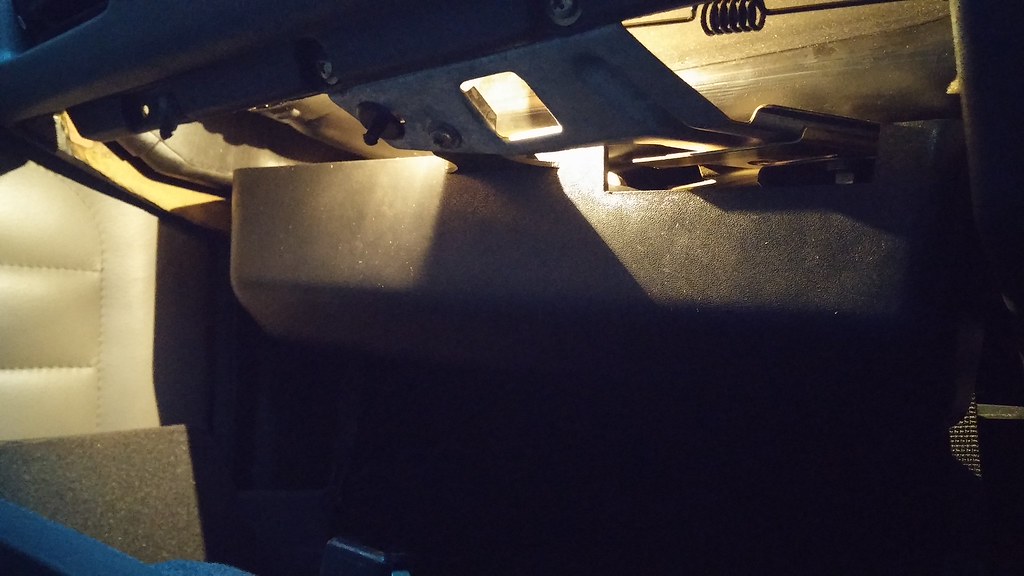 20140702_213005 20140702_213005 by svenicusminimus, on Flickr I bought these off ebay the other day to make myself a fused battery cut-off switch, for safety and security. 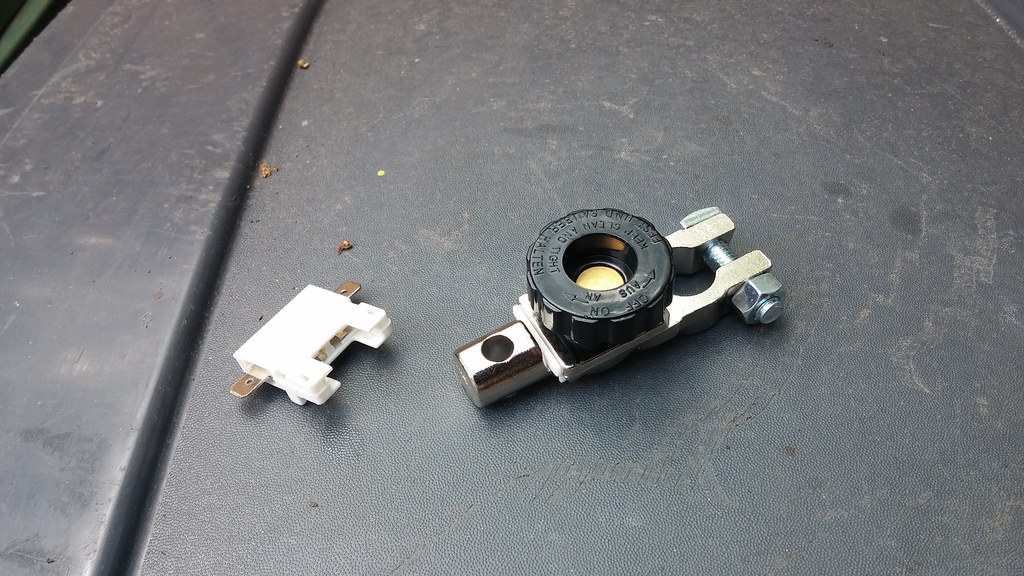 20140703_112704 20140703_112704 by svenicusminimus, on Flickr Looks kind of childish it's so colourful, but it works and only cost me about £7. 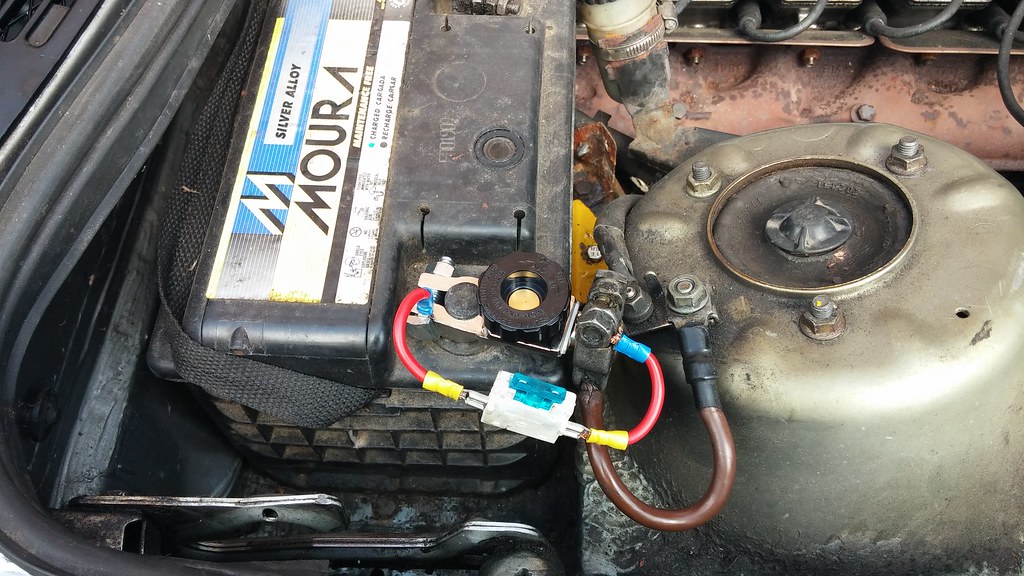 20140703_115000 20140703_115000 by svenicusminimus, on Flickr Here are the ABS sensors I won. I only need the one, but it's handy to have a spare and these were the cheapest ones on ebay anyway. 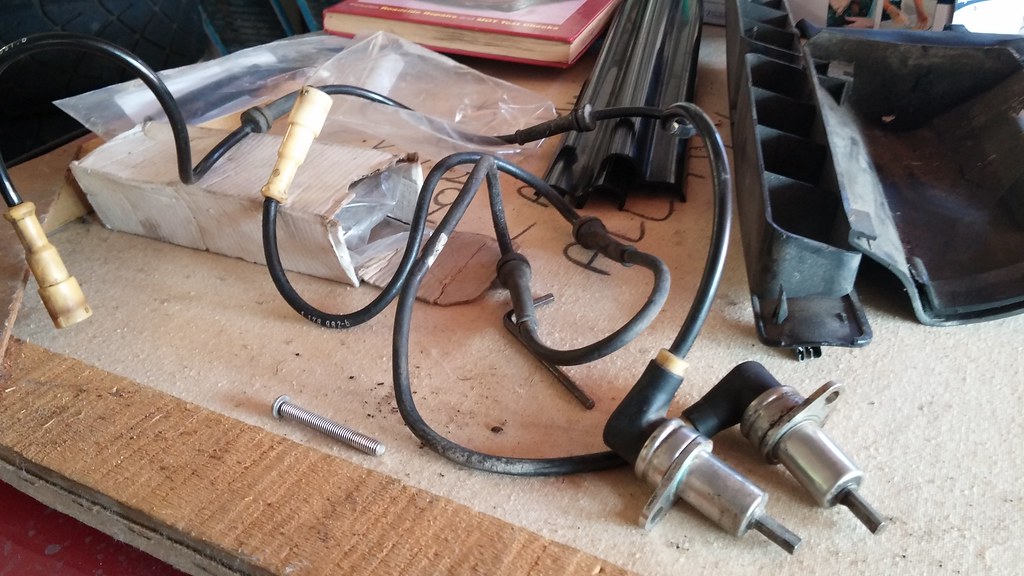 20140703_122651 20140703_122651 by svenicusminimus, on Flickr I fitted the one I needed on to the car and took it for a spin down the road... it worked! ABS is now fixed and there are no warning lights on the dash any more 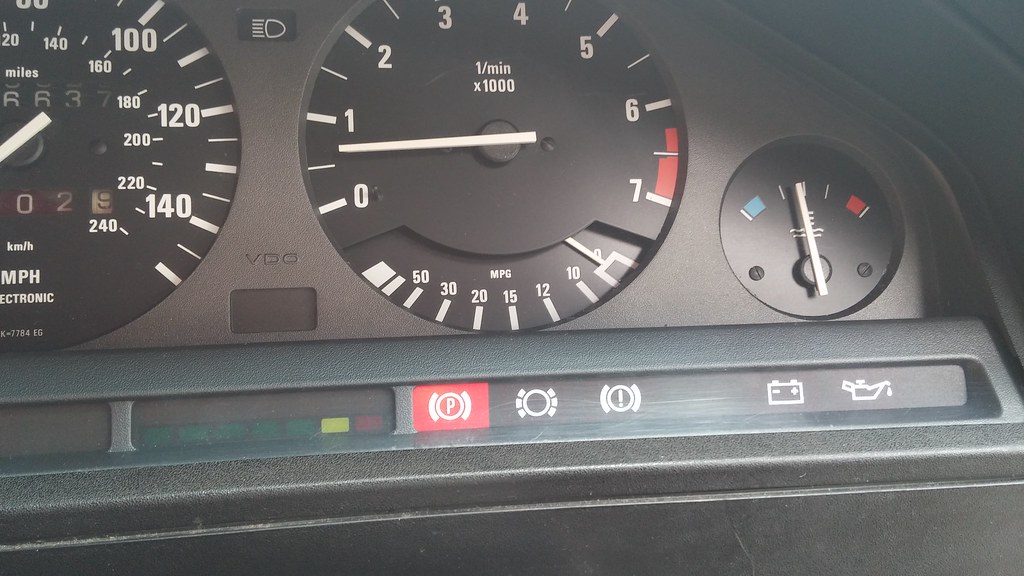 20140703_132331 20140703_132331 by svenicusminimus, on Flickr So with that sorted it's now booked in for the MOT on Monday (7th July) - wish me luck! A while back I bought some of these "luggage hooks" off ebay. 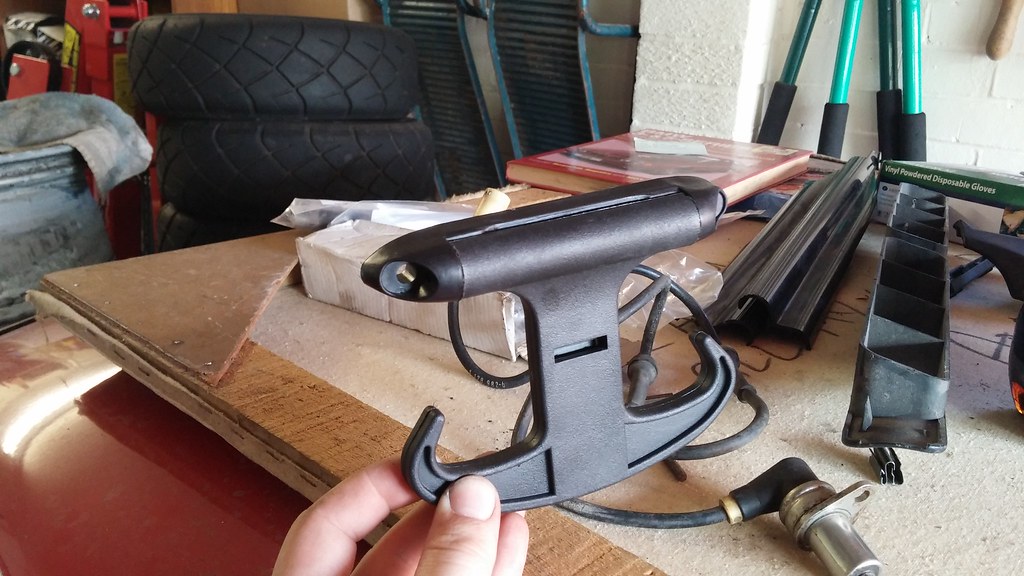 20140703_132731 20140703_132731 by svenicusminimus, on Flickr Reason being, I've gotten very used to the little hooks in the back of the Celica, used for hooking your shopping bags on, on the way back from your nearest Tesco. These big hooks I bought are apparently found in loads of VAG stuff, Passats, A4s, etc, and they're pretty expensive from VW or Audi dealers, about £20 or £30 each apparently. Luckily I managed to find some on ebay, shipped from China for just over £2.50 each So I bought 4 of them, I fitted one in to my Dad's new GT86, and earlier today I fitted two in to the back of the BMW. They still have the VW logo on them on the back side, so they might be genuine stuff pilfered directly from the factory? I pulled out the rear boot liner panel and mounted them to this.  20140703_134531 20140703_134531 by svenicusminimus, on Flickr Back in the car. 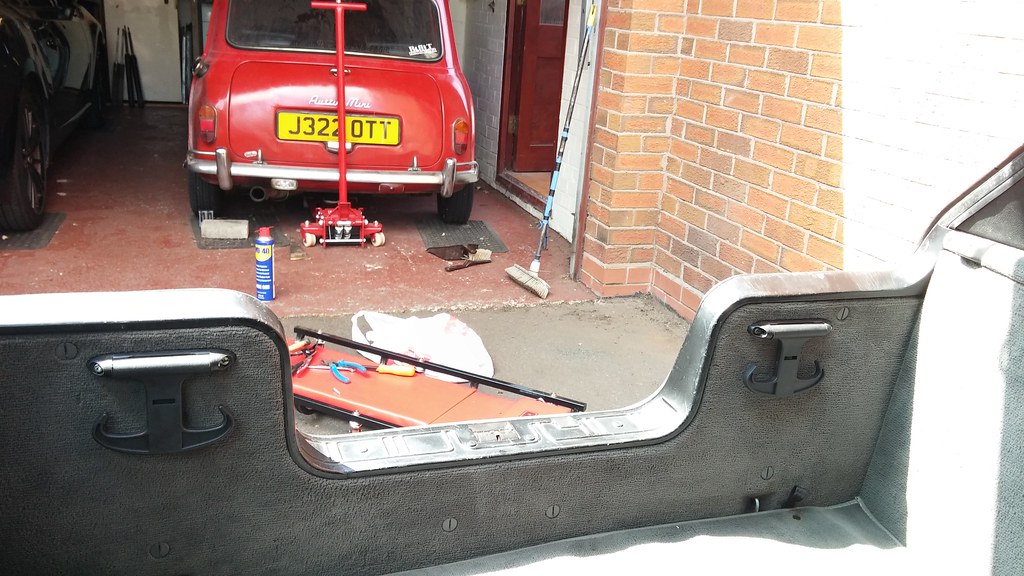 20140703_140431 20140703_140431 by svenicusminimus, on Flickr Might seem a bit unnecessary to some of you, but this will be my daily driver, and I'll be going shopping every week in it during the winter and I don't want my stuff rolling around the boot whilst I'm drifting my way home.  After I fitted those luggage hooks, I finally unboxed the DA I bought a while back and had a go at the bonnet. I'd wet sanded all of the old artwork off by hand a while back and then left it alone once I realised there were a lot more important things to fix before I made the paint shiny, and that it was really hard work doing that by hand... So, now that most of the important things have been fixed, I can make things shiny, and with minimal effort through the use of technology. Firstly I used a 3000 grit 3M sanding disc to try and smooth out all of the scratches from the 1500 grit I did by hand ages ago, then I compounded it (well, I used some old T-cut I had lying around... ahem...) then I polished it (with some cheap old Simoniz stuff I found...), then I waxed it by hand (with some Turtle stuff I also found lying around in the garage...). Considering all the cheap old stuff I used, it came up quite nice in the end. 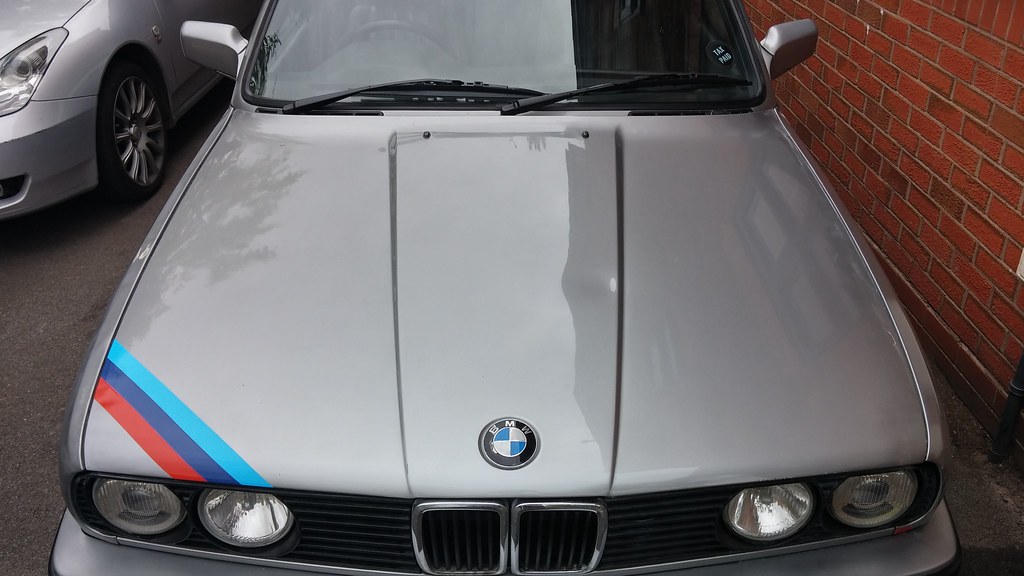 20140703_161330_HDR 20140703_161330_HDR by svenicusminimus, on Flickr Oh yes, you'll also notice the M-stripes there, strategically placed to cover up the bad paint on that corner They also give me 1 million extra horsepower. Fact. Looking mighty fine now in my eyes. 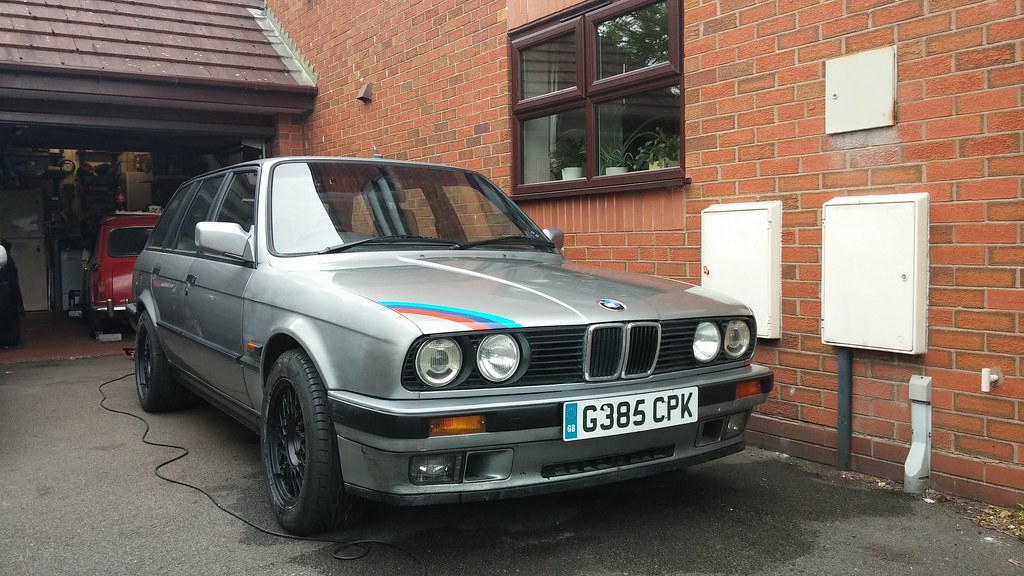 20140703_155549 20140703_155549 by svenicusminimus, on Flickr Still got that wing to buff up some time soon - I flatted that back ages ago as well. 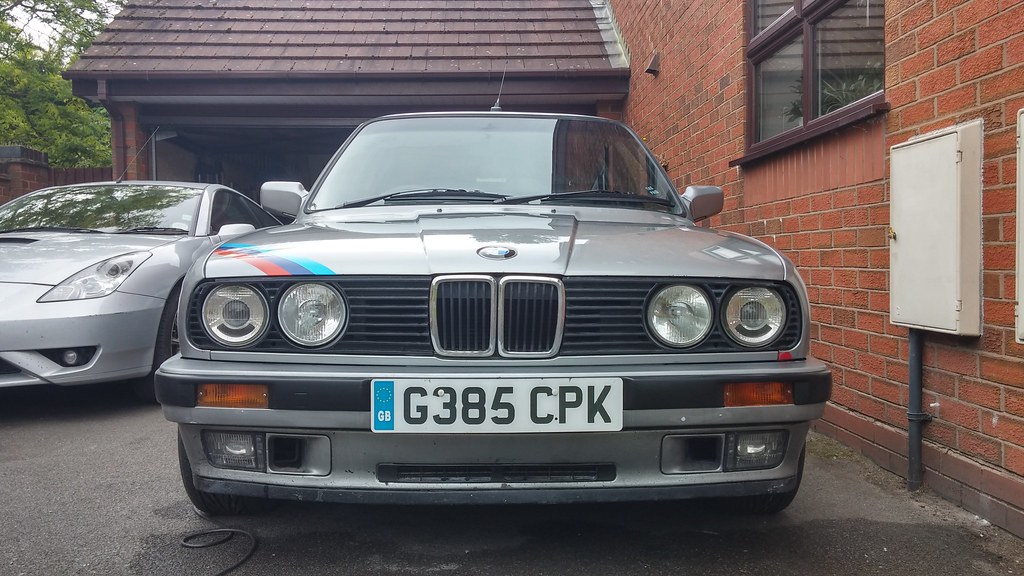 20140703_155945_HDR 20140703_155945_HDR by svenicusminimus, on Flickr For the sake of comparison and making myself feel awesome, here's a couple of shots from when I first got the car. Spot the difference? 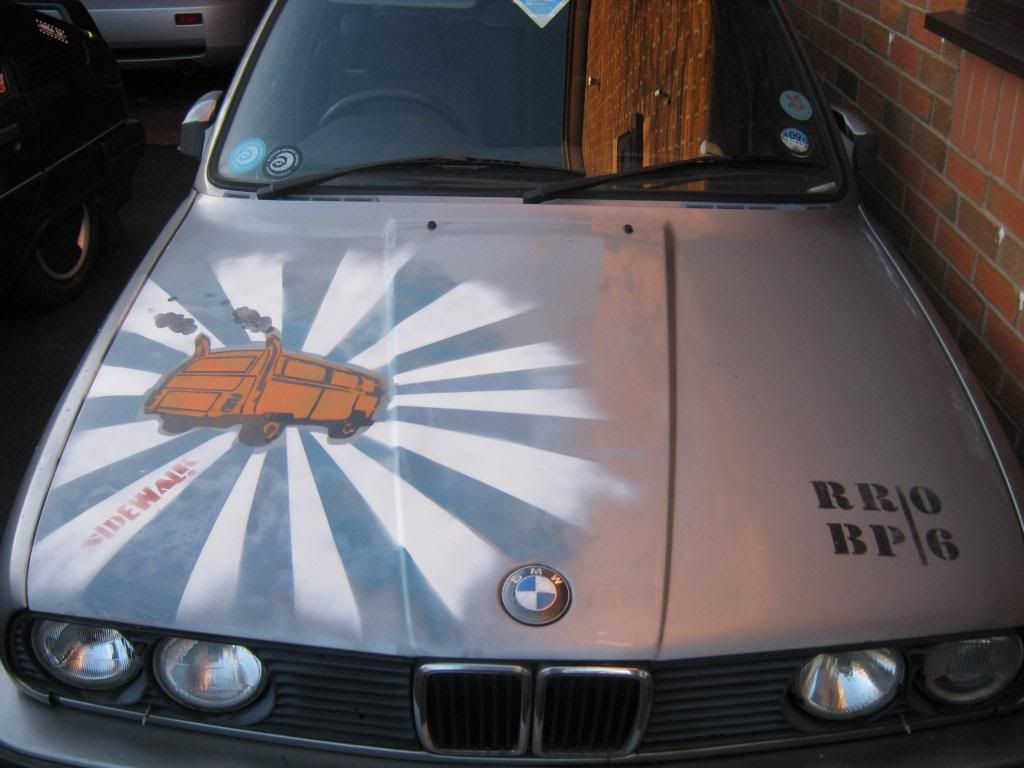 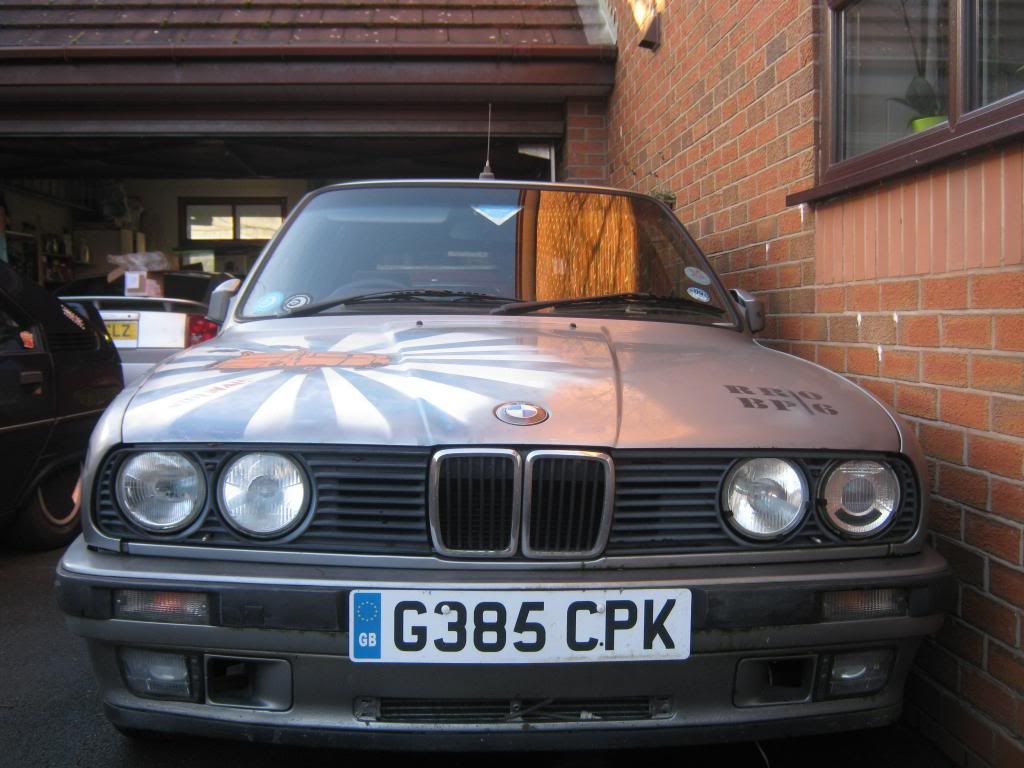 Next update will be on Monday after the MOT - let's hope she passes! Thanks for reading folks, I'm getting more and more excited as the days go by to get this on the road! |
| |
|
|
adam73bgt
Club Retro Rides Member
Posts: 4,868
Club RR Member Number: 58
|
1989 BMW E30 325i Touringadam73bgt
@adam73bgt
Club Retro Rides Member 58
|
|
|
Great work on this, what a transformation! looks a whole load better for all the jobs you've done I did fancy one of these as a daily myself, can't remember why I didn't go for one in the end lol :/ |
| |
|
|
|
|
|
|
|
|
I've a complete touring rear wash wipe system, loom, bottle, motor arm, jet, everything. £45 posted in the UK.
|
| |
|
|
MrOtter
West Midlands
"Your car is your story, so don't let someone else write the book." - Moog
Posts: 281
|
|
|
|
Thanks Adam, I wouldn't worry too much about not choosing an E30, I love your Jaaaaaag! I hardly even "chose" this car really, the opportunity just suddenly arose one day to be able to buy it cheap, so I acted quickly and bought it! I liked E30's anyway, but I really wasn't planning to get another car when I did - we'll find out if it's a good daily or not in a few weeks when my insurance starts on it! BR, thanks for the offer, but the system works completely fine apart from that little broken cap, so I think I'll make do with a bit of cable tied washer pipe for now! Right then, MOT - it passed first time with no advisories. That's what I call a result Not sure if it was blind luck or hard work - probably a bit of both! Unfortunately, sometime that morning before, during, or after the MOT, the radiator sprung a leak and I only noticed when I got home. I knew it was pretty crusty anyway, some of the fins had already crumbled away, but was hoping it would last me a while before it needed replacing. So I ordered a new radiator on Monday, it arrived Tuesday and I fitted it today. Shiny new radiator. 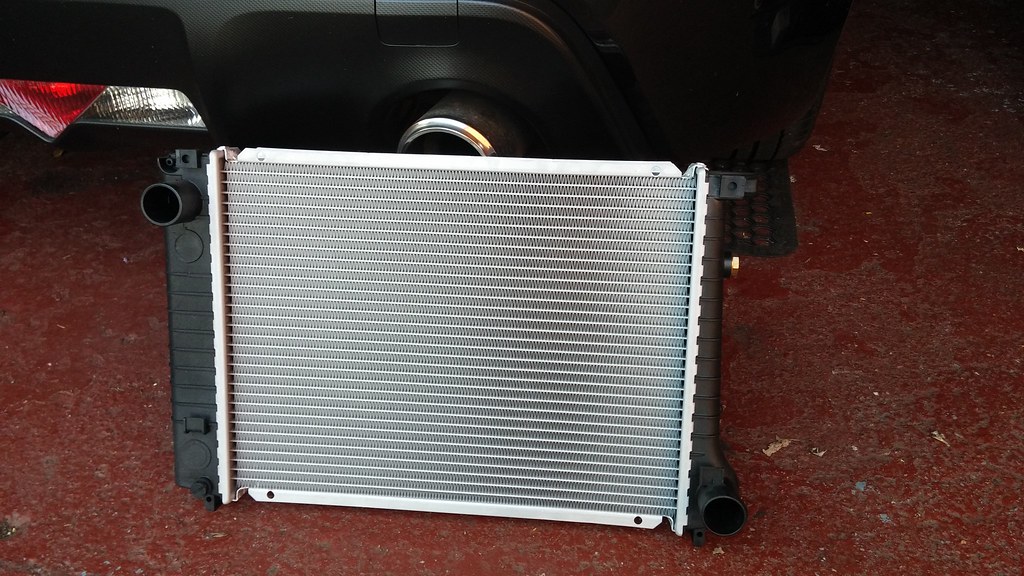 20140709_135814 20140709_135814 by svenicusminimus, on Flickr  20140709_145700 20140709_145700 by svenicusminimus, on Flickr Didn't take me too long to swap them over, seeing as I'd taken the old radiator out a couple of months ago when I changed the water pump, so I knew what to do. Filled the system, fired the car up, bled it - nothing leaked and the temp gauge showed a healthy reading. Annoyingly though, the coolant warning light is now permanently on, on the overhead check panel - there's always something with old cars eh! You can see where the old rad gave way, there's a crack running along the length of that tube in the middle of the shot. I could've patched it up with chemical metal, but it only would've blown out somewhere else in no time, so for less than £60 I got a new one off ebay. I'm pretty sure the old rad was the original - 25 years service for a radiator ain't bad really. 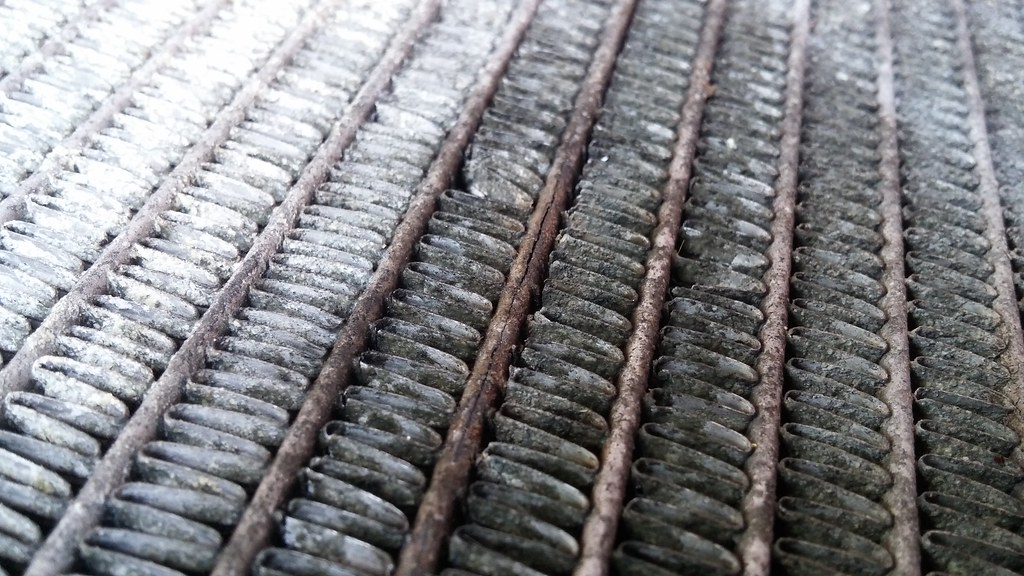 20140709_153049 20140709_153049 by svenicusminimus, on Flickr I also tidied up the battery cut-off switch fuse wiring whilst I was under the bonnet today. Some black heat shrink makes it look a little less conspicuous by hiding all those bright colours! 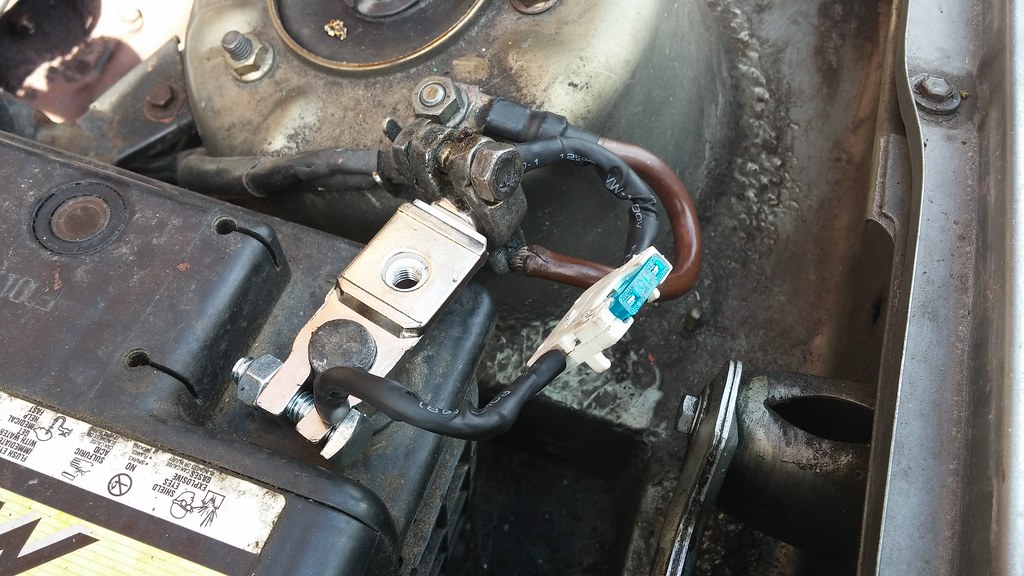 20140709_153923 20140709_153923 by svenicusminimus, on Flickr I had a go at shining up a couple more bits of bodywork last week as well. First I did the driver's side wing; it's far from perfect, but at least the silver bits are now shiny! Still looks a bit dull in the photo, but it is shinier in person. Ooh and I went along the top of the bumper as well - note the grille reflection.  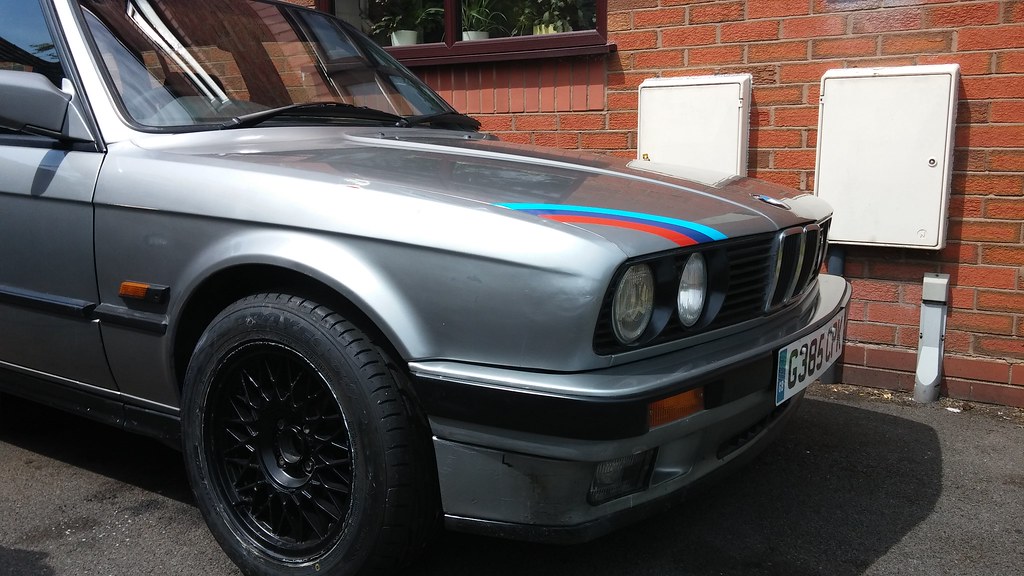 20140704_141504 20140704_141504 by svenicusminimus, on Flickr I also had a go at this really oddly scratched bit on the front edge of the rear driver's side door. 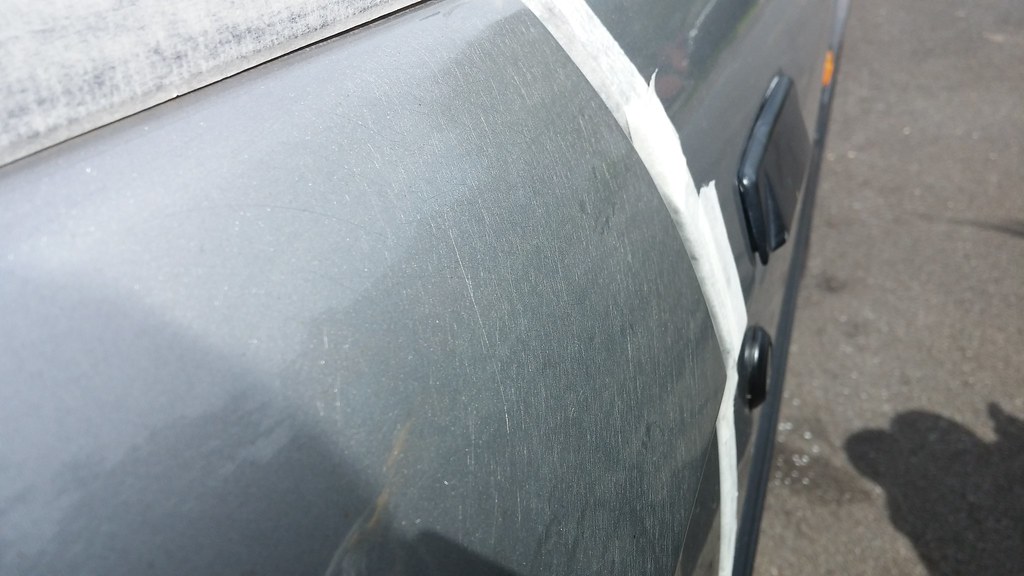 20140704_141852 20140704_141852 by svenicusminimus, on Flickr 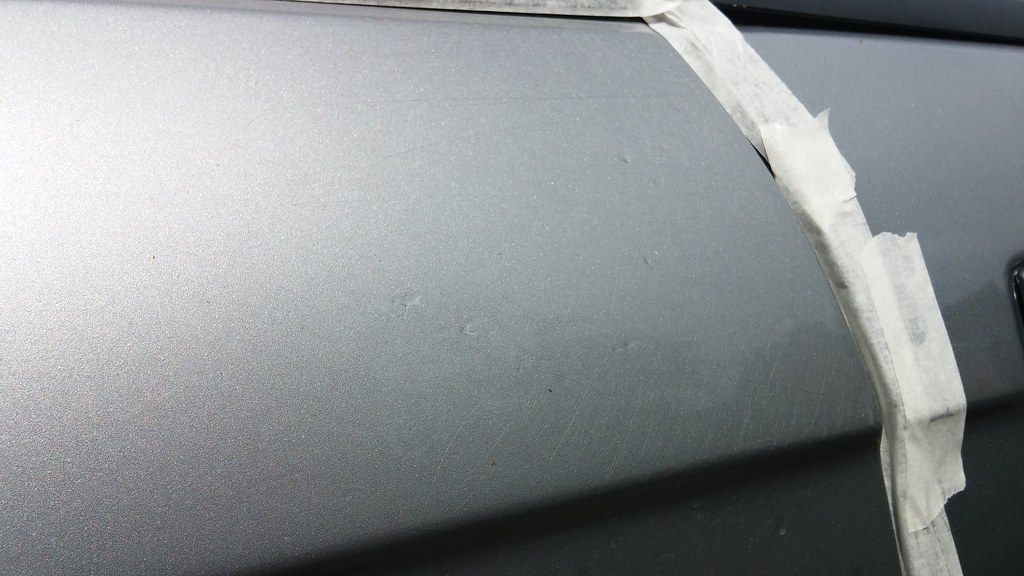 20140704_141917 20140704_141917 by svenicusminimus, on Flickr There are odd scratches like this all over the car... I know it sounds weird, but it really looks like someone washed the car with a brillo pad once and then had a thick coat of lacquer put over the top The roof is the worst part, it looks utterly terrible, but I'll try my best to polish that up sometime too. As you can see, the paint came up a lot shinier than before, but the scratches can still be seen beneath the surface when you look at it in the right light. At least they're a lot less obvious now... 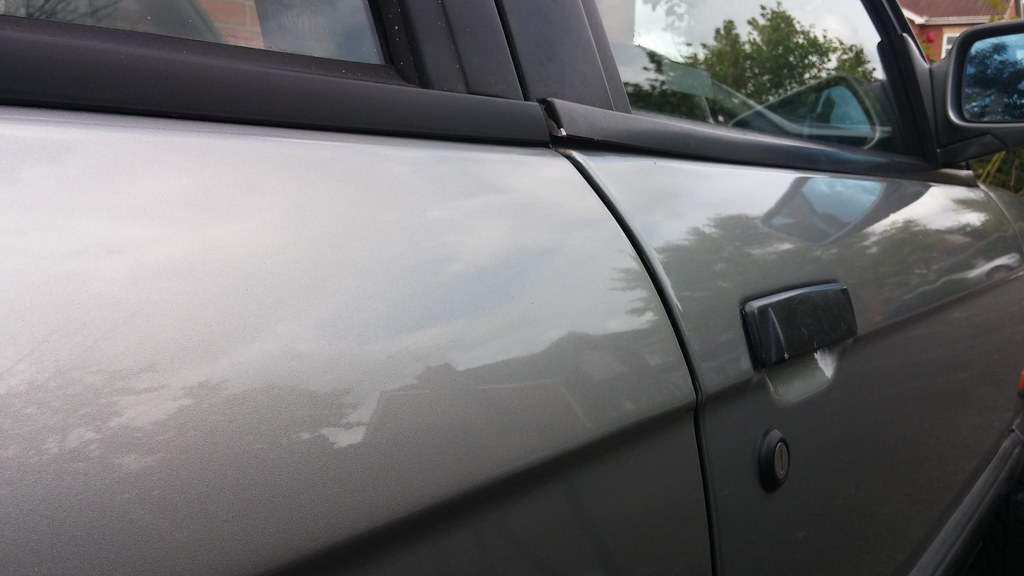 20140704_143915 20140704_143915 by svenicusminimus, on Flickr Scratches still there... 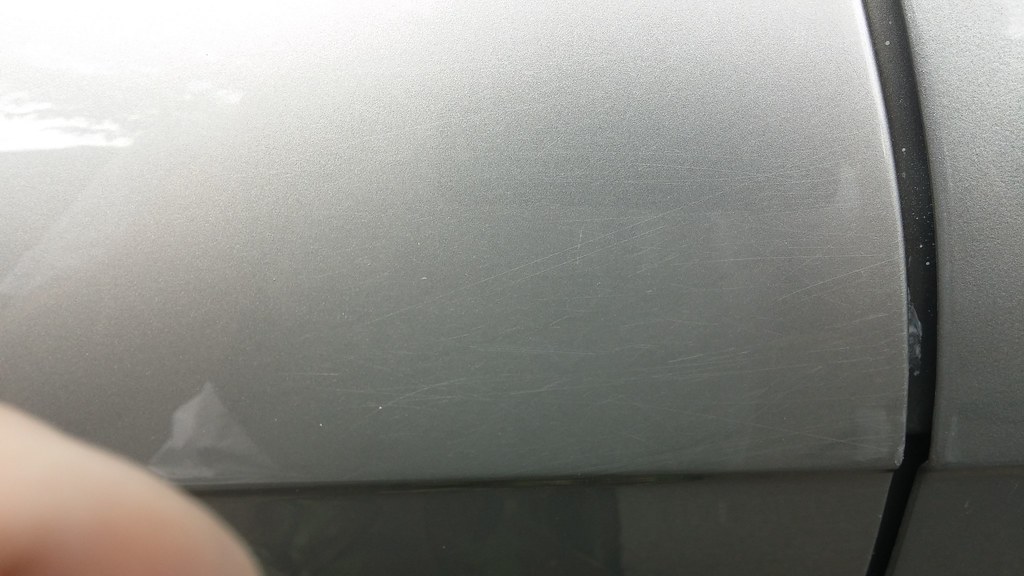 20140704_143908 20140704_143908 by svenicusminimus, on Flickr I haven't got much else planned for the time being, I want to do the valve clearances soon before I start dailying it as it sounds like a bag of nails under the bonnet. It might just be a really tappety engine, but it kinda sounds too tappety to me. There are still plenty of bits of paintwork to tidy up as well whenever I feel like getting the DA out again. Have a random shot of the car from above. 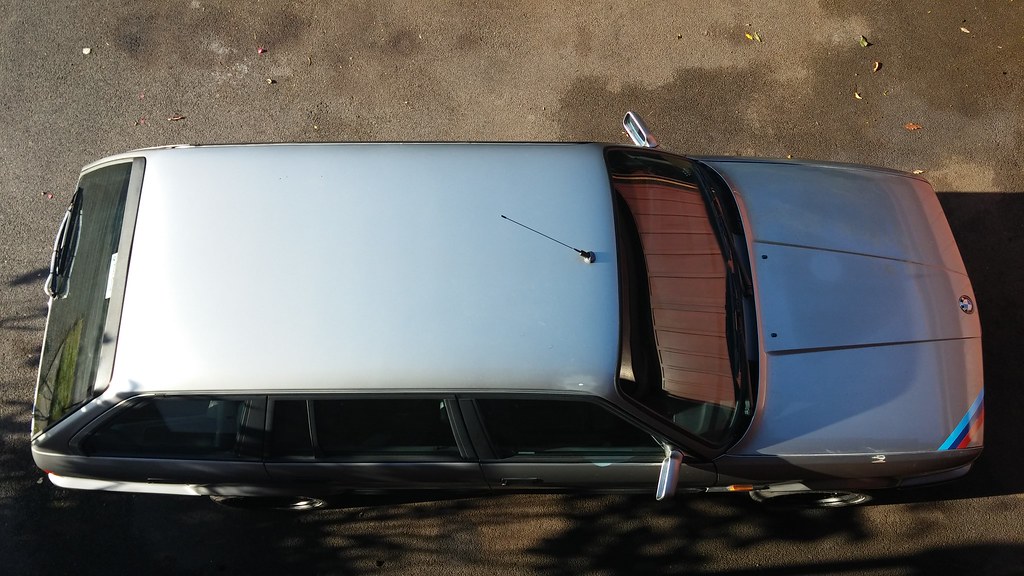 20140707_073149 20140707_073149 by svenicusminimus, on Flickr |
| |
Last Edit: Jul 17, 2014 9:58:56 GMT by MrOtter
|
|
|
|


 Took more aggressive sanding to get all those swirls out, but I got there in the end.


