jamesd1972
Club Retro Rides Member
Posts: 2,921  Club RR Member Number: 40
|
|
|
|
|
There is no way I’m telling GN there’s a pretty good chance that newly acquired bits of Land Rover may well be painted outside with a brush !
(Half height back door and bikini roof cage so can go topless in the summer in case anybody interested)
James
|
| |
|
|
|
|
jamesd1972
Club Retro Rides Member
Posts: 2,921  Club RR Member Number: 40
|
|
|
|
|
The car not me btw
James
|
| |
|
|
vulgalour
Club Retro Rides Member
Posts: 7,287
Club RR Member Number: 146
|
|
Feb 18, 2019 17:53:05 GMT
|
It's a Land Rover, different rules apply  |
| |
|
|
|
|
|
Feb 18, 2019 21:45:48 GMT
|
(can go topless in the summer in case anybody interested) James Oh thank goodness! I'm sure you look proper sexy with your top off (as do I) but I'll stick with the car thanks... Do it once and do it properly rather than this mismatched attitude of it will do for now and I will paint it properly in a few years time - really ? REALLY ! - we all know what happens to those type of plans don't we and I include myself in that pot - call my paint supplier - details below and they will mix you the paint to your spec - put it in a aerosol and post it out to you - you also need to start using panel wipe too in order to prevent the silicone pits appearing - the reacted area flat back and dust primer on very dry in several coats - do not put it on with heavy wet coats and you should be ok - ok lecture now over www.paintshop-products.co.uk/I know exactly what you mean about temporary jobs. I've been saying that I'm going to change the big ends for about 3 years and haven't done it. Point taken. To me 'doing it properly' involves repainting the whole thing with a gun. I haven't the money, equipment or time for that just now. So it'll have to be patched with aerosols. Maybe I should get it the right colour though... Point taken about panel wipe too. I actually thought about it before I put the black on. I'm not sure your paint supplier will appreciate this idiot being on the phone though... (Thanks for the link - I'll look them up.) Would you like me to keep your name out of it!? I've done the odd bit of rattle can stuff in the past - which mostly looked terrible - but I've never done fine filling, painting, flatting, and polishing before. This is very much the front end of a learning curve for me. Lecture (and advice from everybody else) much appreciated. Thank you! James |
| |
Last Edit: Feb 18, 2019 21:46:37 GMT by Sweetpea
|
|
|
|
|
Feb 18, 2019 22:34:42 GMT
|
|
It looks like those may even be pin holes or air bubbles in the surface, I would flat it all back with 240 clean with wipe and go over it with a fine filler or stopper, prime with a good quality primer and top coat with a quality aerosol, the pro ones may be dearer but they do cover far better than the cheap ones (I've done the mx5 wing easily with one can and it didn't need much polishing afterwards). My local motor factor does thsm for about £12.
Personally I don't worry too much about the paint anyway in my opinion its there to protect the metal not see my ugly face in, if it looks ok from 6 feet away it will do, I use my cars for just about every job and they pick up dings and dents all the time!
|
| |
|
|
|
|
|
Feb 18, 2019 23:03:07 GMT
|
in my opinion its there to protect the metal not see my ugly face in Yeah but I'm unbelievably attractive in a masculine sort of a way and need to admire myself in well polished paintwork! But not vain, oh no, just properly adjusted... Am I starting to sound like @quatermass ? Ah well, there are worse people to sound like I guess. I did look up panel wipe this evening and found that some of it is based on isopropyl alcohol. Now IPA is used as a solvent in the electronics industry which is my neck of the woods. So yesterday, when I was kicking myself for not having panel wipe I realised that I had a tin of IPA in the garage and wiped it over with that. (The contents not the tin.) Seems I might not have been far from doing it properly after all. @grumpynorthener has probably just winced... |
| |
|
|
vulgalour
Club Retro Rides Member
Posts: 7,287
Club RR Member Number: 146
|
|
|
|
|
When he said to use IPA he didn't mean beer, you know.
|
| |
|
|
|
|
|
Feb 21, 2019 13:31:16 GMT
|
|
I'm with grumpynortherner here.
I would rub back the whole thing before you spray and make another mess.
The spoiler is just small enough to be rattlecan size but not the rubbish cone spray cans from Hellfrauds. Contact the paint supplier you have had the link for or someone like Paints4U and order a mix-to-order rattle can. These are far better with a slightly higher pressure and have a fan type nozzle so it sprays like a spray gun. The mix-to-order cans aren't much more than off-the-shelf cans. Halfords used to do Holts mix-to-order cans too but the last few i had were not done very well so i've ordered from paint suppliers instead and they have been excellent. You might get a bit more orange peel than if you used a spray gun, but flatting it back will be ok.
Sand it all back uniformly, panel wipe, prime again with grey primer for undercoat but not etch primer (this should only be for bare metal areas really), sand with W&D down to 800, panel wipe,then dust coat with colour followed with a couple of wet coats of colour. With it being metallic i would guess you should then apply clear coat the same way.
Paints4u certainly do a colour and clear coat 'buy together' deal and i'd expect other places would too.
|
| |
Last Edit: Feb 21, 2019 13:35:07 GMT by toast00
|
|
|
|
|
Feb 22, 2019 23:37:50 GMT
|
Hello my little chums! I'll get back to the spoiler another day (sorry for randomly switching story, but you should be used to it by now). You see I’ve been playing with the remote relays for lights on the car today. I won’t bore you with the remaining build photos at the moment on grounds that the afore mentioned relays don’t work properly… Lets skip to the bit where I rigged them on the car to see what happened.  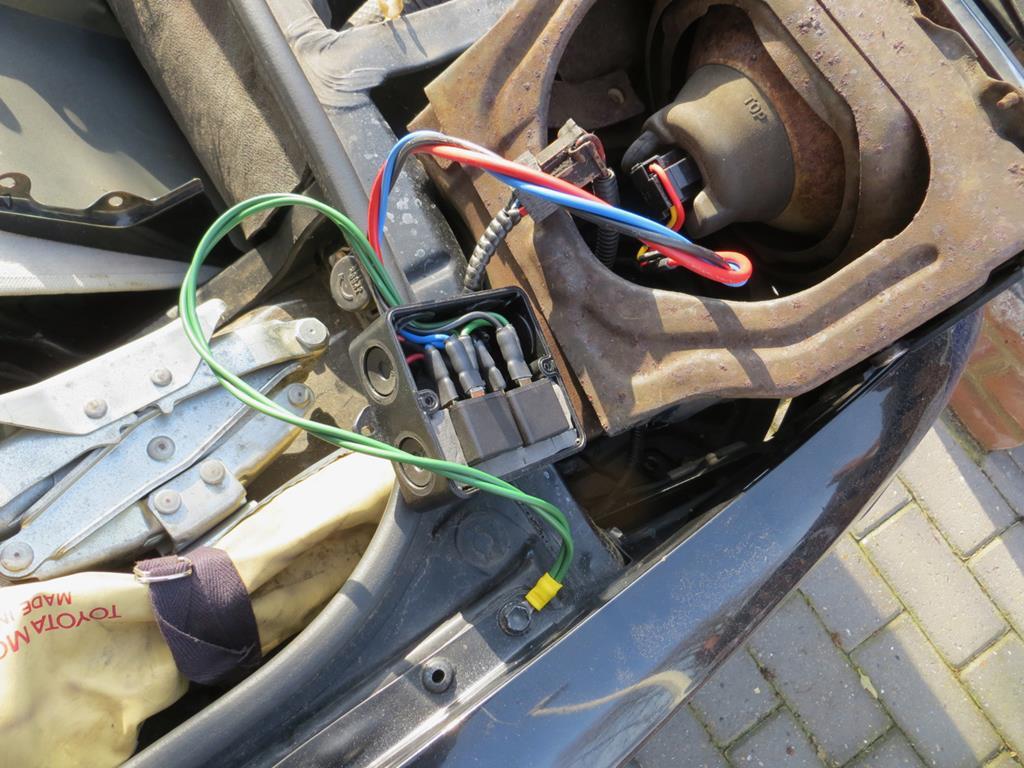 So they sort of work. But it turns out old Mr Toyota did an very odd bit of wiring that’s bitten me on the bum. This was not entirely unexpected, I thought I might have problems - I just hadn’t realised the full extent of them until today. Good news first. On dip beam I have about a volt extra across the filament. In the dark, shining the lights off the wall, it’s noticeably brighter with the remote relays plugged in and my measurements with the lux meter on my phone are suggesting another 15% gain which is not to be sniffed at. Remember I already had a good gain from putting the NightBreaker bulbs in. So what’s the problem then? It’s the high beam indicator lamp in the car. For some unfathomable reason Toyota wired it in the oddest way imaginable. Here’s a simplified wiring diagram of the lights.  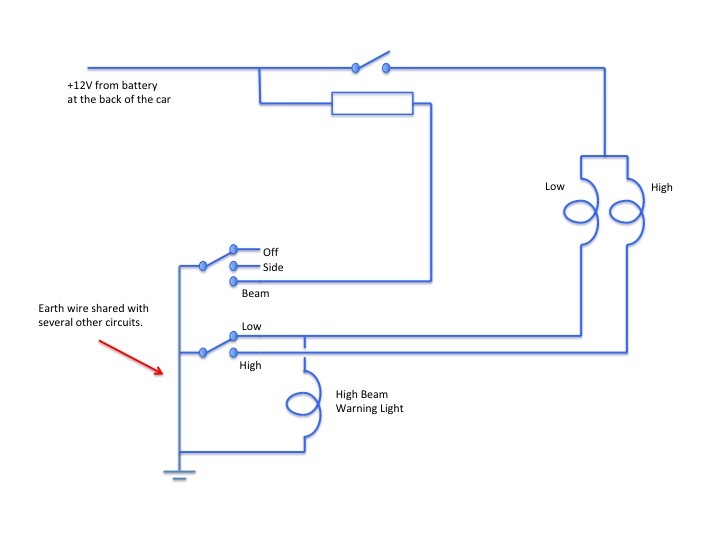 The high beam warning lamp is actually wired across the dip beam circuit. That sounds mad but it’s ok when you think about it. If you look, when the dip / high beam switch is in the low position the high beam warning light is shorted out by the switch so it can’t come on. When you select high beam it’s no longer shorted out and enough current leaks through the dip beam filaments to light the high beam warning light. In effect the warning light is not telling you that the high beam is on, it’s telling you that the dip beam isn’t on. For all I know this might be a common way to do it but, frankly, it’s a bit odd to my mind. So I come along with my remote relays and do this…  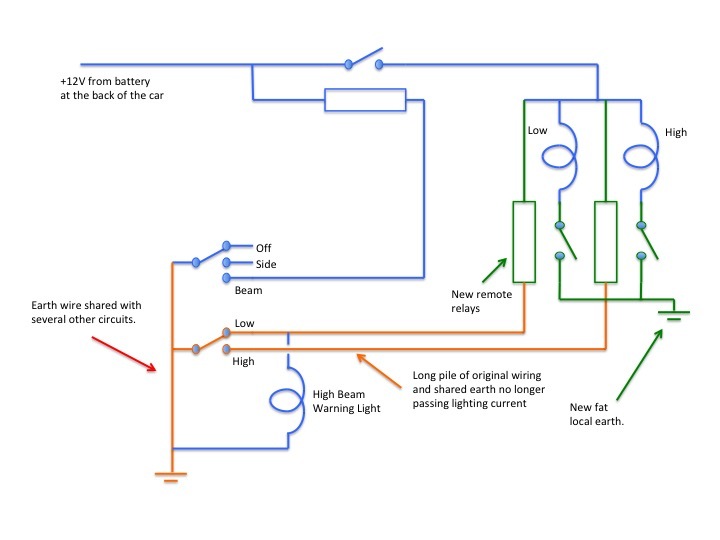 I designed it like this because it mimics the original car wiring. As far as the car is concerned it’s just seeing a relay coil in place of a filament. And the lamps are now completely isolated from the switch gear in the car so that’ll have an easier life as a bonus. However I’d guessed that I might have a problem with the main beam warning light in that the relay coils will allow less current to pass and it may not light up. It doesn’t light up. Worse still is that a 12V relay will turn on at maybe 8 or 9 volts. But it won’t turn off again until the voltage drops to maybe 3 or 4 volts. The high beam warning lamp is leaving enough voltage across the dip beam relays to hold them on. When I switch to high beam the dip beam relays are not turning off and filaments are staying lit. It’s nice and bright but neither the bulbs nor the car’s wiring is designed to cope with having both filaments lit at the same time. Bum hats. I’m formulating a new plan but it’s going to mean a redesign… |
| |
|
|
jamesd1972
Club Retro Rides Member
Posts: 2,921  Club RR Member Number: 40
|
|
|
|
|
Perhaps not quite keeping up with the plot but does the plan move the high / low beam dash light to the switched side off the relay with an ickle fuse to stop nasties happening ?
James
|
| |
|
|
The Doctor
Club Retro Rides Member
Posts: 3,449
Club RR Member Number: 48
|
|
Feb 23, 2019 10:24:02 GMT
|
There should be a solution to this as all the people switching from H4 bulbs to Xenon have the same problem of the High Beam warning light not working anymore. I'm sure i read about it somewhere, i'll report back if i found something  |
| |
Last Edit: Feb 23, 2019 10:24:44 GMT by The Doctor
|
|
|
|
|
Feb 23, 2019 17:41:34 GMT
|
The Doctor, I hadn't thought about Xenons causing the same problem. LED H4s probably wouldn't have worked either. I don't remember any comments when I was researching it though. jamesd1972, I thought about rewiring the warning light for half of last night. A lot of the wiring goes through a junction box in the drivers foot well. That'd be an ideal place to do a mod and I considered sticking a relay in it to drive the warning light but... 1, I don't want to modify the car if I can avoid it. As it stands it's a plug in mod which seems like a good plan. B, I definitely don't want to be running wires from the lights back into the car 'cos it'll look horrid unless I integrate it into the loom and that's hard to do properly. 4, And with regards to adding that relay to the junction box, there isn't a handy 12V feed that's alive at the right time. Hmmph. Not to worry, I have a cunning plan and I'm fairly certain it'll work. I'll draw it up later which'll give me another chance to think it through. The whole thing is complicated slightly by the fact that the switch in the car should be either high or low. But if you move it slowly you can get neither or both so any solution has to cope with that eventuality. James
|
| |
|
|
The Doctor
Club Retro Rides Member
Posts: 3,449
Club RR Member Number: 48
|
|
Feb 23, 2019 20:24:27 GMT
|
|
Yeah, i was wrong about the Xenon thing. They do have the same problem, but only because you switch the Xenon from 1 plug and leave the other one unplugged, which apparantly stops the tell tale working.
|
| |
|
|
|
|
|
Feb 23, 2019 22:03:06 GMT
|
Right. So the high beam warning light doesn’t work with the relays plugged in. This is because the relay coils have a higher resistance than the old lamp filaments so aren’t leaking enough current to light the warning lamp. But also my dip beam relay won’t drop out because there is too much current being allowed by the high beam warning light. Too much current - holding the relay, yet not enough to light the warning light. I need more and less. I need a new plan. I wondered about modifying the wiring to the warning light. Maybe a relay in a handy wiring junction box. But there isn’t a suitable 12V feed. I wondered about adding “a thing” to my relay box that would stick 12V down the dip beam wire to light the warning light. But when you go to dip beam, if you don’t get the 12V off quick enough, you short the battery through the light switch… I thought of lots of things. All of them have problems. One wrinkle is that you obviously have dip beam or main beam. The switch is either in the dip beam or high beam position. Right? Nope. As you move from dip to main the switch actually, briefly, turns both on. And when you pull the switch to the flash position there is a moment where neither filament is lit. So dip, main, neither, and both are all possibilities that I have to cope with. That’s one reason why I went for the two relay design. Replace a filament with a relay coil and the car win’t notice… Shame it did. Ok, sorry for spelling this next bit out at extreme length. It’s partly because you might be interested, but also it’s going to make me think it through so I hopefully don’t miss something. So I’m going to replace the the two relays with a single double throw one like this. 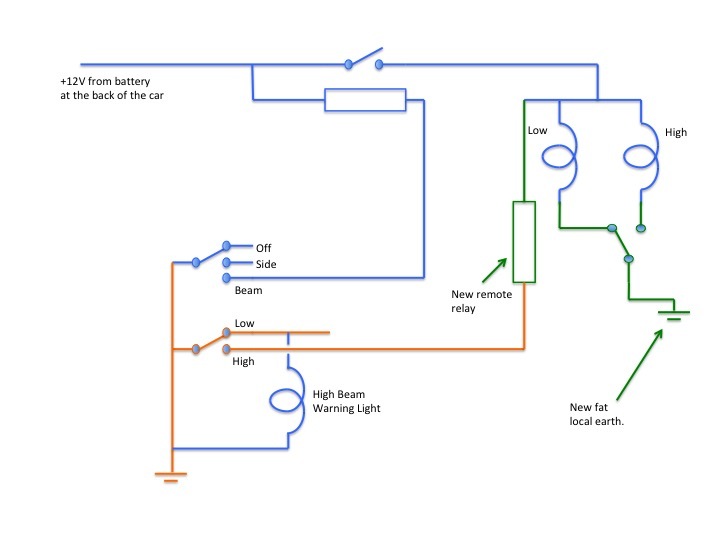  We’ll have the normally closed position bring the dip beam on so the default position is dip (I don’t want main beam on unless it’s commanded to be on). That means the relay coil is connected to the high beam wire and the dip beam wire is not needed. Great - it all works apart from the high beam warning light which, on the original set up, was connected to the bottom of the dip filament. So lets do that…  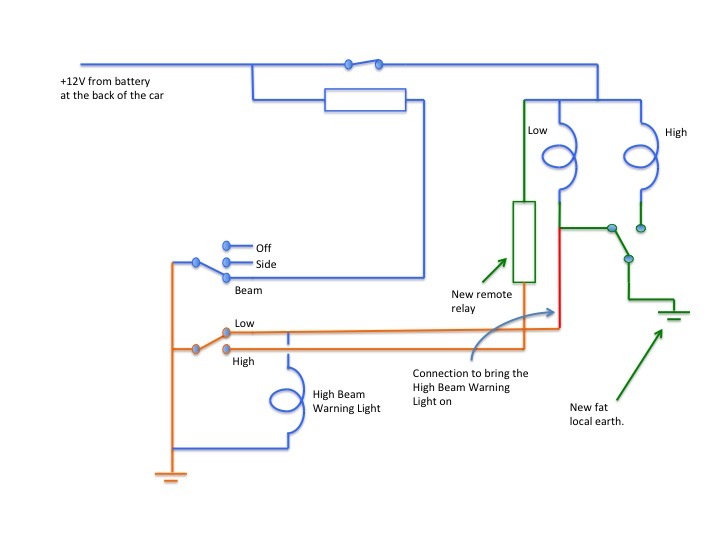 As it’s drawn above it’s in dip mode. My relay is not energised and the dip filament is on. Earth current has two paths to choose from. The original one through the switch and the new low resistance one. Much of the current will take the new fat earth because it’s a lower resistance path so the switch should have an easier life. The main beam warning light is shorted by the switch and my relay so it’s off. Next - Main beam. 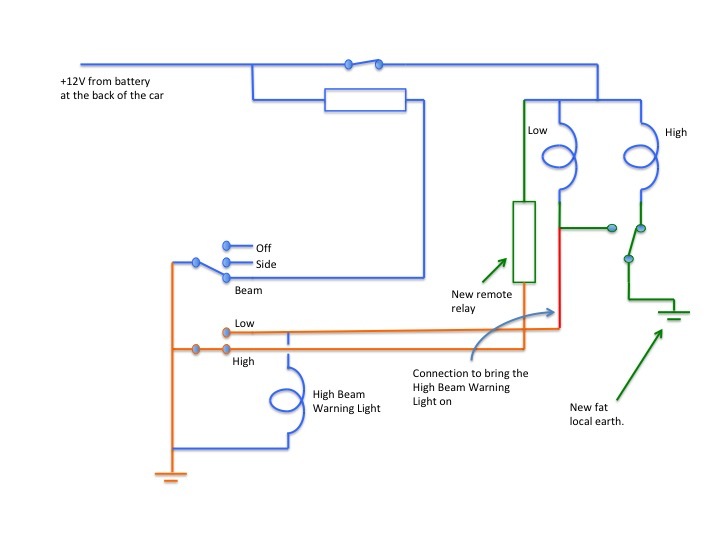  So now the bottom of my relay is earthed and the relay switches over. The high filament lights and the dip one is out. However, just as in the original car, some current flows through the dip filaments to light the high beam warning light. Next, the car’s switch is between positions.  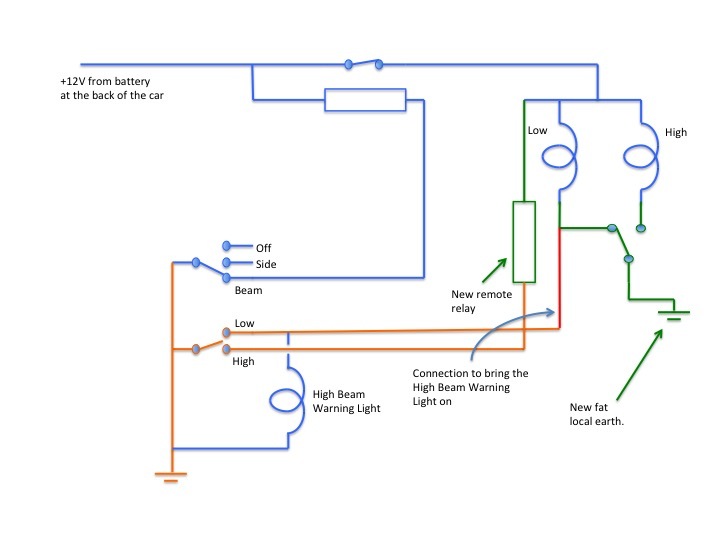 My new relay isn’t earthed so it’s in rest position and the dip filament is lit. The main beam warning light is shorted by my relay so it’s off too. Lastly, the switch is in both positions…  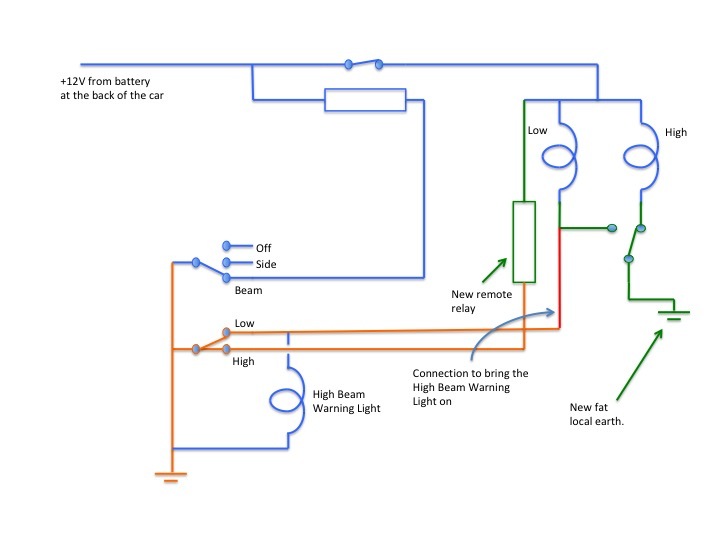 This is the one that’s worrying me… So, my relay is on so it’s earthing the high beam filament via my new earth. But also the low beam filament is being earthed by the switch so it’s on too. And the switch is carrying the full current. Also the warning light is shorted by the switch so it’ll be off. But this is no different to what the car does without my relay box and it’s only a transient moment. I can live with it. I think that’s ok? Isn’t it? Well, at least I’m convinced that I’m not shorting the battery or anything equally horrible. Guess I’d better build it and see what happens. Wish me luck! James |
| |
|
|
|
|
|
Feb 23, 2019 23:18:06 GMT
|
|
I'll post you a new jar of magic smoke, just in case, shall I?
|
| |
|
|
scimjim
Club Retro Rides Member
Posts: 1,503
Club RR Member Number: 8
|
|
Feb 23, 2019 23:22:04 GMT
|
|
How about a 5 pin relay in the dip beam circuit instead of your “new remote relay”?
Wire the W/L to pin 87a (in the centre) instead of the current +ve connection - it becomes +12v (battery live from pin 30) when the relay is de-energised.
|
| |
|
|
|
|
|
|
|
Me? I'm just going for a little lie down...  |
| |
|
|
Phil H
Posted a lot
  
Posts: 1,448
Club RR Member Number: 133
|
|
|
|
|
I'm going to put a left field idea out there - fit an LED in the tell tale instead of the original incandescent bulb but keep with your relays for the high current stuff. Not one of those special proper bulbs either - just a 10p special (with biasing resistor to set the forward current nice and low).
Logic - the sticking relay syndrome is because the telltale passes too much current? LED won’t pass enough current to keep a relay in. I wouldn’t worry about those transient conditions where both filaments are lit with no telltale either as I suspect it’s done that way to maintain light output on switchover. It’s not the only car that does it either so as long as you don’t end up with a short from battery to earth, don’t worry about it.
|
| |
|
|
Rich
Club Retro Rides Member
Posts: 6,341  Club RR Member Number: 160
|
|
|
|
How about a 5 pin relay in the dip beam circuit instead of your “new remote relay”? Wire the W/L to pin 87a (in the centre) instead of the current +ve connection - it becomes +12v (battery live from pin 30) when the relay is de-energised. It is a 5 pole relay if you look at the diagram.  I have just woken up however and as such in no state to look over the wiring diagrams to see if it’s planned to be wired the same as you suggest. I need much more coffee for that. I do enjoy this thread. (Long time listener first time caller) so keep it up OP. |
| |
|
|
scimjim
Club Retro Rides Member
Posts: 1,503
Club RR Member Number: 8
|
|
|
|
I can’t see a 5th contact?   |
| |
|
|


