|
|
|
Apr 12, 2023 19:14:05 GMT
|
|
I think you can do it but you'll need a box of relays. I'm making a few assumptions though.
1, the switch for manual door locking is a rocker switch where you press one end to lock and the other end to unlock? Meaning you ground the brown wire to lock and the white to unlock (or the other way round)?
2, the mirror fold is the same thing where you ground one wire to fold them in and the other to fold them out? Is there a mirror control box somewhere?
3, you'll have a similar rocker switch for the mirrors where one end puts them in and the other puts them out?
Essentially the root of the problem is knowing if the doors were operated from outside (in which case you want the mirrors to move) or inside (in which case you want the mirrors to stay put).
James
|
| |
|
|
|
|
eurogranada
Europe
To tinker or not to tinker, that is the question...
Posts: 2,556
|
|
|
|
I think you can do it but you'll need a box of relays. I'm making a few assumptions though. 1, the switch for manual door locking is a rocker switch where you press one end to lock and the other end to unlock? Meaning you ground the brown wire to lock and the white to unlock (or the other way round)? 2, the mirror fold is the same thing where you ground one wire to fold them in and the other to fold them out? Is there a mirror control box somewhere? 3, you'll have a similar rocker switch for the mirrors where one end puts them in and the other puts them out? Essentially the root of the problem is knowing if the doors were operated from outside (in which case you want the mirrors to move) or inside (in which case you want the mirrors to stay put). James Thanks James, To just get into your assumptions: 1. The manual switch wires are set up for a momentary contact. That is, each time they are connected together they signal the control unit. This triggers a reaction from the locks (and therefore currently also the mirrors), depending on which position they are in it is always the next command. So when unlocked it locks, when locked it unlocks. I presume this is governed by the position of the internal microswitches in the motors. 2. The mirror fold operation uses only two wires. When testing them directly on a battery you have to switch terminals for open and close. There's no official control box, as they are piggy backed off the lock control box, but there's a two relay system between trigger wires and the mirrors. I believe (but I'd have to check) that each relay gets one trigger wire and by linking those relays in a certain way it energises the right movement. A friend in the know created that in minutes for me, lol, and it has worked great ever since. 3. I could live with that as a solution, although I was not counting on that. I was hoping for behaviour like with the lock switch, a momentary contact triggering the mirrors. Like with the locks, depending in which position they are, the other action is triggered. This would mean I can use two identical push button switches. Otherwise I'd have one toggle and one push button. Visually a bit more difficult to locate in a pleasing way, but if this means it's more easily created I'd use it like that. And yes, your final comment is exactly what I've been pondering how to deal with. |
| |
|
|
|
|
|
Apr 13, 2023 20:23:01 GMT
|
Ok, so this turns out to be not so simple. Not impossible but not easy either. Here are some diagrams to explain what I'm thinking and then I'll explain why it doesn't work. Oh, before we start, this is half of it. Let's say it's the door-lock / mirror-in part. You'd have to duplicate it for the unlock / mirror-out function. It also doesn't take into account what you said about single buttons either. Anyway... Starting with unlocking the door from the outside. 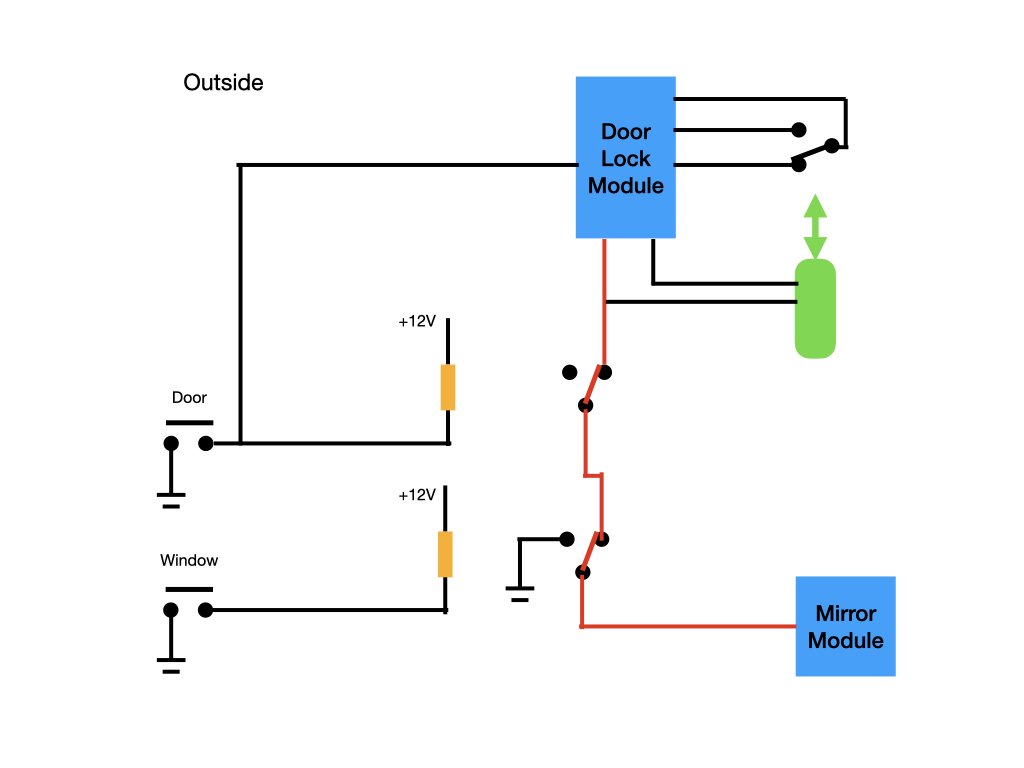 I think this is triggered by the motor being moved and the switch on that motor changing position. That would liven the output and drive the other door locks and the mirrors. Just as it is now. Next, the mirror function inside the car. 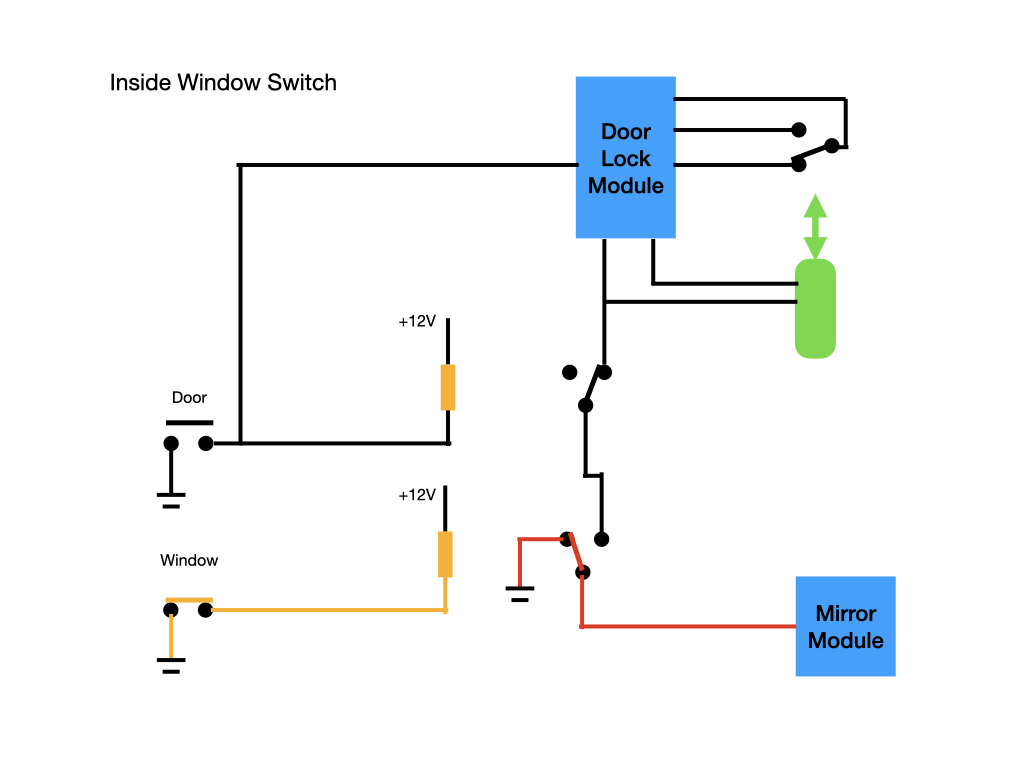 Here the mirror relay drives just the mirrors and doesn't back feed the CL controller. Next, the CL function from inside. 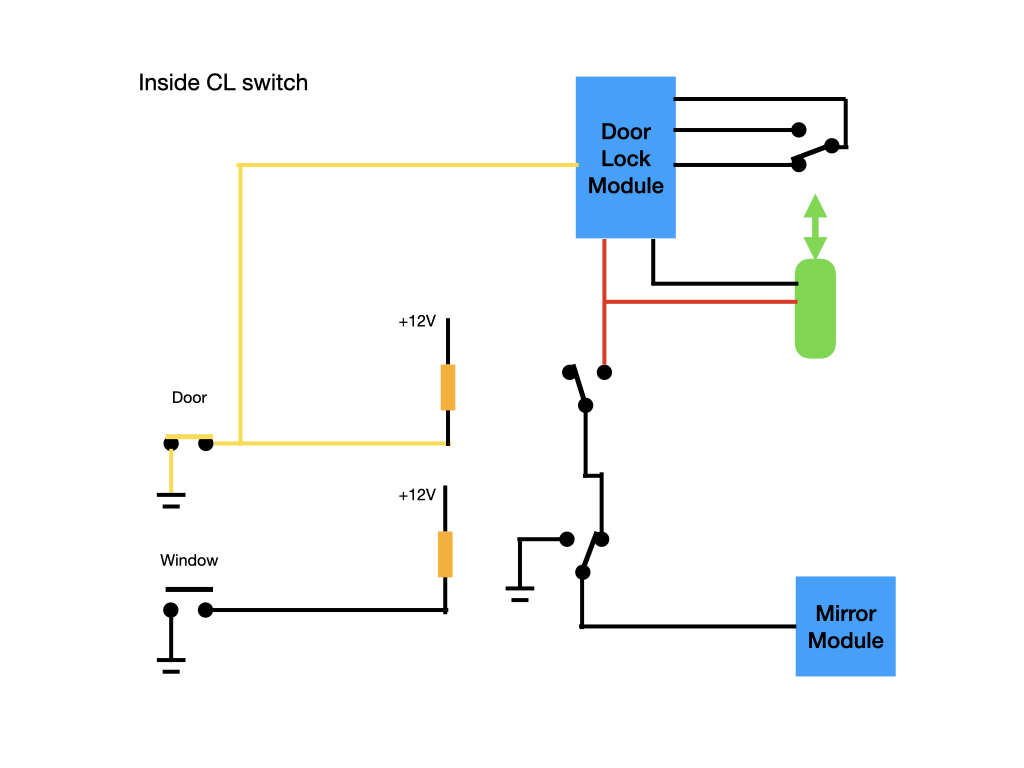 Here the switch fires the CL module but at the same time the relay disconnects the CL motor drive from the Mirror module preventing the mirrors from moving. And here's why it doesn't work. From what I remember of the locking systems when they are triggered they drive the output for half a second or maybe a second to give all the motors a decent chance to move and drive all the locks. When you press the interior CL button the relay disconnects the mirrors but when you let go it reconnects them and the (still active) drive from the CL module will trigger the mirrors. 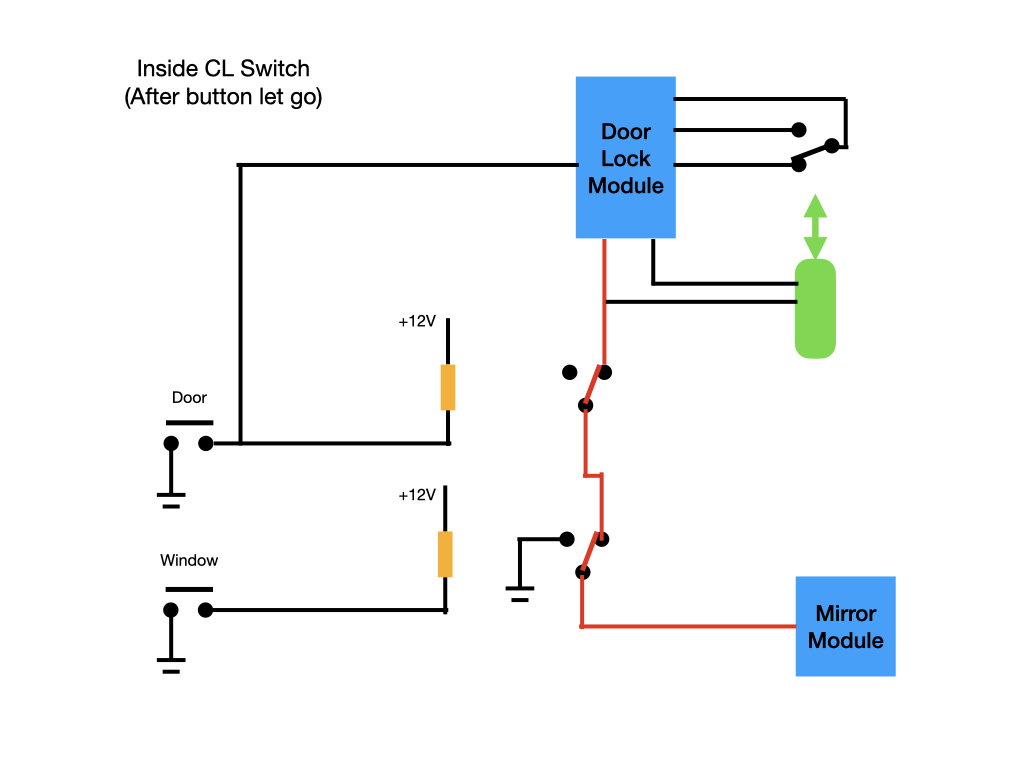 I can't find a way round this using standard relay type stuff. The only way I can think to get round this is to use a timed relay that comes on immediately but then holds on for a few seconds after the control has been removed. I did find such things but they were 45 English pounds and you'd need 2 of them. And we'd still need to work out how to do this with single buttons in the car. How much messing do you want to go to to make this work? If it was me I'd do it but I'm notoriously an idiot who doesn't know when to give up! Maybe this will trigger somebody to have a better thought. James |
| |
Last Edit: Apr 13, 2023 21:03:28 GMT by Sweetpea
|
|
eurogranada
Europe
To tinker or not to tinker, that is the question...
Posts: 2,556
|
|
|
|
|
Thanks for your effort, much appreciated!!
Seeing this gave me another thought. A full set of cl stuff with remotes even is only 35 euro.
So wouldn’t adding a second control unit and thereby separating the mirror control and the lock control?
In this case I’d only need to hook them together for the opening/closing on key. And my limited knowledge suggests that that could be done by hooking the signal wires together with a diode so it only happens one way.
Oh but then I’d still need to solve the manual cl button triggering the mirrors as wel as the unit(s) only have one trigger and don’t differentiate between button lock or key turning.
Then again, my 2013 transit from factory which has folding mirrors, does not have them hooked into the locks either. Something I on the one hand live with, but on the other hand find annoying.
Another thought: if I’d add a second motor in the door that is also triggered by the lock but hooked tot the mirror control box and I’d use diodes to make that a one way connection? Then the button would not trigger it. But the lock will. Only problem there is the extra wires running to the door that I really can’t decently accommodate.
Any thoughts on getting this working as desired adding a second control unit @sweatpea?
|
| |
|
|
|
|
|
|
|
Isolating the mirror switch so it only operates the mirrors just needs a couple of diodes, the problem as Sweetpea points out is the fact that the lock module does not know whether it's triggered by the locks or the override switch, the only way I can see is as suggested to break the connection between the door lock and mirror modules when the manual switch is used with a pair of timed relays, even then you might need a 3rd timed relay to make sure the relays isolating the mirror module are always opened before the power is delivered to the door lock / mirror Module. 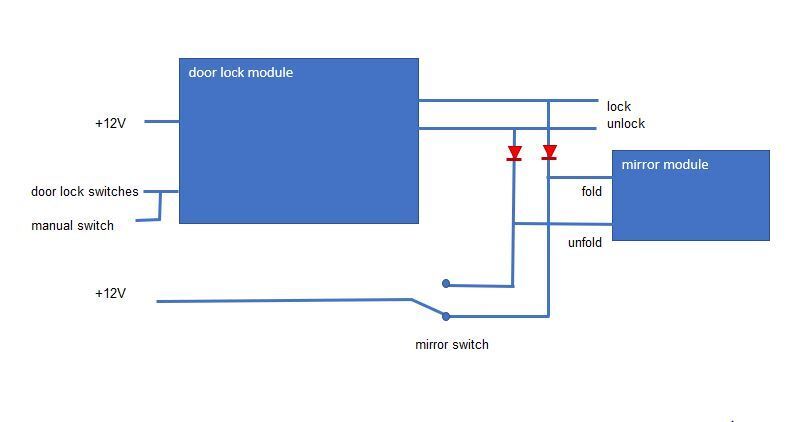 |
| |
|
|
spot
Part of things
 
Posts: 105
|
|
Apr 14, 2023 10:20:05 GMT
|
Hey Alex, What's wrong with the setup 'as is'? Surely the only time you'd need to lock yourself in is 'if' you happened to drive into the paramilitary wing of the Opel Owners Club annual march: Wing mirrors folded flat would surely deter the sticky buggers from having something to grab onto as you buried your right foot! BOT - I'm thinking the de-coupling of the feed(s) shared between the CL/FM is an overly complicated route if complete automation is to be retained. A dirty solution maybe: Would inserting a DPST switch onto the FM legs to manually isolate them from the CL work? This may satisfy the security aspect you seek but has no facility to control the mirrors independently. Me, I would probably err on having both circuits separate of each other. Stand-a-lone 'folding Mirror' modules seem to be readily available cheaply; Wired into the Ign Acc feed and controlled via a fob internally would seemingly satisfy your requirements. PS: Surly your first priority needs to be getting the fuel gauge working! PPS: Felt slightly awkward after a printer jam was cleared recently and this fell out....
EDIT: Perhaps I've possibly booboo'd but I thought the 'in/out' motions were controlled by reversing the polarity rather than a single pulse on each leg.
|
| |
Last Edit: Apr 14, 2023 10:30:15 GMT by spot
|
|
|
|
|
Apr 14, 2023 20:43:04 GMT
|
|
Hi Alex,
Give me a while to mull things over again and scribble some more pictures.
Do you have any diagrams of what's in the mirror electronics?
James
|
| |
|
|
teaboy
Posted a lot
   Make tea, not war.
Posts: 2,127
Member is Online
|
|
Apr 14, 2023 21:10:50 GMT
|
I've read all this stuff about mirrors, door locks, switches and diodes etc and it may as well have been written in ancient Egyptian hieroglyphics. Can you hurry up and start talking about spanners and hammers, please?  |
| |
|
|
eurogranada
Europe
To tinker or not to tinker, that is the question...
Posts: 2,556
|
|
Apr 15, 2023 10:50:18 GMT
|
Hey Alex, What's wrong with the setup 'as is'? Surely the only time you'd need to lock yourself in is 'if' you happened to drive into the paramilitary wing of the Opel Owners Club annual march: Wing mirrors folded flat would surely deter the sticky buggers from having something to grab onto as you buried your right foot! BOT - I'm thinking the de-coupling of the feed(s) shared between the CL/FM is an overly complicated route if complete automation is to be retained. A dirty solution maybe: Would inserting a DPST switch onto the FM legs to manually isolate them from the CL work? This may satisfy the security aspect you seek but has no facility to control the mirrors independently. Me, I would probably err on having both circuits separate of each other. Stand-a-lone 'folding Mirror' modules seem to be readily available cheaply; Wired into the Ign Acc feed and controlled via a fob internally would seemingly satisfy your requirements. PS: Surly your first priority needs to be getting the fuel gauge working! PPS: Felt slightly awkward after a printer jam was cleared recently and this fell out.... EDIT: Perhaps I've possibly booboo'd but I thought the 'in/out' motions were controlled by reversing the polarity rather than a single pulse on each leg.
I think the voice of reason has spoken. The old way really wasn’t a problem… it just that I’d have liked it differently. I think I’m going to attempt the manual switch not triggering the door locks as a happy medium… |
| |
|
|
eurogranada
Europe
To tinker or not to tinker, that is the question...
Posts: 2,556
|
|
Apr 15, 2023 10:52:00 GMT
|
Hi Alex, Give me a while to mull things over again and scribble some more pictures. Do you have any diagrams of what's in the mirror electronics? James Thanks James, But I think I’m going to keep it either as it was or so the manual switch triggers the mirrors only. There’s only two doors to lock, so hitting one locking pin on the door itself as a trigger isn’t the biggest problem… |
| |
|
|
eurogranada
Europe
To tinker or not to tinker, that is the question...
Posts: 2,556
|
|
Apr 18, 2023 14:43:08 GMT
|
Well, another week that is not coming back, lol… First off I have some pictures from the work on the seats to share. By the time I was working on the windows I didn’t take any pictures as I was very much into a get it done flow. For the first time in ages I had felt joy in working on the car (with a bit of sunshine making everything more enjoyable). You see here the messy bits that have become the two bottom yellow nicely done relays and wiring. 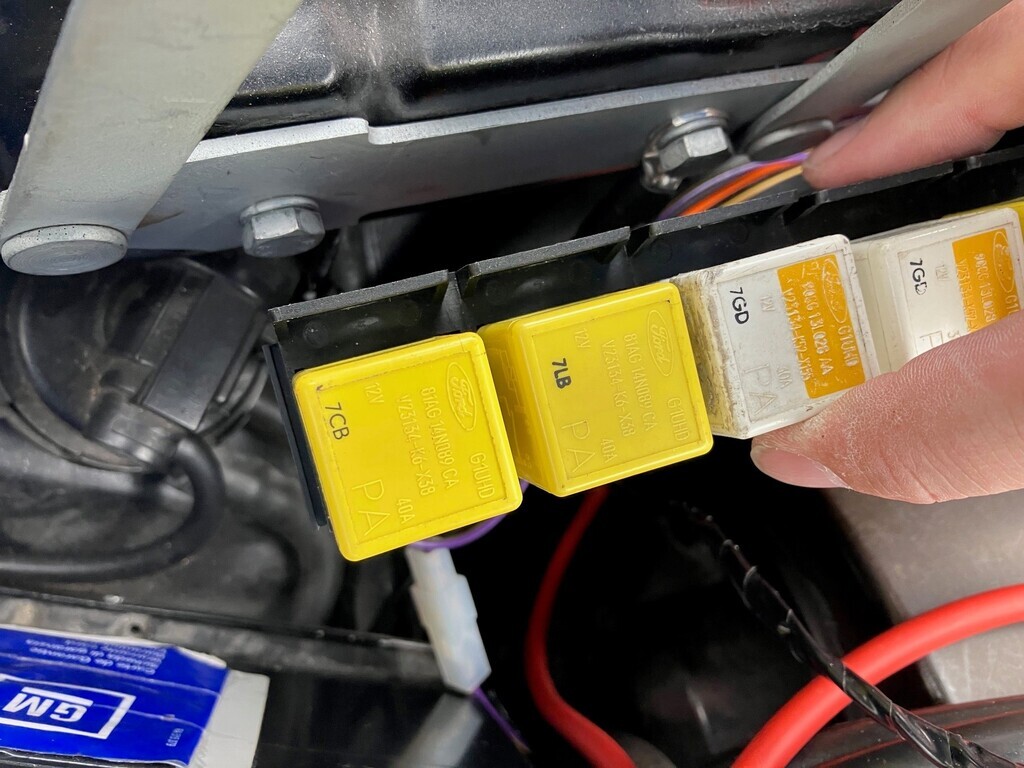 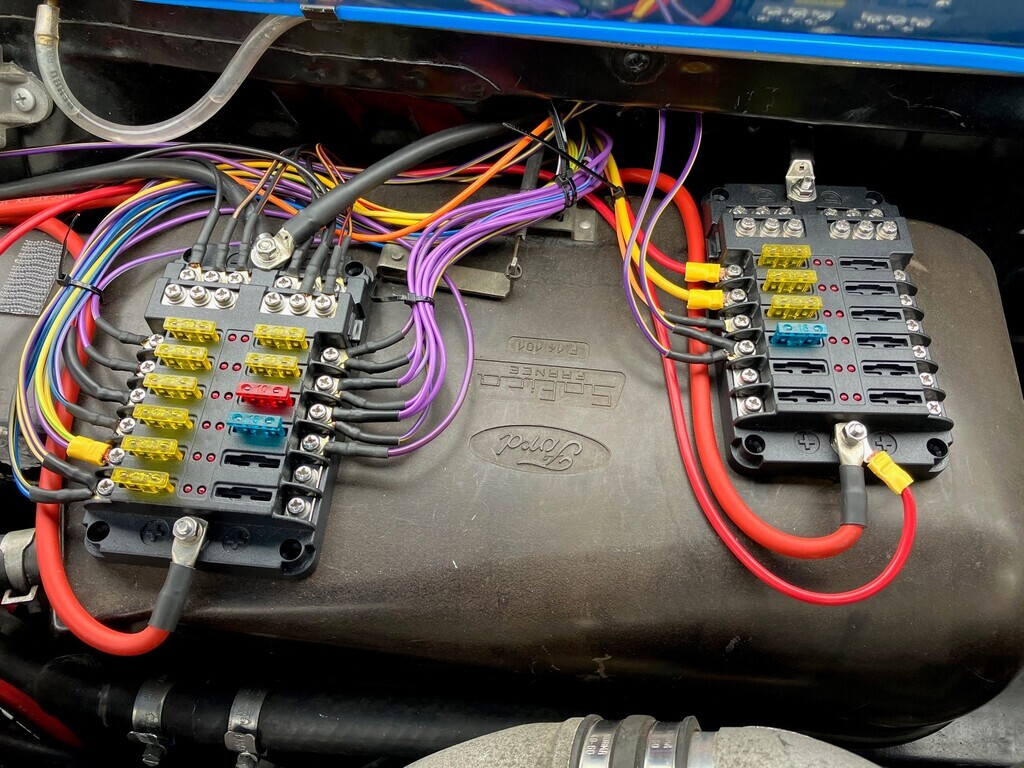 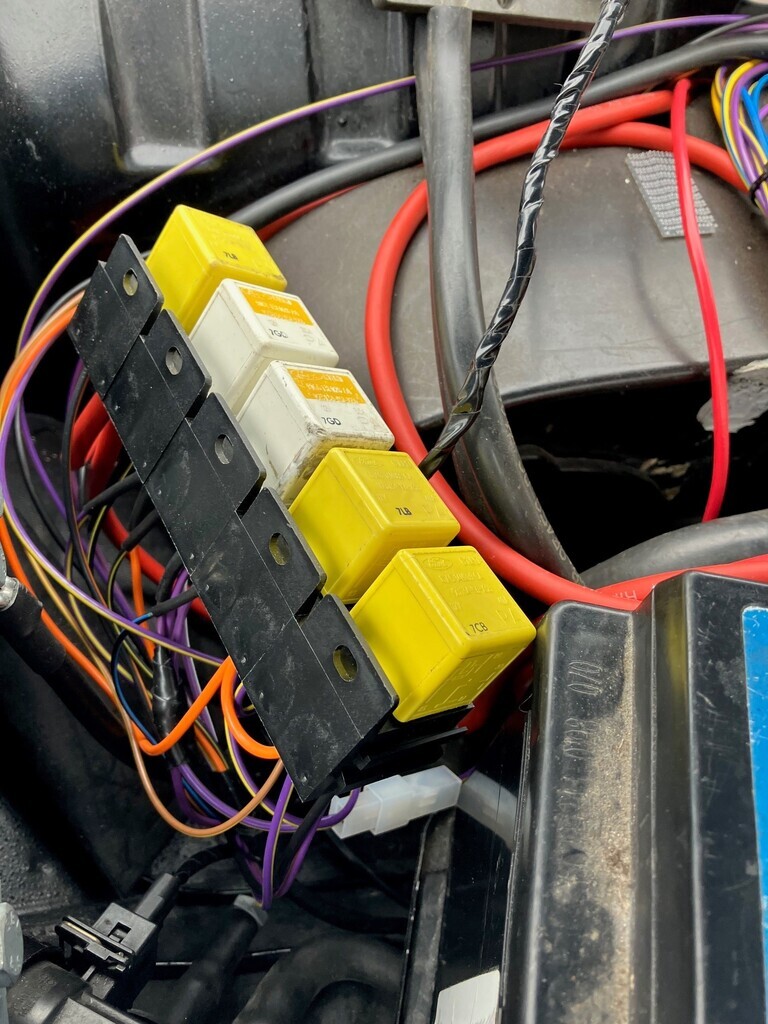 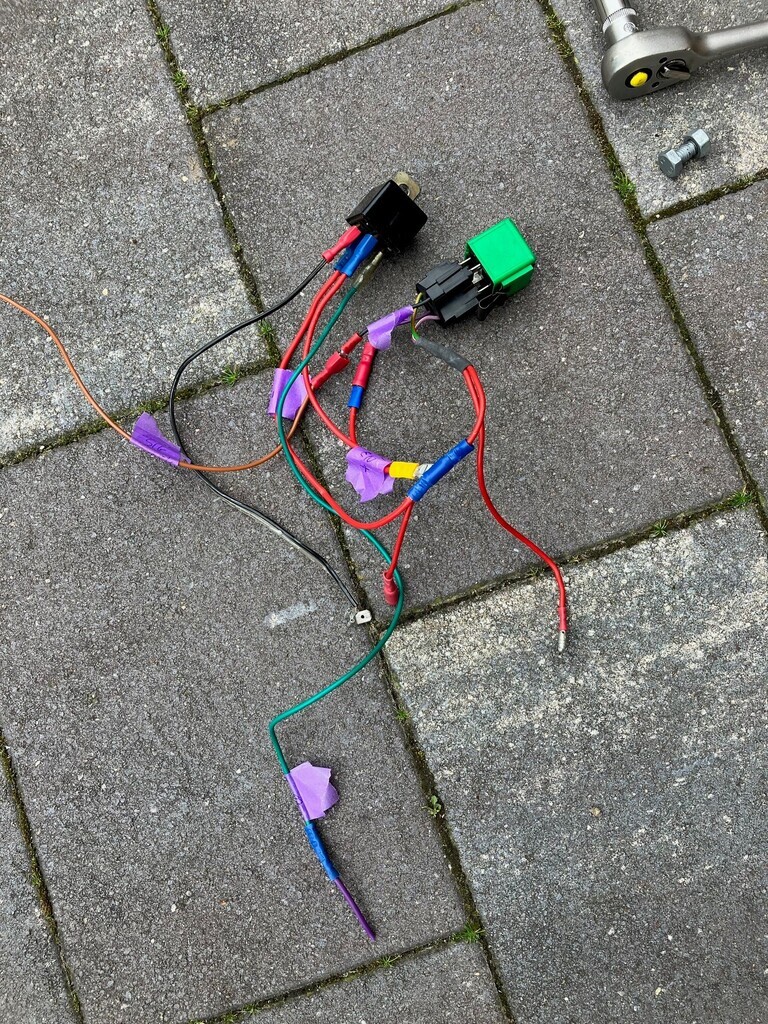 Ok, so what got accomplished this week? Well quite a bit really. I had wanted to finalize all car circuits, but the ongoing matter of how to get the door locks and mirrors to work as desired was holding that back. To get into that at this point, I had a friend come over and inspect the control units and relays and he figured out how stuff was actually triggered. He confirmed the consensus that the unit is not setup to differentiate between the motors triggering the circuit or the button. So with this single unit I could never get what I wanted. So the choice was keep as is or go for a second control unit. This would separate the systems, but the workings of these control units still would mean that they cannot be linked to create the simultaneous lock/mirror action. So I now have to think really hard about what I find more important or convenient. The daily has these circuits separate as well so it’s not something I can’t overcome. And in my narrow garage I think it’s actually wiser to be able to unlock the car without the mirrors unfolding. So I think I’m adding a second unit. And if I’m doing that it may be one with remotes. Back to the update then. I had to find other work to do on the car so I turned my attention to getting things buttoned up under the hood. That required making new earth battery leads, new positive battery leads and finding a way of mounting the relays and fixing the fuse boxes in place. Attention turned to the earth leads first. Unfortunately after taking the current ones off, I was quickly confronted with the fact I had bought too little of the 25mm2 earth wire to make what I wanted. I needed a thick one from battery to engine, and a thick one from engine to body and ideally one from the battery to the body. The latter one currently being half the thickness of the other earth lead to the engine. So in the end I made the new engine to car body lead. It’s such a joy to have the right tools for jobs like that! Decent crimps were achieved and it all looked very nice. Again no pictures yet. I put back the other earth leads for now while I order some extra wire. I Then went on to the battery to starter wire. The old one worked well, but was showing age and was relative stiff or hard. So I felt it prudent to now just put on a nice flexible and thicker new one. I used 25mm2 here as well. Easy job this. The new insulation was already thicker than the old wires’ was, but I added the protection that ford seemed to have put in place originally. No way this is going to chafe through in any place. I took care of routing the wires pretty much chafe free, but also with the thick insulation and the extra protection in places this will last! 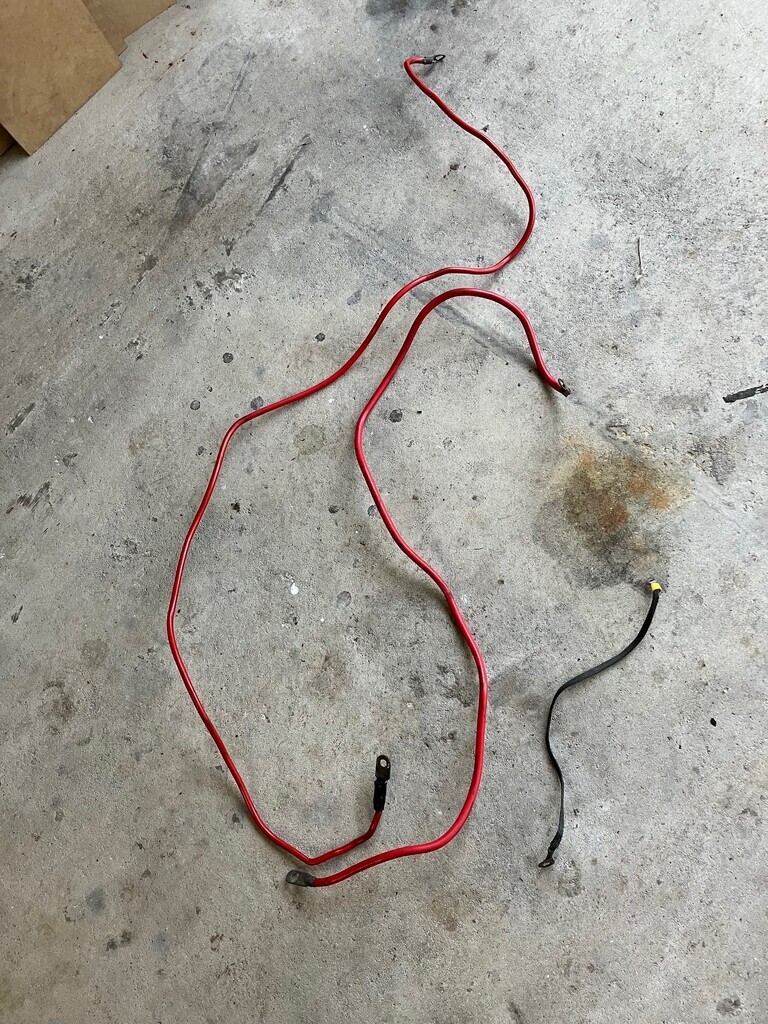 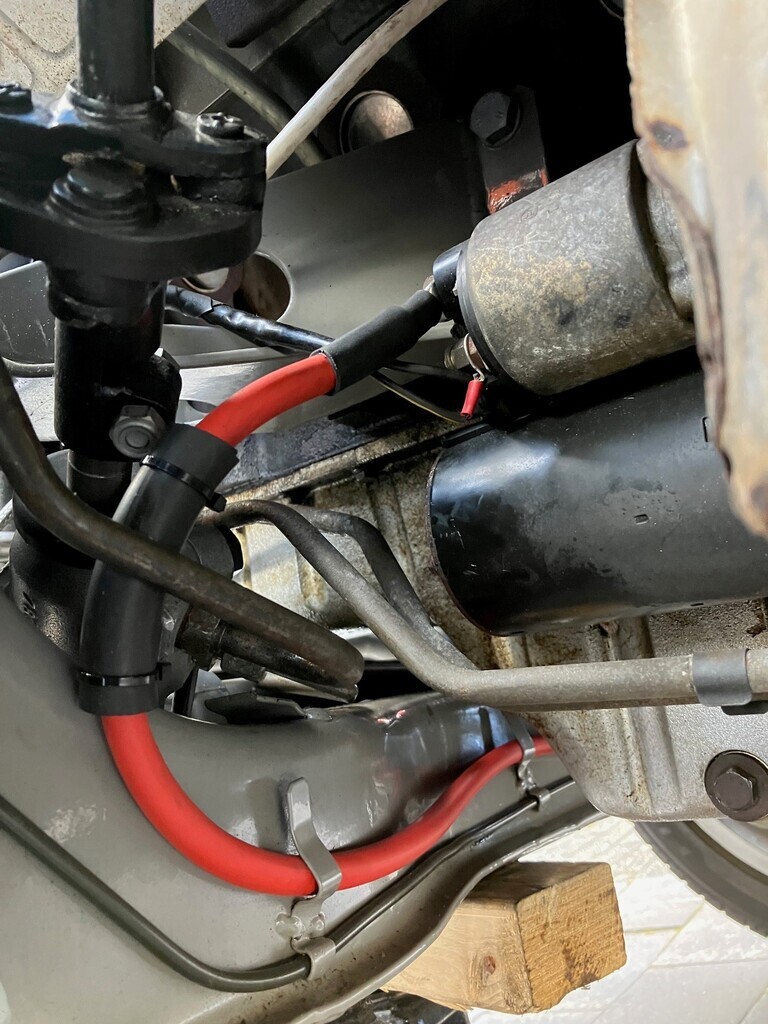 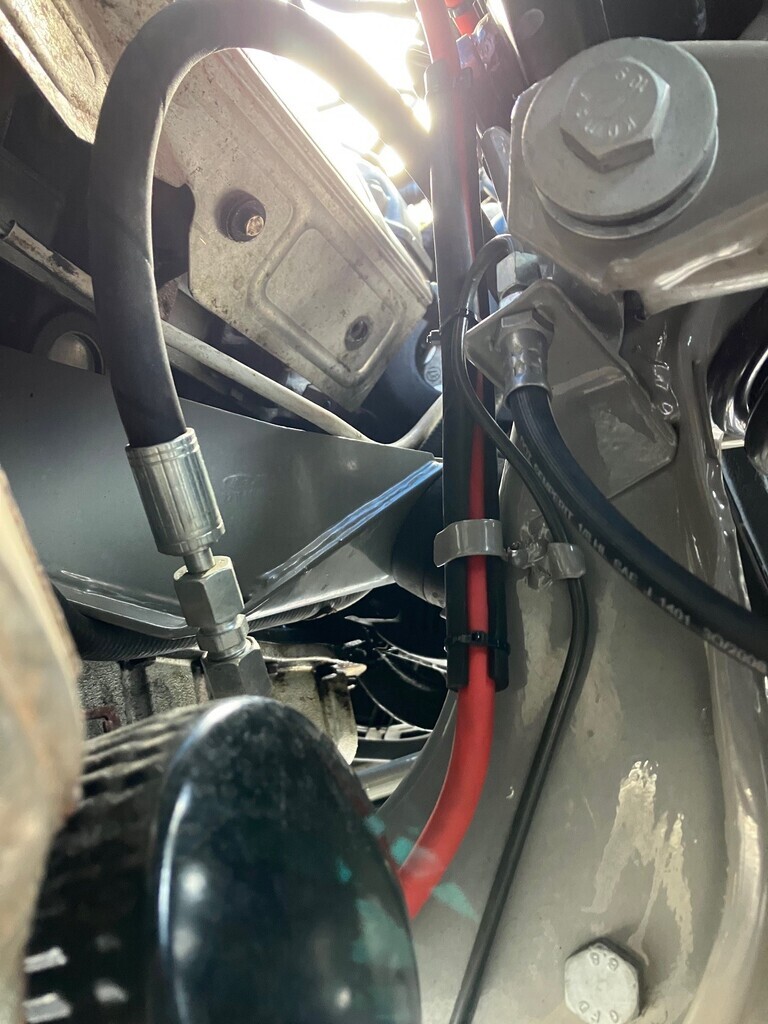 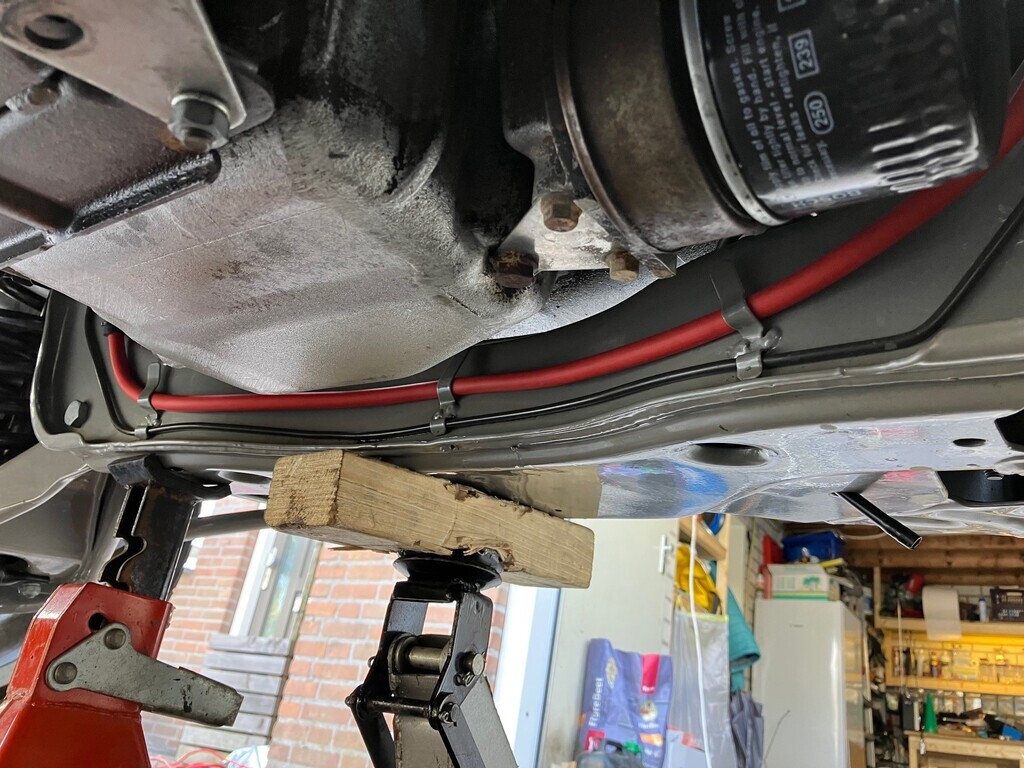 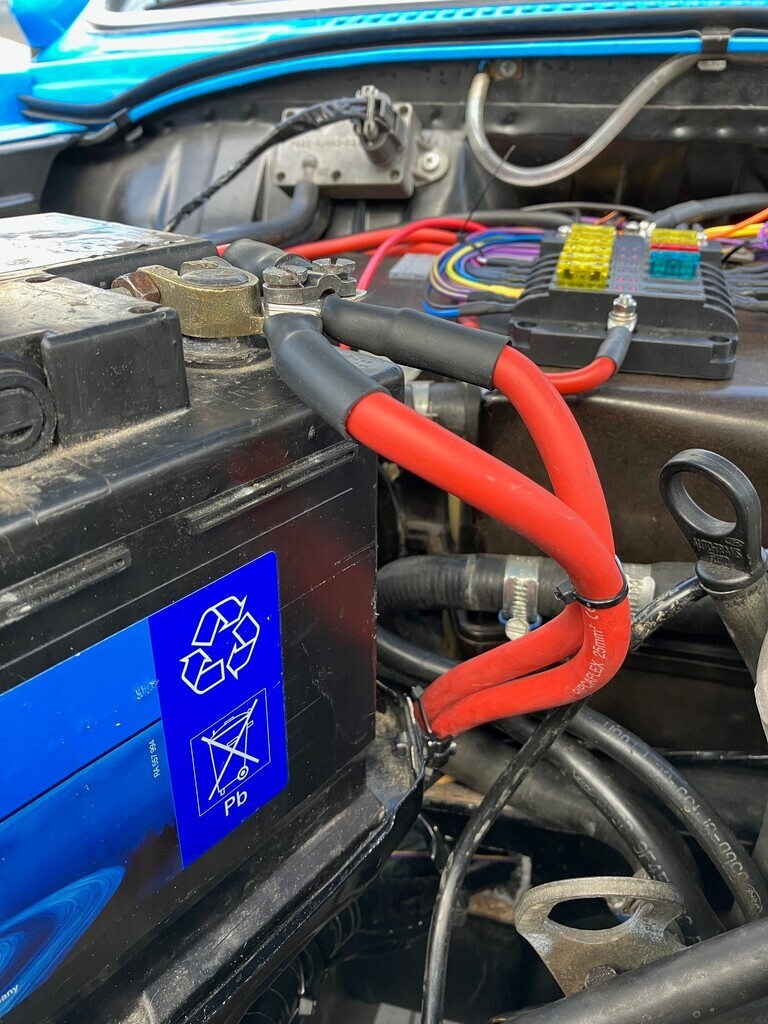 The alternator also had a direct lead to the battery so I changed that out as well. It was newer, but also too long. So I took the opportunity to route it better and make it as long as actually needed. Getting to the alternator connection was a bit of a biaatch, but not as bad as I remembered. Job done! 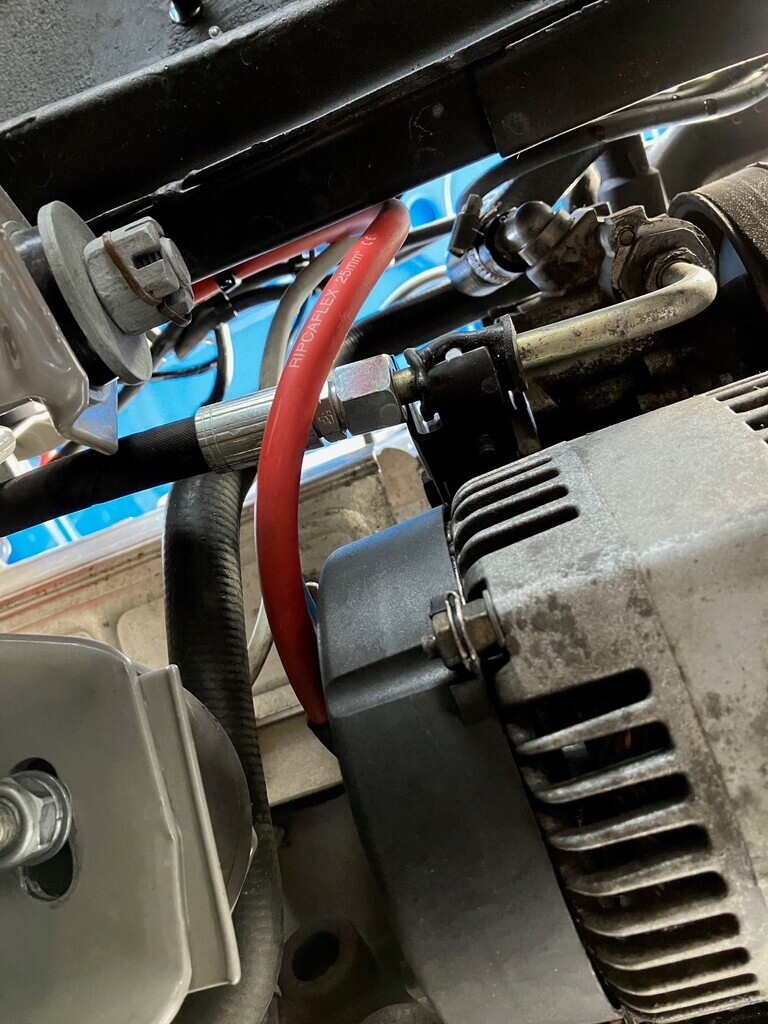 As I had the car on a jack and a stand to safely work underneath it, I was also able to switch the Lambda connectors underneath the car. With the battery disconnected for so long the ecu was code free as well. I haven’t run it long enough for it to cycle through it’s cycles so the code is not yet thrown again. Am curious to see what happens! With that done as well I turned my attention to the bank of relays and fixing them to the car. I quickly made up a bracket, which seemed to work well. I had to fit my work bench vice first, something that has been a to do for ever since i built my custom workbench. Thankfully a small job. I just couldn’t figure out why the bonnet felt different upon closing now. I knew it wasn’t hitting the relays! What I hadn’t accounted for was the position of the hinge bars at rest. I could see that it had pushed the front of the bracket down and even bent it. So I needed a relief for the hinge bar at the front and remove the top part of the mount. Fixed me thought! Well, think again, as the bonnet now was still a bit higher in the corner than I was used to. I don’t know why but it took me a while to realize that at the back of the bracket I had the same problem, I needed a small relief! I still have to make that but I’m sure that should see it done permanently. I’m blaming my current health for not seeing these issues during the design phase immediately. I’m happy with how it sits though. It’s out of the weather and reliably secured. I taped up the wiring into a loom from the fuse boxes towards the relays to neaten it up a bit as well. Oh and I was sound enough of mind to make the bracket such that I could add two more relays for future updates/mods etc. in addition to the one I already had as an extra. 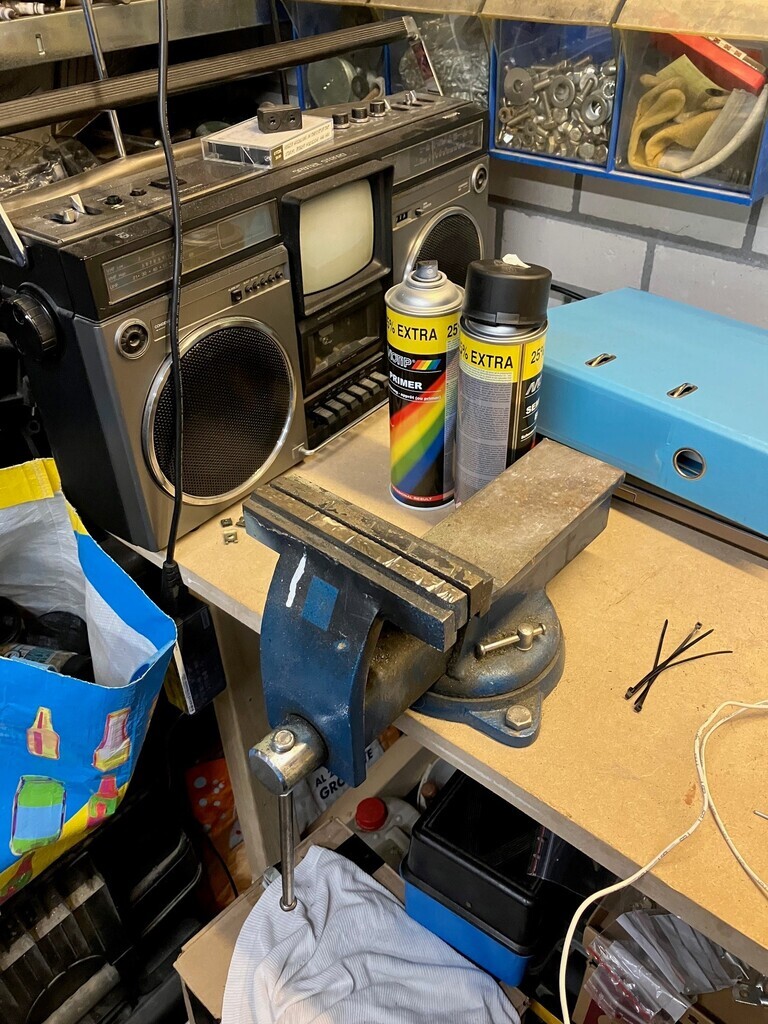 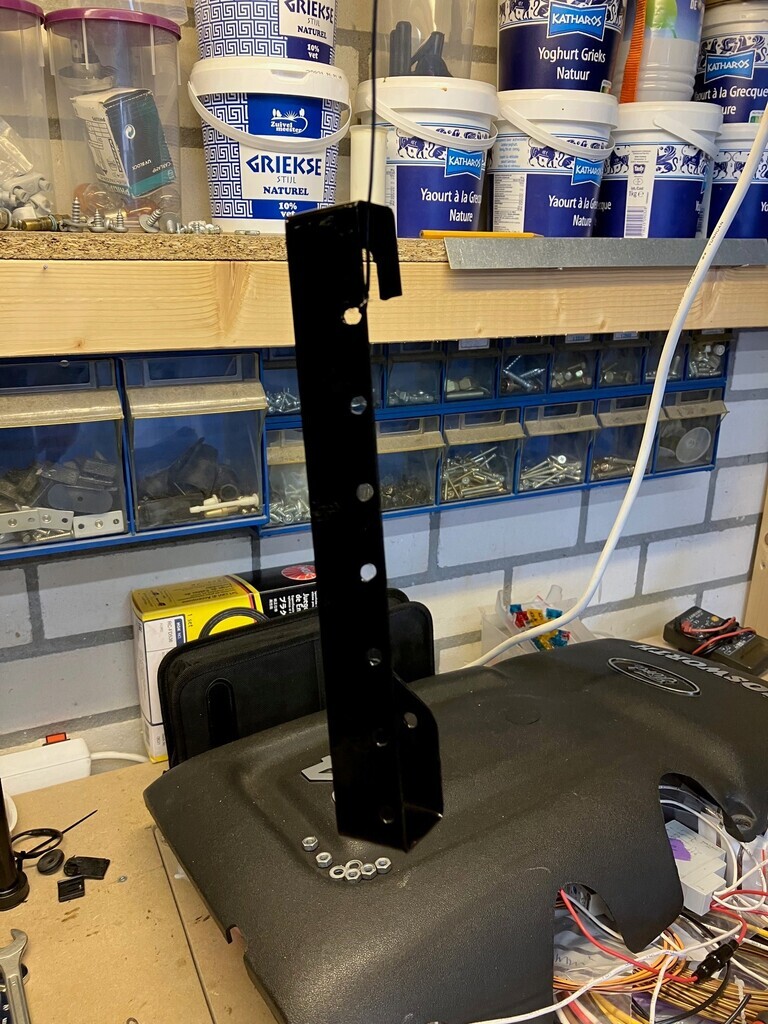 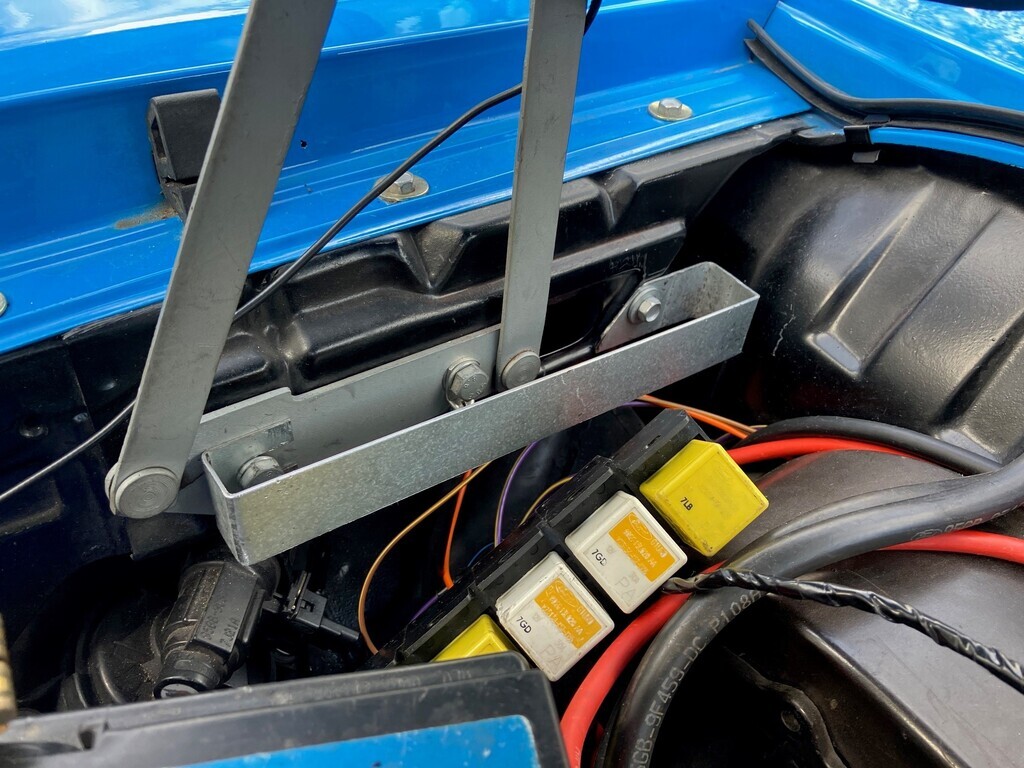 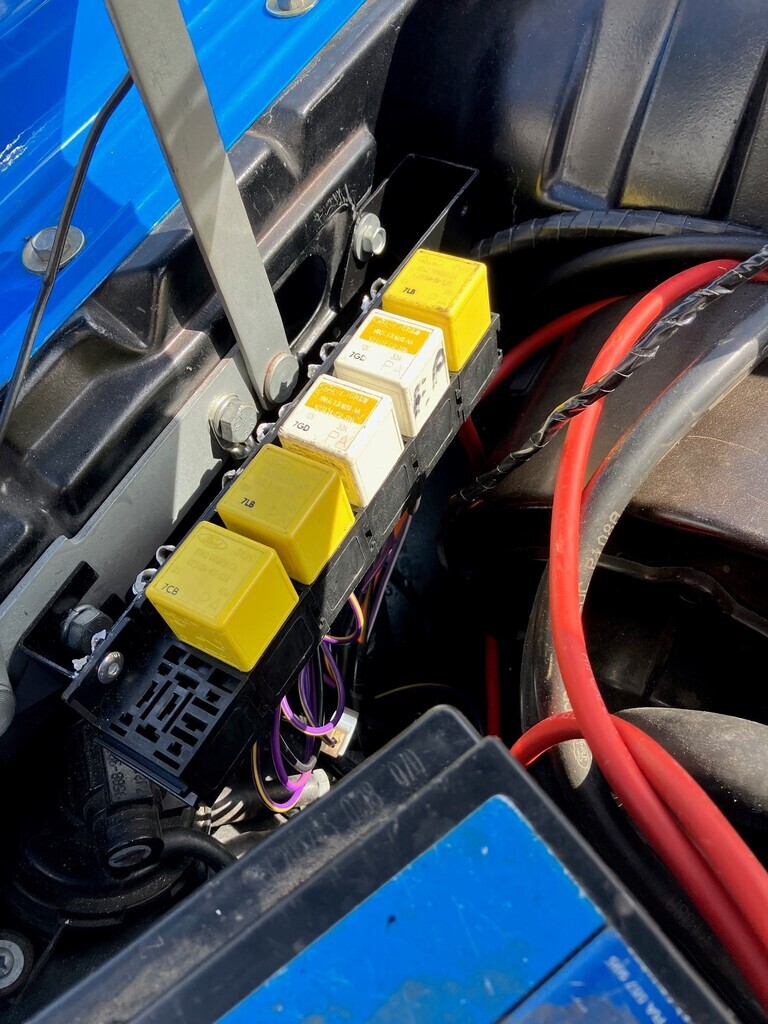 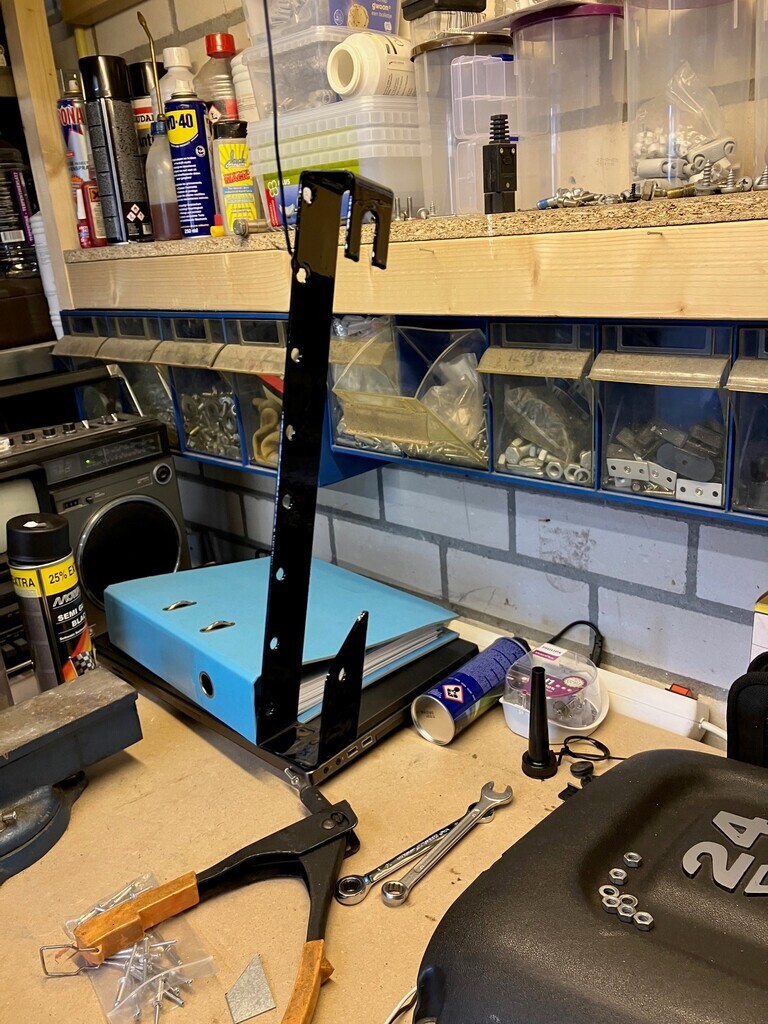 With that done, playtime for the day was over, but fortunately the next day the weather was almost just as agreeable, apart from a colder wind in the more shaded areas of the drive. As I was working under bonnet still I went ahead and focused on the bonnet release popper. But upon looking at that I also noticed the wiring for the second horn. I wasn’t happy with that, even though I had updated it myself 15 or so years ago. So I started there. I made a new feed for the second horn and spliced it in at the relay as that was the easiest place. A simple job. Next I redid the wiring for the bonnet popper. This has a relay near the front of the car and I was contemplating moving it to the relay bank, but I decided that I would have to make more and longer wires than just keep it where it was only with better wiring. This thing is a beast and sounds like a tank when popped, so I have always fed it with thick wires to the relay and the popper. As I didn’t have thick wire back when, I doubled up on the thinner wire, but now I had better means I changed it all out for nice and thick wiring. It only gets energized for a split second so it may all be a bit overkill, but that is better than under speccing things. Happy with that I turned my attention to extending the longevity of the wiring. Where it went through the body, originally there were rubber rings to provide protection from chafing. These were battered and ugly and I put them away for cleanup, but I couldn’t find them when I needed them so I did the next best thing, I went to my spare rubber section and used a bit of an old sliding roof rubber. I cut the foamy bit off to be left with a nice rubberized metal u-shape. I fitted that on both sides around the wiring which was a bit of a pain but also a success. I also bundled and wrapped and tie wrapped things together goinf rom left to right on the car. No chafing issues to be expected there either. 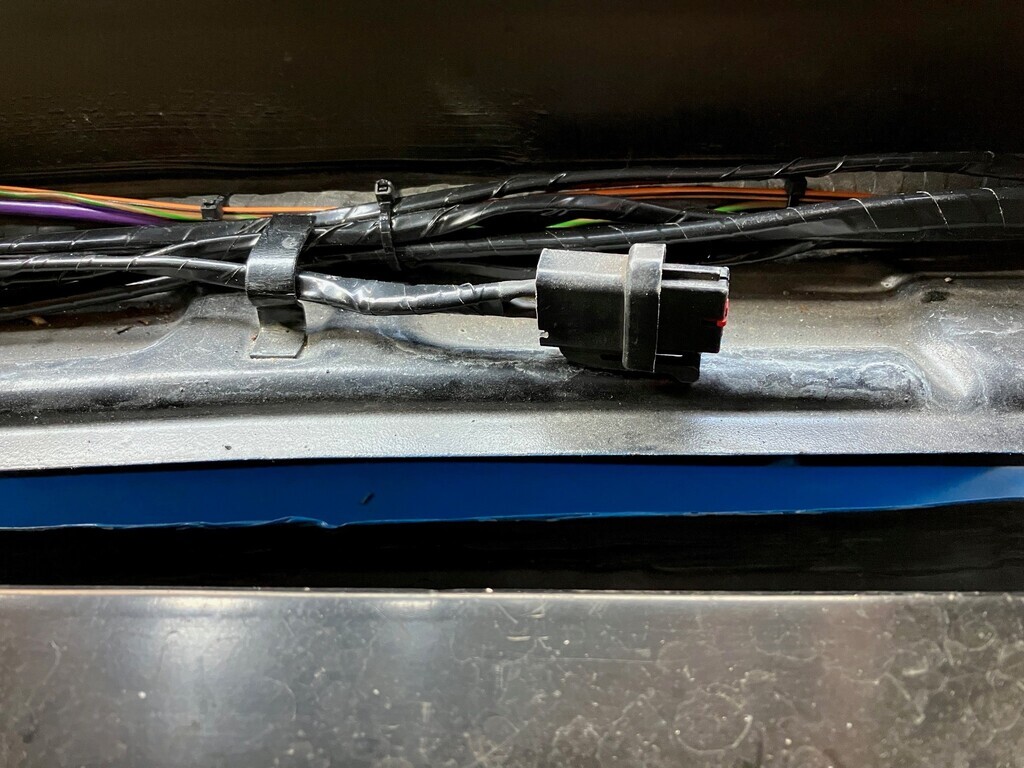 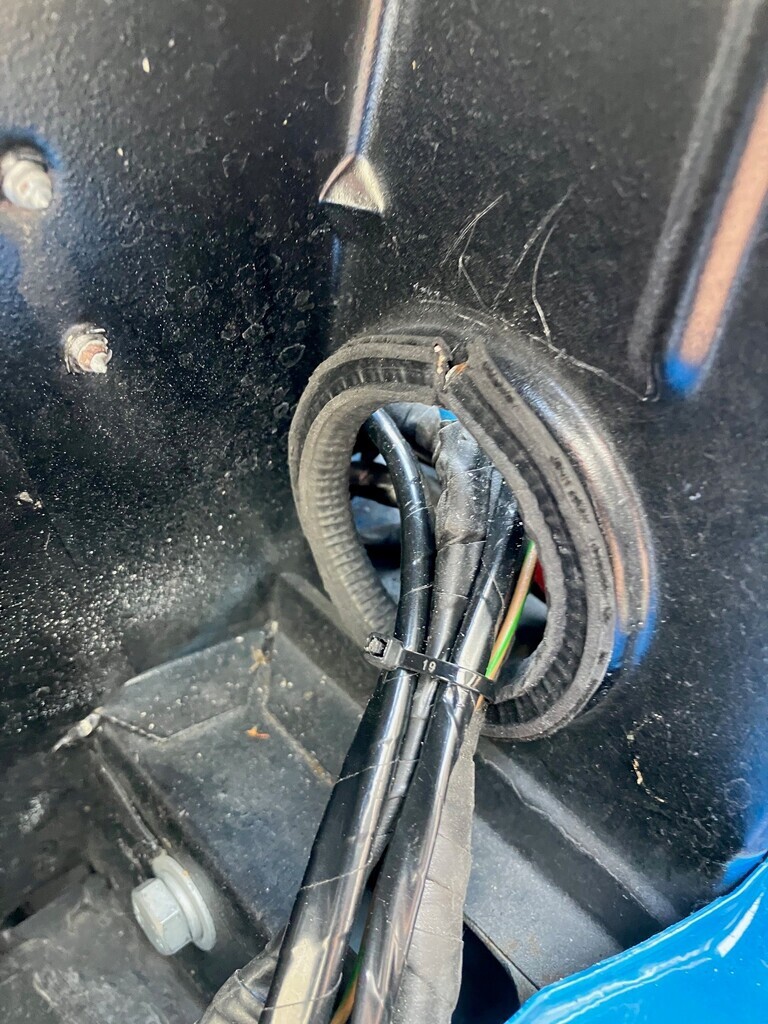 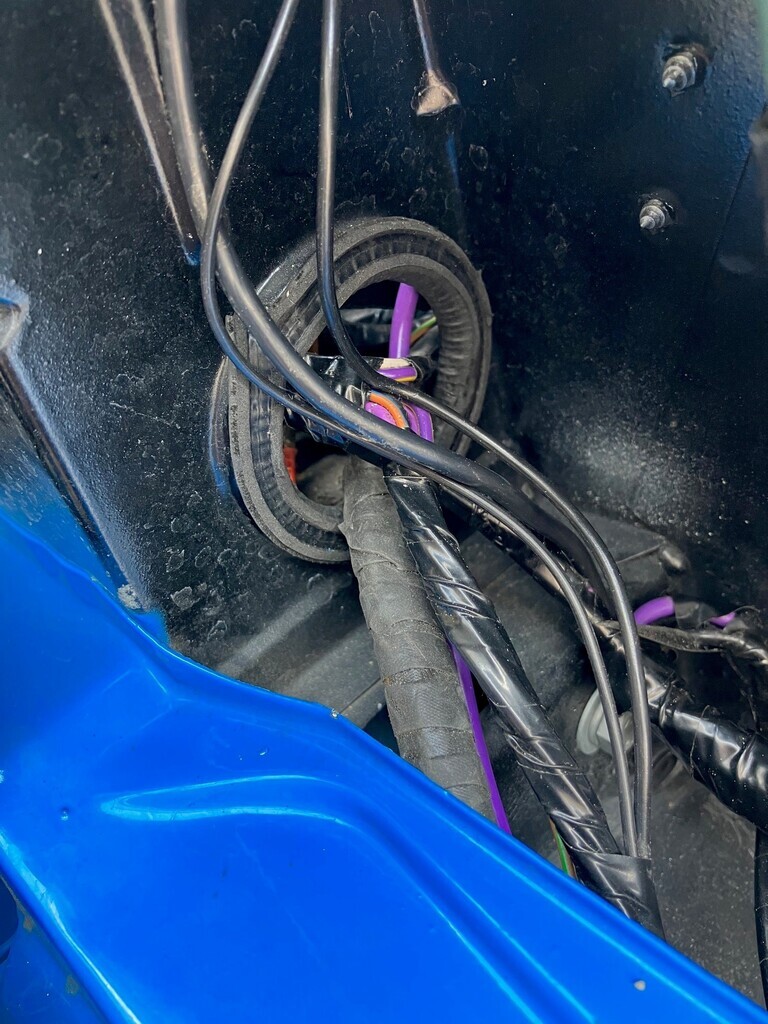 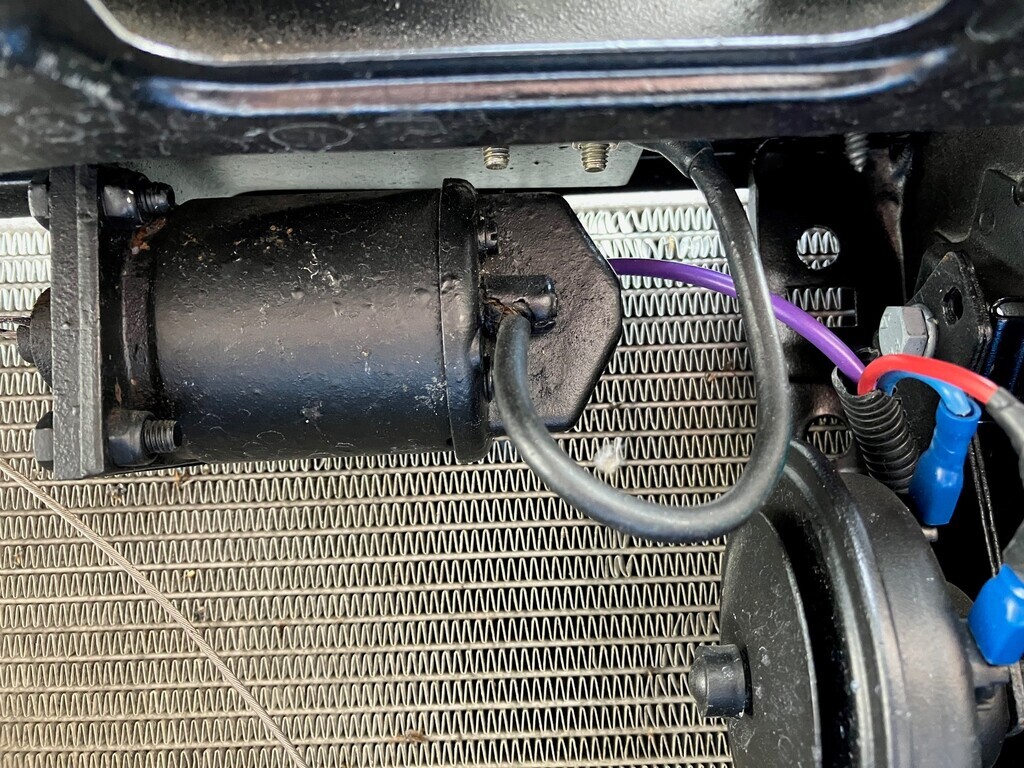 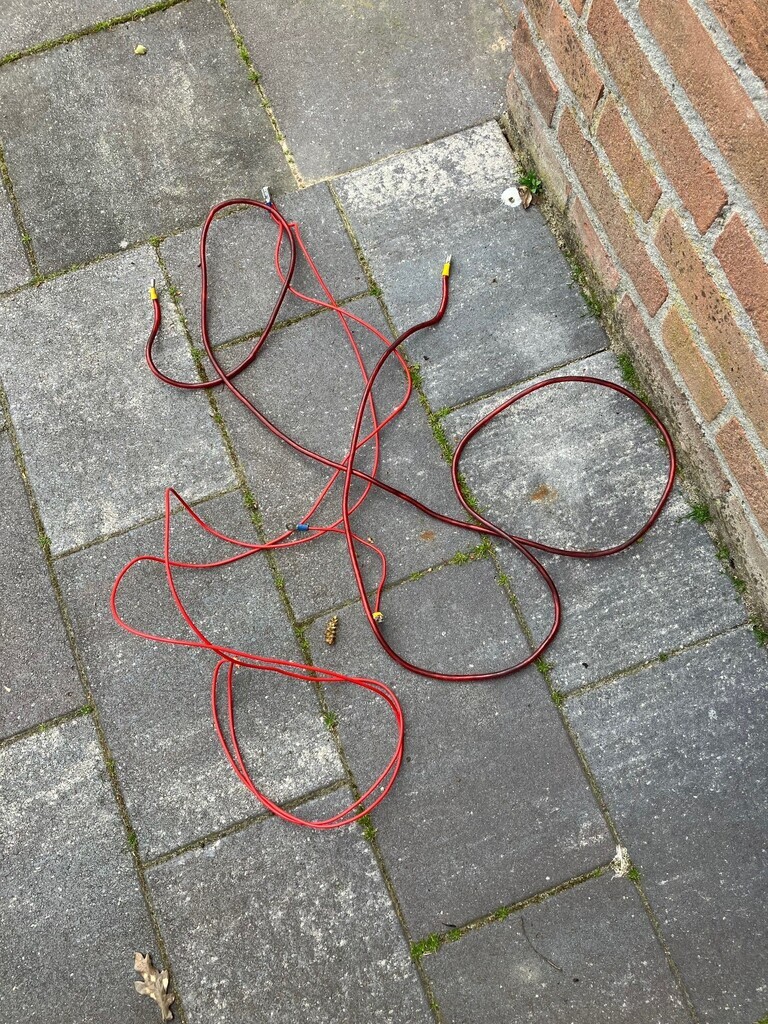 Next I did the same sort of thing on the hole the ecu plug and wiring goes through. All edges now protected. To make it wind tight I’d like to find a piece of rubber with a nice 4 to 5cm hole in it and about 10x15cm. . A bit like a simple gear lever seal to the trans tunnel. But I wouldn’t yet know where to find something like that. A final job that has been 7 or 8 years in the making, was painting the brackets that hold the radiator in place. They’re not the most beautiful things I ever produced but they do the job. I have the original rubbers for them somewhere so when I find them I’ll add those to finalize them. But painted they look a lot nicer. 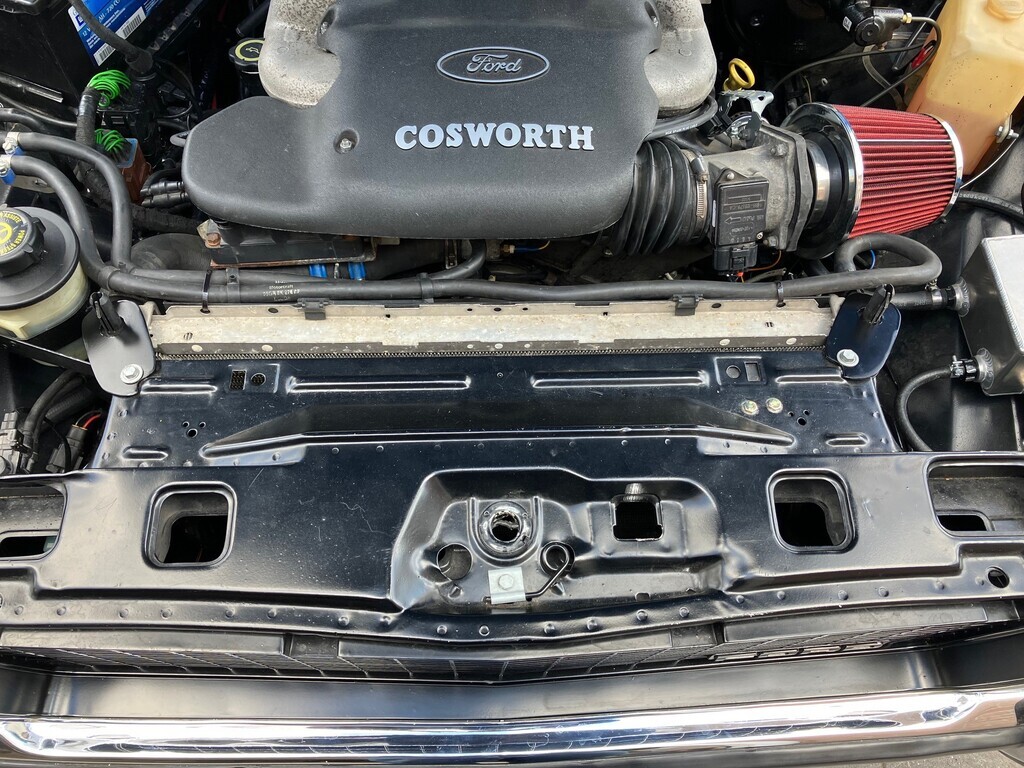 Anyway, with that all done, I felt somewhat triumphant as I removed the ghia grille from the boot of the car to refit. With that the car has made a first leap to going back to being a complete car. 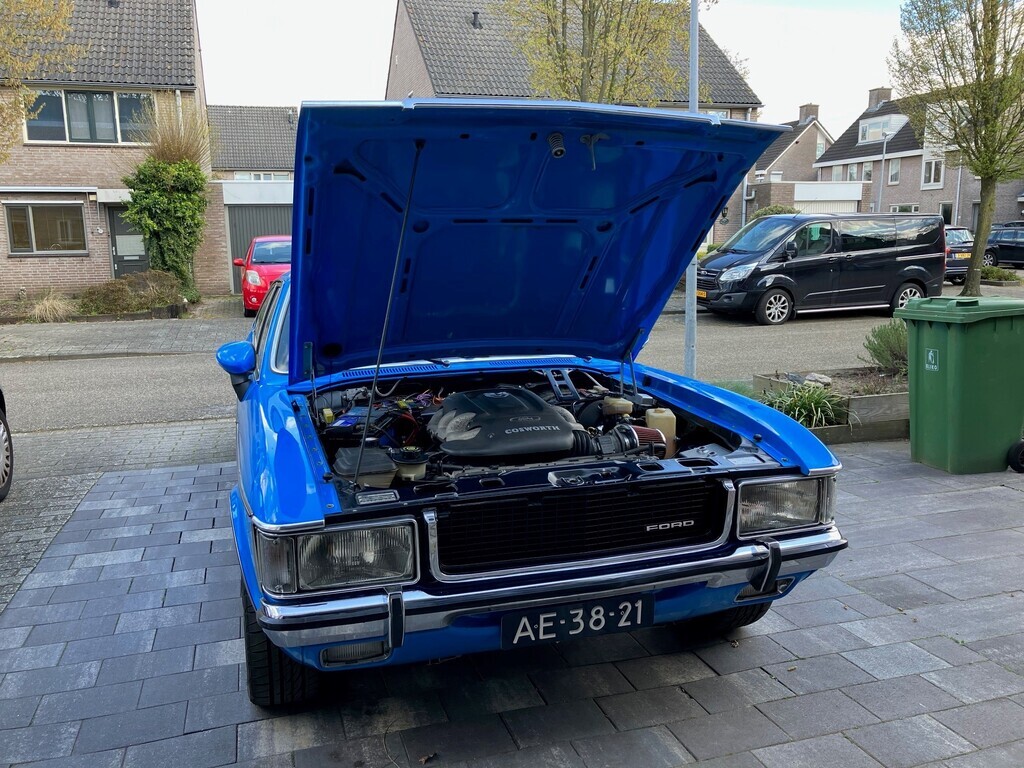 I now have a week off to look forward to and although the massively positive weather predictions have taken a turn for the worse, I still look forward to getting the car finished. That would be my main goal! |
| |
|
|
|
|
|
Apr 18, 2023 20:49:37 GMT
|
To quote Michael Caine in the Italian Job - “Hang on a minute lads, I’ve got a great idea.” The problem with setting me a challenge is that I can’t give up. Now this idea isn’t guaranteed to work but there is a damn good chance. Especially if the mirrors work as I think they do. I should also say that this looks horrible but remember that my previous idea was only half the story. This is the whole thing. Allow me to tell you how it works. Starting with operating the door from the outside. 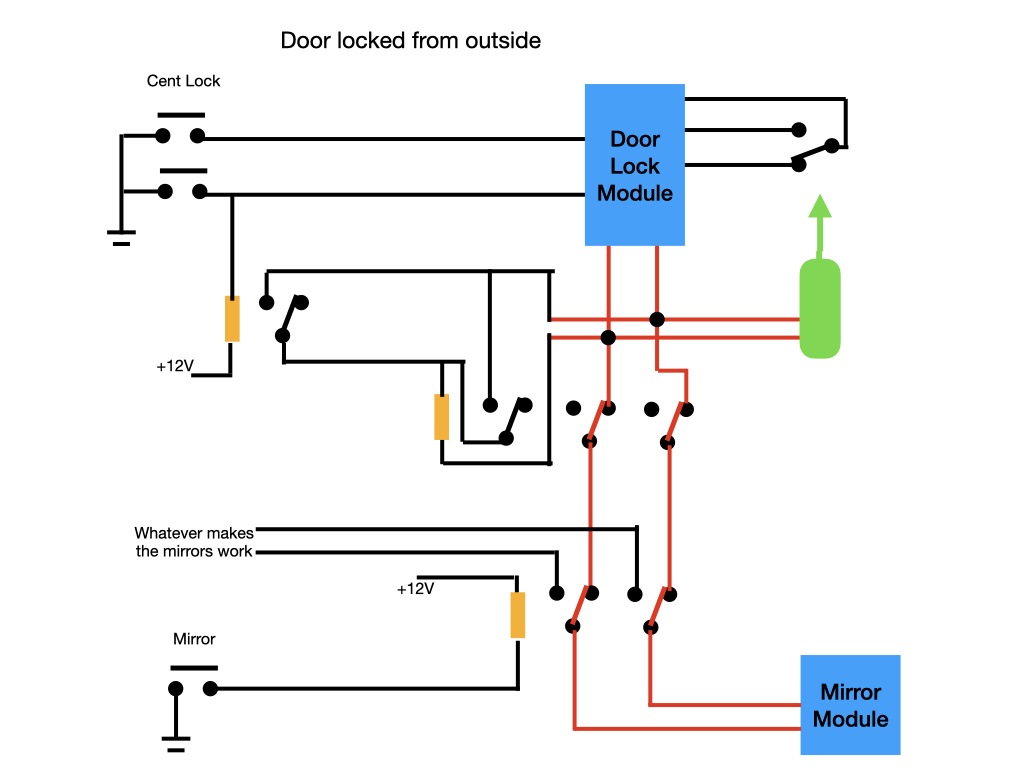 Here you move the door lock and the lock controller comes alive and motors all the other door locks and the mirrors. Easy. Next using the mirror switch inside the car. 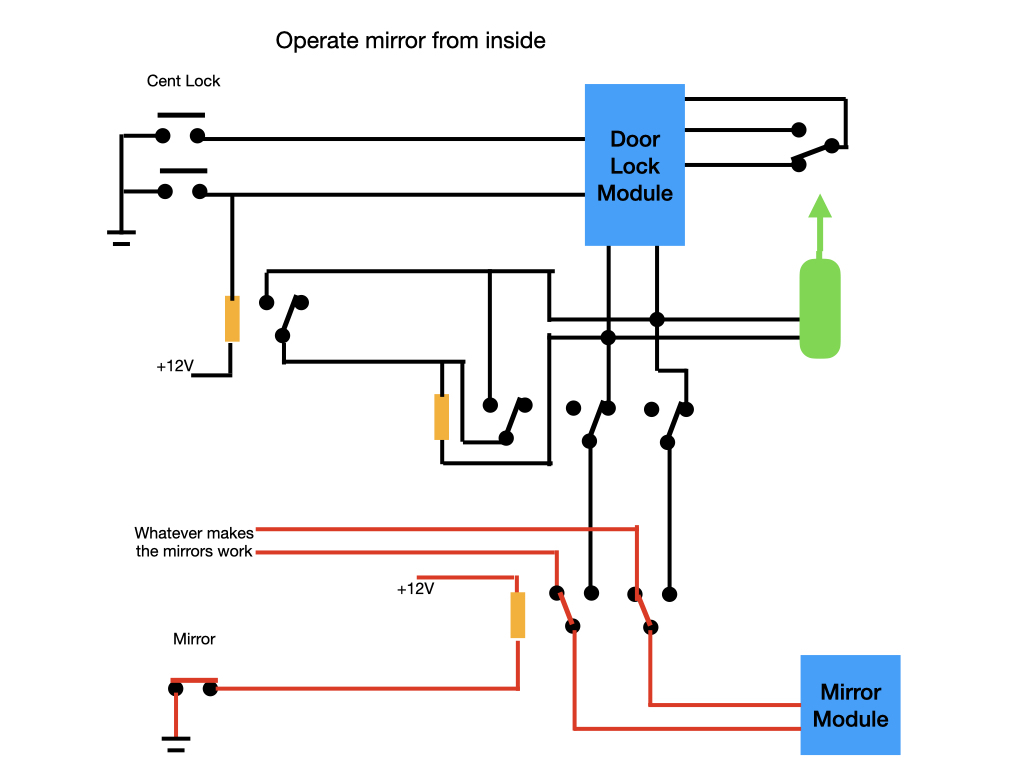 The mirror switch operates the mirror relay which connects the mirror controller to whatever we need to make the mirror work. Exactly what that is depends on exactly how the mirrors work. It’s also disconnected the locking system so we don’t accidentally back feed it. Lastly the interesting bit. Operating the door lock switch inside the car. 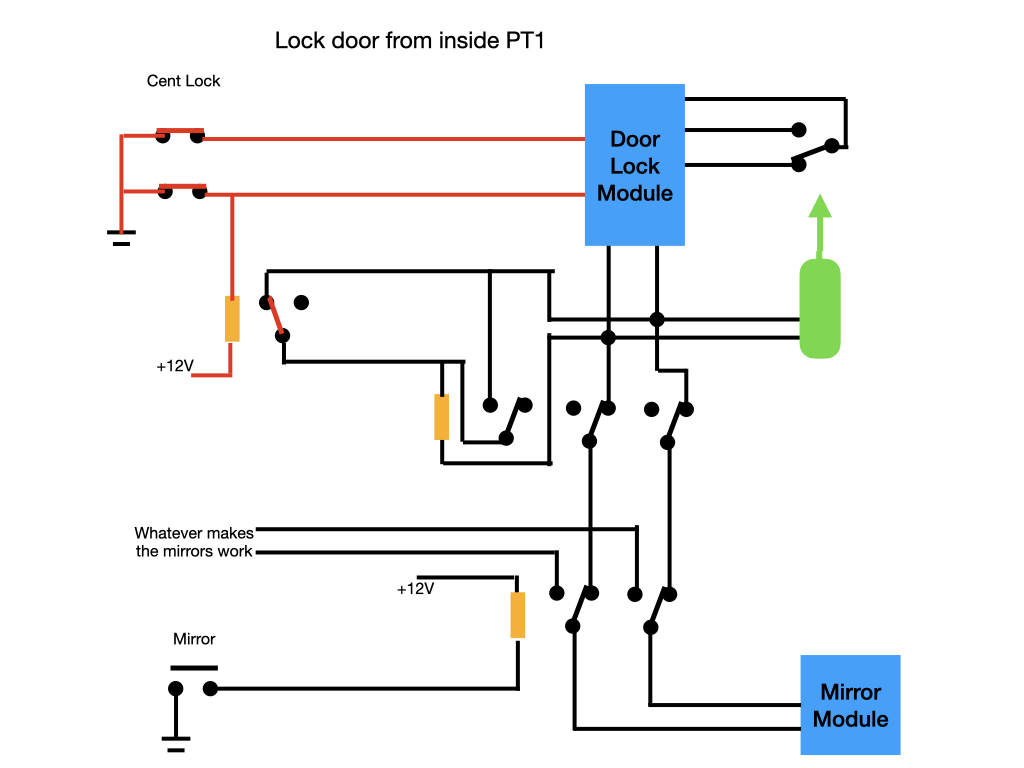 When you push the button it fires the door lock module in the normal way. But it also operates the relay on the left side of the picture. 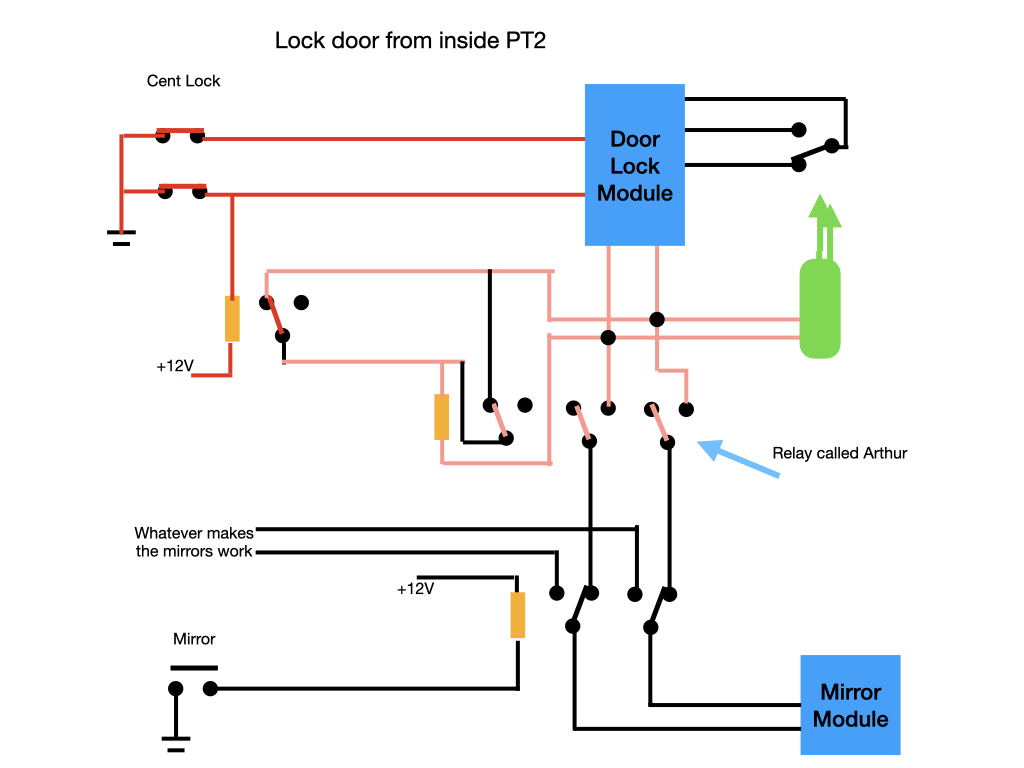 A moment later the door lock controller applies power to the door motors. Because that relay clicked over in the previous step it also applies power to a relay we will call ‘Arthur’. Arthur disconnects the door controller from the mirror module. This is the bit that might not work. Arthur has to disconnect the mirror module before it has time to react. It’s a bit of a race but if the mirrors work the way I think it should do that. The only way to find out is to try it. Now the problem from last time. What happens when you let go of the button in the car? 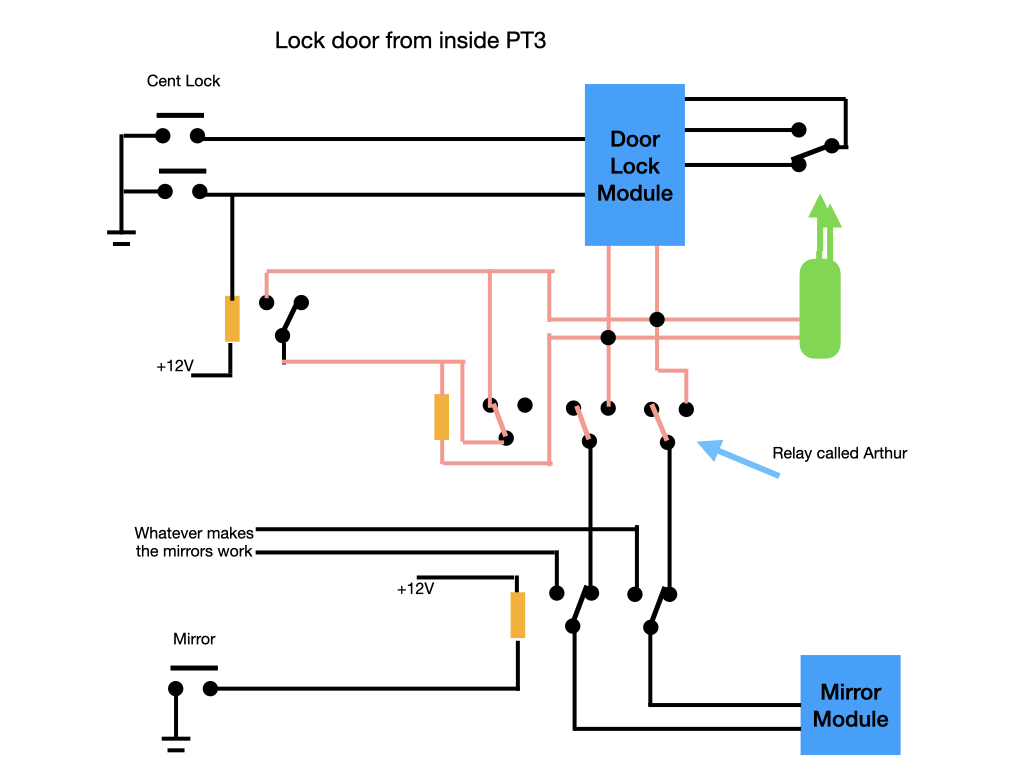 When you let go of the button the left hand relay drops out and in theory so would Arthur. Except… A third contact in Arthur takes the place of that relay that dropped out and holds Arthur on. In effect Arthur has latched itself on. It will only drop out when the door controller removes power from the door motors. Because Arthur needs to be a 3 (more likely 4) pole double throw relay it probably means you can’t use a standard automotive relay. And there is the question of whether Arthur is fast enough to stop the mirrors operating which you’d have to test by experimentation. But on the plus side this is only 3 relays rather than the 4 of the last idea that didn’t even work. So I’ve saved you a relay. Isn’t that nice of me? Alex, I know you have decided it’s not worth the bother and I’m not trying to change your mind. But if you think this might be worth an experiment one day then I’d be happy to help from a safe distance. And you never know, the idea of self latching relays might prove useful to somebody else doing something else. James |
| |
|
|
eurogranada
Europe
To tinker or not to tinker, that is the question...
Posts: 2,556
|
|
|
|
Thanks sweetpea! I love how tenacious you stuck with this problem! Yes, I had sort of decided to keep it simple and stupid by now, but I must admit to being intrigued by the above. I must admit that the complexity is above my normal level of comprehension on car electrics. But I have a friend who's much better at this than I am. I'll ask him to help me see if the above is something we could test. Only fear I have now is that it might not get done in the timeframe I have left (or set myself) seeing I have to source one of those 3/4 pole double throw relays. Anyway, I'll point my friend to your explanation and see what he thinks given his knowledge of the control units and mirror relays as they are now. I'll do my best to give it a try! |
| |
|
|
|
|
|
Apr 19, 2023 17:49:54 GMT
|
|
Getting somebody else to look over it would be a very good idea. Even then I doubt this would just work. These things never do.
I think you could have problems with the relay 'Arthur' not cutting the mirrors off fast enough.
I don't know how your mirrors work but I think you may need another CL controller to drive them. And that will probably lead to another problem if the doors are unlocked but the mirrors are in. If the two controllers are out of sync what happens if you lock the door from outside? You need the mirrors to stay where they are but you could wind up with them motoring out. Or trying to motor even further in.
And there is the very likely possibility that I've just missed some situation where this doesn't work.
A few years ago I wanted to make the headlights brighter on the MR2. They were switched on the earth side via a long wire skinny wire to the switch in the car. So I figured I'd put a relay at the lights and give them a big fat earth. Easy right? Yeah... I hadn't considered how the high beam warning light in the dash worked. Took bloody ages and several goes before I got that to work. Even now I can't remember what devious plan I came up with to get round the problem.
James
|
| |
|
|
|
|
|
|
|
Nice that you are moving on! I get a feeling that what you want the locks and mirrors to do, could be accomplished with a small computer like an arduino board. But I have no knowledge of actually doing that... But it sounds like some and/or/if/else/then programming could work :-) As for the rubber grommets - some of my customers use different drive shaft boots and steering rack boots, usually cut down to size. The may need a flange around the hole to be secured but often it can look good. Places like Autotoc have the option of searching parts without deciding on a car/model, you can just browse the images to find something that looks useful (and cheap). Or this one; size.name/enIt can be really useful for finding "things". Like CV joint boots based on dimensions. Gustaf |
| |
|
|
eurogranada
Europe
To tinker or not to tinker, that is the question...
Posts: 2,556
|
|
|
|
I’ve been quiet for a bit. But I’ve been doing a little when and where I could in the past weeks. The result is that most systems are now back in the car. I spent way too much time on the separation of mirror and lock workings….and it is the only thing keeping the dash and therefore the interior from being buttoned up. I managed to buy some stuff to do the separate mirror and lock control. I thought I’d buy a second control unit for central locking, and I thought why not ad a control unit for remote operation that is supposed to work with the other unit (or cars that have central locking but no remote). Well the new stuff arrived and the units individually worked. I could also get them to work together, but with a strange phenomenon occurring. When working solo the central locking module worked a treat. The momentary switch thing was working also. The other unit when connected to the motor also did what it had to do, lock and unlock the doors and flash the lights to confirm the operation when the remote buttons were pressed. But this unit did not have a provision for the momentary switch. Putting these systems together, the remote activated the motors perfectly (from it’s own relays, but also the CL module relays). But, the momentary switch action from the CL module was suddenly weak. It wouldn’t move the actuators fully any more. So combining these two was not very successful. Somehow the circuit is then compromised. Now I had wired up the CL to test and it worked for a bit, then smelled bad and broke. The supplier couldn’t send a new unit and offered a discount on a new purchase instead. After a WTF moment I initiated a full refund. Meanwhile I tried using the old CL module to control the mirrors. However, without the window motor attached, the momentary switch operation went south. It probably couldn’t complete the circuit without it. I tried a window switch from a ford scorpio and found out how to get it to work. I needed a central earth and then each wire that would normally go to the momentary switch, went on the pin corresponding with the push on the button up or down. I got the mirrors folding like that on command. Press up and it opens, down and it folds closed. That was not exactly what I had wanted, but without the motor that was how it was going to have to work. Having plenty of those window switches I was ok with using one. However, these are supposed to light up and I cant get it to do so. At least not with my current use of the pins which functions for this use. So does anyone now what pin does what in this switch: 95BG-14529-AB as displayed below? 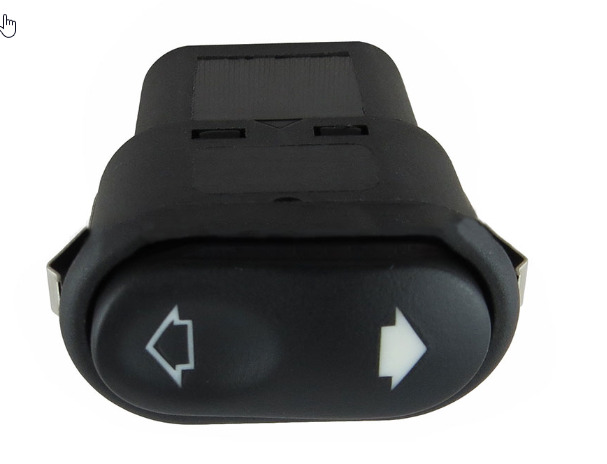 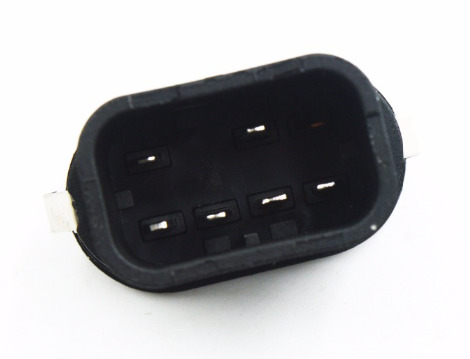 Anyway, I now had a decision to make. I’d like to keep the operation of the systems similar. So now the one system needed a two way toggle switch, I’d like to get the locks working the same. However, with the (now broken) type of CL module, it works with a momentary push button switch. And the remote unit which also worked individually, had no provision at all for a switch. Now I thought, the remote triggers the circuit to be operated, so if I can open up the unit and “read” and measure the board, I should be able to find which pins I need to manually activate to add a switch… However, I wasn’t. I found the earths on the relays, I found the pins that would get activated and signals the locks, I found the 12 volt feed(s). Strangely for me however there was a 12 volt feed on 3 of the pins. So how is the relay/are the relays triggered then? I just couldn’t figure it out. I’d hoped I’d be able to trigger the open and close actions with a toggle switch so it would be a matter of adding two identical switches to the console. But I’m stuck there. Here's the unit open and explained (maybe someone smarter than me gets it, lol): 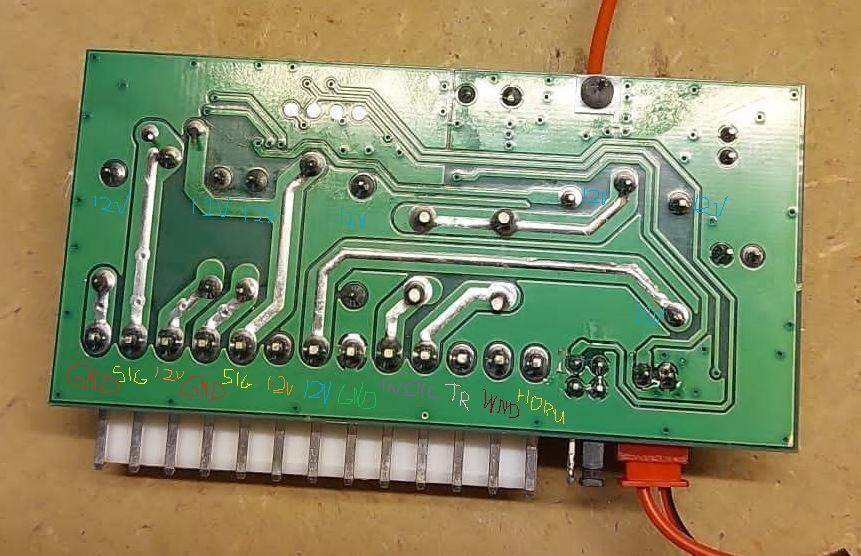 GND, signal close, 12v direct to relay, GND, signal open, 12v direct to relay, 12v for board and other relay (indicators) and the other legs of the two relays, GND for board, 2x indicators, trunk signal, window close signal, horn signal. 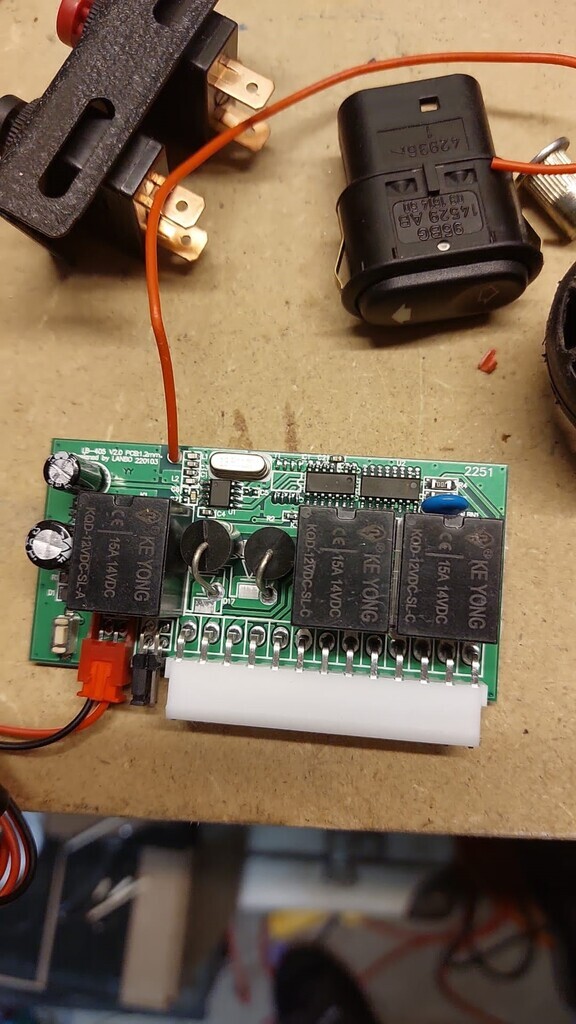 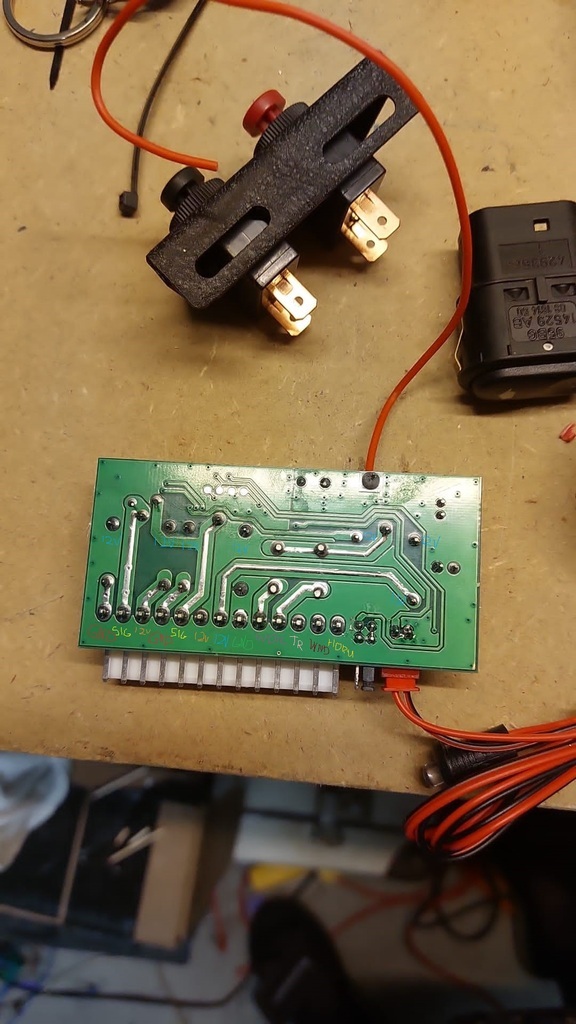 So now there’s a choice: 1. I can buy a new CL module and use that only. This gives me momentary switch trigger and also all doors unlock on manually opening one door. 2. I can not buy anything anymore and just use the remote operated unit. This gives me remote opening, closing of door locks, blinker indication, horn indication if desired, and a trigger wire to also open the trunk remotely. Opposite to these extra’s is the fact that opening the door manually does not trigger the other lock and there’s no switch to manually operate the locks. Well, you can press the button on the remote as the unit does not take into account that the car is running or not. Trouble is, in my head it just isn’t right and also it’s easier to locate two identical switches in a logical fashion than one. So what decision do I make? I’m currently thinking of installing the remote only unit. And putting it in a relatively accessible space so when I have more time someone can help me figure out if a switch can be added. Just so I can build up the dash and finish the car. The only additions to make are the extension of the original lighter circuit for the rear seat phone chargers and the audio installation. The audio is something I want to improve upon but find difficult given the ancient components I want to use. I have a Pioneer DEH-P80MP head which is just magnificent. I have the voice controlled 12cd changer which is possibly on the way out, but might also just need a clean. I have modified the IP bus cable to incorporate a switch to accept the outputs of a Bluetooth car kit. But this Bluetooth quality I find severely lacking when compared to the cd player. So I want to use another. I could buy an IP bus ready Bluetooth module for cheap, but that would mean losing the cd-changer for sure. Any device that either gives an old Pioneer Ip bus head unit an extra input is either extinct or expensive to find. I could do with a CD-BTB200 or possibly a CD-RB20 to achieve what I want, but both are unobtanium or ridiculously expensive for a secondhand old device (but mostly unobtanium). So what is wisdom?? Alternatively I could buy a decent Bluetooth adapter/receiver with cinch connectors that I can hook up to my modified IP bus cable. I need to decide these things so I can at least try and button up the dash and interior. Thanks for continuing to follow my ramblings. |
| |
|
|
mk2cossie
Club Retro Rides Member
Posts: 3,064  Club RR Member Number: 77
|
|
|
|
Do you have electric windows in the coupe? If so, would it be easier to incorporate a later style Ford window and mirror switch? The mirror joystick on those has a function to fold just the mirrors in without affecting the locking  And also, and pictures of the back of the head unit? (Or do you know if it can have control of more than one changer?) |
| |
|
|
eurogranada
Europe
To tinker or not to tinker, that is the question...
Posts: 2,556
|
|
|
|
Do you have electric windows in the coupe? If so, would it be easier to incorporate a later style Ford window and mirror switch? The mirror joystick on those has a function to fold just the mirrors in without affecting the locking  And also, and pictures of the back of the head unit? (Or do you know if it can have control of more than one changer?) Thanks for thinking with me. I'm not sure I fully understand where you're going, so I'll just respond to what I think you mean. Yes I have original Granada electric windows in my non electric window car. They currently work on old fashioned window switches without lighting and I'm probably keeping it that way for now. I'm using the more modern window switches for the opening and closing of the mirrors, which I got to work, but I'd like to get the lighting working as well and I didn't manage that. But I don't know what you are thinking the benefit would be of using even more modern window switches? All I've seen basically seem to have the same or even more contacts. The newer style joystick in itself doesn't help as the way it works is given by what circuitry is behind it. It is basically a momentary contact switch. As I don't have the matching system behind it, it won't help me. I've looked into this as my daily has one of those joysticks. In the old setup before giving the mirrors their own control box, that type of joystick could have triggered the control unit but as it was hooked to both locks and mirrors it still would have triggered both. Now they are seperated and the control unit can't work with a momentary switch input anymore as the lock motor it is designed for is no longer present it wouldn't work either. I could have bought a universal mirror control unit which might have accepted the momentary push button switch type, but they were harder to find and the vendors I found didn't inspire too much confidence. But I'm not complaining about how it all works now at all, I just would like to get the light in the switch to come on with the lighting of the car. My head unit only supports one IP bus input. Like most I've seen. Which is why Pioneer back in the day had the cd-btb200 en cd-rb20 modules to give you an official aux/Bluetooth option. But these are rare now and if you do manage to find one they are expensive beyond reason. In my current setup I got round this by using a 12 contact toggle switch that litterally switches between the sound outputs of the original pioneer lead and an added set of cinch connectors. It works but the unit on the cinch connectors was troubled by what seems to be alternator interference and the bluetooth sound quality"in itself was lacking. I've since looked a bit harder but apparently other people didn't have my desire or problem with only one input as there seem to be no aftermarket solutions to adding a second. Or my googlefu is weak. Current thinking is getting a nicer bluetooth device that has cinch connectors so I can hook it to my home made contraption. I can always revisit later, but for now I'd like to finish the job and start enjoying the car. |
| |
|
|
|
|
|
|
|
|
Oh blimey!
I need to have a proper read of your post and I'm not sure I have the brain power at the moment. Give me a day or three and I will.
James
|
| |
|
|
mk2cossie
Club Retro Rides Member
Posts: 3,064  Club RR Member Number: 77
|
|
|
|
eurogranada my thinking was that it may be easier to have the central locking activate the switch, and the later model switch to enable mirror folding when locking/unlocking, but also the ability from the switch to fold just the mirrors when needed. Unless I misunderstood, then ignore my ramblings  For what its worth, with regards the head unit...I had a similar issue in mine, but with Kenwood. I have both a 10 disc CD changer, and 3+1 MD changer, Bluetooth and ipod connectivity! But none of the latest head units have changer control 🙄 So I am slightly tied in to a set era of headunit, and the price penalties that come with that. There are a few of the Bluetooth modules you mention on ebay, but they are over £100 🤯
|
| |
|
|


