alx
Club Retro Rides Member
Posts: 367
Club RR Member Number: 21
|
|
Aug 15, 2013 14:09:56 GMT
|
I'm also going to make clear covers to go over the headlights with custom chrome surrounds to hopefully really finish the front end off. I know this is from a loooooong way back in the build but I've only just read through it all (awesome BTW) but I was wondering how you were going to make some plexi glass covers? I'm in need of similar plexiglass covers for the front end of my RX7 but they're either rocking-horsee-poo rare or ridiculously expensive to get made when I've enquired. I did toy with the idea of moulding some myself but so far lack of talent trumps good ideas  Keep up the amazing builds, it's better than discovery channel. AL. |
| |
|
|
|
|
alx
Club Retro Rides Member
Posts: 367
Club RR Member Number: 21
|
pair 5x100 16" steelsalx
@alx
Club Retro Rides Member 21
|
|
|
|
I'll have 'em then.
If you pm me your details I'll PayPal it across.
Cheers
AL.
|
| |
|
|
alx
Club Retro Rides Member
Posts: 367
Club RR Member Number: 21
|
pair 5x100 16" steelsalx
@alx
Club Retro Rides Member 21
|
|
|
|
Would you courier these?
I'm after a couple to make up a full set.
Cheers
AL.
|
| |
|
|
alx
Club Retro Rides Member
Posts: 367
Club RR Member Number: 21
|
|
Nov 11, 2012 17:08:55 GMT
|
|
No response to me.
I've sacked it off and bought some carriers elsewhere.
AL.
|
| |
|
|
alx
Club Retro Rides Member
Posts: 367
Club RR Member Number: 21
|
|
|
|
|
Any prices yet?
AL.
|
| |
|
|
alx
Club Retro Rides Member
Posts: 367
Club RR Member Number: 21
|
epic banded steelsalx
@alx
Club Retro Rides Member 21
|
|
|
Two mongs don't make a right.  LOL....Quote of the week. Liking your work Mr. Core ;D AL. |
| |
|
|
alx
Club Retro Rides Member
Posts: 367
Club RR Member Number: 21
|
|
|
|
|
Hi there,
Does your V6 have the 312mm front discs and calipers with carrier?
If so, what kinda price for the front pair of calipers/carriers and discs, posted?
edit: Just realised, only need the carrier and discs (if there's any life left in them). My calipers on the MK4 are the same as yours. Price for carriers if you'll part them out??
Cheers
AL.
|
| |
Last Edit: Nov 7, 2012 10:26:58 GMT by alx
|
|
alx
Club Retro Rides Member
Posts: 367
Club RR Member Number: 21
|
|
Oct 27, 2012 17:54:12 GMT
|
|
Any centre caps with these?
AL.
|
| |
|
|
alx
Club Retro Rides Member
Posts: 367
Club RR Member Number: 21
|
1964 Ford Cortina 2 dooralx
@alx
Club Retro Rides Member 21
|
Sept 13, 2012 8:13:02 GMT
|
No tina fans here then ?  I'd bookmarked this, cool old car + lots of choppy choppy and buzz buzz = what's not to like ;D I like how people go about the restos in there own way and it's nice to pick up tips. This is gonna look very nice once done I reckon, keep up the good work dude. AL. |
| |
|
|
alx
Club Retro Rides Member
Posts: 367
Club RR Member Number: 21
|
|
Sept 5, 2012 10:35:35 GMT
|
I stayed around for most of the Sunday, just checking out details on cars and trying to get photographs that weren't rubbish (and failing). So here is a quick selection of my favourite cars (having seen them all multiple times!) : Nothing says SERIOUS RACE CAR like being made entirely out of carbon fibre:  IMG_7121 IMG_7121 by RetroSceneMag, on Flickr Is this an RX7??? Cos that is HARD AS NAILS!! AL. |
| |
|
|
|
|
alx
Club Retro Rides Member
Posts: 367
Club RR Member Number: 21
|
Japanese Toolsalx
@alx
Club Retro Rides Member 21
|
|
|
JIS screwdrivers and screwdriver Bits are going to be some of the first items I will sell, as there near impossible to get here, i'm sure anyone who has worked on a Japanese car knows all about them (there the reason so many crosshead fasteners on Japanese cars are rounded off, as JIS is a bit different from Philips or pozidriv) That explains a lot. Always wondered why the phillips 2 heads were just a bit too big or face angle too steep to fit into the screws in my J cars. Good to know, and I would probably be up for a few of the drivers as they look decent and would prevent rounding out the crossheads. AL. |
| |
|
|
alx
Club Retro Rides Member
Posts: 367
Club RR Member Number: 21
|
|
|
|
THAT IS FIRKIN AWESOME  My uncle had one of these in the 80's and it was awesome then, now they just look immeasurably cool. I would love one of these, but 4 cars would probably end with me missing bits of my 'bits' that I'm quite attached to ;D Free bump to a lovely motor. AL. |
| |
|
|
alx
Club Retro Rides Member
Posts: 367
Club RR Member Number: 21
|
MX5 parts all £10 or lessalx
@alx
Club Retro Rides Member 21
|
Jul 25, 2012 11:52:30 GMT
|
|
Moneys boshed across to you ;D
Cheers
AL.
|
| |
|
|
alx
Club Retro Rides Member
Posts: 367
Club RR Member Number: 21
|
MX5 parts all £10 or lessalx
@alx
Club Retro Rides Member 21
|
|
|
|
Postage for the clockspring to CW8 please?
Ta
AL.
|
| |
|
|
alx
Club Retro Rides Member
Posts: 367
Club RR Member Number: 21
|
|
Apr 14, 2012 21:13:58 GMT
|
They're the ones I've got and the only bit I haven't checked yet is: g) The compressor has not been unloaded and there is
back pressure on the piston. Dismount and check
unloader valve (fig. 9). The back pressure may be
due to a leaking non-return valve causing the
compressed air in the receiver to leak back into the
compressor motor. Dismount the non-return valve and
clean or change O-ring (fig. 10).AL. |
| |
|
|
alx
Club Retro Rides Member
Posts: 367
Club RR Member Number: 21
|
|
Apr 14, 2012 21:07:34 GMT
|
|
Tried on-line and found some stuff on the Jun Air site with some parts diagrams which give exploded diagrams and some initial troubleshooting tips but nothing too helpful.
It looks to be a horizontal piston so it'll be a case of properly taking the guts out of the motor casing as all you can see with the head off is a bit of side support and some springs.
Cheers
AL.
|
| |
|
|
alx
Club Retro Rides Member
Posts: 367
Club RR Member Number: 21
|
|
Apr 14, 2012 20:43:48 GMT
|
Hi All, I'm hoping there's a compressor guru among us who can help me please. I got given a Jun Air compressor years ago and it's just sat in the cellar doing now't since. I do know it used to work as I switched it on at the time and air was duly compressed and puffed out of it. Exhibit 1  I think it's a 6-15 model (6 is the motor type and 15 is the receiver size in litres) I've decided it was time have a look at it but it's not playing ball. The power light comes on when the switch is thrown and it does a bit of humming and then the thermal cut-out seems to shut things down to protect it. Anyway, here's how the investigation went 1. Yes, it's got oil to the correct level 2. took the head off the motor casing and nothing looks goosed, and that's my technical appraisal ;D 3. There seems to be a helluva lot of sloshing about going on in the receiver so I took off a valve and emptied the contents into a tub Exhibit 2 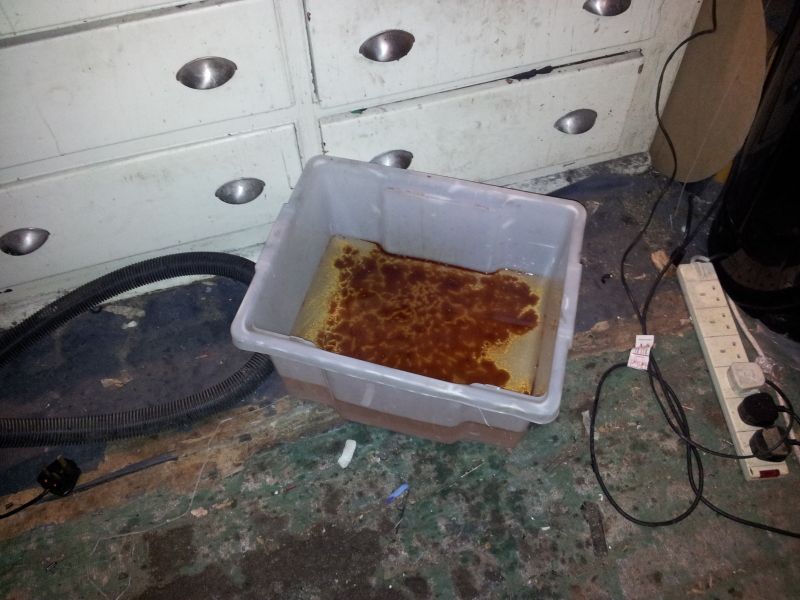 What looks and smells mostly like water with a fair amount of lube oil in it, now floating in the tub. Must be about 5 to 10 litres of the stuff!! Question - Should a receiver have all this in it or is it condensate that's sat in there for ages? OK, so there's the history now can anyone point me in the general direction of how to get the bloody thing to 'compress air' like it's supposed to and not just be a rubbish humming paper-weight (although it excels at that cos it's bloody heavy) Cheers AL. |
| |
|
|
alx
Club Retro Rides Member
Posts: 367
Club RR Member Number: 21
|
|
|
|
if your following the indtructions rght, you shouldnt need to hold it as its contact adhesive so grabs upon contact with the other surface. spread the glue thinly and evenly on both surfaces, wait for to dry then push together. I use the solvent brushable version for kitchen worktop edgings and its instant if you allow both surfaces to dry before joining them, if you rush it and push them together before the solvents dry out it takes ages to dry (but may be different for fabrics) Agreed, contact adhesive does grab when you wait for both sides to dry but it doesn't reach full strength straight away. For an edging on a worktop this probably isn't a problem as it's not a great deal of weight but with a large headliner I think that gravity would be working it's naughtiness on it before the glue is at full strength. I reckon you're best bet is a compilation of all the recommendations above and go for: 1. Damn good prep and clean of the areas 2. Glue up both surfaces and wait to dry as per instructions 3. Lob the headliner up and smooth into all the corners etc. 4. Get some form of propping-up device set up that spreads a nice amount of pressure over as big an area of the headliner as possible and leave for 24hrs if you can. 5. If that don't do it, concede defeat and retire to the pub. AL. |
| |
|
|
alx
Club Retro Rides Member
Posts: 367
Club RR Member Number: 21
|
|
Jan 31, 2012 12:33:51 GMT
|
|
Might be worth 'propping' something against the headlining to keep it in place whilst the glue cures.
Dunno how you'd do it for a full headlining but some Heath-Robinson contraption consisting of broom handles, boards and cushions springs into my head.....maybe I've just got malaria ;D
HTH
AL
|
| |
|
|
|
|
|
|