|
|
|
Oct 12, 2021 17:15:58 GMT
|
Do you have, on your channel, a simple idiots’ guide to setting up a sewing machine and stitching something really basic? Hi, Ditto. Mum taught us how to do lots of household skills as children (Knit, sew, crochet cook and bake) but not keeping it up over time and her not being around for the last 10 years they have mostly gone now.  I bought a sewing machine a couple of years ago (Singer 99K) and tried to use it with not much success, so put it to one side. So a bit of a tutorial would be most helpful. Colin Edit: Must type faster. Thanks, I will go back a study that when it's a bit less manic here and/or quieter evenings. I just hope there's not going to be a test.  There are Youtube videos explaming setting the tension of these machines. yours is from around 1955. I have a Singer from 1935.which is a sewing machine without an electric motor. When i got it, i had to clean the moving mechanism but after that it worked like new. These machines are so well build and needles ect are still plenty to buy. These machines are capable of stitching almost everything. I made a new carperset for my Rover P5 and restitched the main seams on the seat and other interior bits like the headlining and a vinyl sunroof. I did not have any experience with sewing machines but was happy with the result although it took a lot of time. A fast industrial would have been to fast and these are fairly expensive to buy and i would not know if such a machine would be OK. I payed Euro 60,- for it along with an instruction manual from the 1930 s with lot of accesorries. It also had an Singer electric motor fitted afterwards. I got it working but its not so powerfull so i use the food and hand "power"

Peter
|
| |
|
|
|
|
|
|
|
|
|
|
|
|
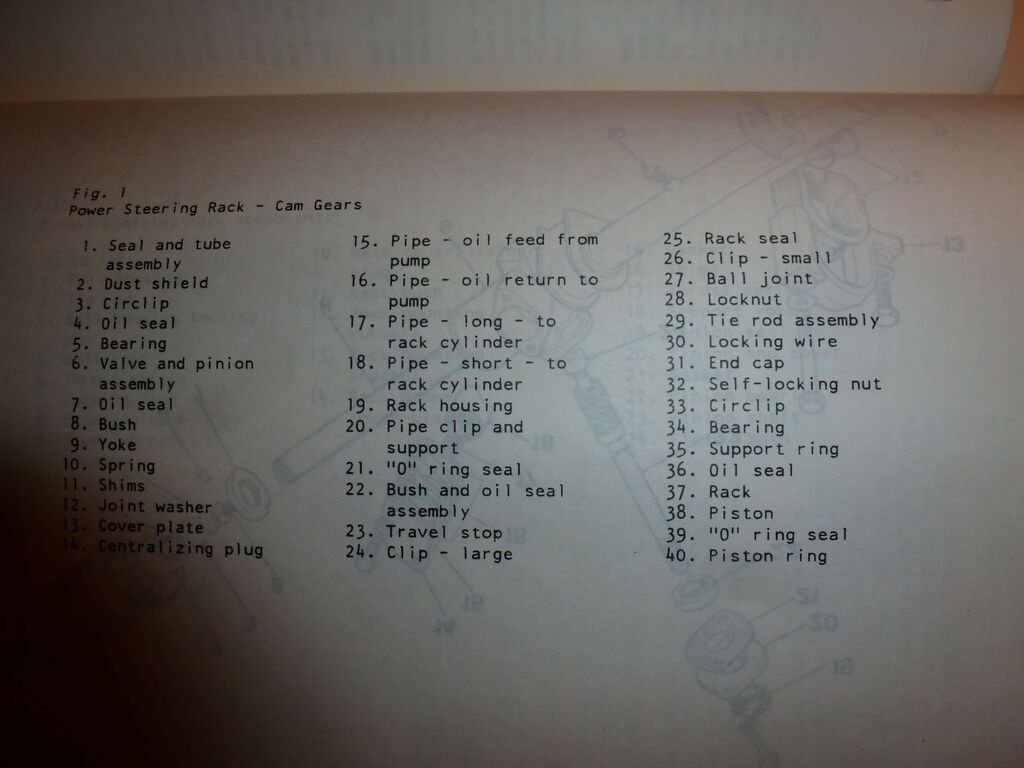
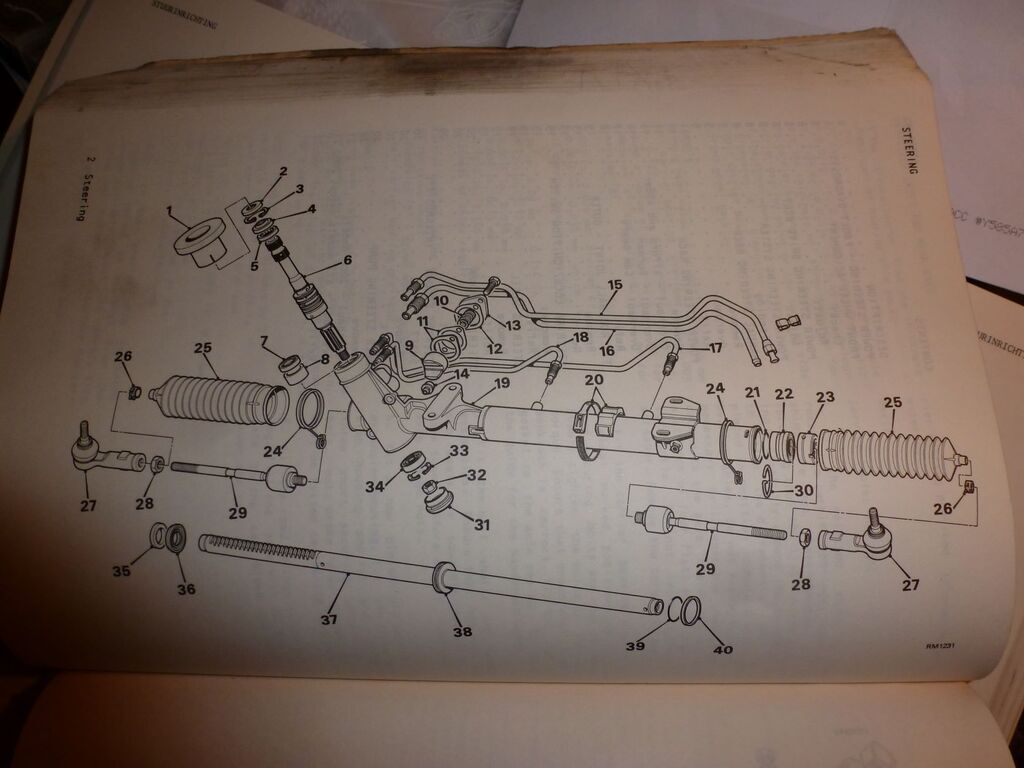
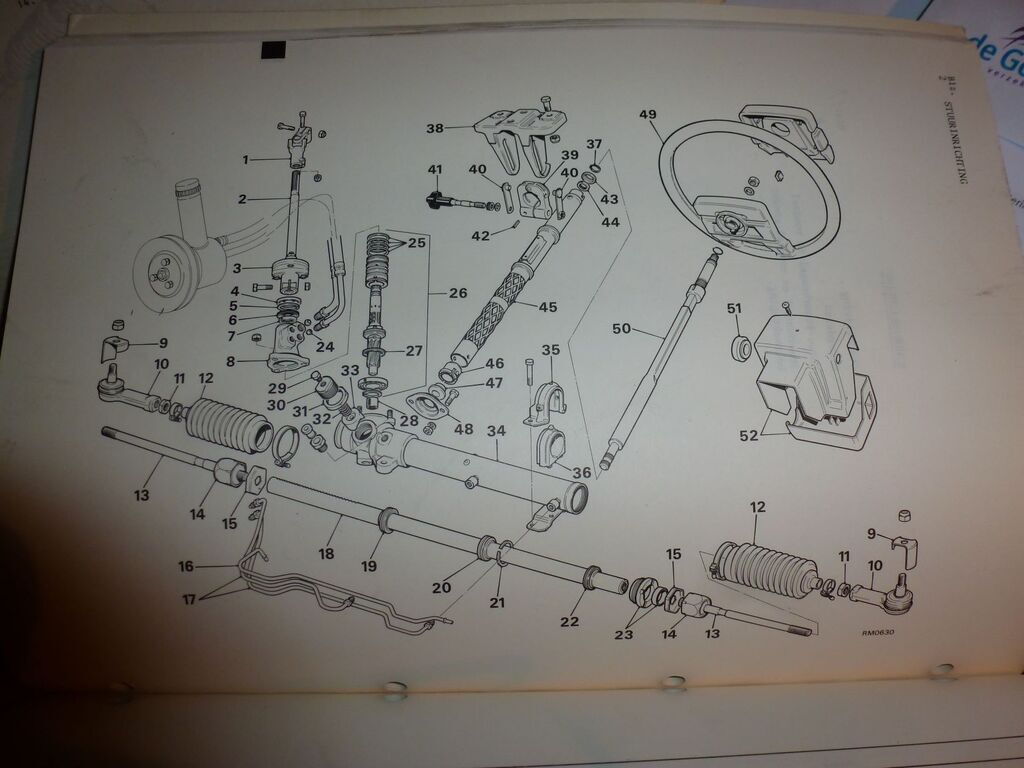
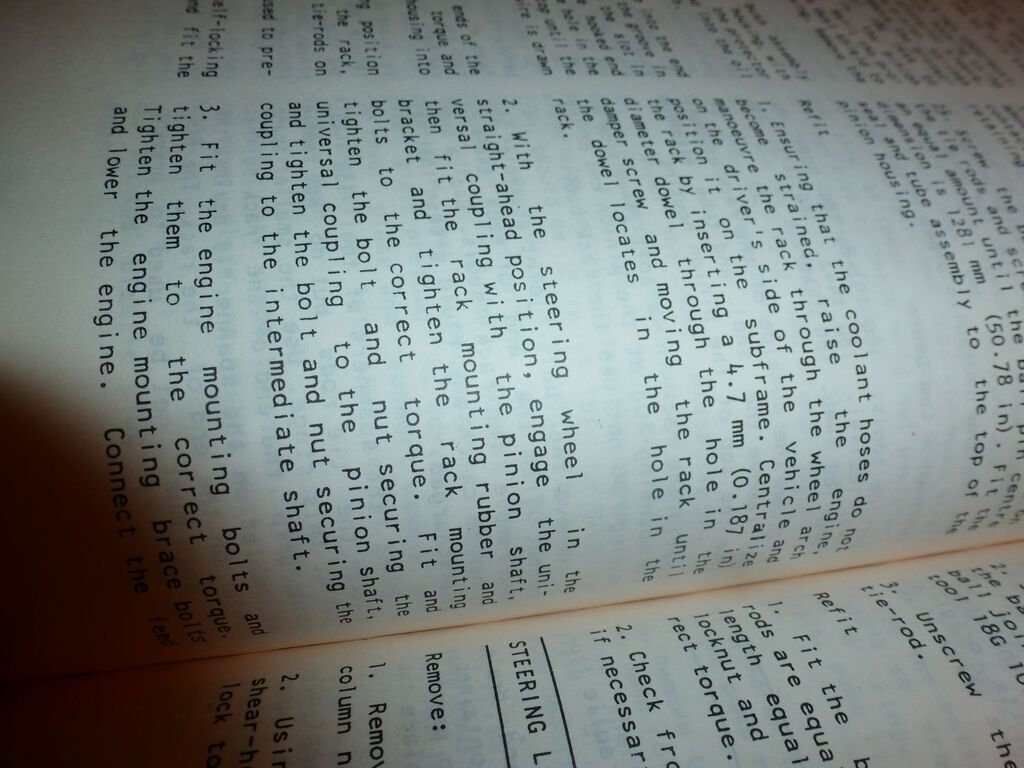
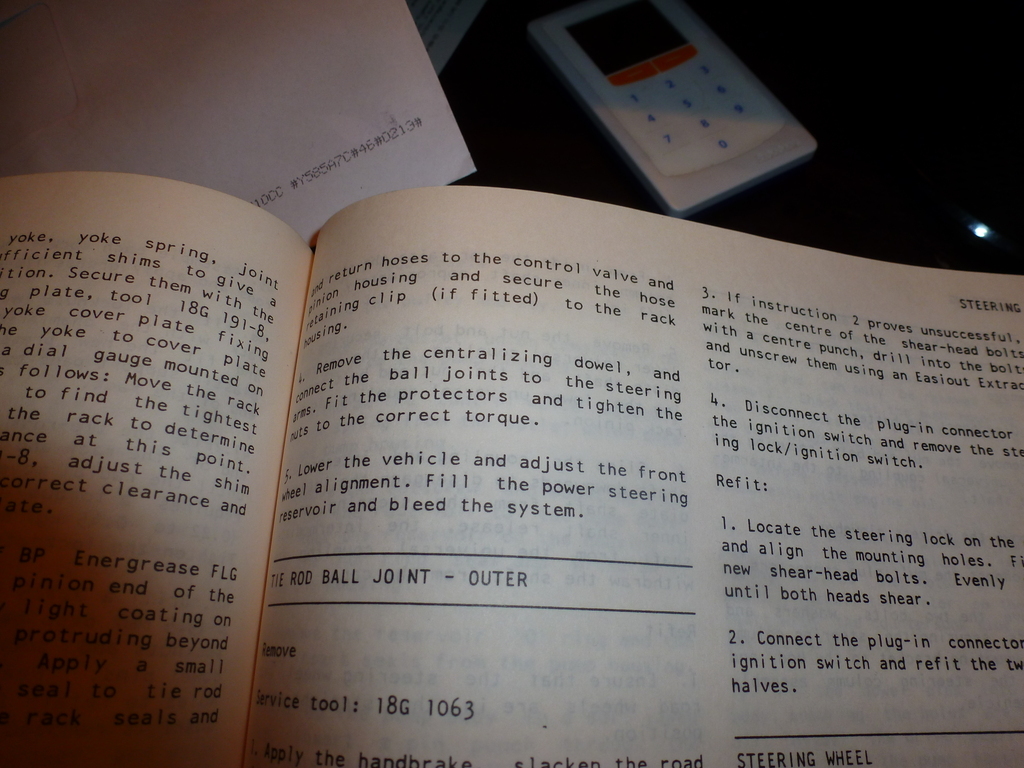
I was given a Rover SD1 workshopmanual (not the Haynes but the Rover one) in the Dutch language recently. The workshopmanual does not have the powered steering rack but i also was given an addition and this assition has an item on the 3500 powered steering rack with an overview drawing and advise how to remove it from the car. Sadly for you it is in Dutch.
I can scan rhe overvieuw picture or even the text which you could translate with google translate to Englisch.
Are these 3500 racks identical with the 2300-2500?
Peter
|
| |
|
|
|
|
|
Sept 30, 2021 13:19:49 GMT
|
|
Nice job! I did a V8 conversion on an MGB. On the SD1 gearbox cross member there is a big bolt with a rubber bush to stop the engine rotating on acceleration. I did not use this but the engine rotated a fair bit so later i modified the cross member by adding the bolt and rubber bushing. You can also fit a bar between the engine and front inner wing to stop this
Keep up the good work! Nice color by the way
Peter
|
| |
|
|
|
|
|
Sept 30, 2021 13:13:20 GMT
|
More sanding and more filling. 430 hours Congrats with the show win. We discussed it before how time consuming such a resto is. 430 hours and a fair bit to come. The owner should raise a statue for you
Peter
|
| |
Last Edit: Sept 30, 2021 13:13:46 GMT by petervdv
|
|
|
|
|
Sept 30, 2021 13:08:39 GMT
|
|
If you look for parts there is Jim who rebuild a police SD1 and also has a diesel SD1 and lots of spares. He is also on youtube as nitrosylvia and currently posts on you tube with rebuilding a V8 engine
These SD1 are very nice cars especially in the blue color. I bought one with a poor body as an engine donor for my MGB V8 but could not resist driving it for a few month before pulling the engine
Peter
|
| |
Last Edit: Sept 30, 2021 13:09:57 GMT by petervdv
|
|
|
|
|
Sept 24, 2021 22:09:24 GMT
|
|
i had simular exoerience with a Rover SD1 which i bought as an engine-gearbox donor for my MGB V8 conversion. The SD1 had a rusty body but the engine ran pretty well so i ran it for a few month. After removing and dismantling the engine i was quit surprised to find 2 cam lobes which were pretty much gone.
On your merc it looks pretty bad but the surface of the lobes and rockers is hardened and if this hardened layer is gone, the wear goes much quicker. I would not swap the head now. I would check first if the oil pressure is good because if the oil pressure is not good, the other head will wear rather quick.
Peter
|
| |
|
|
|
|
|
Sept 12, 2021 22:27:18 GMT
|
|
Nice job as usual!
|
| |
|
|
|
|
|
Aug 26, 2021 17:39:07 GMT
|
|
Another issue is that a 4ZF in a Rover is slightly rotated. If you use a 4ZF from anither brand, then because of the rotation, the dipstick will give a faulty reading. This can be solved with mounting a sump from a Range Rover but this is fairly deep so might be the lowest point which is not good
|
| |
|
|
|
|
|
Aug 26, 2021 17:36:07 GMT
|
|
I did 2 BW35 to 4ZFHP22 conversions on Rover P5B and the 4ZF is so much better then the BW35. When i drove the Rover at 120km-hr with the BW35, the engine revs were between 3500-4000 and these dropped with the 4ZF to 2500. Also the shifting is much smoother.
There are a few issues which can be solved but take time. I used the original Rover P5B shifter and had to change the "lock" mechanism in the shifter as the pattern was different and there is a forth gear. I also had to change the length of the bracket arms for the shifter and the kick down cable as these were different. It is a bit of a puzzle but doable. Then most 4ZF HP22 boxes have a electronic speedo so either you buy a module to run the mechanical speedo or you convert the speedo gauge. I bought a 4ZFHP22 from a LDV which is one of the few boxes with a mechanical speedo. The speedo showed a speed which was 30% lower then the actual speed so you need a small gearbox for the speedo cable. I did not do this because i had SATNAV in the Rover
Regards
Peter
|
| |
|
|
|
|
|
|
|
Jul 17, 2021 12:35:47 GMT
|
|
Sad news. Condolences and all the best!
Peter
|
| |
|
|
|
|
|
|
|
|
I fitted mine in the engine bay as there is with my MG no need for frequent adjustments. Once in a while with temperatures around 35 deg F, the fans need to come in a bit earlier
|
| |
|
|
|
|
|
|
|
|
|
| |
Last Edit: Jul 14, 2021 7:28:44 GMT by petervdv
|
|
|
|
|
|
|
I am not sure that there is no metal in the rim. I restore steering wheels and i have never done one that has no steel or aluminum in the rim. On some you can see it, on some you cannot. It is also possible that someone fitted the screws afterwards as where the spokes meet the rim is the weakest part of the wood and its often cracked there or loose. You actually do not need rivets or screws in your new steering wheel. I have restored steering wheels from 60 and 70 cars and originally only the 2 wooden halfs were glued together with woodglue and there was no bond with the metal. In todays world we have modern epoxy glues which bond the wood rim to the aluminum and no screws or rivets are needed. I only fit rivets to remain the original look but not for strength. The difficult part is making the wood rim. This is normally not made out of massive wood but with thin layers of wood wrapped and glued circular. For the aluminum, its best to use a aircraft grade aluminum with a 6... or 7... code. Its not easy to get hold of a small sheet of these types of aluminum. What i recommend is to contact a compagny that laser cuts aluminum and ask them to lasercut your design or buy a small sheet of aluminum from them. you can see examples on www.classicsteeringwheelrestoration.comRegards Peter |
| |
|
|
|
|
|
May 12, 2021 22:45:00 GMT
|
|
Nice job on the interior! The wood panels of this age discolour a fair bit when exposed to the sun. I did a few Jaguar XJ wood panels which had an amzing transformation. First you should check if it is real wood and not a kind of painted wood. Normally the coating is a polyester coating. You can sand it down with sandpaper and i advise you to do this by hand as the veneer is only 0,6mm thick. What also works is heating it up with a heat gun. The polyster wil crack and come loose from the wood. This should also be done with care not to burn the wood. Then you should lightly sand, If you take a rag with water you can get an idea how it lloks when clear coated. I see a rather big difference with the wood in the center console. You can match it with dyes before appying the coating.The coating, i start with a 2k epoxy (without solvents)applied by brush to fill the grains. After 2 or 3 layers, i sand it smooth with grid 200 followed by 400 and then spray paint it with a 2K clearcoat. It takes a fair bit of time to get a smooth surface but it looks so much better when done
Peter
|
| |
Last Edit: May 12, 2021 22:48:16 GMT by petervdv
|
|
|
|
|
|
|
|
Thorough job again on the wiring and nice attention to detail
Peter
|
| |
|
|
|
|
|
|
|
|
Nice job and great quality work. Your mate is very lucky with you spending so much time and doing a great job on his car
Peter
|
| |
|
|
|
|
|
Apr 11, 2021 13:56:38 GMT
|
|
Fantastic progress on the car!
I do not like shelves as all the dust gets on items on the shelf and its a lot of work to clean them. I have lots of steel cabinets which were all different color so the cabinets were all painted red which looks a bit more organised. Only ppainted the outside of the cabinets
Peter
|
| |
|
|
|
|
|
Mar 23, 2021 10:15:50 GMT
|
|
Yes undo the large nut. You can then remove the float bowl. The gaskit is a kind of large oring
Peter
|
| |
|
|
|
|
|
Mar 20, 2021 17:01:03 GMT
|
|
3 pin oil pressure sensors were used on Rover Sd1 and there is a pin for feeding an electric fuel pump. This meaans that the fuel pump is switched off when there is no oil pressure.
i believe during starting the engine, the fuel pump gets power from the ignition lock
Peter
|
| |
|
|


 I bought a sewing machine a couple of years ago (Singer 99K) and tried to use it with not much success, so put it to one side. So a bit of a tutorial would be most helpful.