vulgalour
Club Retro Rides Member
Posts: 7,088
Club RR Member Number: 146
|
|
Jul 20, 2021 10:15:33 GMT
|
|
I'm sticking to incandescent bulbs for these since that's what they were designed to work with and we'll be supplementing with some hidden high level LED lights so there's not really any need to put LED ones in the original fixtures. That also gets around any of the issues in trying to find the correct sort of LED bulb to work best in these fittings.
Not too fussed about fitting an extra reflector bowl at the moment, I imagine it must be do-able since you can get separate sidelight innards and the like. I suspect a reflector bowl might make a bit of a 'hot spot' visually rather than a nice diffuse glow, though I could only prove that suspicion by fitting a reflector bowl, of course.
|
| |
|
|
|
|
vulgalour
Club Retro Rides Member
Posts: 7,088
Club RR Member Number: 146
|
|
Jul 19, 2021 23:00:30 GMT
|
|
Opinion seems divided right down the middle on this one (offline and on) as to whether white or silver/chrome is best. However, since the reasons for using white offered are the same as Colin explains above, I'm inclined to think it's the better option. I also like the suggestion of painting each one a different colour and then testing them side-by-side so we can get a nice definitive answer. They are incredibly easy to wire up thanks to the sprung wire clamp fitting on the back so I can test them very easily off the car. I'll be sure to share the results once I've tried it so we can see what difference, if any, there is.
|
| |
Last Edit: Jul 20, 2021 10:10:34 GMT by vulgalour
|
|
vulgalour
Club Retro Rides Member
Posts: 7,088
Club RR Member Number: 146
|
|
Jul 19, 2021 19:28:22 GMT
|
|
These are indeed rear lights. I still have the good chrome paint from doing the instrument binnacle, it seemed slightly better than pure white for light output. I wasn't sure if there was a better colour for showing red than for showing white.
|
| |
|
|
vulgalour
Club Retro Rides Member
Posts: 7,088
Club RR Member Number: 146
|
|
Jul 19, 2021 17:56:38 GMT
|
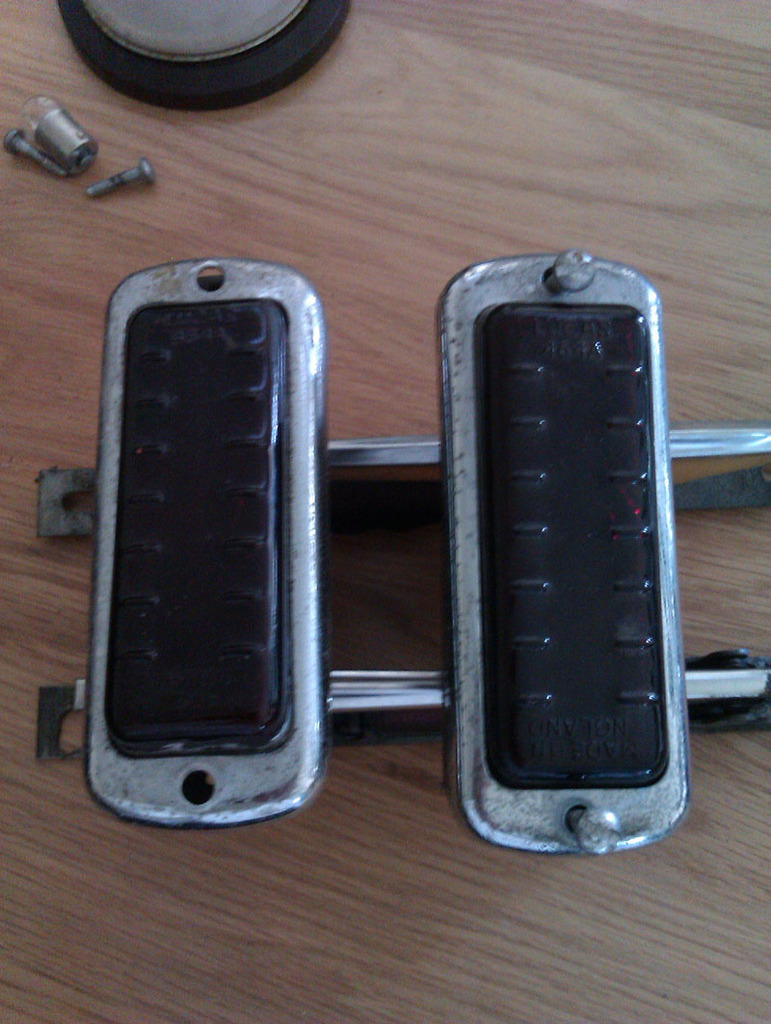  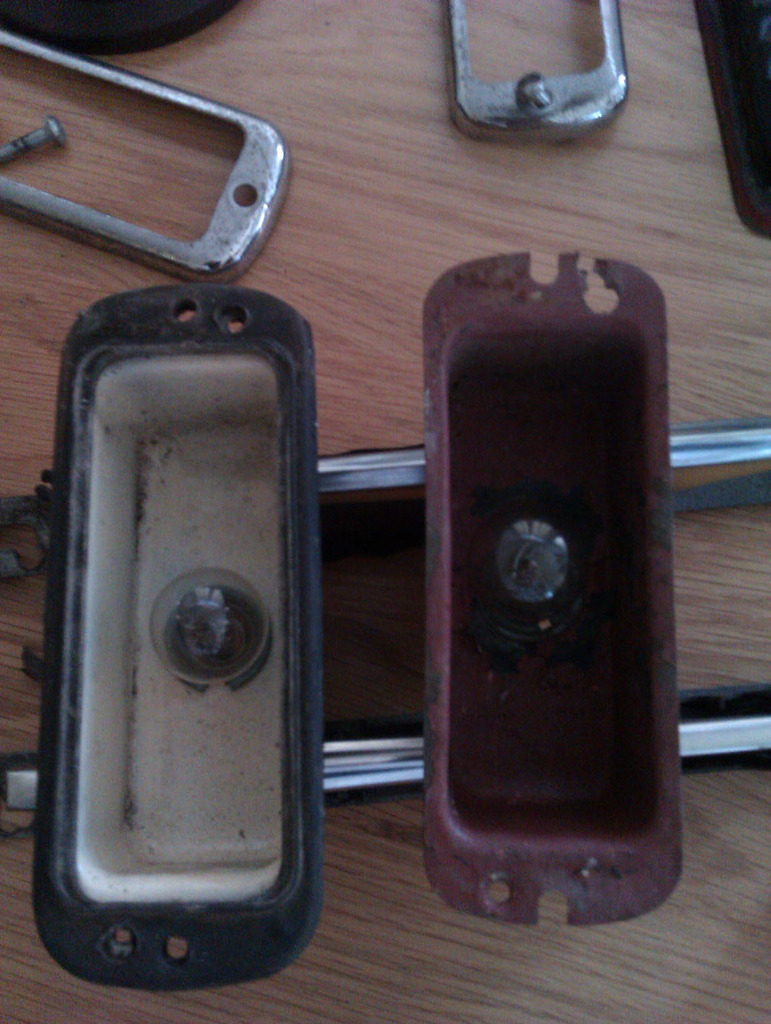
Unsure on which colour is going to be best to repaint the interior of these light units. They look to have originally been an off-white, a previous owner has repainted one unit in red oxide which is obviously pretty useless. Should I repaint the interiors in an off white, a bright white, a chrome, or something else? The colour of the lights comes solely from the red glass lens and I want to try and make sure there's as uniform a red light as possible.
Searches online for info about this just led to a lot of adverts for various light fixtures which wasn't particularly helpful.
|
| |
|
|
vulgalour
Club Retro Rides Member
Posts: 7,088
Club RR Member Number: 146
|
|
Jul 18, 2021 18:15:22 GMT
|
|
Foolishly spent the day doing more wiring removal. Semaphores, interior light, and brake lights now all removed. Bits of string hanging out of the headlining for routing the new wiring easier, and much learned about how things go together. It is possible to remove the wiring without removing the headlining, it's just also quite difficult. Am hoping I can get enough tension on the headlining fabric to re-tack it once the new wiring is in, there's not a lot to work with but the fabric isn't actually as brittle as feared.
The only bits of wiring to remove now is the run along the chassis, the tail going to the fuel sender, the brake light spur that runs across the bottom of the boot shelf (screws that hold the wire clips are properly stuck), and a few odds and ends under the dashboard that are still attached to the instruments. Feel like we've done the very worst of it now at any rate. Oh, and the stator tube wiring needs to be done too, ignored that one for today since I wanted to do something that was a slightly easier win.
The wiring doesn't come up the B pillar as expected, it actually runs along the chassis, up into the boot, back into the car via the driver's side C pillar, and then over the rear driver's door and across the middle of the roof above the headlining.
A rewarding, if slightly crispy, day's work at any rate and I feel a bit more confident about the bulk of the rewiring job.
|
| |
|
|
vulgalour
Club Retro Rides Member
Posts: 7,088
Club RR Member Number: 146
|
|
Jul 18, 2021 10:25:48 GMT
|
|
I had, and that's one of the methods attempted. Advice from another forum suggests the olive can sometimes cut into the stator tube if the nut is done up too tight and it's possible that is our issue. Solution: more hammer (with care).
|
| |
|
|
vulgalour
Club Retro Rides Member
Posts: 7,088
Club RR Member Number: 146
|
|
Jul 17, 2021 21:59:23 GMT
|
|
I can tell you it's a Bishop Cam steering box and the diagrams I have found don't show the wiring that goes down the middle, only the mechanical bits that surround it. On those diagrams I can't see anything obvious that would be causing the problem and I'd been led to believe that once disconnected where I have the whole unit 'simply pulls out into the car'. Which it doesn't. Even if I hadn't disassembled the control unit in the steering wheel hub you'd not really have any better purchase for pulling, and there's this sensation that it's hitting a stop somewhere when you try rather than it being a tight fit. It's like I've missed a grub screw or something of that sort somewhere, I was hoping removing the end plate would have released everything, or that it would have come off separately to the little screw thread bit in the middle but it doesn't appear to and with everything being made of things like cast iron and yellow metals I don't want to be applying too much percussive persuasion.
|
| |
|
|
vulgalour
Club Retro Rides Member
Posts: 7,088
Club RR Member Number: 146
|
Sew What? - Albion Chieftainvulgalour
@vulgalour
Club Retro Rides Member 146
|
Jul 17, 2021 14:15:58 GMT
|
Yes please to the chairs. We'll pass on the table as we're at capacity for those. The chairs not being carvers makes them a bit easier to store so that's neat. You're just for an excuse to come and do the Lanchester wiring for me  |
| |
|
|
vulgalour
Club Retro Rides Member
Posts: 7,088
Club RR Member Number: 146
|
|
Jul 17, 2021 13:20:16 GMT
|
Bit of pre-work tinkering and I've come unstuck, unlike the job I'm trying to complete. Should have been a simple one this, just removing the stator tube wiring. Should be a case of undoing the nut that the wiring goes through at the end of steering box, removing the olive behind, and draining the oil. Both the user manual and the online directions don't give any idea of how you drain the oil. There was no obvious drain plug. The olive was fixed very firmly in place and, since it seems to be brass, not something I wanted to apply any amount of force to in case I damaged it. After much deliberation, it was decided the best course of action was to undo the four bolts holding the end plate onto the steering box. This then released the SAE 140 oil messily as it started coming out of the top right bolt hole first and then all around the sealing edge. Allowed to drain, and expected the olive and wiring to now be free and easy to remove, or at least have enough play to slide the end plate down to see/remove any sort of retaining device. No such luck. You can get a few millimetres of play but there's a very obvious something physically stopping much movement in any direction, like there's some sort of retaining grub screw I've missed somewhere. Again, rather than force anything I've left the oil to drain and will reassemble just so we can get the car back in the garage. Without the end plate bolted on the steering wheel can't really do anything and we can't exactly leave the car sat stuck half in half out of the garage overnight. For illustrative purposes, some photographs. If anyone can see what I might have missed here, or know what else I should do, please let me know. It's going to be something obvious, I just can't see it. 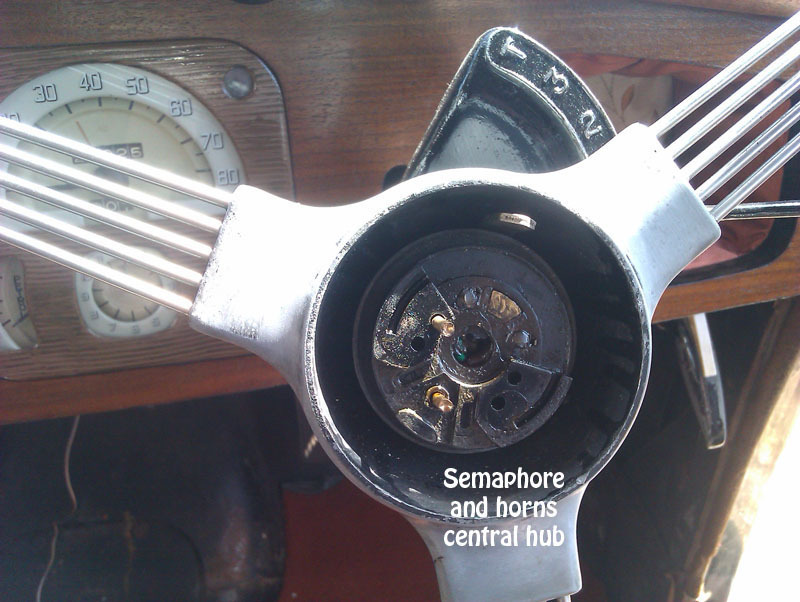 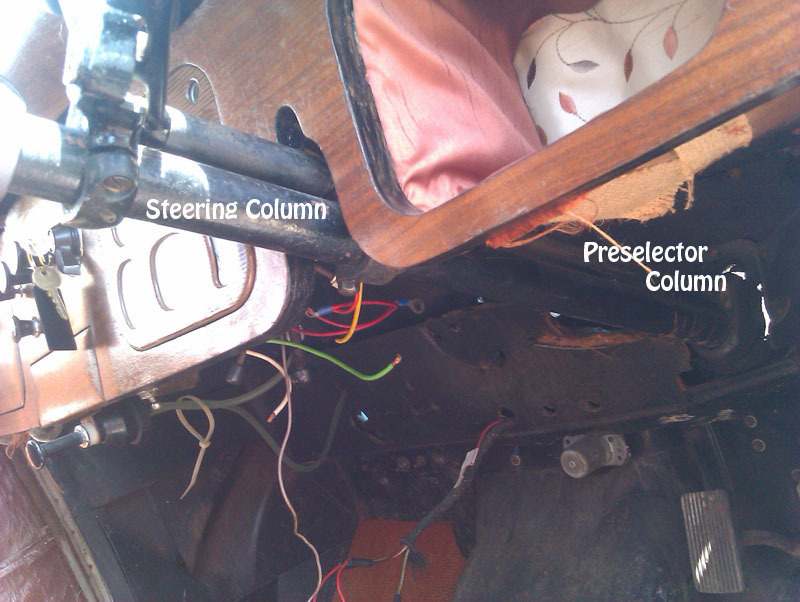 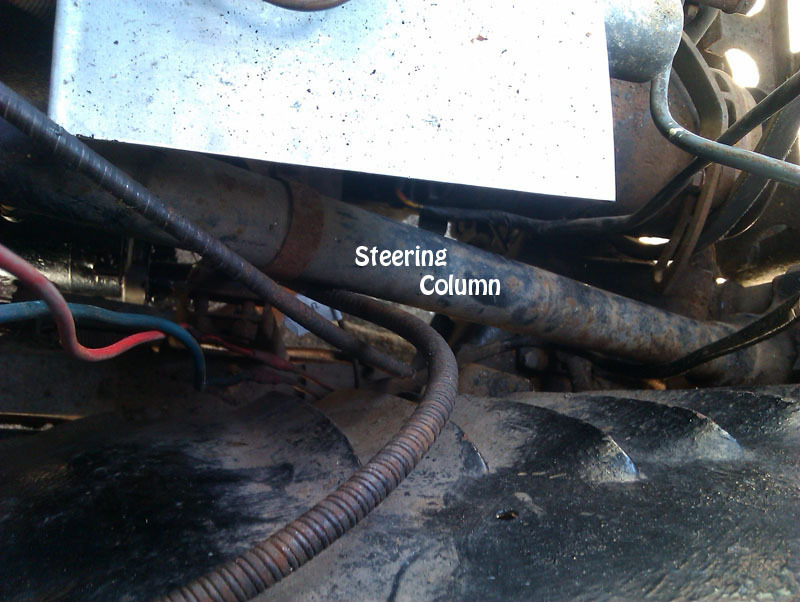 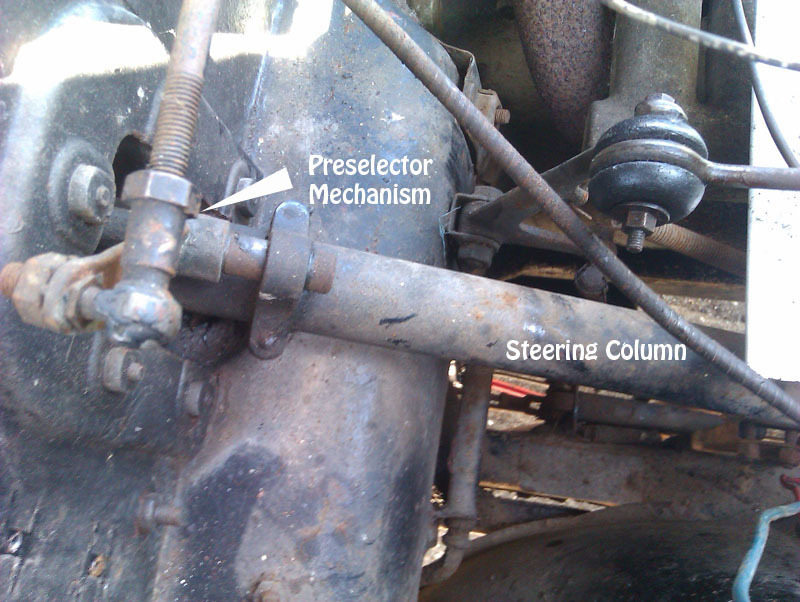 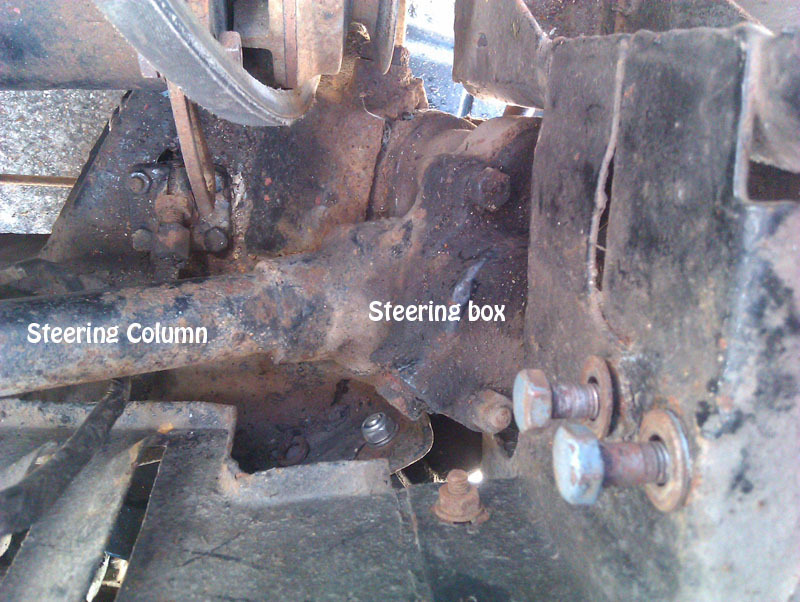 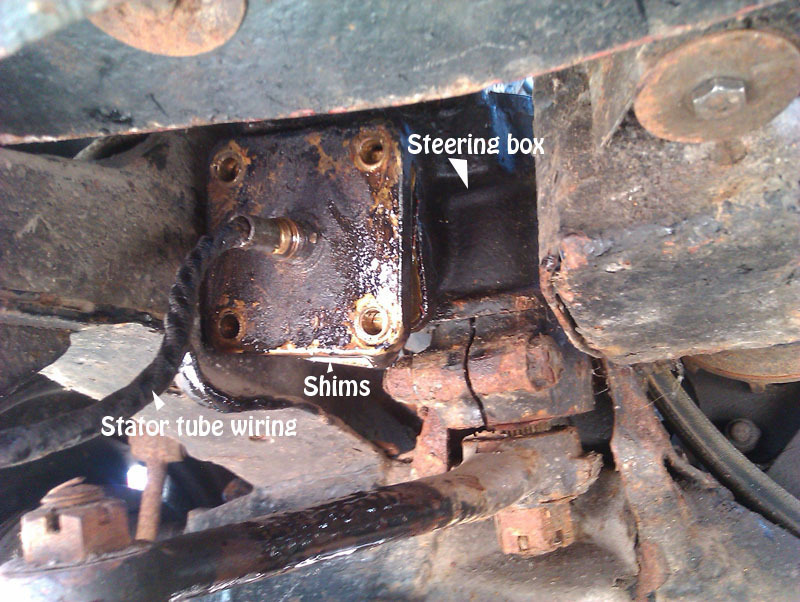 |
| |
Last Edit: Jul 17, 2021 13:20:44 GMT by vulgalour
|
|
vulgalour
Club Retro Rides Member
Posts: 7,088
Club RR Member Number: 146
|
Sew What? - Albion Chieftainvulgalour
@vulgalour
Club Retro Rides Member 146
|
Jul 17, 2021 13:05:54 GMT
|
|
I'm going to give that a provisional yes please, I do like the opportunity to do a bit of downcycling.
|
| |
|
|
|
|
vulgalour
Club Retro Rides Member
Posts: 7,088
Club RR Member Number: 146
|
1981 Eriba Tritonvulgalour
@vulgalour
Club Retro Rides Member 146
|
|
|
|
You could Briarwood the Eriba instead of painting it, then it'd match your new amazing Jeep Briarwood.
|
| |
|
|
vulgalour
Club Retro Rides Member
Posts: 7,088
Club RR Member Number: 146
|
Sew What? - Albion Chieftainvulgalour
@vulgalour
Club Retro Rides Member 146
|
Jul 16, 2021 20:17:00 GMT
|
Surprise find today, spotted a couple of chairs with a FREE sign on them. Thought they might be good as garden chairs until I got a proper look at them. 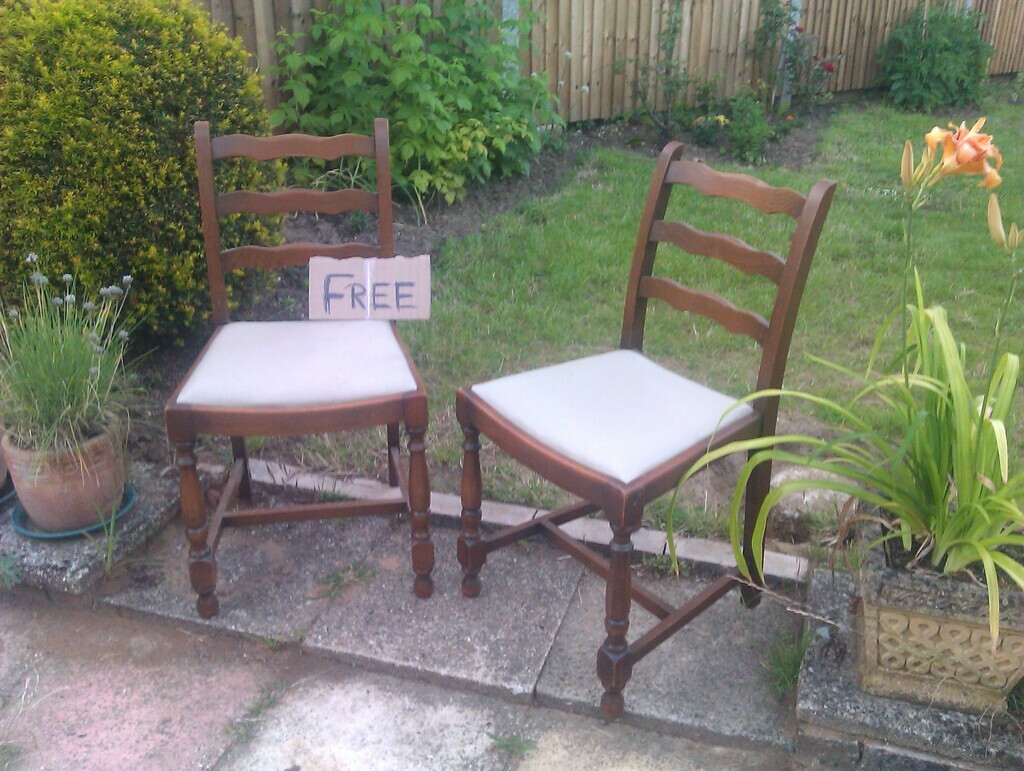 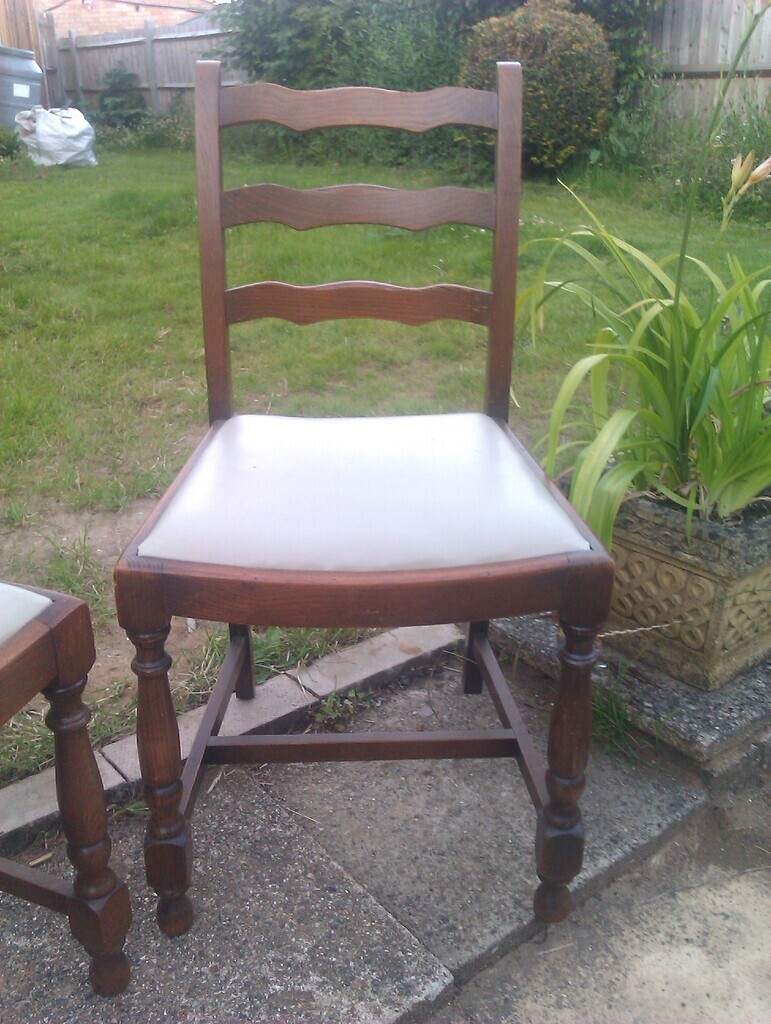 Not sure on the date of them, they're a bit 1970s Jentique looking. There might have been cloth or velour on the seats if they are from that era. The seat backs look a bit too modern to be 1950s so I don't think we missed out on any brown leathercloth for the Lanchester interior bits that are missing and need remaking. 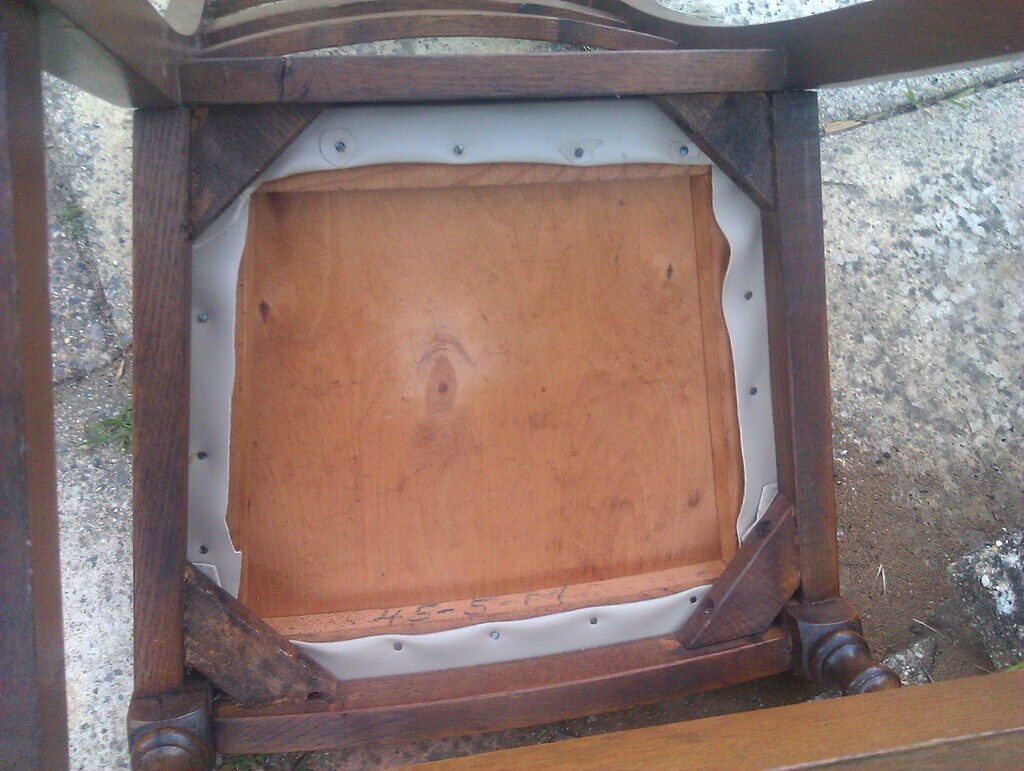 A nice solid pair of old chairs at any rate, that are actually pretty comfortable too. Might recover the seat bases in the future, not really a fan of the beige vinyl, but they'll do just fine for now. |
| |
Last Edit: Jul 16, 2021 20:18:02 GMT by vulgalour
|
|
vulgalour
Club Retro Rides Member
Posts: 7,088
Club RR Member Number: 146
|
1981 Eriba Tritonvulgalour
@vulgalour
Club Retro Rides Member 146
|
Jul 16, 2021 19:22:33 GMT
|
You could just two tone the Jeep to match, how hard can it be to mask off, it's all straight lines. |
| |
|
|
vulgalour
Club Retro Rides Member
Posts: 7,088
Club RR Member Number: 146
|
1981 Eriba Tritonvulgalour
@vulgalour
Club Retro Rides Member 146
|
Jul 16, 2021 13:05:59 GMT
|
|
That gold doesn't look too terri... oh no, the spat. Maybe that's how it was applied? A nice burnt orange would be just the ticket to replace that gold, match the seat covers.
Watching with interest. Always good to see old 'vans resurrected smartly.
|
| |
|
|
vulgalour
Club Retro Rides Member
Posts: 7,088
Club RR Member Number: 146
|
Sew What? - Albion Chieftainvulgalour
@vulgalour
Club Retro Rides Member 146
|
Jul 15, 2021 15:26:28 GMT
|
|
Tricky bit is finding a suitable carpet for it. All the stuff I have at the moment is too stiff, you want something with a good bit of mobility to it while also being a nice tight tufted weave. A carpet bag has actually been on the long term list for a while, the right carpet for the job hasn't crossed my path yet.
As an aside, carpetbagger is one of those words with some interesting history attached to it, worth doing a quick Wikipedia read if you're curious.
|
| |
|
|
vulgalour
Club Retro Rides Member
Posts: 7,088
Club RR Member Number: 146
|
|
Jul 15, 2021 14:57:06 GMT
|
Got the wiring all laid out. This gives you some idea of what we're dealing with. The black bits are the original wiring, all the colourful bits are what's been put in. I'll be making another diagram to understand this a bit easier, looking at it, the wiring diagram, and the new harness I can't really make this match up with what it's supposed to do yet. Some of the confusing bits make sense where new wire has been spliced in, but not all of it. Everything is labelled at least, and having it out of the car will make it easier to decypher. The wiring for the generator and starter motor are still in the engine bay, they weren't part of the loom and instead were two newer wires that were connected separately so it was easier to leave those in the car for now and we can remove them when the new harness goes in. Same for the wiring that goes up the column, that had been split at the steering box so it was easier to disconnect the bullet connectors, label it, and leave it in place for now. What's really confusing matters is the wiring from the voltage regulator to the white connector block that was attached to the bulkhead, that seems to have muddled up some of the connections so while everything did work (bar the brake lights on the pedal and the interior light) it doesn't seem to have been wired as per the original to achieve that. 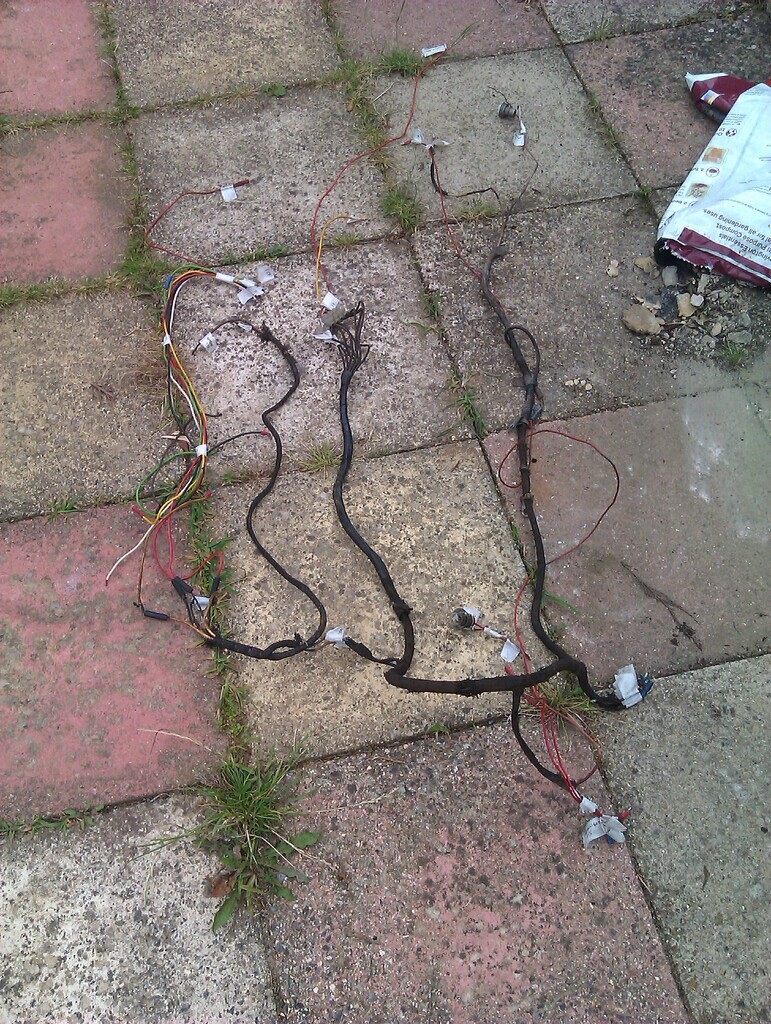 |
| |
|
|
vulgalour
Club Retro Rides Member
Posts: 7,088
Club RR Member Number: 146
|
|
Jul 15, 2021 14:18:14 GMT
|
|
Noted. All of the old wax capacitors are going to be replaced, it's still running what are presumably the originals from 1948 and while there was no sign of leaks or bulges when I was doing the cleaning, there might be now. Only had the unit running for a few minutes, didn't push my luck. Next step is to acquire all the new bits its likely to need and get on with replacing things before testing again.
In other electrical news, today the last of the engine bay wiring was removed. The repair work done in the past has muddied things a lot, we need to go through and work out what's actually been done so we can understand it a bit better. The best news is we've finally found the route the wiring takes to the back of the car. The reason we couldn't find the wiring before is that it is quite well hidden unless you know where you're looking. With all the new stuff out of the engine bay we could actually see where the original wiring disappears into a boxed section of the chassis and could then find it underneath the car where it reappears in an open section of the chassis and runs to the back of the car. This probably means the wiring branches off at the B pillar on the driver's side for the semaphore, goes up to the interior light (which has never worked while we've had the car) and down to the other semaphore. In theory, we should be able to attach string or similar to the passenger side semaphore wiring and the interior light wiring to pull the old wires through and then feed the new wires back in without disturbing the headlining at all.
We've also found more and more problems with the old wiring as we've removed it from the car. It really does seem like it's the failing wiring that took the car off the road more than anything else, clearly someone has gone to a lot of effort to keep things going, it just wasn't enough as the old wiring continued to disintegrate.
|
| |
|
|
vulgalour
Club Retro Rides Member
Posts: 7,088
Club RR Member Number: 146
|
|
Jul 14, 2021 23:41:16 GMT
|
Remember this? 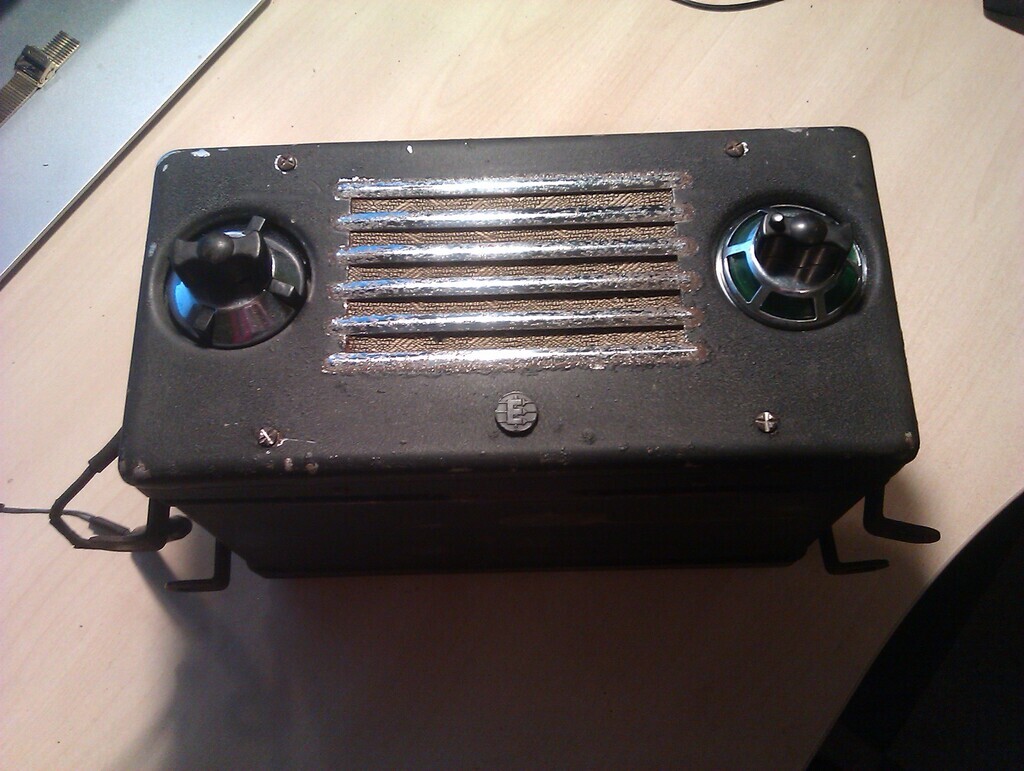 Had some time after work today to quickly hook it up to a power source to see what it does. The unit buzzes, which suggests the vibrator is vibrating, and the buzz quietens down as everything warms up. One tube I could see glowing through the case vent (I didn't take the case off for testing, I will for next time) so power is getting to at least one tube. However, with no aerial hooked up and not knowing what else does and doesn't work, that's as far as I got. No smoke, no horrible smells, nothing getting hot so it will probably be able to be revived. The selector doesn't illuminate either, but that could be a blown bulb or attention to the wiring required, we'll find out when I dig deeper into it. I feel a bit more confident digging into it now at any rate. |
| |
|
|
vulgalour
Club Retro Rides Member
Posts: 7,088
Club RR Member Number: 146
|
Sew What? - Albion Chieftainvulgalour
@vulgalour
Club Retro Rides Member 146
|
Jul 14, 2021 23:37:45 GMT
|
|
I have actually been trying to find some suitable fake sheepskin to make some front seat covers for the Lanchester. As yet, I haven't been able to find the right sort of thing, I'm being very fussy on how the fur looks and feels, it has to look right and that's tricky because I'll only know it's right when I see it. I'd like to have a go at a motorbike seat cover at some point, they look nice to do, but motorbikes and I don't really get along.
|
| |
|
|
vulgalour
Club Retro Rides Member
Posts: 7,088
Club RR Member Number: 146
|
Sew What? - Albion Chieftainvulgalour
@vulgalour
Club Retro Rides Member 146
|
Jul 13, 2021 23:45:01 GMT
|
Really difficult to film/photograph curtains due to exposure. Just a couple of snapshots from the video for you. 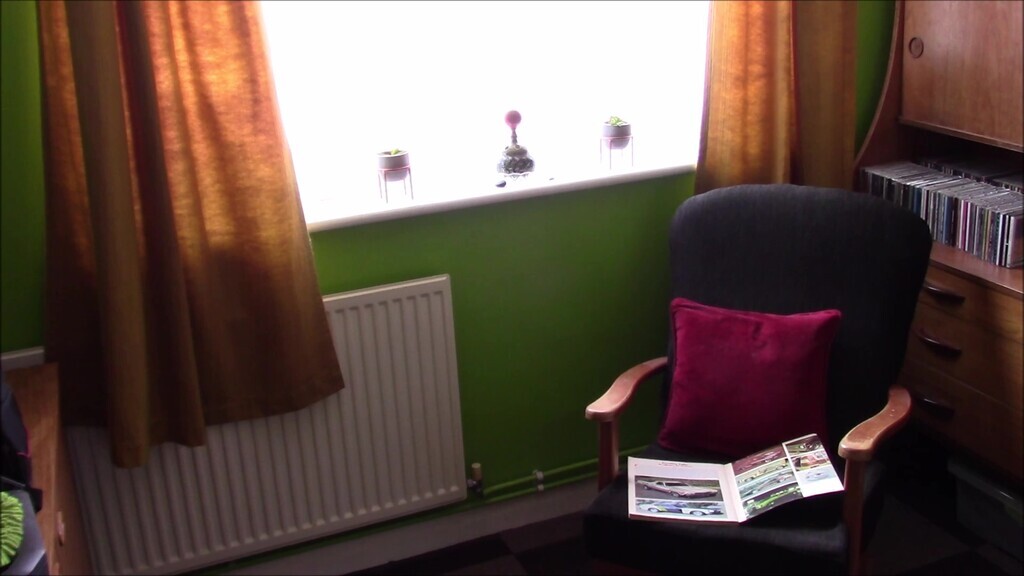 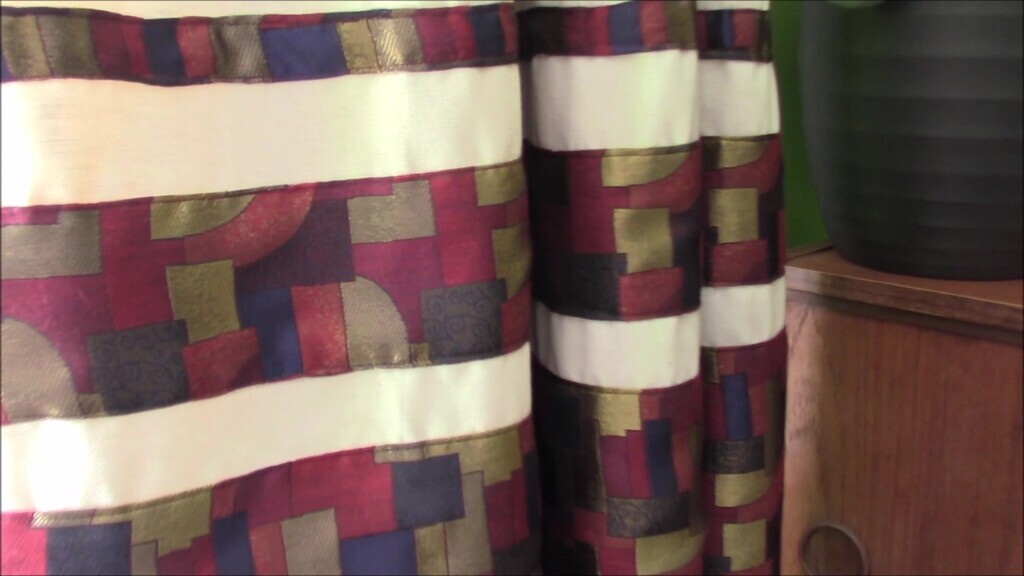  In no particular order, projects currently in the works are: - Tool roll - Table drop leaf repurposing - Simple summer top - Office chair cover - Waistcoats, including drafting and altering your own pattern - Pullover, specifically copying and making a replacement for one that's falling apart. - Shopping bags. Ages ago I made some shopping bags out of fabric to replace a bag-for-life. The resulting bag has been more durable than any of the bag-for-lifes we've got so I should definitely put a how to together for that since it has proof of concept now. - Oak drop leaf table restoration There's more stuff I want to do, just a case of finding the time. Suffice to say we're not short of content here and it's going to be a good mix of useful stuff. I'm also always open to suggestions for things you'd like to see and know how to do, if it's something I can provide info on through a video of my own, or someone else's, I'm happy to do so. |
| |
|
|
|
|


