vulgalour
Club Retro Rides Member
Posts: 7,108
Club RR Member Number: 146
|
Sew What? - Albion Chieftainvulgalour
@vulgalour
Club Retro Rides Member 146
|
Aug 24, 2021 17:32:45 GMT
|
|
The 99K is very similar to the 201K I use and is one of the best beginner machines out there. Really great parts support and lots of coverage on how to set them up, particularly since they have a following in the US which always helps with old tech.
The trickiest thing to set up is usually the tension. A bit like welders, once you find a setting that works for most of the things you do with the machine you don't really touch it again. The two settings for tension are usually a screw on the bobbin shuttle (the bit that goes underneath the machine and holds the thread), and a dial on the front of the machine (or side, or top, depending on the machine). You want the thread to pull through freely with just a little resistance as a base line and then fine tune based on what you're sewing from there.
Too much tension and the thread will snap, too little and it'll go loopy or one thread will just pull out as though you hadn't sewn anything at all. The tension is usually the thing that makes setting up a nightmare, it's a bit of an art. Once it is set, generally sewing is then trouble free, except for when it isn't.
|
| |
|
|
|
|
vulgalour
Club Retro Rides Member
Posts: 7,108
Club RR Member Number: 146
|
Sew What? - Albion Chieftainvulgalour
@vulgalour
Club Retro Rides Member 146
|
Aug 24, 2021 17:04:13 GMT
|
|
For setting up the Singer 201K I use, I do cover that in the Victorian/Edwardian shirt. This should timestamp to the right point, if not skip to 5:45
As for simple projects, probably the simplest is the Chinos adjustment (with Jones Model 105 review, though I'm not sure if that covers setting it up too).
Most older sewing machines (pre-1980 or so) thread the needle from right to left. Newer ones tend to thread the needle left to right. Except for ones that don't. Most machines thread in an N pattern, imagine drawing the N from right to left. Except ones that don't. Realistically, setting up a machine depends on the individual machine, while there's commonalities, finding out what machine you have and then doing a search online for that should bring up a diagram etc. on how best to set it up. There's a lot of sewing machine videos out there on Youtube too covering everything from design aesthetics to full mechanical rebuilds, just a case of finding one that matches or is similar to the one you're having trouble with.
To add to the complication, sewing machines seem to have a rudimentary level of intelligence, rather like a cat, and will do their best to go wrong when you have a deadline looming only to be perfectly fine when you don't.
|
| |
|
|
vulgalour
Club Retro Rides Member
Posts: 7,108
Club RR Member Number: 146
|
Sew What? - Albion Chieftainvulgalour
@vulgalour
Club Retro Rides Member 146
|
Aug 24, 2021 15:25:34 GMT
|
|
It was going to be woodwork this time. Instead, plans got messed up so I diverted and did a Rainbow Goth thing. Simplicity 4219 is a nice quick easy sew, I can make one of these shirts in a day since they're not complicated. Great for if you're starting out in re-enactment, doing a bit of cosplay, or like a bit of alternative fashion.
|
| |
|
|
vulgalour
Club Retro Rides Member
Posts: 7,108
Club RR Member Number: 146
|
The RR Spotted Threadvulgalour
@vulgalour
Club Retro Rides Member 146
|
Aug 21, 2021 13:22:24 GMT
|
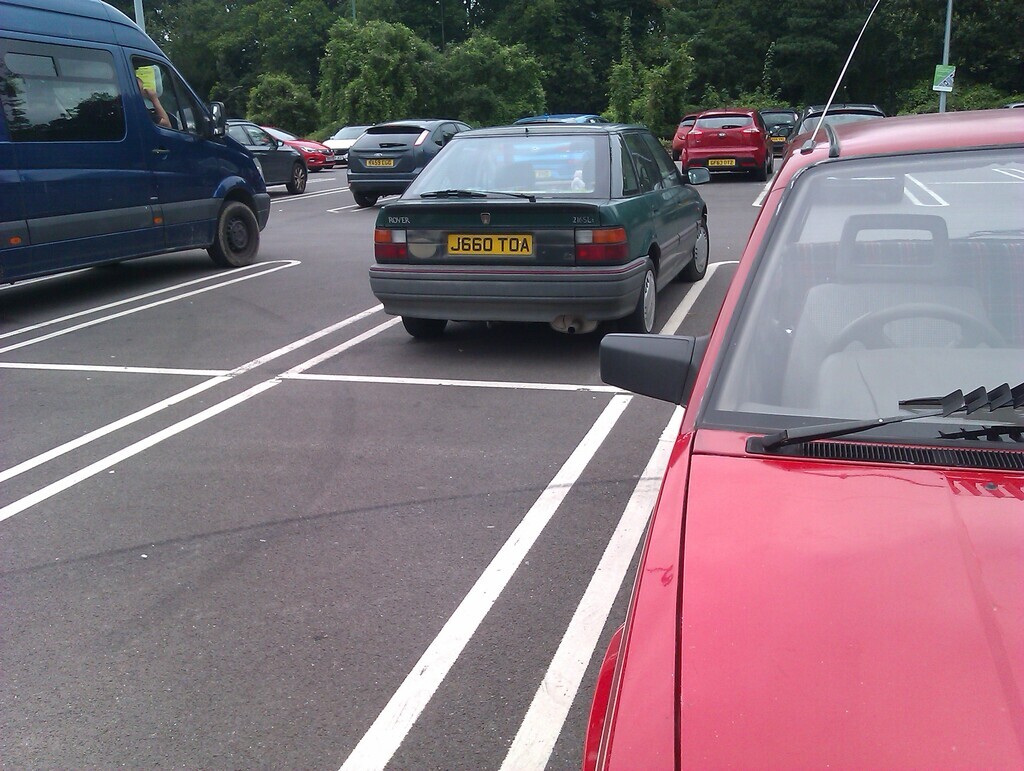
Look at this magnificent thing! Chance encounter on today's errands meant it ended up following me into the car park and we became neighbours. Best Land Rover I've seen all year.  |
| |
|
|
|
|
vulgalour
Club Retro Rides Member
Posts: 7,108
Club RR Member Number: 146
|
|
Aug 17, 2021 14:55:02 GMT
|
|
I'm well behind on the words and pictures updates now. Been struggling to find the free time for it, sorry about that.
|
| |
|
|
vulgalour
Club Retro Rides Member
Posts: 7,108
Club RR Member Number: 146
|
Slammed Austin Somerset?vulgalour
@vulgalour
Club Retro Rides Member 146
|
|
|
  Somersets are awkward to modify, which is why people generally don't. It's not impossible, they just don't like to make your life easy. Or so I'm told. This is second-hand knowledge so anyone that knows better please do correct me because I'd rather learn than work on assumptions. Here's what I've been told over the years: Engine - MG B performance upgrades are where it's at. B series is a pretty versatile lump and well catered to. Rear Axle - It's narrow for the size of the car and because of the rear arches, without modifying the arch opening, you have to keep it narrow. This also limits the size of the wheels you can put on because there's surprisingly little room at the back. Suspension - woeful. Adequate for the time the car was built, and a big stumbling block for getting the best out of any performance upgrades. I expect it's easier to fix this side of things now since there's so much more aftermarket support available, what with the huge hot rod scene. Steering - vague. Mostly down to worn out components and the fact it's a steering box, so theoretically this can be improved with modern or just new components. Arches - there's not a lot of room in them. Enough for the wheels to do their thing in standard width but as soon as you start lowering or going to wider wheels, they quickly interfere with one another. Stepping down an inch on the steels is an option, though that can limit tyre options and smaller wheels can look a bit lost in the Somerset's arches. I do wonder if channeling the body over the chassis slightly in addition to a modest suspension drop is the answer to the car looking low but remaining practical. It's a whole pile of work to do as these jobs always are, all depends how dedicated to the cause you're feeling. Roof chops really help the proportions (and that Enbloc's sister's car is a stunning example of that). I do wonder if spats/fender skirts would help visually lower or just make the Somerset look even more dumpy, if they do help lower it visually that's an easier option than chopping and channeling if less cool. Perhaps combine it with an exterior visor over the windscreen to add some horizontal to the profile and flatten out some of the chonk. |
| |
Last Edit: Aug 16, 2021 1:04:35 GMT by vulgalour
|
|
vulgalour
Club Retro Rides Member
Posts: 7,108
Club RR Member Number: 146
|
|
Aug 12, 2021 22:00:51 GMT
|
I feel like a fleet recap is overdue, so here's where we are.  Nothing at all has happened to the Princess for quite a long time. I started it and turned it around today, changed the tyre that went flat for a spare, and left it running for long enough to be able to get it warmed up, go through a systems check and confirm that the head gasket hasn't magically fixed itself or got any worse, it's still putting exhaust into the coolant and sweating coolant out through the head gasket seam. The plan is still to get the engine over to a friend in Lincolnshire so that he can do the necessary work to get it sorted properly. Unfortunately, our schedules being what they are, that's been proving very difficult. The plan is to basically replace everything that's worn out or broken and redo the head again if necessary, deck the block, skim the head, etc. etc. I have zero confidence in my ability to rebuild the engine and less joy at the prospect of doing it myself so it's something for someone else to earn some pennies on. I had hoped to have the Princess paint done by now, and again a lack of free time and other projects have put paid to that this year. I'd also hoped to have the suspension refreshed and a new MoT on it, but there's no point doing either of those things until the engine is sorted. It has been a nuisance, so the Princess sits, which I hate because I'd rather be driving it. 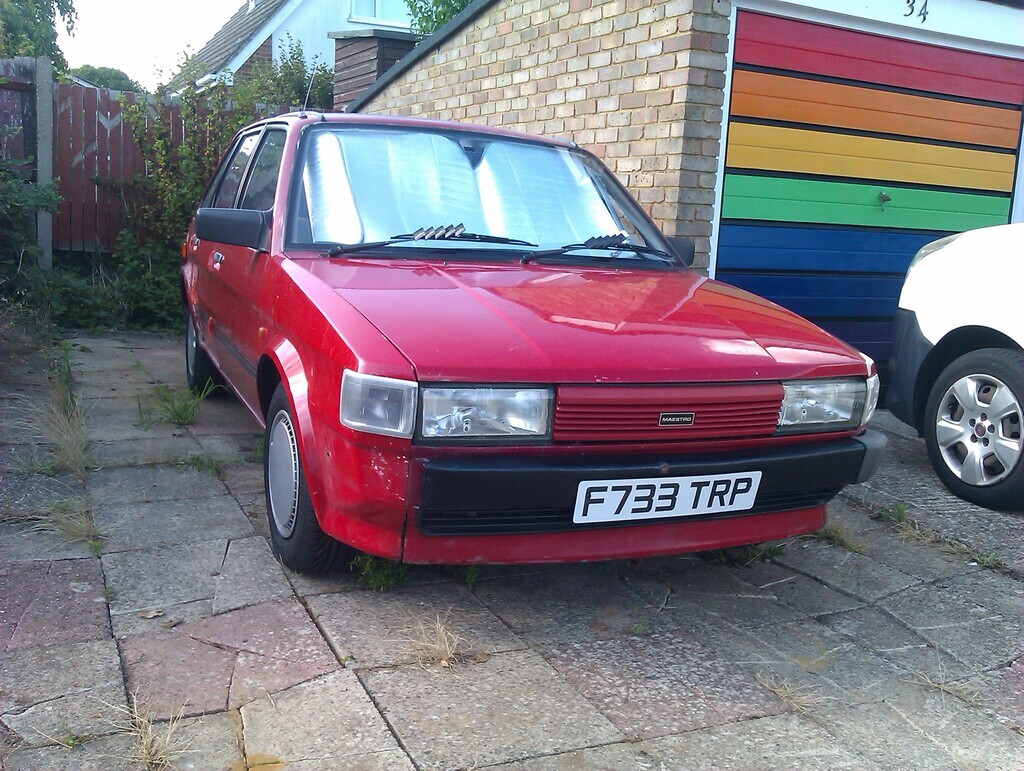 The Maestro is still plodding along just fine. I've a few items I want to address before the MoT at the end of the year and I've been amassing parts to do just that. I'm currently part way through an interior swap and have been replacing panels with less rust/dented panels. I've a bit of welding to do so that I can avoid advisories, and a bit of mechanical stuff to address to keep things tip top. there's a new radiator on the way, I'm hoping the bit of exhaust I've took a chance on actually fits (Maestro exhaust parts are shockingly difficult to acquire, especially for the 1.3). I've also got a mystery knock on the front suspension somewhere so I've been getting track rod ends and balljoints and whatnot to try and track that down since I can't find or see any play anywhere. The Maestro is a fairly rewarding thing at the moment, even if it is a bit crude, it's been nice just tidying it up and making it a little bit better gradually. 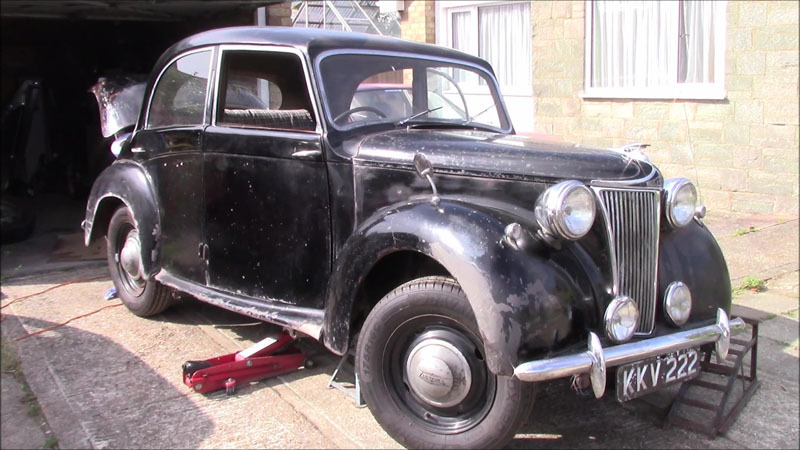 I've taken a break from the Lanchester for a little bit. The new wiring is in and ready to be tested and connected, I've just needed to do something else for a while since it's been a physically stressful job to get to this point and getting the Lanchester in and out of the garage is still a bit of a chore. It is something Pat and I will be getting back on with soon and there's some videos in the pipeline of progress that's been happening. It's unlikely we'll have the Lanchester on the road this year because the weather will likely beat us and that's okay, we're not in a rush, it will take as long as it takes. There's a lot we want to do with the Lanchester and once the new wiring is sorted everything gets a lot easier since we'll have a reliable base system. I have had a look at the welding required and most of it is far enough away from wooden bits that I'm confident enough to do it myself when the welder is set up - just gas and an angle grinder to get now - and the rest of the work will have to be farmed out to someone else. --- Youtube is probably the other thing. It's going about as well as I expected so far. I don't promote it very heavily, I want it to develop organically since I'd rather have a quality following than a large following and it's more about getting info out there than making money. It'd be nice to be making money from it of course, it takes a lot of time to make the videos and all the rest of it even though they're fairly basic things, but I'm certainly not relying on it to earn me any sort of a living, that would be madness. Maestro is certainly the star of the channel, certainly it seems to be moderately infamous in Maestro circles now. Lanchester content is surprisingly popular (by the standards of my tiny channel) so I'm really pleased some folks are getting some enjoyment out of that since it's pretty niche stuff. Sewing/DIY content is the least popular stuff I put out and that's okay, there's a loyal little following for it and I enjoy it so I'll keep doing it until I run out of things to do which seems unlikely. What else?... oh yeah, Spacecat.  www.redbubble.com/shop/ap/85145104 www.redbubble.com/shop/ap/85145104 |
| |
|
|
vulgalour
Club Retro Rides Member
Posts: 7,108
Club RR Member Number: 146
|
Really Retro Stafford pics vulgalour
@vulgalour
Club Retro Rides Member 146
|
Aug 10, 2021 23:17:23 GMT
|
|
That little red Micra on the Centras is a treat.
|
| |
|
|
vulgalour
Club Retro Rides Member
Posts: 7,108
Club RR Member Number: 146
|
Sew What? - Albion Chieftainvulgalour
@vulgalour
Club Retro Rides Member 146
|
Aug 10, 2021 17:22:45 GMT
|
|
Got an office chair you don't like looking at? Maybe you have an office chair in the garage that gets grimy and you want a way to keep it a bit cleaner. Here's how to make a fitted cover, it's not that difficult.
|
| |
|
|
|
|
|
|
vulgalour
Club Retro Rides Member
Posts: 7,108
Club RR Member Number: 146
|
|
|
|
|
Yes but what IS my biggest car related challenge? Other than that, done.
|
| |
|
|
vulgalour
Club Retro Rides Member
Posts: 7,108
Club RR Member Number: 146
|
|
|
|
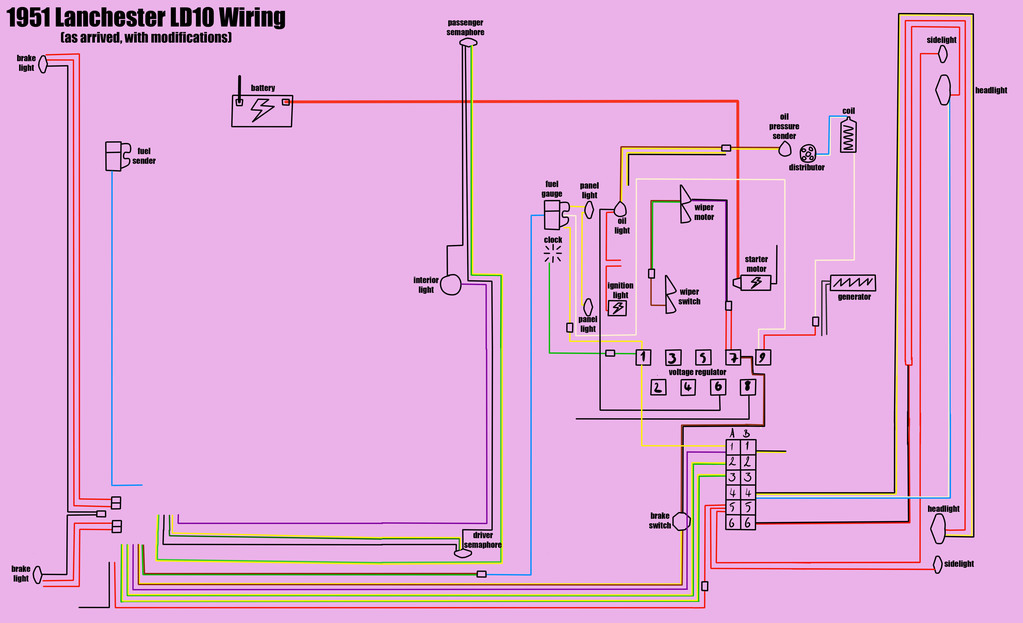 That there is the wiring diagram as it stands for the wiring that the car came to us with. Or at least, it's the stage I'm at with laying it out. I now understand a bit better what goes where and while I'm aware that my labelling isn't conventional, I'll fix that in the next version. The purpose of this was to get my head around what the wiring was doing, and wiring in general. I'm one of those people that learns by doing more than by reading, so this was a practical exercise for me and I feel like I understand what I'm looking at a bit better now than when I started. The little open black squares are where the wiring was spliced and it's laid out pretty much as if it were in the car physically, rather than the London Underground style wiring diagrams are normally in. It should also help explain some of the confusion with the way it had been wired, what with changing colours and odd splits where they shouldn't be up front. It worked, everything did function, until things started not to. Hopefully it makes some sense to those readers with some wiring experience. |
| |
|
|
vulgalour
Club Retro Rides Member
Posts: 7,108
Club RR Member Number: 146
|
|
|
|
|
Eventually I'll do the words and pictures update on the Maestro vids, I'm been a bit distracted by other projects as you've seen from the various updates.
|
| |
|
|
vulgalour
Club Retro Rides Member
Posts: 7,108
Club RR Member Number: 146
|
|
|
|
That do be the plan, using an incandescent bulb rather than an LED, got all the bits and bobs for it. Tomorrow is video day and it's going to be some Maestro bits and bobs, including some of this.  If you're one of the handful of folks that are subscribed to, and commenting on, the videos then thank you, I appreciate that very much. I do hope the videos continue to be helpful. I'm certainly becoming more aware that I have a small bunch of followers keeping track of my progress with the Maestro which so far seems to be benign and supportive, so I welcome that. |
| |
|
|
vulgalour
Club Retro Rides Member
Posts: 7,108
Club RR Member Number: 146
|
|
|
|
|
We're going to be careful, it's very tempting to just plug everything together and fire the car up but that way danger lies. We'll test and connect each section one at a time before trying to start the car. Once we're confident that all the systems are wired up correctly and not showing any weird issues, then we'll try and start the car. Pat and I are a bit nervous about it since we're learning as we go to some degree here, but there's no rush or deadline to meet so we can just nibble away a bit at a time and make sure we don't get workblind to any issues. One advantage to the harness being a new one means we haven't got to try and figure out someone else's modifications/bodges or chase down mysterious earth issues and fire starters (hopefully).
|
| |
|
|
vulgalour
Club Retro Rides Member
Posts: 7,108
Club RR Member Number: 146
|
|
|
|
|
Last of the new wiring installed now, not too terrible apart from the rain appearing right at the wrong moment. Now just a case of connecting and testing everything. I still have the black-with-white-trace wire leftover, I can't find a match for it yet so we'll have to see where that goes as we get everything connected.
|
| |
|
|
vulgalour
Club Retro Rides Member
Posts: 7,108
Club RR Member Number: 146
|
|
|
|
Now I've sat and enjoyed a big plate of delicious bangers and mash, here's a little photo to celebrate the outcome of today's adventure.  I've got about 25G of video footage from this job so far and, worst of all, wiring videos are one of the least popular things you can put out on Youtube. I'm going to do it anyway. Nobody is documenting the physical routing of these sorts of jobs and I know that info would have helped me enormously on this one. I'll be editing the footage down into a mini series, probably 1-3 episodes, to go from removing the original wiring, to installing the new wiring, and finally to testing all the functions and running the car again. This is a huge job but one that the rest of the car depends on for reliability so as horrible as its been, it will be worth it in the end. |
| |
|
|
vulgalour
Club Retro Rides Member
Posts: 7,108
Club RR Member Number: 146
|
|
|
|
|
I'm thinking the cordless will be handy when you do those small awkward jobs where the cord is in the way, or when you're just flatting off welds, trimming repair panels, that sort of thing. Light duty. Normally I put the disc on the grinder by just grabbing the disc and turning it until it's tight rather than using the key, but I can never get the thing undone after without the key.
|
| |
|
|
vulgalour
Club Retro Rides Member
Posts: 7,108
Club RR Member Number: 146
|
|
|
|
|
I'm a curse word for working tired just to get a job done, I have no idea if it's an autism thing (never been evaluated for that), but it's certainly one of my bad habits. That and taking on more projects than I should.
I've been a lucky little sprout today because I managed to avoid all the rain showers and didn't have to pack up early or pause the job. Happily got all of the chassis run of the wiring out now, all it took was about 4 hours of hard graft, removing the petrol tank, unfastening and moving the front inner wing splash guard, getting covered in rust, tar, and road dirt. Great fun.
I was also very sensible and paced myself so when I had the old wiring out even though I had time to get the new wiring in I decided not to and instead have put everything away for today, ready to tackle the next stage fresh.
The other good news is I've almost got all the things I need to get welding again now. Both my angle grinders are somehow missing their keys so I need to make/acquire one of those, though I'm tempted to get a cordless grinder to supplement them which would then allow me to make new keys a bit easier for the corded ones. Then it's just a case of ordering some gas and some new tin snips and I should be able to crack on with bodywork stuff again.
Now I have the old wiring out I can confirm that the mystery really long three-wire-bundle does run along the chassis. In the engine bay, the old wiring had been modified so it wasn't clear what was going on and at the boot end it wasn't as clear until the petrol tank was moved out of the way. So the only wire left to identify is the mystery black-with-white-trace.
There is still a couple of scraps of old wiring to remove, but it's literally the tail ends from things like the dimmer switch so they don't really count. As much as it matters, I think we can say all of the old wiring is now removed from the car.
|
| |
|
|