


Just typed most of this out over last night and tonight and deleted it as I got near the end 
For my Final GCSE Project I was asked to produce a night light/moodlamp, so, er I did and this is it:
Second Model - the same as the first but the centre section was a cuboid in the first. I used a tube because the cuboid would have been made from 4 different pieces of acrylic joined at the edge, and therefore very weak, and with a tube I could guarantee the size would be perfect:

A small scale wonky model of what the cuboid would have looked like. After I took this pic I pulled it apart with my hands so decided to use the tube method:

Deciding what colour to do the bases. I made quite a few of these acrylic blocks, by sticking them together with Liquid Solvent Cement (which melts the 2 surfaces of acrylic and joins them, a bit like normal metal welding in a way) and the edges smoothed with a belt sander and then polshed with emery cloth and wire wool. Decided to go for Light Gathering Orange (which is see-through) acrylic and Clear acrylic layers:

I was going to use the Liquid Solvent Cement in the final product but decided against it as it left marks that could be seen through the transparent layers. I did a small scale test of drilling holes and cutting a thread onto them with a die and screwing a bolt in. This didn't work and some of the layers were not even touching, let alone under compression. The bolts are screwed in as far as they would go in the pic below:

Then I drilled holes and simply put a bolt through with a nut on the end, this worked much better and the layers were under compression.

One of the bases with the layers taped together ready for drilling. The bottom layer is solid, the next 7 have a 70mm hole for the light to sit in (drilled with a 70mm tank cutter, one by one ). The top 3 layers have 90mm holes for the tube to sit in, cut with a milling machine:

As above, but with the light and tube in position:

One of the 2 bases drilled and bolted together, tube in and top base taped together, undrilled. When I had bolted the layers together, I just evened up all the edges on a belt sander and rounded the corners off:

Both bases bolted, sanded, and rounded off, light in position and on. There is another light in the top base, facing downwards, not in this pic though:

One of the bases finished,and after a serious amount of polishing the edges with emery cloth and wire wool. Looks much better now it's been buffed though.
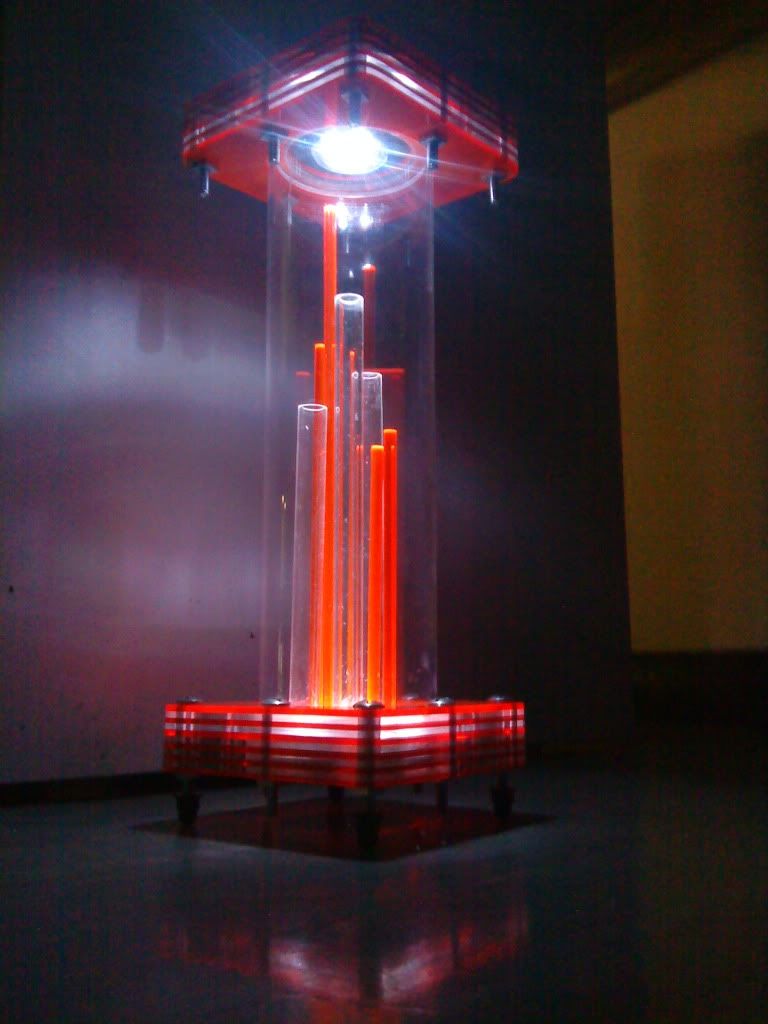
Finished!
Both bases buffed, rods and tubes in main tube, end caps for tube made (which also stops the top light form falling) and both lights in. BTW the whole thing slots together and is in 3 main parts - 2 bases and the tube. To turn each light on, you do have to whip the sections off, but this only takes a few seconds and if it did not come apart, I would have had to find a way to turn the lights on and off, change the batteries and change the actual lights, so it's a small price to pay really.
Tube:

Tube viewed from top without top base on:

And another pic of the overall product:

Sorry for the crappy pics (camera phone), these are the best ones I have on the laptop, will post others when I get the chance.
Also sorry if any bits don't make sense, I'm tired, lol
Thanks for looking, constructive criticism welcome

For my Final GCSE Project I was asked to produce a night light/moodlamp, so, er I did and this is it:
Second Model - the same as the first but the centre section was a cuboid in the first. I used a tube because the cuboid would have been made from 4 different pieces of acrylic joined at the edge, and therefore very weak, and with a tube I could guarantee the size would be perfect:
A small scale wonky model of what the cuboid would have looked like. After I took this pic I pulled it apart with my hands
 so decided to use the tube method:
Deciding what colour to do the bases. I made quite a few of these acrylic blocks, by sticking them together with Liquid Solvent Cement (which melts the 2 surfaces of acrylic and joins them, a bit like normal metal welding in a way) and the edges smoothed with a belt sander and then polshed with emery cloth and wire wool. Decided to go for Light Gathering Orange (which is see-through) acrylic and Clear acrylic layers:
I was going to use the Liquid Solvent Cement in the final product but decided against it as it left marks that could be seen through the transparent layers. I did a small scale test of drilling holes and cutting a thread onto them with a die and screwing a bolt in. This didn't work and some of the layers were not even touching, let alone under compression. The bolts are screwed in as far as they would go in the pic below:
Then I drilled holes and simply put a bolt through with a nut on the end, this worked much better and the layers were under compression.
One of the bases with the layers taped together ready for drilling. The bottom layer is solid, the next 7 have a 70mm hole for the light to sit in (drilled with a 70mm tank cutter, one by one
 ). The top 3 layers have 90mm holes for the tube to sit in, cut with a milling machine:
As above, but with the light and tube in position:
One of the 2 bases drilled and bolted together, tube in and top base taped together, undrilled. When I had bolted the layers together, I just evened up all the edges on a belt sander and rounded the corners off:
Both bases bolted, sanded, and rounded off, light in position and on. There is another light in the top base, facing downwards, not in this pic though:
One of the bases finished,and after a serious amount of polishing the edges with emery cloth and wire wool. Looks much better now it's been buffed though.
Finished!
Both bases buffed, rods and tubes in main tube, end caps for tube made (which also stops the top light form falling) and both lights in. BTW the whole thing slots together and is in 3 main parts - 2 bases and the tube. To turn each light on, you do have to whip the sections off, but this only takes a few seconds and if it did not come apart, I would have had to find a way to turn the lights on and off, change the batteries and change the actual lights, so it's a small price to pay really.
Tube:
Tube viewed from top without top base on:
And another pic of the overall product:
Sorry for the crappy pics (camera phone), these are the best ones I have on the laptop, will post others when I get the chance.
Also sorry if any bits don't make sense, I'm tired, lol

Thanks for looking, constructive criticism welcome


 . The pic of it after polishing but before buffing doesnt seem to be showing for me - if it isnt showing for anyone else let me know and I'll sort it


 Ax GTi Turbo


