|
|
|
Jul 19, 2007 20:45:19 GMT
|
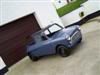
hi guys,cool forum,thought i'd share the build of my VW camper turbo with you It all started after finding a mint low mileage bay for my sister earlier in the year. I went to VW Northwest at Tatton park just for a mooch around and got taken by my lovely bay "Hovis" He had been imported from Oz earlier in the year by one of my brothers mates and he had basically started things off with a narrowed lowered beam and a set of Radar replicas.I had a quick look around,badgered the Mrs for a few days then went to see him with an offer he couldnt refuse. I became the proud owner a few days later,much to the disgust of my mother whose house I parked him in while I made room at home. Here he is as delivered  I didnt really do much with him then for a couple of months whilst I collected bits from mainly ebay or shows. I started the interior with a set of Ebay bargain TMI seat covers(£36),that set the tone for a Brown interior anyway  Things got bought and stored,deadlines missed through work or laziness untill I decided that after being invited to a Deluxe line up at Vanfest that i'd better pull my finger out if it was ever to get finished. Now I am not the kind of person to take on a massive restoration,i can do it but don't get much pleasure from it,thats why I bought this bus,apat from the usual battery tray,it was and is totally rot free underneath,i decided that this was the way it was to stay and pinched my mates roller from his Capri restoration in order to protect Hovis properly  He was thoroughly cleaned,prepared,then several coats of Finnigans No1,primer,stonechip,more primer then topcoat.Shouldnt rot now.I was very carefull not to touch any of the actual bodywork,just filled him full of waxoil to preserve that "patina"  |
| |
Last Edit: Oct 14, 2007 21:45:47 GMT by kevdonlon
|
|
|
|
|
|
|
Jul 19, 2007 20:45:54 GMT
|
After the underneath was done i painted all the tinware to tidy the engine bay  This was then painted gloss black,the engine was cleaned and as it was an ok runner reassembled and refitted Next on the list was a new headlining,this was the job i was dreading the most as it was to be done outside,I knew it was going to take more than a day so i watched the weather forecast closely for a few days sunshine before starting,luckily the sun came out so all the windows were popped and work began,the great thing was that there were no nasty surprises below the rubbers that needed repairs,oh how i love hot climates The strip out  Starting to replace  Bit saggy  Getting there  thanks to whoever gave the tip of getting loads of bulldog clips,worked for me  Time to start the interior,starting with the floor  Then the panels,for these i got some parchment vinyl from Ebay,hardboard from B&Q,glue scissors and Bob's your uncle  I had previously decided that a late Devon Eurovette interior is what i wanted,it may offend the purists but after seeing how practical it was in my sisters bay (swing out /removable cooker and removable buddy chair,all important in a tin top)i bid and won one on,yes youve guessed it Ebay. Now a word of warning,before you bid on something,make sure it is as described,i travelled almost 280 miles to pick this up and it was basically scrap,every piece of wood had swollen with damp and all the plastic coating had fallen off the rock and roll bed. But as i've said,it was the interior i wanted so a bit of lateral thinking was needed,I have a good friend who fits bedrooms for a living and he has plenty of "ahem" spares laying around,so into the garage we went with the "spares" and using the old units as templates made new ones cleaning the hardwear as we built them up. |
| |
|
|
|
|
|
Jul 19, 2007 20:46:38 GMT
|
After a very poor attempt at upholstery and after my mum gave me some money as a gift when she emigrated i decided that i would have the upholstery professionally made. J&S Upholstery made the bed cushions,the buddy seat cushions and the headrest(genuine Devon) for a dead reasonable amount and i can quite honetly say they were a treat to deal with. Here are some shots    Not too shabby if I do say so myself Everything got reassembled in anticipation of Vanfest,the only hurdle was the dreaded MOT Unfortunately he failed on his first attempt,a few things were hastily ordered but things were looking grim as work was really busy and time was really short,its times like these when you realise who your friends are,unknown to me,my lovely sister and girlfriend had contacted good friend and general VW guru John Walklate (63Ragtop)he got the bus prepared for its mot on his day off and took it back for its retest while i was at work,i can honestly say that i am so gratefull as i had been working flat out everyu evening and weekend and had just about lost faith. We finally made it to Vanfest,camped with friends,got drunk and had a brill time Here is our "camping photo"  Our display photo  And a photo with my sisters van at Vanfest just before we came home  The journey home didnt go without drama,we lost 2nd gear and the brakes started to pull heavily to one side,no bother though as these will be sorted in the next phase of alterations........ the future,or present actually John 63ragtop Walklate has built me a new 1776 engine,to this i have ammassed all the parts for a diy turbo conversion,this includes a new GT15 turbo,recon Renault 5 turbo carb,regulator dump valve etc,i have also had the gearbox rebuilt with a 4.57 ring and pinion to make the turbo work harder and also give a better cruising speed. I am currently developing a wide 5 vented disc conversion for the front as i have access to some of the best motorsport engineers in the business who have spent time working with parts i have provided and between us we have developed a billet hub that fits a vented disc,huge caliper but without an increase in track,and all the parts are well up to the task of stopping a fully laden bus before anyone asks,all this for a lot cheaper than a bought alternative,more pics to follow. I hope you have enjoyed reading this thread,please feel free to comment,good or bad cheers kev |
| |
|
|
|
|
|
Jul 19, 2007 20:47:55 GMT
|
Christmas has come and gone,bad weather and more laziness have hampered progress,I have the engine still in the garage waiting for the tinwear to be reassembled but before that goes in I want to sort the fuel tank in anticipation of the turbo conversion. I have watched the many posts on turbocharging with interest,picking up hints and tips along the way,the bit I have been dreading is the fuel tank return,i originally wanted to go with a tee at the outlet and return the fuel back into the fuel pump line,after reading many posts that have said that there will be problems if I do it this way I decided to bite the bullet and weld a fitting into the top of the tank. I took the tank out and washed it thoroughly a few times,made up the fitting required from my mates fittings box then drilled the tank to allow a boss to be welded,i then put my airline hose into the tank with my blow off gun trigger taped up so I had a constant flow of compressed air all the time I was welding. This went without drama and I am pleased with the results 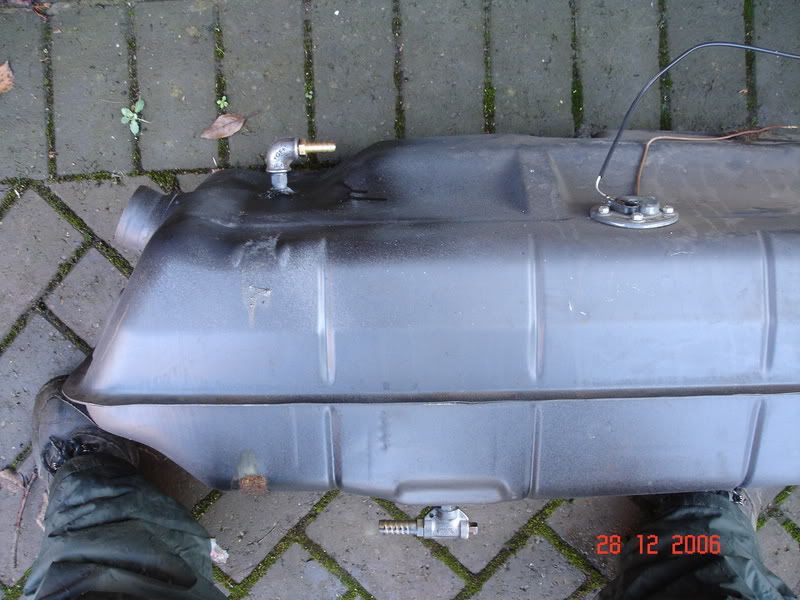 The keen eyed will notice that I have gone with a tee anyway on the outlet,this gives me the option of routing the fuel pipe either way into the fuel pump I have also mounted my external cooler,i tried to fit it above the gearbox but there wasnt really enough room so after faffing around underneath looking for a suitable place I decided on putting it above the battery,the logic behind this is that when the bus is moving cool air flows down into this area anyway so should aid cooling,i couldnt get it into the airflow below the bus so this should do nicely  |
| |
Last Edit: Jul 19, 2007 20:57:55 GMT by kevdonlon
|
|
|
|
|
Jul 19, 2007 20:49:05 GMT
|
Another quick update: Right then,early bay/full flow= small problem fitting the engine support bar and clearing the full flow fittings,solution after scrapping the CB maxi pump that was supplied with the engine by overtightening a 45 degree adaptor fitting was to fit a new pump with a Scat cover,3/8 npt 45 degree adaptor and chop off the offending mount.A quick scout around the garage heralded a length of tube and a scrap piece of rectangular bar,a new mount was then fabricated and welded onto the bar,clears all the pipes now  and a better view from the side  After that was done i started to assemble the tinware/dynamo,manifold etc. I decided to use Samco hoses on the inlet manifold as i have no idea if the standard stuff can take any sort of boost pressure,pricey but now i have piece of mind  Lastly for now i needed to mount the Renault turbo carb,this is almost a bolt on fit onto the standard manifold,all i had to do was slightly elongate the holes in the manifold to allow the carb to sit on,2 mins with a drill had this done.The carb linkage is on the wrong side to work with the standard throttle cable so this had to come off, (it also hits the dynamo)also the spindle is too long and also hits the dynamo,this was ground down and now clears a treat. I chopped the old carb linkage up and welded it to a piece of the linkage on the other side of the carb (easier to see on the piccy than try to explain) this will now take a standard throttle cable (important to me as i plan to travel abroad and need to take spares) I have also found that with the alloy "lobster" that i plan to use i will have to relocate the coil  Thats it for now as i fell down the stairs last night and tore some lligaments in my ankle,so no garage for me for the next week or so. The brakes have still not been sorted,my engineer has had a massive order for Land Rover bits so mine will have to wait  but he has promised that i will have them done before the show season starts (bloody hope so,USB here we come ) |
| |
|
|
|
|
|
Jul 19, 2007 20:49:51 GMT
|
update 21/01/07 started to mock up where the turbo was going to sit yesterday,at the time i had the engine on a box in my garage,there was no way i was going to get an accurate mock up in there so i had to put the engine back into the bus. Threw it back in,no clutch or cables to worry about as it had to come back out again so wasnt a big deal,made sure my header was on so i had a reference point to start from and started to place the turbo in,now for some reason i had always thought that the turbo would fit on the passenger nearside but the turbo thought different,it made loads more sense and would ultimately be loads easier to fabricate pipes for of it was on the drivers side,i mocked it up with cable ties and welding wire in a position where it would not foul on anything and the inlets and outlets all ran in the right place. This left me with a small problem which was easily solved,i had loosened both housings of the turbo which allowed me to rotate the casings to a position that worked,on this particular turbo the centre where the oil feed is also rotates independantly of the outer casings making that easier to locate properly,but as you rotate the cold side (pressure) it has an effect on the position of the actuator,i got it in to position and basically altered the bracket to fit. A photo of the mock up position,tight but everything clears without any body mods  Then i needed to make a pipe to connect the exhaust manifold to the turbo,i raided my mates exhaust cut off box (he has been making manifolds for his off road racer)for all the necessary bends and tubing,the flanges were made from templates of the manifolds out of 8mm flat steel and mig welded onto the tubing  a better view of the turbo position  This will all be coated in high temp black paint when it comes back out,finally a photo with the bumper in place,wont be too obvious when its back on the road  I must apologise for the curse word photo's,i dropped my camera and it is now slightly out of focus,if anyone wants any better piccys let me know and i'll try again Oh and yes my fence blew down in the wind but i'll be damned if i'm spending another weekend putting it up again for the wind to blow it down again,it will wait for a couple of weeks :mad: |
| |
|
|
|
|
|
Jul 19, 2007 20:50:23 GMT
|
update 28/01/07 Not much to report today,had an oil feed line made up by Pirtec,while i was there i bought a 90 degree AN10 (5/8") fitting and a couple of feet of 5/8" hose for my oil return,this will connect to a thin line sump extension that i am having a male fitting alloy welded to,i am dubious how the oil is supposed to return to below the oil level but after reading several peoples comments i am sure it will work. I have also made the pressure pipe to go from the turbo to the carb,i had hoped to use my spangly alloy one with an assortment of hoses but the position of the turbo made this impossible,i have used several bends from a Transit exhaust system (FOC again cheers Ian )which is a pretty perfect size to couple onto the top of the carb,i made a flange which is a tight fit on the top of the carb with a bevelled edge to squash against the O ring and welded the 2 together,i have mocked it up in the photo,i still have to order the silicon hoses and weld in a tube for the blow off valve,i need a couple of hose barbs welding in also but i am at the mo unsure just how many If anyone has the details of how the carbs are piped up could they please share the info,i will soon be at the starting stage (fingers crossed) so this would be very helpfull I have decided to move the oil cooler to under the floor area,the space it leaves will eventually if needed house an intercooler  |
| |
|
|
|
|
|
Jul 19, 2007 20:51:05 GMT
|
update 04/02/07 decided today to concentrate on some plumbing,welded 3 x hose barbs into the pressure tube and a tube to connect the blow off valve to  after that i took the engine and box out to fit my new Kennedy stage 1 clutch and kush lok disc,also fitted a new release bearing  while the engine was out i fitted the fuel pump and regulator and fitted the fuel lines  decided to move the oil cooler to under the van where it will definately get more air  from the side  found an intercooler to fit in its place,absolutely spot on fit and comes with a fan as standard,this will be fitted at a later date as it means remaking the pressure tube again  cut the rear valance to allow the tubing and oil feed pipe through  and finally recut and welded the rear exhaust pipe,it was bugging me that it seemed to droop so i am happy now  and thats it for this weekend,ordered the silicon pipes should be here in the week,need to sort a couple of relays for the fan and fuel pump,pipe up the oil cooler and filter then see if she goes |
| |
|
|
|
|
|
Jul 19, 2007 20:51:33 GMT
|
With the weather being really curse word this weekend i decided to tackle a couple of things inside the garage rather than out on the drive,first i rebuilt the carb and increased the main jet size to a 135 as per ourkids thread,this should give me a starting point to work from as my engine is a larger capacity. The next thing was to modify my 009 dizzy to limit the advance to 24 degrees as per again ourkids thread first as he says you have to have an understanding of how the mechanism works,this is a centrifugal advance distributor that relies on weights moving out as the distributor rotates untill max advance is met,the total advance is too much for a turbo so has to be limited first strip the dizzy down to its component parts and identify what does what,the pic below shows the weight (with the plastic pad) and the stop it hits as it moves out 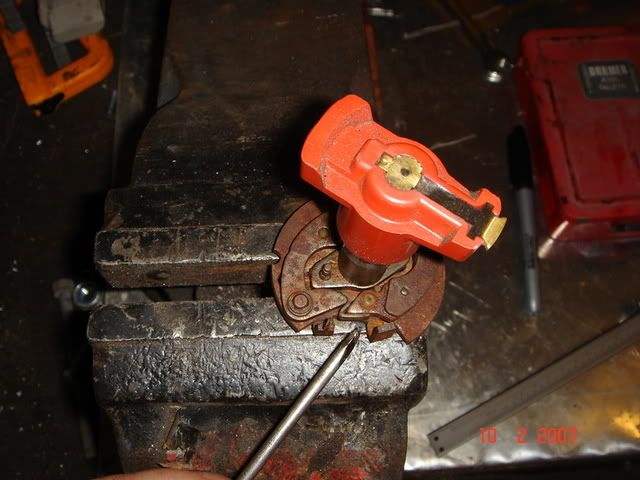 the next thing to do is drill and tap the stop for a 3mm grub screw 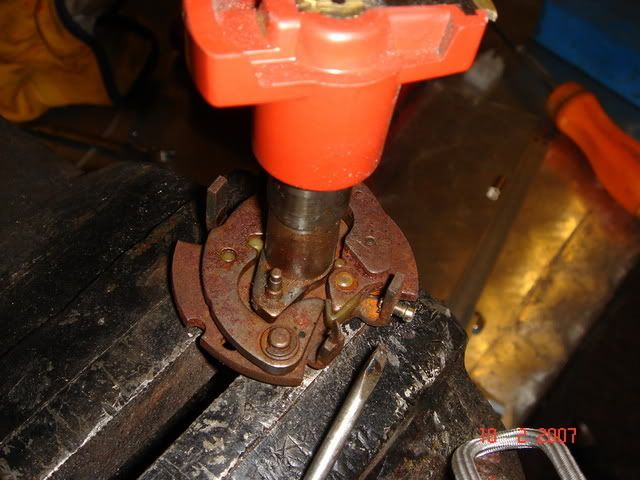 reassemble the dizzy and pop out the cover on the side,this will allow you to rotate the rotor arm so you can see the new grubscrew inside and adjust it to limit your advance 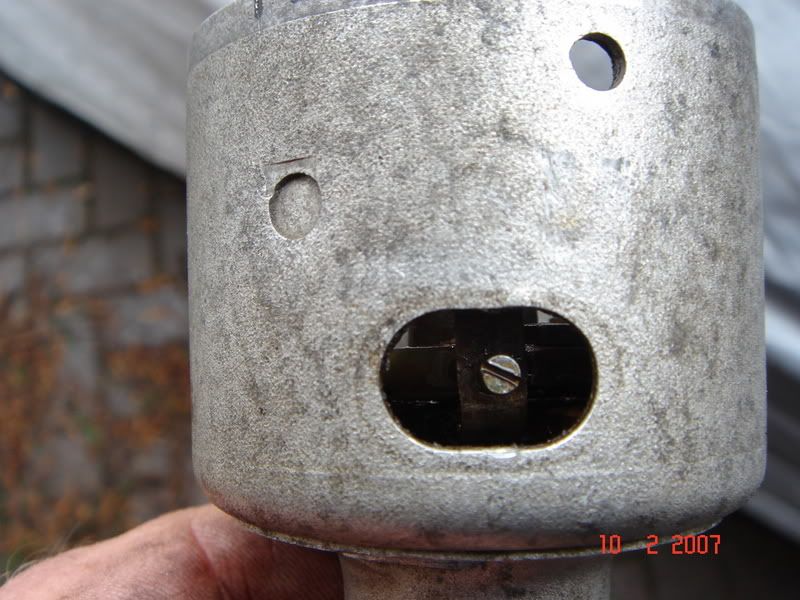 using a protractor i marked a line 7 degrees clockwise of the original timing mark, i drew a line on the rotor arm and lined it through,then using a screwdriver i opened the weight towards the grubscrew untill the line on the rotor arm lined up with my mark 7 degrees away, i then adjusted the grubscrew onto the weight and this should now limit its advance 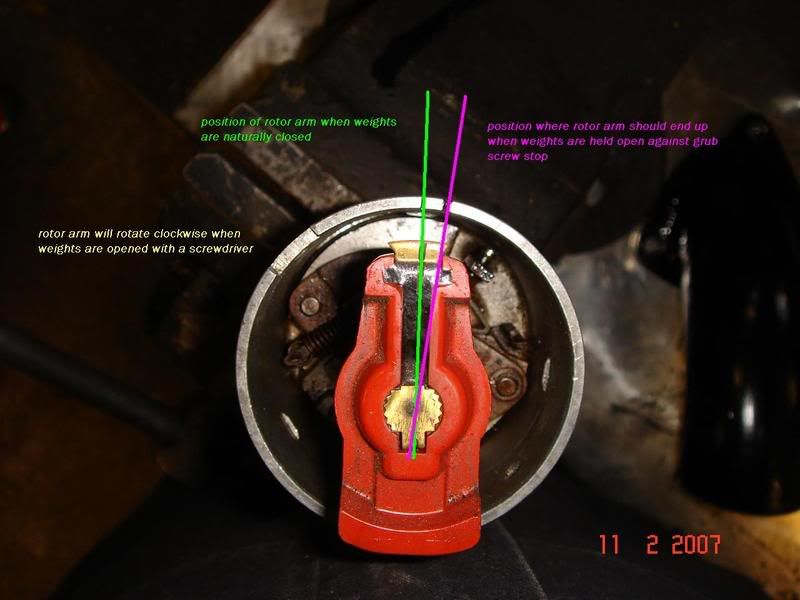 and with the rotor arm removed for clarity (weights being held against the grub screw stop)  When my engine is running i will set the timing at 24 degrees at 3000 revs and lock it off,according to what the timing is when it idles i may slightly adjust where the weights are limited to but always resetting to 24 degrees at 3000 revs (basically only the idle timing will change then) Disclaimer,i am no expert on this,i have tried to follow previously done work and include pics as i go along,don't moan at me if you follow this and your motor blows up,mine will have already gone and i'll have too much work on my hands putting it right to worry |
| |
|
|
|
|
|
Jul 19, 2007 20:52:01 GMT
|
i have bought a K&N Filter from Ebay with the correct 45mm opening for the tube i an using,this is connected via a 90 degree hose to the turbo,it will sit next to the pressure pipe inside the engine bay  I have also been thinking about the drain issue,my engine mount was getting in the way of the return hose slightly so to give it the best chance of working i have modified it so the hose will now run through it rather than around it,if it causes problems i will get a scavenge pump plumbed in. cut and weld  and paint and fit  Hopefully running it this weekend if my hose clamps are delivered tomorrow,have plumbed in the filter,thermostat and cooler,just need to wire in the fans now,also the intercooler i have (will be fitted later) has a temperature switch built in that will trigger an attached fan if the boost temp is too hot,that should sort it out (big boost here we come ) Good news on the disc conversion,the enginers have my billet blanks in and are programming the machine this weekend,all coming together nicely now |
| |
|
|
|
|
|
|
|
Jul 19, 2007 20:52:32 GMT
|
Today i have concentrated on finishing the exhaust manifold,the slip joints that are standard are a pain to seal properly and on an early bay the engine bar gets in the way of the exhaust clamps,my solution was to fit the exhaust,mark where the slip joints would actually fit and put a spot of weld on them,i then cut the j tubes in half at a convenient point to get the exhaust off the motor. I fully welded the slip joint and made some flanges to join the j tubes back together (using a standard exhaust gasket for a total seal) i then painted it black with woodburning stove paint  I did a bit more reading about blow off valves (dump valves) and as they are connected to a vacuum line i needed to insert a barb fitting below the carb butterfly (in the inlet manifold) a quick look through the trusty fittings box got me a 90 degree fitting that i welded in on the rear of the manifold,i have tried to put all the fittings bar one at the back to keep things neat and tidy,i hate seeing spaghetti wiring and piping.  i refitted it all and installed the carb,i have piped it up as the next photos show,it works so far so cant be that far out     the photos show the old alloy 'lobster' that i was going to use but as i have replicated the fittings on the one i have made it is piped the same,the new fitting i welded into the inlet manifold is connected to the dump valve and a boost guage is tee'd off as well, i was desperate to get it running so rigged up the fuel pump,after making sure every pipe that carries fuel or will be under pressure has a hose clip on it. i fitted the oil filter and piped the full flow pipes into it,i have not piped up the cooler as yet as i want the swarf from the bearings etc to be contained in the filter and not in the cooler. i made sure that everything was tight and filled it with oil,took the plugs out and spun the engine over untill the oil light went out,topped up the oil,refitted the plugs and turned it over,no one was more surprised than me that it started straight up,a bit wooly at first but after a bit of tweaking it idled ok and is not too loud,i am not sure if the drain is working or not yet,there is a small amount of blue smoke when it is revved but as it is a fresh engine i would expect this,if it continues when i eventually drive it i will definitely fit a scavenge pump here is a video of its first breath,excuse the fat bloke laughing like a mentallist,my mrs thought it would be a good idea to film me as i had dragged her from in front of the fire  still need to wire in the fuel pump and fan properly,still waiting for my proper oil hose clamps to arrive,great isnt it,you can get stuff delivered from china and the states faster than your own back yard :mad: |
| |
|
|
|
|
|
Jul 19, 2007 20:53:09 GMT
|
Been thinking more about a silencer,don't know what the MOT man would say if i just turned up with it as it is,and as i don't really want to give him any more reasons to fail it (he already hates lowered vans :rolleyes: ) i need to do something i have put the bumper back on to see how much room i have to play with and to be honest the tailpipe thats fitted looks a bit lost,it is way back tucked underneath the rear corner where it can hardly be seen  i am also concerned about the noise of an unsilenced motor,its not too loud but loud enough to get noticed(not as loud as my bro's bug exhaust anyway) so have decided that i am going to fit a silencer either in the same way as most of the decent "turbo/mondo exhausts ae fitted or tucked under the rear corner with just the tip showing i have been around the local motorbike breakers and bought a stainless silencer that is easy to shorten without welding for a tenner :eek: here is a piccy before i start modifying  and after i have chopped it about to fit my motor better  these are simply rivetted together at the size you need,i will wait untill the weekend to decide which is the easiest way to route the new tubing,making sure that i can still get at everything without dismantling the exhaust system,this should take the slightly 'woofly' sound away that is there at idle and give a nice tone when cruising |
| |
|
|
|
|
|
Jul 19, 2007 20:53:41 GMT
|
update 24/02/07 probably the last update for a while untill my disc conversion is done and i can drive the bus, i started to mock the cut down motorbike exhaust and plan where the connecting pipe would run,i want the look to be as a normally aspirated motor at first glance so decided on running in the standard mondo style silencer position  the look was good unfortunately to get from my turbo back round to the exhaust would be a nightmare,the tubing would have to go through 3 x 90 degree bends and would be very close to the actuator and the oil return hose,as the hose is already close to the manifold (protected by heatproof/fireproof sleeving) i didnt want to introduce any more unwanted heat or indeed overcomplicate things. When i bought the bike silencer i actually bought two (both a tenner each so rude not to)one was stainless and easy to shorten,the other steel and alloy so easy to weld to,as it was already a short silencer (GPZ 1100 race can) i cut off the original exhaust bit and made a simple connector to my turbo flange (carefully measuring to get it level) and welded it together  this silmply bolts on to the turbo and can be hung via a rubber off the bumper iron  from the rear it has the look that i was after and has drastically muted the exhaust tone,it is easily quiet enough for a long cruise but still has a really nice tone to it all in all a real result  the only other thing i have done is to wire in the fuel pump via a second fuse box and a relay,i am really paranoid about electrical failure and fire so no corners have been cut in this (or any really) department,the engine loom is new,all connections are soldered and heat shrunk when needed and everything will be fused (scotch locks are the devils invention) oh and i have gained another motor on the drive (this makes 6 :rolleyes: ) my bro was travelling home from work the other night when a woman decided to 3 point turn in front of him without warning,the result was this :eek: "Pearl" R.I.P.   he is ok but understandably gutted,he took a year to find his bug,it has never been welded,he has had it for 5 years and spent every spare penny he has on it,it was his wedding car,and his kids have grown up with it,the car can be replaced but not the memories,we are waiting on the insurance to see what happens next |
| |
|
|
|
|
|
Jul 19, 2007 20:54:06 GMT
|
Happy days!!!!! finally something has happened with my brake conversion,to refresh i wanted wide five vented discs on the front but didnt want to pay the £820ish that people wanted for them,so i did some homework on discs and calipers,scoured scrapyards and tried out several combinations of manufacturers to get some that worked together,i then took my idea to a mate at Rakeway engineering where we are building next seasons off road racer (background pic on site) for him to design a hub using Autocad.This he did and a mock up was made,I trial fitted this to my bus to make sure everything cleared and that i was happy with how everything looked. He has now finally machined the hub from high grade billet alloy and here is a photo from the front  one from the rear (ooh err)  and finally one showing how the vented disk looks when in place  It should be going onto the miller today to get the holes drilled for the wheel studs and the retaining bolts for the disc, i am only waiting for the caliper bracket to be machined and i can bolt it all up and see how it goes,the hub has been designed and machined to accept standard bearings and seals without having spacers made or any fannying around getting closer now,cant wait |
| |
|
|
|
|
|
Jul 19, 2007 20:54:38 GMT
|
update time again finally after what seemed like a dogs age i have got my brake conversion sorted,the studs are pressed in,new bearings and seals and all assembled,all piped up and almost ready to go,just 12 x metric fine thread cap screws are between me and my first run with all the new gear on,so close now i cant wait here are a couple of pics for those interested   |
| |
|
|
|
|
|
Jul 19, 2007 20:55:09 GMT
|
update time again brakes are a transformation,no pulling to one side,good firm pedal and look great to boot:D having small problems with the engine,when its cold and you give it a few too many revs it blows the seal out of the filter,done this twice now so have ordered a new pressure relief valve and spring with a genuine VW filter,we'll see if that sorts it The engine is a transformation too,it is so torquey,i havent taken it past 3k revs yet as it only has a couple of hundred miles on it but it is night and day from the old engine,i can now comfortably accelerate up the steep bank from my house in 3rd and 4th gear when before it struggled in second,the gearbox is great too,i have low profile tyres on but can still cruise at 60 at 3k revs i have decided to fit the intercooler tonight,it required remaking the pressure tube at a different angle  and locating it above the battery where i had previously had the oil cooler,the intercooler has a fan attached that is temp controlled so this should be as good a spot as any,have to say though the bill in silicon hose is mounting:rolleyes: here's a pic in situ,will make a lightweight frame to keep it off the battery tomorrow  |
| |
|
|
|
|
|
Jul 19, 2007 20:55:36 GMT
|
another quick update hopefully now sorted the fram filter seal blowing problem i've had,i have replaced the oil bypass valve with a new one and replaced the filter with a Champion one instead,so far so good Took the bus down to Bus types in Oswestry to complete the running in of the engine,no problems to report Took the bus to Big Bang with the intention of running on the strip,the fan on the cooler wasnt cutting in so had to take it easy on the way down as my Berg dipstick was flickering the oil light to say it was getting warm (didnt get on the strip but thats another story) Got to a service station and bypassed the thermostat and it cooled ace after that,went the rest of the weay at 80+ no problems The gearbox is great,even with low profiles it cruises great Had the carb off to have a couple of mods done after i was struggling to rev over 4k,turns out the emulsion tube was blocked with curse word so my man changed that,an air corrector jet and the venturi was bored out to better suit the bigger engine,the result is a transformation,there is loads of smooth grunt now and it revs upto 5k no problems,i have some ratio rockers to fit after the weekend and some final tuning and then thats it,should be finished The engine performs eactly as i wanted it to,it feels like a 2110 or bigger but quieter if that makes sense,it now accelerates up hills like they are not there,the gas mileage has suffered whilst the emulsion tube was blocked and i was revving it to try and get over 4k but now its fixed i cant see it being more thirsty than a standard motor as it only uses the turbo when its needed on another note,when we were on the way back from Big bang a friend followed behind in a 1776 bay with twin carbs,after a few miles at 70mph she started to fall back so we pulled in at the services,her Berg sensor had turned around fully and had lit the oil light up,mine was only half way round indicating good running temperature,remember same vehicle,same speed same weight,the turbo runs cooler and cruises better.............. you know it makes sense |
| |
|
|
|
|
|
Jul 19, 2007 20:56:06 GMT
|
right,update time again, not much to report really,done a couple of shows now and generally got some miles on it,so far has been super reliable,no breakdowns at all (touches wood) but i have still had a niggling pinking problem in 3rd and 4th,pulled the plugs and the carb is slightly lean,took it back to my renault expert and he has upped the jet to a 140 and altered the air corrector jet to suit,he also thought that the fuel pump may not be delivering enough fuel for the size of engine so i bought an uprated fuel pump also,this has hopefully sorted the fueling side as the plugs are no longer white i have also invested in a MSD ignition set up that automatically retards the ignition timing as the boost rises,there is nothing wrong with the 009 set up that i had previously running wise,but with the advance being limited to 24 degrees or there abouts the mpg when cruising suffers and there is a tendency to run hotter  here it is in situ,took a couple of hours to wire in properly (solder/heatshrink etc) but fired in straight away,there is a knob on the dash that now lets me retard upto 3 degrees of advance for every pound of boost that it detects. i have done a few miles with the set up now and it has transformed the cruising ability again,no pinking or geting warm at a genuine 70mph(tomtom) for miles and miles,really chuffed oh and i have also fitted my scat 1.25 ratio rockers,a big thankyou to John (63ragtop) for sorting the pushrod length,cant really tell if there is much difference as i am still fine tuning but it all helps Hopefully now theres nothing stopping me hitting the strip at Bug Jam next week |
| |
|
|
|
|
|
Jul 19, 2007 21:01:20 GMT
|
|
What a cool descriptive thread.
Some of you guys really know your stuff.
PS: nice busses.
|
| |
|
|
J.P
Posted a lot
 I like to eat ice cream and I really enjoy a nice pair of slacks.
Posts: 1,175
|
|
Jul 19, 2007 21:43:25 GMT
|
|
Brilliant thread. Welcome! The bus is so clean looking, yet such a sleeper! Shame about the white beetle.
|
| |
|
|
|
|


 but he has promised that i will have them done before the show season starts (bloody hope so,USB here we come