kitch
Part of things
 Counting his chickens
Posts: 157 
|
|
|
|
Hi all,
Have neglected this site in recent years, and forgot just how good some of the content is! Having read through other people's builds, I thought I'd copy mine over from other forums, starting with my Imp (spread over a few posts!):Sometimes life doesn't go the way you expect it to. Sometimes bad things happen, and sometimes good things happen. Sometimes, things happen which initially start out bad, but switch to a positive, depending on the way you look at them. I've got a million other readers cars threads going (because I have about a million cars) and most of them are old and French. Not this one though, oh no! This one is even older.....and Scottish! So what's the crack? Long story short (I'll do the longer ones sometime in the future), I run a small workshop specialising in restoration (mainly TVR chassis) but also tinkering in classic and modern classic cars, as well as a plethora of kit cars and specials. A long, long time ago, a young man by the name of Tim came to me on the recommendation of a friend, and said that he had a Hillman Imp, and wanted to put an engine in it. It didn't have an engine fitted, it was basically a rolling shell he'd bought from a field: 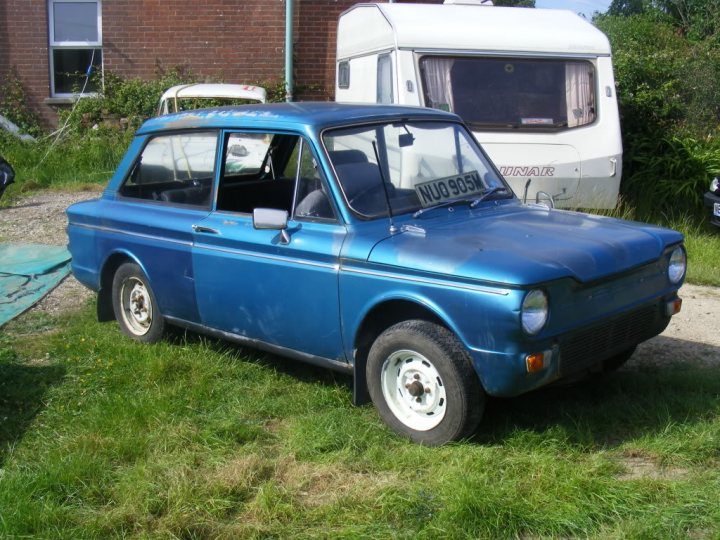 He'd lusted after an Imp for many years, and this was the realisation of a dream! He asked if he should put a motorbike engine in, to which my reply (based solely on my own opinion) was no, you shouldn't. Bike engined cars are awesome on the track, and bike engines are just better than car engines in terms of technology. But on the road, where this thing was going to spend most of its life, the bike engine would be a pain. No reverse, little to no torque at low revs (BEC's often need revving to 5-6k revs, just to find the biting point as they're no longer trying to move 200kg of Kawasaki around). My advice was use a car engine, if it is to be a road car with very occasional track use. Next engine to be dismissed was one of the Imp's original innovative features, the Coventry Climax-based all alloy lump. Would be the cheapest in terms of a package, but would need serious tuning to achieve the 100bhp goal we had set. And it would be unlikely to be a reliable 100bhp, or certainly not as reliable as an engine designed to run 100bhp in the first place. That all said, both Tim and I wanted to retain the 'Impness' of the car. We've had literally 1,374 people ask us "Why didn't you fit a Subaru XXX or a Honda YYYY or a Dacia Sandero V8?" Well, the reason is because, at the end of the day, an Imp is what Tim desired, and if he ended up with a V6-powered spaceframe clad with Imp bodywork.....well, that's not really an Imp any more, cool as it may be. So it needed to still be 'Imp' in its DNA, even if the engine wasn't. And of course, we know more than most that if we went cutting up an Imp shell in a structural manner, we'd be well into the realms of the dreaded IVA test. We didn't want that! And so, I had a brainwave. It's probably know by a few people on here that I have a serious condition called 'Likesrattlyoldfrenchitus'. This condition led to me considering a tenuous link - Peugeot. The Rootes group was bought out by Peugeot in the late 70's, Talbot name and all. I knew from my PSA obsessions that Peugeot used the Simca-derived XY engine (aka the suitcase, because it lays down flat) in the Peugeot 104, Talbot Samba, early 205 and early BX models, among others. They were available in 1360cc, and would yield around 80bhp. All alloy, quite light, sounded god-awful but generally quite durable and peppy. Trying to find one might be tricky, but I swear I'd seen the conversion done before. And so I Googled frantically 'Peugeot engined Hillman Imp' and found nothing on the XY engine. Balls. What I did find, was a small thread on a forum regarding a Scandinavian ice-racing series. In that series, a limit of 1399cc had been set, and apparently the cars that were tearing up the field were Hillman Imps being pushed along by Peugeot/Citroen TU3 engines lifted from the AX GT and 205 XS. 85bhp, similar basic weight to the Climax and pretty tough. I didn't realise they'd fit, as they sit bolt upright, but a quick trawl of some Imp forums revealed that they did - just! Could we find an AX GT engine? Could we feck! But the TU came in many different flavours, and one of these was the TU5 in the Saxo VTR 1.6 unit. 90bhp as standard, and pretty tough. Lots of midrange torque (perfect for munching Imp transaxles) and they engines were cheap. Hell, even the cars were cheap, so we bought a car!: 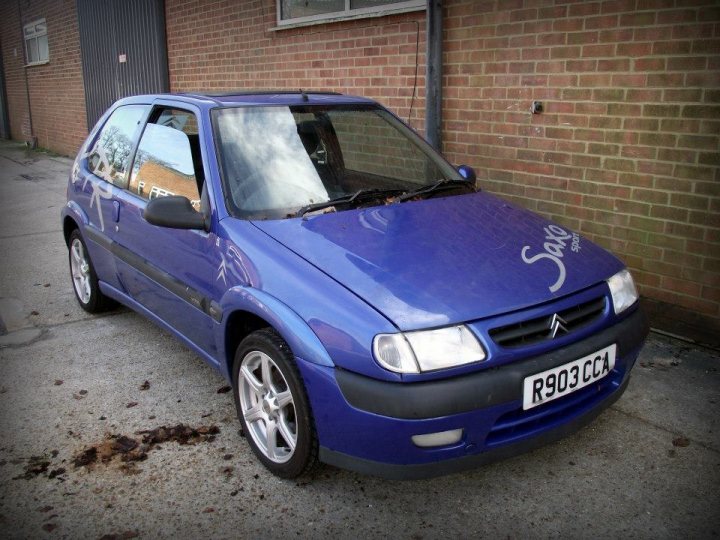 Only drawback, is that the TU5 only came in iron block flavour, unlike the all alloy TU3 fitted to the AX GT. With a weight penalty of around 30kg, we'd need to be clever to stop the car handling like a pig. In retrospect, the perfect engine would have been the TU2J2 fitted to the S1 106 Rallye, but they're even rarer. And more expensive. The Saxo came with 120,000 on the clock, and no MoT. We popped it on the dyno before the engine came out, where it continued the Saxo tradition of bettering its book power figures (every Saxo to date has produced more power on the dyno than the book figures state!) 95bhp was the number, and the graph was strong (even if the radiator was not!) The engine was duly removed and the Saxo discarded. Now we had a square peg (a TU engine), and a round hole (an Imp). But the TU5 would get us to the 100bhp marker we set, and provide it reliably. So how to you make a square peg fit a round hole? Simple, you improvise: 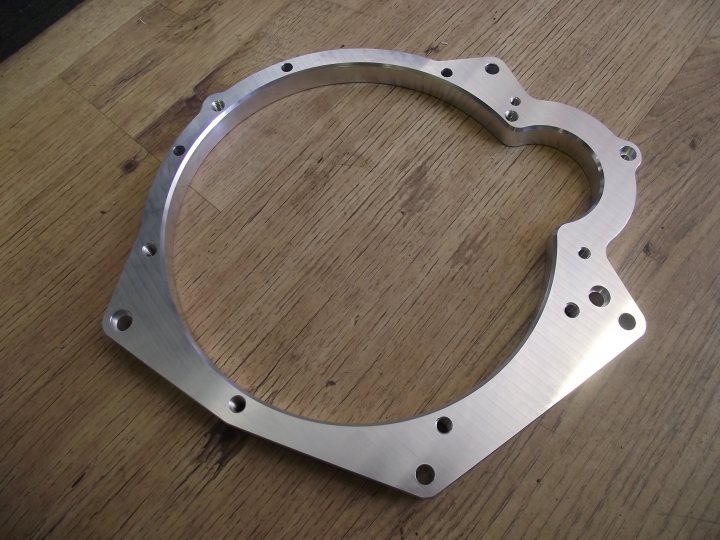 We spent a LONG time to designing that! Now we had a TU engine and a way of mounting it to an Imp transaxle. We came up with a hybrid clutch using Sierra bits and Saxo bits, along with a flywheel from a 106 Quicksilver. We had Reg Patten build a mk3 gearbox (the strongest casing) with a Ford-splined input shaft, to allow the Sierra driveplate to fit. Then we used Lotus Elan roto-couplings to connect the box to 1in Imp Sport driveshafts. To push the TU5 engine into the 100+ club, we fitted some Honda Fireblade bike carbs (the standard injection system wouldn't fit), as well as a Newmans PH3 fast road camshaft, and Raceland 4-2-1 stainless exhaust manifold (standard VTRs use what is basically a 1.1 exhaust, possibly to strangle them a bit to bring insurance groups down). The ignition is distributorless, and managed by a Megajolt box mounted in the back. To keep the engine cool, an MGF radiator was installed up top, and I took and angle grinder to the front end to create a kind of 'custom' grille. Twin cooling fans keep the temps in check, and Evans Waterless Coolant circulates the pipework plumbed through the cabin (as the original Imps had radiators mounted in the engine bay) which is heat-wrapped and hidden below handmade GRP panels, carpeted to take the eye away from them. The rear seats are no longer there, though I would put some in if the coolant pipes didn't go there. The rest of the Imp was also given similar treatment. All suspension was stripped, shot blasted and painted in POR15 before before fitted out with polybushes. The front drum brakes were binned in favour of Fiesta mk1 discs, Goodridge braided hoses were fitted all round, and the steering tie rods were upgraded to the Imp Club adjustable types. The body shell was fully resprayed in Vauxhall Karabic bue. Why? Because Aquarius metallic is harder to mix up, and the Vauxhall colour is 99.5% the same as the fairly rare Aquarius, just much easier to deal with if it needs any future resprays (which it does, already - more on that later!) We had the pinholes for the side mouldings smoothed over, along with the rear panel where we removed the bumper mounts and starter handle hole. Speaking of the rear panel, we braced it and fabricated an extended engine mounting boss, so we could utilise all the original Imp mounting points. The engine cover is a carbon-fibre piece, as is the front spoiler. The entire build can be seen here|https://www.facebook.com/SouthwaysAutomotive/photos/?tab=album&album_id=377896038960059 in this blog we did along the way (apologise for some of the pictures - I got carried away with Picasa back in the days!) And so where do we end up now? Well, life doesn't always go the way you plan. And so, as I said when I started the thread, we're at that point. Tim no longer owns the Imp, I do. Life came Tim's way, and shat at his doorstep. The alternative was to break the car up, as Tim couldn't stomach seeing someone else enjoying the fruits of his cash and our labour. If I didn't take it, nobody would. I couldn't bear to see the Imp come this far and not cross the finishing line. We'd covered around 100 test miles since January 2016, but still had (and still have) plenty of kinks and creases to iron out. Yesterday, me and my wife took it to the Seven Stars near Petersfield, to see if we could take a run out in it without issue. We got there and back, though there are still issues! Even so, I took some pics at the end and this is where we're currently at: 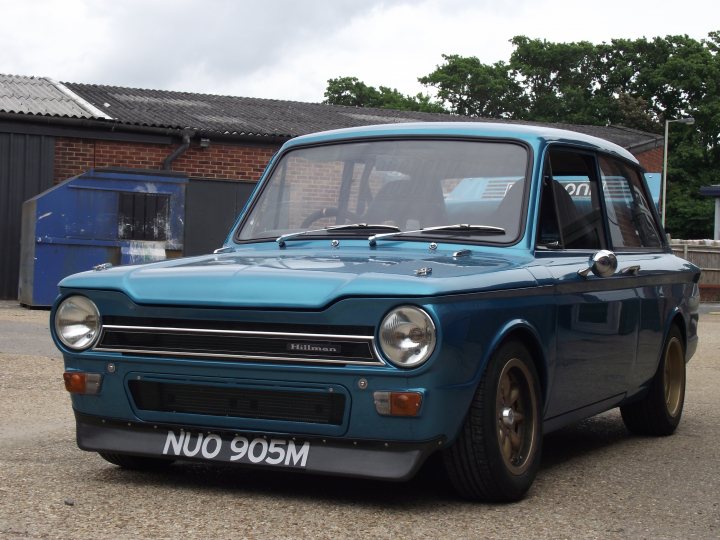 The interior is half finished. I don't like the seats (have more period ones ready to go in) and the dashboard needs more of a dashboard! The binnacle itself is a custom-made six-dial version of a Stiletto dash, finished in black crackle paint (naturally). It comprises an oil pressure gauge (which doesn't work properly), a coolant temp gauge (which doesn't work properly), a speedo (which doesn't work properly), a rev counter (which DOES work!), a fuel gauge (which DOES!) and finally a volt gauge (which works, but is only there because it came in the box - will likely get replaced with an AFR gauge or something):  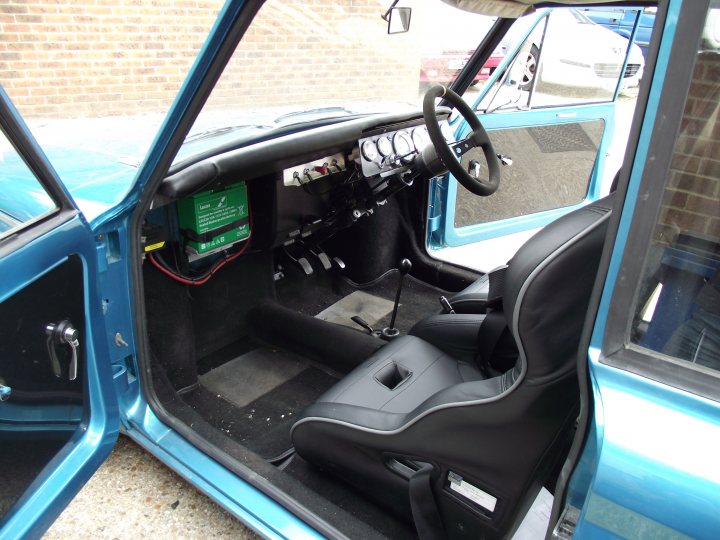 The 'frunk' (front-trunk) would usually be loaded with a spare wheel, a heater blower motor, a fuel tank and not much else. Now, it houses the radiator and cooling fans, an alloy fuel tank (which sits on a custom-strut brace), the electric fuel pump and pressure regulator. The two areas are split by a plastic bulkhead, which is there to prevent the radiator heating up the fuel tank. The spare wheel well has been opened up to allow warm air to pass through, and the lourves in the wheel arches allow the low-pressure air in the wheel arches to suck the high-pressure air out........when the car is moving anyway!) The splitter is carbon fibre, as mentioned, and the grille is an original Imp grille we cut up and hid some mesh behind (had the idea on the bog one night!) The headlamps are halogen-converted: 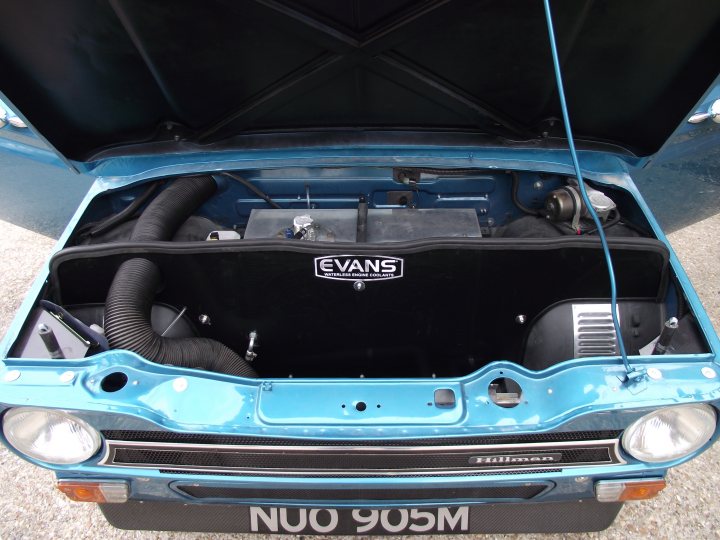 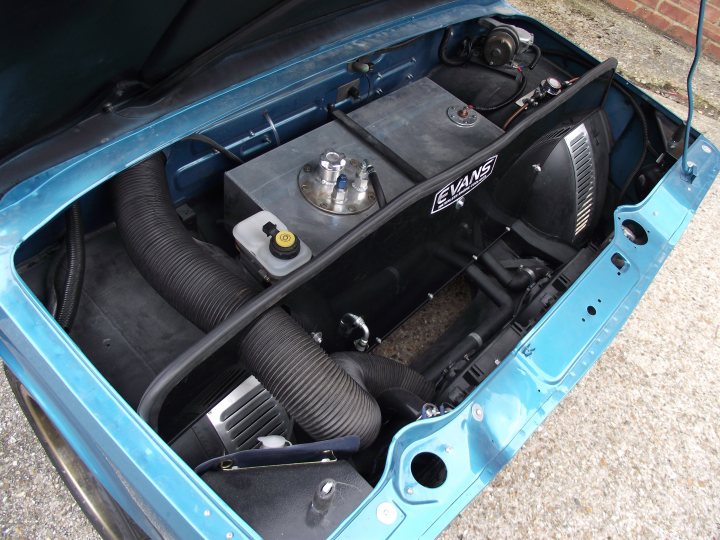 The business end! The Citroen TU5 lump sits with masses of space either side of it, as the original Climax lump laid flat. To fit it in, we had to remove the parcel shelf skin, but otherwise it fits fairly well, and nothing structural needed to be hacked out, which was important to us. The rear panel was a standard Imp piece which we customised into one being able to take a Spoox Peugeot 106 Grp N mounting plate. Spoox carbon fibre timing covers replaced the plastic (must have saved, ooh - 0.012kg there!). The gearbox is a standard mk3 box fitted with a custom input shaft, and uses original Imp mountings. We added a Mini stabiliser bar to the offside of the engine to aid stability, and the rear panel is braced triangularly, just for a bit of additional torque-resistance (we're going from 50lbft odd to around 100lbft): 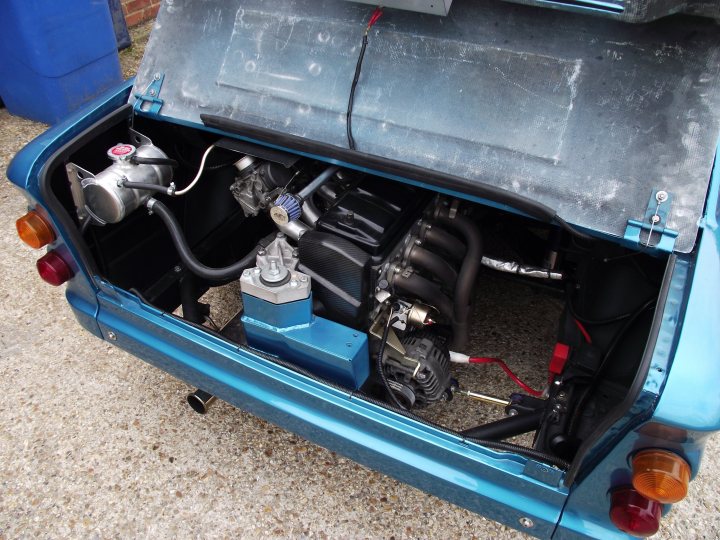 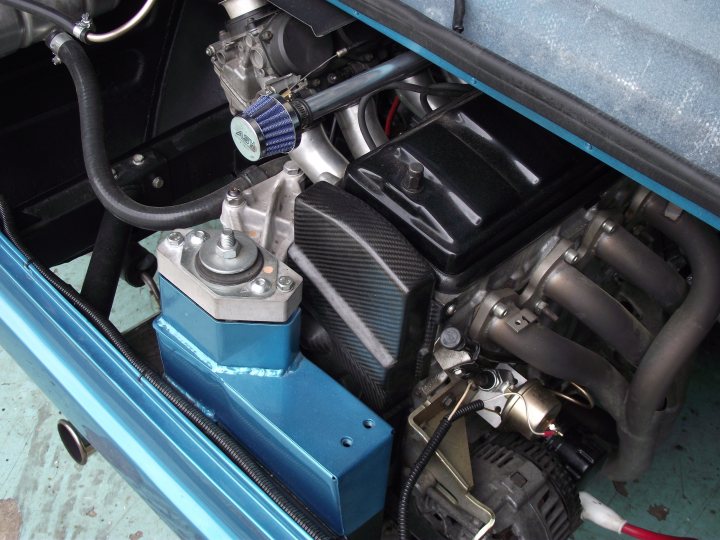 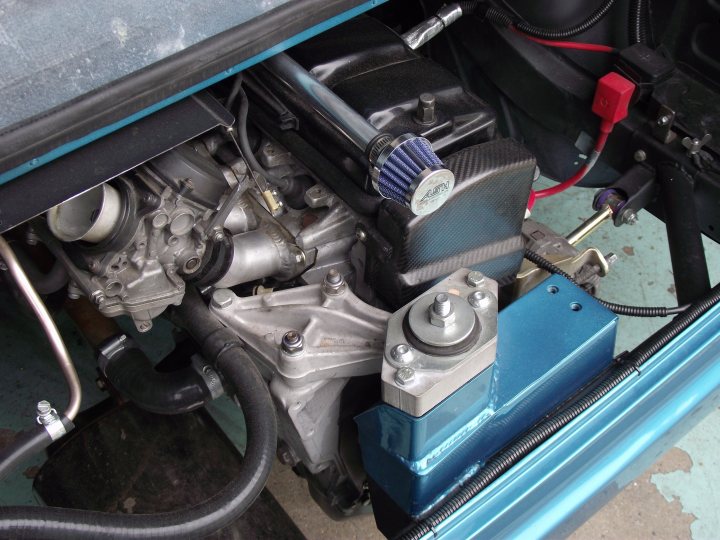 To compensate the weight gain of the engine, the battery and radiator have moved off to the front. The Longlife exhaust system is tiny, and weighs very little. The carbon-fibre engine cover weighs around 1.5kg - around 5kg less than the original. Access to the engine is gained obviously though the engine lid, but can also now be gained through the interior of the car. This sound-deadening box we made from Celotex board, and insulated it against heat. It's mounted on a rear stiffening brace, which also houses the seat belt harnesses: 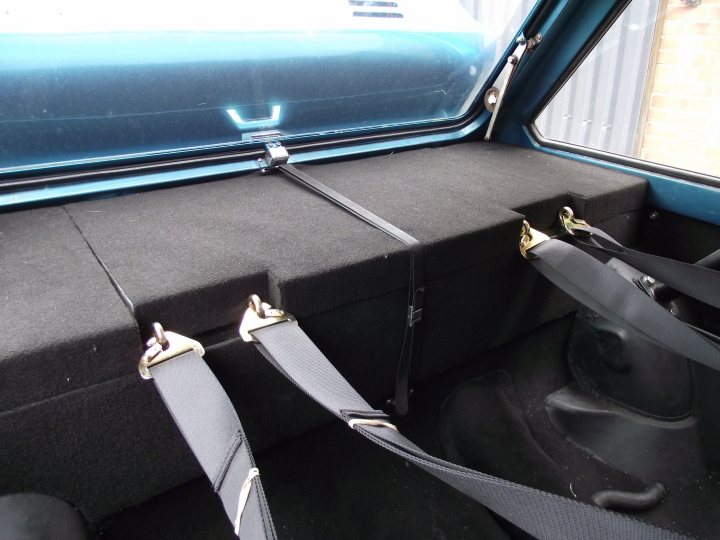 There is also a safety devices roll bar fitted. So what's it like to drive? Erm, frantic! That would probably the be the best way to describe it. In terms of performance, it's probably on par with a 205 GTi 1.9 or a mk2 Golf GTI 16v - that kind of level, only with a lot more noise! The gearing is the weak link, really. It's only 4-speed, and the final drive is very short. 2000rpm equates to 30mph in top gear, and each 1000rpm increase equates to an additional 15mph, so 6000rpm is 90mph. Being that the limiter is at 7000rpm, top speed is basically a ton, so it's not exactly....refined. It pulls well, makes a nice old skool carb induction roar and plenty of soft pops from the exhaust on the overrun. It's very easy to drive in traffic, all controls are light and easy to use and it idles sweetly. Handling? It's good! So much communication through the steering and through the car itself. You can feel the weight shifting around, but it's all well-mannered. That's at 7/10ths - on a qualifying lap it might be more of a handful, but it kept up with a new shape Mini being driven fairly briskly recently. Probably enough to make the driver look in the rear view mirror and think "Eh?!" The gearchange should be sweet, but isn't. More work needed here as it makes some awful noises when coming on and off the clutch, and it tends to lose its oil. We always knew it would take a while to iron out the creases, and we suspect the concentric slave cylinder we fitted is to blame. The brakes are equally as bad. So much so, I'm currently looking at a pair of old Wilwoods and some 5mm plate steel. The suspension is surprisingly compliant. Riding Gaz coilovers at the front and Gaz adjustable dampers with standard springs at the back, it rides quite well. The suspension was quite advanced for a small car of the time, and it shows even today, where it rides better than something like a Metro, designed nearly 20 years later. On the whole, it's a lot of fun. I love innovative, often overlooked cars, and I always wanted to own an Imp. The Imp was the first car to have folding rear seats (which I've removed) and using an all-alloy engine in a compact car was certainly unusual (removed that too). But on the whole, it's a good giggle and I'm looking forward to tinkering. Next step, new seats (I don't like the ones currently fitted that much) and I'll be ditching the gold wheels (again, not my cup of tea - Tim loved them though). Oh, and the engine needs to come back out to have a look at that clutch/gearbox issue. I'm aiming to get it to some shows and meets this summer though, and a couple of mags have been chasing for a feature for a while.
|
| |
|
|
|
|
kitch
Part of things
Counting his chickens
Posts: 157
|
|
|
|
Because the car has had so much work, and so many new designs etc, the 100miles or so that it's covered since it was built are really test miles, and the car is still being tweaked. I've got a small list of big issues to put right at the moment: * I've got suspected fuelling problems with the carbs * I've got some pretty bad bodywork issues, caused by the guy who did the panelwork on it prior to the paintjob (carried out by a different guy) * I've got clutch/transmission issues. Everything else is stuff I can sort later on. Stuff that doesn't really hamper my use of the car. I did change one non-critical bit, though! OMP T-RS Legends (left) out, OMP Brands Hatch (right), in: 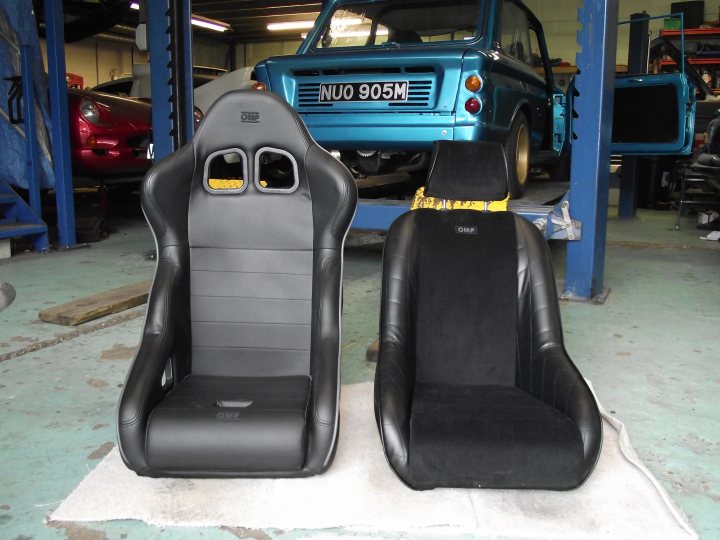 Never really liked the full buckets, in terms of style and in terms of fitment. They were MASSIVE in the little Imp. They'd be great in something a bit bigger, but I wanted a more old school look:  They match the OMP harnesses, and OMP steering wheel. I could be sponsored by OMP!:  They also have corduroy centres. Win: 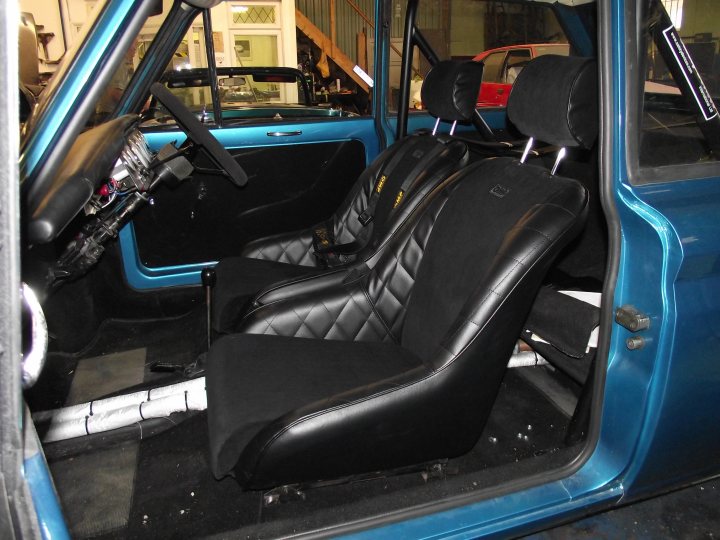 So on to more pressing issues - gearbox. The transaxle I'm running is the standard Imp transaxle. It's very light (good), very short geared (not so good) and fairly weak (obviously a bummer, but not so much of an issue if you're sensible and don't try to jump from about 45bhp to around 110bhp). The idea with the conversion was that if it chewed a gearbox up, we could replace the engine with a 1400, 1300 or even 1100cc version of the TU in preparation for the next gearbox. Or, we could upgrade the gearbox, but unless you want to spend £3k on a 5-speed Jack Knight dog-box, that's going to involve cutting and shutting something. Or, Tim (now me) could just learn to drive a bit smoother! Now, we have transmission issues already, with around 100miles covered. Or rather, I suspect we have clutch issues. The gearbox is dropping oil from the bellhousing area, and when fully depressing the clutch pedal, you hear a nasty grounching kind of noise. Trying to select gear can make this worse, but not by much. It'll do it in neutral. Let go of the clutch, and all is quiet again. Gear selection gets worse the more you drive the car. So we have a problem! The original Imp setup used a slave cylinder, release arm and normal clutch (first car to have a sprung centre plate I believe - more innovation there, innovation fans!) In order to run the TU, we had to improvise! We used a modified Imp input shaft, found purely by chance on an Imp forum. It had been made to accept a Ford-spec clutch plate, so that's exactly what we used - a Ford Sierra 1600 clutch plate, turned down around 5mm to mate up to a Saxo 1400 clutch cover (which was designed to use a 180mm clutch, not the 200mm of the standard VTR spec. Because of this, we dropped down to a 1400 flywheel too, which came from a 106 Quiksilver (on the bay of E, at a cost of £10, posted!) We had to drop down to a 180mm clutch as the 200mm one wouldn't fit inside the Imp gearbox bellhousing! So, we sent the shaft away along with the rebuilt Reg Patten gearbox, back to Reg Patten for him to install the new input shaft.  When it came back, we fitted this:  Concentric slave cylinder. At the moment, it's my belief that this is the unit at fault. Why, is anybody's guess. Worst case, the gearbox doesn't like having the load of the clutch against it there, and has fractured (causing the oil leak). Best case scenario, the design is fine and it's simply a faulty unit. We'll find out tomorrow, when I pull the engine out and have a look! |
| |
|
|
kitch
Part of things
Counting his chickens
Posts: 157
|
|
|
|
Friday (many, many Fridays ago!) saw an attempt to figure out what the gearbox issue is. Engine and gearbox to be removed, which begins by access the back of the engine via the interior of the car (aha! Stick that in your hash-pipe Hillman!): 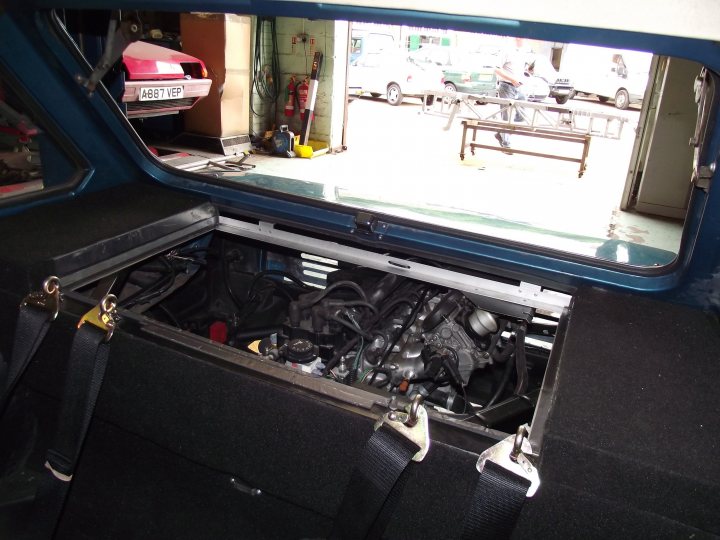 Engine and box out (again):  Engine and box split:   Trying to work through my head as to what could cause the issue. The issue being a loud groaning sound, matched to engine revs, which arises when you press the clutch pedal down. I had visions of the release bearing failing (it has, as it goes - or the bearing part at least) or something grinding away on something else. I didn't stop to consider the thrust bearing, which looked fine on the face of things: 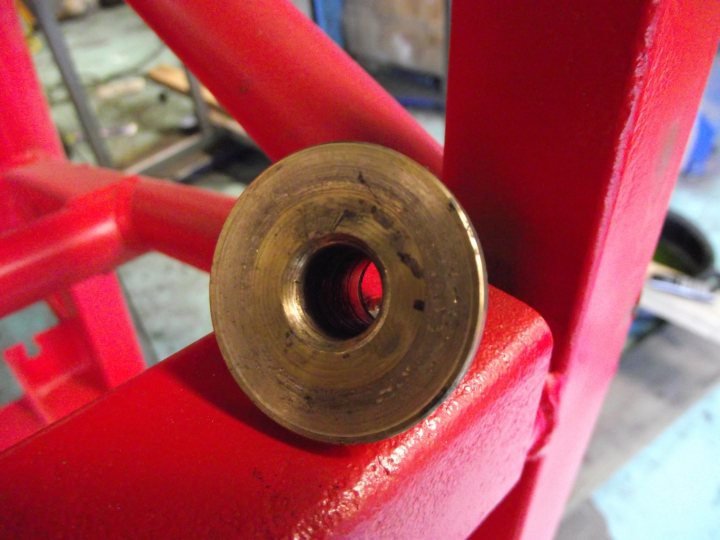 But rattled around in the end of the crank like a prick in a shirt sleeve! This is why: 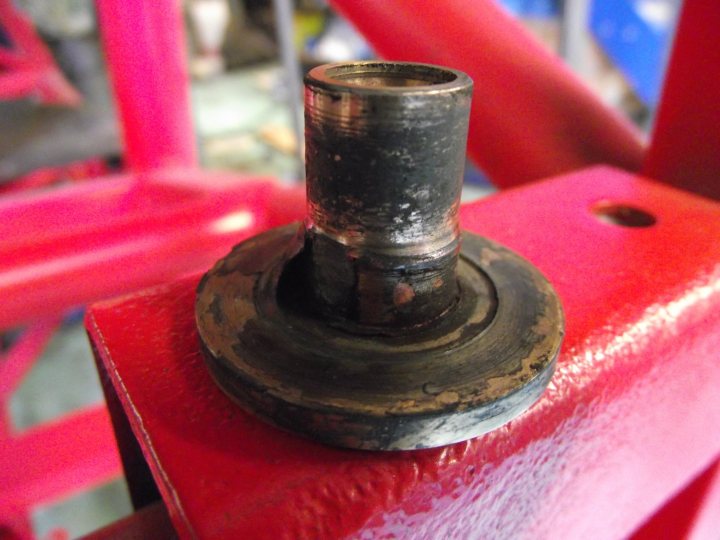 150miles down the line, it's knackered. So why? Well, the Imp transaxle has a very floppy input shaft (ooh err!) Stood alone, there is no bearing support and the shaft flops around. It's designed to engage at the very end into a bearing at the end of the crankshaft, which a Climax lump used. The Saxo setup is different. There is no play in the Saxo's input shaft, and they don't use a spigot bearing. Because of this, we had to make one from phosphor-bronze, which we then bonded into the end of the Saxo crank. It looks like the epoxy we used didn't really hold up to the job, so on Monday I'll be popping down to see the boys at the local engineering works and see if they can make me one which is more of an interference-fit. Stick it in a freezer while heating the crank up in preparation, kind of thing. Fingers crossed, that was the issue with both the noise and with gear selection. |
| |
Last Edit: Apr 6, 2018 12:22:40 GMT by kitch
|
|
kitch
Part of things
Counting his chickens
Posts: 157
|
|
|
|
Since the last post, I had to go on a speeding awareness course, as the trip to the Seven Stars with the wife resulted in being zapped by a man in a van! Speedo wasn't working - it's a fair cop! Since then I've removed the engine, installed the new spigot bush, refitted the engine etc and made a few tweaks to the layout. Horrible noise coming from spigot bush gone, but now the clutch is not working properly, and I have a torrent of DOT5.1 hitting the floor. Time to drop the concentric cylinder and explore other ideas. I've also sourced an original mk2/3 dashboard, as I'm not really loving the non-dash the car currently has. Plans are to get a mate to flock it, tart it up with some carbon fibre and tit bits and go from there. I want to keep the electromagnetic indicator stalks though - they rock. It also needs some bodywork to sort out the mess the first bodyshop guy made of the doors, but I suspect this might have to wait for a while. Oh, and the wheels are no longer gold:  |
| |
|
|
kitch
Part of things
Counting his chickens
Posts: 157
|
|
|
|
Time for an Impdate! Work has resumed on the Imp, mostly because it's immobile and in the way, and I need to get it out and home again. If that means fixing it so it can be driven and enjoyed again, so be it! The main issues currently concerning the Imp are: 1) The clutch, which didn't work and needed a re-think 2) The interior, which I wasn't mad on, and needed a rethink 3) The bodywork, which needs sorting! Of those three, the bodywork is the least important. It won't be done any time soon, mostly because funds don't currently allow. The issues aren't the paint, as on the whole it's a beautiful paint job. It was done by a mate of mine, though if he spots the bit he didn't quite cover properly under the driver's door on the sill, he'll kick himself! It'll be sorted when the bigger bodywork issues are sorted, namely the fact the panel gaps around the doors are atrocious! They were done by a bodyshop on my workshop's industrial estate, and they are shocking! I shouldn't be surprised, as I've had similar issues on another car I had done there. Still, you live and learn! 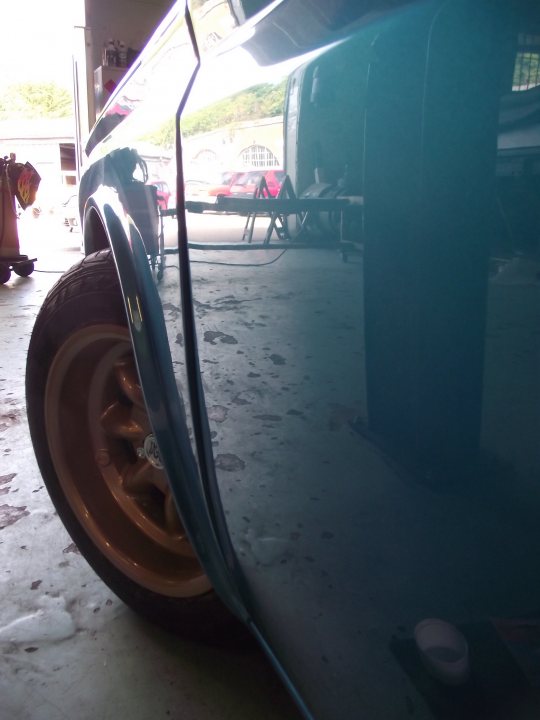  I also found that he'd used a fair bit of filler in the front arches, when the front tyre tried to knaw a chunk off: 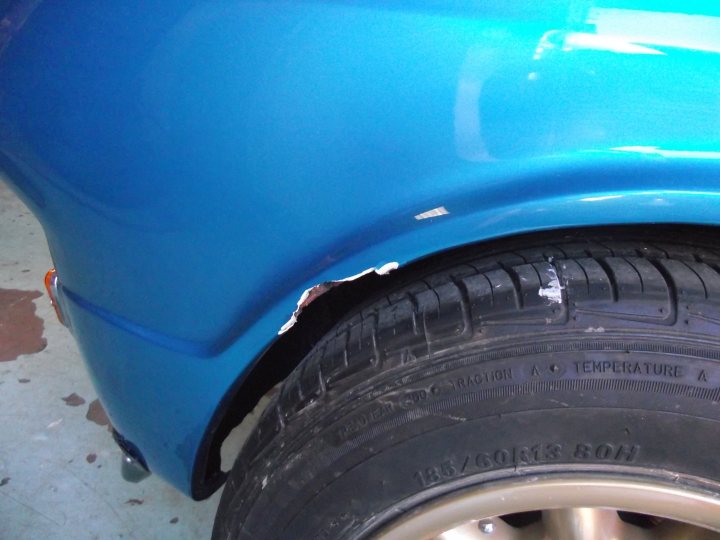 Anyway, as I say the bodywork will have to wait. What's more important is getting it to drive right! The interior will come later. Those who've been following the thread will remember I've had issues with the concentric slave cylinder arrangement we first used. The setup had its advantages, as the bearing had its own guide so to speak. It exerted the force directly onto the clutch, with no other moving parts. Great! Only not. The issue has been getting the thing to stay leak-free. The unions had leaked since day one, and once I'd finally got those to seal, the main seals themselves decided to start weeping. It could probably be fixed and used again, but I've given up on it. The main problem is that each time you want to do anything with it, you have to take the bloody engine out and take the gearbox off! It's not that hard, but after the 3rd time it gets pretty boring! Originally, the Imp used a hydraulic setup, with a slave cylinder pushing on a release arm posted in from the top of the bellhousing, thus:  I decided that I would go back to this tried and tested layout, but realised there was a problem fairly early on; The original Imp engine is canted over, and the Saxo engine sits bolt-upright. This means that there is an engine where the Imp slave cylinder needs to go. Bum. I looked into 'pull'-type cylinders, that I could mount on the opposite site of the release arm. I looked at making a cradle for the standard cylinder to sit inside, in front of the release arm (so that when extended, with would drag the arm in the right direction). However, salvation was at hand, in the form of Car Builder Solutions! They offered a very slim clutch slave cylinder: www.carbuildersolutions.com/uk/flat-backed-clutch-slave-cylinderWith one of these, I might be on to something! I ordered one up, adjusted it so it fitted and offered it up. it fitted! The only issue was that the cylinder sat slightly higher, which then meant I had to cut the top off the release arm I'd found, and attempt to extend it:   Once I'd extended it up to the height required to meet the cylinder, it was looking promising!  That was the top taken care of (and yes, I've done some maths and it will extend far enough to disengage the clutch - I even measured how much travel was needed to do this:  I even filmed it in action! Only needs about 5.5mm of movement from the would-be release bearing to completely disengage: The original Imp setup, however, used one of those 'orrible graphite bush-type affairs, rather than an actual bearing. Aside from being awful, this is incompatible with the clutch cover, being a TU 1.4 setup. 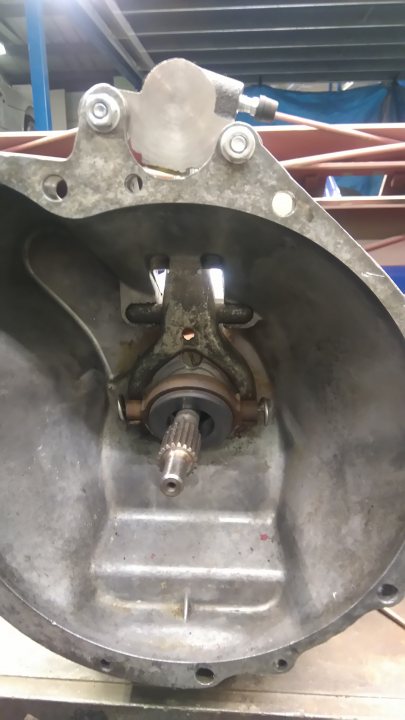 So I set about trying to remove the carbon/grahpite bush from the Imp's release mech so I could attempt to convert it to a bearing-type setup......and broke it. I have no pictures of this. Honest! I wasn't 100% sure that this was the best way to go, as there would be more work to be done trying to extend the release mech out to reach the clutch (baring in mind the adapter plate between the engine and gearbox means everything has be extended forwards the same kind of distance), but with no other ideas immediately at hand, I decided to get another bearing in to see where I'd end up. I had a stroke of luck, as by chance I discovered MG Midgets (with the A-series lump) use a similar setup, only slightly deeper: 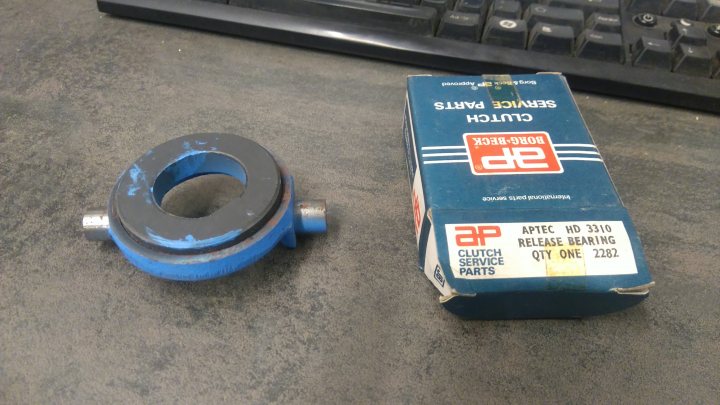  I drilled the retaining clip holes and successfully removed the graphite from the housing: 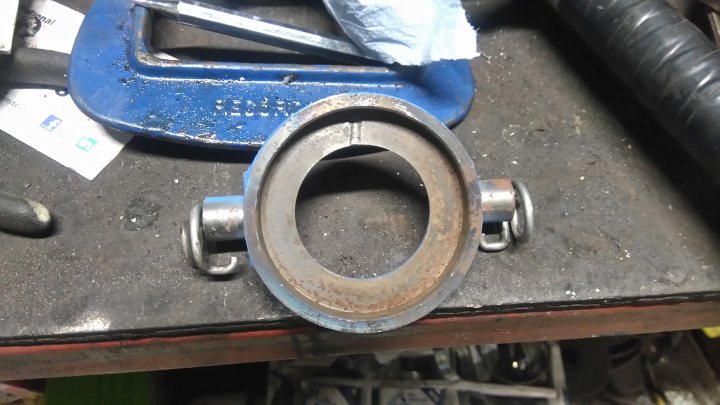 It now fits the Imp release arm: 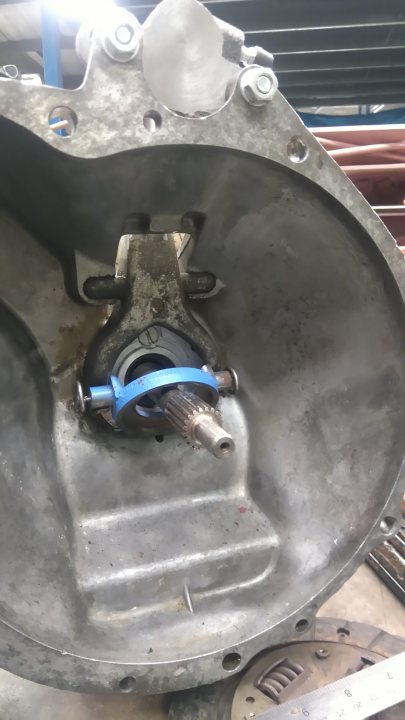 It hasn't won me all the extra clearance I needed to make up for the adapter plate, but it's a step towards it. However, I'm now at another crossroads. You can see in that pic above that the release housing is drooped over - the centre of gravity just can't keep it upright, even with the standard Imp bearing. The issue is that once the clutch is fitted and everything's in place, the top of the bearing is going to constantly be resting against the clutch fingers. Now there won't be much weight against it (not unless I use the clutch as a footrest like a numpty), so in theory the bearing should be OK. To be fair, even if it did shorten the life of it to something like 15,000 miles, how long exactly is it going to take this car to do 15,000 miles?! It'll be 15years I expect! Even so, it bugs me. I like the idea of using a sleeve for the bearing to slide up and down, like on the original Saxo setup, but the problem is the release arm has fixed location points to the bearing; It won't allow it to move back and forth as it's trying to move in a small arc, and when sliding up and down a sleeve there is no room for an arc, with or without all the animals and floods and Noah and curse word. So my thought processes at the moment are: * Do I need to fit a sleeve, and in doing so have to redesign the release bearing setup and how the arm operates it.......again or * Can I just have a spacer made to go between the existing release housing and the current release bearing, and live with the arch it sweeps in an arc? Decisions! |
| |
|
|
kitch
Part of things
Counting his chickens
Posts: 157
|
|
|
|
Many nights have passed since I last updated the thread, and that's because many nights have passed since I last did anything to the Imp! However, progress has, at last, been made! So to pick up where we left off, I had decided to use an original Imp release arm (modified) and mount a slave cylinder externally, as per the original Imp design. I had space issues as the original Imp cylinder lay over the original Imp engine, and because I don't have an original Imp engine, I don't have anywhere for the original Imp slave cylinder to lay. There's a lump of iron where that would go, so a slimline clutch slave cylinder was obtained and fitted. Initially, we'd been running with a solid spigot bearing (an oilite bush, if we're being pedantic). The first one that went in was awful - too small, and it broke out. The second one that went in last year ended up being too tight on the end of the shaft. Different ideas were floated, before we actually found a supplier of needle-roller bearings in various sizes. The TU engine doesn't use a spigot bearing, as the MA gearbox a Saxo is normally fitted with has the support bearing on the input shaft, but happily there was still a bore hole in the end of the crank, and into that I managed to fit two very lightly greased needle roller bearings: 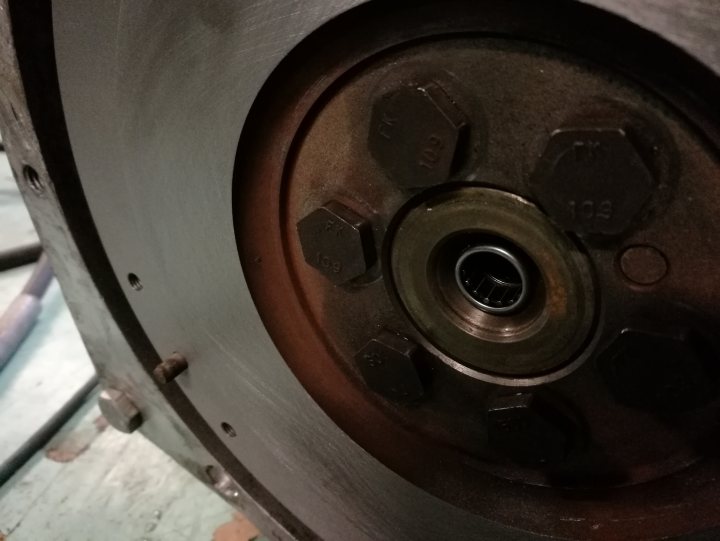 Another modification made through the process was shaving 0.5kg off the flywheel, by using an AX GT item, rather than the 106 Quiksilver item that was already fitted (the original Saxo VTR setup didn't fit in the bell-housing as it used a bigger clutch). I think the half a kilo saving is purely down to the fact the 106 unit had an enlarged timing ring on the outside of it, presumably for the TDC sensor on an injected engine. This change also necessitated the use of an AX GT clutch cover, rather than the 106 one, but that was fine as I had beaten ten bells of curse word out of the 106 one trying to remove the gearbox a week or so before! The AX GT flywheel was refaced, checked for balance and fitted to the VTR engine:  The issue with all this was that I was going to have to space out the release bearing from the housing, which itself just pivoted on the end of the release arm. In a normal Imp, the issue of balance wasn't....well, an issue at all, seeing as the COG of the housing was spot on, and the bearing was actually a carbon bush. Different ideas were floated around on ways to extend the reach of the bearing (because of the thickness of the adapter, and it causing the gearbox to sit further away from the engine), but without having the issue of the whole assembly tipping over and getting too up close and personal with the clutch cover fingers. That would be a fairly annoying noise! Eventually, through researching bits on eBay and playing on Google, I arrived at something I thought might work. First step was to obtain an MG Midget (1.3.......I think) release bearing, as seen further above. I then had my business partner turn up a delryn insert, that would fit inside the bearing housing (having removed the carbon bush). I have no decent pics of this, but in this image I'm drilling a tapping it, so that I can fit some small retaining bolts from behind (all they'll do is keep it up against the housing, and stop it trying to rotate in the housing, should the bearing seize up or something: 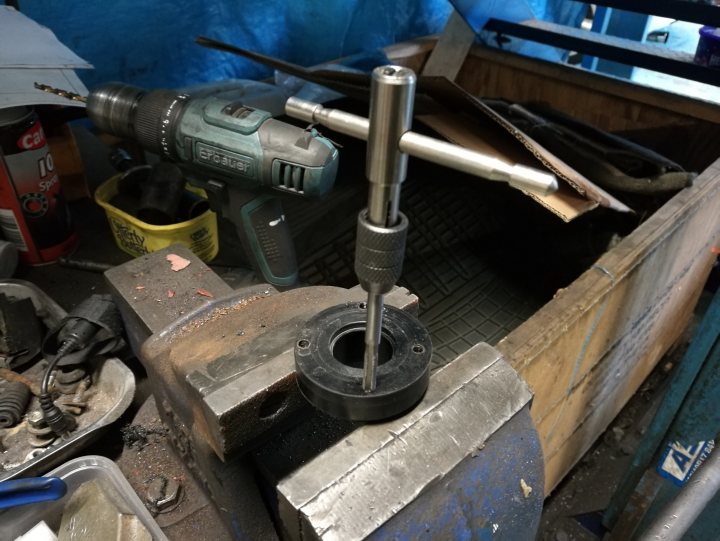 Here it is with the bolts fitted. I'd love to tell you they're not fitted in an even PCD for a particular reason, but the truth is it was late in the evening, it won't affect how effective it is, and (perhaps crucially) nobody's going to see it...  In the interim period, I'd been speaking to a guy who used to race Imps. He said a trick back in the day was to bend a nail and weld it into the inside of the release bearing fork. I didn't fancy that, so I found some M8 studding and used that instead. I've been pretty curse word with getting pictures, so this is how it looked to start with. You'll have to take my word that I fitted it!  Next step was to modify the top of the arm. Risky business, as I'm now altering the swing ratio, but as I measured before, I need 8mm of movement. The release bearing gives a maximum of 15mm (I think), and through the measurements I worked out I needed 12mm of movement at the slave. I made a new end for the arm, beefed it up pretty much everywhere and finalised the design:  Then it was time to paint and fit, along with the pushrod I made from an old TVR Chimaera clutch master cylinder rod, connected to a rosejoint. I made it adjustable, so as the clutch wears down I can shorten the pushrod to compensate. I don't want to be changing it again for a long time!  In order to keep the bearing vertical, I managed to come up with a really simple but effective solution right at the end (at the point I was contemplating life with a release bearing that chattered its tits off everytime I pulled up at the lights). All it took, was a spring! 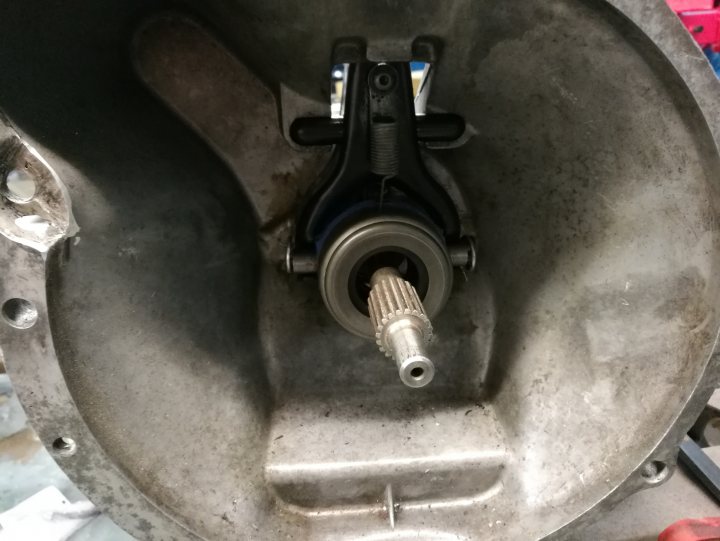  Here it is all fitted and with the retaining springs lockwired in place to stop them dropping out. So what I ended up with, was a bit of a mis-mash of bits. Citroen Saxo VTR engine Hillman Imp mk3 transaxle with a custom input shaft (with Ford splines) Citroen AX GT flywheel Citroen AX GT clutch cover Ford Sierra 1.6 clutch plate (turned down to 180mm) Fairly heavily modified Hillman Imp release arm Saab 900 release bearing MG Midget release bearing housing (with custom delryn boss) CBS shallow clutch slave cylinder with modified TVR Chimaera actuation rod and HEL braided line Before I even through about putting it back in, I had to check it all added up. I knew the slave cylinder was the same capacity as the original Imp one, and it was running a standard Imp master cylinder, so the piston ratio should be the same. Only one way to check whether it all works or not.....rig it up!  Luckily, thanks to the HEL braided line, I had just about enough spare hose to sit the engine on the floor and bleed it in! It seemed to bleed in OK, and it was operating the arm, so I made the decision to actually fit the engine and see if it worked or not. I did! I have no picture of the engine back in place yet, but the driveshafts were fitted up and the clutch bled in once more. I put it in gear, tried to rock it backwards and came up against the engine resisting it. I depressed the clutch.....and still it wouldn't move. I sighed, loudly. I pushed harder and realised I could move it, but that it was dragging heavily. I had a feeling there was some air trapped in the system, and suspected the slave as the bleed nipple is mounted at a less than ideal angle. I removed the cylinder, bled it in my hand with the bleed nipple pointing the right way, refitted, tried again.....YES! The clutch was working! 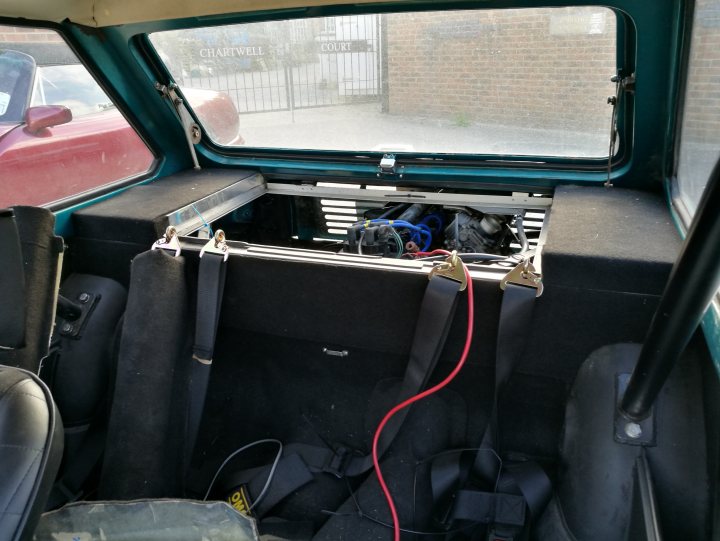 I rigged the engine back up and got it running. I tried to select gears...no problem at all! The pedal is a perfect weight, and the clutch is silent both disengaged and engaged. It actually couldn't have gone better! I took a quick video, which I'll upload to the tube, but early signs are great! Last time it was on the road, I remember there were some issues which I'll need to resolve, but I've booked an MoT for Thursday, so I'll see if I can get it through and begin testing it. It needs a new battery, and I'm going to fit a proper 063 rather than that stupid cyclic gel thing that goes flat every 5 mins. In the meantime, I completely forgot I'd applied for a spot at the Goodwood Breakfast Club classic car meet. The Imp's been accepted, so fingers crossed it'll be there on the 6th August  |
| |
|
|
kitch
Part of things
Counting his chickens
Posts: 157
|
|
|
|
You know you're nervous about an MoT when you wash the car first....  |
| |
|
|
kitch
Part of things
Counting his chickens
Posts: 157
|
|
|
|
Straight through! Picked up an advisory on the kingpins, which it had last time (but in reality it's done about 60miles since then, though the speedo says 170 because it was overreading as we hadn't done a good job designing the speedo pickup). Otherwise, no issues, though the tester did say that so much of the test isn't applicable to a car of that age it's almost pointless doing it! I had brought my TVR into work yesterday morning to get it ready for the Uxbridge car show on the weekend, where the TVR S group have a stand. That meant that, practically speaking, I needed to leave it in the workshop where the Imp normally lives (I've got so many cars they float around - I'm never totally sure where they all are!) So, MoT in hand (and quite a few aspects of the car not fully finished) I decided to drive the car home. I live 4 miles from work, and spent the first mile getting the speedo adjusted fully (now reading 1mph over). I spent the following 8 miles (slight detour) grinning like a loon. I arrived at home yesterday around 7pm, and to be honest I was buzzing! That feeling where you've just done something fun, and then you suddenly stop, leaving you at a bit of a dead end for the next 30mins! It's so much smaller even than the TVR. Ideal sized for a tiny garage (going to be fun getting the BX back in there):  I'd just forgotten how much fun it was. It's very noisy, very frantic and very fun. The gearing is so short that if you put your foot down in 2nd or 3rd it really pins you back in the seat! It sounds mental, and angry, and yet it only lasts a few seconds as you run out of revs (because of the short gearing). You work up a sweat baaaaaarping and banging and making 1970's rally car noises, and then you get home, look at your GPS app on your phone to check the mileage is correct and find that you didn't exceed 52mph! I never broke the law, yet I was grinning like a Cheshire cat! Probably because I got to 52mph so quickly... I'm going to make a list of things to sort out. I junked the small gel battery and went for a proper 063, but I need to find somewhere decent to fit it and secure it properly. The brakes need bleeding again as they're really poor (I hope that's not 'how they are', and then there's the bodywork to sort out. I'm also planning on giving the interior a revamp. You know, just with all that spare time I spend kicking around doing nothing.... |
| |
|
|
kitch
Part of things
Counting his chickens
Posts: 157
|
|
|
|
Finally managed to find a couple of hours to sample some more Imp yesterday. I had to go to a DIY shop to buy a stopcock key, so combined this with a ~30mile trip in the countryside to let the Imp sing me the song of its people (breakdown, for those who don't get that kind of curse word humour!) On the whole it behaved very well. Might need to think about hooking the choke back up as getting it going first thing wasn't as easy as I'd hoped. Also found a small coolant weep from the back of the engine, but nothing major, and because it's running waterless coolant, it doesn't get up to pressure and spray everywhere once it's hot. Ah yes, heat. That was one of the 'issues' raised by the cheapo Dolphin gauge set:  It would flirt somewhere between there and 250F. I learned this morning that 212F is 100C (it's almost like Celcius makes more sense, or something), so at times I was way above that. Apparently. However, the cooling fan is controlled by a Looks-like-a-kenlow-but-isn't-a-kenlow-but-is-basically-the-same-thing-controller, and this was still set at 85degC, as I hadn't altered it since I'd been playing around. I pulled over and had a look:  Because it's got a kind-of-lumpy cam, I have to run the idle a bit quicker than normal, otherwise when the twin cooling fans cut in the idle gets dragged down so far the rear view mirror falls off. However, when I stopped, I noticed the fan wasn't actually running anyway, which meant despite the gauge saying I was close the apocalypse, I was actually closer to gas mark 2. From that point on I decided to ignore the coolant gauge! Plans for the future here include moving the fan controller inside the car, and rigging up an LED on the dash to illuminate when the fans cut in, because unless I'm stationary, I can't really tell if they're on or not, and if they're running while I'm moving along, that's not good for them. I had another moment when at full-bore in 3rd gear down the A32 (calm down officer, have you looked at Imp gearing?!) In 2nd, she pulled hard. Continued the trend into 3rd too, until lots of pinking, misfiring, chattering and a general lack of progress became apparent at 5000rpm! I let it roll down the road, collecting my thoughts, and looked for a lay-by. It was at that point I realised it was actually still idling, and seemed to be responding to the throttle inputs. I selected 4th gear, and it carried on its merry way. I stopped at the old station car park in Wickham (loves my old disused railway curse word, I do) and popped the 'frunk'. I spotted the fuel pressure regulator was set wrong, so the carbs probably ran out of fuel. Good ol' TU engines! Any other lump and I'd have melted something! I reset the regulator, and failed to find the balls to try it again. I'll have another go closer to home! 30 miles (give or take) covered, and generally no issues. Brakes need further bleeding as I swear they're supposed to be better than this! Rear view mirror is useless, as (even though it hasn't fallen off) the whole car buzzes around so much that you can only make out objects at certain RPM. Get the frequency wrong, and you can't tell if you're being tailed by the rozzers, or dragging an old lady down the road by her shopping trolley. I think I might need to do a bit more to bring a sentiment of refinement back into the car. I've (still) not driven a standard Imp, but I suspect this one has MOAR NOISE! It buzzes, it tingles, it smells, it gets hot in the cabin and it doesn't give you a break. My TVR is a Rolls-Royce compared with this! I'm itching to go and drive it again now though, that's how fun it is! |
| |
|
|
kitch
Part of things
Counting his chickens
Posts: 157
|
|
|
|
'So, how's the Imp going?'....nobody asked. True enough, but I thought I'd share the progress since the last update. Has there been any? Well, yes, happily! Things have gone well in the world of the little Scottish saloon. I had plans for the weekend just gone, but the game last week was all about putting miles on the car, to give anything that felt like failing on me, a chance to fail. Thus far, nothing has, and to date (10th August) it's covered around 450miles on the odo, or around 300 real miles since the thing went back together. Initially, I was just mooching around in it, using it when I could. I commuted in it at the beginning of the week, and had to take a detour as my normal route was closed due to a cyclist riding underneath a van (probably not intentionally). I've had worse commutes though, as commutes go:  On one hand, the simpleton part of me thinks 'How cool! I'm commuting in an Imp!' While the more rational, buzzkill part of me thinks 'Yeah....like about 100,000 people were in the 70's...' A couple of short runs down, I set about getting it ready for a couple of longer test runs. The first to Portsmouth (boooo), and then to Southampton (yaaay). The first stage in planning any journey is, of course, to attend to areas of body damage. Y'all remember the issue around the front wheelarch? Well, the lump of filler that the bodyshop (who did the bodywork, but not the actual painting) left in the arch was hacked out, and the metal treated/made good. Not a permanent repair, but it'll do for now and it'll stop it getting any worse:  Of course, to improve the look further, I needed some paint. Not just any paint either! I needed paint that was the same colour as the bodywork (which is Opel/Vauxhall Karabic Blue 277, seeing as you asked. It's so close to the original Aquarius, it's just easier). A trip to Express Paints in Portsmouth was required, which would not only pave a way to painty-goodness, but also give the Imp a slightly longer run to deal with. It wasn't just the Imp that would benefit from this trip either (if it didn't break). I also needed some paint for the BX GT bumpers (Oh yes, the BX GT....that's on here somewhere too). This meant I needed to take a bumper down to the paint shop (not a paintshop, it's actually a shop that sells paint). So, the Imp became a BX bumper carrier:  Paint was acquired, and the front end visually improved:  Nothing special, just a rattle can job, but it'll do. One of the other tasks on the to-do list, was to relocate the battery. Originally, we had a compact gel battery fitted (effectively the same as those Odyssey types, only half the price) but I hated it. The size and weight was brilliant, but it had about 3 cranks in it before it was dead. And then it started dying by itself. It was time to rid myself of it, and a standard Yuasa 063 was bought and fitted down behind the passenger seat. I'd have preferred it over the front axle, but there just isn't the space.  Long term I may make a case for it to mount into. The next day, a trip to Southampton was on the cards. It had dawned on me that I'd never had the wheel alignment checked on the car, so I booked it in at The Wheel Alignment Centre and headed down on Friday. I'd previously taken the car to 100mph (private roads, obv) and the experience could best be described as 'alarming'.  Post-wheel alignment, the same test was carried out and the result was deemed 'concerning', which is a definite improvement. It's running 3degrees of negative camber on one side, and 2.1deg on the other (ah, good old quality control!) Ideally, I'd rid the car of the negative camber full stop, which will aid the stability more. Normally a car is set at toe-in bias to try and make it more stable (at the expense of some turn-in response), but in the case of the Imp, it was decided to go neutral. It's much improved, in fairness. I now set about getting it cleaned up (kinda...I used Demon Shine and a rag!) I had a Goodwood breakfast club to go to on Sunday morning, and Friday was my last day of Imp time, so when the working day ended, the Imp evening started. It cleaned up pretty well:   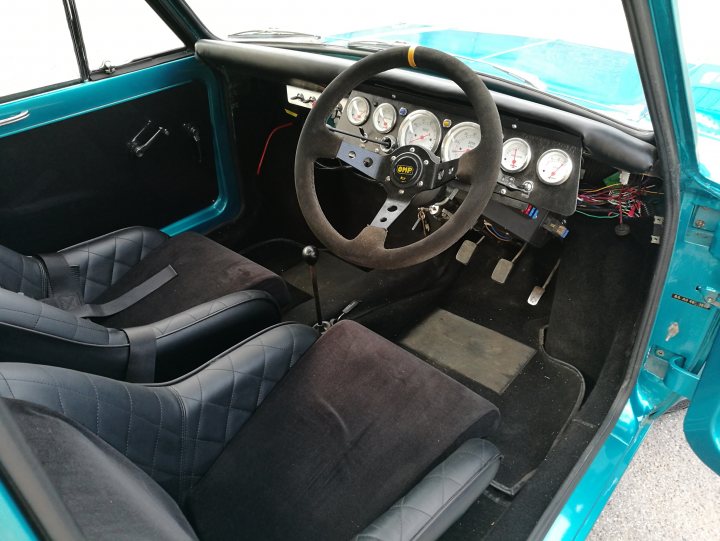 In the course of hoovering the carpets, I found the car wasn't as watertight as I'd hoped. In fact, it's probably more similar to a sponge when the rain sets in. Happily, I found I'd gained more horses! No, really. I always thought the best the engine ever kicked out was 111bhp on the dyno, but when researching the exact RPM figures for making a little info card for the car (so I could put it in the window and avoid any social awkwardness I exhibit when people ask me questions about my car) I logged onto the rolling road computer, and found this: 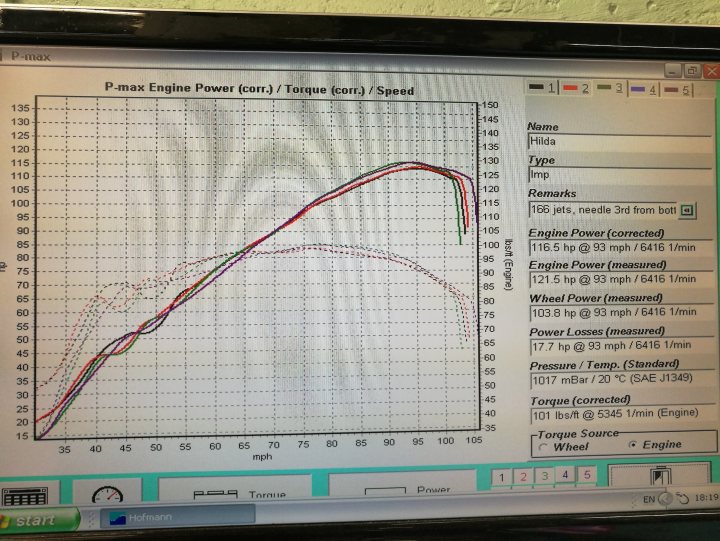 After the last session with the car, I had about 3 runs all around 116.8bhp. Of course, that rounds up to 117bhp! Made me giggle when I remembered the car originally was rated at 37bhp! This car has taken one Hillman Imp, and then added two more into the engine bay :hehe: The Breakfast Club day came, and on the way there I swung by to collect a special guest for the morning (or the first bit of it anyway!).....Tim, the original owner of the car! He came out for the car's first official 'appearance' at any type of show or event. So, in true Breakfast Club style, I pushed the car out of the garage at silly o'clock, and then proceeded to get it started and hold a fast idle to warm it up, because the choke isn't connected. Wakey wakey everybody!: 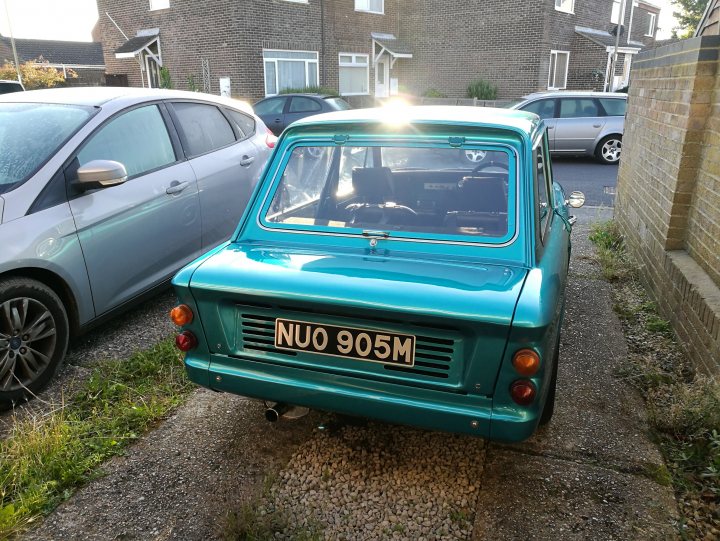 We arrived at Goodwood at around half 8 in the morning. The run there was good, and the car behaved perfectly, except a minor moment where it developed a misfire just before I drove into the tunnel. Not sure what that was about! We were directed onto the track, and realised it was quite busy. I'm not great with getting attention, and the Imp was instantly attracting a lot of attention! 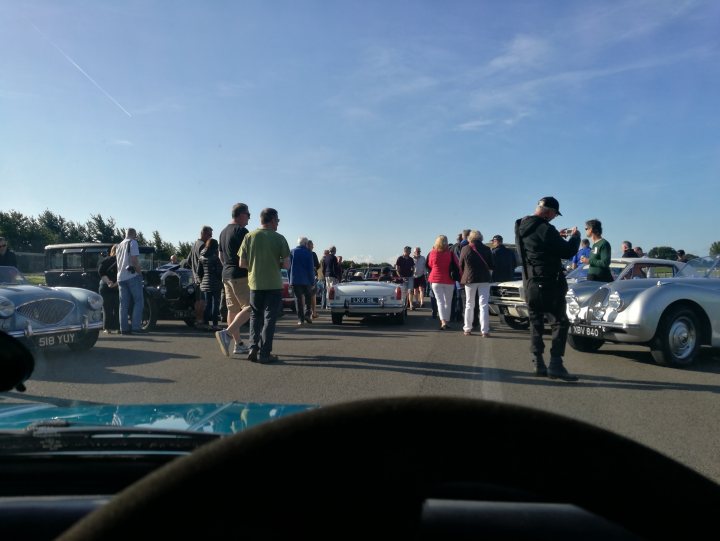 We parked up, and got out. It wasn't even a minute before a small crowd had gathered around it. Someone asked me to open the engine lid, which I did (kinda reluctantly, as I was hoping to go and look around first!) and as I went to walk backwards ended up walking into what seemed like a wall of people peering in! The crowd slowly dispersed, and I spent a bit longer chatting to quite a few people in more detail. I was aware there were people actually seeming to queue up to ask me something, but I just didn't seem to get a minute spare. Tim was fielding questions left right and centre too! Good to see him enjoying the involvement  It wasn't busy there purely because of the Imp; It was a very busy event in general, but I have to say I wasn't prepared for the amount of attention the little thing received. A mix of people coming to see an Imp generally (as I was the only one there, as the Imp National meet was on the same day in Kent) and others attracted more by the 'custom' look of the thing, and the rumours that it had an engine conversion.....possibly. A hour passed in the blink of an eye, and for a while I found enough space to get a picture:  Tim left and my wife and kids arrived. I think even they were surprised by how many people I was talking to (I'm normally not good at talking to strangers!), but eventually I had to apologise to some people looking at the engine, shut it all up, lock the doors and curse word off to look around the event with the kids. Saw some interesting stuff there, including a gorgeous Lancia Fulvia Rallye, and my dream car, a Citroen SM on the grid. Nearer the end of the morning it had quietened down:  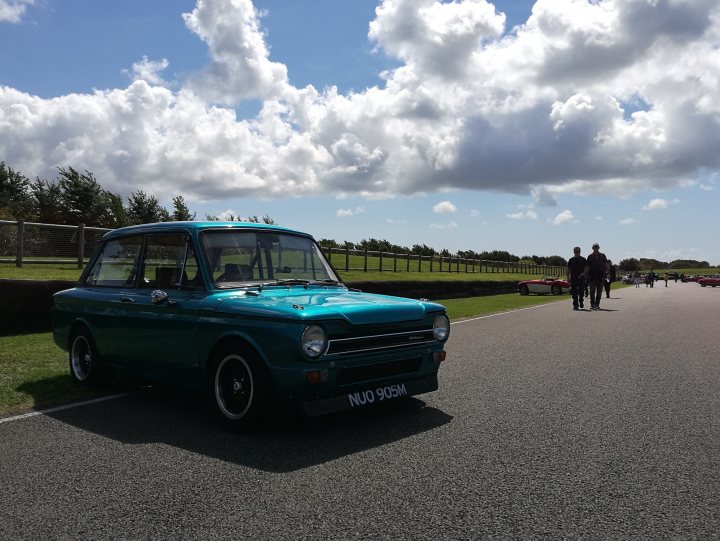 I took the Imp home the scenic way, and I have to say the drive back was simply brilliant fun! I was driving with my wife and kids following in the family wagon, but even at lower speeds it's just so much fun. It's SO involving to drive! Everything is you and the mechanical component you're operating....nothing else. And yet, it's not recalcitrant in the slightest. The gearchange is decent enough (3rd to 4th using your fingertip in a 'flick' motion once the box has warmed up is particularly trouser arousing), the pedals are well weighted, the ride is firm but composed and the visibility is immense. The best thing is the steering though! You feel EVERYTHING. I've never driven another car, where it's like a push bike, in that you see the road surface in front of you, and when you drive over it, it feels exactly as it looks. In most cars, the road noise changes note slightly, even in my TVR. But in this, you feel the information from everything, all the time. Any yaw; Any lateral movement; Any surface change....everything. And yet, it's not overwhelming. It's just right, and it creates a situation where because you have a car that is so involving, and noisy, and buzzy, you should be fed up of it after a while, and just want to get out. But in this car, every single time I've driven it, I always feel a tinge of sadness as I arrive home that my drive is over, even if I've just spent the whole morning in it and have a fume-induced headache to prove it. It's cliché, but it's the closest thing to a go-kart for the road. The weight distribution, the noise....even the steering wheel is mounted at a stupid angle, off-centre! I arrived back on Sunday at around 1pm, and spent the next couple of hours giving my kids their first rides in it. 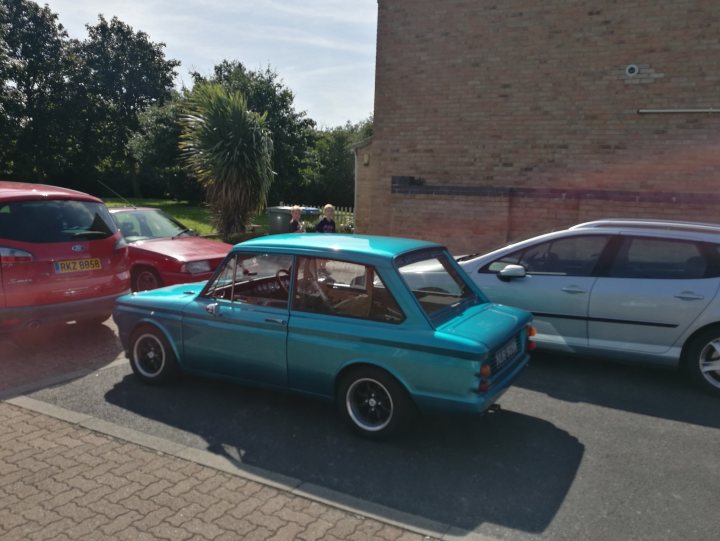 Two 8 year old boys, and a 5 year old boy. Suffice to say, they loved it too, though one did say it was embarrassing being in it when everyone looks! The other 8 yr old said he wished some of his mates from school saw him in it. Who'd have thought that an 8yr old thought a Hillman Imp was so cool, he wanted his mates to see him in it! Words you never thought you'd hear.... |
| |
|
|
|
|
kitch
Part of things
Counting his chickens
Posts: 157
|
|
|
|
So, update time for the Imp! And we start before the last one; At the end of August, last year. Location: Gosport: 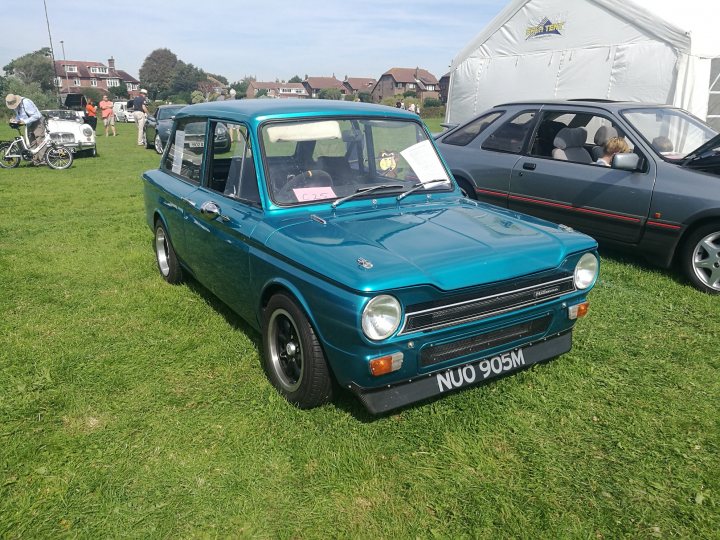 That picture was taken last year, at the annual 'Gosporteers' classic car show. Aside from Goodwood, it's the only show the car went to. I don't seem to get as much enjoyment out of car shows as I used to. Sometimes it's good, but 9/10 times it's just a load of cars that never see the road in anything other than exceptional weather conditions (by the UK's standards, anyway) with a load of 'one-upmanship' thrown in, as everyone tries to out-polish everyone else. Gosport's not like that, thankfully. It's too quiet, to be honest! I did finish the show 'season' last year at Tangmere Air Museum though (not in the Imp - in one of the BXs), and that was a cracking event. Brilliant mix of cars on display. I think I'll try to hunt some more of those down this year in the Imp. I just don't use it enough! But enough pictures of it sitting around doing nothing - you want to see something underneath, right? OK. Last year, about the same sort of time I got it up and running again with the new clutch arrangement, I set about trying to improve the speedometer accuracy. Normally, an Imp has a mechanical setup, with a cable-driven speedo rotated by one of the front wheels (don't ask me which - this car never had one!) This Imp has an electronic speedo, which is driven by a sender unit which I (when I say 'I', I of course mean a man called Simon) fitted to the transaxle, so it reads the offside rear wheel (or more specifically, the offside rear output flange's rotational speed). Originally, Simon (not I; I'm happy to accredit him with this particular detail, as it failed) set the unit up to read the three mounting bolts from the rubber driveshaft 'doughnut' to the flange, believing that - due to the style of sender unit - three pickups would be sufficient. Three pickups were not sufficient, and the speedo floated and bounced and generally did everything except the job is was designed to do; to accurately relay the current road speed to anyone who cast a glance at it. So, a new system was devised (by me, I'm happy to report!) It had been suggested to me, that an old-style Transit fitted with a 2.3 petrol engine (well, that's what the part number I was given translated to), used a detachable type of toothed trigger wheel. This had 36 teeth (probably....I'm not totally sure, but it was more than three), which installed much more confidence! The trigger wheel duly arrived: 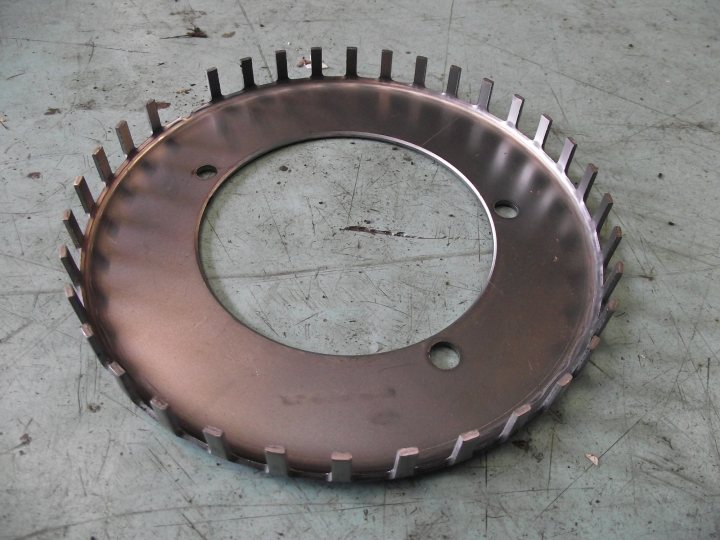 Happily, it already had three mounting holes (the same number as the thing I intended to mount it to). Unhappily, it might has well have had twelve, as they weren't in the right place:  Even more unhappily, the holes I needed to make fell right on the inner edge of the wheel, which meant it wasn't going to be as simple as just drilling three holes (when I say 'simple', I of course mean drilling three holes on EXACTLY the right circumference, or have a trigger wheel that hopped up and down, and smashed up the sender unit). I had to 'relieve' some metal as per the pic above, and then sacrifice some washers to complete the holes all the way around. I then welded the washers (or the remains of them, anyway) in, and ground it all down to try and make it look like it was meant to look like that from day one. Kinda:  Being that this was a trigger wheel for a crank pulley, it had one flaw in the design that would prove to be a big flaw. The crank sender on said Transit 2.3 petrol records all the teeth passing it, bar one. This is intentionally left out, so that each time it passes, the ECU knows the crank has made one complete rotation.  My sender don't work like that. Oh no. My sender wants to know how many teeth there are (more than three), and then just count how quickly they pass. It was no good. I had to conduct teeth......work. Tooth fitted:  Tooth shaped:  New wheel offered up in place (before then being removed for painting): 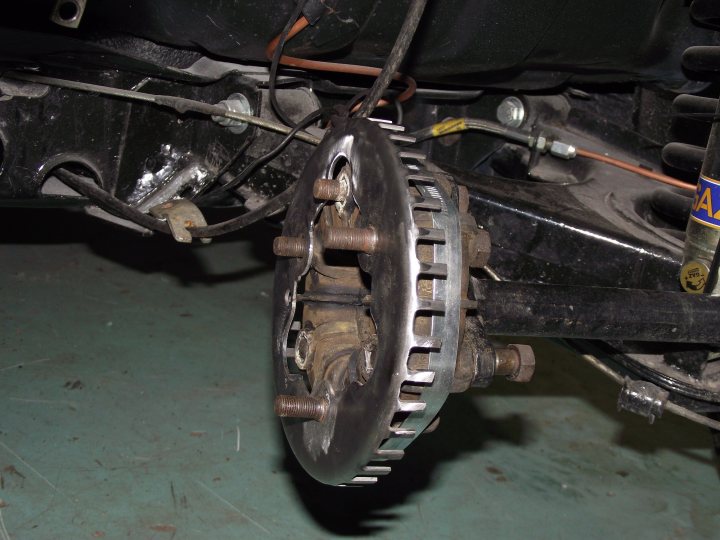 The operation proved a success. The speedo now read smoothly, and resembled something like a speedo from a normal car. Only it still wasn't accurate! Not a problem, though, as with this speedo (as with all aftermarket electronic versions) it's possible to calibrate it. You simply press and hold the mode switch (I like the fact a Hillman Imp has a 'mode switch') until the speedo enters calibration mode: 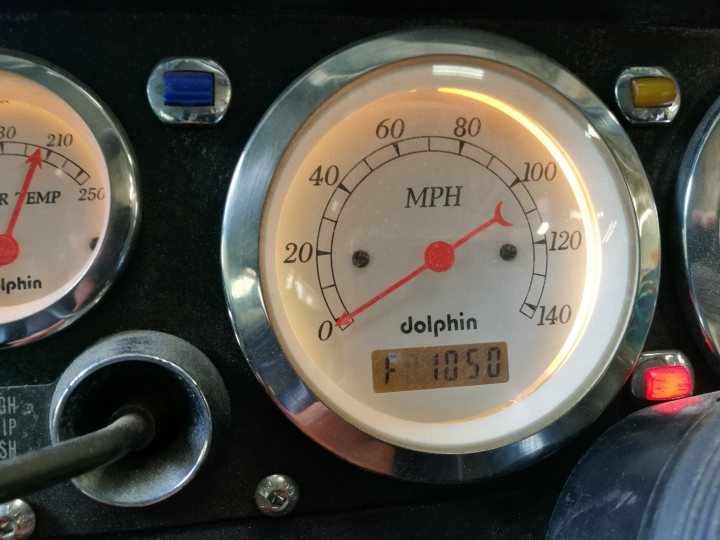 Then, because you really can't be arst to read the instruction manual, you prick around pushing buttons and entering different number combinations until the speedo reads close to what it's supposed to. Besides being a tool for bringing emotional turmoil to numerous project car owner's lives, our rolling road has a speedometer test function, which is actually quite a handy thing. It allows you to bring the wheels up to a series of pre-determined speeds, whereby you pause at each one while as suggested by the car's speedo, before moving on to the next. Then, at the end of the test, the machine tells you just how inaccurate your speedo is:  As we can see, it's underreading a fair bit. It's normal for cars to underread, but that's a bit more than ideal. That graph was also taken after a fair bit of trail and error playing. I managed to get the higher speeds reading quite well, but around the 20-40mph mark, it's proving quite tricky. I did find out what the top speed of the Imp is though: 107.4mph. When you hit the limiter in top gear, that's how fast you're going. Out and about on the (private) road, it's very easy to hit the limiter in 4th, but there's normally a bit too much going on to cast a glance downwards at the speedo. Anyway, more work needed on the speedo front. One of the other issues I had to sort after Goodwood, was the lack of rear brake lights. The Imp uses a pressure-operated brake light switch, rather than a pedal-mounted effort. This is mounted in the engine bay (which is at the back remember, sports fans). I've wondered in the past about the legitimacy of having it driven by the rear brakes, but then wondered if the balance is closer to 50/50 on the Imp, due to the backwards engine layout. Makes no odds - the switch is at the back, so I started there. Took no pictures of the event, but one night I went to test the switch and found it unplugged. "A simple fix" thought I! Not so - there was nothing to plug the switch into. No wiring....nothing. In the days to come, I found the wiring: 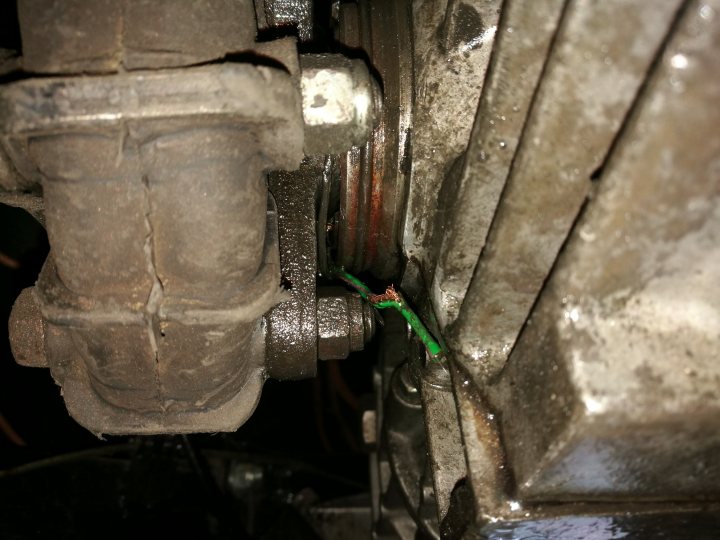 I do remember hearing a BANG once, while out in the car, but to be honest it's such an assault on the senses that the odd noises just pass me by these days! But it seems what happened was that my brake light switch wiring somehow picked a fight with the output flange on the transaxle (the opposite side to my new speedo sender, thankfully), and lost. Que an hour of phaffing around trying to extricate shards of copper wire from the output seal. Still, it answered my next question....what was causing the gearbox oil leak! Since then I've just been driving the Imp around. Here it is, out and about in the salty roads last year: 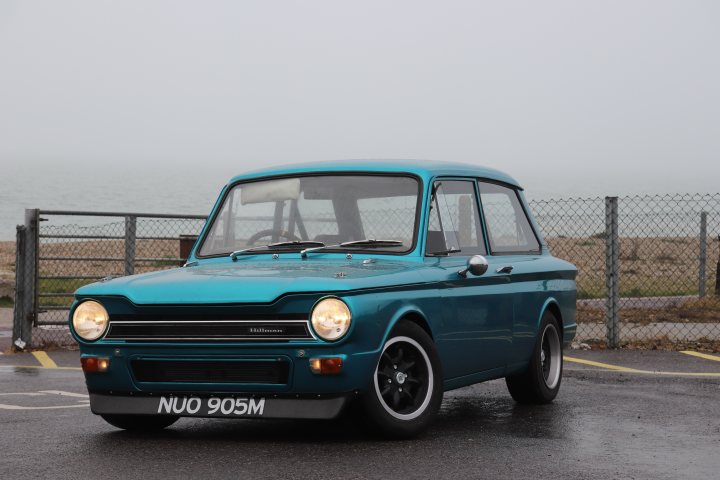  There are still jobs to do, however. For this year, I want to get some of the tasks sorted before I go ragging around in it. So first up, I sourced some new doors: 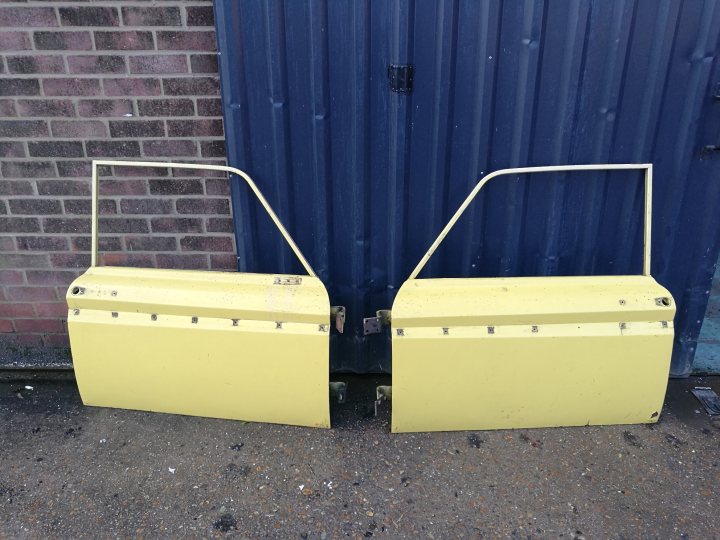 The keener-eyed of you will notice that they are a slightly different shade of blue (and when I say 'slightly', I course mean, they're not blue at all). I've sent these away to be soda-blasted, and the only thing that's prevented me for picking them up again is that the van I was going to use ran out of MoT! But I'm hoping they haven't gone too rusty, as it was about 2-3weeks ago that they were done. My plan with these is to offer them up to the car, and see if the shutlines improve at all. You might remember I've had problems with the shutlines on the old ones, thanks to the complete cock-up the first bodyshop guy we enlisted to help made on the doors (one of which how has a big crack across it where the filler is breaking out) I'm hoping he didn't do too much work on the quarter panels either, otherwise I'll have problems there too. Plan is to offer the new doors up (which I know are pretty good) and then dress them to improve the panel gaps on the shell, before having them painted. I'll report back on this when I actually start it! Lastly for today, I finally made a start on the new dashboard. I've never personally liked the layout it's currently got, so some time ago I sourced a (Chrysler-era) mk3 dashboard, which would look something like this (sans wood):  In place of the wood panelling, I plan to have real carbon fibre. And in place of the glovebox, I plan to have a steering wheel (because Britain). My dashboard is looking a bit sad in places, and it's taken from a car that had no glovebox. That's proving a bit of a pain, because I want a glovebox (not just for practicality, but also because the dash looks like it's got a gaping hole in it with no glovebox!) The problem is that the end panel is different for a glovebox dash. Here's my current dash: 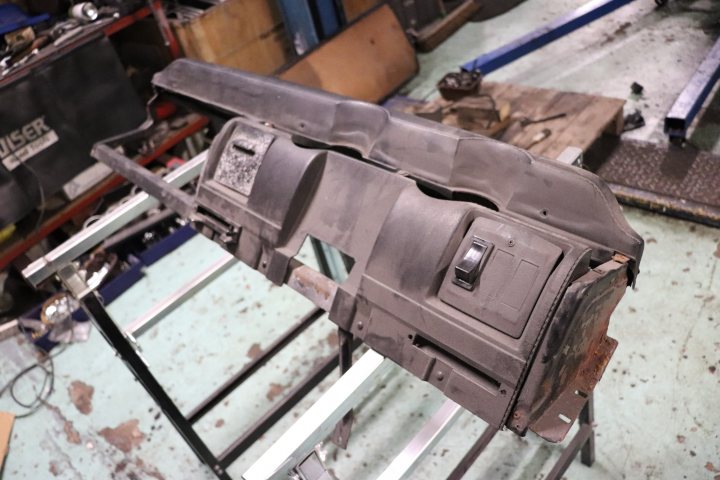 And here's the offside end panel (made of tin, incidentally) on my current dash (looking a bit sad):  Now for the nearside end panel, I should have a mirror image of that (I'm assuming), but I don't. I have this:  Ordinarily, you would approach the owner's club and ask for assistance in finding a spare. Sadly, it's quite an odd request for most, as it's not the sort of part you keep laying around (and if you have one, you probably need it). Also, I keep falling out with members of the Imp club (the younger ones mostly, but sometimes the older ones can be so far up their own arses they refer to their garage as a 'studio') on account of my ridicule of their 'sick stance' and various other assorted ways they've ruined their cars. I'm not very popular in Imp circles these days, but happily it doesn't really bother me too much. By the way, here's my prediction for the future: The Imp, as a classic, will get rarer and rarer. You'd assume they've already made the transition into bone-fide classic status, but the original cars are owned by all the older people. When they pass away, the cars get will bought by the 'yoof' (I'm 34, FFS) and then get slammed until the tyres make contact with the road via about 20mm of rubber collectively, and have stickers all over the windscreen, and skulls for gearknobs, and generally have so many pictures taken in that bloody awful vignette effect for their Insta-friends that the paint actually starts to go blue. As a result, the Imp in its pure form will continue to get rarer and rarer, rather than being firmly in the safe-zone like you'd expect. You want to make money on a classic? Buy an Imp, thats my opinion! I'm aware of the irony that I'm saying all this with that whacking great iron lump in the back of mine.... Anywhoo, my backup plan is to remove this similar looking panel from inside the glovebox aperture, and cut bits of tin out of it until it sort-of fits the existing nearside mount, before welding it all together and painting it. It won't be identical to the driver's side, but it will kind of resemble what it should be. Kinda. 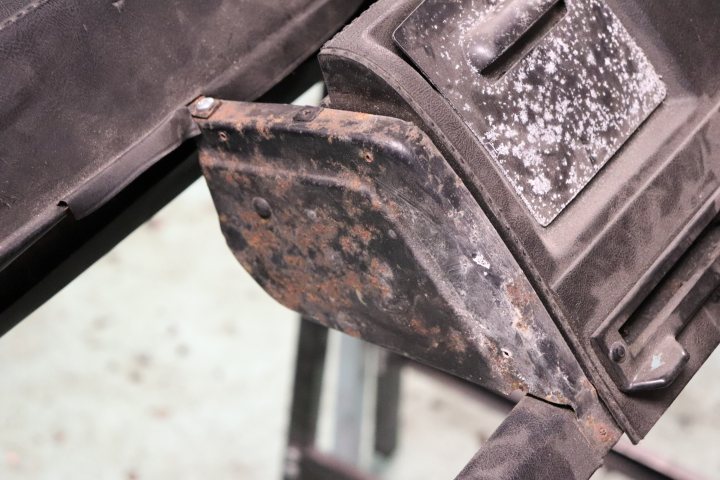 I continued to dismantle the dash ready for refurb. It's a metal frame design, and comes apart quite easily. This unless some Scotsman made a hash of pulling through a pop-rivet in 1973...  From there I kept going until all the bits were split down. Next step is to make that nearside end panel, before shot blasting everything and painting it all up, either gloss black or, if I'm feeling lucky, crinkle-coat black. That's as far as I've got currently. Plan is to finish the dashboard (along with some new gauges), install some kind of heater-demister system, beef up the front suspension mountings and renew the fuel lines. I might also fit an oil cooler, but haven't done enough testing yet to determine whether I need one or not. Oh and of course, the doors. Plan for next year? In reality, to sell it. As things stand, 2019 will be the year I part ways with it. I want to 'finish' it first, which includes finally getting it into the mag feature it had to pull out of last minute a while ago. Not so much for the attention, or 'credit' of the thing, but because in a weird way, the feature would feel like the seal of approval. The stamp of completion. That's one of the reasons I took the car on - because I wanted to see it finished. I don't use it enough otherwise, and have many other cars that need my attention. That's why this year, I need to get out and about in it as much as I can |
| |
|
|
kitch
Part of things
Counting his chickens
Posts: 157
|
|
|
|
|
That's as far as I've got! Thanks for reading thus far (if you stuck with it!)
Next update will be real-time.
|
| |
|
|
|
|
|
|
|
|
That's bloody cool that is!
|
| |
|
|
|
|
|
|
|
|
Very cool bit of kit that and a very enjoyable read. Top work chap
|
| |
|
|
Rasc
Part of things
Posts: 47
|
|
|
|
|
Great thread
Great work
Stunning car
|
| |
It's better to burn out than fade away
|
|
remmoc
Part of things
Posts: 919
|
|
|
|
Nice workmanship - ive got two Imps with Imp engines still fitted - even these are a real hoot to drive - i bet yours is better though |
| |
|
|
simes
Part of things
Posts: 734
|
|
|
|
|
Fabulous car and work.
How’s the BX?
|
| |
Simes
205Mi16 - 262 cams, Jenvey Throttle Bodies, Emerald managment blah blah......
E91 320D MSport
Honda NC30
Vespa 300GTS
|
|
hagus
Part of things
Posts: 35
|
|
|
|
|
Fantastic read and car, thanks for posting this 👍
|
| |
|
|
|
|
|
|
|
|
Great read, thanks for posting. You can really put yourself in the grin factor (in my head anyway) just from your description of driving it! Hopefully the bodywork doesnt give you to many dramas when you get stuck into it.
|
| |
|
|
|
|
|
|
|
|
That’s mint, love these little things.
|
| |
|
|
|
|


