drdick
Part of things

Posts: 359
|
|
|
|
Rover v8. Cheap , simple , easy parts . Sounds the part. Are they cheap? Maybe my memory is off but last time I had one the parts seemed expensive. don't expect a lexus lump to fit in the engine bay and clear the steering, or even the front suspension. the size of the heads and exhaust manifolds is utterly ridiculous. think i know of a 351windsor coming up soon. all runs and drives but needs a freshen up. I'm not sure what box is on it, but i do know its got a gas kit fitted as well.... Yeah, read that they were wide and haven't even got as far as wielding the tape measure. Windsor sounds up my street, it's what I have in the Mustang so parts commonality is there. Let me know if you find out more please Dez. Plus a Ford motor in a GM car is bound to wind someone up which appeals. |
| |
|
|
|
|
Dez
Club Retro Rides Member
And I won't sit down. And I won't shut up. And most of all I will not grow up.
Posts: 11,712
Club RR Member Number: 34
|
|
|
|
|
rovers arent cheap. maybe once but these days its a fallacy. arguably easier to get parts for SBF/SBC too.
thats what i was thinking, its easier if you have more than one car with the same motor, hence me and Y blocks.
its in a running, driving T+Ted '80s f350, supermegalong wheelbase crewcab truck of my mates. ex USAF so looked after up to a point. i'll get a price for you.
|
| |
|
|
|
|
|
|
|
|
Rover v8s are not expensive really . I only said it as they are probably more common than a yank v8 . As a example there is a running range rover 3.5 for £250 BIK on ebay at the moment .
It would be much better with a ' proper' v8 though .
|
| |
|
|
drdick
Part of things
Posts: 359
|
|
Dec 13, 2016 20:16:10 GMT
|
I've spent a long time thinking, researching and planning on this but very little time actually doing anything. First up, I did the important thing which was to bust out the tape measure and check what lows I can get.. 10" between axle and frame here: 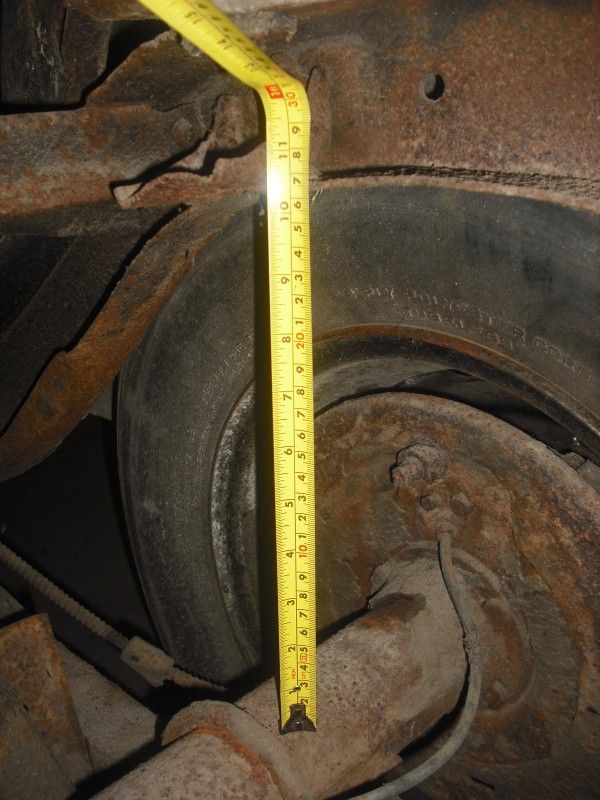 Which means I could get the sills about 4" from the ground without any frame mods: 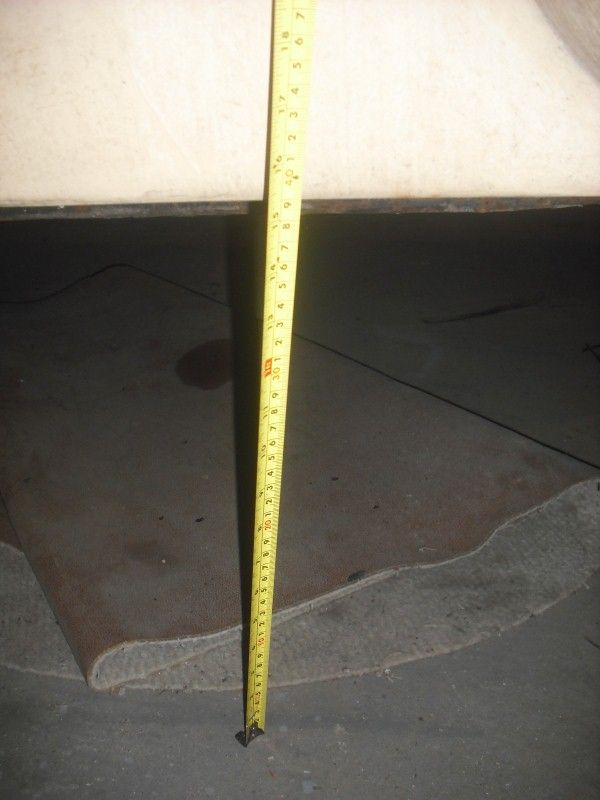 I'll have to think about that, basically I'll be putting it on ladder bars anyway so do I want to go the little bit extra to put in a frame notch so that I can drop it to the floor? I guess I can decide in the future. First issue is to sort out the body tub though. Problem 1 is that some bodgy repairs have been done in the past which means the body is no longer bolted to the chassis, it's welded in places and more annoyingly the doors don't really shut. Gap at the front seems ok if a wafer too wide (ignore the bonnet at the top, its not really attached properly): 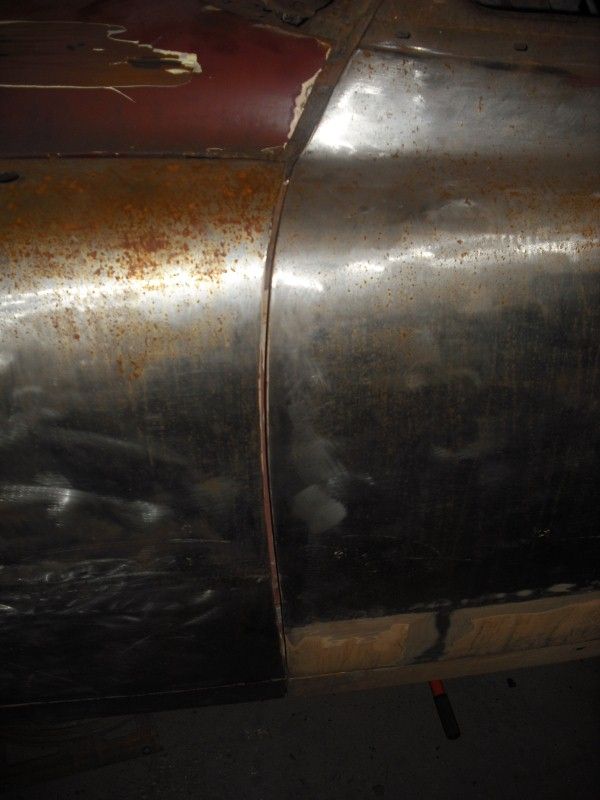 Gap at the back of the door seems all kinds of bad: 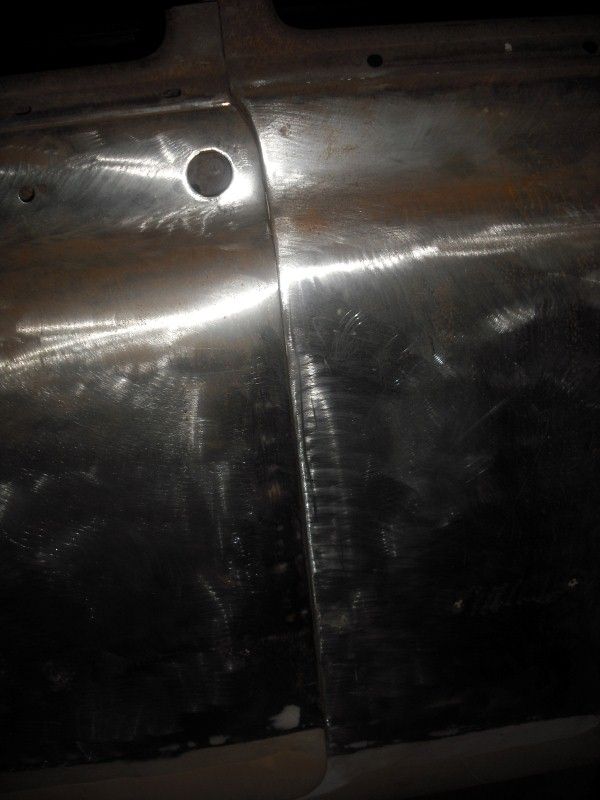 The front wing does not really adjust, only the door, so I reckon if I can get that to fit in the hole properly we are all good. Much measurement and head scratching later and I still cannot really decide if the poorly repaired sills or the roof chop are to blame for this conundrum but the fact that two body mounts have been hacked off can't really help: 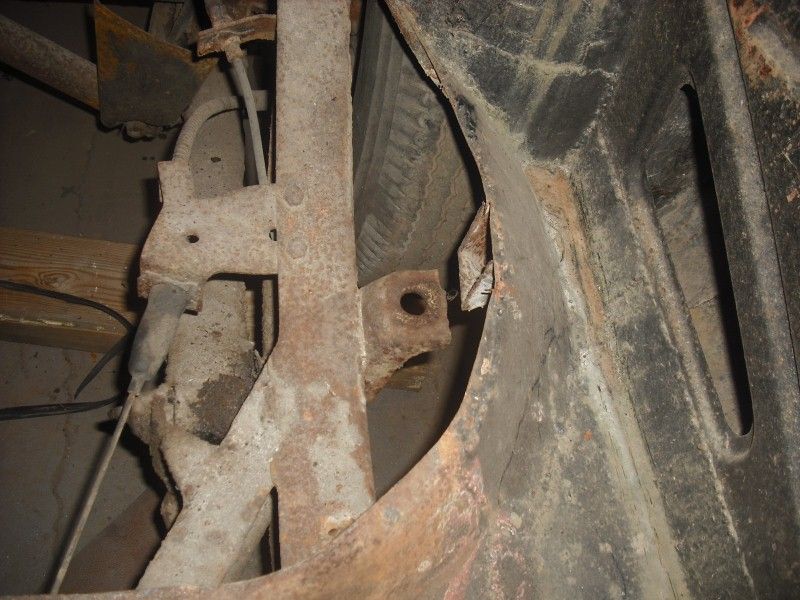 And some others being welded instead of bolted: 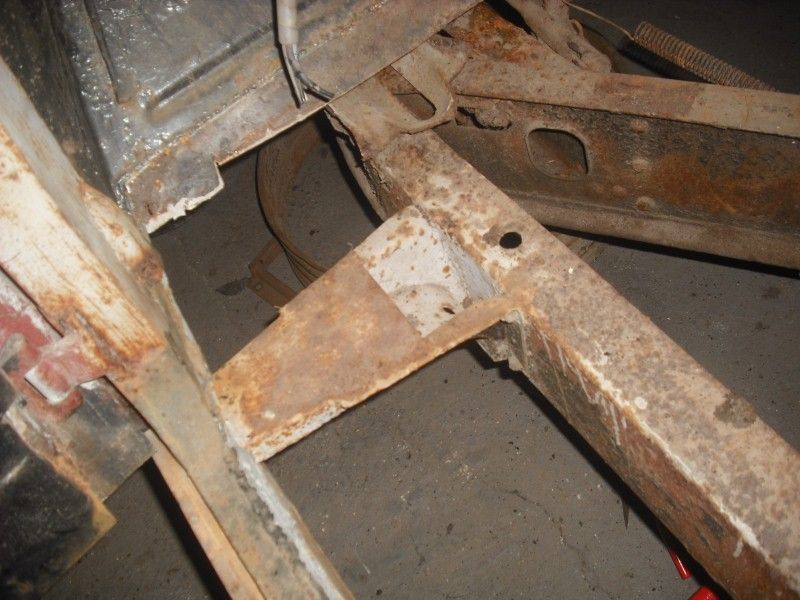 So the plan is drastic...... 1. Brace the body with 1" box 2. Brace that against the chassis 3. Cut all the sills off 4. Push it all into place so that the door fits in the hole 5. Replace sills I want to be in the position where the body is bolted to the chassis once more and then, when it comes to it, I can separate them and have the body soda blasted. So, sills are first. I have some plans for the bracing which involves turnbuckles (or similar) to jack the door openings into place but I haven't 100% figured all of that out yet. I happened to have a US car show on the TV the other night whilst cooking dinner and they were doing a 52 Pontiac. They solved their problems with a new chassis (I'm not doing that of course) but the bit that caught my eye was that they folded up some sills from sheet metal. These were then welded to some cross beams and the whole lot shoved between body and chassis. By eye my car has a very slight curve to the sills but I think I could get away with this idea so it's what I'm going to try. Our finger break at work is only 4' long though so I will be doing some sketches and getting somewhere to fold me up some sections that are 6' (or more) long. I wanted to get the front end blown apart so that I was just working with the tub on the chassis. So a mate and I attacked it last Sunday afternoon. I had forgotten how hard it is to dismantle a car that has bolts that have rusted into place for over 50 years so there was a lot of swearing and grinding down of bolts. We also discovered a lot of rust but pleasingly the panels with difficult shapes are very solid. I also discovered my camera battery is curse word so only have this appalling phone picture of the half mangled front: 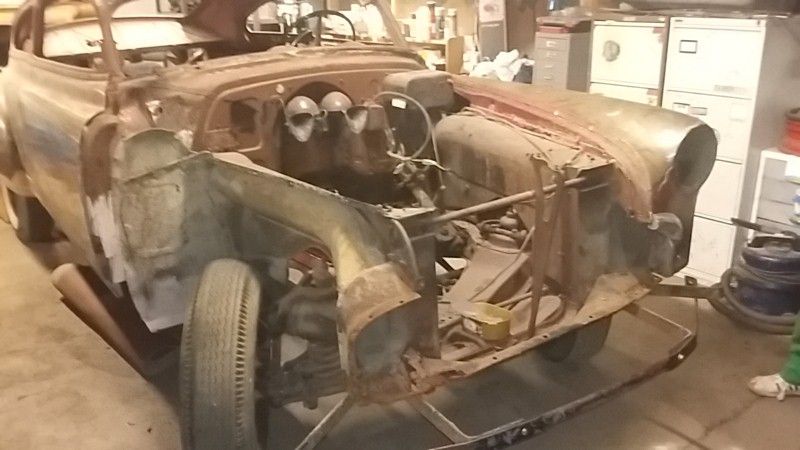 Bracing will hopefully go in at Christmas.... |
| |
|
|
Dez
Club Retro Rides Member
And I won't sit down. And I won't shut up. And most of all I will not grow up.
Posts: 11,712
Club RR Member Number: 34
|
|
Dec 13, 2016 20:55:15 GMT
|
|
It's definitely the sills that are out. Your plan of turnbuckles in the door gap bracing and chopping the sills out was exactly my plan. The sills are meant to be dead straight, I think that's part of the problem tbh.
|
| |
|
|
|
|
|
Dec 13, 2016 21:19:27 GMT
|
|
Good to see that you've started this!!
|
| |
|
|
drdick
Part of things
Posts: 359
|
|
Dec 13, 2016 21:29:19 GMT
|
It's definitely the sills that are out. Your plan of turnbuckles in the door gap bracing and chopping the sills out was exactly my plan. The sills are meant to be dead straight, I think that's part of the problem tbh. I'm tempted to say great minds think alike  TBH I have thought about this a lot, so much so in fact, part of the reason for stripping the front end off was because I was in danger of only thinking about the project. There is a gentle curve in my sills but not really in the door. Holding a straight edge up to a piece that isnt a foot thick in wob does show it to be mostly straight so I'm happy with that idea. Repro sills are available and do, on the website, look straight as well but I reckon I can get some parts folded up rather than cough up a load to ship some sills here. Talking of which, I will need some panels. These guys: emsautomotive.com/ do quite a lot of repro metal for 49-52 Chevolet but tell you to get in touch if you have Pontiac/Olds/Buick. All these bodies were built by Fisher for GM but have quite a lot of differences. So I thought it best to contact them. They have quite a reasonable website and some YouTube vids showing the products etc but no email! Only phone or fax.. I decided it was easier to fax rather than hang around on the phone so I sent them something. A week or so passed and nothing came back so I was about to phone when they replied. Glad I did query this stuff because a lot of the rear end metal for a 49 Pontiac is common to a 51/52 Chevy. So now I know what I need I also know what its going to cost  Can't decide whether or not to go for it now as the pound is just dropping in value and that seems unlikely to improve. This car is such a dream for me, even with the areas of galloping rot, the inevitable problems that will come up and the wads of cash I will send in it's direction, I cannot stop looking at it and having serious man love for it. Something of this ilk has always been very near the top of my list along with a '32 Model A so the chance to own and work on it is genuinely an honour. |
| |
|
|
Dez
Club Retro Rides Member
And I won't sit down. And I won't shut up. And most of all I will not grow up.
Posts: 11,712
Club RR Member Number: 34
|
|
Dec 13, 2016 21:32:20 GMT
|
|
I think it was about 120 for a Lower rear 1/4 when I looked, 70-ish for the section behind the wheel arch. there's a guy on US eBay does em and I know someone who has used em and he was very happy with the fit.
|
| |
|
|
drdick
Part of things
Posts: 359
|
|
Dec 13, 2016 21:47:22 GMT
|
Cheapest place appears to be from the manufacturer. The ones in my eBay watch list (which are the ones you sent me anyway Dez) are now more pricey  If I want to take the easy route and buy everything I need its a $1000 give or take which is going to be over £1000 by the time I get it here. Putting it that way makes it sound like a lot but whats the point of earning money if you can't spend it on cool curse word? |
| |
|
|
|
|
|
Dec 13, 2016 22:23:51 GMT
|
|
Wow! Quite the challenge but anything pre 60s always piques my interest. Bookmarked!
|
| |
I have a Jaguar XJS - RARRGHH! She is called Lily, and she is my best friend! goo.gl/bT3ASP <-- video of her  |
|
|
|
logicaluk
Posted a lot
Every days a school day round here
Posts: 1,316
|
|
|
|
This car is such a dream for me, even with the areas of galloping rot, the inevitable problems that will come up and the wads of cash I will send in it's direction, I cannot stop looking at it and having serious man love for it. Something of this ilk has always been very near the top of my list along with a '32 Model A so the chance to own and work on it is genuinely an honour. |
| |
|
|
|
|
|
Dec 15, 2016 14:46:01 GMT
|
|
A pile of fresh sheetmetal will help on the motivation front.
I do love a Lead-sled
|
| |
|
|
|
|
|
Dec 16, 2016 18:32:47 GMT
|
Just been reading through the tread - brilliant! Keep it up. Back to engine options: My son has an LS400 in a wheelchair accessible, gull-wing doored, hand controlled rod. When he was nailing it together, cheap & reliable power was key as he couldn't afford a smallblock at 16. Found this on one of the kit car sites & found it fascinating reading... www.super7thheaven.co.uk/blog/rover-v8-vs-lexus-v8-dimensions/ "Lexus V8 Dimensions I apologise to the originator for not putting a link back to all the sites the info was gleaned from. These are great engines, you don’t need custom engine management and the power output shame the elderly Rover lump. Lexus V8 1uzfe Height and Width You’ll have to trust me on this, when standing next to the Lexus V8, it looks a brute. It looks really BIG! Rover V8 Dimensions vs Lexus V8 Dimensions The Rover V8 basic dimensions: Length : 708 mm Height : 707 mm Width: 770 mm Weight: 220Kg (minus starter & flywheel) Power: 150 – 230BHP (ignoring the TVR 5.0 version) Lexus V8 4.0 quad cam 32 valve V8 basic dimensions: Length : 655 mm Height : 610 mm Width: 620 mm Weight : 177Kg (minus starter & flywheel) Power : 256BHP - 305BHP Huh! This doesn’t make sense! The Rover looks tiny in comparison but yet the figures clearly say the complete opposite. The answer is very simple, your eyes look at the 2 rocker boxes, then tell you that’s how big the engine is. However, with the Rover V8, the water pump protrudes a long way out the front, the exhausts hang way out the side and the injection system stands high above everything. The Lexus engine has everything tucked in tight. The large rocker boxes span pretty much the whole length and width of the engine, nothing stands above them (apart from a few wires), only the cam belts stick out the front and the exhausts are tucked so far underneath, from the top they are invisible. The Lexus motor is quite tune-able. I’ve seen a supercharged / twin turbo Supra conversion claiming over 1200HP – even if that’s exaggerated, I’m guessing the power output is still healthy. The Lexus V8 wiring isn’t too scary either. Simply make sure you take the whole ECU and wiring loom, then add a handful of simple wiring; job done. Can strip the ECU from around 87 wires to 9 ish for basic running & there are plenty of guys doing good stuff with them (Froggy on R 'n S) So, it weighs less than a 2lt Ford Pinto and it’s smaller than a Rover V8; how long will it be before one is fitted to a Haynes Roadster? The Lexus / Toyota V8 is good for over 200,000 miles; even when abused. How many times would you have to rebuild the same Rover? Even with the catalytic converters still in the system, this engine sounds very similar to the Chevy LZ1 engine. By the way, look inside the Lexus oil pan and just dribble at the quality and over-engineering - beautiful. Rogan's had about 130k miles on it & still has the honing marks on the bores. I believe it was originally built to compete in NASCAR until a sudden rule change banning injection just as Toyota were getting started around 91. Prepared to be wrong, but I can believe it looking inside the motor. Hope this is of use. |
| |
|
|
|
|
|
Dec 16, 2016 22:06:08 GMT
|
I have an LS400 as a daily and the engine is awesome. Near on 170k miles and took a pasting at the nurburgring the other month.   To add to the info above, the 1uz is an awesome engine. They were designed oversquare, and with 6 bolt mains, forged rods etc as they were going to be used in Toyotas gt500 cars, but the idea got scrapped. I'm sure I remember reading there's some Aussie or NZ ones running over 700bhp on stock internals which is nuts... |
| |
|
|
Rebel
Part of things
Posts: 343 
|
|
|
|
|
The LS400 V8's are good for about 600,000 before major work is required, as long as they're serviced regular. Could be the way to go....
|
| |
1968 Dodge Charger
1985 Chevrolet Camaro
1993 Toyota Hilux Surf
2001 Ford Mondeo
|
|
drdick
Part of things
Posts: 359
|
|
Dec 18, 2016 19:15:46 GMT
|
|
Thanks for all the LS info, things to think about there. To be honest I'd parked the engine thinking for the moment whilst I puzzle out the body issues but I need to come up with some ideas for a drivetrain solution.
|
| |
|
|
|
|
|
Dec 18, 2016 23:46:17 GMT
|
|
I know it's not everybody's choice, but if you do go the 1UZ route, just buy a whole LS400 as donor. The transmission is quite nice (I'm not an auto fan), but the whole drivetrain will let you sit on 110kmh/66mph? with then engine barely humming at 1600rpm. Fully loaded with 3 guys and snowboard gear, mine did around 950km per tank on highway trips.
|
| |
|
|
drdick
Part of things
Posts: 359
|
|
Dec 30, 2016 12:39:10 GMT
|
Managed a bit on this after finishing a) the worlds supply of food and b) another garage reorganisation session. Bought some box section and turned it into some interior bracing as well as temporarily reinstating the missing body mounts: 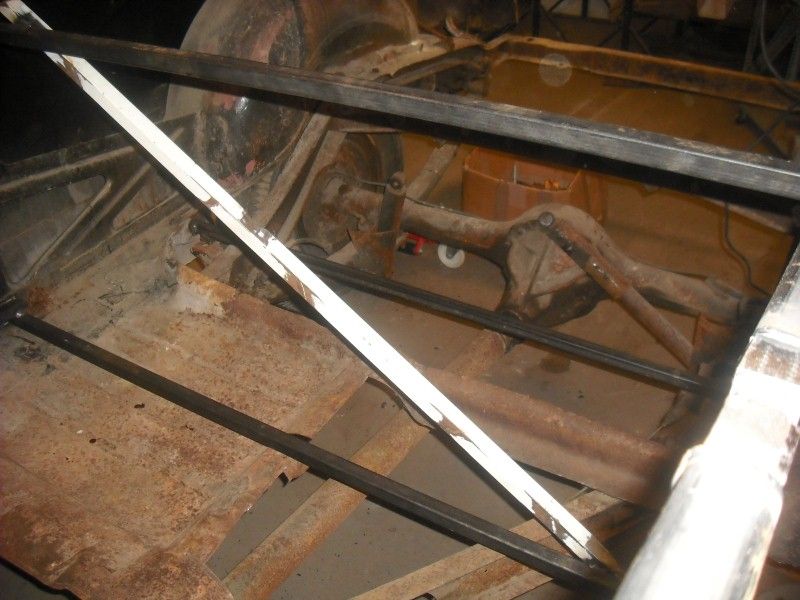 I also braced the a pillar at the bottom and supported that on the chassis. This will (hopefully) support things once I deal with the mangled outriggers 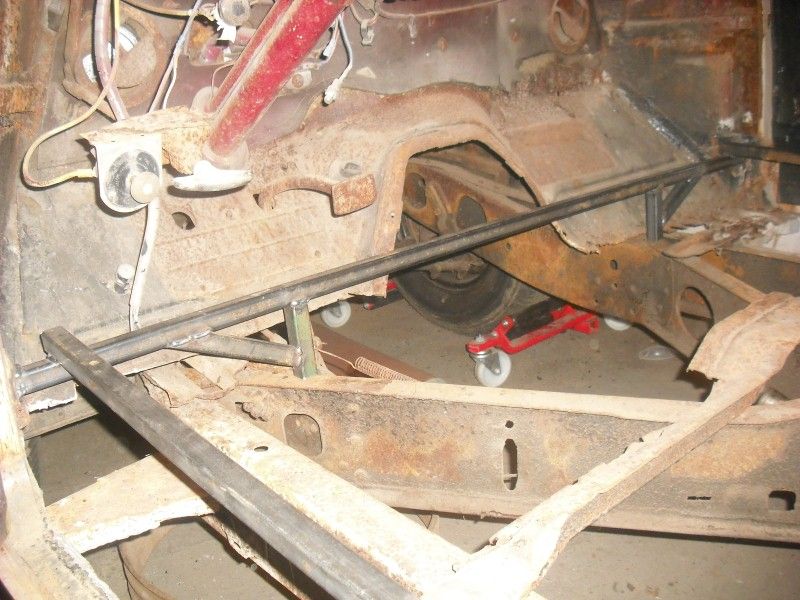 Then a little session with the lathe and welder to create some adjustable braces which are welded across the bottom of the door gap: 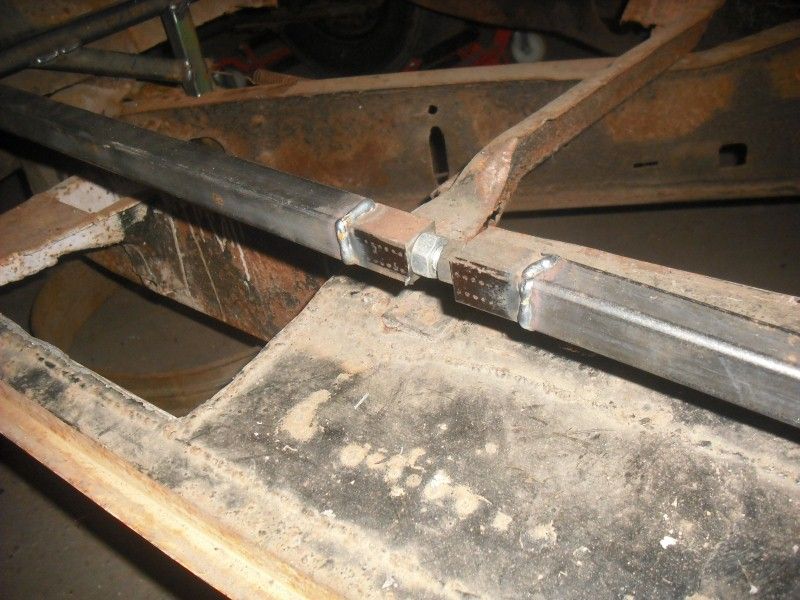 And across the top:  Then I thought "sod it", went a bit mental and chopped through one of the sills: 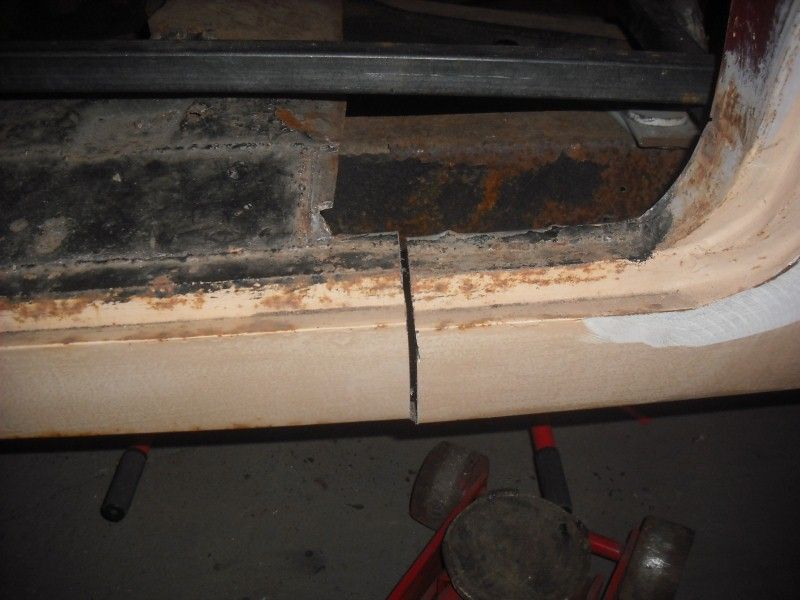 A few turns of my nuts  on the adjusters and presto chango, the door shuts: 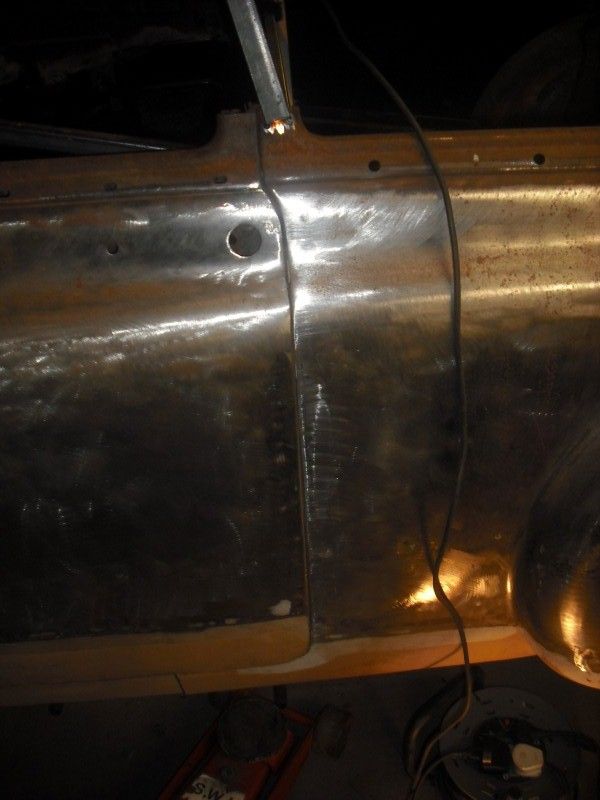 It's not 100% aligned but I think I will move the door next before I adjust the gaps any further. Now my next task is to take the lump of sill I removed, convert it into a drawing and have some 6' long sections folded up. |
| |
|
|
v8
Part of things
Posts: 299
|
|
Dec 30, 2016 13:01:57 GMT
|
I wouldn't know where to start with all that metalwork! Great idea with all the adjusters, more civilised than swinging a big hammer for sure  |
| |
|
|
|
|
|
Dec 30, 2016 14:45:05 GMT
|
|
Just that one thing is a huge step surely. The old if it looks right then it probablt is ,springs to mind.
PS. Bookmarked!
|
| |
|
|
|
|


 TBH I have thought about this a lot, so much so in fact, part of the reason for stripping the front end off was because I was in danger of only thinking about the project.
 Can't decide whether or not to go for it now as the pound is just dropping in value and that seems unlikely to improve.
 If I want to take the easy route and buy everything I need its a $1000 give or take which is going to be over £1000 by the time I get it here. Putting it that way makes it sound like a lot but whats the point of earning money if you can't spend it on cool curse word?


 on the adjusters and presto chango, the door shuts:

