|
|
|
Mar 29, 2016 19:26:49 GMT
|
carmad - Thanks fella, update below. flyingphil - Thanks mate, as said above there is a new update below. Thanks for following. Little update today, started on stripping the rear down now. Managed to strip down the rear lights, the rear portion of the cars wiring loom, stripped off the rear bumper although I couldn't get the brackets off at all. The bolts are rusted through the chassis. The bumpers weigh quite a lot and I can see the practical side of running without them. Here's how it looks after today's efforts. 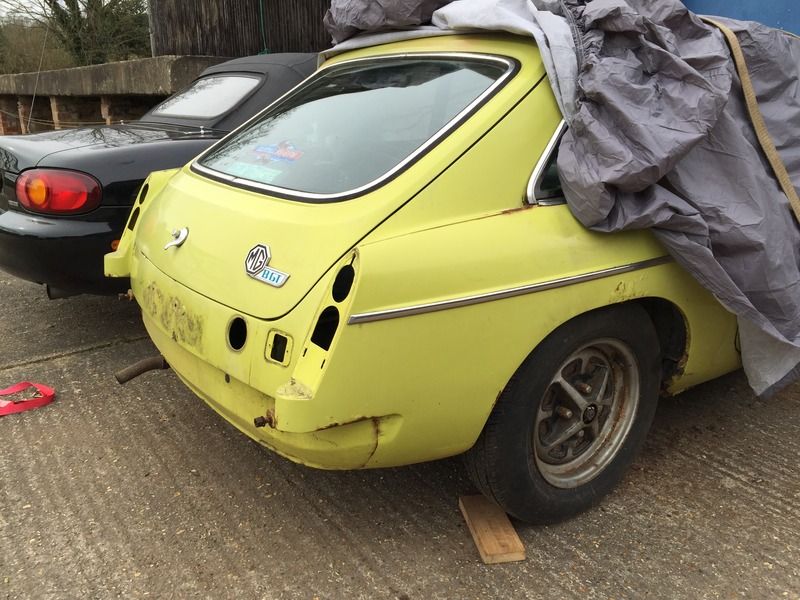 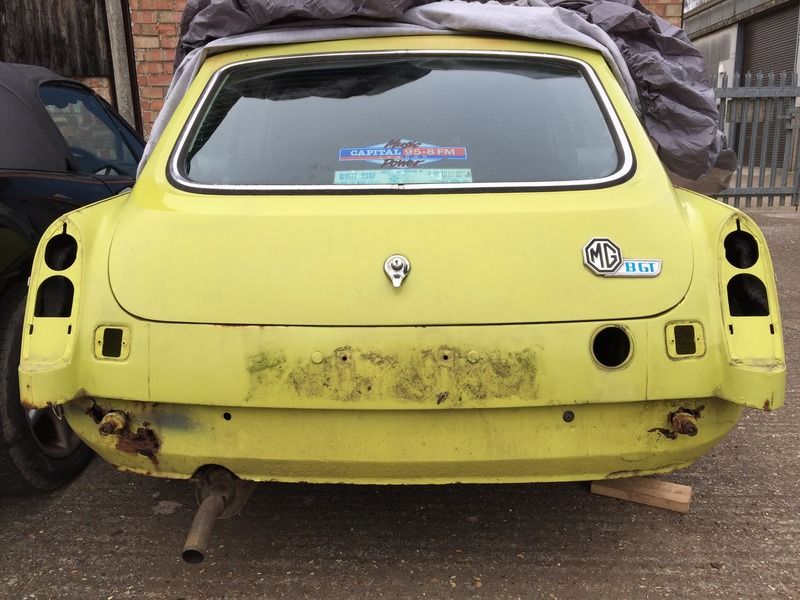 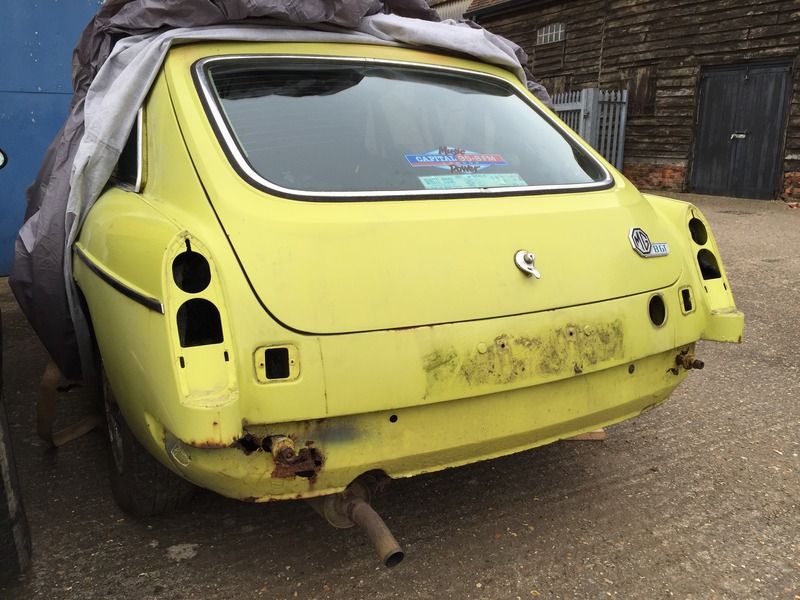 As you can see the rear valance joins the list of rotted out panels. 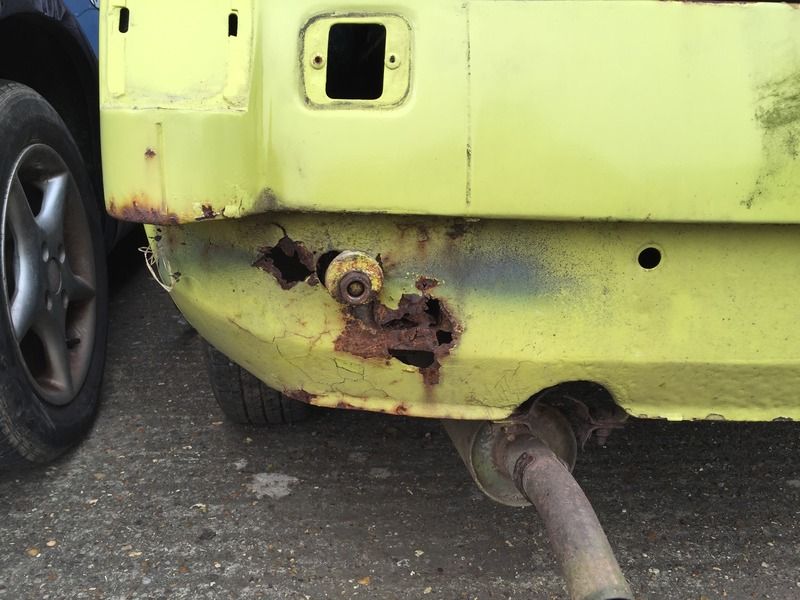 |
| |
Twitter @w0rd5w0rth
1957 Ford Prefect
1965 Austin 1100 4 door
1968 Fiat 500L
1969 Ford Escort Super
1971 Vauxhall Viscount
1974 MGB GT
1978 Vauxhall Cavalier GL
1981 Ford Capri GL
1982 Ford Cortina Crusader
1985 Vauxhall Cavalier L
1987 Austin Maestro City 500
1987 Ford Fiesta 1.1L
1988 Volvo 240GL
1989 Ford Sierra Cosworth
1991 Fiat 126 BIS
1993 BMW 740i
1997 BMW M3 Evo
1998 Ford Transit Beavertail
2002 MINI Cooper S
|
|
|
|
JoshO
Part of things

Posts: 337
|
|
|
|
Hi again man, where I work we can supply pretty much all the parts for an mgbgt, and most of the parts for an mx5, drop me a pm  |
| |
|
|
|
|
|
Apr 21, 2016 16:09:48 GMT
|
Josho - Rest assured mate, when I need some parts I'll drop you a PM to have a look for me. At the moment I'm still in strip down mode as you can see in the updates. So another nice day outside stripping down the MGB. Unfortunately it's not looking good for the plucky little Brit! First thing I did was remove the passenger side front wing, nothing too different here in comparison to the drivers side. 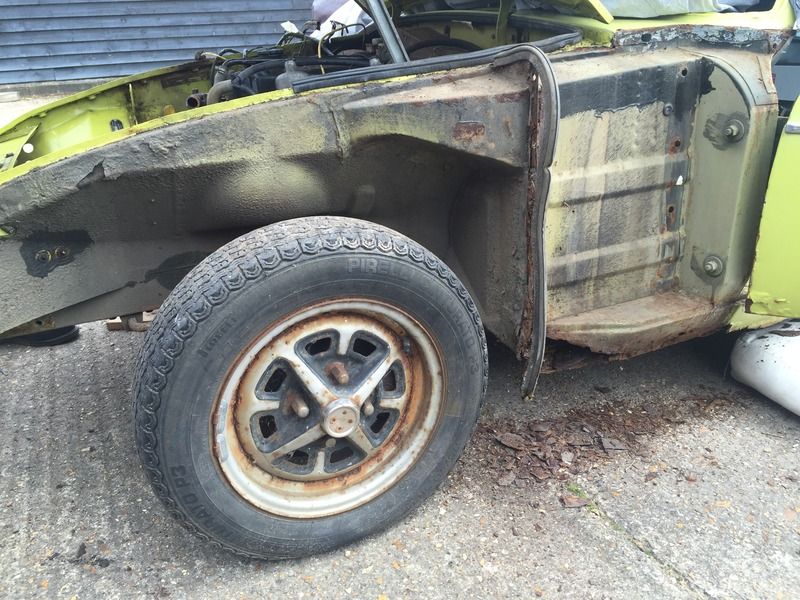 The actual wing itself looks a lot newer than the rest of the car, a good solid sturdy panel here. 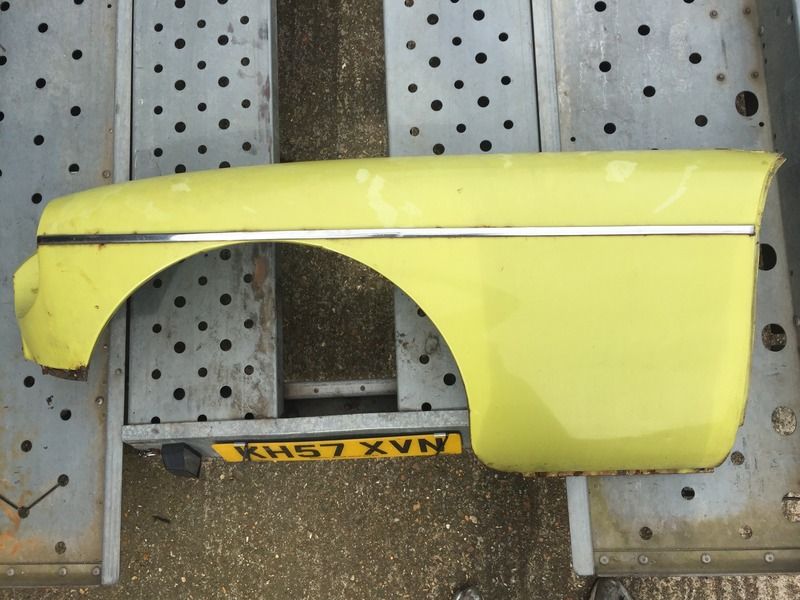 However, the bottom of the front inner wing and A pillar is looking far from solid or sturdy! 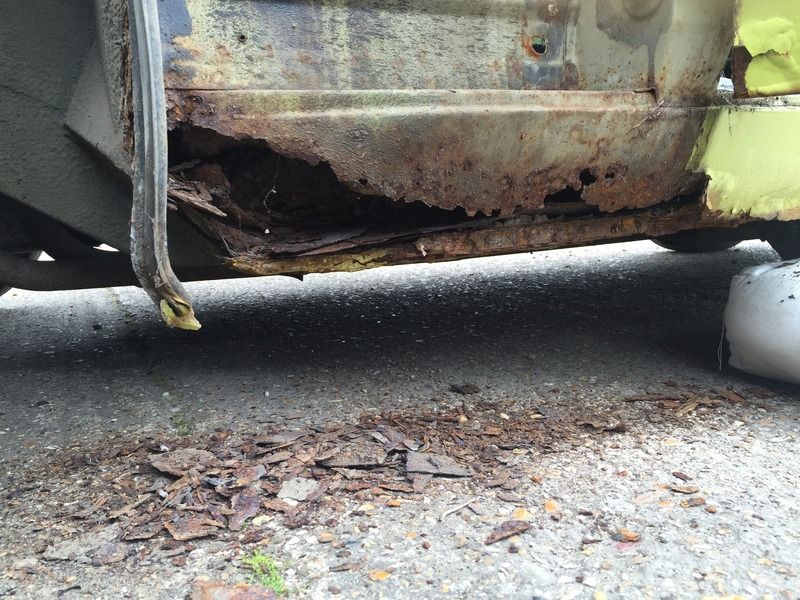 Next up I turned my attention to stripping out the rest of the interior including the carpets. Immediately I knew we had problems as the carpet was soaked! Probably years of raining in to the cockpit left me with this nightmare on the passenger side. 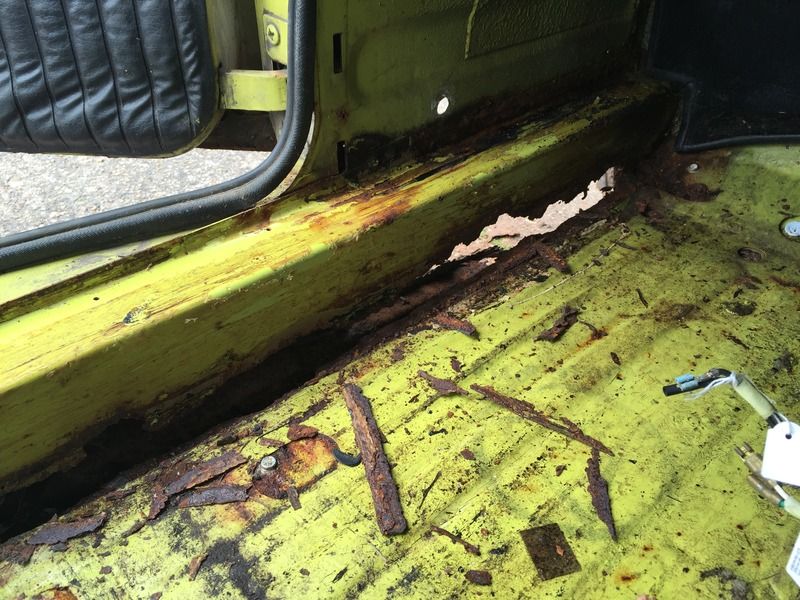  It's really not much better on the drivers side either! 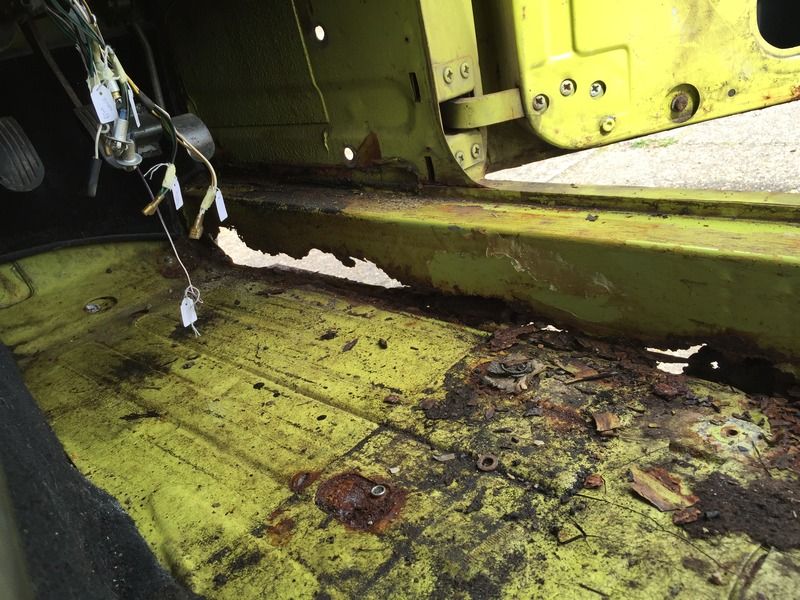 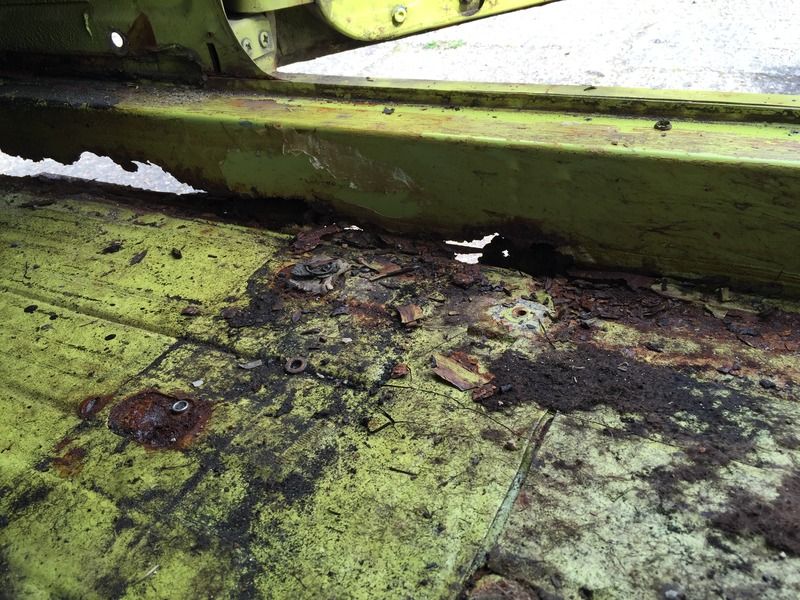 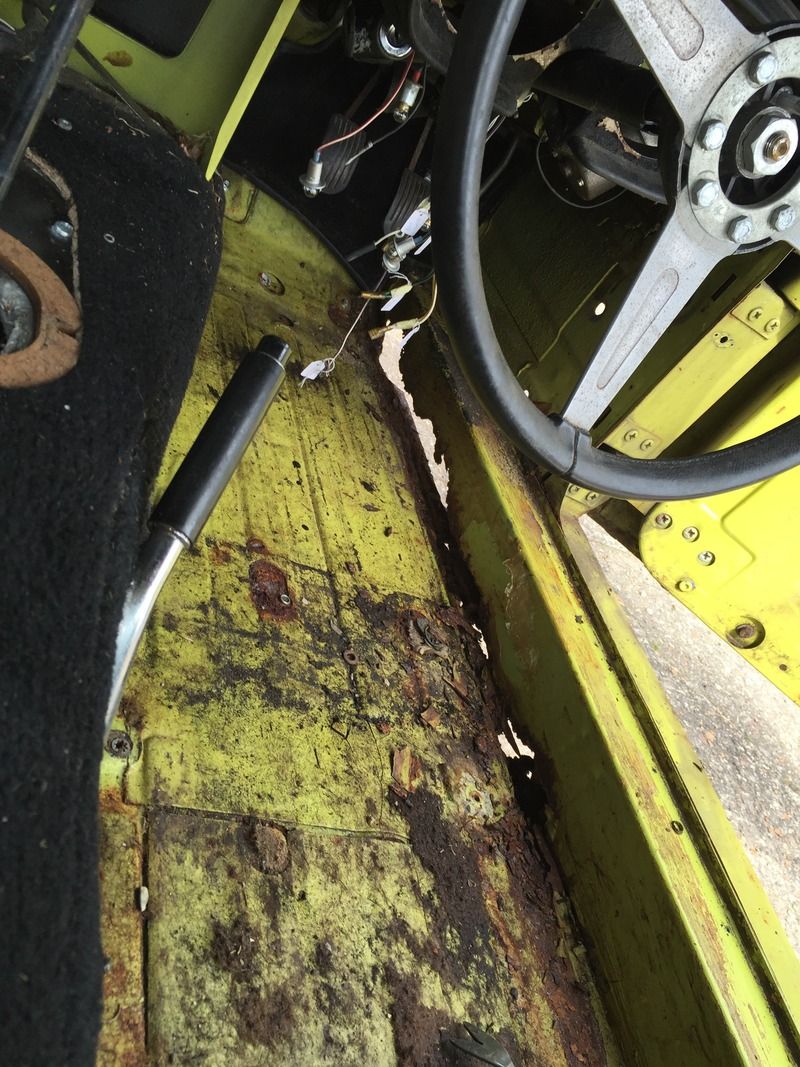 This is how dropped the floor is on the passenger side, it's pretty much sagging down as there's not a lot supporting it anymore. 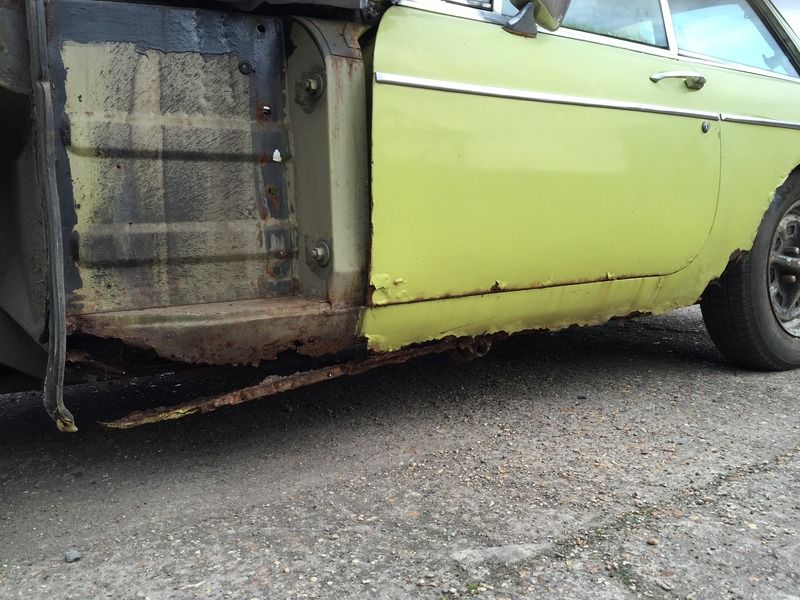 Whilst stripping out the interior I was surprised to find both the 6V batteries still connected. 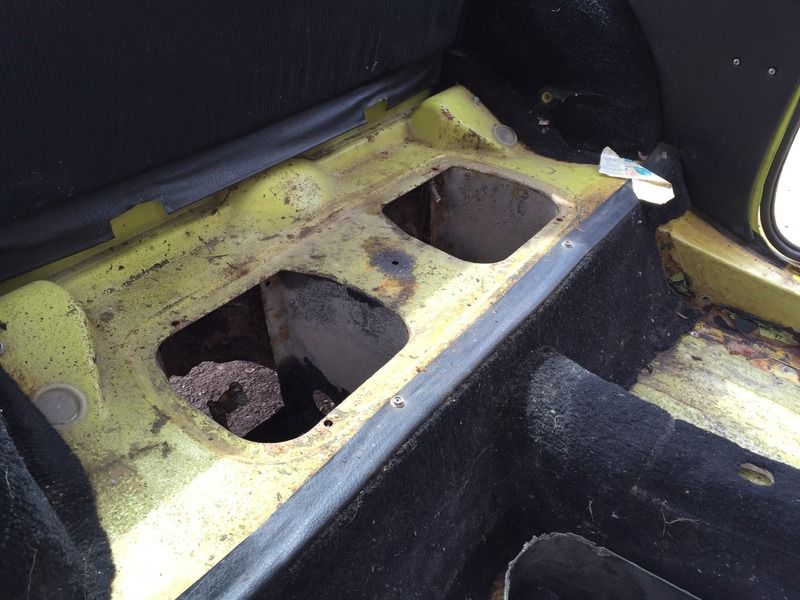 Needless to say they had exploded some time ago as they were expanded and burst in their casings. They were so corroded I just cut the leads off. 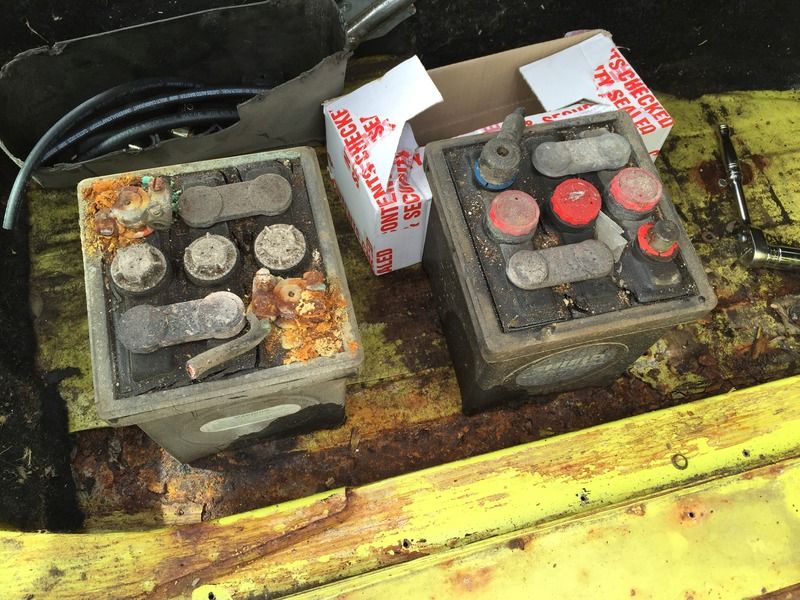 I finished removing the rest of the dashboard from the car, it looks in pretty good condition. 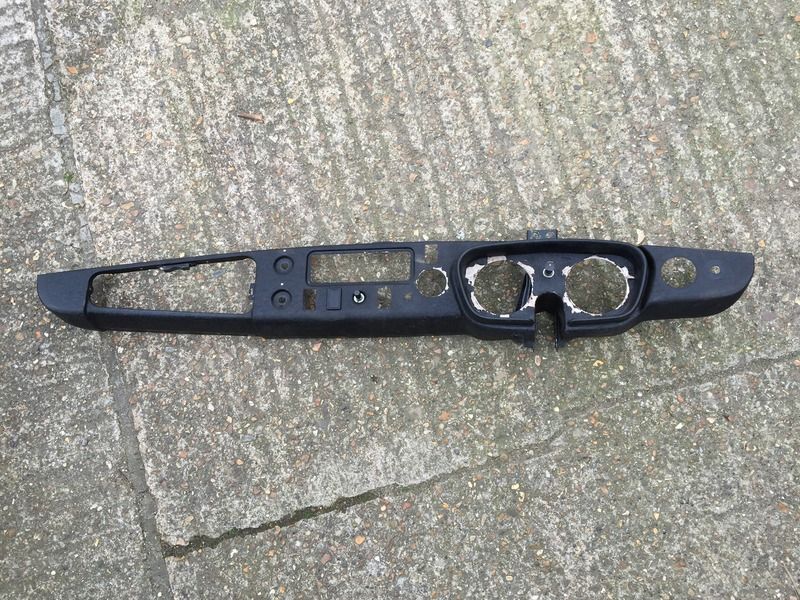 The inside now looking a bit like this. 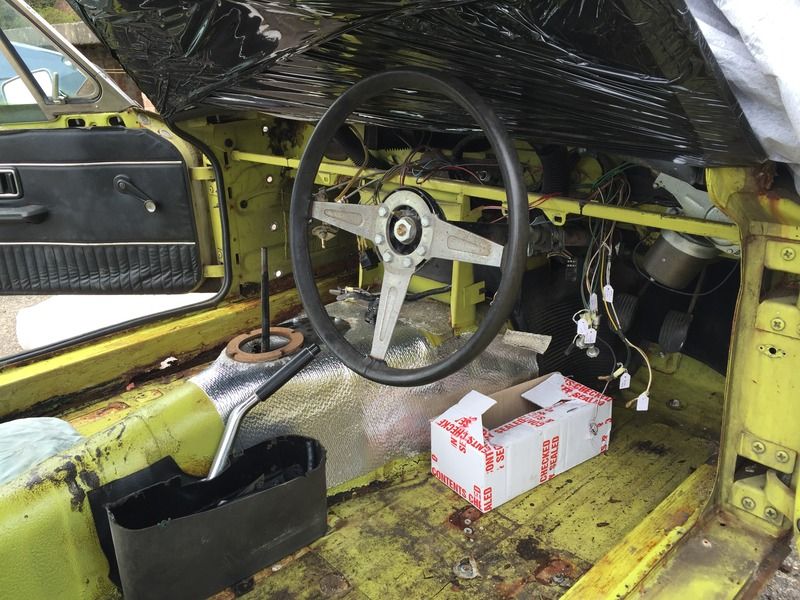  At the end of play, this is the pile i'm looking at on the floor again! I fear there's plenty more to be removed as well. On the plus side it's saving some weight surely! 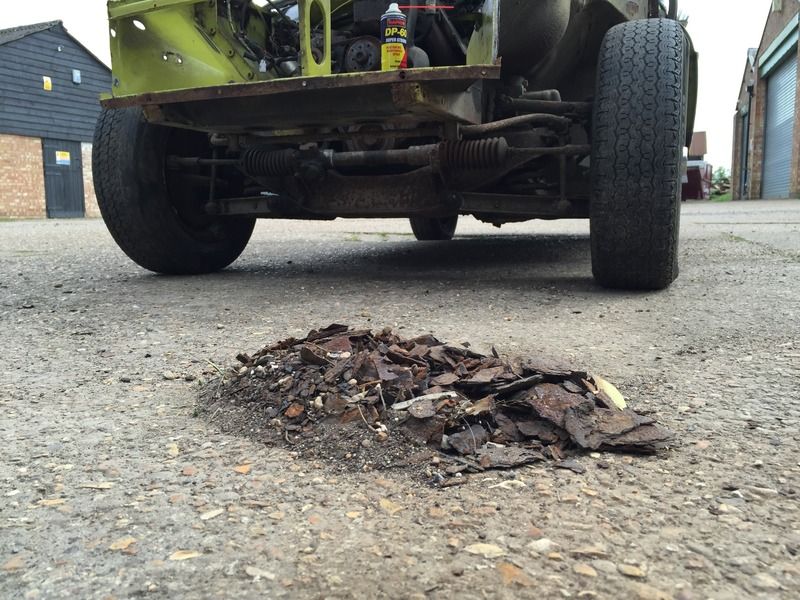 It's actually quite possible that this may be too far gone for me, I need to sit down with the panel catalogue and work out how many panels need replacing and at what cost! Thanks for looking and all comments welcomed. |
| |
Last Edit: Apr 21, 2016 16:11:12 GMT by blacksaff
Twitter @w0rd5w0rth
1957 Ford Prefect
1965 Austin 1100 4 door
1968 Fiat 500L
1969 Ford Escort Super
1971 Vauxhall Viscount
1974 MGB GT
1978 Vauxhall Cavalier GL
1981 Ford Capri GL
1982 Ford Cortina Crusader
1985 Vauxhall Cavalier L
1987 Austin Maestro City 500
1987 Ford Fiesta 1.1L
1988 Volvo 240GL
1989 Ford Sierra Cosworth
1991 Fiat 126 BIS
1993 BMW 740i
1997 BMW M3 Evo
1998 Ford Transit Beavertail
2002 MINI Cooper S
|
|
|
|
|
Apr 21, 2016 16:46:31 GMT
|
If you are doing sills, it does not really matter if they are a bit rusted or a whole lot rusted; you are doing sills anyways. See page 3 for a walk-through that I did for another person in you spot. While it is quite doable, I suspect that he bailed when faced with doing the actual work. retrorides.proboards.com/thread/183293/vanessa-1979-mgb-dat-rust?page=3 |
| |
|
|
|
|
|
Apr 21, 2016 17:22:07 GMT
|
If you are doing sills, it does not really matter if they are a bit rusted or a whole lot rusted; you are doing sills anyways. See page 3 for a walk-through that I did for another person in you spot. While it is quite doable, I suspect that he bailed when faced with doing the actual work. retrorides.proboards.com/thread/183293/vanessa-1979-mgb-dat-rust?page=3That is very useful indeed and obviously took a long time to put together, so thank you very much for that. It's much appreciated. It's not just sills, it's inner sills, outer sills, floor pans and castle rails! You can't see too easily from the pics. But it's looking rather crusty under there. I need to strip it down further to assess how much more it has gone. In fairness it's quite solid along the front chassis rails, reasonably solid around the bonnet and boot, the boot floor looks ok but it's gone where the chassis rail meets the rear valance. Worse case scenario is that it will be a parts donor car for others to live on. |
| |
Twitter @w0rd5w0rth
1957 Ford Prefect
1965 Austin 1100 4 door
1968 Fiat 500L
1969 Ford Escort Super
1971 Vauxhall Viscount
1974 MGB GT
1978 Vauxhall Cavalier GL
1981 Ford Capri GL
1982 Ford Cortina Crusader
1985 Vauxhall Cavalier L
1987 Austin Maestro City 500
1987 Ford Fiesta 1.1L
1988 Volvo 240GL
1989 Ford Sierra Cosworth
1991 Fiat 126 BIS
1993 BMW 740i
1997 BMW M3 Evo
1998 Ford Transit Beavertail
2002 MINI Cooper S
|
|
adam73bgt
Club Retro Rides Member
Posts: 4,867
Club RR Member Number: 58
|
1974 MGB GT (Updated 21/04)adam73bgt
@adam73bgt
Club Retro Rides Member 58
|
Apr 21, 2016 17:38:22 GMT
|
Hmm that is quite rusty! But at least you can get any panel for MGB's I'm no expert on rust repairs by any means but if you separate the repairs into little groups of work, it may make the overall task seem less daunting? Good luck with it! |
| |
|
|
|
|
|
Apr 21, 2016 18:29:12 GMT
|
|
The irony is that it is actually easiest if you do a full inner, castle, membrane and outer sill repair rather than trying to separate the job. The method I outlined takes you through the process up to the point where you reach the dogleg. I can provide more if anyone gets that far.
|
| |
|
|
adam73bgt
Club Retro Rides Member
Posts: 4,867
Club RR Member Number: 58
|
1974 MGB GT (Updated 21/04)adam73bgt
@adam73bgt
Club Retro Rides Member 58
|
Apr 21, 2016 18:36:39 GMT
|
The irony is that it is actually easiest if you do a full inner, castle, membrane and outer sill repair rather than trying to separate the job. And this is why I'm no expert in MGB rust repairs  |
| |
|
|
|
|
|
Apr 21, 2016 18:59:30 GMT
|
|
adam73bgt - I am quite lucky about the panels being so available for MGBs, however I've also heard that there are so many bad panels available on the market! If I'm honest being a novice at panel work I would have agreed with your comment about it being less daunting one part at a time. However bjornagn is right, it's the same task I'm facing with my transit, you have to cut everything out before putting back in. Unfortunately I've got a lot to cut out.
bjornagn - Where do you recommend purchasing panels from? You've clearly done a lot of these over the years going by your comments on other threads. I have a 'spit' that I'll be putting the car on once it's stripped down, that will hopefully make it easier to weld. But yes I may well be wanting some more in depth advice from you if that's ok? It depends how far I go with it as I need to spread my time and money over my whole collection. So it may just not be financially viable for me. However I'll always update my threads with any decisions.
|
| |
Twitter @w0rd5w0rth
1957 Ford Prefect
1965 Austin 1100 4 door
1968 Fiat 500L
1969 Ford Escort Super
1971 Vauxhall Viscount
1974 MGB GT
1978 Vauxhall Cavalier GL
1981 Ford Capri GL
1982 Ford Cortina Crusader
1985 Vauxhall Cavalier L
1987 Austin Maestro City 500
1987 Ford Fiesta 1.1L
1988 Volvo 240GL
1989 Ford Sierra Cosworth
1991 Fiat 126 BIS
1993 BMW 740i
1997 BMW M3 Evo
1998 Ford Transit Beavertail
2002 MINI Cooper S
|
|
|
|
|
Apr 21, 2016 20:08:51 GMT
|
adam73bgt - I am quite lucky about the panels being so available for MGBs, however I've also heard that there are so many bad panels available on the market! If I'm honest being a novice at panel work I would have agreed with your comment about it being less daunting one part at a time. However bjornagn is right, it's the same task I'm facing with my transit, you have to cut everything out before putting back in. Unfortunately I've got a lot to cut out. bjornagn - Where do you recommend purchasing panels from? You've clearly done a lot of these over the years going by your comments on other threads. I have a 'spit' that I'll be putting the car on once it's stripped down, that will hopefully make it easier to weld. But yes I may well be wanting some more in depth advice from you if that's ok? It depends how far I go with it as I need to spread my time and money over my whole collection. So it may just not be financially viable for me. However I'll always update my threads with any decisions. You are correct that I have done a bunch of these. If there is one thing that I have learned is that whenever possible I use the full panels that are manufactured by British Heritage. These panels are made on the original tooling and for the most part fit. ALL aftermarket panels will take some effort to adjust and will not be quite right if you are a fussy person. You also wont like my answer about the rotiserrie: You need to do sills with the car supported on a flat surface. The danger is to introduce a twist. I support the car under the front tyres and back axle when working on a car. The tops of the axle stands are adjusted so that they are level. Use plywood shims underneath if you have to. Feel free to ask if you need more insight into this process. Also did a quick tutorial on the technical board for those new to welding tin. retrorides.proboards.com/thread/188308/welding-advice?page=2 |
| |
|
|
|
|
carmad
Posted a lot
Posts: 2,000
|
|
|
|
That's not rusty this is rusty  But I surpose as with most projects it's time money tools and ability to do it Also depending on how mint you want the car some off that floor ect could be done with patching metal instead off full panels |
| |
|
|
Nathan
Club Retro Rides Member
Posts: 5,626
Club RR Member Number: 1
|
1974 MGB GT (Updated 21/04)Nathan
@bgtmidget7476
Club Retro Rides Member 1
|
|
|
|
Brings back good memories these photos, I went through all this whilst at Uni with the GT I have now (16 years ago!!!) :-).
BMH/MGOC/MGBHIVE all stock those parts you need, Hive being the cheapest usually for some reason.
Keep up the good work chap.
|
| |
Last Edit: Apr 22, 2016 9:15:34 GMT by Nathan
|
|
|
|
|
Apr 22, 2016 10:39:13 GMT
|
|
I'd say it's pretty much the usual repairs needed to restore a B,it looks like a very original car that has never had any resto work previously.I've seen worse !
The floors actually look rather better than i would have expected.
Good luck with it !
|
| |
|
|
|
|
|
Apr 22, 2016 10:39:54 GMT
|
That is nuts. Still repairable since it just requires all new panels let in, and they are all available. But here is the thing, With a car this rusty, you can sink a ton of time and effort into getting the sills and floors and outer panels all replaced. But it s the little bits of rust holes all over that can let the fini$hed project down. I have done them this rusty, but what I have learned is that you don't have to do them since a new tub or another car becomes the less expensive option. |
| |
|
|
|
|
|
Apr 22, 2016 10:59:15 GMT
|
|
For the ones I did years ago we used to buy the outer sill, castle and castle section then make the rest from a large sheet of steel, the vertical face of the inner sill and outer couple of inches of the floor were replaced with a folded length (you used to be able to buy a 4 foot long 3x3 2mm angle section for next to nothing)then the rest used to go back together pretty easily, if I remember unpicking it all around the back was the most time consuming part.
It's just a matter of getting stuck in, once it is all cut out it's not that difficult to put back together.
|
| |
|
|
carmad
Posted a lot
Posts: 2,000
|
|
Apr 23, 2016 16:12:41 GMT
|
How it looks now but no jokeing a lot off work  |
| |
|
|


