gtste
Part of things

Posts: 75
|
|
Apr 17, 2013 16:00:04 GMT
|
Well the rust removal on the fender wasn't as good as it was supposed to be, My Anode didn't work properly (I overlooked the rust protective paint on it), So I'll know better when i do the next fender. Onto some better news, With the help of a blowtorch, I managed to remove the stuck handlebars & Forks. This left me with the frame like this. 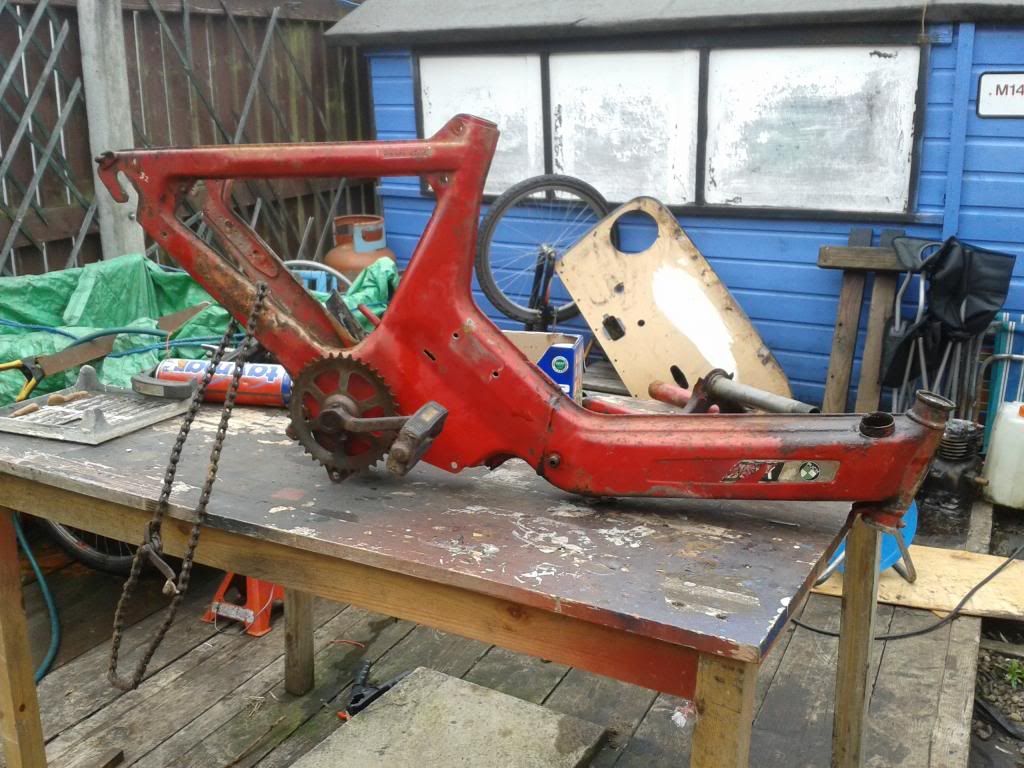 This is now ready for the rust removal Process. I only had one container suitable for the process, The paper wheelie bin that rarely gets used ! 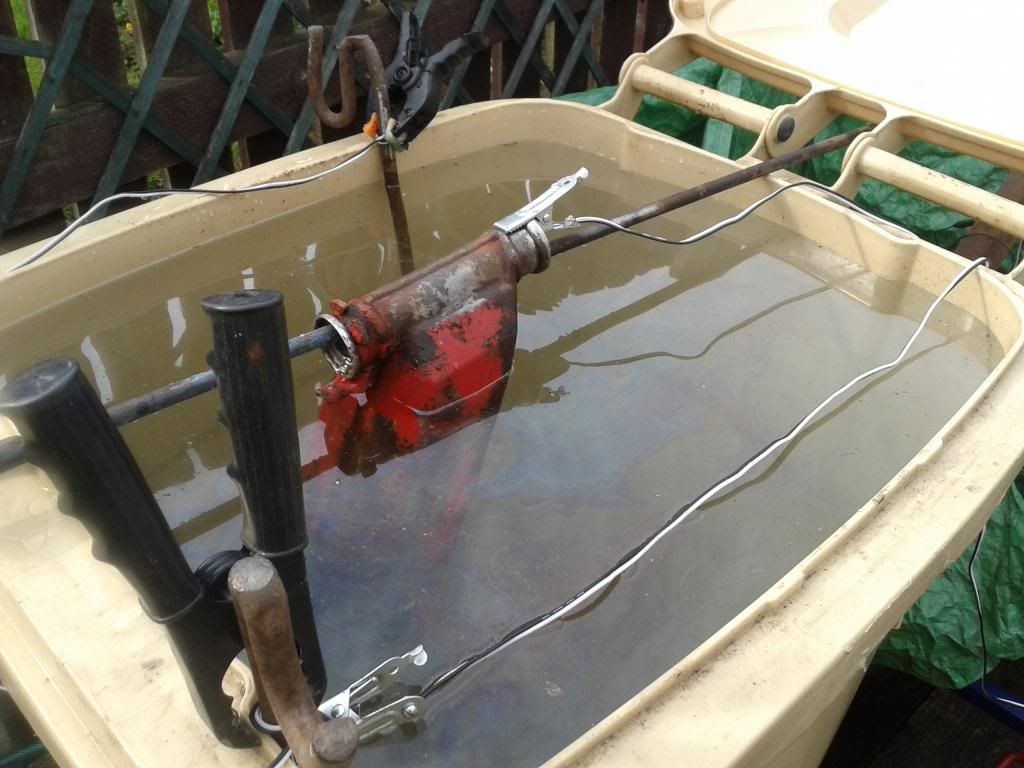 The bike is suspended slightly, with two pieces of Rebar acting as Anodes. After setting it up properly, and turning the power on i was greeted with this after around ten minutes of being on. 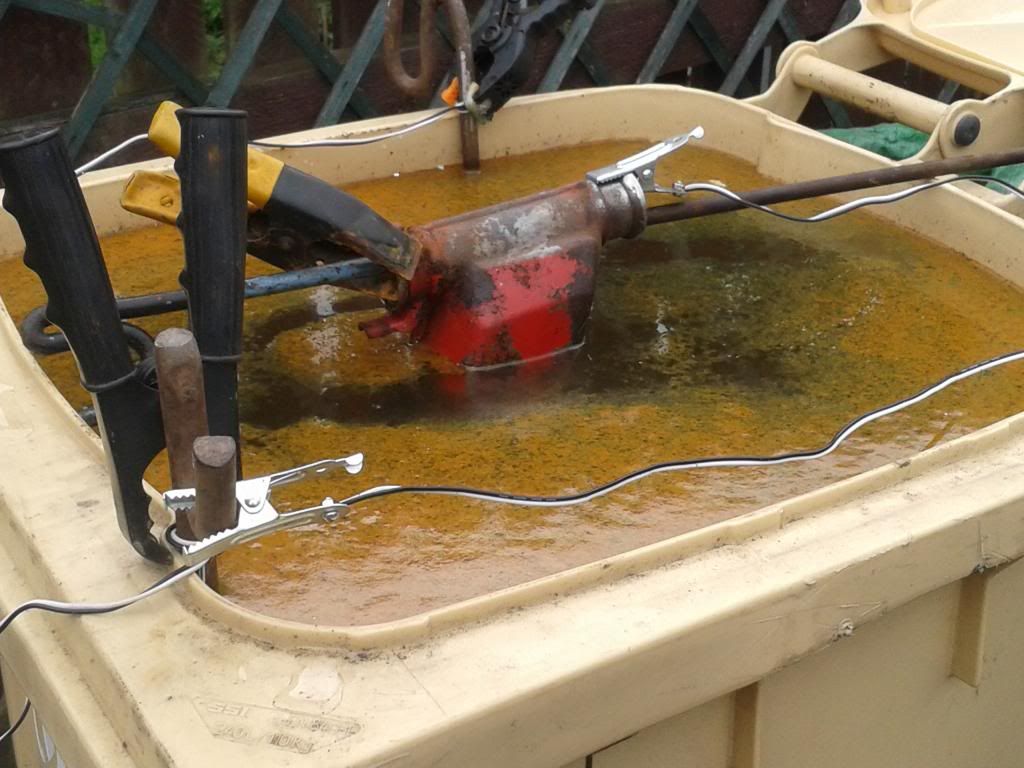 There's going to be loads of rust removed from this ! Hopefully it should work better than the fender did. I'm still looking for spares for this bike if anyone has any going spare, As you can see by the state it's in, I'm going to need quite a lot of bits. Stephen |
| |
|
|
|
|
|
|
|
Apr 23, 2013 20:14:38 GMT
|
|
I'm going to be breaking my maxi k fairly soon, its a twin shock not a hardtail but let me know what you need and il see if i can help. Ive a fair old pile of other maxi and magnum spares left over from previous projects aswell.
|
| |
|
|
|
|
|
Apr 23, 2013 21:36:16 GMT
|
|
|
| |
Last Edit: Apr 23, 2013 21:37:24 GMT by areofall
|
|
gtste
Part of things
Posts: 75
|
|
Apr 23, 2013 21:48:05 GMT
|
Areofall - Thanks for the info, I have seen that site before. But found a cheaper one from overseas. EvilMonkey - I'm looking for the following (Bit of a long list!) New cylinder & Piston set. Petrol Tap (Petcock) A Rear Light & Front light New Wheel bearings New Handlebars New Cables New Exhaust New front wheel New Twist Grip (Throttle) I'm going to try and source as many parts as i can second hand to stick to my limited budget, But finding second hand parts seems near enough impossible for these machines. If you have any of the above you're willing to part with for a good price be sure to PM me, All the help is much appreciated ! Thanks Alot for the help guys. Anyway ! Up for an update on the bike, I've managed to get most of the paint off so far, which has shown me the true state of the bike, Its filled with deep pits ! So i'm going to get the rust out as much as i can, and if i can source some lead sticks for cheap enough i will fill them with lead. If not, Body filler it is ! 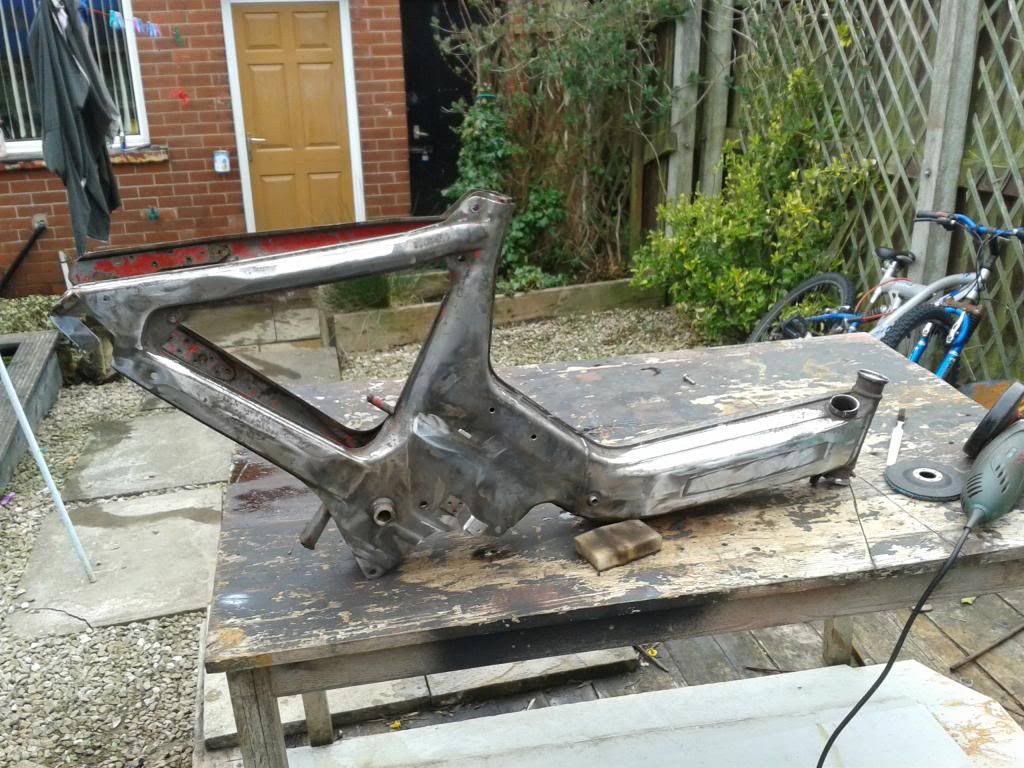 Stephen. |
| |
|
|
|
|
|
Apr 23, 2013 22:54:13 GMT
|
|
What other site have you found? Puchshop.de is good. Have a set of new handle bars and some new genuine cables too.
|
| |
|
|
gtste
Part of things
Posts: 75
|
|
Apr 24, 2013 15:21:22 GMT
|
The website was www.jmpbparts.com/ , Their UK postage is around £15.00 (depending on the euro exchange rate), so a little expensive. But i worked out using a spreadsheet it works out cheaper than ypvspares for the bits i need. Stephen |
| |
|
|
|
|
|
Apr 25, 2013 19:12:06 GMT
|
|
You have pm. Keep up the good work.
|
| |
|
|
retrolegends
Club Retro Rides Member
Winging it.....Since 1971.
Posts: 3,719
Club RR Member Number: 94
|
1974 - Puch Maxi N (Hardtail)retrolegends
@retrolegends
Club Retro Rides Member 94
|
Apr 25, 2013 19:19:20 GMT
|
|
Good build thread, looking forward to more updates.
|
| |
1974 Hillman Avenger 1500DL1992 Volvo 240SE1975 Datsun Cherry 100a flying custard1965 Hillman SuperMinx Rock N Roller1974 Austin Allegrat Mk1 1.3SDL1980 Austin Allegro Mk3 1.3L1982 Austin Allegro Mk3 on banded steels2003 Saab 9-3 Convertible 220bhp TurboNutter1966 Morris Minor 1000 (Doris) 2019 Abarth 595C Turismo (not retro but awesome fun) www.facebook.com/DatsunCherry100a |
|
gtste
Part of things
Posts: 75
|
|
Apr 28, 2013 18:00:32 GMT
|
Quick Update As I've got a new cylinder & piston on the way, I decided to clean up the engine. It started off looking like this, I used a dremel with wire brush & some other bits to clean it! There's still alot of work to be done on it to get it to my standards.  I also made a clutch puller to remove the clutch, But failed miserably with it! It's stuck on really tight, So i'll probably get the engine up and running after leaving some oil in the clutch to loosen it up.  Bad welds on that nut ! Stephen. |
| |
|
|
gtste
Part of things
Posts: 75
|
|
Apr 30, 2013 15:31:51 GMT
|
With it being a warm day in Bolton, I decided to clean & attempt to prime my frame. I started by cleaning it & applying body filler to all the pits in the metal.  It was a pain in the  to sand down without the right paper. Although it will look alot better than the bare metal. Whilst i was waiting the 20 Minutes for the body filler to dry, i decided to clean & prime the front cog. I quickly sanded it with the drill sanding attachment (2 Pound from Toolstation, so nothing fancy).  Once i had sanded the filler down i started to apply primer.  Whilst waiting the 10-15 minutes inbetween coats i decided to clean & also prime the seatpost.  After one or two coats of primer the frame started to look fairly okay.  My new cylinder & piston came today. Its only a stock cylinder, But is in great nick & Should hopefully allow me to have the engine running in a week or two. Stephen. |
| |
|
|
|
|
|
|
|
|
|
|
Craking work mate, nice to nice another puch getting restored, I have the same model maxi N in the same colour too
try 50cc.nl for parts too
|
| |
Last Edit: May 1, 2013 18:39:18 GMT by Barrass
VW nut
1984 MK2 golf type 19e
|
|
gtste
Part of things
Posts: 75
|
|
|
|
Thanks a lot  I've never heard of the 50cc.nl, Thanks for that tip ! Hopefully i shall have her running as soon as i get my hands on two new circlips for the piston, as one somehow found its way down the cracks inbetween my decking ! Stephen. |
| |
|
|
gtste
Part of things
Posts: 75
|
|
|
|
Today, I decided to clean up & smack a bit of primer on the flywheel cover. I was offered a chrome flywheel cover for a fair price, but I decided to keep mine & paint it. As it adds to the originality of the bike (And saves me a few quid) I started to clean it up with a wire brush.  It was really weathered, you could see the water stains from where it had been sat in water, (The same line appears on the flywheel & inside the flywheel)  ] After cleaning some crud off it with the wire wheel, I went at it with some 240 Grit. I would love a dual action sander, But would rather spend the £20 on parts for the bike. So I have to settle on this drill powered £2 'cheapie' from Toolstation. It does the job just fine !  Bit of shoddy primer work here, But it can always be redone when I have more money !  Stephen. |
| |
Last Edit: May 7, 2013 18:01:58 GMT by gtste
|
|
gtste
Part of things
Posts: 75
|
|
|
|
Well with one of my (future) panniers arriving today, I decided to do a little work until the weather got too rough for me to be bothered ! As I'm building a new electrical system for this bike (Still using the original 6vAC generator in the flywheel, But with a 12V battery & A stepper Motor Generator to help charge it) You can use the original 6V Dynamo, It just changes the rev range, For instance instead of charging a 6V battery at a lower revs, It will achieve the 12V on higher Revs. I am going to be building a custom rack out of some bent flat bar for this bike, along with two panniers. I needed a set of panniers that were small & Quite light, they needed to be extremely waterproof and I didn't like the idea of using a plastic box, as anyone can get in with a small hammer, Nor i didn't like the idea of using my fabric panniers. As they rip really easy. So i bought a small 30MM 7.62 MM ammo case off eBay for around £10 posted, These have rubber gasket seals, are made out of steel, and are relatively light. I could have gone for the slightly wider Ammo Case, but i opted for a smaller one due to my needs & wanting to keep the bike as light & nimble as possible.  I was expecting it to be a lot heavier, but it's no heavier than a good bike lock. I was hoping to use it 'as is' on the bike, without any painting or effort on my part, but due to the odd rust spot, I decided to paint it.  The sides were in great nick, so I just hit them with some 240 Grit in the drill, spending a little more time on the rust spots. I sprayed some primer on them & it started to pour down (I love English weather) so my painting was stopped and put on hold. Whilst outside & having not much to do, I decided to remove the spokes from the front wheel & clean up the rim a little bit. I decided to cheat & just cut the spokes out instead of fighting with the screws.  Once they were cut out and removed, i was left with a rusty rim & a hub in good nick. The hub is going to get a full 'teardown' with new brake shoes and bearings being put in. I'll then clean it up with a brass brush in the Dremel.  With the rain really pouring down by now, i decided to head inside & work on some of the electronics. I'm going to use the stepper motor pictured below, as a generator, unlike ordinary dynamos these have multiple coils inside & so are much better as generators. You cannot use them directly as a generator to charge batteries & what not though, as they output a AC signal.  I designed in a circuit designer software suite a circuit that would convert the AC to DC with a bridge rectifier, and then double the voltage output with two Capacitors. I etched this onto a printed circuit board, and started to build the circuit.  It's not very neat, but it will work fine for what it is. Once it was all soldered it looked like this:  Although unfortunately i couldn't get more than 6 Volts DC out of the thing. (I spun the motor in a drill chuck to test it at various RPM'S) The capacitors both double the output DC Voltage, and allow it to be stable. If the motor has stopped turning for a short time (Up to around a minute) the voltage will stay stable untill the capacitors Discharge. I guessed the low voltage was something to do with bad capacitors I used, so i replaced them with much larger ones, I'm now able to get up to around 60 Volts DC out of it (The higher the voltage the less amperage you will typically get with a setup like this).  I'm next going to be building a regulator to regulate the voltage at a steady 13.8 V for the battery to charge, and some regulator boards for the 12V battery, to allow for my aftermarket indicators, and any other accessories i'd like. For instance a USB charger for my sat nav etc) I'm very happy with the electrical setup at the moment, and will be even happier when i get the bike up and running. Hopefully it shall be by the end of next month, and will have it definetly taxed & MOT'D at the end of July. Thanks, Stephen |
| |
|
|
gtste
Part of things
Posts: 75
|
|
May 15, 2013 12:43:29 GMT
|
I decided to have a go at making a new rear rack today, as the bike is getting new panniers (30MM 7.62 Cal. Ammo cans), It needs these as their the cheapest & best waterproof boxes. They will house a new electrical system, as well as storing waterproofs & other assorted bits. My original plan was to design it with a computer, Build the rack to the profile i designed out of flat bar, And then use a CNC Router i have access to, to cut out some wood to fit the top of the rack. Although i then realised the CNC router's cutting area was too small, and just put pieces of metal inbetween instead of wood. I may still put some sort of top on it. Although for now it's fine as it is I used CAD software to design the rack & to make sure i knew the sizes. I measured the original rack, and changed my sizes accordingly.  I started off with some thin mild steel flat bar, and a while later after bending in a vise and some welding (& As i had access to a nice indoor garage, i decided to give it a quick coat of primer), came out with this.  There were some imperfections in the flat bar, as it's recycled stuff & not new. But you won't see them once the panniers are on.  I have had to cut the ends (Where it mounts to the seatpost) down with an angle grinder, and i've done a shoddy job on it. So i will clean them up later on. Once on it looked like this ! I'm very happy with the size of it, Although i need to build the 'downward supports', which will also be built out of flat bar. I put the pannier on, it will have two of these when finished just to give an idea of the finished size. You might notice the bike has been painted, again I've done a bad job of it and it will need to be re done (Probably next tuesday, when i have access to an indoor garage again).  I think the bike rack will be painted black. I do like the idea of not having a top on it, As it leaves room for me to bungee cord stuff onto it. |
| |
|
|
gtste
Part of things
Posts: 75
|
|
May 23, 2013 21:57:00 GMT
|
I decided to take apart the front hub today, In preparation for its new rim & Spokes. My plan was just to strip it, regrease the bearings & clean it. I expected a small job, but was greeted by a huge mess !  It doesn't look too grubby on the outside. First step is to remove the speedo drive unit.  This is a simple job, and is done just by removing the outermost bolt.  The rubber gasket on the outside had perished, and will need replacing. Although that isn't a problem.  I then removed the other bolt, and removed the 'cup' bolt, with the proper spanner.  I removed the bearings and was left with this !  That's 29 years of being sat in a barn !  I gave it a quick clean, and decided to wait till I have some more wire brushes for the dremel to clean it properly. After cleaning the shed up a bit, I decided to remove the vinyl from the seat. So I can remove the springs, clean & paint it properly in the future.  I drilled a hole a few days ago, in one of my panniers, to put my lock. Although have decided to use a different lock on that box (Plus i drilled the hole in the wrong place -.-) So i spent a good twenty minutes rectifying my mistake. I filled the hole with Weld with the Mig Welder.  Its not the prettiest, But it will do. It was my first proper time using this particular welder, I'm used to using a bigger gas welder, whereas this is a small gasless type. I then ground the weld down to this, there's still a little bit of filling that needs doing. But i will do that tomorrow. With some primer on you won't be able to see it was a repair (Until you open the lid)  |
| |
Last Edit: May 23, 2013 22:01:12 GMT by gtste
|
|
gtste
Part of things
Posts: 75
|
|
Jul 11, 2013 13:27:16 GMT
|
Having not wrote anything on here for a while, I Thought i better update on my newest purchase. Its an exhaust, I think it's a Puch MS50 Exhaust (A modern copy) with a 28MM Puch Header pipe on it. I've never seen an exhaust like this on the Maxi's, But i liked it and thought I'd take the chance with it on eBay. After fitting it up to a frame with no wheels i think it should fit fine.  [/URL]  [/URL] Look at the size difference with the stock Puch Exhaust, And the new one !.  [/URL] And a quick side by side photo to show the difference. There's not really been any progress with the bike now, I've just left school & Am wanting to work on it, but can't due to having no money ! Although i did finally recieve the V5C from the DVLA, Its last owner acquired it in 1983 (A year before it was took off the road) and it's had 5 previous owners !. Stephen. |
| |
|
|
retrolegends
Club Retro Rides Member
Winging it.....Since 1971.
Posts: 3,719
Club RR Member Number: 94
|
1974 - Puch Maxi N (Hardtail)retrolegends
@retrolegends
Club Retro Rides Member 94
|
Jul 11, 2013 19:16:06 GMT
|
|
Brilliant work! Keep the updates coming.
|
| |
1974 Hillman Avenger 1500DL1992 Volvo 240SE1975 Datsun Cherry 100a flying custard1965 Hillman SuperMinx Rock N Roller1974 Austin Allegrat Mk1 1.3SDL1980 Austin Allegro Mk3 1.3L1982 Austin Allegro Mk3 on banded steels2003 Saab 9-3 Convertible 220bhp TurboNutter1966 Morris Minor 1000 (Doris) 2019 Abarth 595C Turismo (not retro but awesome fun) www.facebook.com/DatsunCherry100a |
|


