|
|
|
Feb 19, 2012 18:01:51 GMT
|
Nice work! I've got 4 of these myself. I can't believe all the rust repairs you guys have to do over in the UK. Cool idea with the wheels, although I think you should splatter them more so they don't just look like they were stored on the ground while you were painting something. Although that's just my opinion. I think the wheels are really sweet.  Interesting that the '91 UK model has so many parts from the earlier versions, such as the sawblade wheels, Zenki taillights, etc. Have you considered fitting a set of rear lamps like these? 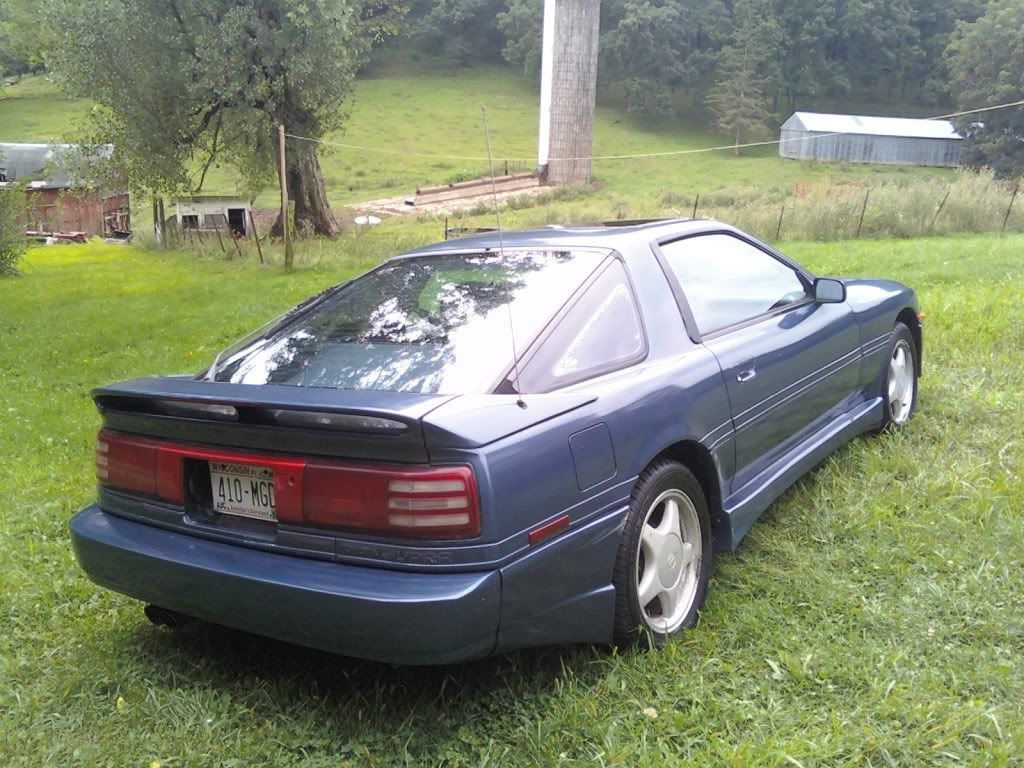 |
| |
Last Edit: Feb 19, 2012 18:21:01 GMT by yurikaze
|
|
|
|
|
|
|
Feb 19, 2012 22:00:11 GMT
|
Thanks I can't wait till they're finished and complete with tyres and center caps! The only supras over here with those lights are JDM imports and although they are a popular swap for supra owners here they're not my cup of tea. Besides, the rally car I'm replicating had UK lights. Nice ride |
| |
Last Edit: Feb 19, 2012 22:01:07 GMT by 7M.elody
You can't buy happiness but you can buy cars and that's kind of the same thing.
1989 Austin Metro
1994 Harley Davidson hardtail bobber
|
|
|
|
|
Feb 25, 2012 18:44:07 GMT
|
Been busy today Just tidying mostly and dabbing a bit of paint about........ Sill needed tidying for the trim to go back on! Remarkably un rusty so just a bit of sand paper to clean it up and hammerite away!   I also painted my towing eyes and my rad brackets and cam pulleys..    Then I masked the car up to paint the sills black as they should be but were covered in white overspray!   I'll do the other side once the back trim is back on, someone has broke the clips for it so I was gonna use Tiger seal but then realised I don't have a gun for it  to the shops tomorrow! Then I splattered the rest of my wheels!  They will get some laquer tomorrow and then tyres next weekend hopefully! Tomorrow the plan is to do some welding also and I will be able to get the rad brackets back on and the other side of the pulleys painted.... fingers crossed the weather holds up! |
| |
You can't buy happiness but you can buy cars and that's kind of the same thing.
1989 Austin Metro
1994 Harley Davidson hardtail bobber
|
|
braith
Part of things
 Paddling furiously....
Posts: 30
|
|
Feb 25, 2012 21:16:36 GMT
|
Had one of these a couple of years ago - awesome bit of kit that sounds like the coolest 'truck' ever when idling - had to weld up all around the fuel filler on mine, got it on the road all sorted then was distracted by other stuff and sold it! Still wish i had it now....as I paid next to nowt for it and it wasn't half bad! I was gonna go down the larger afm and injectors route too...very clever are the ECU's in having the ability to adjust their values to suit , more so than most anything alse I've come across... Like the rally rep theme - something different for a J car  Keep it up! |
| |
'94 OM606 Disco - rolling coal
'89 Astra GTE 16v - Missus' daily c/w cage
|
|
|
|
|
Feb 26, 2012 10:26:11 GMT
|
|
cool motor, and good thorough work
me mate used to have an n/a in white, now has a 185 celica. its amazing looking at your photos how similar bits and pieces are, the metal bar behind the dash, that the colum mounts to, even little things like the U shaped clamps at the top of radiator, and the little filler cap with the odd expansion bottle. bolts and braces for everything, sheilds for this and that, sensors everywhere. 80s toyota engine bays always look so cluttered complicated, but i gues rightly so
|
| |
|
|
|
|
|
Feb 27, 2012 15:50:35 GMT
|
Thanks peeps I'm thinging of going down the larger injector route also but not for some time yet I want to get it looking the part first then I'll start hunting for bargains in that department. Darren, I think they had a basic blue print for all parts and then just blew it up or made it smaller depending on the car they were building lol |
| |
You can't buy happiness but you can buy cars and that's kind of the same thing.
1989 Austin Metro
1994 Harley Davidson hardtail bobber
|
|
|
|
|
Mar 24, 2012 18:36:57 GMT
|
Yay, I finally have an update I went this morning to fetch some tyres for my wheels, unfortunately they were a bit low on stock so I only ended up with two and I have to go back in a couple of weeks but that's not too bad. I'd bought some Collinite 845 Wax as it seems to have a good reputation for protecting wheels from brake dust ect. so they all got 2 coats of that  I'm well chuffed to have them on the car finally, Just waiting for my centercaps to be finished now I also have received a SH brake master cylinder as mine was leaking pretty bad... So I took the old one off (it was only half full even though the car hasn't moved) and scraped off all the loose paint from the servo where the brake fluid had melted it off. While I was at it I did there same with the patch on the bulkhead from when the clutch master leaked before.   I started painting over the bare metal to protect it with some old 2pack I found, then I realised it looked so much nicer than the rest of the servo I did the whole lot New one to go on tomorrow so we will have brakes again and I'm not sure what else I'll do, there is plenty to choose from. Oh and a patch for the hole in the arch has been made and tacked in now so ever closer to the road! |
| |
You can't buy happiness but you can buy cars and that's kind of the same thing.
1989 Austin Metro
1994 Harley Davidson hardtail bobber
|
|
|
|
|
Mar 25, 2012 23:39:06 GMT
|
Did some more today! Fitted my new Brake master cylinder and was very happy to see no leaks   And I also refitted my fuel cap which I painted cause I was trying out different rattle cans to find a close match to the rest of the car... looks ok I think...... even though it still refuses to gap anything like square Anyway this is because after some modification I will have to paint my new front bumper as it's not a toyota white, and I will need to paint the arch when that gets repaired too. So at least I have found a suitable match  Then I went to put it away and the car had a proper hissy fit spitting water everywhere from what appeared to be several different places including out the exhaust, I'm putting it down to not having got warm for ages. It pressured up really quick too and there was loads of air in the system so it seems I have a leak or two, I found one already on the top hose so that want's a new clip. I will have to have a closer look next weekend as it was too late to investigate properly |
| |
You can't buy happiness but you can buy cars and that's kind of the same thing.
1989 Austin Metro
1994 Harley Davidson hardtail bobber
|
|
|
|
|
Mar 26, 2012 13:28:49 GMT
|
|
Good luck, hope the leak isn't anything major.
Does the filler flap not go dead centre so that when it opens it doesn't catch? Assuming the hinge is toward the front of the car.
|
| |
|
|
|
|
|
Mar 26, 2012 20:34:41 GMT
|
Thanks, I don't think it's anthng serious cause it would be doing well to break it's self whilst being stood  fingers crossed! I never thought that about the fuel cap, maybe your right the hinge is certainly towards the front. I will check out some other Supras to see if they're the same! |
| |
You can't buy happiness but you can buy cars and that's kind of the same thing.
1989 Austin Metro
1994 Harley Davidson hardtail bobber
|
|
|
|
|
|
|
|
|
This weekend wasn't that productive, I attempted to replace the oil cooler flexi's from the engine to the hard pipe under the bumper to stop my oil leak and ended up discovering that it's the hard pipes that were leaking I've got some off a breaker coming, so when I get that I'll replace them and cut some more pipe to change the rest of the flexi's the rest of the way to the cooler while I'm at it as they're showing their age!   Then today I thought I would fit my bonnet pins which I got for Christmas, started drilling holes (which are perfectly in the right place yay!) only to discover that of all the drill bits we have the biggest is a 10mm and I need a 12 so that's as far as I got with that job   It's the rad that's wonky not me I measured against the nose cone and wing. Then having got two half jobs out the way I thought I would do another half job and finish off my centre caps as I now have the new centres. So I drilled a small hole in the middle of the old caps (only through the first layer) and prised the centre of it out which is only a bit of tin glued into place. after doing this I discovered that the new centres need filing down a touch to drop in place and I couldn't find one anywhere so I have brought them home with me and I'll get my nail file round them  Maybe I'll get some more stuff finished over easter but I will have to juggle it with spending some time with my lil bro who is coming to say for 4 days we'll see! |
| |
Last Edit: Apr 2, 2012 8:41:18 GMT by 7M.elody
You can't buy happiness but you can buy cars and that's kind of the same thing.
1989 Austin Metro
1994 Harley Davidson hardtail bobber
|
|
|
|
|
|
|
Managed to get a couple of bits done this morning I have my brother for the rest of the easter weekend now so will get nothing else done! I filed down my new centers for my center caps to get them fitting nice, super glued them in place and gave them a couple of coats of laquer for good measure! Unfortunately I have broken one of the plastic tabs off the back and I'm not sure what I'm going to do about it yet because super glue didn't work.... we'll see...  I painted the other side of my cam pulleys, so when that's properly dry they can be fitted  And I also finally got a new gun for the tiger seal and got this trim back in place.... the masking tape is to hold it till it dries, fortunately not a permenant fixture although quite effective  My new pipe for the oil cooler hasn't turned up yet so that will have to be a job for another day.... I realised also that I had left my expansion tank out all week in the snow! oops! |
| |
You can't buy happiness but you can buy cars and that's kind of the same thing.
1989 Austin Metro
1994 Harley Davidson hardtail bobber
|
|
grayb
Part of things
Posts: 86
|
|
|
|
Nice one, I'm impressed with your dedication, I wish I was as motivated  Keep the updates coming, looking forwards to seeing how this turns out. |
| |
1984 Celica Supra
|
|
|
|
|
|
|
Thanks, I'm hoping to get some red paint on the car as soon as the welding and oil leak is sorted then I can get an MOT and some stickers! 2 wheels finally finished!  |
| |
You can't buy happiness but you can buy cars and that's kind of the same thing.
1989 Austin Metro
1994 Harley Davidson hardtail bobber
|
|
|
|
|
Apr 16, 2012 22:56:34 GMT
|
One step forward and one back again this weekend! The step forward is that I have patch one of two now welded in properly and patch two of two made. Unfortunately no pics as Phil is a bit shy that's a big step so I'm very happy! The step back was when I was changing the oil cooler pipes and the oil cooler wanted to stay part of the pipe it was all corroded inside and just snapped off so it's new oil cooler time now!   I should have one hopefully by the weekend so I can get it fitted. Also with any luck I will be able to get a lift up to the tyre place for my last two tyres |
| |
You can't buy happiness but you can buy cars and that's kind of the same thing.
1989 Austin Metro
1994 Harley Davidson hardtail bobber
|
|
|
|
|
Apr 16, 2012 23:21:45 GMT
|
|
looking good so far! keep up the good work!
|
| |
|
|
|
|
|
|
|
Got some welding done yesterday WOOOOO!!! We already had one patch welded in but Phil is being shy and wouldn't let me show you pics of his welding even though it is awesome! So two patches were required. One half to the seam recreating the inner arch and bending up to complete the suspension turret from underneath. Then a second patch for the other half completing the inner arch and turret from inside the boot. The turret is triple skinned again now as original and the seam is double skinned too. Making the patches isn't easy if you want to do it in two! Phil and Ric had to bend the metal up into the seam and also round up to the turret but somehow a flat piece of metal turned in to this....... with only a couple of hammers, a big pair of pliers and some tin snips...... These are the pics I am allowed to show....   Phil is well chuffed with his welding And then it got a thick coat of zinc primer, some normal primer, then paint and I will also be going over it with Hammerite when I do the whole boot again.  The inside of the arch has had a thick coat of Zinc Primer, Red Lead and Seamseal all over the welds and in the seam to stop water getting in there again. I will be also having a coat of chassis black and finally underseal but the Seamseal was taking too long to dry Anyway.... I dare moisture to attempt to break this shield again!!!! Next, interior out to start the same process with the second hole in there. The other side can wait till there is MOT, Phil said he will make me a temporary outer arch for the dead side for the first show or two so no one can laugh at me |
| |
Last Edit: May 7, 2012 20:55:17 GMT by 7M.elody
You can't buy happiness but you can buy cars and that's kind of the same thing.
1989 Austin Metro
1994 Harley Davidson hardtail bobber
|
|
|
|
|
|
|
|
Hmmmm, for some reason the pictures won't show, even though the image tags are in there when i try to modify the post?? Weird. I'll look again later.
|
| |
You can't buy happiness but you can buy cars and that's kind of the same thing.
1989 Austin Metro
1994 Harley Davidson hardtail bobber
|
|
|
|
|
|
|
Got some welding done yesterday WOOOOO!!! We already had one patch welded in but Phil is being shy and wouldn't let me show you pics of his welding even though it is awesome! So two patches were required. One half to the seam recreating the inner arch and bending up to complete the suspension turret from underneath. Then a second patch for the other half completing the inner arch and turret from inside the boot. The turret is triple skinned again now as original and the seam is double skinned too. Making the patches isn't easy if you want to do it in two! Phil and Ric had to bend the metal up into the seam and also round up to the turret but somehow a flat piece of metal turned in to this....... with only a couple of hammers, a big pair of pliers and some tin snips...... These are the pics I am allowed to show....   Phil is well chuffed with his welding And then it got a thick coat of zinc primer, some normal primer, then paint and I will also be going over it with Hammerite when I do the whole boot again.  The inside of the arch has had a thick coat of Zinc Primer, Red Lead and Seamseal all over the welds and in the seam to stop water getting in there again. I will be also having a coat of chassis black and finally underseal but the Seamseal was taking too long to dry Anyway.... I dare moisture to attempt to break this shield again!!!! Next, interior out to start the same process with the second hole in there. The other side can wait till there is MOT, Phil said he will make me a temporary outer arch for the dead side for the first show or two so no one can laugh at me Iirc, it's the S in the HTTPS bit at the start that stops them showing, plus the file names are huge. Should be fixed for you now. Good work there. |
| |
|
|
|
|
|
|
|
Thanks for that, I will keep that in mind they worked on a different forum so I couldn't understand! |
| |
You can't buy happiness but you can buy cars and that's kind of the same thing.
1989 Austin Metro
1994 Harley Davidson hardtail bobber
|
|
|
|


 to the shops tomorrow!


 fingers crossed!


