|
|
|
Jan 31, 2012 21:32:53 GMT
|
Beachbum Start by creating the rib detail in the middle, using a hammer and chisel and an edge of steel 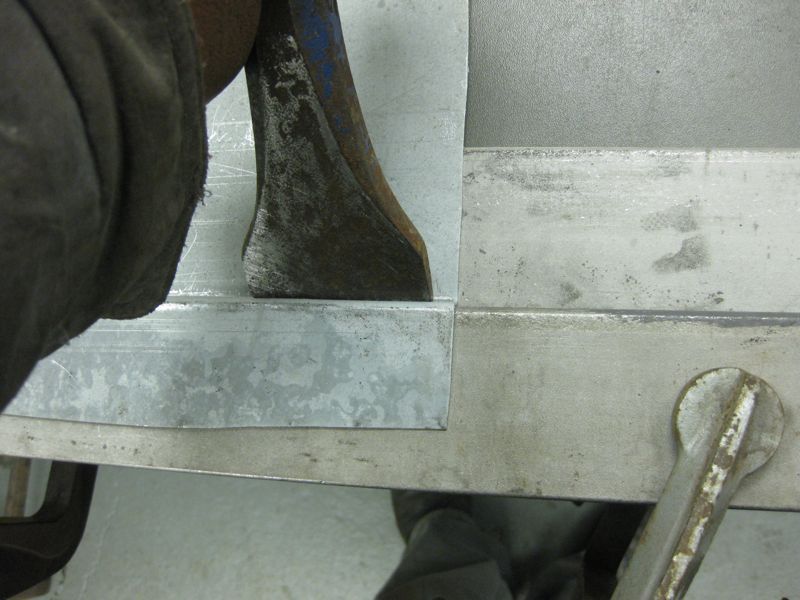 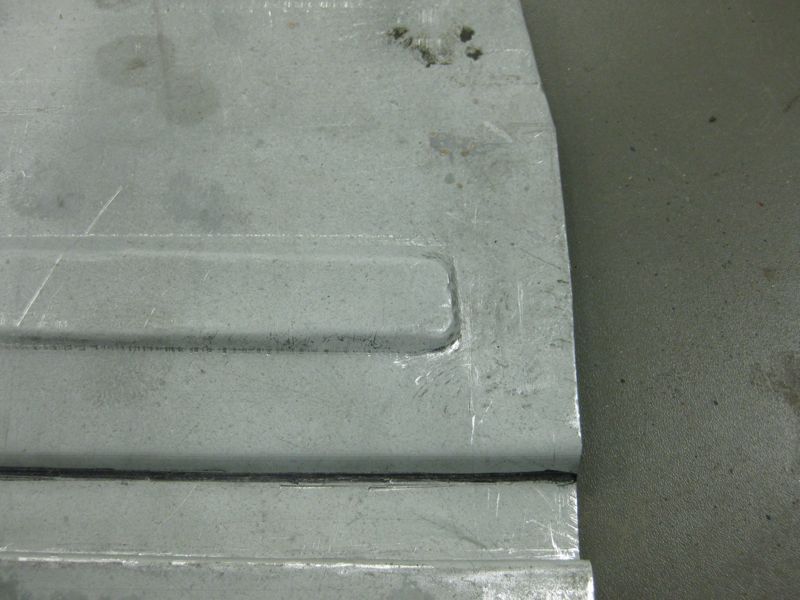 You can read the full write up here retrorides.proboards.com/index.cgi?action=display&board=usetharch&thread=70135&page=4#997838To create the curved stepped shape then either find some tube that diameter as you say, or even just cut some plywood to the right shape, it should be strong enough to form what you need, or depending how accurate it needs to be just work on a straight edge and keep turning the job to make a curve then when you have the base shape sorted, fold up the sides around a piece of round tube Hope that helps Tony
|
| |
|
|
|
|
|
|
|
Jan 30, 2012 20:25:00 GMT
|
|
|
| |
Last Edit: Jan 31, 2012 7:42:55 GMT by tonybmw
|
|
|
|
|
Jan 29, 2012 19:11:33 GMT
|
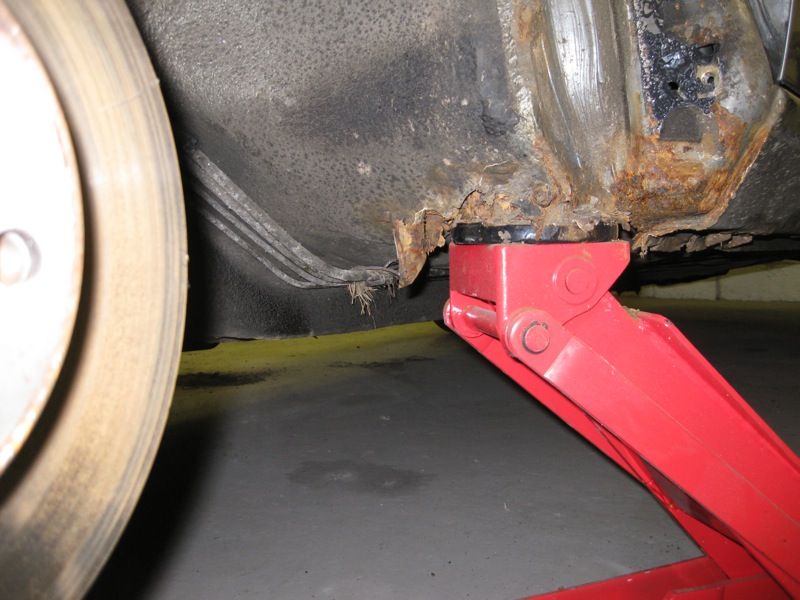
Just another 1/2 day today, got the interior stripped out 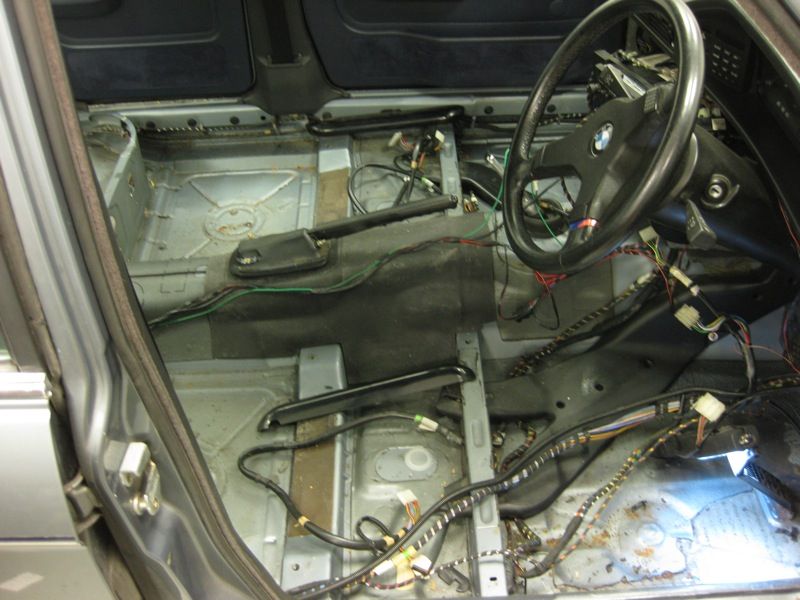 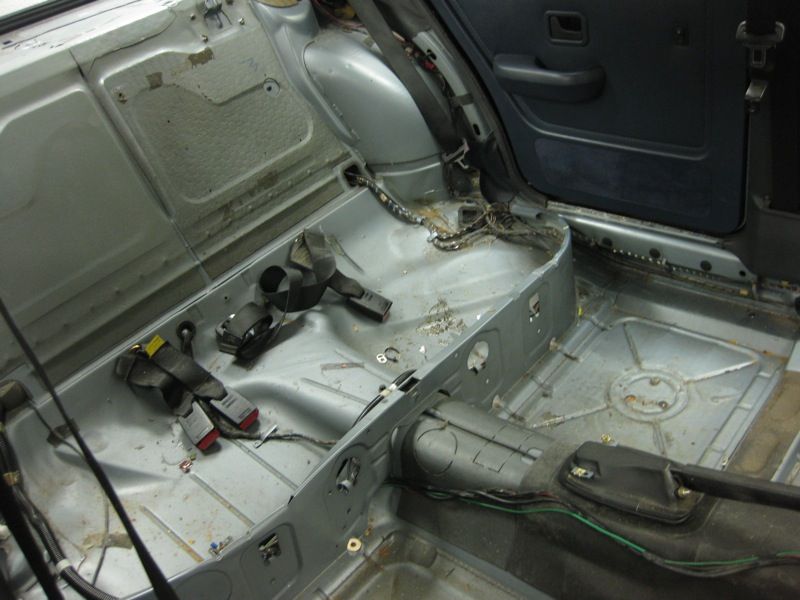 Took twice as long as an E12 due to all the wiring, the M5's have electric seats, along with every other conceivable extra, and this one has aircon too Then I could see the floors Drivers side has been patched before, so that will need to be redone 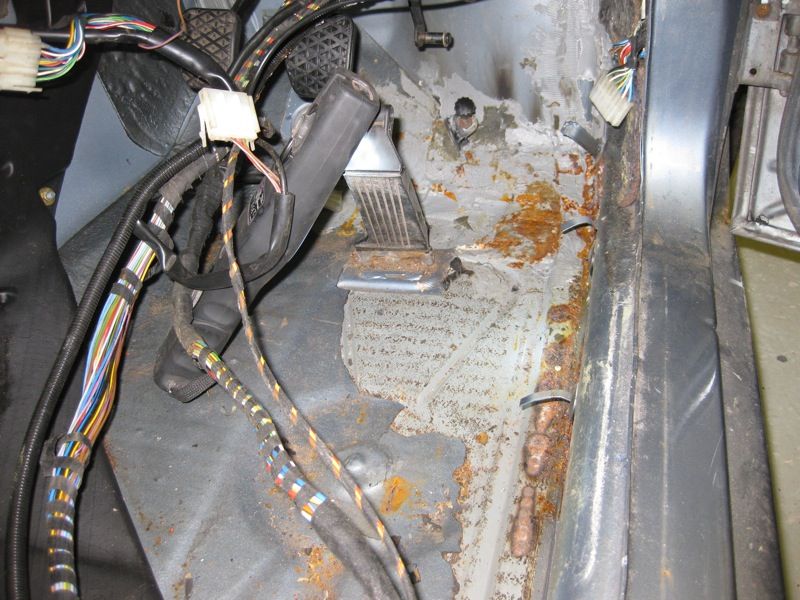 But passenger side does not look like it has been, but is very weak, and the floor and inner sill, are deformed because the jacking point is so weak 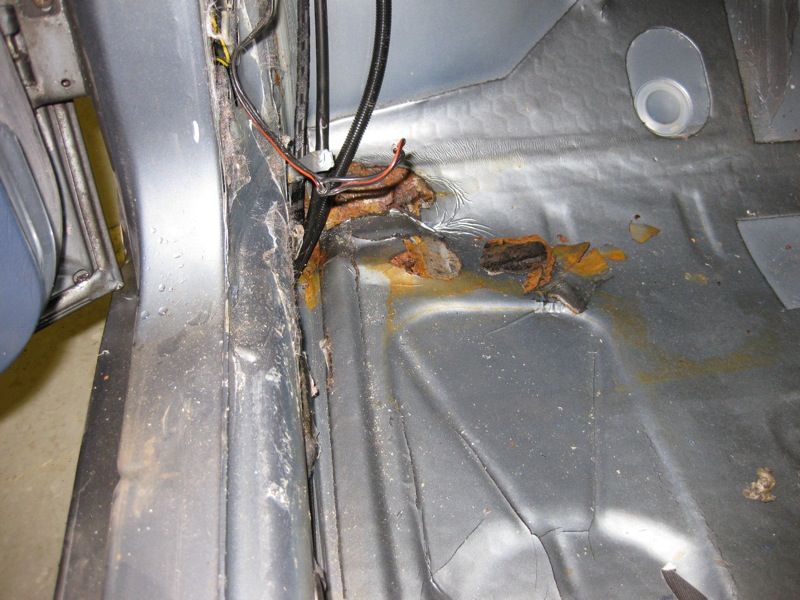 But generally the inner sills look okay, so thats one thing less to worry about |
| |
|
|
|
|
|
Jan 28, 2012 21:42:19 GMT
|
|
|
| |
|
|
|
|
|
Jan 28, 2012 17:52:06 GMT
|
|
|
| |
|
|
|
|
|
Jan 28, 2012 17:29:17 GMT
|
|
Looks like an absolute bargain at £122, a fantastic buy
|
| |
|
|
|
|
|
Jan 25, 2012 18:34:05 GMT
|
|
I prefer the first one with the main dials in the middle
|
| |
|
|
|
|
|
Jan 24, 2012 21:23:39 GMT
|
|
Ahh !!!
It was a last minute Ebay purchase, Genuine BMW part, never stopped to think that there might be differences, its difficult to tell the condition of the original one, it was meant as a spare incase we needed it, will have to keep my fingers crossed that we don't
|
| |
|
|
|
|
|
Jan 23, 2012 19:41:49 GMT
|
Teaboy - Grips worked great, would definitely recommend them when pool welding spot welds Where do you get them from, Tony? TeaBoy, It was at an Autojumble, I'd not seen them before and thought they might be worth a try, has anyone else seen them for sale anywhere ?? What guage do you use Tony, 20? 75nut, yes I use 20swg for body panels, and 16swg for chassis repairs Hi Tony I wonder if you could add you your making panels thread the techniques and equipment you use to achieve your totally invisible repairs - I suggest that thread because it's such a comprehensive thread and if you did it in this one it would get lost. I know you use a powerfile and a DA sander and I'm going to purchase both but aspects like powerfile belt grit selection as well as DA disc disc selection may well have passed me by in other threads  Sorry for the slight deviation to this thread but my welding repairs have reached the stage where they are structurally sound but still very visible - this doesn't really matter on my track car but it really will matter on my next project and I'm really keen to understand how you do it so well  Good Idea I'll give that a go on the next suitable repair, although I did do a grinding tutorial if that gets things started retrorides.proboards.com/index.cgi?action=display&board=usetharch&thread=70135&page=2#942606 |
| |
|
|
|
|
|
Jan 22, 2012 22:04:32 GMT
|
I'm running out of superlatives! Out of interest, what steel are you using to make all your repair panels? it seems to be coated in something that protects it but doesn't affect your welds. Sphinx - its called Zintec, its Zinc coated, and as you say it does not affect the welding, Like Garlic Bread, "its the Future" ;D ;D ;D |
| |
|
|
|
|
|
|
|
Jan 22, 2012 19:22:29 GMT
|
Thanks Guys, Teaboy - Grips worked great, would definitely recommend them when pool welding spot welds Got that Arch completed today 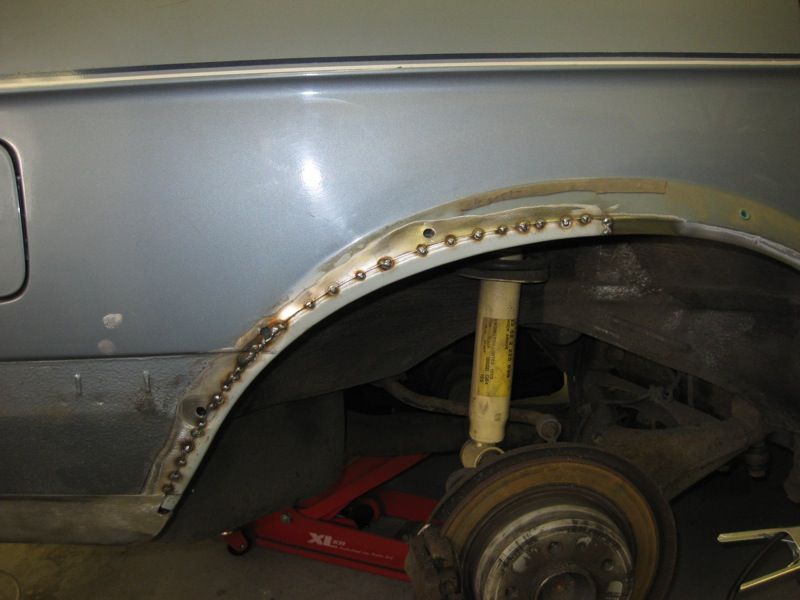 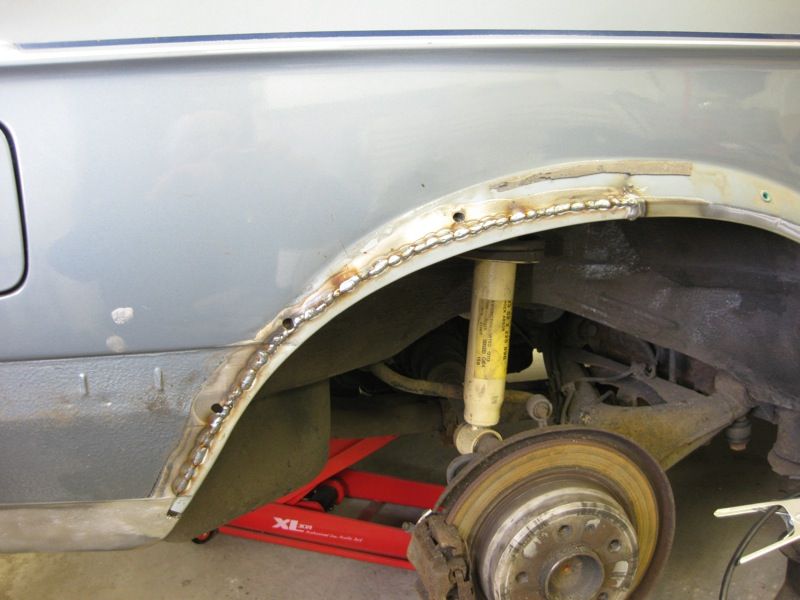 Didn't like the look of this lower flange 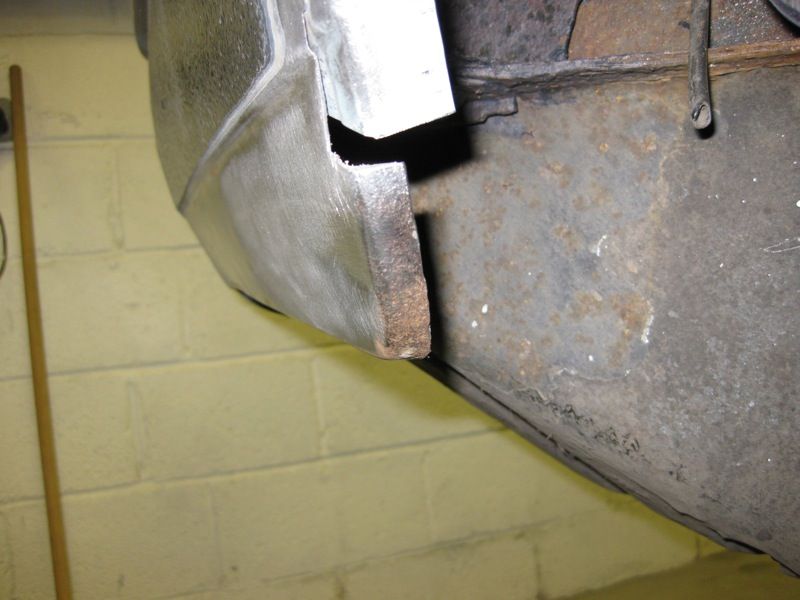 So it had to go , to be replaced by this 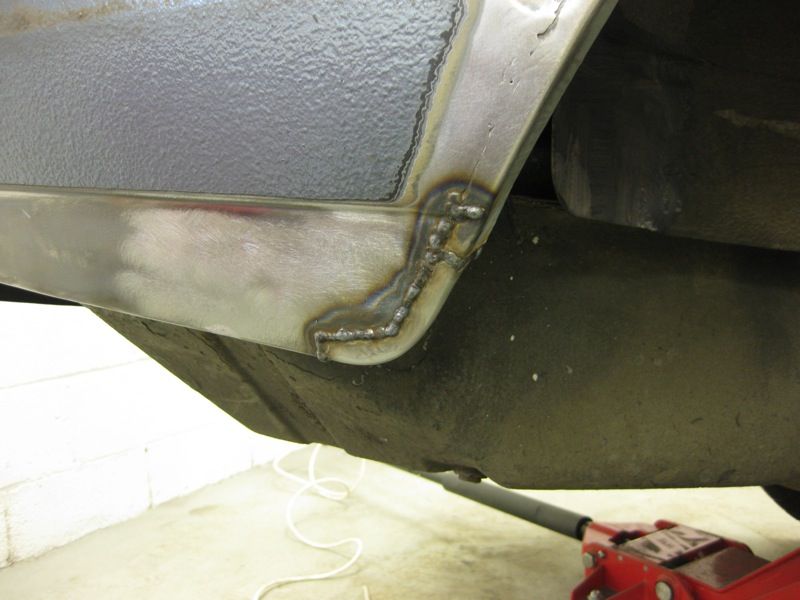 After some fettling 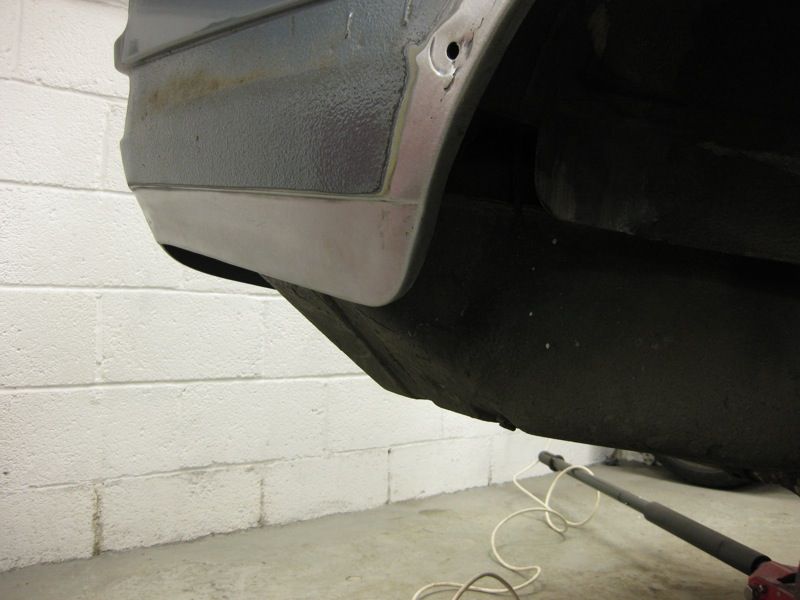 All done 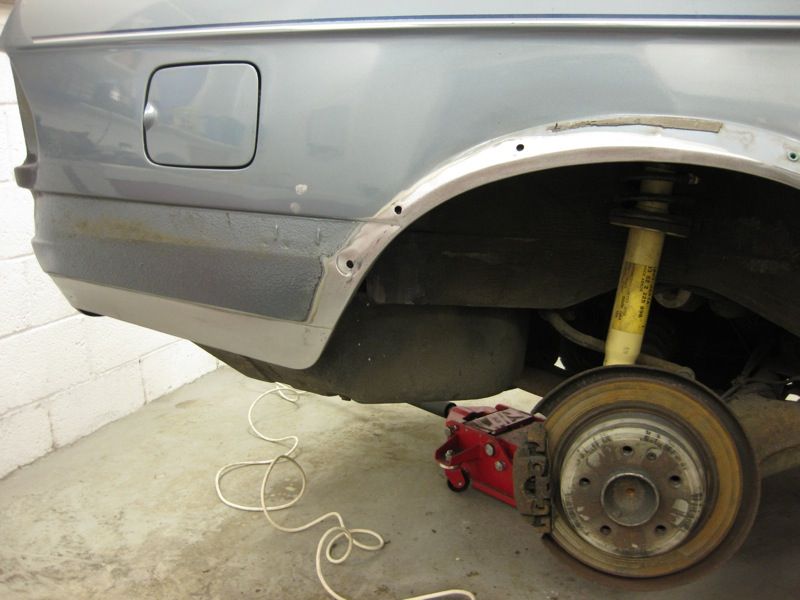  |
| |
|
|
|
|
|
Jan 22, 2012 19:01:39 GMT
|
|
Great work XBoll, i've done the same with the good side bad side thing, your right once you've spent so long on it, you can't just leave it,
I'm normally spurred on when my wife says, "I told you it was a scrapper and you shouldn't have bought it", so then I carry on just to prove her wrong ;D ;D ;D
|
| |
|
|
|
|
|
Jan 21, 2012 21:08:04 GMT
|
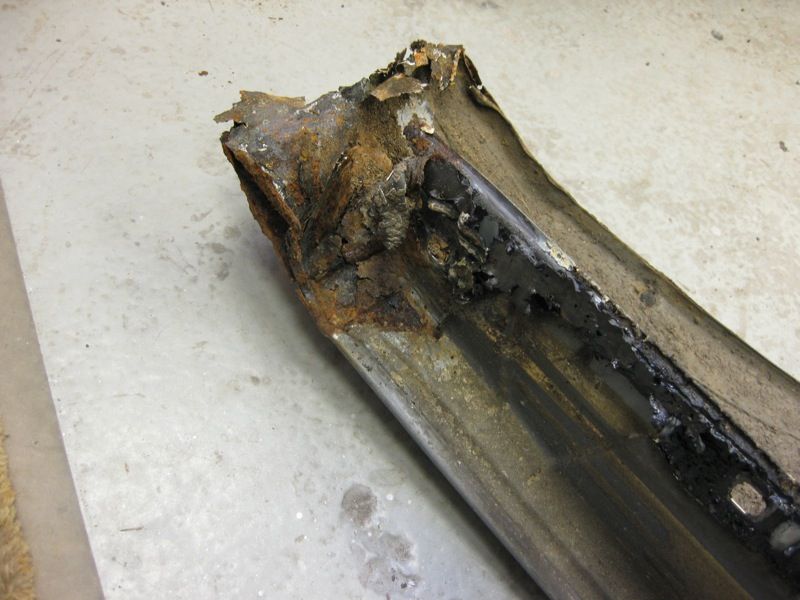
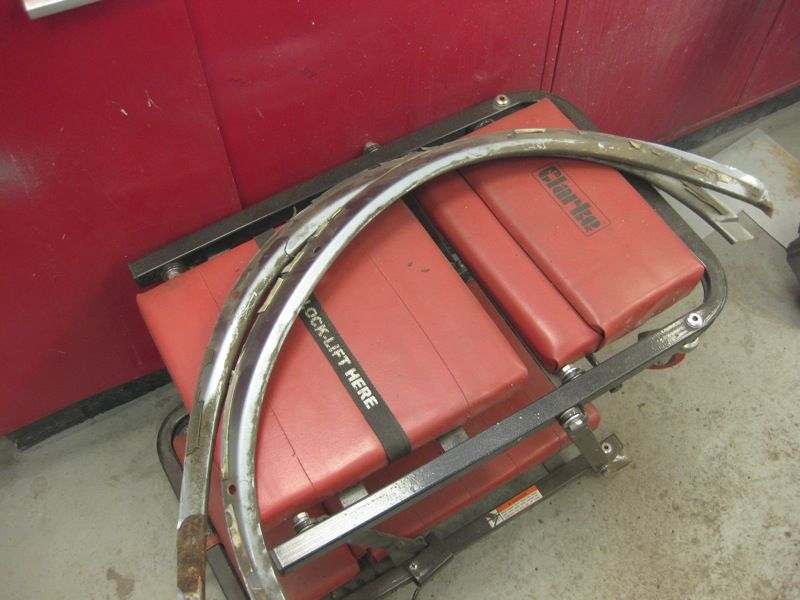
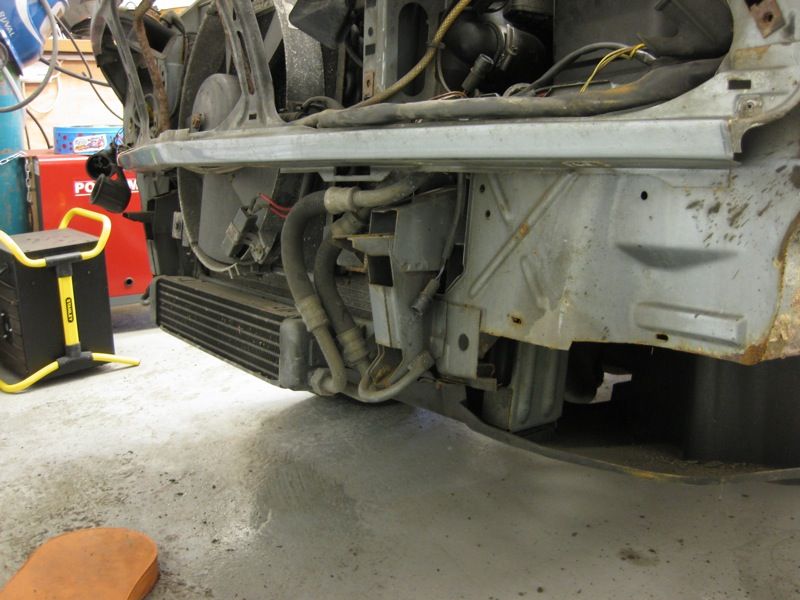
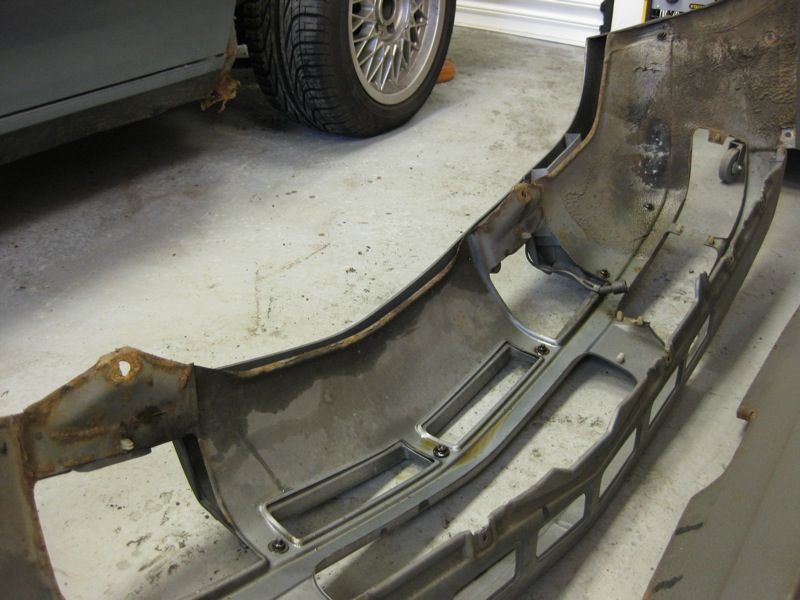
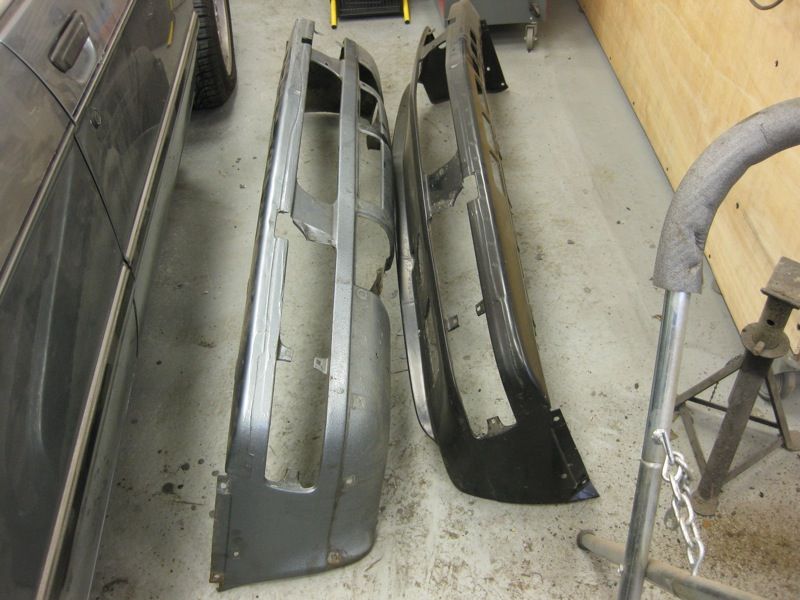
A Small update from today Brian came round and left these New Rear Bumpers parts 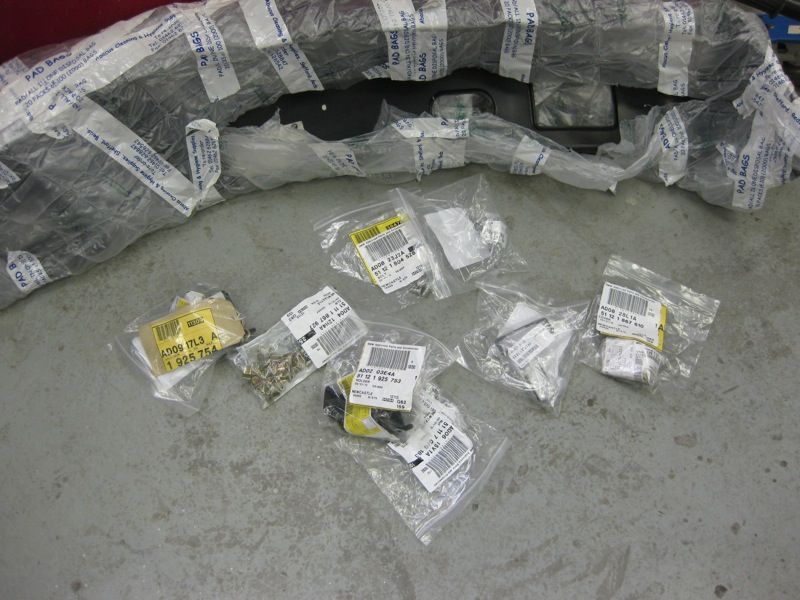 Sill  Front Panel 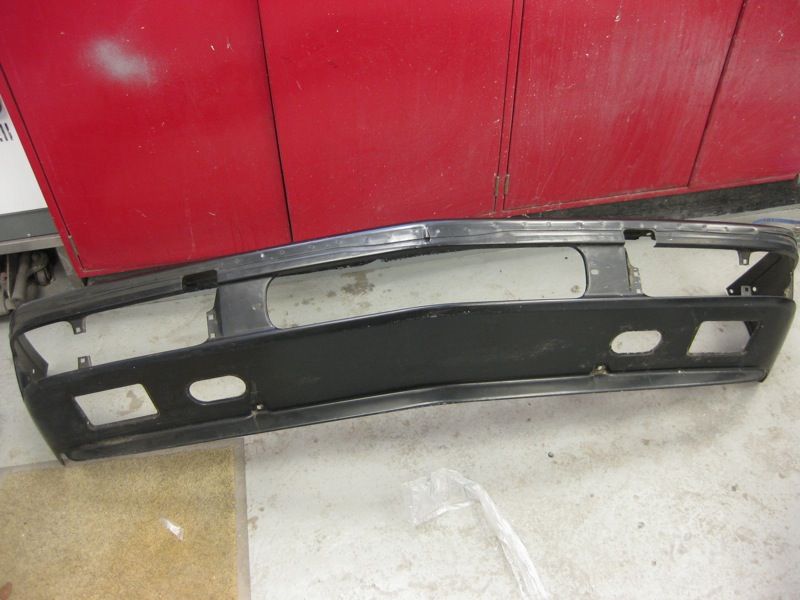 We discovered last week that the sills have been plated a couple of times before, so decided to look at replacing those too, in for a penny in for a pound Got some Genuine BMW sills, and their beautiful, all the strengtheners,, drain holes and Jacking points 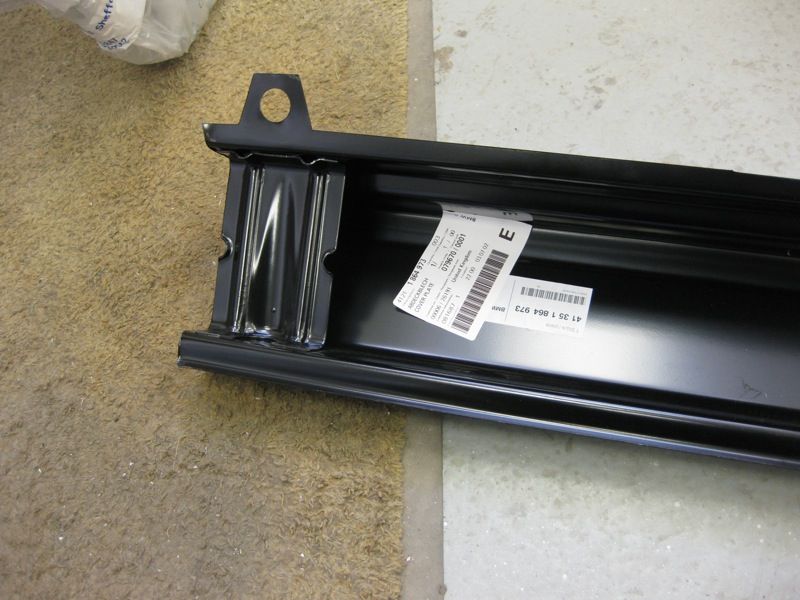 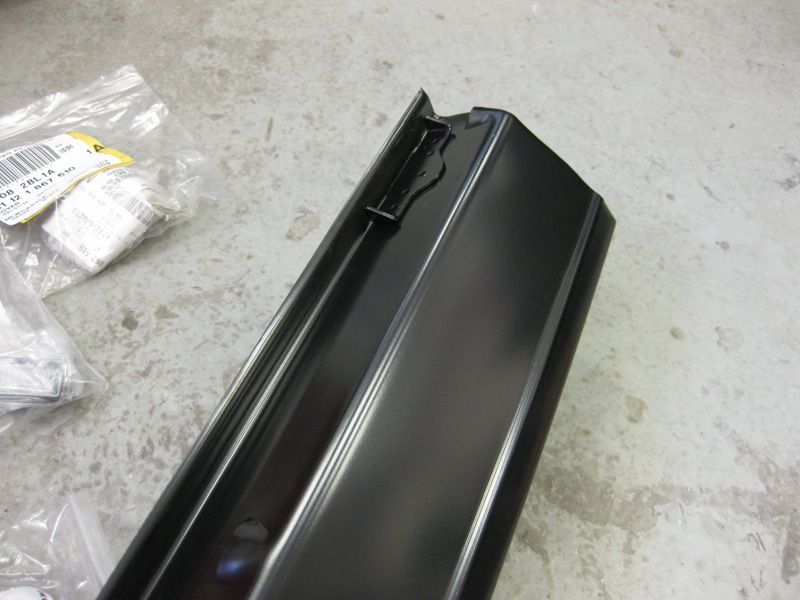 Decided to fix the Driver side arch today, just a little bit scabby 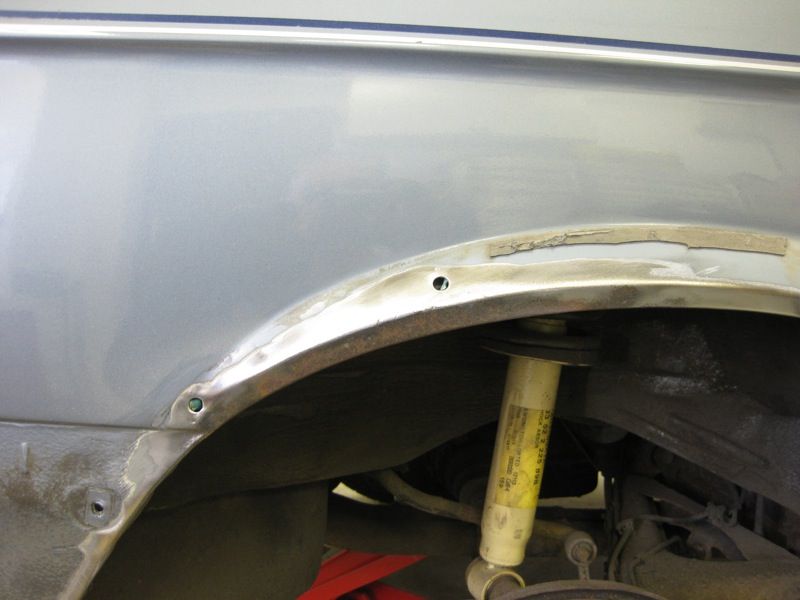 The only way to fix it properly is to cut out the rot 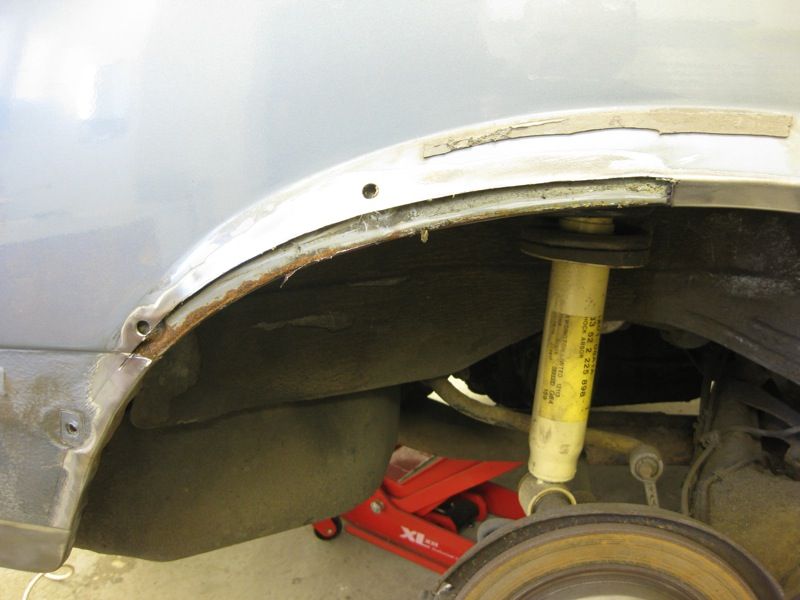 A bit of angle in the shrinker/ Stretcher 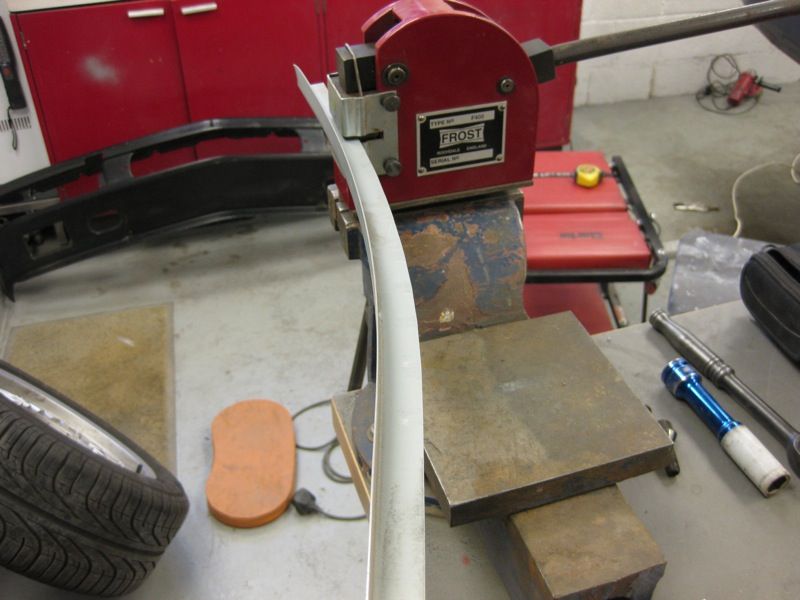 several minutes later 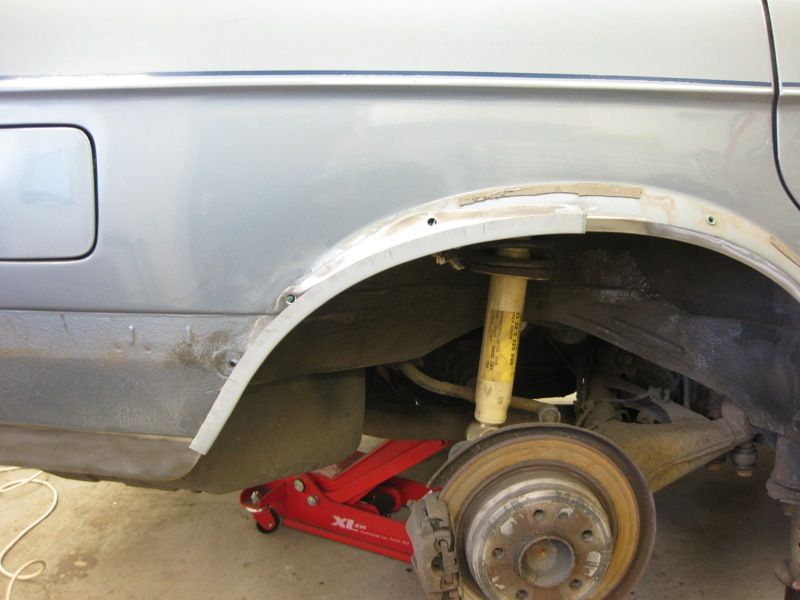 Its taking shape 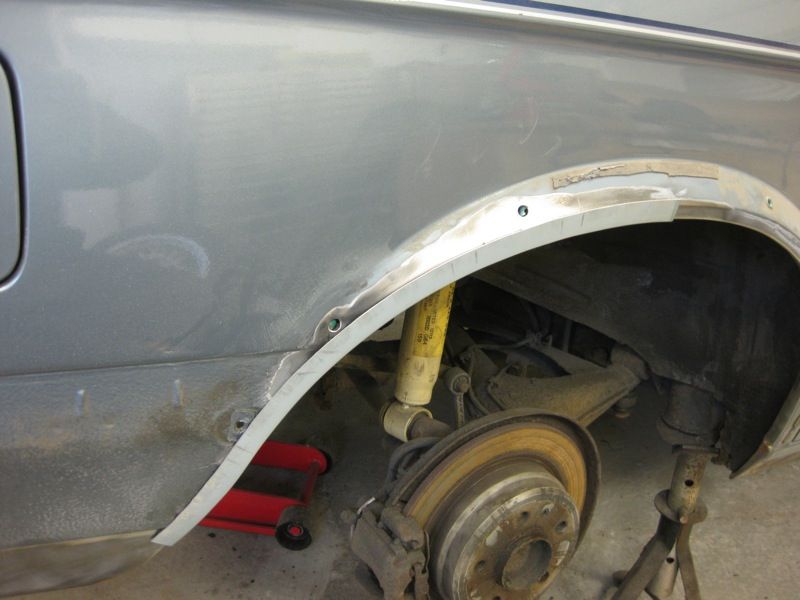 But then discovered this 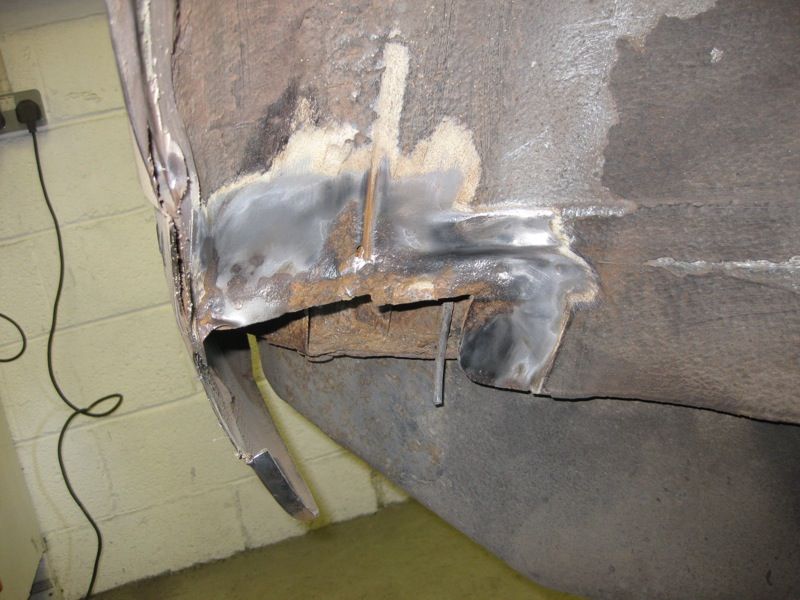 cut 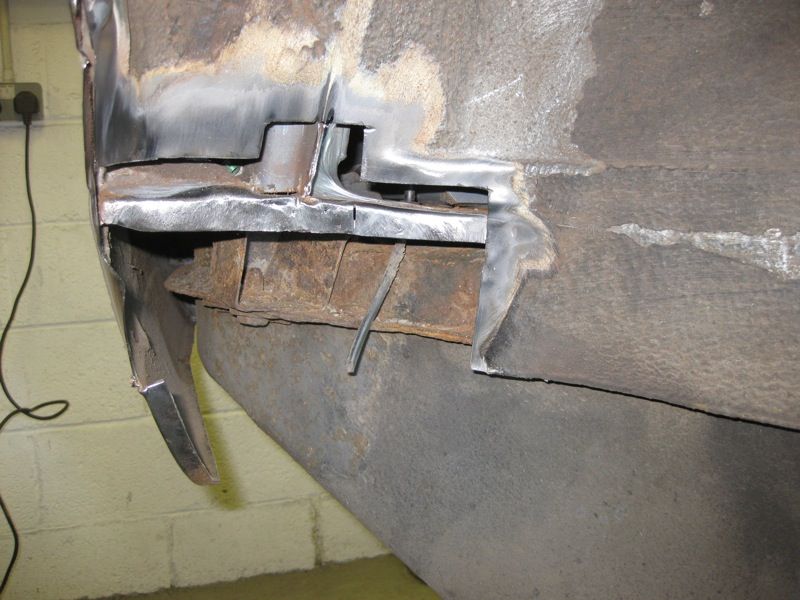 I wanted to try to replicate the seam that was already there, but metal behind it meant it could not be 2 pieces, so tried this instead 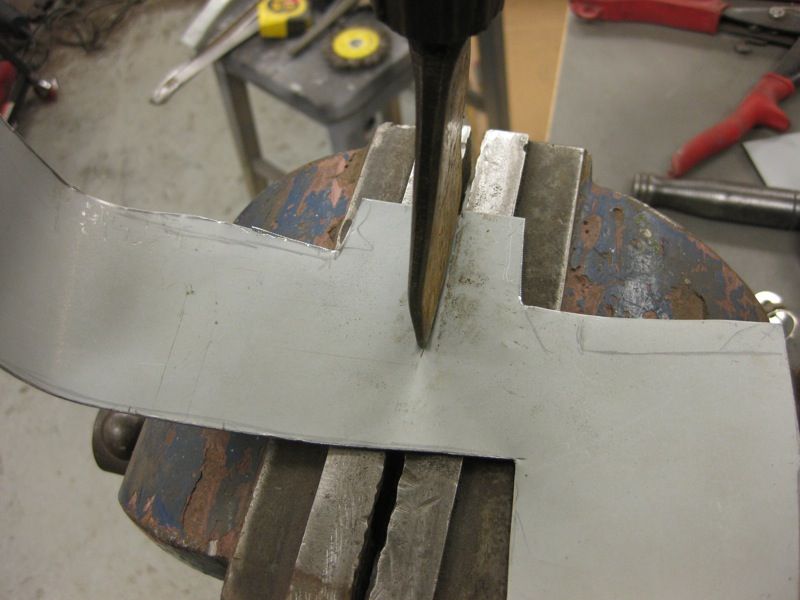 Great excuse to try my new grips 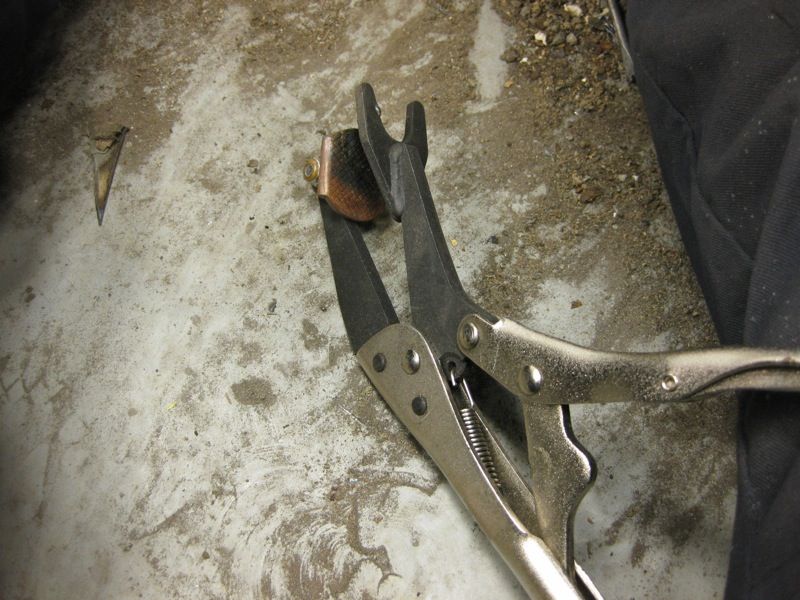 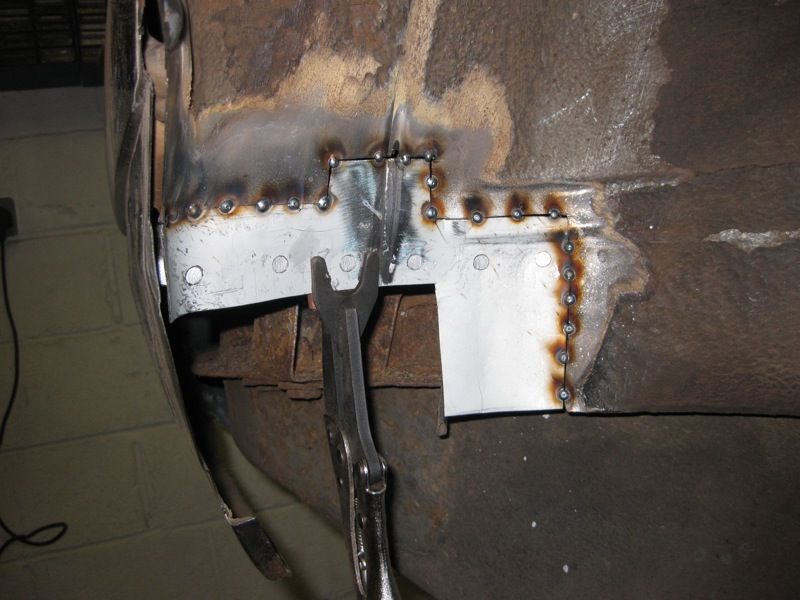 Weld 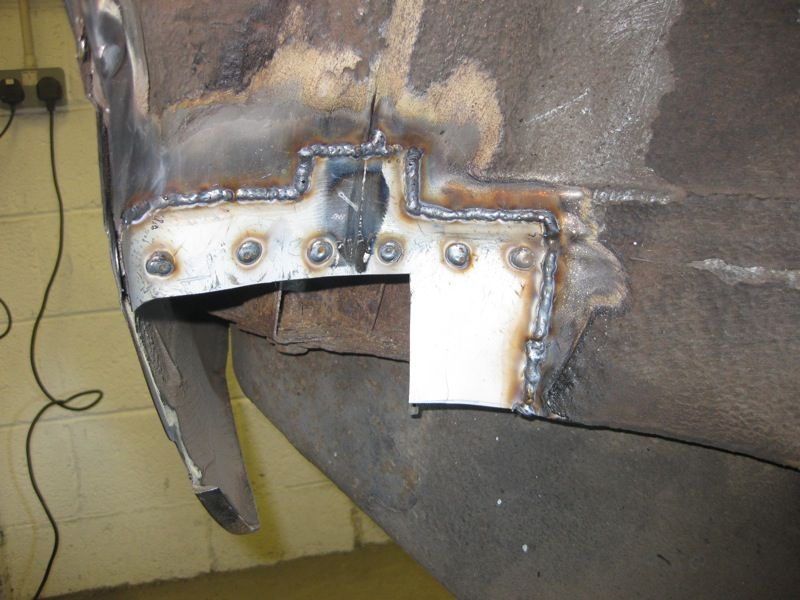 Then grind and admire 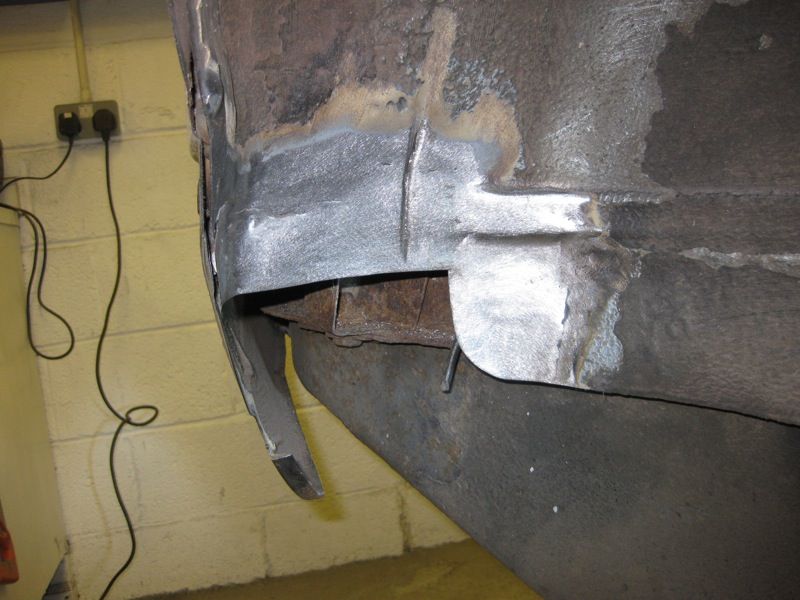 The arch is mostly done now, just needs welding in, hopefully tomorrow 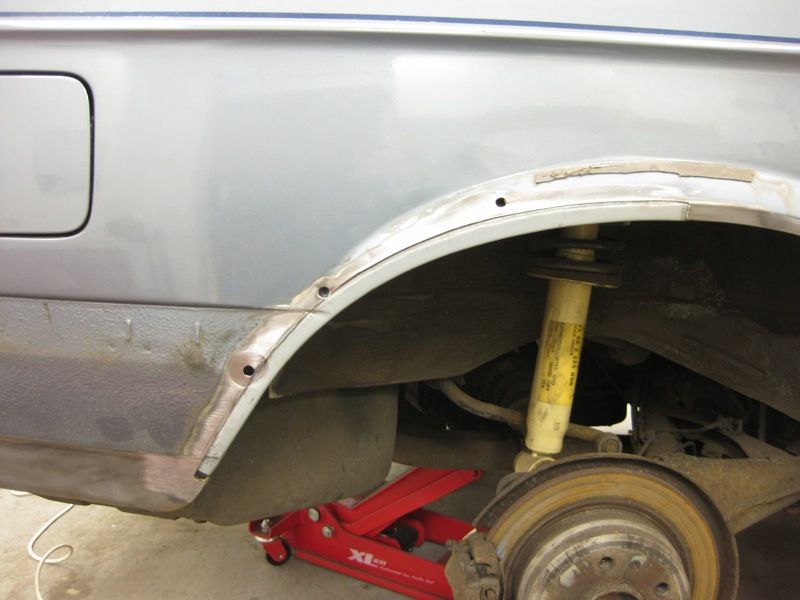 |
| |
Last Edit: Jan 21, 2012 21:14:21 GMT by tonybmw
|
|
|
|
|
Jan 20, 2012 17:20:21 GMT
|
When I see a bit of TonyBMW welding, classical music starts playing in my brain, my eyes glaze over and disappear inside my head and a stream of pink love hearts start coming out the top of my head like when bugs bunny sees a gorgeous female bunny winking at him. Xboll, you certainly have a brilliant way with words, like no one else I know, I bet your a huge hit with the Ladies  Thanks Derin, that M535i certainly came out superb, although now I am slightly more worried now, as every day I am seeing more E28's with more rot than I imagined, I suspect that this one may be hiding some more nasties yet. |
| |
Last Edit: Jan 20, 2012 17:20:51 GMT by tonybmw
|
|
|
|
|
Jan 18, 2012 20:15:07 GMT
|
up at 21psi of boost on a holset hx40 at mo with no issiuses , ive also just fully converted a mk4 polo with a vr6 ,in it then diy modifyed a full turbo , intercoolered , I'm tempted to get a garage and do it for a living , might be a bit dearer due to exspenses , but would any one be insrested , ill add a pic of conversion ive just done if anyone wants a veiw of it. I'd be very surprised if you could not make a living out of your skills, can you not try doing stuff from home to start with and see how it picks up |
| |
|
|
|
|
|
Jan 18, 2012 20:07:26 GMT
|
Oh Dear Xboll, shame about that cutting out, but treat it as a lesson learnt and I'll look the other way. But seriously, I would have cut the floor further, and joined it above the chassis rail, that way you wouldn't see the repair from underneath anyway Not to late to repair the rail and make it look right Go on, you know it makes sense  |
| |
Last Edit: Jan 18, 2012 22:57:21 GMT by tonybmw
|
|
|
|
|
Jan 16, 2012 22:05:08 GMT
|
|
Yes please post pictures of the Merc
|
| |
|
|
|
|
|
Jan 16, 2012 19:54:43 GMT
|
|
Hope you have a speedy recovery John
|
| |
|
|
|
|
|
Jan 16, 2012 19:00:28 GMT
|
Your work gives me butterflies. On one hand I can't wait to start practicing your techniques on my own cars, on the other hand I'm still scared of doing bodywork stuff. Do you take work in Tony? I'd pay to get a few spots on the Viva welded but I want it to be a seamless invisible repair so it looks factory fresh and have no idea what body shops to trust. Oli My Advice would be to give it a go, what the worst that could happen ?? And sorry no time for any more projects for the foreseeable future Just out of interest Tony, where did you learn to weld etc? Mark As far as working on cars goes I started by buying a welder and teaching myself, but then got a job as a sheet metal worker, working in thin Gauge stainless steel, so I've had plenty of opportunity to hone my skills |
| |
|
|
|
|
|
Jan 15, 2012 20:00:24 GMT
|
Got some of the Bilt Hamber Gel and it did an Okay job, not as good as the DEOX C liquid, but due to the size of the part, it could not be soaked overnight, but a quick wizz over with the wire wheel on the drill, and it came up nice and clean So painted the inside of the panel, just to try to make sure it had paint in all the tricky to reach places 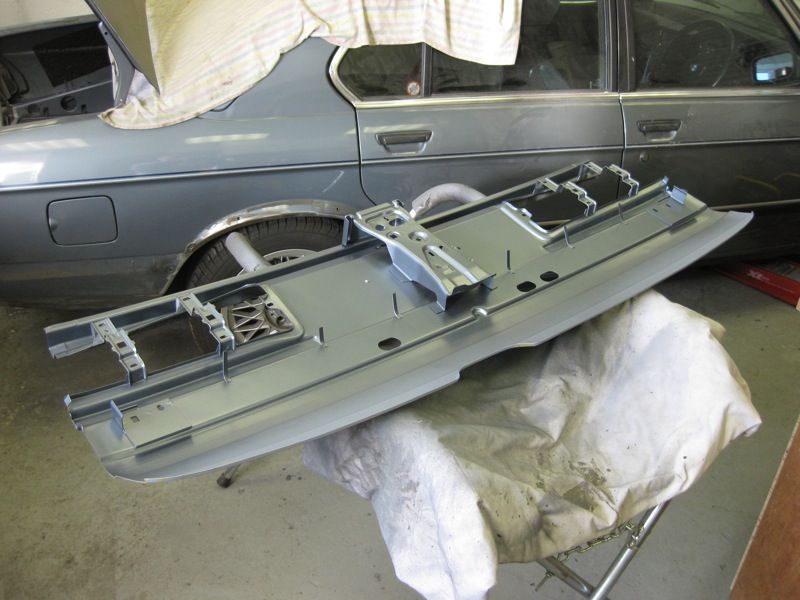 Sprayed the rear flange with the Zinc weld thru Primer 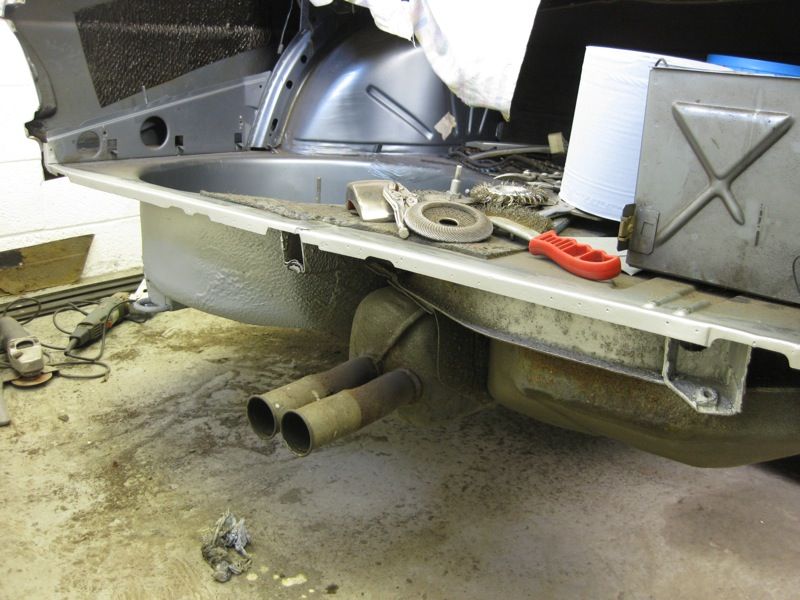 and then tried the panel on for size 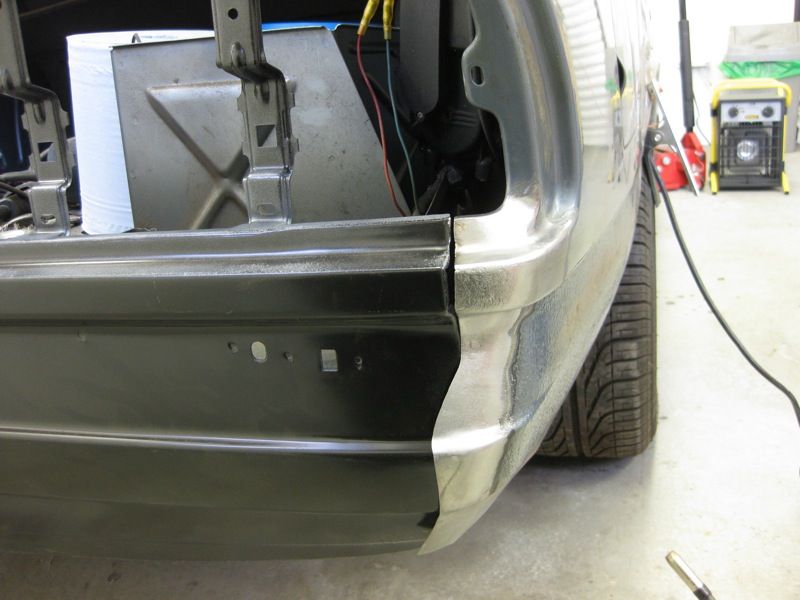 there was still the problem of the seam having to have been cut away, because of the rust, so that will need to made back up again, decided to do it like this 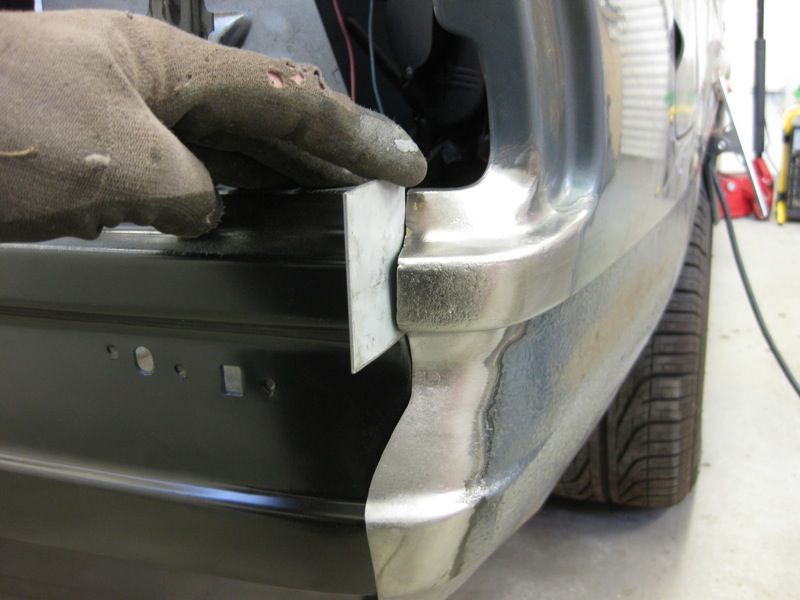 Weld in a bit of 16swg, it needs a fair chunk of weld to fill the gap 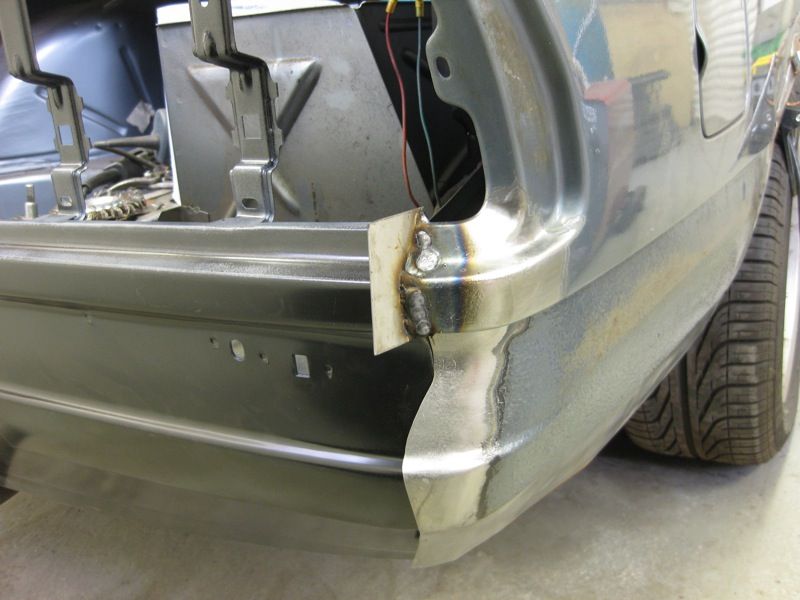 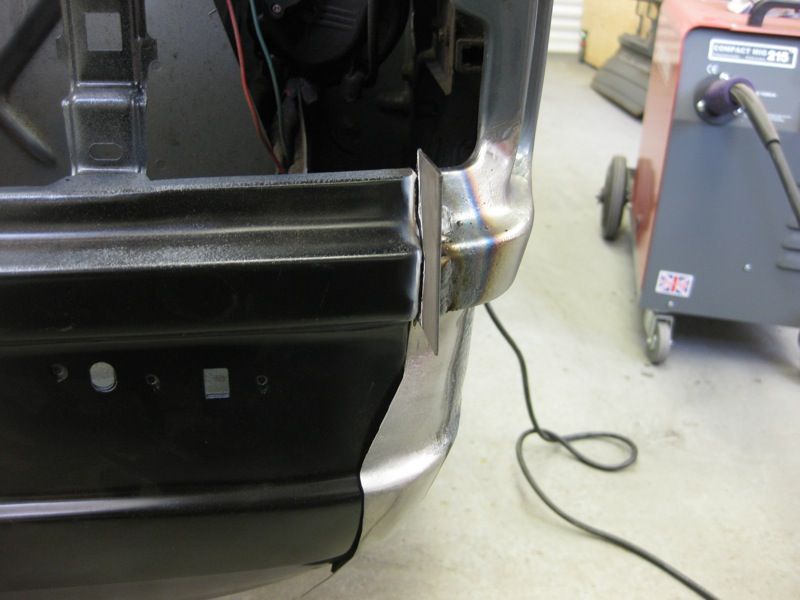  But once its trimmed down 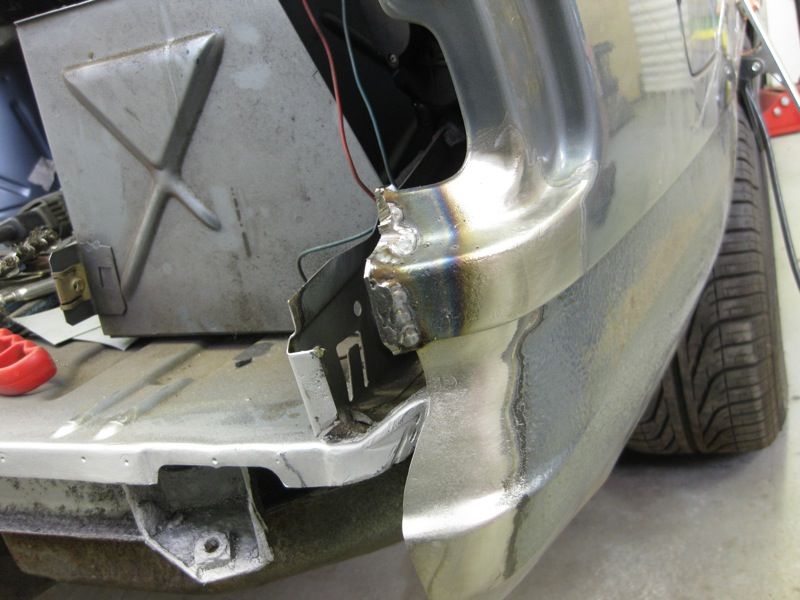 and ground 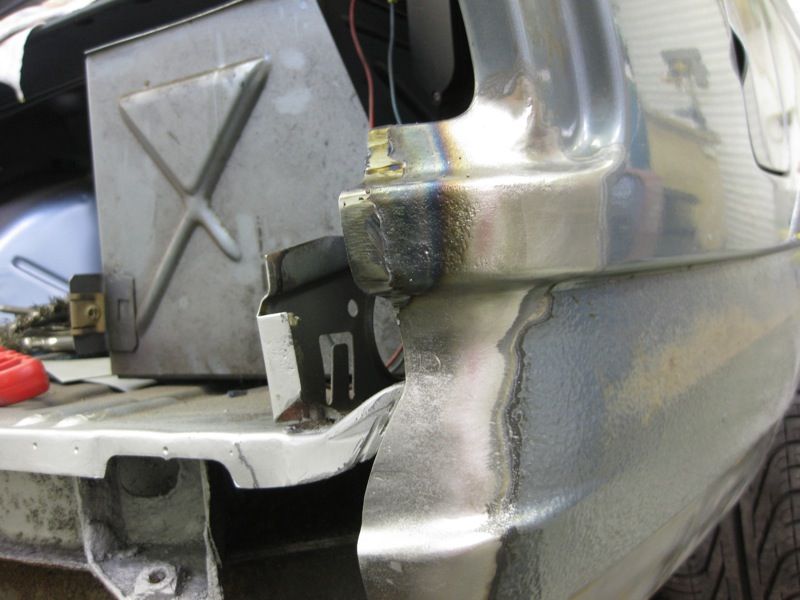 It should be okay 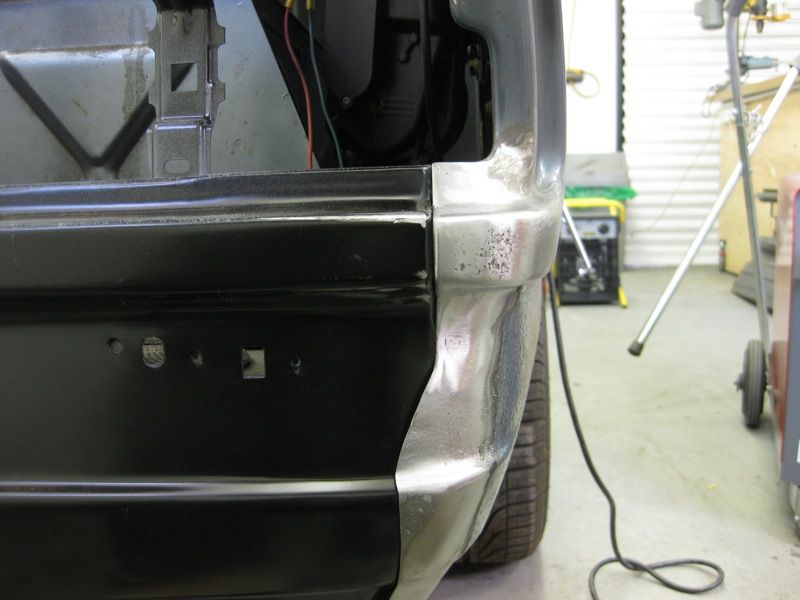 and then repeat for the other side 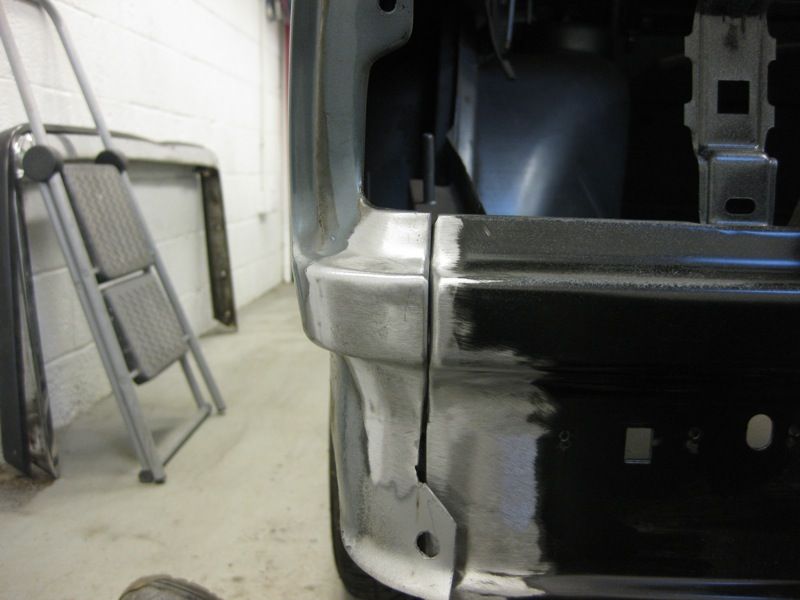 So then clamp the panel in place, after marking and drilling the holes to be pool welded 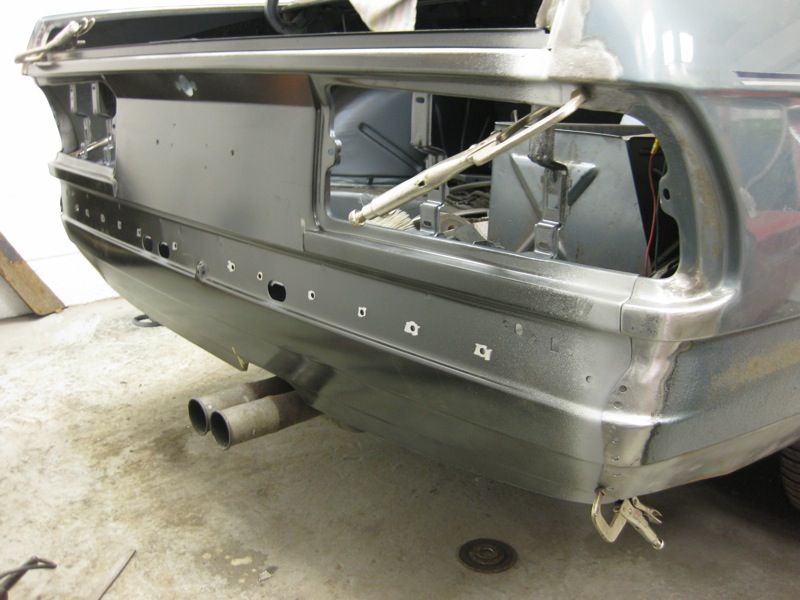 and weld it all up 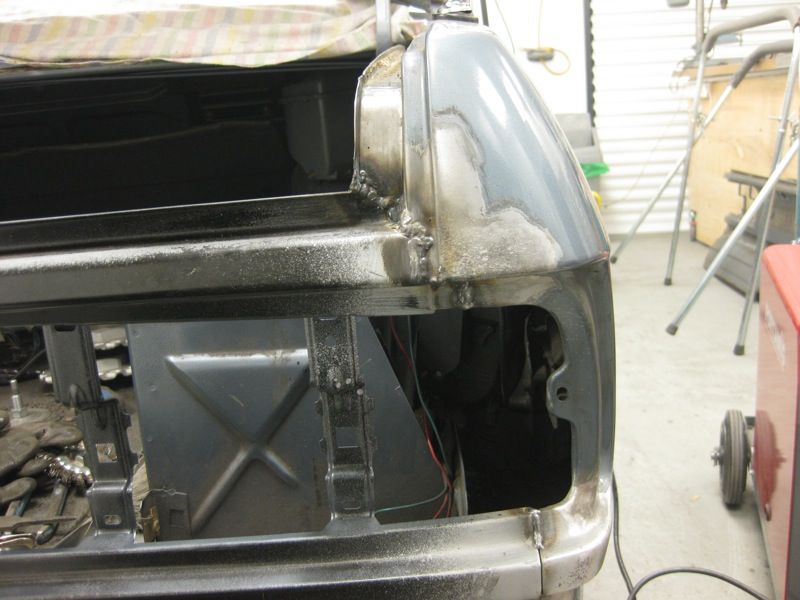 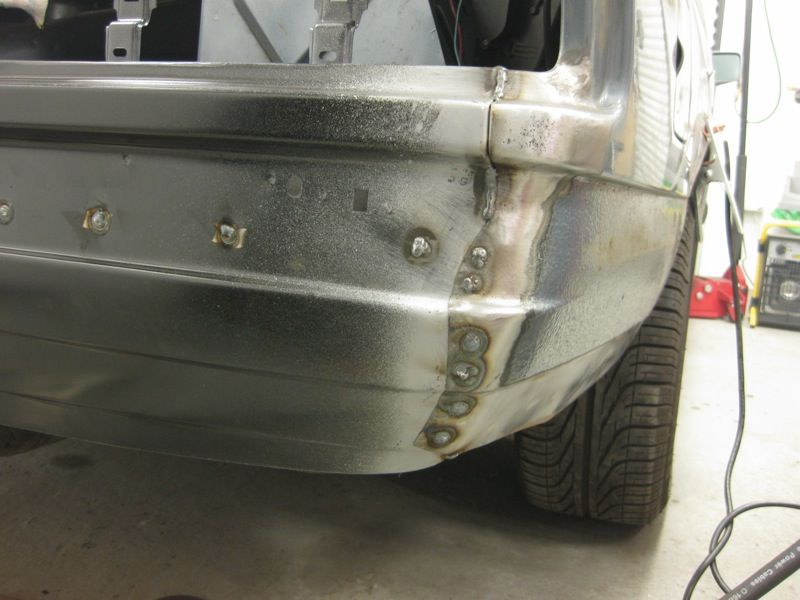 and then after a bit of Grinding and DA action and the Dremmel into the tight spots, we're all done 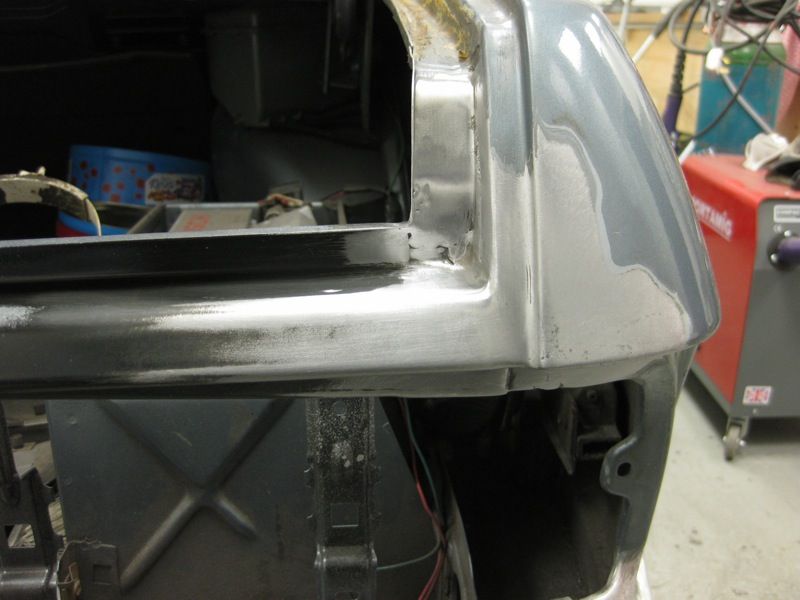 I'm going for the Factory look, so the part welded and overlap is how its supposed to be 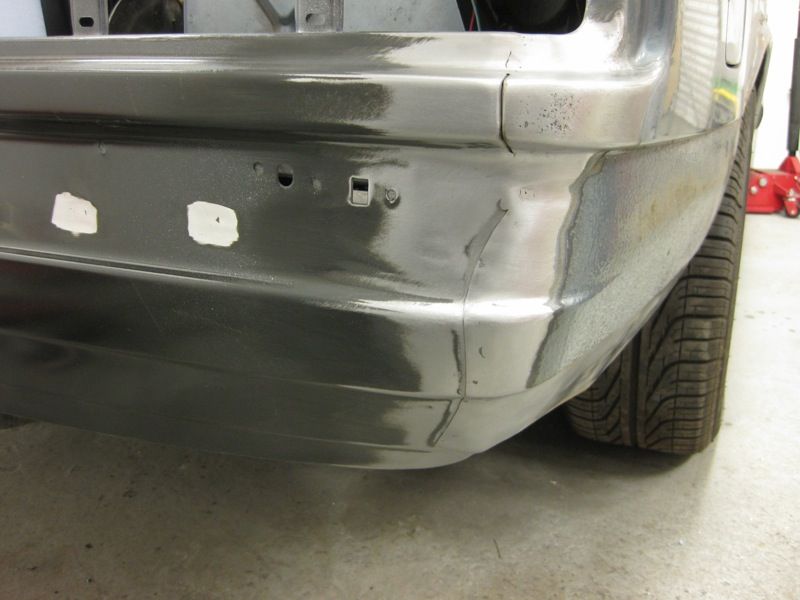 |
| |
Last Edit: Jan 16, 2012 18:53:05 GMT by tonybmw
|
|
|
|