|
|
|
Jan 21, 2016 23:24:41 GMT
|
|
I like it, interesting stuff and some funny bits too.
Their own cars are mighty fine, very much to my taste.
|
| |
|
|
|
|
|
|
|
|
|
|
I used lorry mudguards for my Fugitive.
Very cheap, easy to work with and if you warm them up you can reshape them so they don't have to have the correct radius when you buy them.
|
| |
|
|
|
|
|
|
|
Thanks again for your kind words chaps. Knowing that someone enjoys seeing it really helps keep my enthusiasm up. A bit of catch up. A few weeks body related work condensed into a handful of pics. I painted the sills, the rear valance, the boot and the underside repairs in several sessions. No pics of most of it, some of the boot. 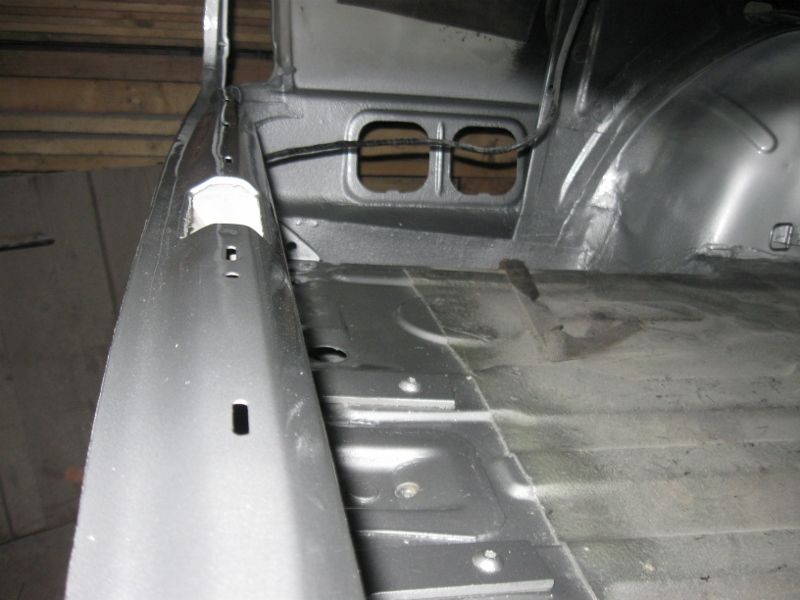 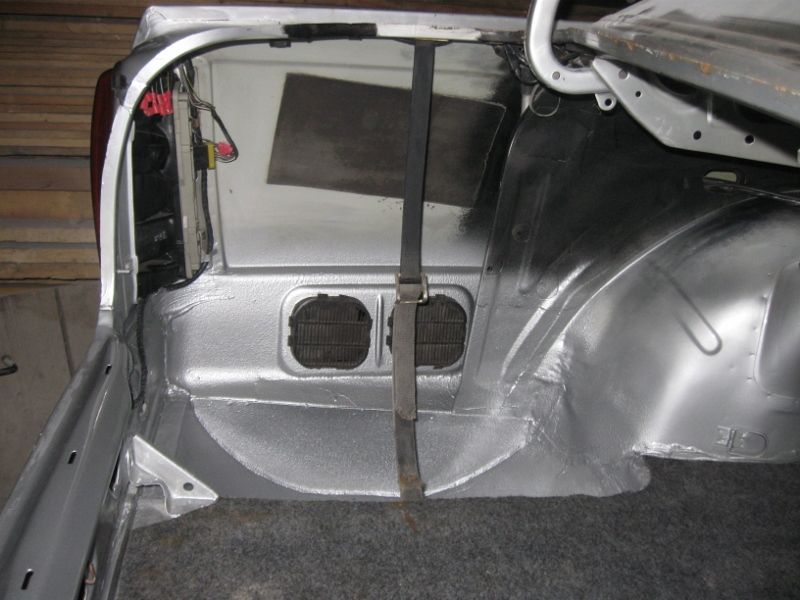  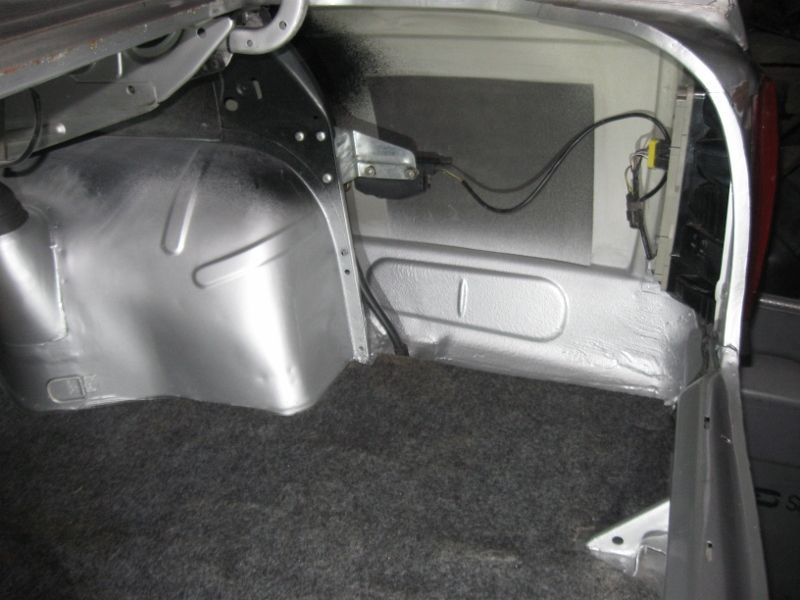 On the wheelarches I wanted to prevent the stones thrown by the back wheels taking the paint off and starting rust yet again, I hadn’t taken care of this last time. I continued the stonechip from underneath onto the lip, then used the replica black tapes overlapping onto the stonechipped area so its all protected. I might have to take the arch top trims off in future because I didn’t take care to protect the top edges when I put the arches in years ago.  I put all of the doors back on, new pins to reduce play in the fronts. I went to quite a bit of trouble when putting it back together to get gaps and alignments right. Carltons look terrible with bad gaps, and the design of the GSis in particular with different bumpers and trims makes bad alignment stand right out. I saw a Carlton not long ago with what looked like recent paint, it had some bad gaps and didn’t look like a good car, putting this back together with good gaps and straight lines has made it look like a more decent car straight away even with well aged paint etc.  When fitting the back bumper bracket it turned out that I had put the new sunroof drain location right where it should be, a quick notch out of the bracket fixed it. 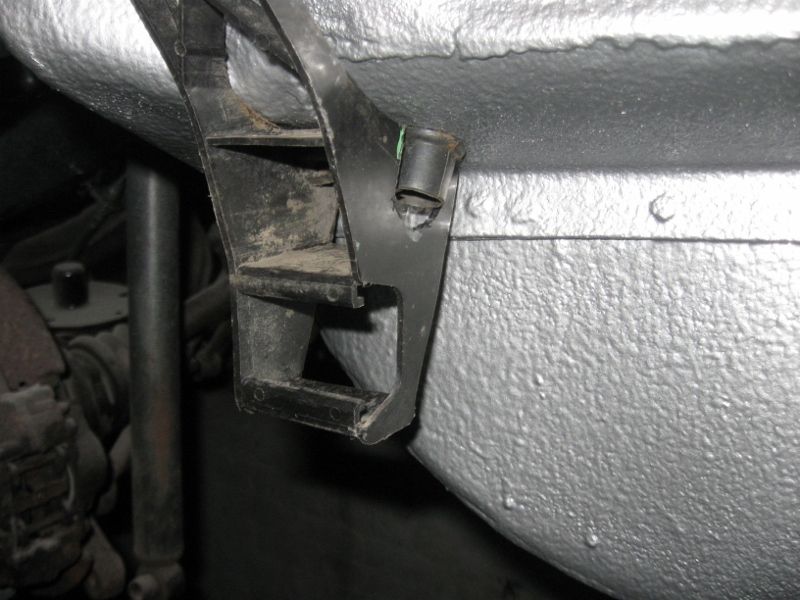 The front half of the skirts were binned due to being too distorted from the previous terrible efforts at fitting, I had some spares in red so they were all painted and re-attached using windscreen adhesive. 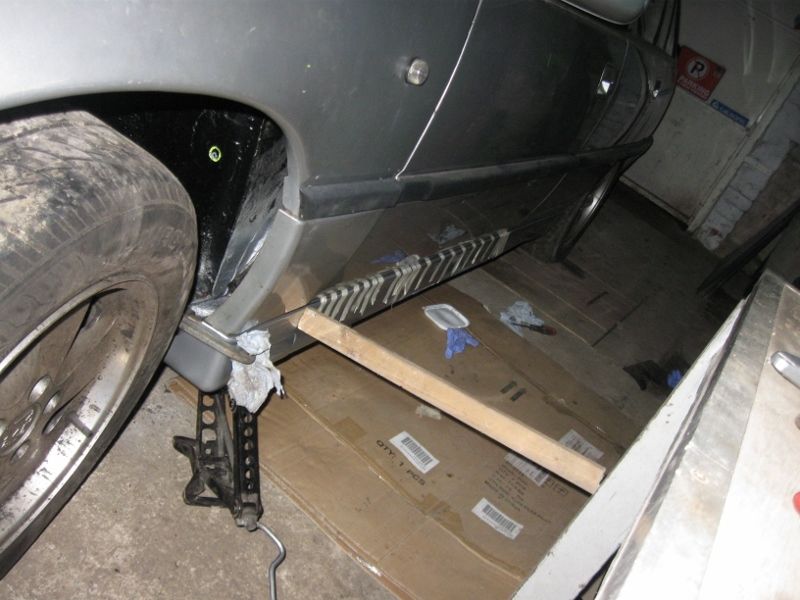 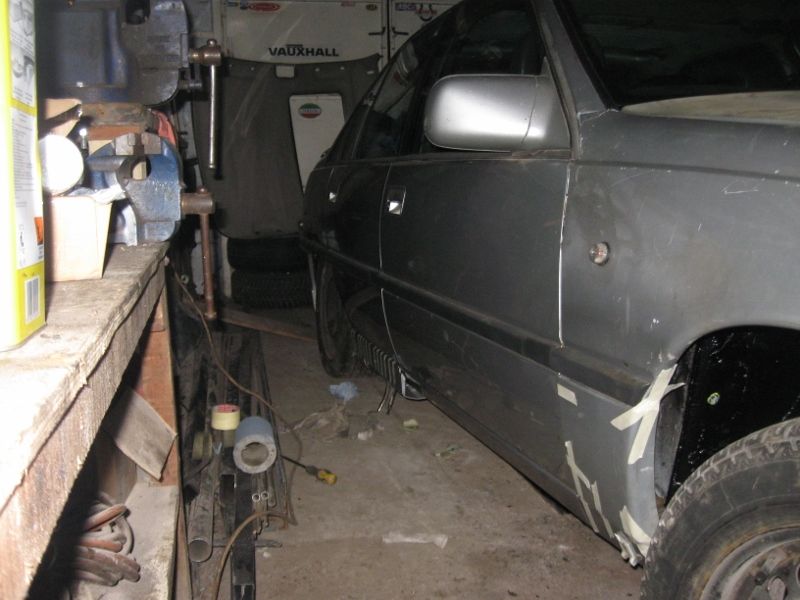 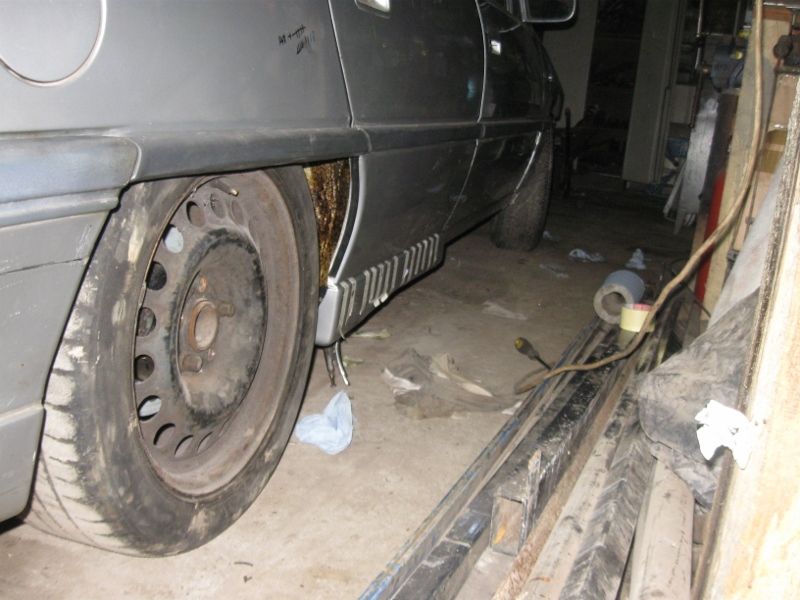 The underside repairs were stonechipped and painted, an exhaust hanger was knocked up from stainless to replace the original that should be part of the car but had rotted off. 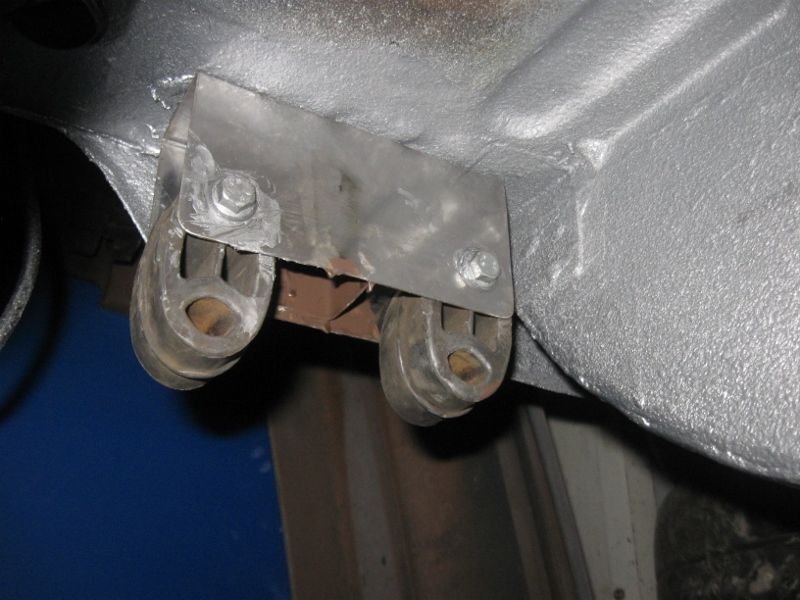 Some more catch up stuff when I sort the photos. |
| |
|
|
|
|
|
Dec 28, 2015 15:06:44 GMT
|
|
Excellent plan.
Looking forward to reading more about this.
Would I be right about guessing it will end up with the Nissan reg?
Just a thought, in a case like this to keep the original appearance it might be worth transferring the Trojan reg to the Nissan before starting. Is that even a possible plan?
|
| |
|
|
|
|
|
Dec 27, 2015 23:47:16 GMT
|
Thanks for the comments chaps Not a catch up post again, I did a bit that I like this weekend so I thought I’d show you, I think it might be the best bit of the car, although certainly not to everyone’s taste (if anyones), I like it though. I heard that an Omega gearstick was shorter, a direct swap and a better feel due to the length. I took my gearstick out (not hard as there is no gearbox) and not having an Omega one to hand took mine to bits thinking it would be easy to shorten. I turns out that they are very difficult to shorten, they are in two halves with rubber damping half way up and have an internal pull cord for the lift up reverse interlock. I puzzled for ages over a solution and also over what to have on the top of it as the original knob is moulded on and falls apart during removal. Anyway, after much searching for ideas I went for a slightly different take on a very old theme, the 8 ball. I wasn’t going to go that way until I found that the big manufacturer had a limited edition silver 8 ball, same colour as the car, so maybe a bit out of era but I’m happy. First to make the basic stick, I turned down the bottom half of the old one then made a new top half from aluminium. It has O ring grooves turned in it and with the O rings fitted it’s a perfect fit inside the tube used later. I made the extension with an oversized bore and fixed the two parts together with windscreen adhesive in the gap to replicate the rubber damping of the original, held in the lathe to set. 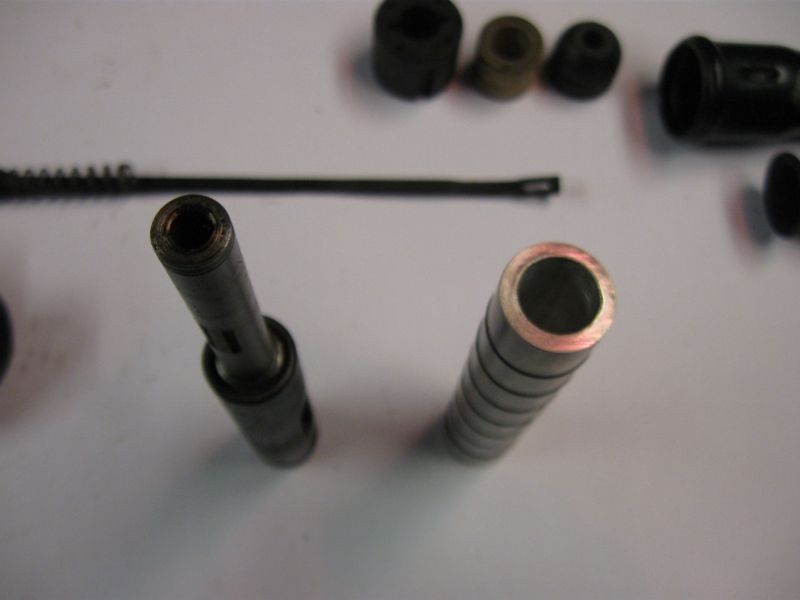 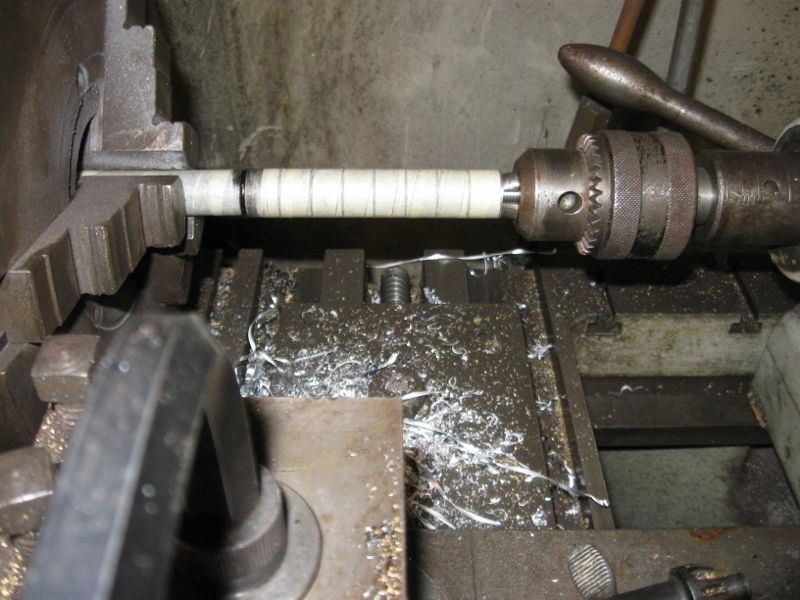 Late on Xmas day with the Chas n Dave Xmas special on the telly I prepared the pool ball, I haven’t drilled one before but it went well. I don’t care much for Xmas so this was a nice way to finish the day. 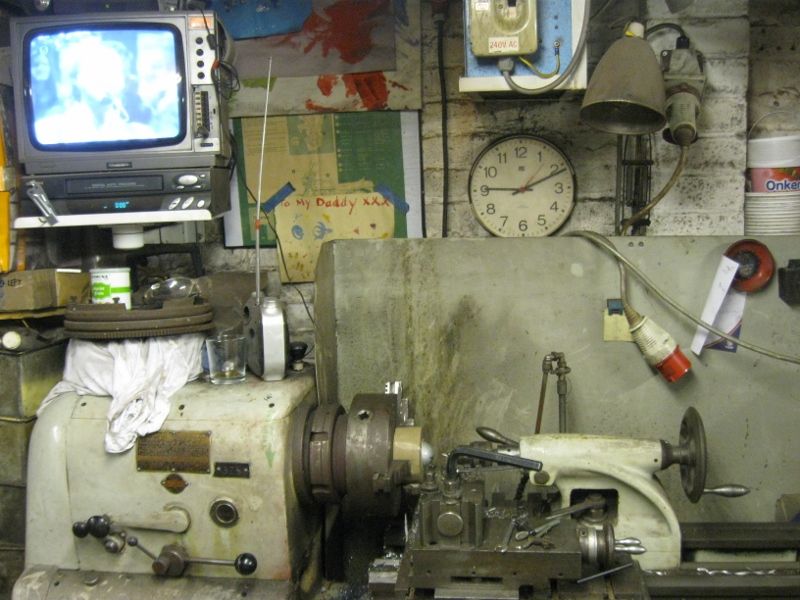 To prevent damage I had an idea, I shoved it into the centre of a roll of parcel tape and put the tape in the chuck. It worked just fine. 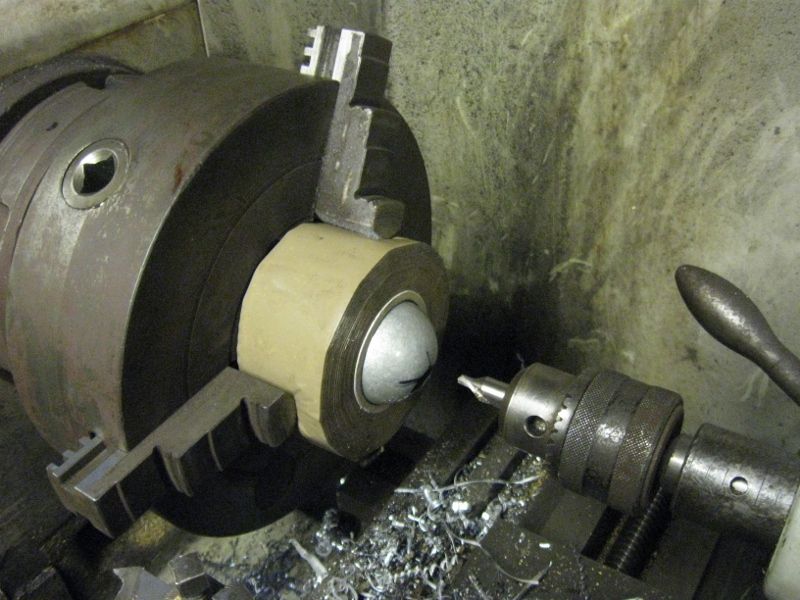 I drilled and tapped it M8, they are easy to drill and tap and take a thread well. 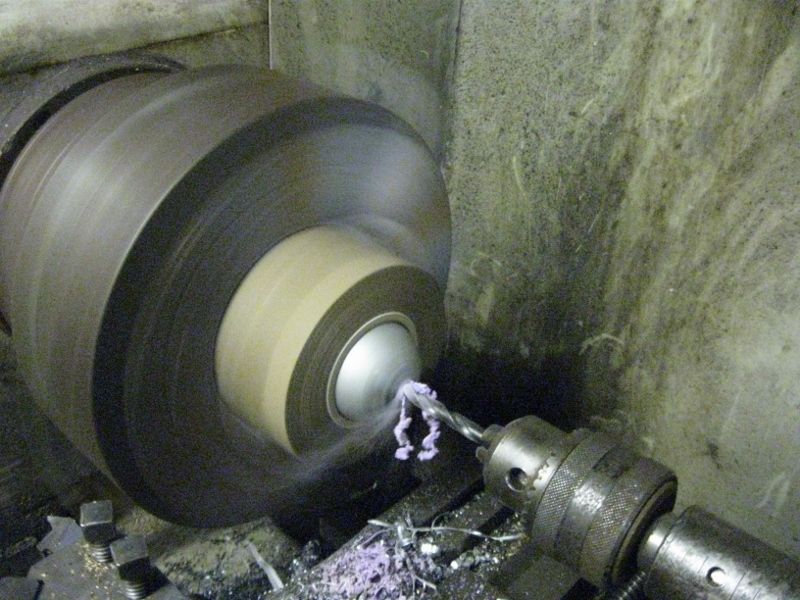 Before the hols I had made the stainless outer sleeve which was how I had decided to get the lift up reverse interlock to work. It has bits made to fit the original interlock plastic moulding and a collar for lifting. 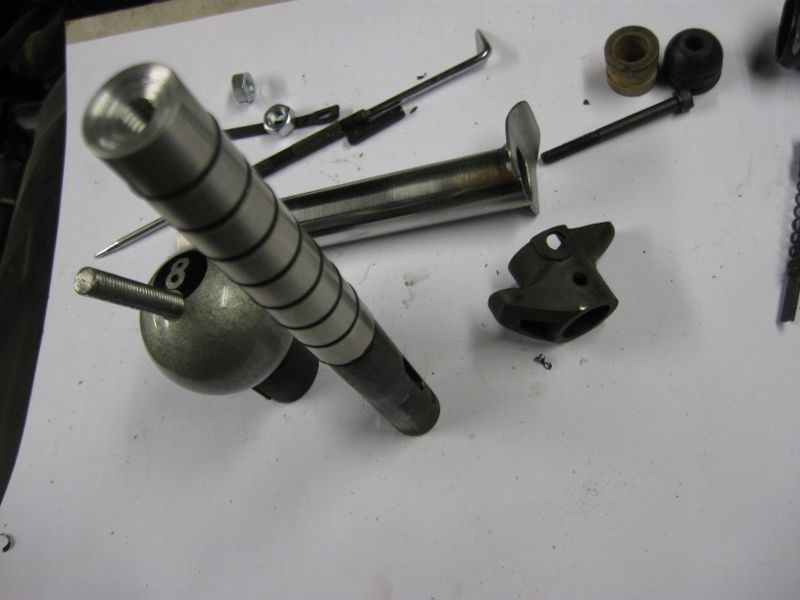 I polished the bits where necessary too. 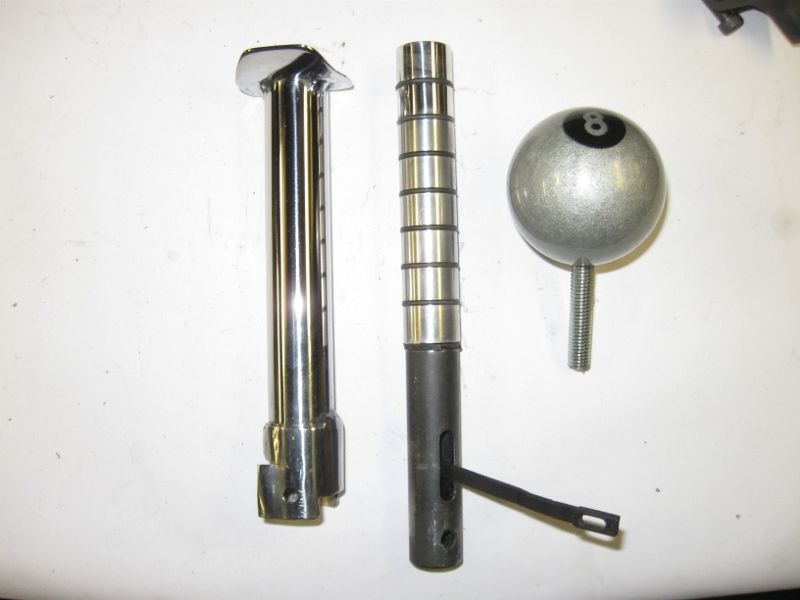 And put the bits together. The lift up part has no play and was a little bit stiff so a wipe of rubber grease on the O rings has it operating better than I could have hoped for. 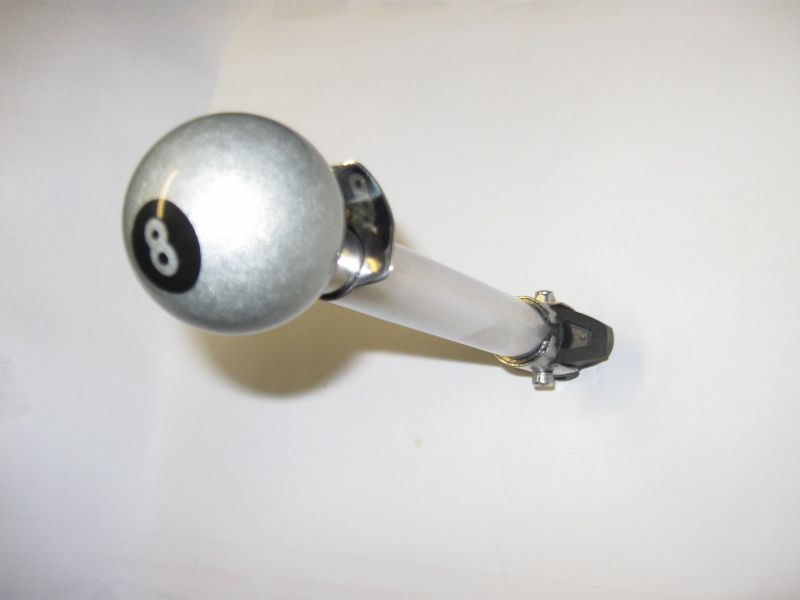 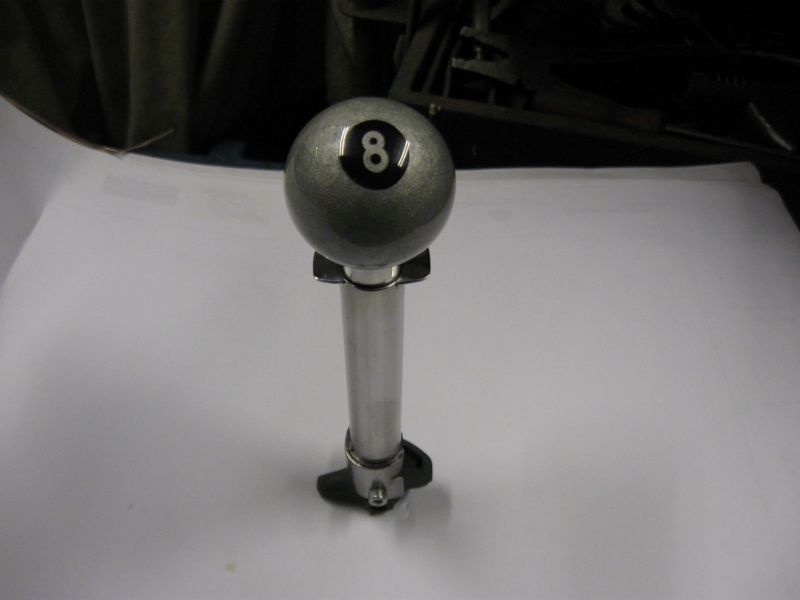 I fitted that to the rest of the mechanism and forgot to take a pic, then fitted it to the car. Ignore the bracket for the gearstick lock, a shame to clutter it up with that but with a 90s Vauxhall you cant afford to remove a security device so it will be refitted. It has new handbrake and gearstick gaiters from ebay seller “topgaiters”, recommended. 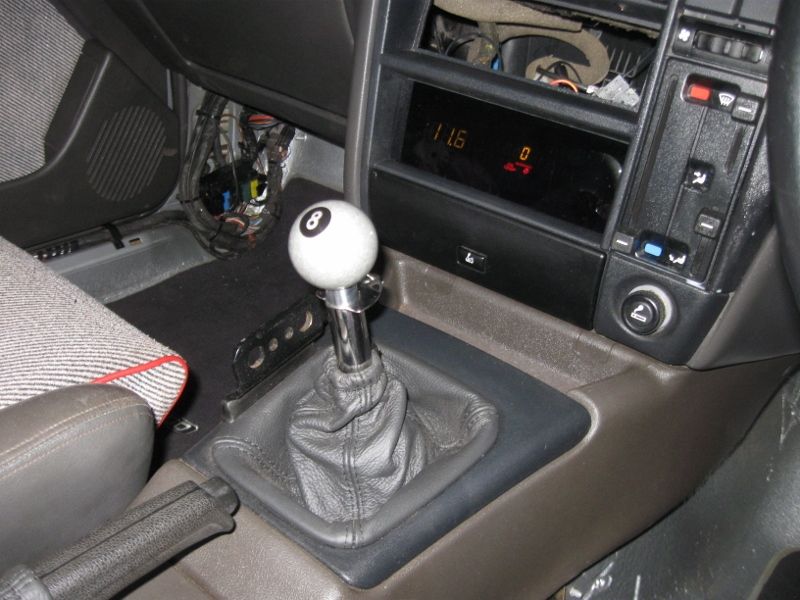 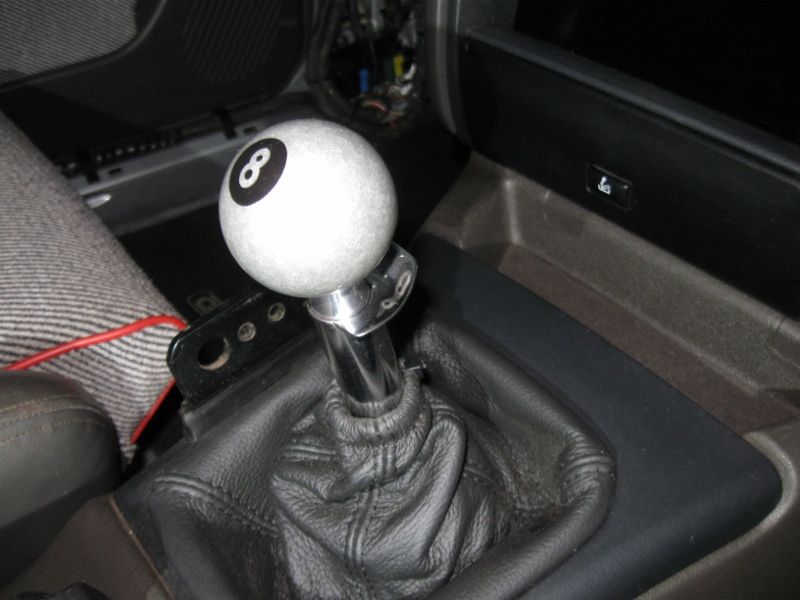 I’m happy with it, I’m sure pool balls are a bit marmite and certainly not typical of a 90s car but there you go. A couple of pics of it in its surroundings that I haven’t posted yet, including that digital display fitted. Apologies for the dust. 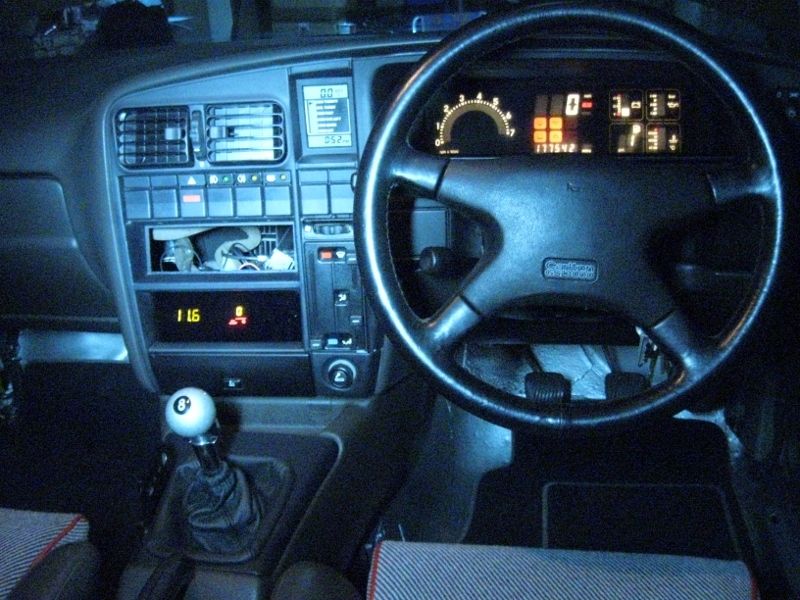 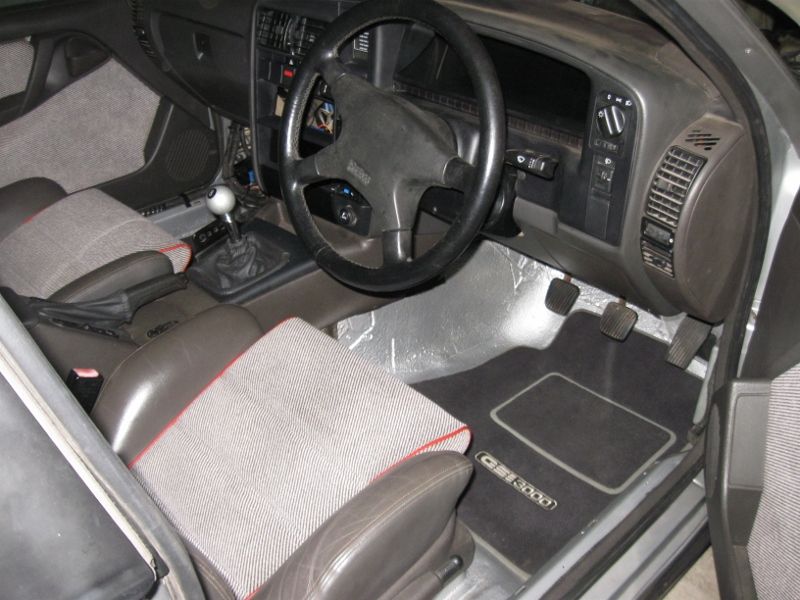 |
| |
|
|
|
|
|
Dec 16, 2015 18:43:05 GMT
|
Just a quick one today. While working on the interior I found the original delivery receipt for the car. Not important but interesting to find. 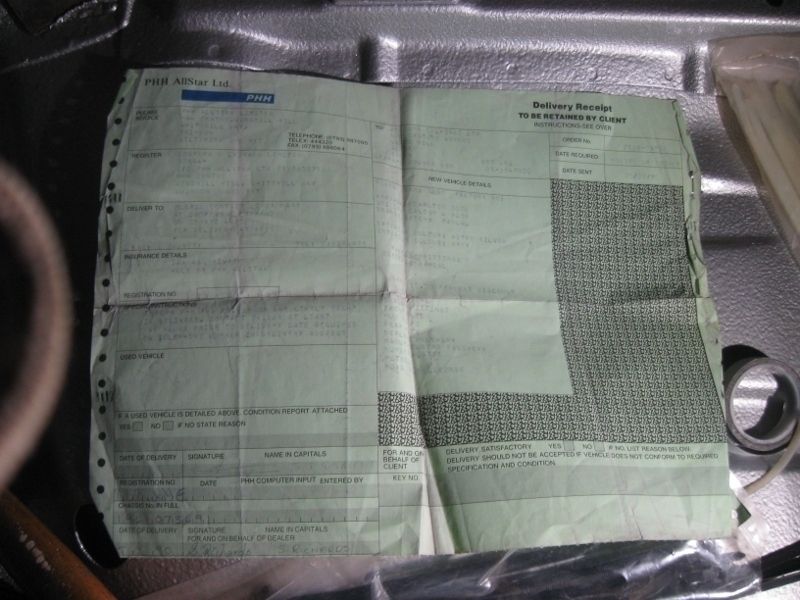 A couple of pics out of sequence, just yesterday but I was quite happy so thought I’d post. I wanted to add a couple of things to the dash and the car has the lovely retro digital dash with amber digits, I like it a lot. I wanted oil temperature because from what I have read the cooling system on these is less than perfect, I know improving it would be a good choice but in the meantime simply knowing what the temp is will make sure I don’t do any harm because if I need to I can always calm down a bit until it cools. I also wanted an accurate voltage reading, a couple of car problems I have had recently have been much easier to understand with a voltmeter attached so I’m going to monitor voltage at the battery allowing me to check charge and alternator output at a glance. I decided that any additions would be better if they could match the dash. The car had a junk slot below the radio so that seemed to be a good place to put extra bits. The idea was to have it look plain black when not in use, then the digits only be visible when the ignition is on. I chopped up the junk holder, a gauge pod from chine via ebay and some bits of black interior trim. 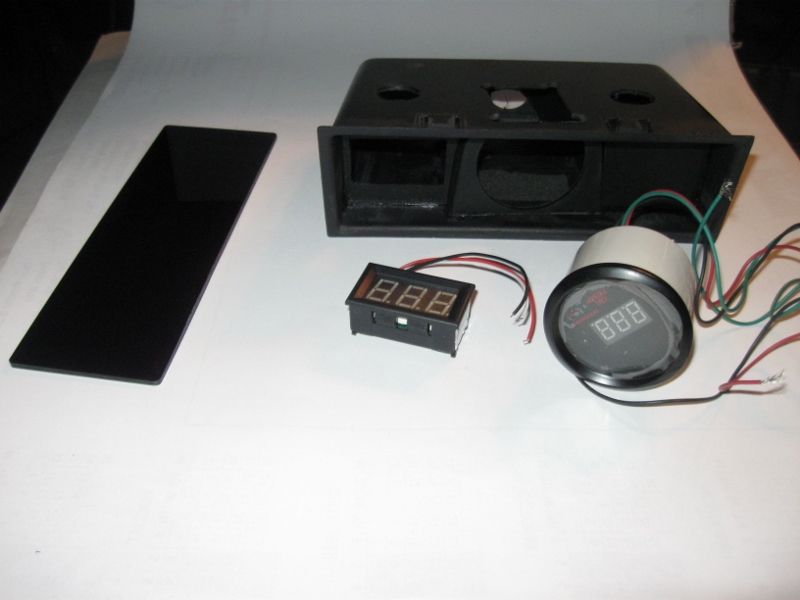 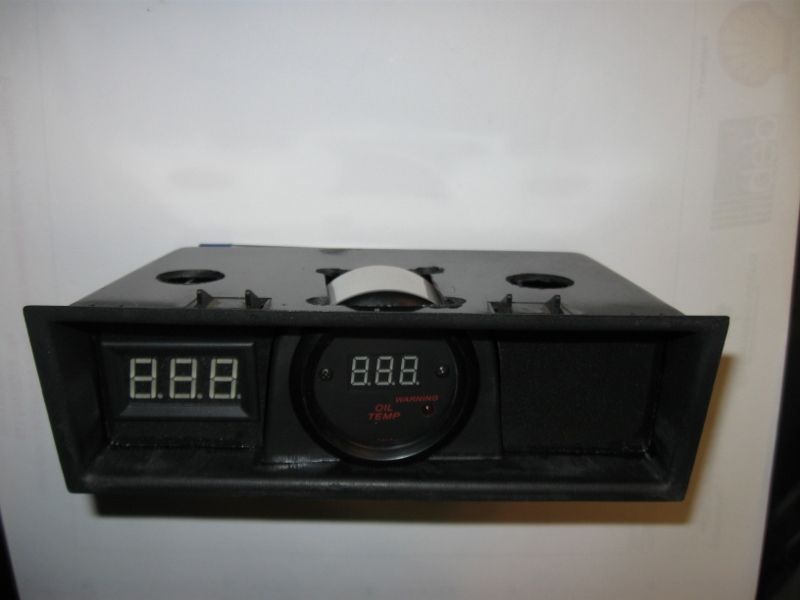 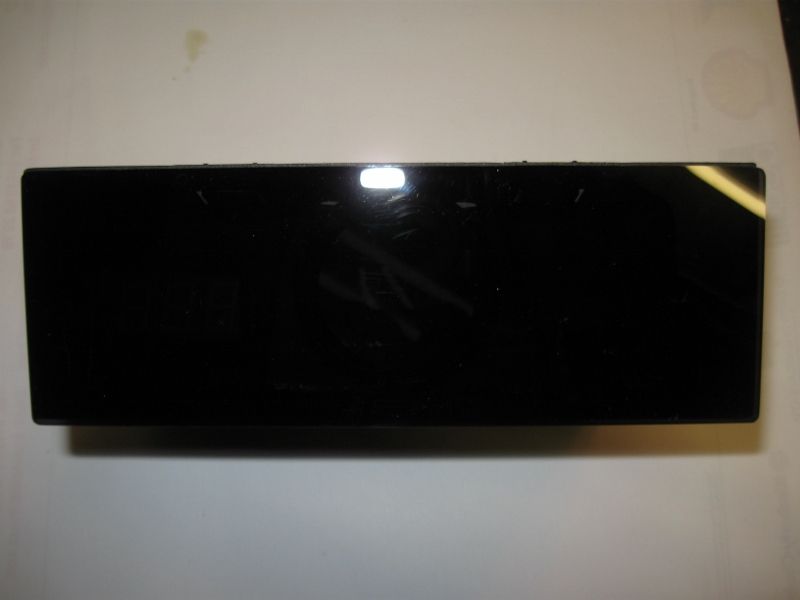 Switched on viewed roughly from the drivers angle – 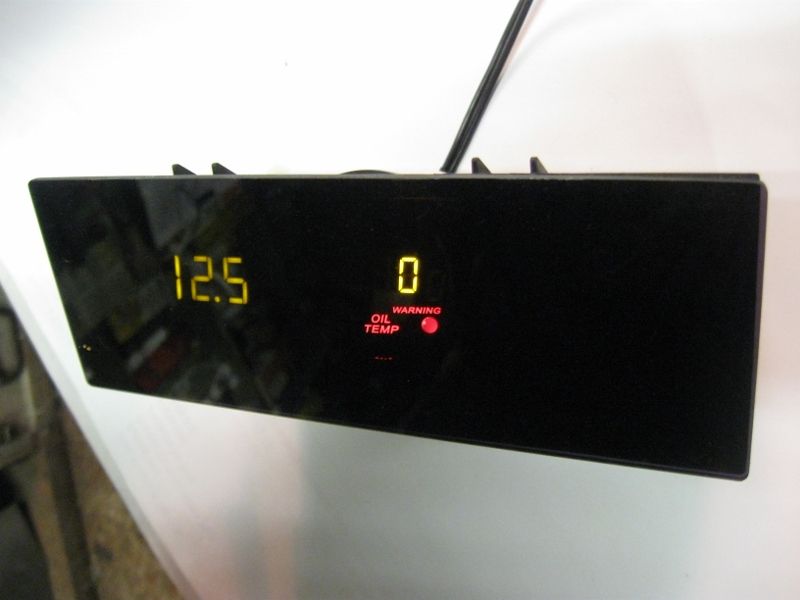 I might re-do it later especially if I want more bits in but hopefully that should be in keeping with the dash. |
| |
|
|
|
|
|
Dec 14, 2015 23:00:42 GMT
|
A bit more, to try to catch up not many pictures which might make it not look like much work but in fact was quite a bit. The floor had to be cleared on both sides, there are harnesses across the floor within the insulation on both sides and the ABS ECU lives under the passengers seat. No pic of the mess on the other side. 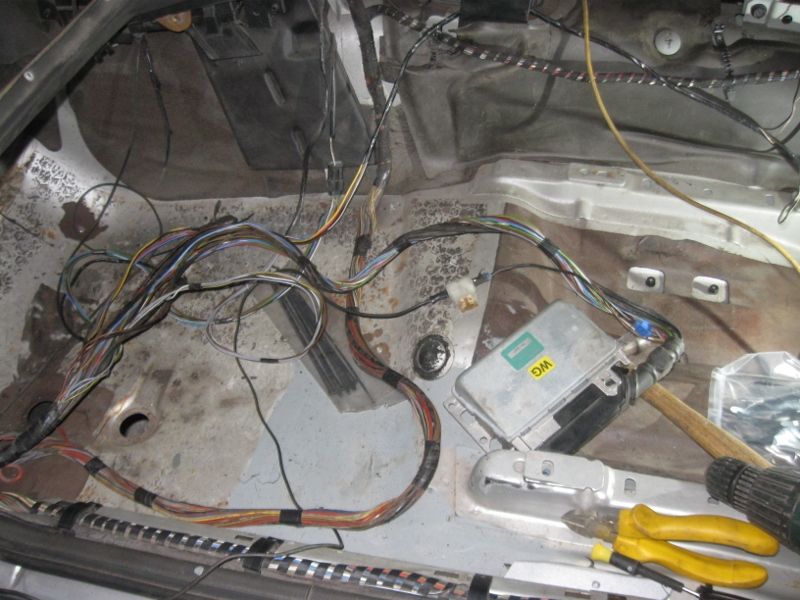 I relocated the ECU behind the dash under the scuttle, here you can see the plastic carrier relocated from the floor, wiring still to route. 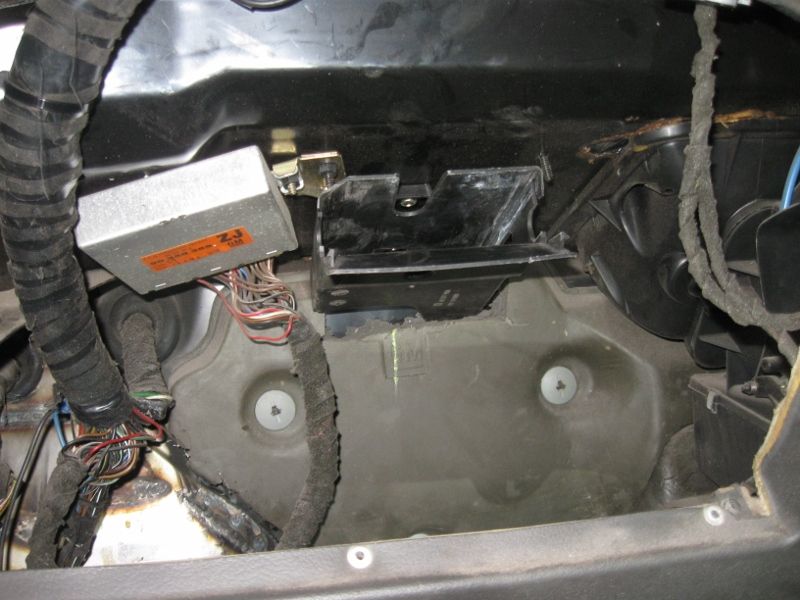 Floor cleaned as required and some rust preventing primer added & seam sealer as required – Just a couple of pics - 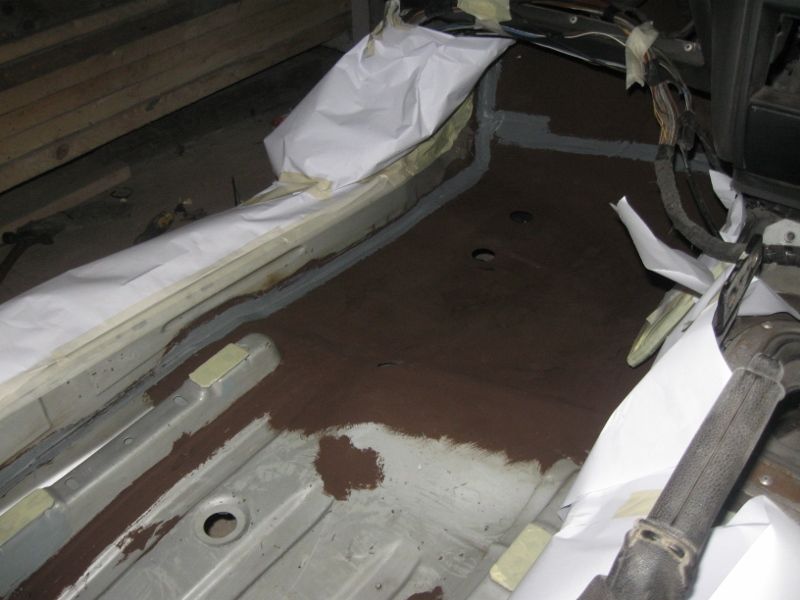 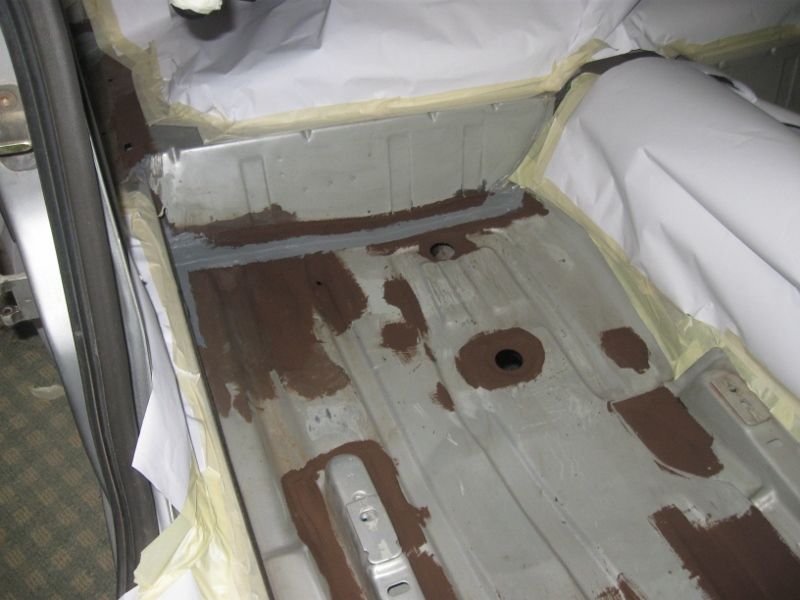 No during pics, lost, but my idea for the floor inside was stripped of clutter but smart and body colour and just mats in. This was originally part of the stripped out idea which hasn’t really worked out but I decided to still go with the floors, I’m fairly happy with it. I stonechipped it all first, a couple of reasons, a little sound deadening, and no need to perfect prep as it has a fairly even stonechip dimpled finish all over which works really well. After the stonechip was dry it was painted in body colour Astro silver base coat and 2K clear laquer. 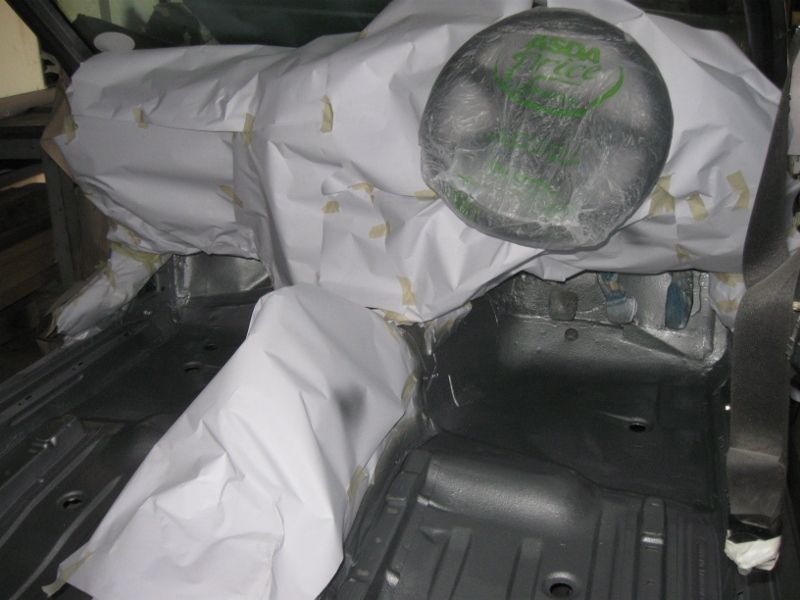 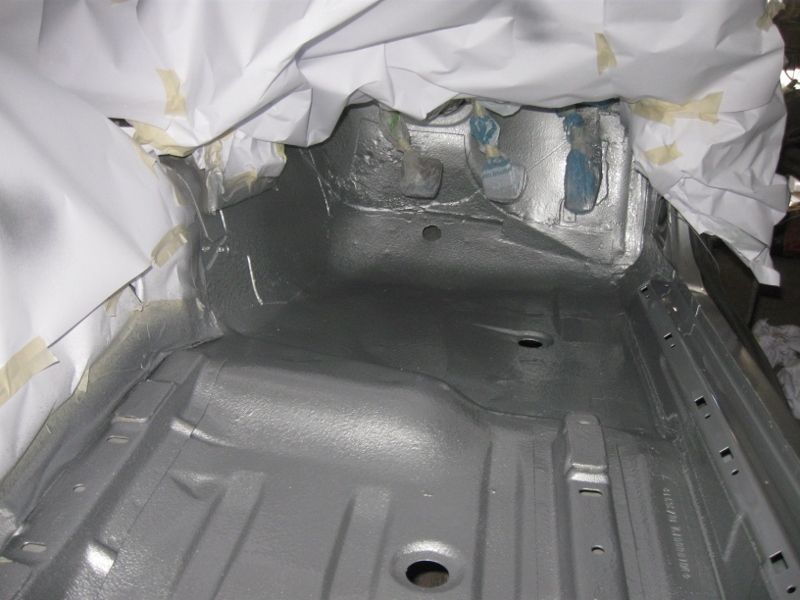 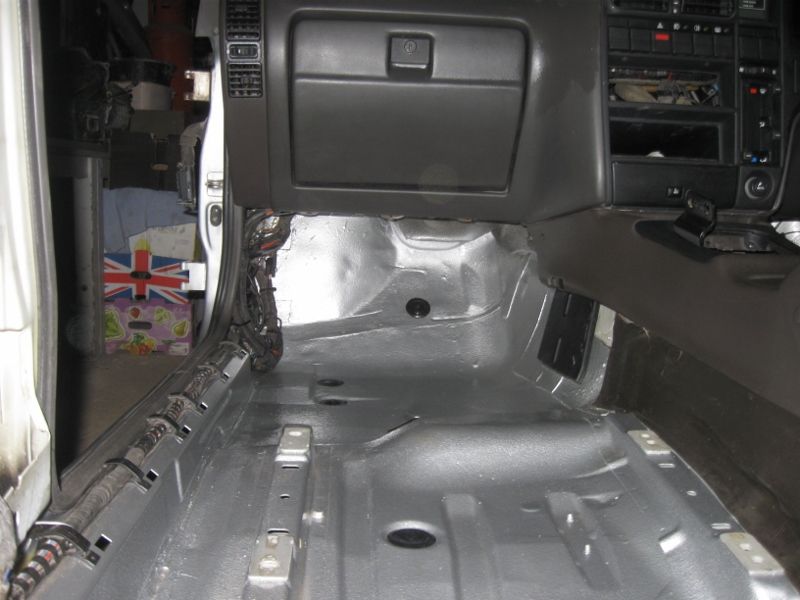 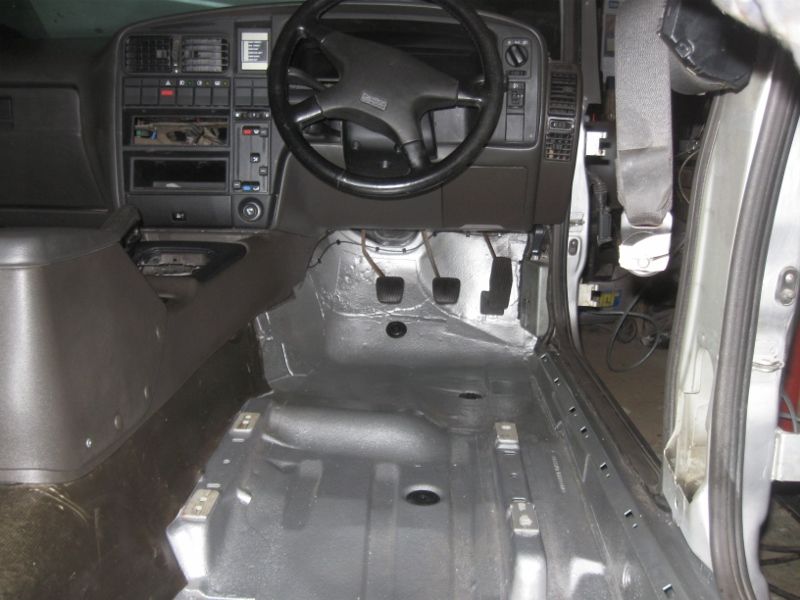 You can see that the wiring had a lot of attention in the later pics, lots or rewrapping and rerouting to keep it all off the floor. Lots of nasty damage and old bodges repaired too. Quite a bit of the dash work is also done here. More soon hopefully. |
| |
|
|
|
|
|
|
|
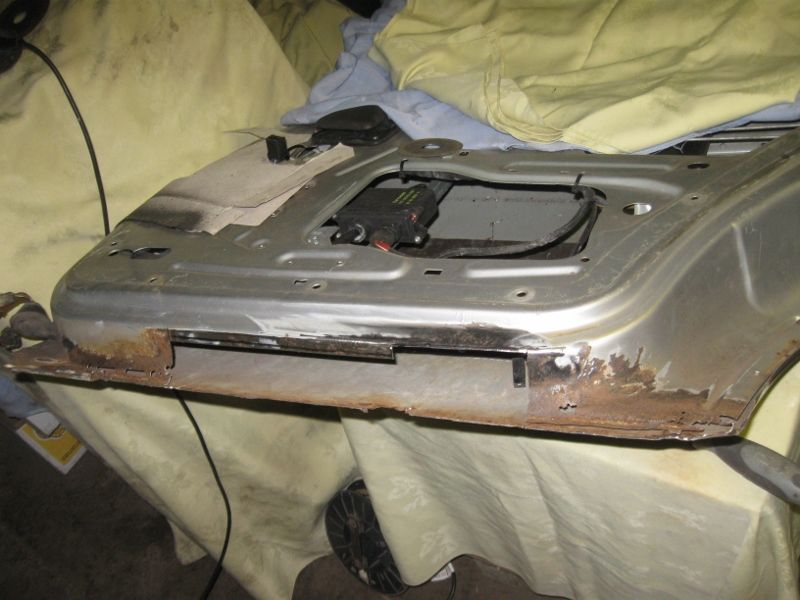
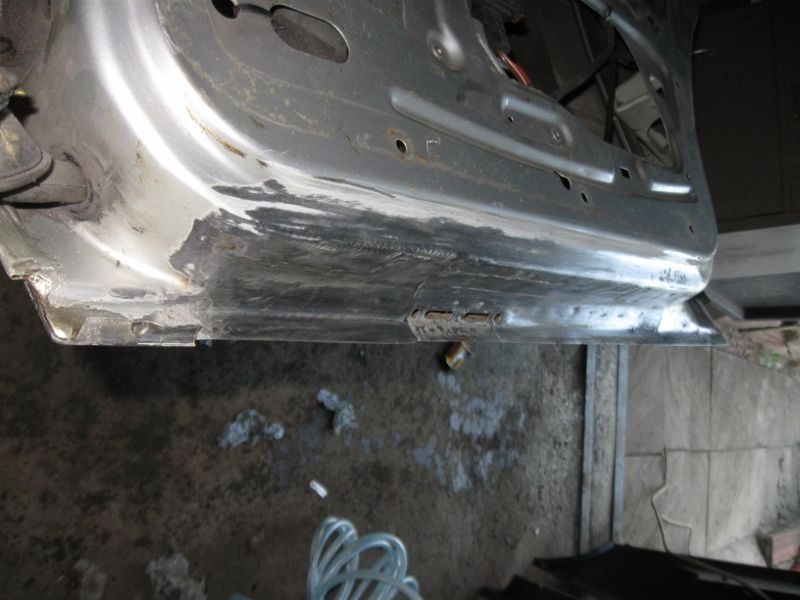
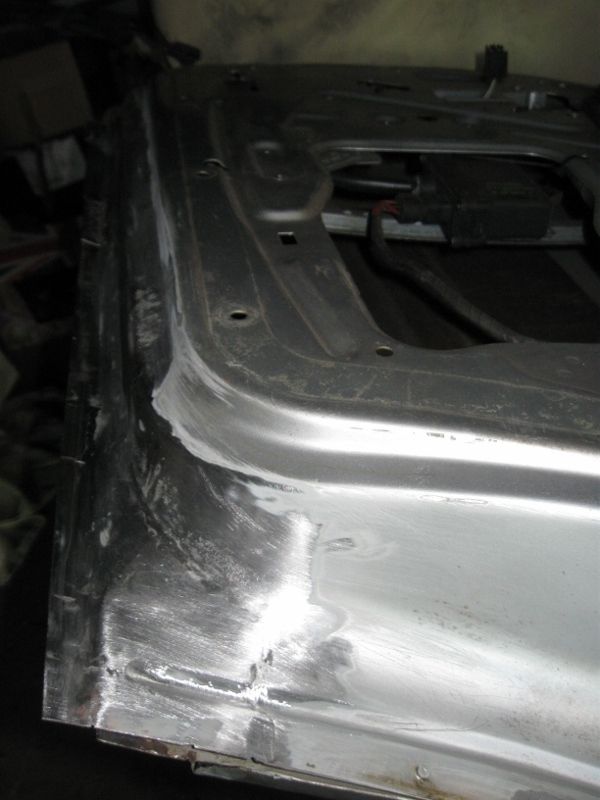
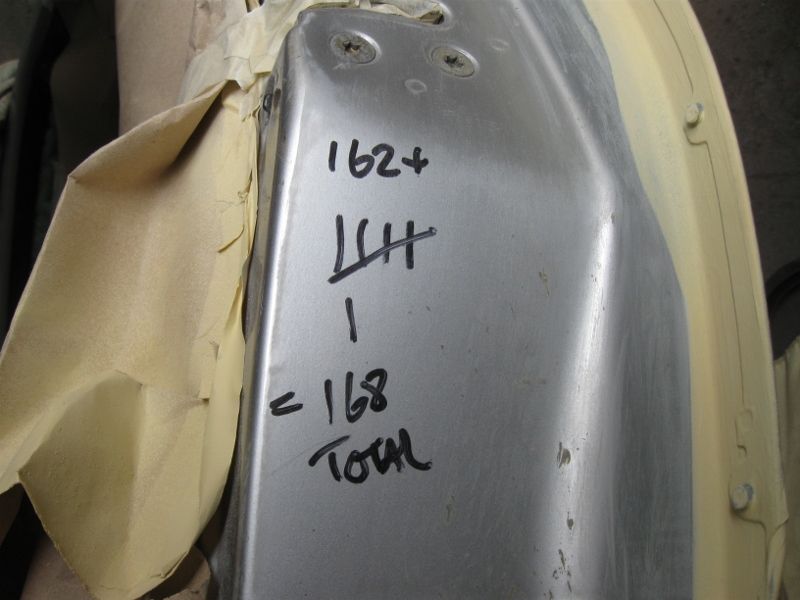
Its been a very long time since the last update, the reason is that I have been working on it in any spare time I can find at all and never found time to post. I wanted to get as far as possible before winter due to the car being in a garage away from home with no electricity or heat. I’ve been quite successful as it happens, the car is way further on than the thread so now I'm going to make an effort to catch up. I really regret not keeping the thread up to date, I should have posted a weekly progress post for extra motivation. Just feeling the need to post progress and also the feedback really helps. It’s a lesson to learn for future projects. Lets get the rot out of the way first, the welding is actually finished. In fact I finished the welding three times before finding more, very annoying. I removed some more carpets from the boot to prep for paint and found rot in a rear shock turret, a bit surprising as the other side had been uncovered and found to be spotless long ago and I haven’t seen one of these rot before. 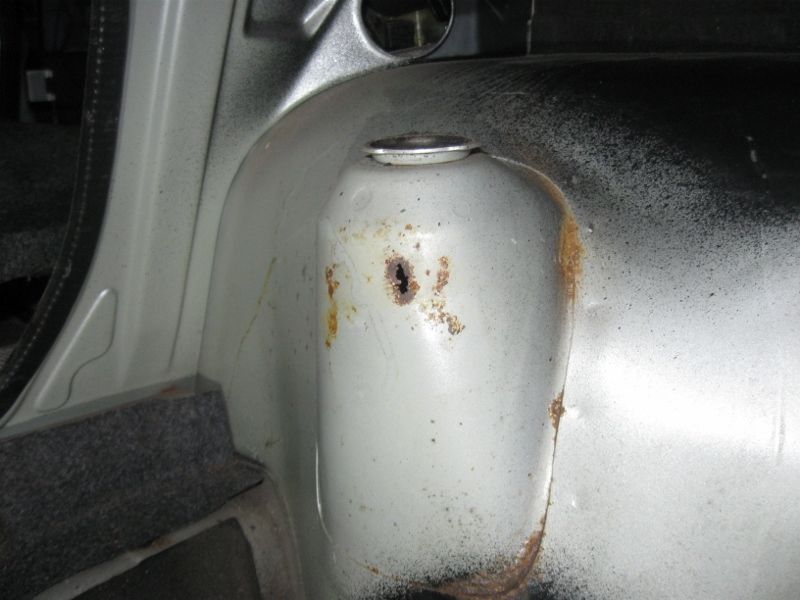 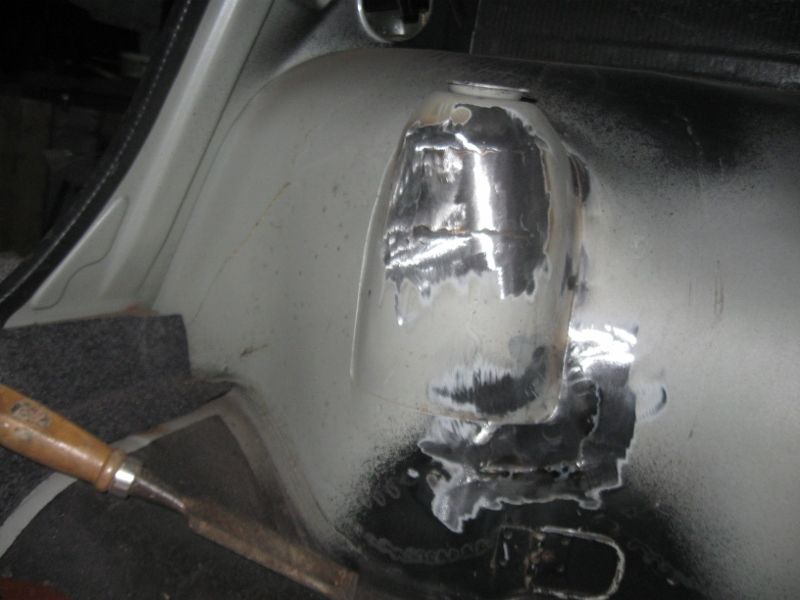 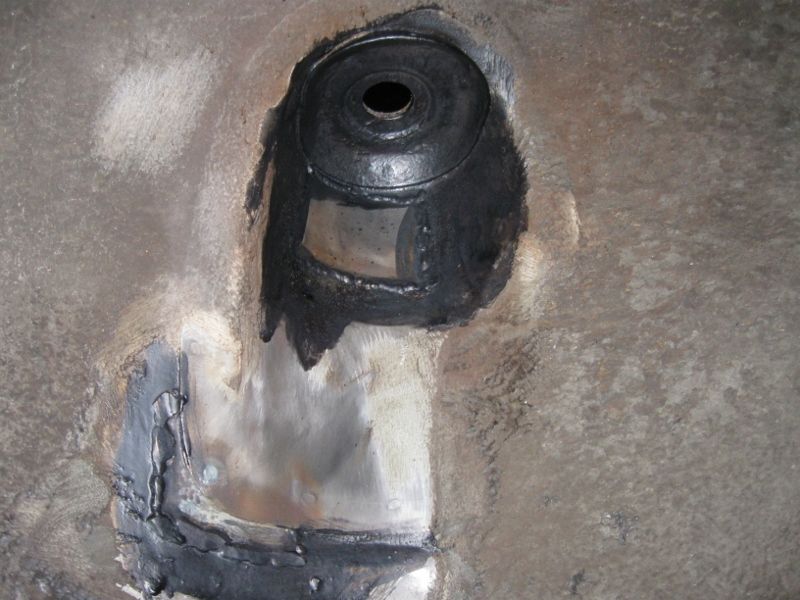 I went to begin cleaning the floor inside the car and in the drivers footwell in an area that appeared spotless I found that it was rotting from behind where a crossmember is welded to it, so it got cut out and replaced. No work in progress pics, I seem to have mislaid quite a few pics from this point in, not sure whats happened. 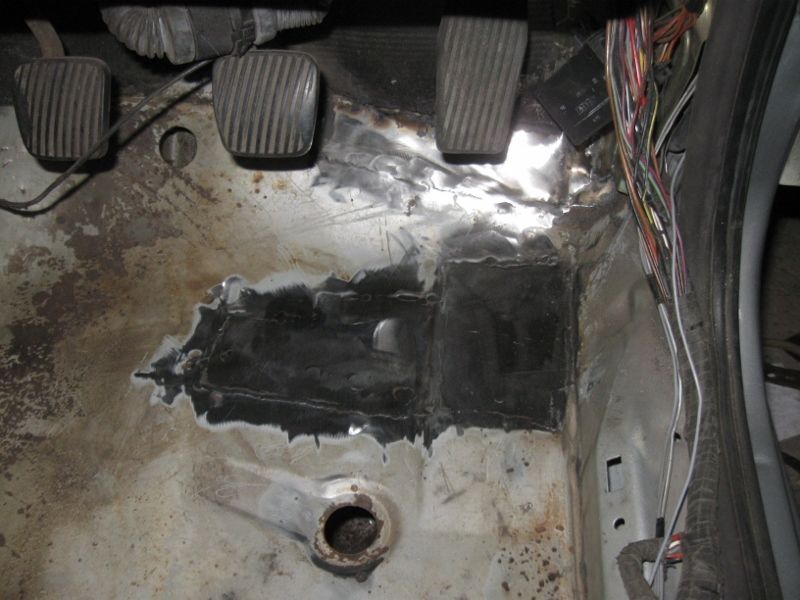 Once fixed I got on with cleaning up the floor and getting it ready for paint. Anywhere where I couldn’t get all signs of rust off got rust converter, including spotweld indentations, that’s the row of black spots. 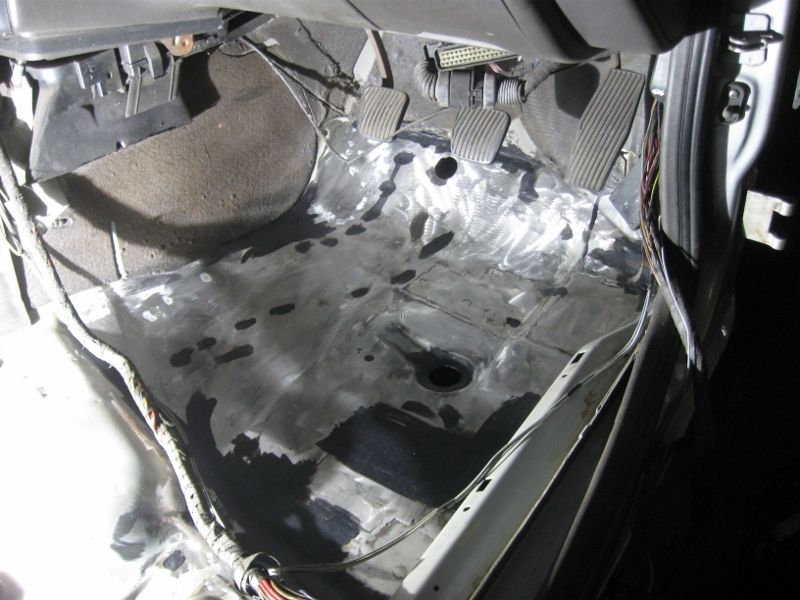 The discovery of the last of the rot and some impressive structural cracks wasn’t until later, next I cracked on with getting paint on. More pics asap. |
| |
|
|
|
|
|
Aug 18, 2015 23:32:34 GMT
|
|
I've never heard of any problems relating to replicas except emergency services vehicles, you certainly cant go around with a blue light on (don't ask how I know).
I would think anything that isn't standard should be declared to the insurance company if you want to be on the safe side.
|
| |
|
|
|
|
|
Aug 15, 2015 13:53:12 GMT
|
This is in the process of happening to one of our best local meets. Started as a aircooled, american, hot rod kind of meet. Over the years classics and retros have joined in, then the watercooled vw lot, then the stance lot and now its a free for all. Won't be long until its dead. Only been to two this year, after that I decided I'm just not going to bother anymore. Idiots in Corsa's wheel spinning. People in high powered japanese stuff over taking and racing each other from the lights etc etc. I know the one you're talking about there, and you're right about it's imminent death I reckon. Loads of heated debate on FB about it, mainly from the interlopers who've brought unwanted attention to the event. Shame as it used to be a really good night out. Are we talking about the Metrocentre here? No reason not to name it if it is.
I agree, I've been going in various retro / classic stuff for a very long time but probably wont be back, its not even a nice atmosphere for someone into the cars never mind the shoppers and businesses there nowadays, I feel bad for being part of it when I see how intimidating it must be for the shoppers etc.
|
| |
|
|
|
|
|
|
|
Aug 15, 2015 11:39:49 GMT
|
|
Great stuff, they make it look so easy, I want to try it.
Wearing gloves on a lathe though on one of those vids, makes me want to shut my eyes, very silly (info for anyone teaching themselves and maybe didn't think about it). Its easy to loose bits of fingers on a lathe, but its a whole lot better than a strong glove snagging on something (usually the chuck) and pulling your hand and arm in.
An ex work colleague didn't make the gloves mistake but didn't concentrate for a moment after 30 years of experience using emery on a lathe and was taken to hospital with his fingers, hand and arm still wrapped around the job, a couple of fingers couldn't be saved, he never turned again. Lathes are fantastic machines but incredibly dangerous, please be safe, no gloves, no long hair, no loose sleeves, extreme care with emery tape.
|
| |
|
|
|
|
|
|
|
|
It looks like a low spec car might be able to donate some winders then, thanks for the info.
I'm nowhere near Warrington but thanks for the tip off.
There is no hurry for winders, loads to be going on with at the minute, its the sort of thing I might look to sort out in the winter.
What I do need is a boot seal if anyone has one around, mine is totally shot due to the state the boot lip was in. I checked and an estate seal is a completely different profile.
|
| |
|
|
|
|
|
|
|
|
Thanks Craig and BC, very informative posts, I,ve learned quite a few things.
Firstly I had wondered if exercise window handles were available for these, I've never seen them, same for mirrors. I know some of the electricals don't work but have no idea which ones. To start with I will be getting it on the road and trying to get everything working (just to not be beaten) but later if it goes the lightweight route will definitely want some of those items. If the windows are already shot I might do it sooner rather than later.
I have already removed the carpets and sound deadening, they were all soaked and spoiled and at the minute there is no plan to replace them. The floor is getting stonechip then body colour on the inside then just some mats.
The headlining is gone as are the pillar trims etc, I would really like to remove the sunroof as I don't like them anyway and they are heavy, I really like the idea of the challenge of welding a piece in though but the risk of ruining the roof is huge so I plan to take advice on how to do it. I'm thinking use a section of Carlton roof, very accurate fitting and TIG weld in with minimal or no filler rod (or body filler). It could be a disaster.
Its very interesting to read about how much you both had to strip out compared to the percentage weight loss, it isn't easy at all it seems to lighten one significantly. I'll get it on the road then decide how far to go, I need to enjoy it on the road most importantly. Having felt the weight I think the seats are an easy big gain, I'll think about that.
The body plastics and radio definitely wont be going though.
I had thought about a roll cage further into the future so as an absolute minimum cancelling that out has to be done.
|
| |
|
|
|
|
|
|
|
|
Thanks for your kind words Stevie, Grifterkid and Speedle
Darren H, Klokkerholm, to be fair at least they do something for these cars so I shouldn't complain but through all of the above work only 3 parts were available that were of use. Owners of old Opels aren't very well served at all compared to the likes of VW and Ford.
The quality isn't great but its a long way better starting point than nothing.
I was amused to buy some Klokkerholm sills and under their sticker was one saying Made in Rochdale, cant remember the company name but I assume they have bought stock from other people who no longer bother with our cars and rebadge it as their own.
|
| |
|
|
|
|
|
|
|
So when do you reckon it'll be ready for the road? Can't wait to see it finished Well I was aiming for dragging it to the gathering - but that's not possible I've just been told that the RAF Marham trackdays might be back on at the end of Sept so my couple of month slippage means I'm quite tempted to aim for that!!! Wow, that's a fantastic progress rate (that would put me to shame). I'd assumed it would take a lot longer. I'll be really looking forward to seeing it come together. |
| |
|
|
|
|
|
|
|
I will do thank you.
I think I remember some of yours from ABS or TC.
That rust free crashed shell would be a great source of pieces to cut out to repair other cars.
I sold that car about 5 years ago to another RR member. It was still driveable at the time, so sold it as spares. Think the engine ended up in a mk1 Cavalier and I'm sure the shell was scrapped. The engine was an absolute belter, 3.0 12v gold-top straight out of a Senator with decent exhaust and air filter, easily the best 12v I'd owned. Used to keep up with 24v's no bother, but then it was over 200kgs lighter than a standard car! What sort of things did it loose to get that weight reduction, its something I'm considering as a future move, just wondering if there are any ideas I might miss?
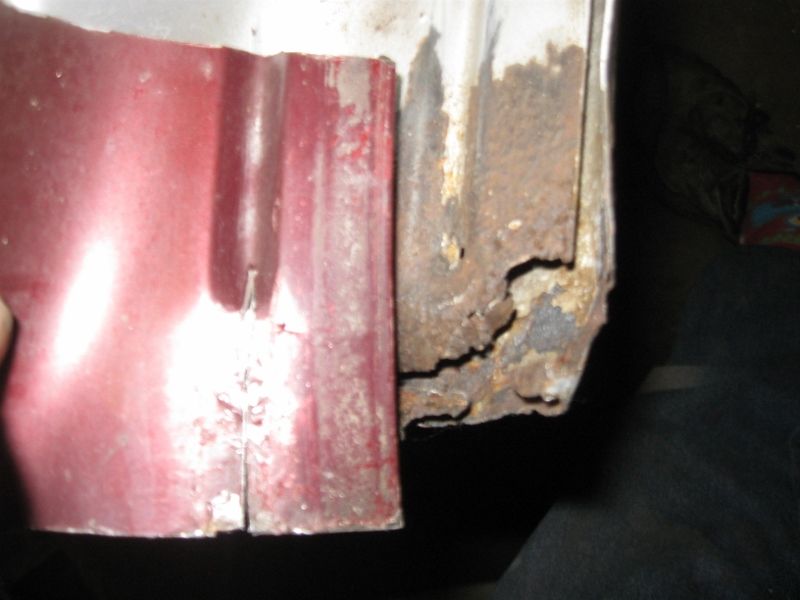
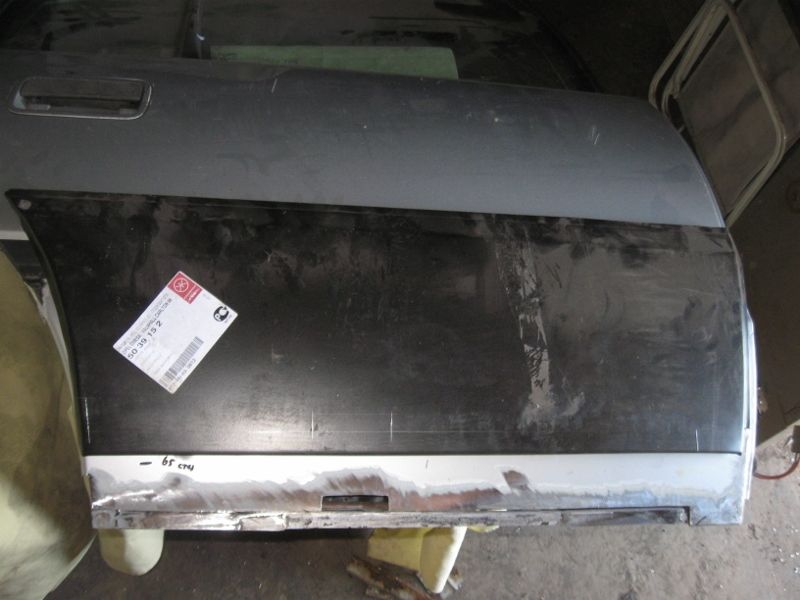
Next a door repair couldn’t be avoided, I don’t plan to make the car tidy and that means most of the doors can be left alone until any future decision to make it look nice.
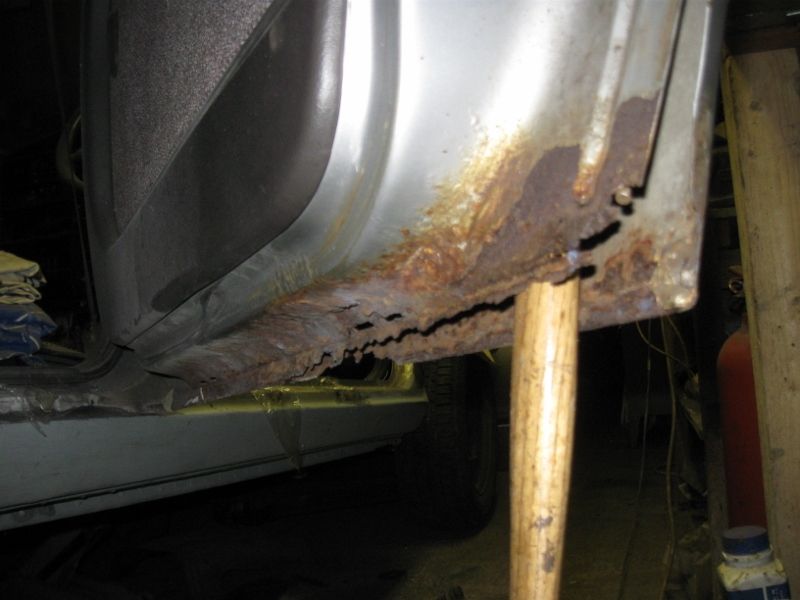
You might have spotted in the pics above that the drivers side rear door couldn’t be left, the skin flapping about like the sole of a tramps shoe.
Annoyingly I sold a near enough mint estate rear door a while ago for next to nothing and as only the top frame is different I wish I’d kept it.
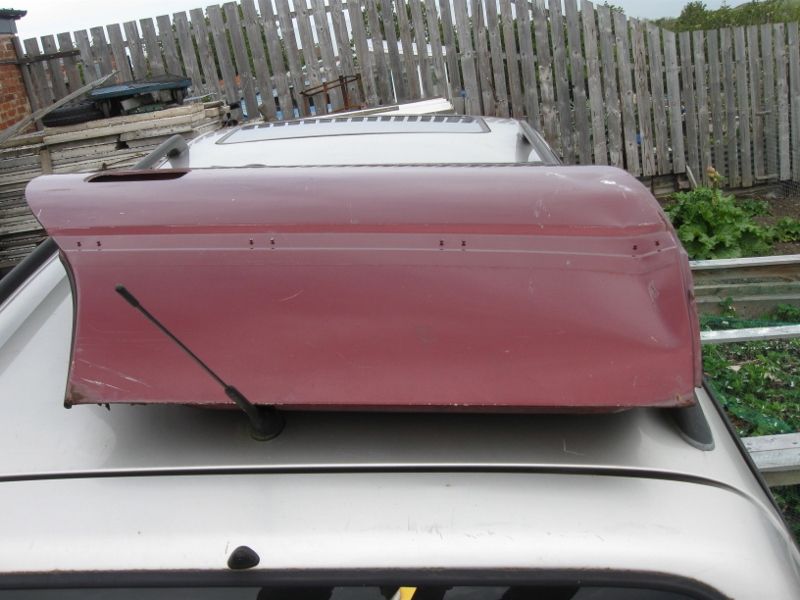
Good Carlton doors aren’t all that common now and of course are a pain to transport and would probably need paint so I didn’t bother to try to get one.
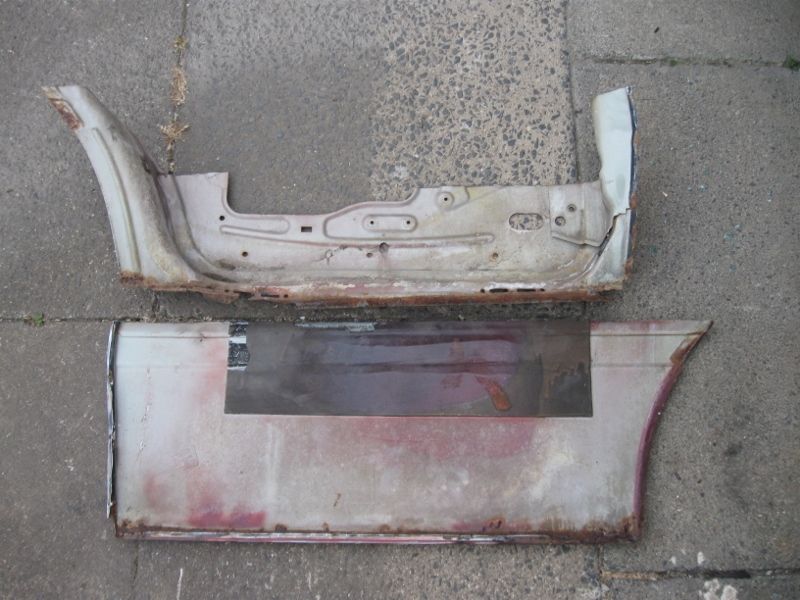
I did have another not so good estate door and took it apart to consider using the bits to repair mine but it wasn’t good enough really.
There seems to be a few pic missing but here are a few of patching it up.
For the bottom inner corner it should have the end of this swage line, I cut a piece from half way up the donor door, slit into the swage and hammered it flat to replicate what I wanted, you can just see the closed up slit, welded later.
I chopped out bits at a time and made some repairs from new steel and also reused bits of the donor door.
Here that corner is in and so is some of the bottom, the purple paint gives the sourceof the steel away, the piece to be welded is also from the donor door but the purple is on the other side.

Bzzt bzzt with the welder some more and a bit of grinder noise.
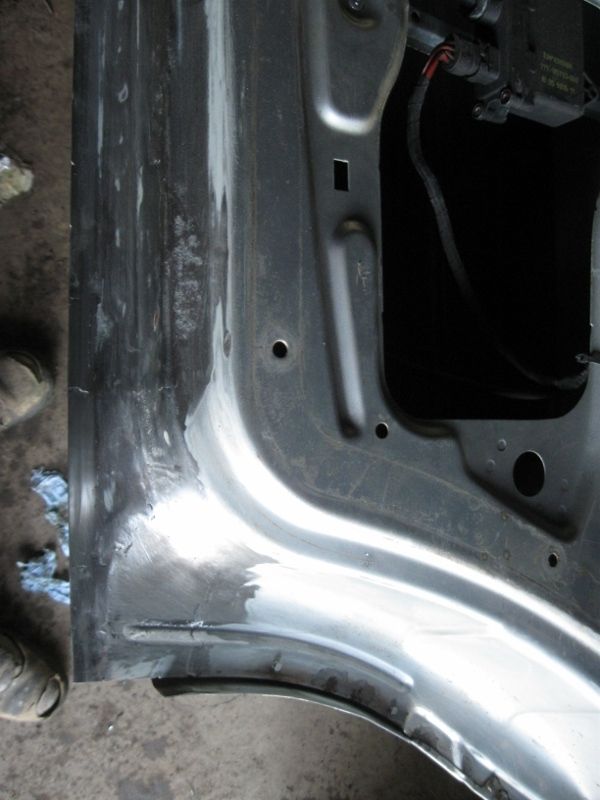
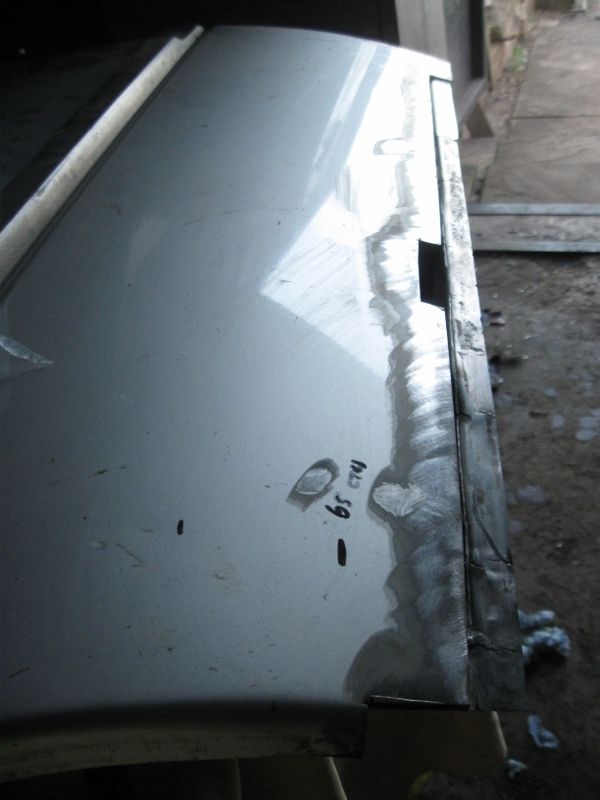
For the skin I had bought a repair panel, that would be the third bought piece so far I think. I only used a tiny bit of it, a bit of a waste.
No pic without a bit of protective primer I’m afraid.

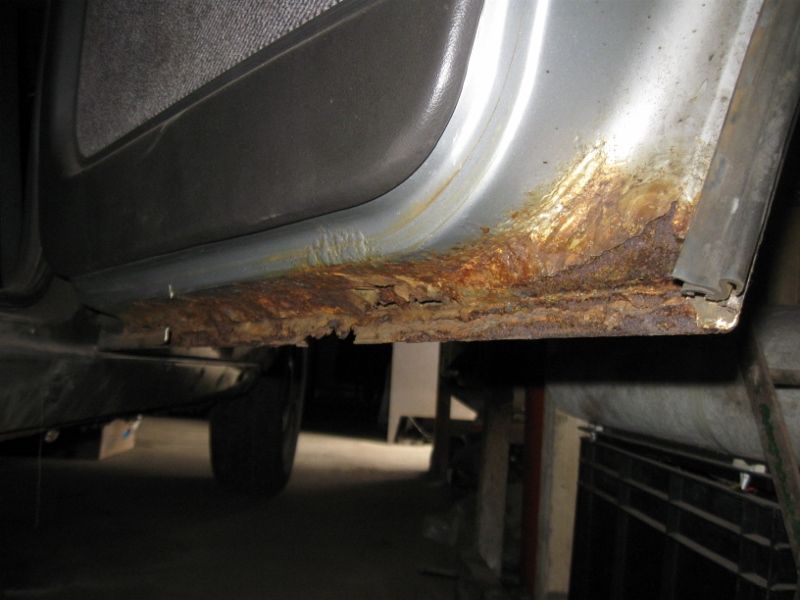
The scores on the door – I thought at this point that I had finished welding with the patch count now at 168.
|
| |
|
|
|
|
|
|
|
|
What a fantastic project.
Any chance you get to post pics would be appreciated, I'll be following your progress.
|
| |
|
|
|
|
|
|
|
|
|
Nice to see so much effort being put into keeping a Carlton on the road. Having owned several in the past, reading this makes me want another! My last GSi had the most rot free shell I'd ever seen, and I managed to crash it backwards into a wall (on a track I might add!). Good luck with this one, keep up the good work! I will do thank you.
I think I remember some of yours from ABS or TC.
That rust free crashed shell would be a great source of pieces to cut out to repair other cars.
|
| |
|
|
|
|
|
|
|
I reckon you should've weighed the Carlton before you started welding to see how different the weight was when you finish. I feel that it will be probably twice the weight once it's finished... Nice welding though, keep up the good work fella! I read that as should have weighed it in before starting  , it had crossed my mind. , it had crossed my mind.
The finished shell will weight almost exactly what it should do when I'm finished because I cut the old metal out and usually make properly fitting repairs in the right thickness (used 0.8, 1.0, 1.2, 1.5 and 2.0 so far). I used to have a source for those thicknesses or I might have compromised to be fair.
It will be heavier than before I started though as holes don't weigh as much as steel, on the other hand that might have been cancelled out by having four sills.
The finished car will hopefully be lighter than at the start due to some lightening effort, deleted unnecessary stuff like cruise, headlight wipers, a lot of wet foam from the floors etc and lots of lots of trim going including headlining, eventually sunroof and heavy seats too.
That middle sill is an awful thing to fix, I reckon that very few people putting sills on do it at all, who would know later? I guess the result would be less rigidity and therefore poorer handling. Mine aren't repaired in an attractive way but they should provide the strength they were designed to do. |
| |
|
|
|
|


 , it had crossed my mind.