logicaluk
Posted a lot
 Every days a school day round here
Posts: 1,373
|
|
Mar 24, 2024 21:52:32 GMT
|
Well that was the weekend that was, and this is what happened. Saturday I was rudely awoken by the dustman, and thought about leaving the house. No I was awoken but the bloody cat talking at 6am well I say talking she said wow, but at 6am and couldn't get back to sleep, by 7am I was assembling the tools of loom manufacture, as I had cunningly acquired the proper pin crimping tool, now I could have crimped them with a normal crimp but if you got access to the proper crimp one is going to use it. 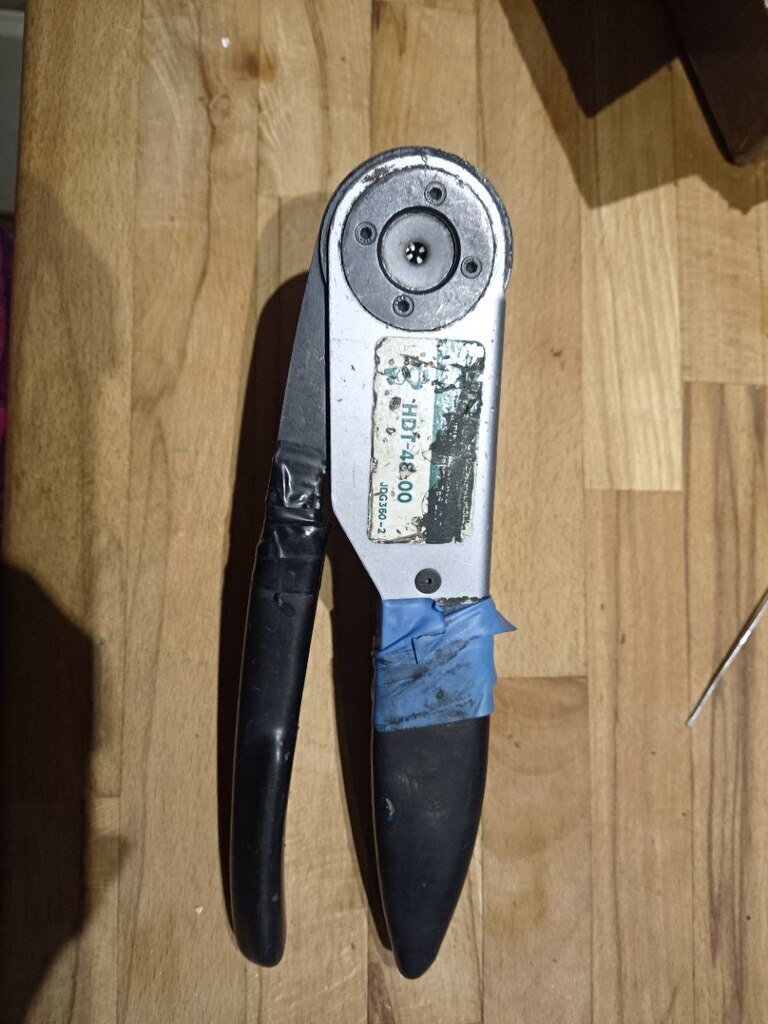 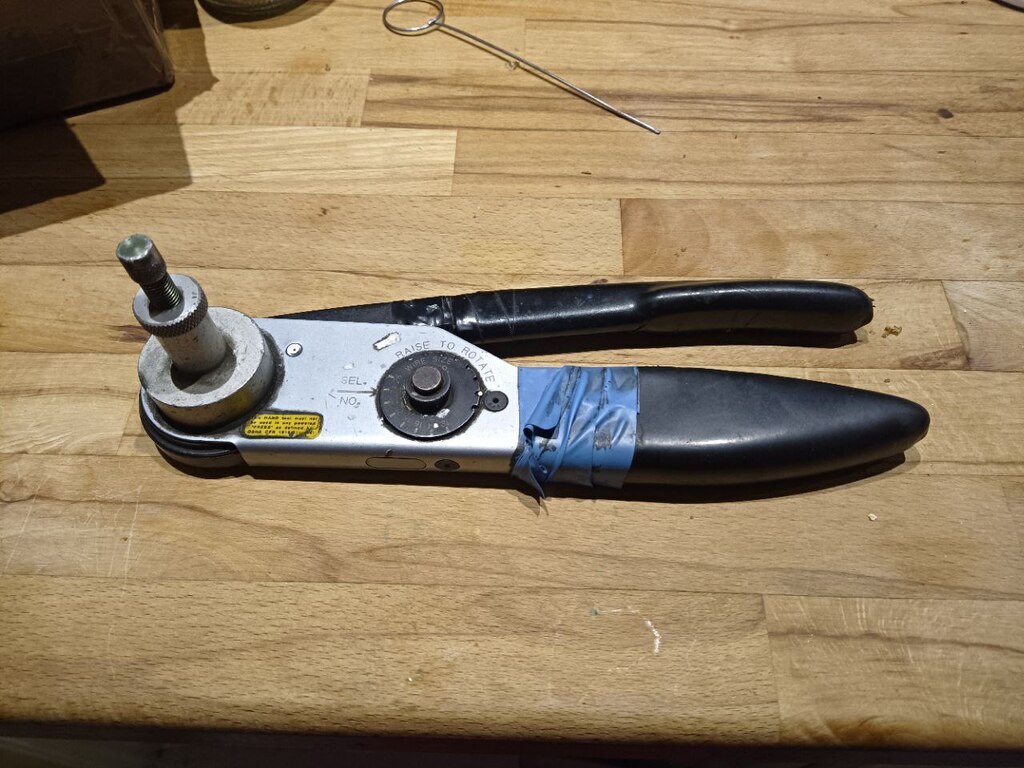 It being a Deutsch crimp tool, I've looked for them on eBay and the cheapest I can find is a new one for £199, it is a little cumbersome to use, but it crimps the pin on the wire almost perfectly, I only had 2 Fail the pull test because the wire was ridiculously thin, so I soldered them, with over 60 pins crimped the word success springs to mind, anyway I'm getting ahead of my self. First job was to take the laptop and cloth tape measure, and roughly figure out what's going where, there are 4 important points, ECU, bulkhead, block and battery. Using these dims, I pinned the ECU plugs and worked out the branches one just inside the bulkhead one just outside and everything else splits out at the back of the block, I'd bought reusable Tywraps for this very purpose, but completely forgot about them until I was almost dome After a solid morning's work, I had this. 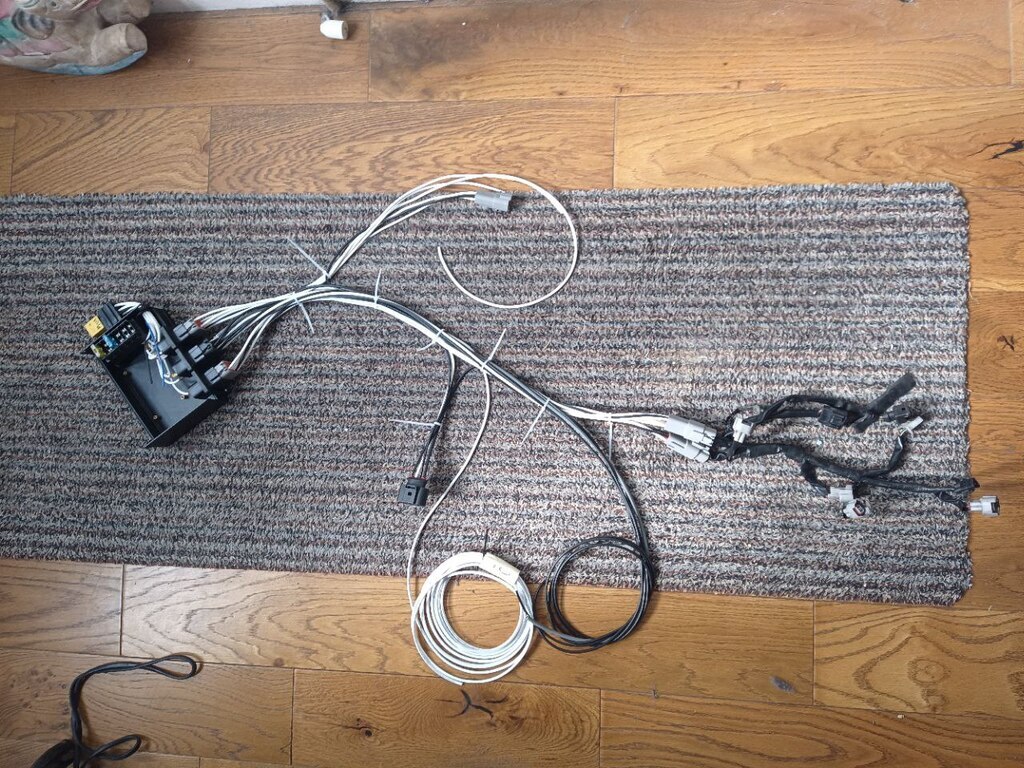 Which was ready for its first light toss, which led to taking the case apart to affix a bracket, a bracket of such cunning even the likes of Binkys own mystic mechanical gurus wouldn't contemplate, no they would have spotted this curveball 9 years ago found a better mounting solution, I went for reusing the flat steel sheet that the last ECU was mounted to and hung it off a fresh bolt. No Pics as the Garage Frank lives in doesn't have much light, and I was working by torchlight and most importantly I didn't have my phone with me. The afternoon was spent changing a couple of components (I hate desoldering through hole components), and finishing off the boards then crimping the socket pins, strangely the socket pins are male and the plugs female. Sunday morning once again the cooking fat wakes me up at 5.45am then this time snuggles down on the bed and goes to sleep right beside me, not for long as I have my petty revenge, waking her up every 5-10 mins for the next hour and a half, Engage Smug Mode. I got up, had a cup of lemon green tea, such is my want in the morning, before I got started on the ECU I have to finish off an unfinished job from a couple of years ago, when I fitted the new kitchen worktops and sink, I also fitted a filtered water tap, but hadn't plumbed it in. This hadn't been a problem as the jug filter was working fine and Wilko had plenty of filters in stock, alas Wilko is no more and so was our supply of water filters. The problem is the plumbing under the sink doesn't suit the new taps, so a reengineering was needed, I don't like plumbing, especially the sort that takes place in the back of a cupboard with no room to work. At this point something went wrong, My mood crashed, and I was hit by the wave of depression, that has been stalking me for the last couple of weeks. I managed to drag myself through it fighting with one joint that really didn't want to be watertight and needed the whole thing stripping out to tighten, but I think it's OK now, ill check it again tomorrow. This left me feeling like all I wanted to do was to go back to bed, and either wake up on Thursday or never again. I have learnt that when I feel like this the most important thing to do is to find someone to talk to, luckily I did and a couple of hours later I managed to start on the ECU, this was a very absorbing and the concentration helped me fight my way back to feeling OK. 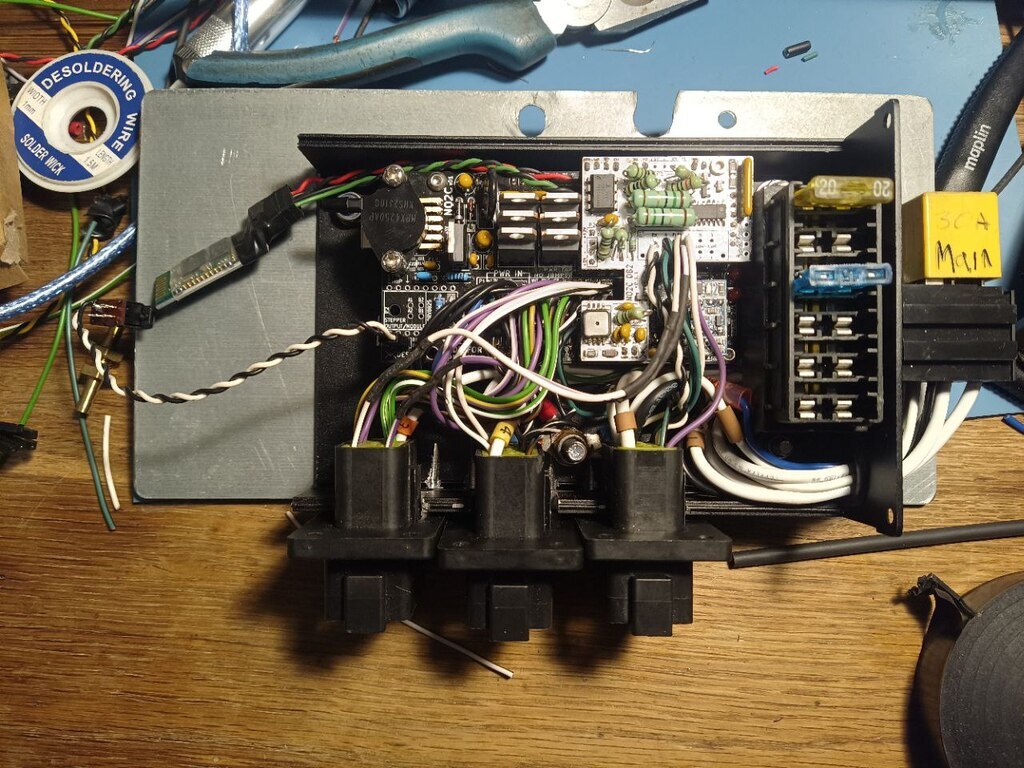 Yes, I know there are 2 wires I cut short and had to lengthen, but I'm calling it a win. Now it's all in the car, I've adjusted the branches to fit better, found the crash sensor, so in the event of a crash if the engine is able to run, it will kill the ignition feed to the ECU. I just need to remake the O2 Sensor connector for the new Deutsch plug, connect power and block grounds and ill be able to see if it still verks. Dan |
| |
Last Edit: Mar 24, 2024 22:04:43 GMT by logicaluk
|
|
|
|
logicaluk
Posted a lot
Every days a school day round here
Posts: 1,373
|
|
|
|
|
I too am fascinated by this project, some projects I read every post every time I come here, others like this one, I catch up when I have free time so I can better digest the information. As long as you are happy to, keep doing what you are doing. Looking forward to the flip front.
Dan
|
| |
|
|
logicaluk
Posted a lot
Every days a school day round here
Posts: 1,373
|
|
Mar 17, 2024 15:32:00 GMT
|
With Saturday being perfect spannering weather I decided it was high time I did some, today's job was to finalize the layout for the Speeduino case, and find somewhere to put it. Frank had eaten all the pixies in the battery, so after spending 30 mins trying to locate my jump pack I gave up and pulled the henormous jumping battery out and fired him up, got him out the garage and parked up, I opened the boot to retrieve a 10mm spanner only to find the jump pack in the boot. Doh The location of the ECU will dictate the layout of the case, Micro Squirt sat on the back of a plate with the connections facing forwards, up behind the glove box, then there was a fuse and relay panel lower down at the back of the lower parcel shelf. The Speeduino is twice the size, but I can put the connectors where ever works. 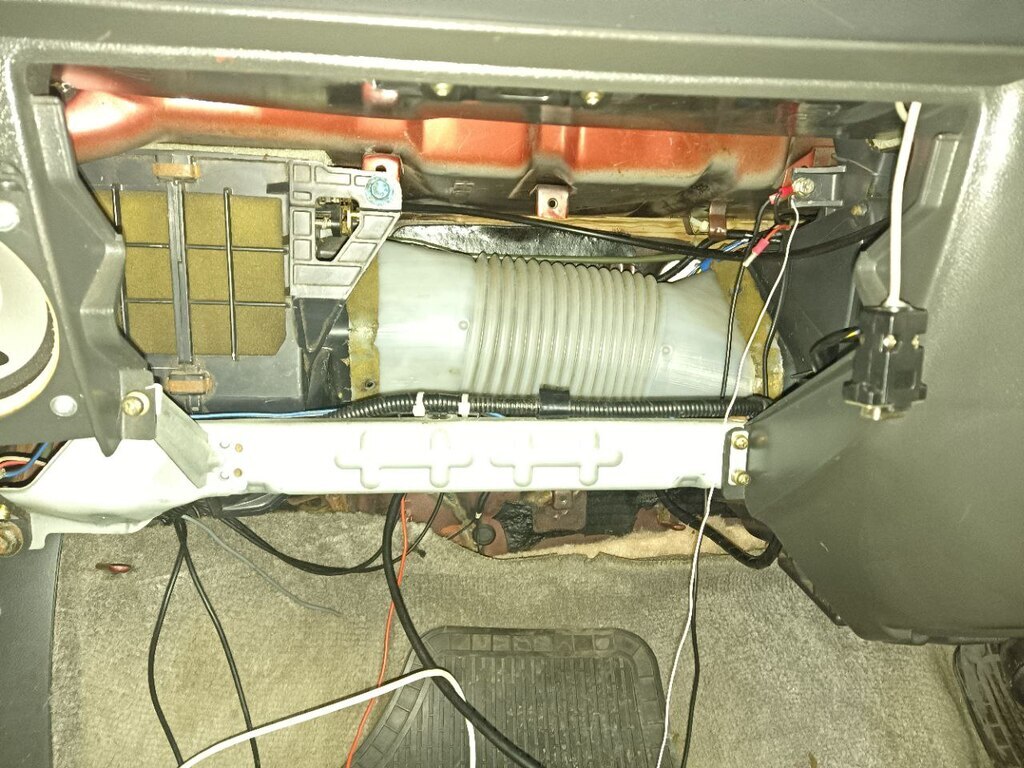 Yep loads of space, but the glove box needs to go back in and there's not much in the way of mounting points, what about the engine bay?well this box isn't waterproof so that's not a risk I'd be happy taking so back to the glove box area, all the cabling comes through the A/C piping hole just in front of the heater box, yes A/C was available as an optional extra, iv never seen a working one and only seen the A/C button in 2 Acclaims. I refitted the glove box and had a look-up the back, something it would appear the designers never did.  Because there is a cavernous space behind the glovebox, which means we have a winner, I can use the old mounting bracket and bolt it to the back of the case, it will only have one bolt but the Micro Squirt has done several thousand miles with no issue, so fingers crossed. I then realized I might just possibly have enough room to get the fuses and relays in too. Then spent the rest of the day hacking some holes into the case and ended up with this. 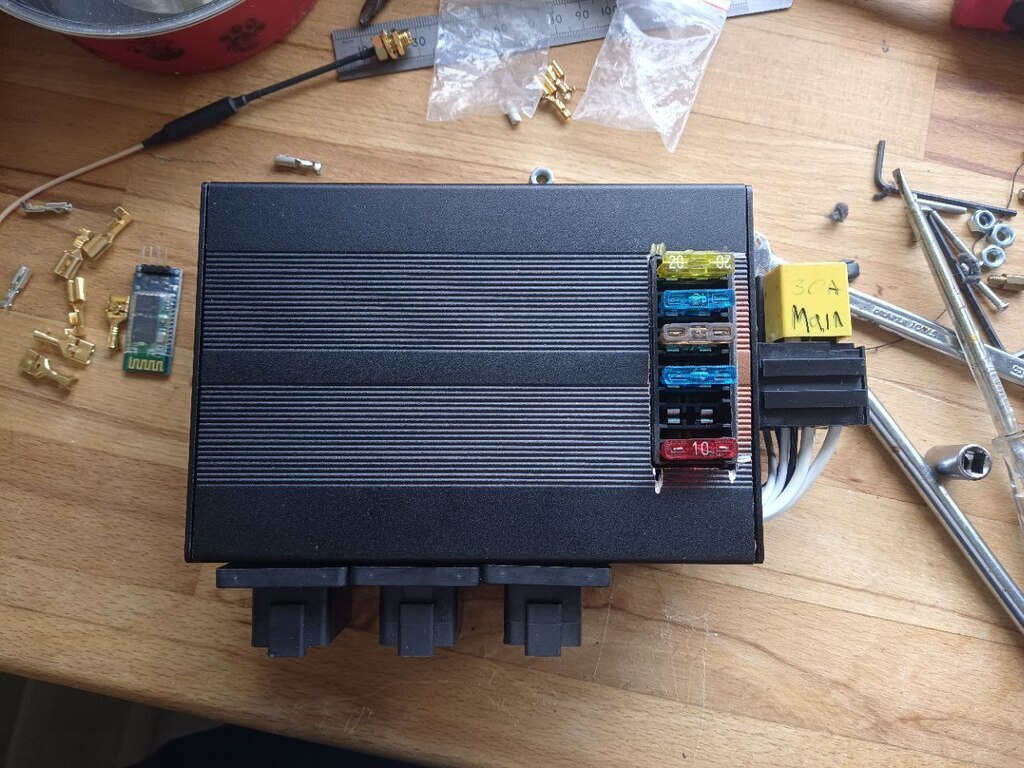 Well almost that, as the fuse holder which used to be pop riveted in place now neds to be height adjustable and has M5 mounting holes, it won't take M6 as there's not enough room for nut, and it turned out I have about 15 M5 bolts of varying lengths, 7 M5 washers and 2 nuts, one nyloc and one plain, FFS, M4 no problem M6 loads M5 almost nothing. So this morning I popped over to a mate who had 10 M5 nuts, well he did have 10 M5 nuts, he doesn't any more. Then, when it stopped raining, I added a couple of rivnuts to Frank's bulkhead and fitted the new coil pack, the lead to number 2 plug only just reaches. 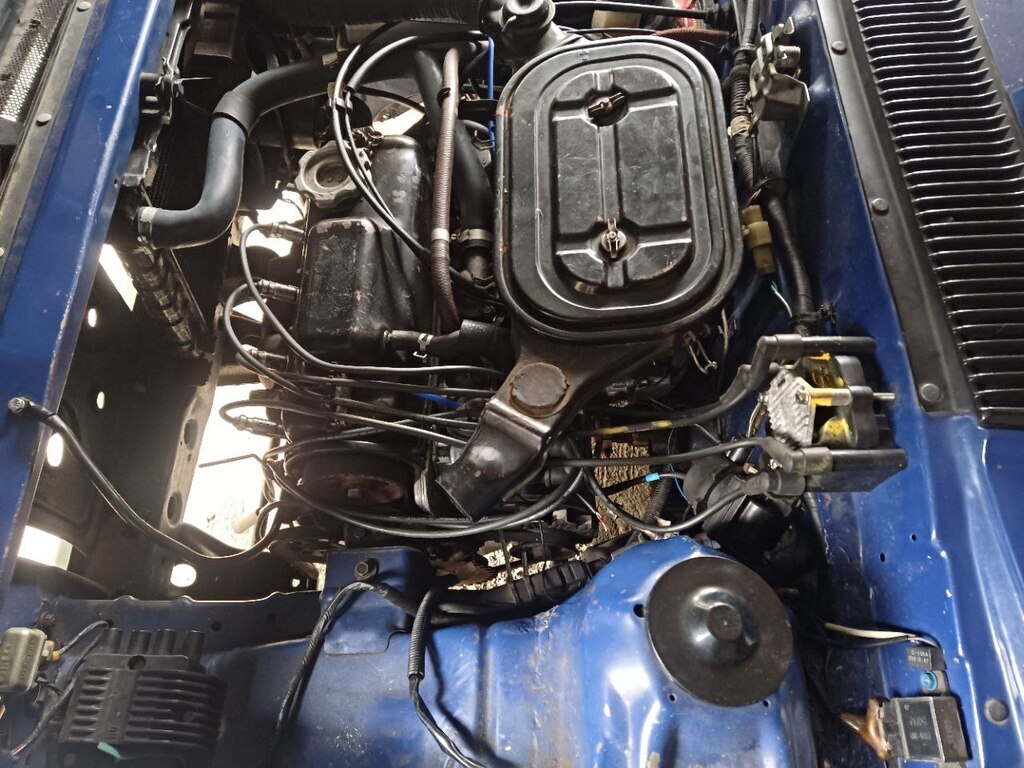 As long as I remember to borrow the crimping tool from work, ill have the ECU finished this week, then I'm on to making a new engine bay loom. |
| |
|
|
logicaluk
Posted a lot
Every days a school day round here
Posts: 1,373
|
|
|
|
|
It's a Triumph, it will need its own thread eventually.
|
| |
|
|
logicaluk
Posted a lot
Every days a school day round here
Posts: 1,373
|
|
|
|
I think I found the problem wiki.js can't use a password protected SSH key and GitHub won't accept a non password protected SSH key. so it's back to the drawing board. Thanks jimi maybe now I can get back to the car. Dan |
| |
Last Edit: Mar 14, 2024 6:54:52 GMT by logicaluk
|
|
logicaluk
Posted a lot
Every days a school day round here
Posts: 1,373
|
|
|
|
Any help LINKY ? I've found their Pi How-to's to be excellent  That looks just like I set it up the problem is getting it linked to my GitHub so everyone can access it. Thanks Dan |
| |
Last Edit: Mar 13, 2024 11:59:01 GMT by logicaluk
|
|
logicaluk
Posted a lot
Every days a school day round here
Posts: 1,373
|
|
Mar 12, 2024 22:43:11 GMT
|
It took some time, but I finally found an encloser I'm happy with, not only that, but it was a bargain, most places on eBay were £13 -£15 I got 2 for £17, even better and much to my surprise it was on royal fail 48hr and had arrived when i got home from work today (Tuesday) it's the perfect size to get all the plugs on one side 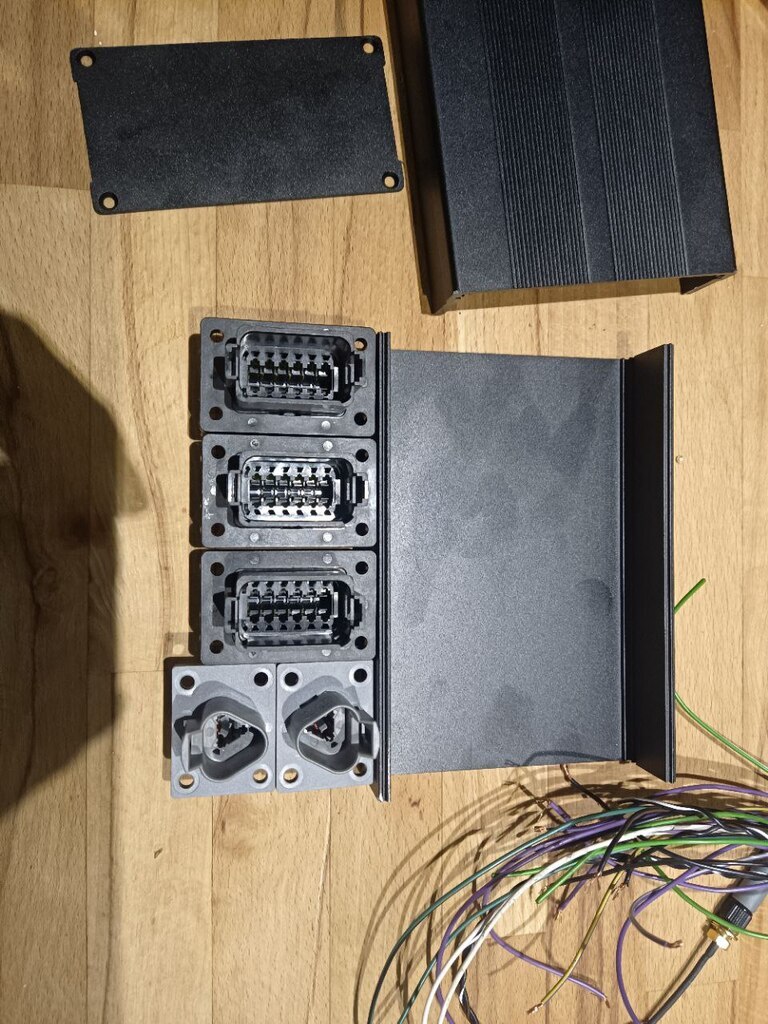  Here's the plan for the layout.  But I'm still bashing my head against the wiki for the Speeduino if anyone can help with a docker running on a Raspberry Pi, I'm trying to get it to connect to GitHub so other people can see it. forum.retro-rides.org/thread/226706/computer-help-trying-run-wikiif you use github |
| |
Last Edit: Mar 12, 2024 23:03:23 GMT by logicaluk
|
|
logicaluk
Posted a lot
Every days a school day round here
Posts: 1,373
|
|
Mar 12, 2024 21:19:50 GMT
|
|
I keep geting this error message.
Fetching origin ERROR: Repository not found. fatal: Could not read from remote repository. Please make sure you have the correct access rights and the repository exists. error: could not fetch origin
|
| |
|
|
logicaluk
Posted a lot
Every days a school day round here
Posts: 1,373
|
|
Mar 12, 2024 12:26:44 GMT
|
|
Excellent to see this project under way again, big saloon estates make fantastic family classics.
|
| |
|
|
logicaluk
Posted a lot
Every days a school day round here
Posts: 1,373
|
|
Mar 12, 2024 12:19:41 GMT
|
|
When I first looked I thought Photoshop, but congratulations,that's a monumental step forward.
I'd like (in a completely selfless act) to volunteer to test the Dyno when it's installed.
Dan
|
| |
|
|
logicaluk
Posted a lot
Every days a school day round here
Posts: 1,373
|
|
|
|
I am building a new manual for the speeduino ECU, it's currently running on a raspberry pi attached to my home router, I am a complete novice at this btw. So now I want other people to be able to access, comment and edit this resource. From what I've found the best way is to do that, for free is to store a copy on GitHub but I can't make it work, I've followed the wiki.js guide, docs.requarks.io/storage/git and I can't get it to upload the wiki. Anyone with any knowledge on the please let me know I've been bashing my head against this for days, and can't see a solution. Dan |
| |
Last Edit: Mar 12, 2024 11:08:21 GMT by logicaluk
|
|
logicaluk
Posted a lot
Every days a school day round here
Posts: 1,373
|
|
|
|
And that case is too small, rethink required. The DB2 is almost done I say almost because, I've lost one of the chips for it, it was the first to arrive, and it's gone, so I've ordered another one luckily at £5 It's not too bad, not as bad as the connectors, I was planning on using some plugs I recovered from some scrap parts, like this but 8,10,12 way plugs all i needed was the sockets  Eventually after working out what they were & buying the sockets, I changed my mind, they are screw terminals and I want his to be as reliable as the MS as it will probably be fit and forget I changed my plan. I managed to scrounge up some Deutsch DT connectors,  These things are great, they are fully sealed, completely re-buildable and best of all I could get 3x12 pin plugs ad 2x3 pin plugs for free, (that's my second favourite price BTW) just needed to find some panel mount sockets, I was struggling to find a baro sensor in a quantity of less than 1000, but digi-key had the sockets and the baro sensor lot delivered for £50 job done. Or so I thought, when they turned up though they were just sockets, no pins or retaining bar, so I had to spend another £38 on a box of mixed sizes just to get the pins and retaining bars but at least I have some useful connectors spare now....... |
| |
|
|
logicaluk
Posted a lot
Every days a school day round here
Posts: 1,373
|
|
|
|
And this morning I managed a bit more, (did mention how much I don't enjoy bodywork). The spot weld drill was surprisingly good. 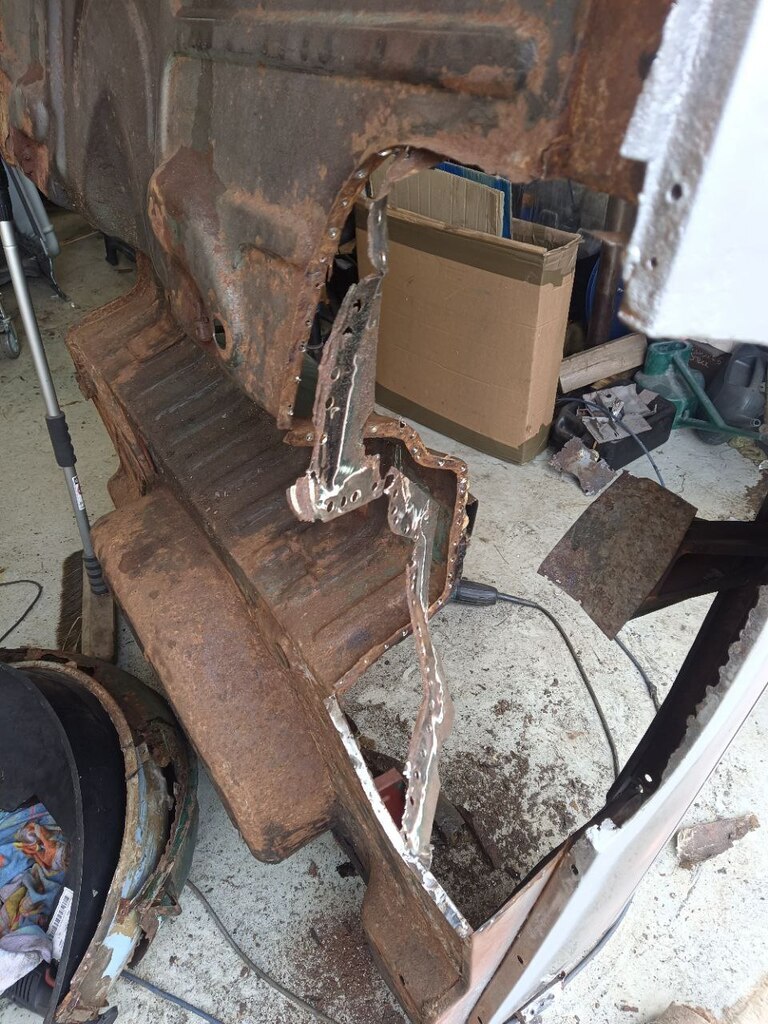 Which I cleaned up, and repaired the worst bits. 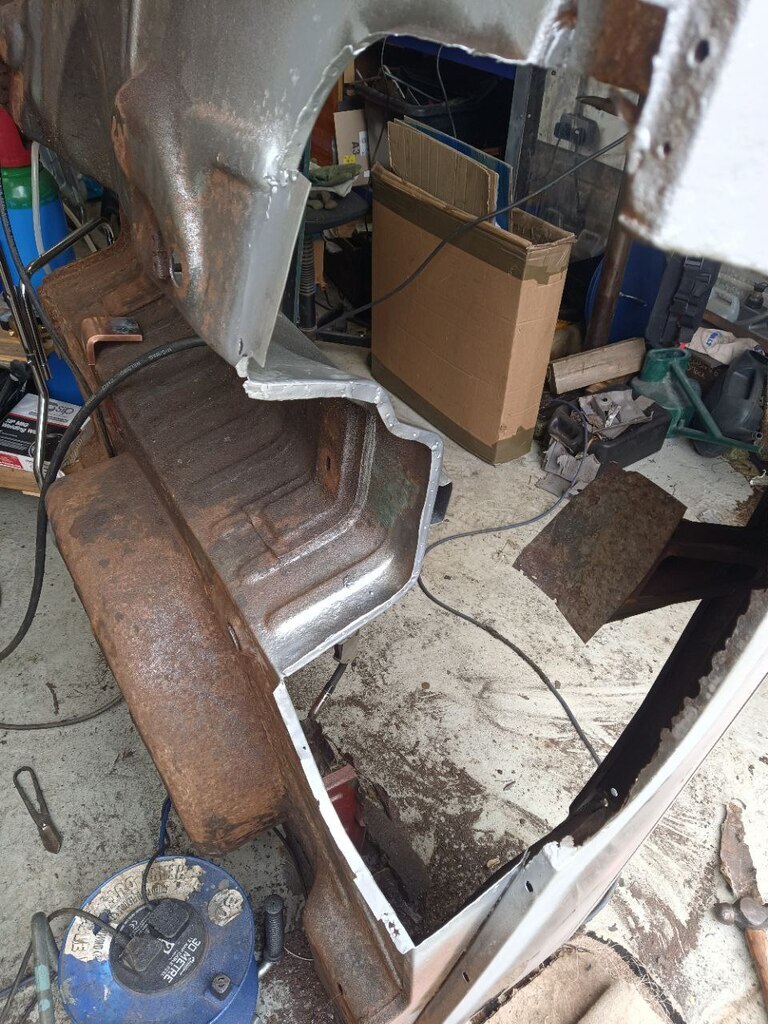 I had been puzzling over some of the holes in the body tub, I thought they might have been for seatbelts, but each point has 2 boltholes, rather than the usual single metric fine thread. 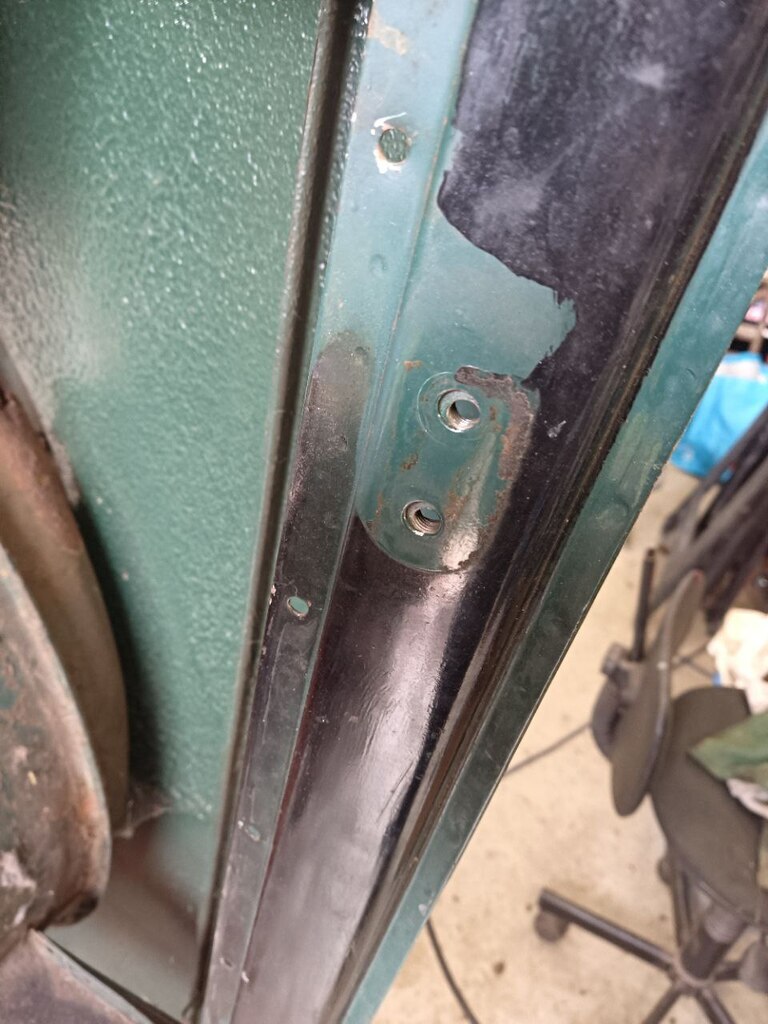 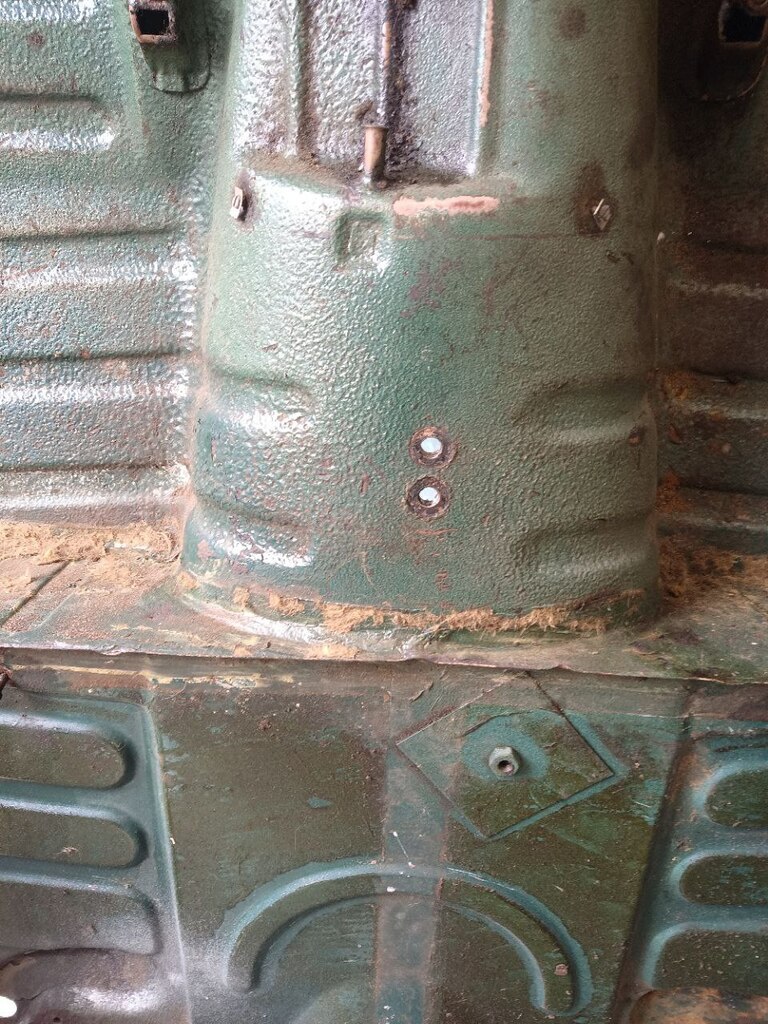 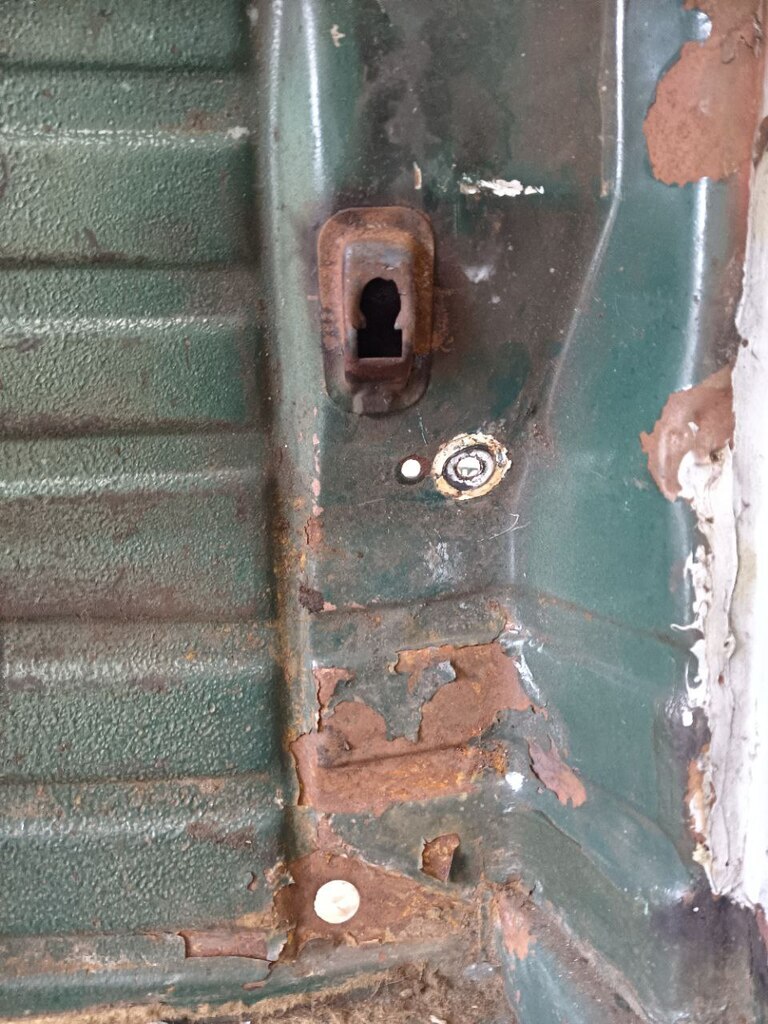 So I had a dig around in my box of seatbelts and found the answer. 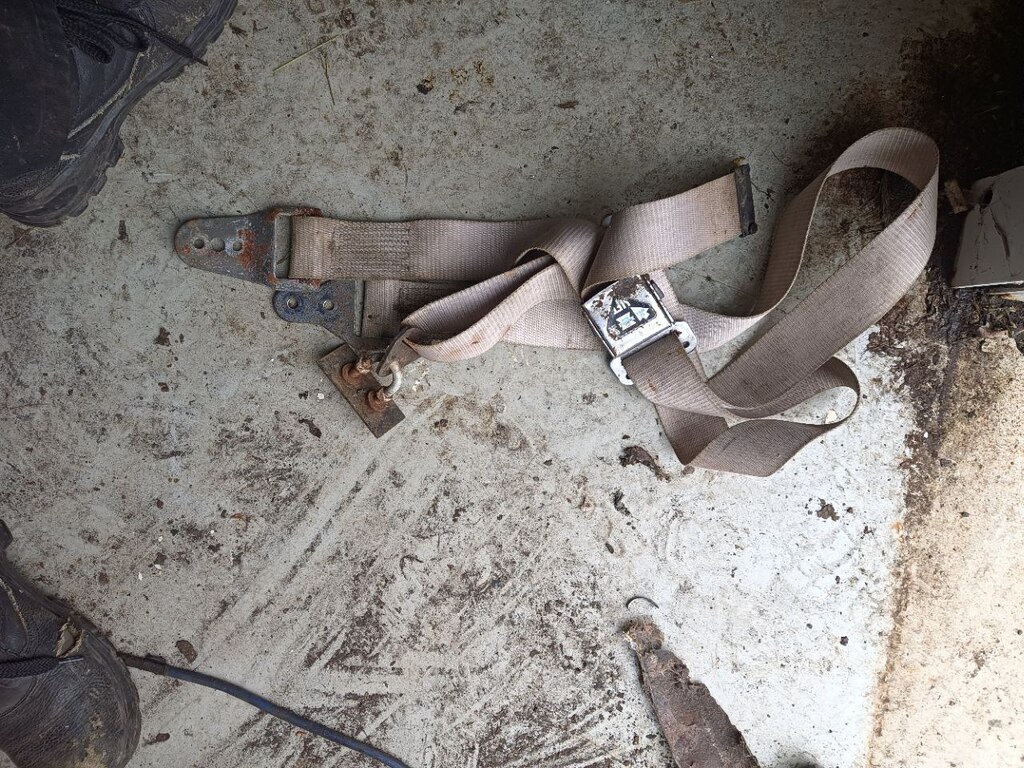 Then I went in and worked on the Speeduino for Frank. Dan |
| |
|
|
logicaluk
Posted a lot
Every days a school day round here
Posts: 1,373
|
|
|
|
I had been requested to help strip down my mate's GT6 so it was duly arranged and Fresh back from a week in Mallorca, I find he's completely forgotten and has done one in the early hours to collect some furniture from god knows where, change of plan. How was the holiday? great, thanks a bit chilly most days, it was mostly 8-12deg but a couple of days it got up to 17  with the view from my bed like that and the view from the bar like this  those warm days were lovely saw a couple of cool cars   But most of them were boring moderns, a new car brand I've never heard of was DR, drautomobiles.com/ apparently rebadged Chinese imports. Anyway, I had drafted in some assistance for working on the GT6, so not wishing to waste the opportunity Barry finished off the Bond bulkhead, which I don't want to use on the estate, as the wiper mounts are in the wrong place for a 65 herald, there also wrong for a 64 Bond, but I don't care so much about the originality of the Bond. Whilst Barry cracked on with that I started on the body tub, I'm sure someone said the wheel arches didn't look too bad, now what's the correct engineering term. 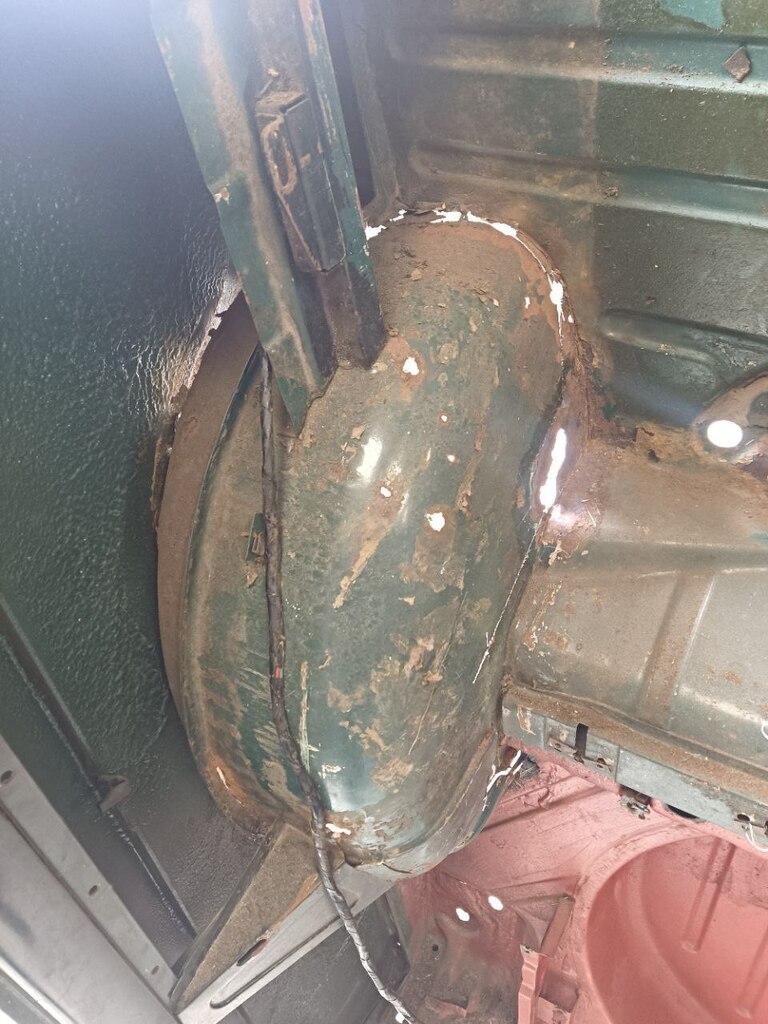 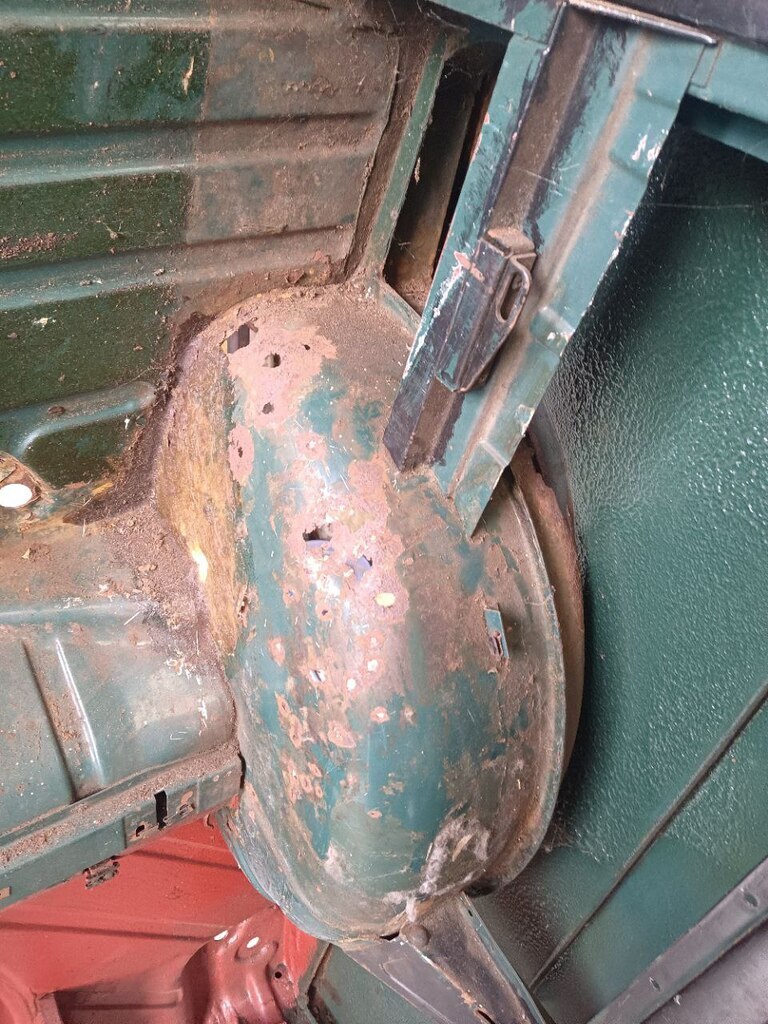 Completely tea bagged, so I set about cutting one out, well most of it. 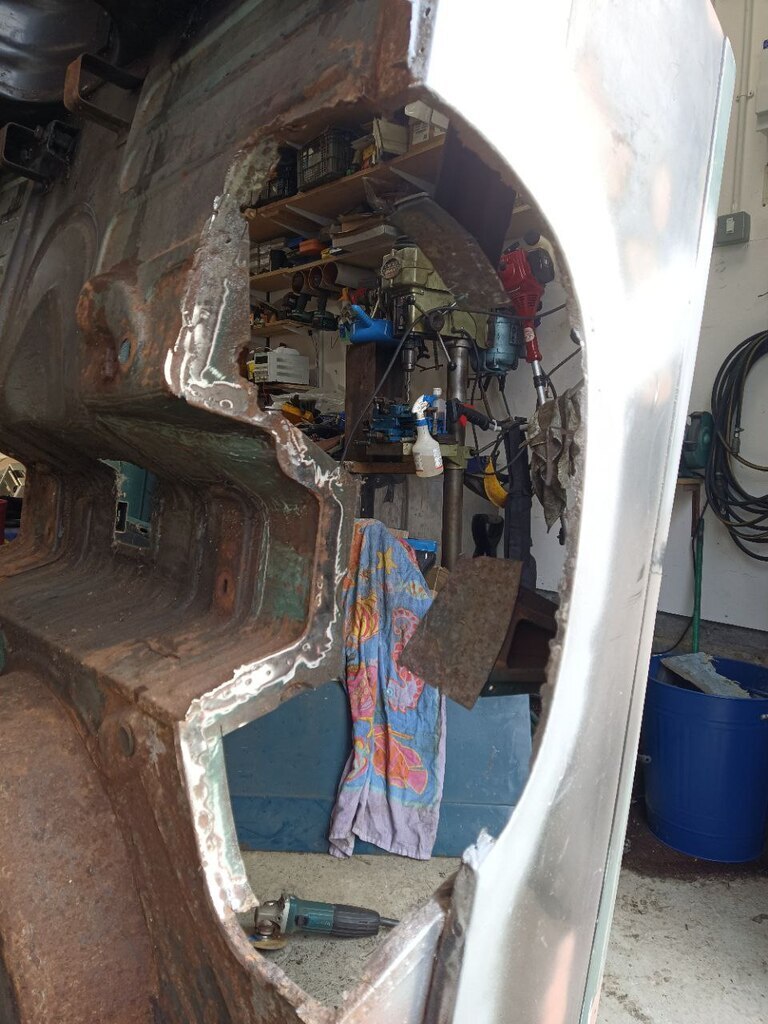 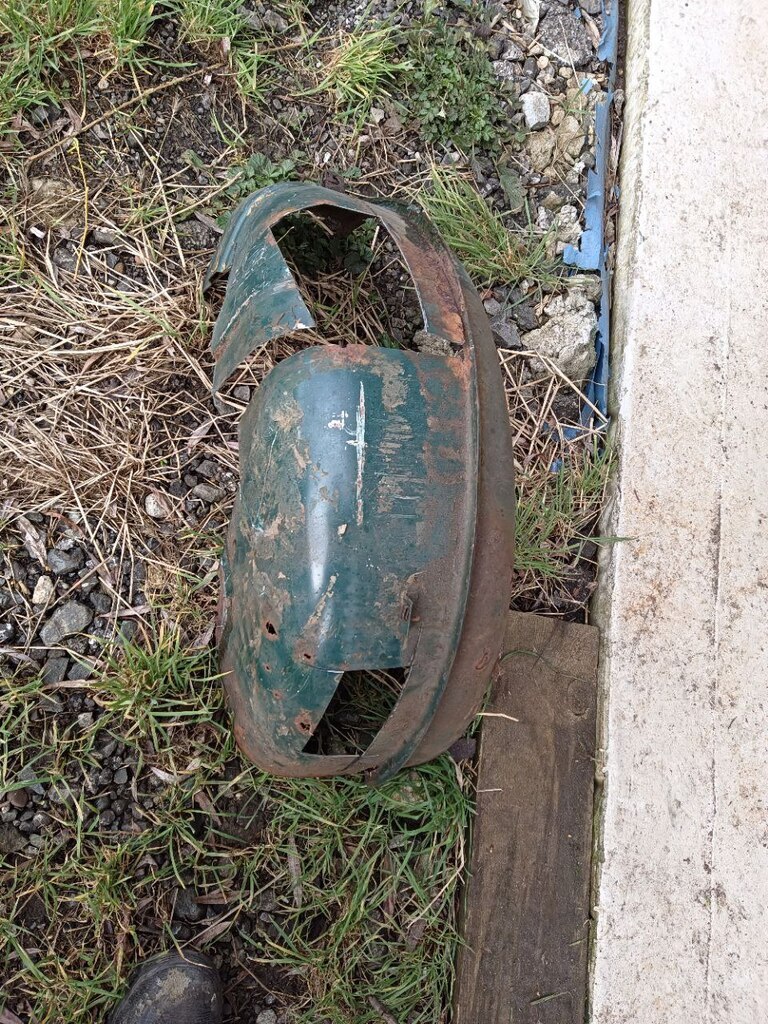 The 2 supports that are left, one is spot welded in the most awkward to get to spot, and the other is braised which I'm sure will cause no end of headaches later. We were both very surprised to see the outer arch is in remarkably good, condition. 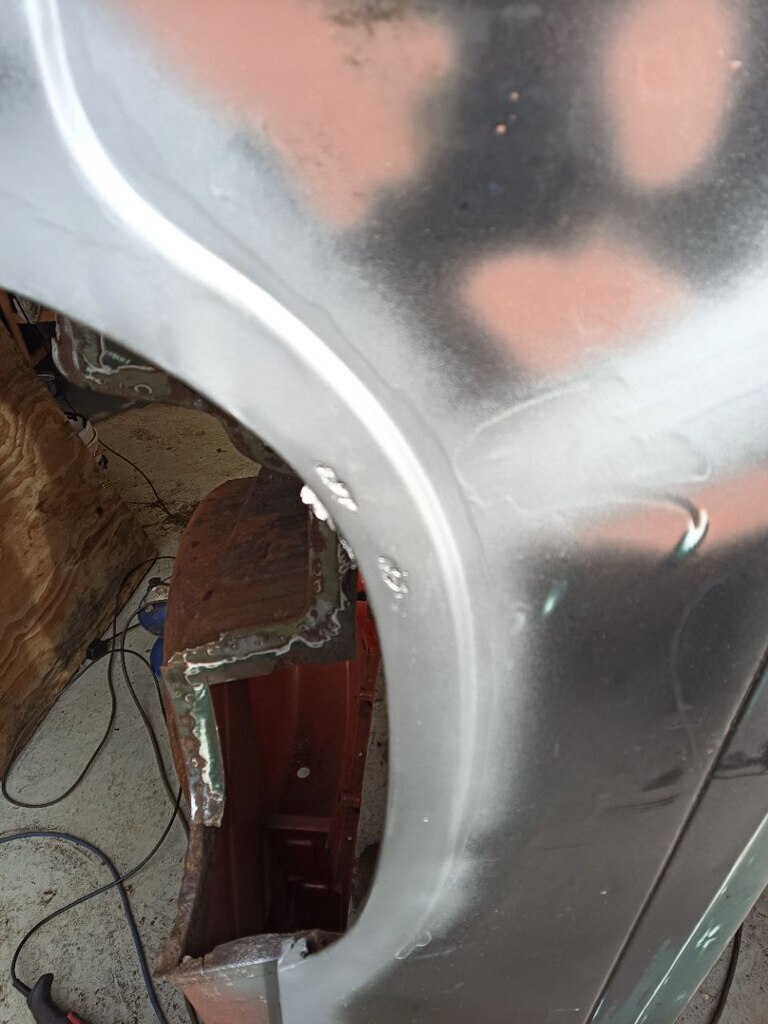 I ordered some spot weld drills from Amazon at 4pm yesterday, and they arrived at 8:30 this morning, so I guess I'm off out to the garage to remove what's left of the inner arches. Dan |
| |
Last Edit: Mar 3, 2024 9:17:34 GMT by logicaluk
|
|
logicaluk
Posted a lot
Every days a school day round here
Posts: 1,373
|
|
|
|
|
Top work sir. I love the filler profile that's a very clever idea.
Dan
|
| |
|
|
logicaluk
Posted a lot
Every days a school day round here
Posts: 1,373
|
|
Feb 25, 2024 14:13:30 GMT
|
|
For years, I've always been given the cheapest steel toe boots available, usually £12 Portwests. I found putting a decent innersole in helped loads, then when I started at my current company, I got a decent pair of Dewalt boots, I still swapped the innersole but what a difference, going from £13 to £50 boots made. They used to get given Dr Martines steel work boots, which apparently were super comfy.
Dan
|
| |
|
|
logicaluk
Posted a lot
Every days a school day round here
Posts: 1,373
|
|
Feb 24, 2024 14:46:57 GMT
|
|
Loving the updates Dez, the garage move must have been painful.
Dan.
|
| |
|
|
logicaluk
Posted a lot
Every days a school day round here
Posts: 1,373
|
|
Feb 24, 2024 14:41:24 GMT
|
Good to have you along for the ride BT, BTW you can re-purpose medium current outputs for injection channels. Between working for a living and trying to build the best Acclaim ever, rebuild the herald estate and ignoring the Bond, I'm also reworking the speeduino manual as it's a bit lacking in the build up area. A small update All the components and the circuit board, have arrived for the DB2, oh how I'm not looking forward to my first attempt at surface mounted components, but I'm not good get around to building it for a week or so, there is plenty of time to worry about it. In the meantime, this turned up 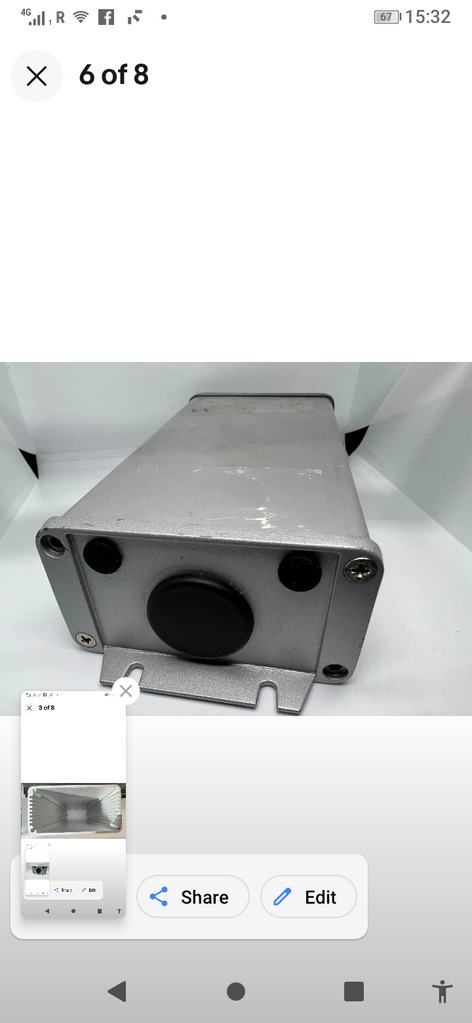 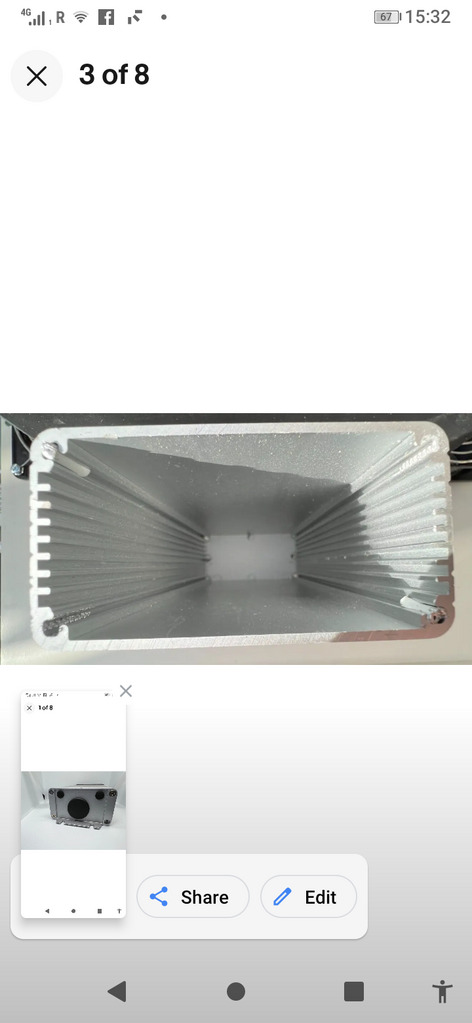 I'd been looking for suitable enclosures for the speeduino and found these on eBay for £6.50 delivered but wasn't sure if it would work. Then the seller offered a quid off and I thought what the hell it'll come in for something eventually, and it looks like it's going to be just to short to fit the way I want it to, luckily the chap has a longer version but I'm going to wait till the connectors turn up before ordering it. |
| |
|
|
logicaluk
Posted a lot
Every days a school day round here
Posts: 1,373
|
|
Feb 20, 2024 22:23:34 GMT
|
very informative. I'm now convinced my soldering skills are not up to it and will buy a ready built ecu for my range rover! Thank you, I know my soldering skills aren't fantastic, but I chose the smallest of the speeduino boards to work on. Any of the other speeduino boards would be better suited to your application. Speeduino dropbear (someone been reading Pratchett) is fully built in a case complete and has 8 fuel 8 ignition channel ECU with canbus it's the most fully featured speeduino and costs $420 + tax and shipping, but I can't seem to find a UK supplier. The UA4C seafox has 4 injection 4ignition built in a case for £288 Inc vat but if the connector is the same as the one on mine I really struggled with them, it could have been me, they may be different. The V3 V4 boards have 4 injection and 4 ignition channels come fully built but will need case a case and comes with a 40 pin I'd type connector for £186 Inc VAT. Hop that is of some use, you have probably look it all up by now anyway. Dan |
| |
|
|
logicaluk
Posted a lot
Every days a school day round here
Posts: 1,373
|
|
Feb 19, 2024 18:38:13 GMT
|
I thought the NO2C board was small 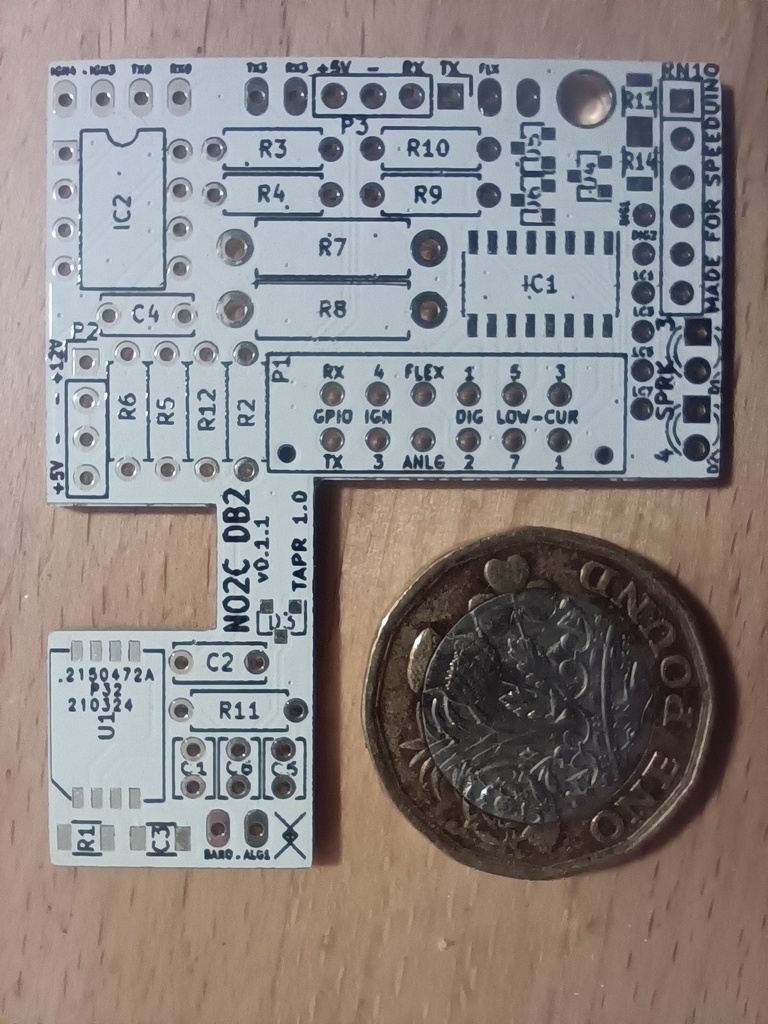 This is not going to be easy. Dan |
| |
|
|
|
|


