drdick
Part of things

Posts: 359
|
|
|
|
Managed to get some time on this a couple of weeks back, spent a lot of time aligning the rear panel, the wings and the bootlid. Not really sure if it's going to work out ok in the end because it doesn't really line up 100%. I think this is a function of a replaced rear wing on one side. Anyway, used a portapak, hammers and anything else I could find to get it into place. This was after repairing a significant amount of brackets and gussets. 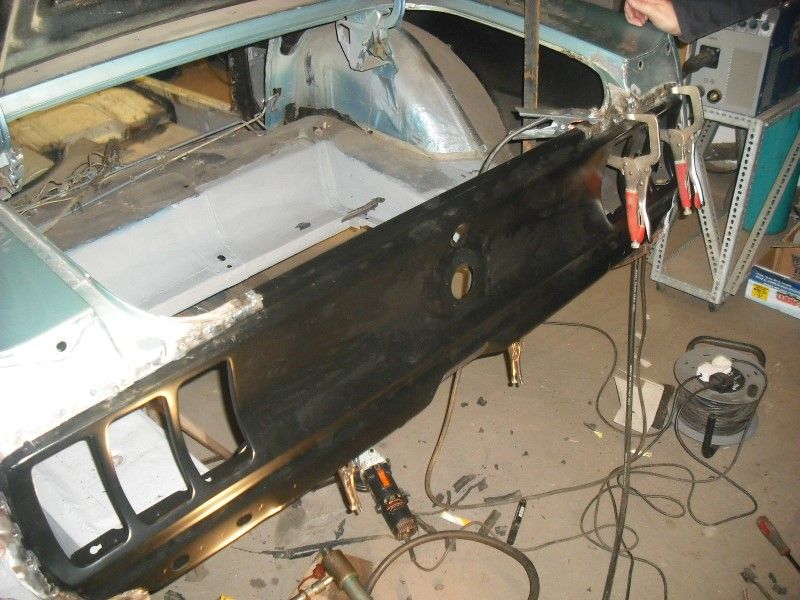 Loads of super-rusty repairs: 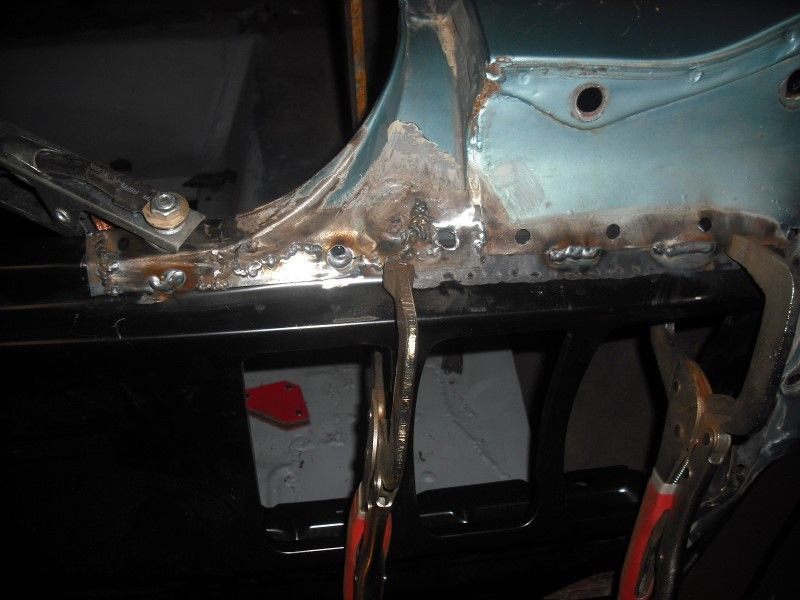 Finally got it all in including the brackets inside the boot that hold the rear bumper: 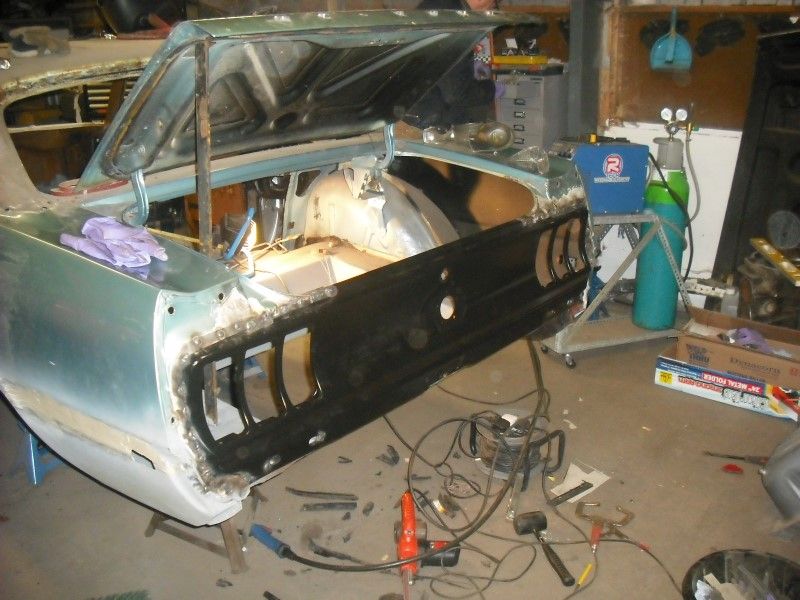 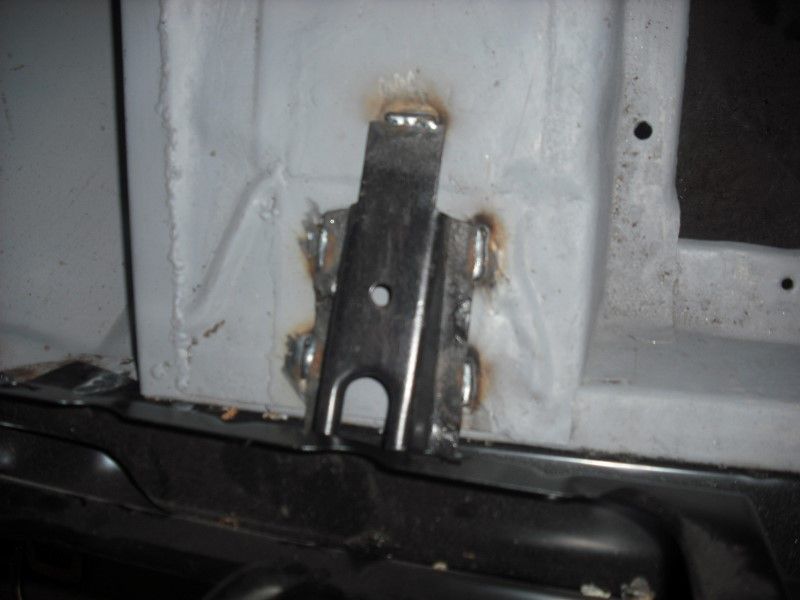 Put on end caps, bumper and bootlid to check it all looks ok: 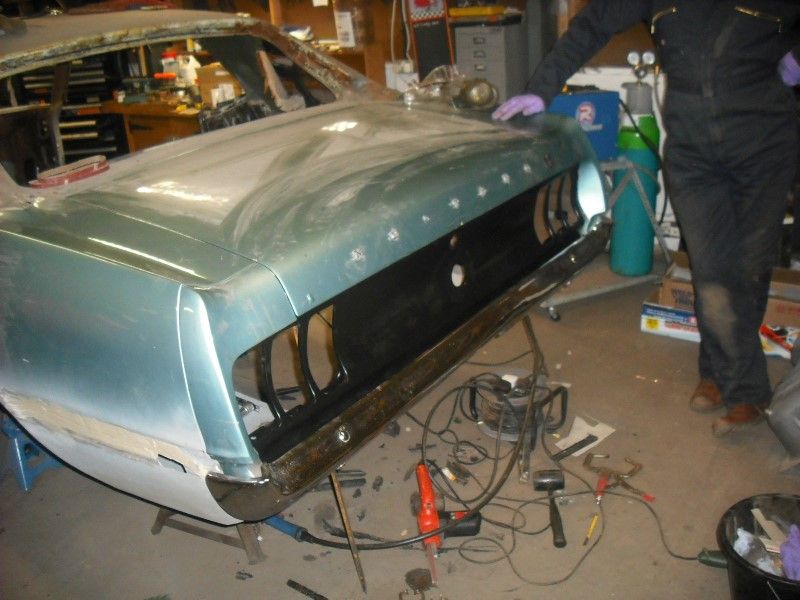 I cannot describe the mangled horror that is under the end cap on the far side of that photo. Nothing lined up so I just whacked it all into place and welded it on figuring that only I and the guy that paints it will know the true depths of the bodgery. On to the inner arches: 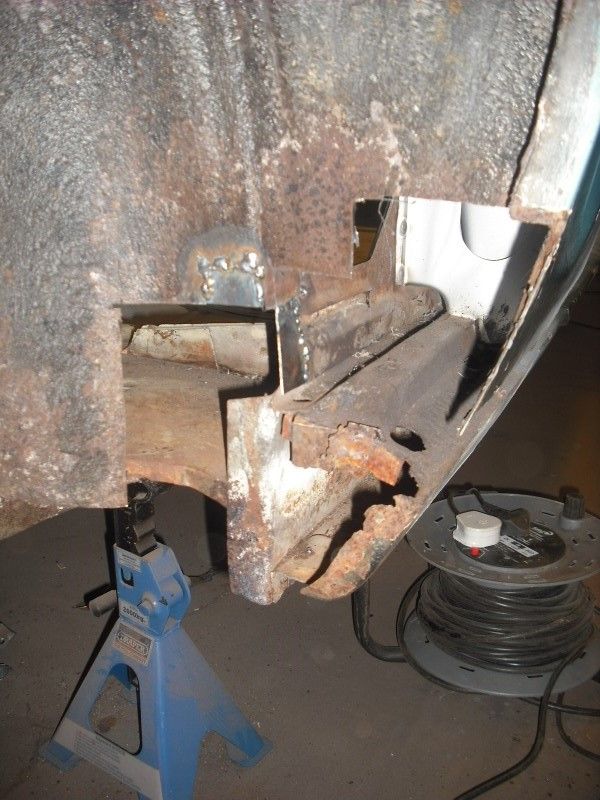  Both sides have been patched so that everything you can see from inside the car is done, that means I can prep and paint the interior. Still got the repairs to the outer parts to do plus this little horror:  The satisfying bit is that this is now the worst part of the car. I hit it with the knotwheel and once the dust settled: 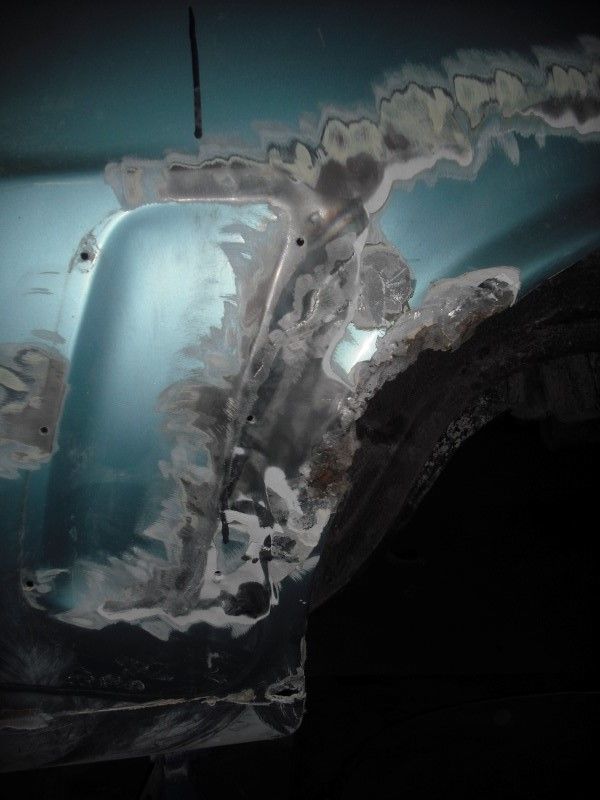 Hmm, pretty bad, should have looked at this before repairing the rear of this panel as a new quarter would have been easiest. So this is where I am welding-wise at the moment. It's where I will remain for a while too as, only hours after I took those photos, we had a little visit from some magic fairies who took all our tools, thanks a lot dirty thieving scum!  Now working on doing a lot of sealing and painting followed by some actual mechanical re-assembly. Hopefully get a bit done this weekend. |
| |
|
|
|
|
drdick
Part of things
Posts: 359
|
|
|
|
Thanks for the comments, I don't really hate it that much, it's just rather never-ending and I'm a very impatient sort of person. You will note that it's very important to leave two sharp bits on the top left and top right of the opening you have created, if you forget to leave these then you'll have nothing to cut your head on when you stand up  Sorry but this really did make me laugh! Looks like you really do have your work cut out with this one The worst thing about this is that I did exactly the same thing when I replaced the tail panel on my last Mustang..... at least you can console yourself with the fact the car you're putting all this effort into is worth a fair whack at the end of it, rather then spending all that time on something thats still only worth 1500 quid when its done. it kinda makes your 'hourly rate' a better figure, if that makes sense. I hadn't really thought of it this way. The prices on these things are getting ludicrous, both here and in the States. I know that recently a 69 Coupe was sold in the UK for what I paid for mine 18 months ago and it was totally rotten, with missing parts and a seized engine. Admittedly I don't know if my engine runs but it turns over which is probably good enough! Another mad weekend of this thing planned in 2 weeks, eBay has furnished me with a new camera battery for 3 quid delivered so maybe more photos next time! |
| |
|
|
drdick
Part of things
Posts: 359
|
|
|
|
Spent a day on the car, feels like I am getting nowhere really, every time I prod or scrap something I find either filler, braze or thick black goop under which there is always a rusty hole My camera is also knackered or at least the battery is, 10 minutes in the cold and it won't hold it's charge so I have out of focus HTC shots for you today. Cut all the brackets and things from the rear so that they can be recycled. These hold on the boot lock and bumper. 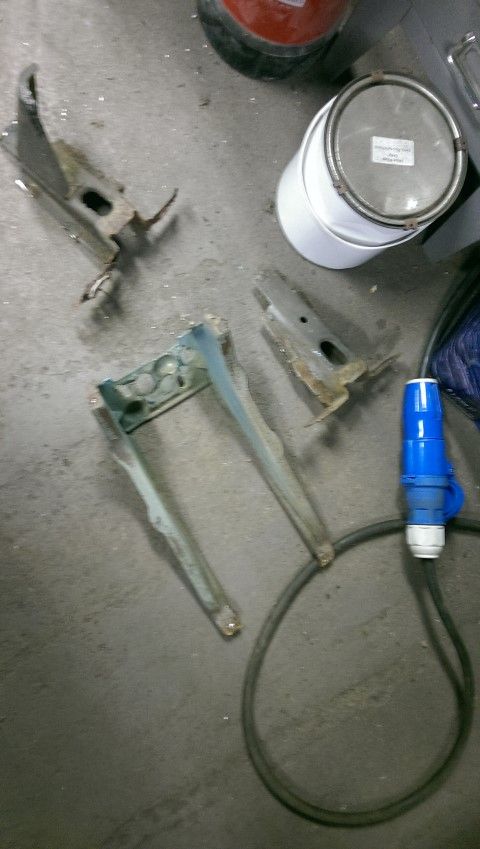 Then go ape curse word and chop everything out. You will note that it's very important to leave two sharp bits on the top left and top right of the opening you have created, if you forget to leave these then you'll have nothing to cut your head on when you stand up 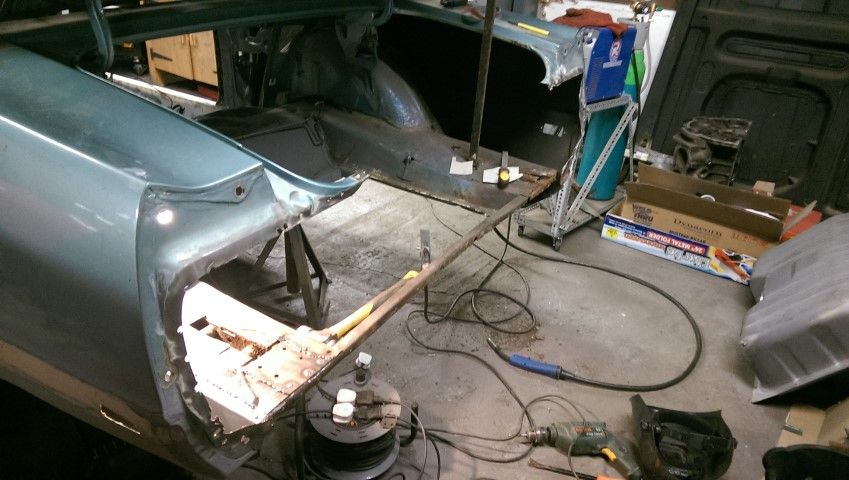 There is of course rust under the rear bumper brackets. On the drivers side I found most of the rust after I'd already cut and made a patch for what I initially thought was the rusty bit....  At the top of the bit I've cut out there should be a recessed drain hole of some sort. I was going to just forget about it but Hairymel was determined to have a bash at making a replacement using a hole saw, some sockets and a big hammer. I left him to it because I was hungry but when I returned the next day...... 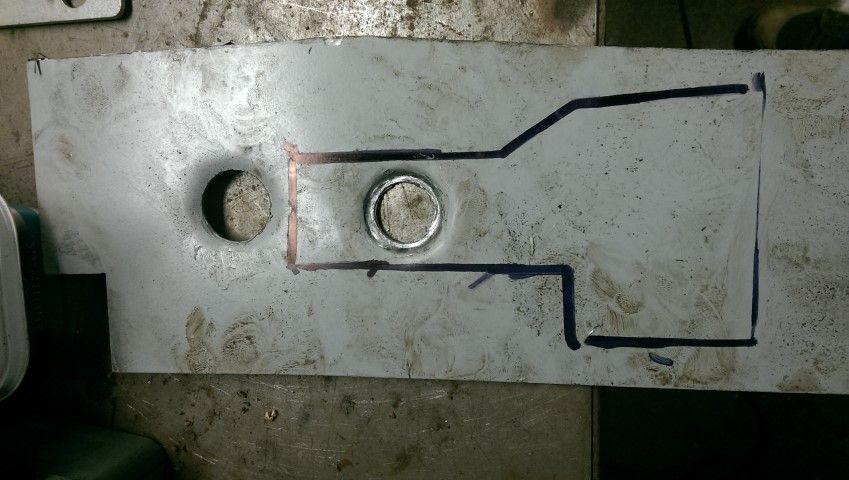 I guess the left hand hole was practice  Since the Hairy one had so kindly made this it would have been downright rude not to use it... 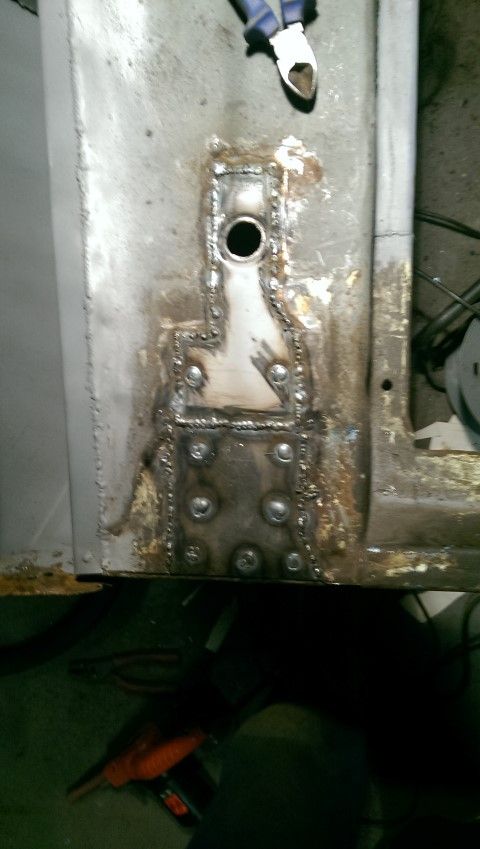 The other side is equally grotty, although for some reason the hole on this side does not have a recess... 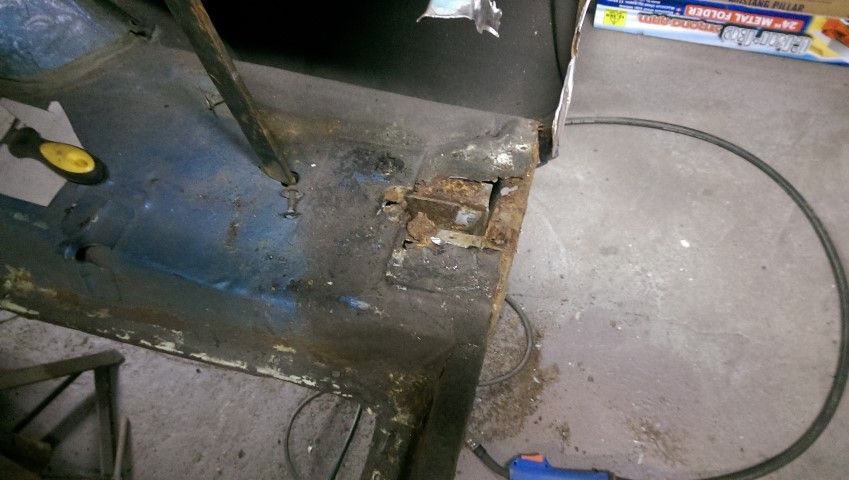 Once again, chop out the rust, patch it (including the bit that drops vertically for the tail panel to attach to) and then scrap all the goop away ready for a slap of primer. 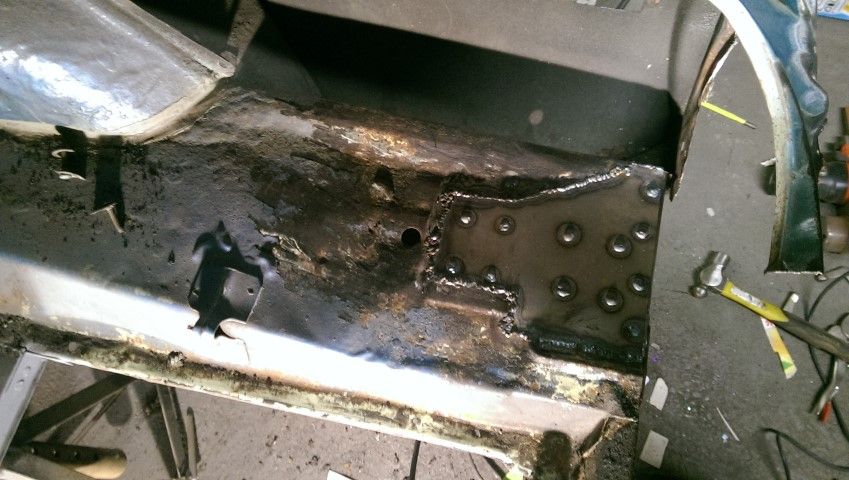 The sharp-eyed will notice that there is a rusty bit to the left of the drain hole. This is when I really started to get miffed with the whole thing. I know I should have scraped all the goop before making a patch, that's what makes it annoying as hell. I chopped it out and patched it of course. I did manage quite a bit more but I didn't take any photos of course. I've straightened the rear cross member with one lucky blow of a rubber mallet (clearly the car has been shunted from the rear before, that's why it's 90% filler). I've done a trial fit of the boot lid and tail panel. Once I had used a mini portapak thing to push one of the rear wings into place it all seems to fit nicely. Had to whip it all out again to drill holes for welding etc but hoping to get that in next time I go up there. I might try and buy a new battery for my camera as well, very annoying taking it there and finding it won't hold it's charge! |
| |
Last Edit: Mar 3, 2015 8:47:54 GMT by drdick
|
|
drdick
Part of things
Posts: 359
|
|
|
|
I was a bit confused when i realised i didn't know what was fashionable in trousers these days - i think i have reached that age  Very tight around the leg, low waist and possible turn ups. I do live near Shoreditch mind, so may be suffering from hipster influence |
| |
|
|
drdick
Part of things
Posts: 359
|
|
|
|
Quick update - got a little time yesterday on the car. Managed to finish repairing the inner part of the cowl: 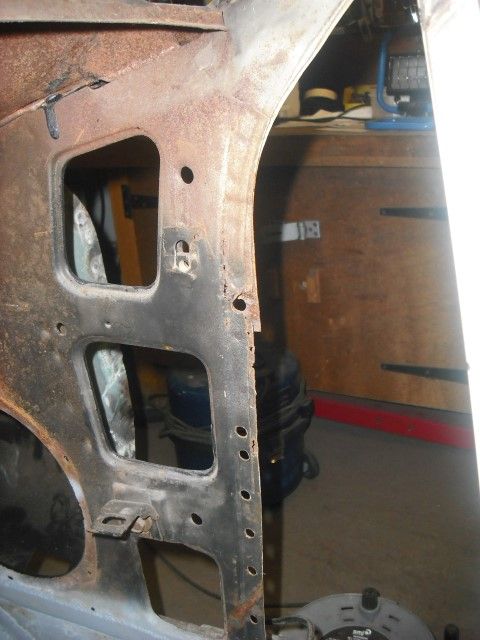 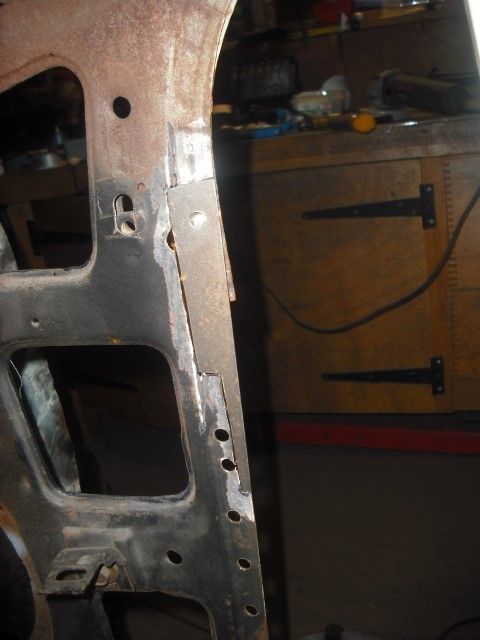 Then I trimmed and cleaned up enough to get the a pillar in: 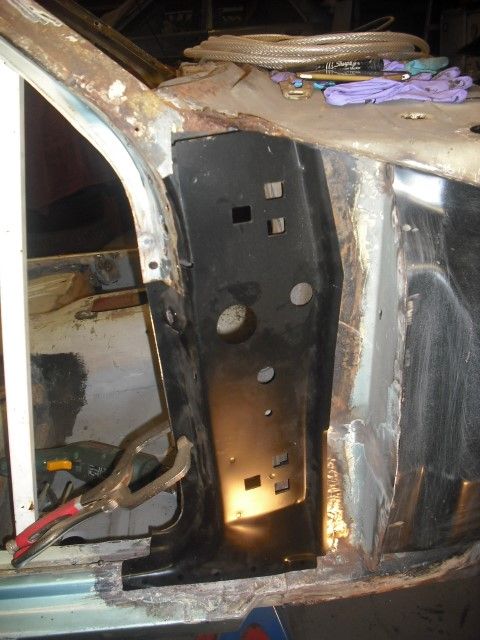 Looked good so I attached it with hot metal:  Spent a long time sorting out where the bracket that holds the back of the wing goes as well as closing off all the little gaps. Forgot to take pictures of that though so here's what it looked like at the end: 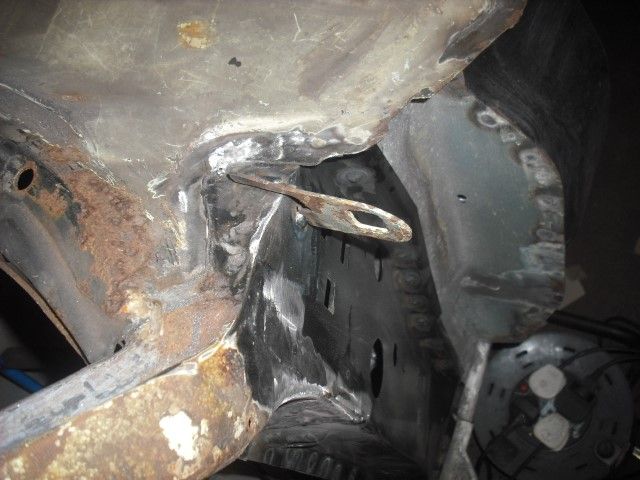 I then removed the piece of bracing box section so I am calling that bit finished. Did a lot of grinding and powerfiling. My extensive research of eBay powerfile belts leads me to believe that, even though they are a bit loose, the Silverline ones are best. My latest batch of German brand ones are exactly the right size but wear out in seconds. Finally, started to remove the tail panel. Surprise, surprise it's full of filler and braze so glad I am cutting it off. 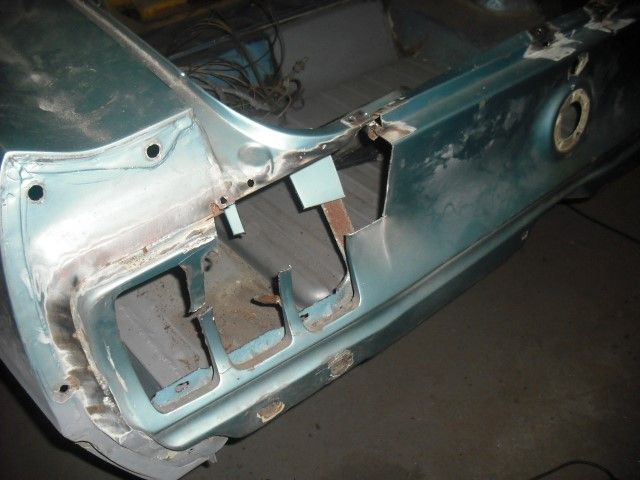 That's it till next weekend, some reasonable progress again. Day only marred by someone hitting my Merc on the M11. No serious damage but no witnesses either so there goes my no claims |
| |
|
|
drdick
Part of things
Posts: 359
|
|
|
|
|
Just got the Metz one from eBay and it seems to work well although i have nothing to compare with. The real advantage is that if you are patient you can win an auction one for about 80 quid.
|
| |
|
|
drdick
Part of things
Posts: 359
|
|
|
|
Oh good nothing like a deadline to focus the mind _ same deadline for me RRG15 although painting might have to take a back seat Yeah, I suppose I could not paint it depending on the progress but can I be bothered to put it together, go to the Gathering and then pull it apart again for paint?? |
| |
|
|
drdick
Part of things
Posts: 359
|
|
|
|
So after nearly a week of throbbing agony I finally took my smashed finger to hospital where they punched a hole in the nail to release the pressure, felt good Then the nail fell off, so now it just looks gross. I have managed to do some stuff on the car, been very careful with the hammers though! I discovered that rust converter really hates the cold, when I got back to the car it was all curse word brown rather than nice rust-converted black. I ignored that and carried on with the reconstruction of the frilly bits. Inner panel reattached to sill: 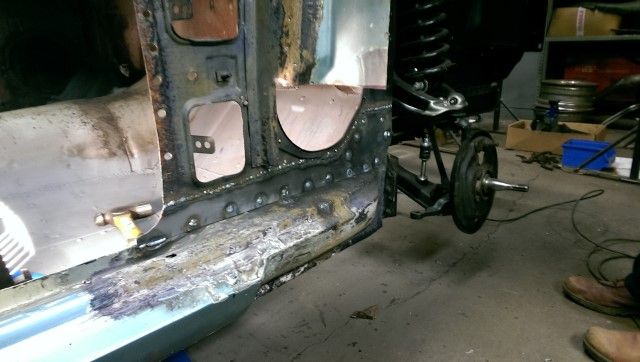 Remainder of a-pillar "bit" rebuilt: 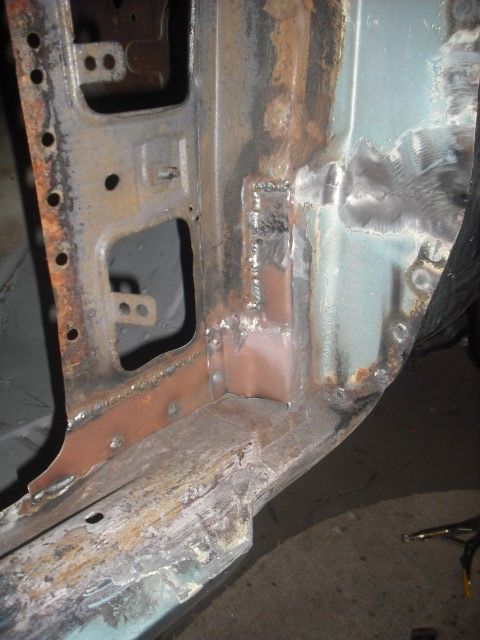 Outer cowl panel kidney bowl shaped doodah replaced: 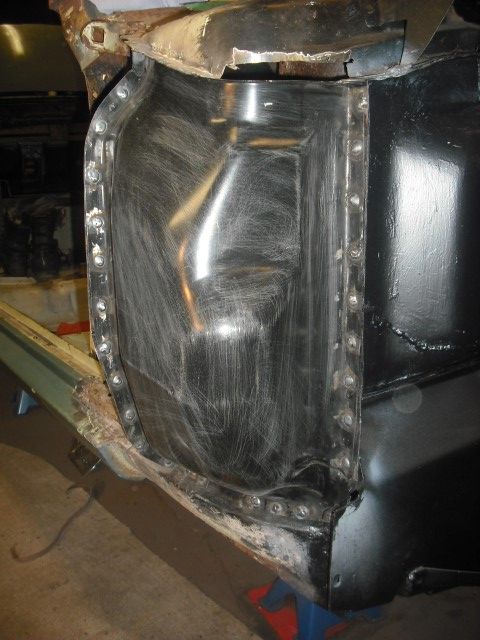 That just leaves this little section to close off.  I have bought myself a Clarke sheet metal bender that goes in your vice and an EBay Metz shrinker/stretcher. This seemed like a perfect chance to try them out so after making a bracket to mount the shrinker/stretcher in my vice I cut a roughly correct size piece, folded it into an "L" and then tried the stretcher: 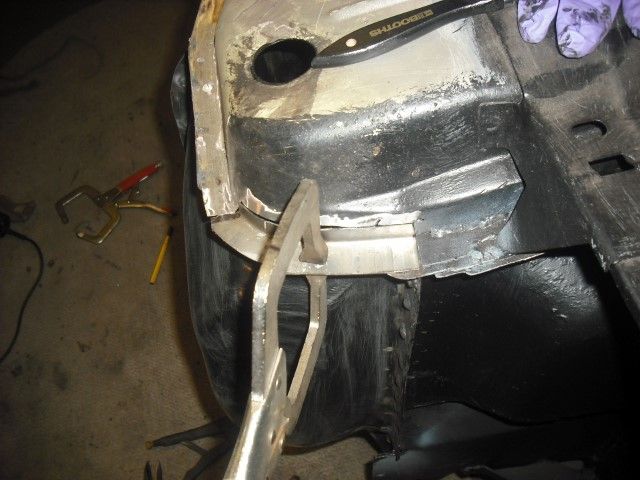 Success! This was surprisingly easy to get right, just keep cranking the handle and offering the piece up to the car until it fits. So I welded it in: 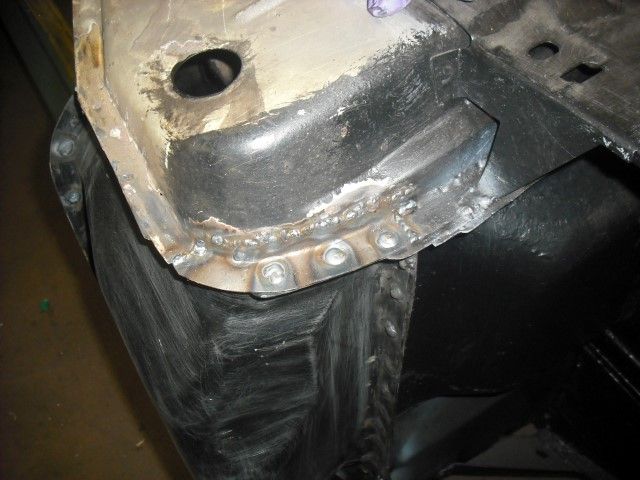 And that was as far as I got for now. I'm aiming for the Gathering (this year......  ) but that will depend on how quickly the guy I want to use can get it painted, how much time I can get off work/clear with SWMBO and whether the motor is any good. It isn't seized which is normally good enough for Yank V8s. I've also been thinking about how far I have got. I bought 21 repair panels for this car including two door skins that someone else fit for me. Of the remaining 19, 1 is the rear valence which bolts on, 1 is still in transit from Florida and 2 are sitting in the car. That means I have fitted 14 of them which isn't too bad. Most of what is left welding wise is stuff I will need to fabricate myself but that is just a time thing. If I could get the welding done by end of April then I reckon it's possible. |
| |
|
|
drdick
Part of things
Posts: 359
|
|
|
|
|
Down with this sort of thing......
|
| |
|
|
drdick
Part of things
Posts: 359
|
|
|
|
When I saw the thread title I had to check I wasn't browsing one of my other specialist forums.... My Mercs all leather inside, looks nice, smells nice. I don't really think there is a decent alternative for cars. I hate leather sofas though, cold, slidy, you just can't get a good slouch going on imo. (Cow) leather is a waste product from the meat industry so until the vast majority go veggie then there will always be loads of it about. Personally, I'm with Mercdan up there, I'll eat any meat, mostly because I'm an apex predator and have evolved to do so. Denying yourself yummy meat makes Darwin cry or something |
| |
|
|
|
|
drdick
Part of things
Posts: 359
|
|
|
|
I need some advice on how others have approached this repair. I have about one and a half inner wings, inherited from Martin as he got a good pair in Florida last year. So I suspect I will need to cut some pieces out of the donors and make them fit (hopefully) Is it going to be possible to harvest sections for the tips that narrow down, from hogher up the fenders?  Drill spot welds, carefully slice through upper surface with small grinder, peel off upper layer like opening a sardine can. That will hopefully leave you with a relatively undamaged lower panel. I'd use some cardboard etc to make a patch from a piece of fresh steel but if you can find the right shape in your donor then that's worth a go. |
| |
|
|
drdick
Part of things
Posts: 359
|
|
|
|
Still hugely avoiding the windscreen frame and still have no gas so limited possibilities for work. I borrowed a squirt of gas from another unit dweller in order to finish this: 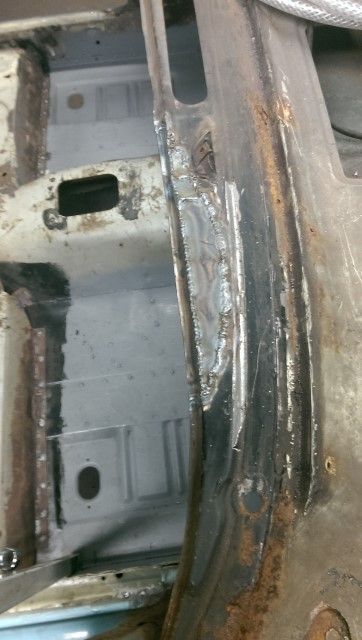 Still got to grind it down but I'm calling that done. Then I recycled my bit of bracing and gave the gas bottle back.... 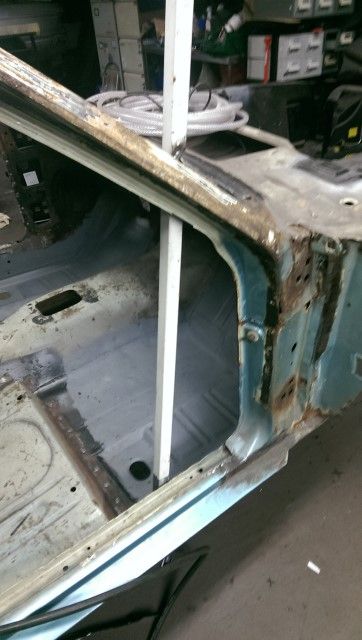 which just left the fun of chopping a lot of stuff out. Going, 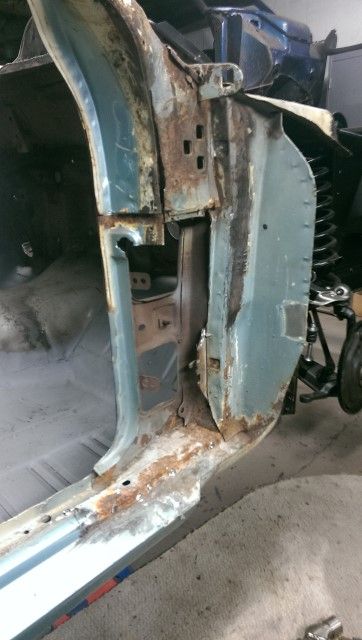 going, 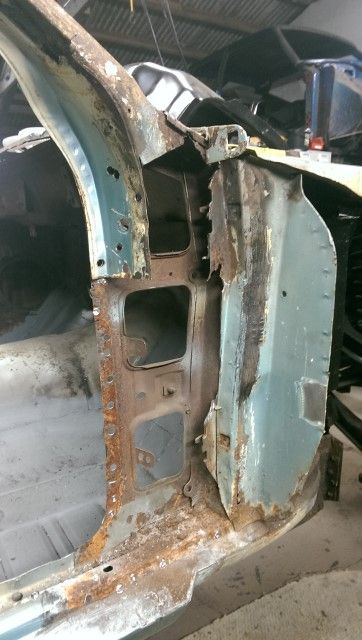 gone  The bottom of the inner panel was rusty so that's been removed and in order to properly repair the lower portion of the panel that sticks out I decided it was easiest to cut that off as well. I'll repair the inner, then reattach the sticky out bit before putting in the new a pillar. Slapped some rust converter about.... 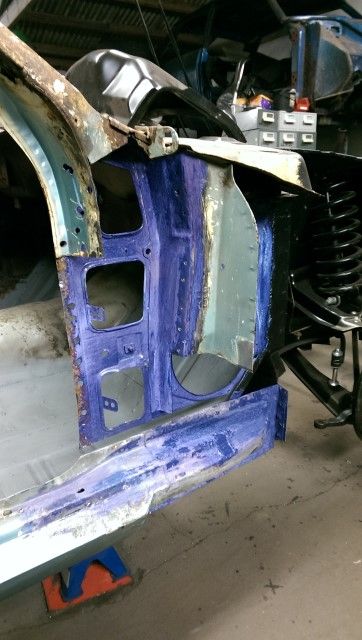 will crack on when I a) get some welding gas and b) the finger I smashed with a hammer repairs itself.... |
| |
|
|
drdick
Part of things
Posts: 359
|
|
Dec 30, 2014 10:03:57 GMT
|
you are probably best off putting it back when youre done rather than using filler though, as the reason they use it is that s ahigh stress/flex area, and it wont crack out like filler. Putting it back in sounds outside of my skill zone. When it comes to it, is that something you are familiar with? I can feel me crossing your palm with silver. |
| |
|
|
drdick
Part of things
Posts: 359
|
|
Dec 27, 2014 22:24:15 GMT
|
if its 'lead loaded' near to where you are welding, on the old sunbeam i removed the lead with a wire wheel in a drill - just like the ones you threw all over my bench last week  . if you want to borrow another i am sure there are still some on the floor  all looking good mate  I already tried that with the wheel you gave me ages ago, its too thick for it to really get rid of it. Its not really a little bit of lead, its a deep join where 2 or 3 panels meet. Gonna try the blowtorch mainly because it involves fire which must be good right?  ? |
| |
|
|
drdick
Part of things
Posts: 359
|
|
Dec 27, 2014 22:18:39 GMT
|
only way you will sort it out properly is to sweat all the lead out as you say. just be prepared for a LOT more than you expect to come out... is it an original seam or a repair/bodge over thin or perforated metal? Now that is weird because the one person on retrorides that I thought would know the answer to this is you Dez. Its the original seam, they put lead at the tops of each corner (of the roof) as far as I know. I assume cleaning all the paint off and then hitting it with a blowtorch will do the job? Do I need to encourage the molten lead out with an airline or something? I assume as long as I don't eat the lead this is fairly safe? |
| |
|
|
drdick
Part of things
Posts: 359
|
|
Dec 27, 2014 21:27:26 GMT
|
Keep telling me I'm doing well, I'm sick of welding at the moment so it keeps me going Christmas eve I spent the afternoon on the car prior to a Hairymel organised curry. I really didn't have a clue how to go about the a pillar so I procrastinated to the max by grinding down all the welds on the b pillars and slapping some etch primer over it. 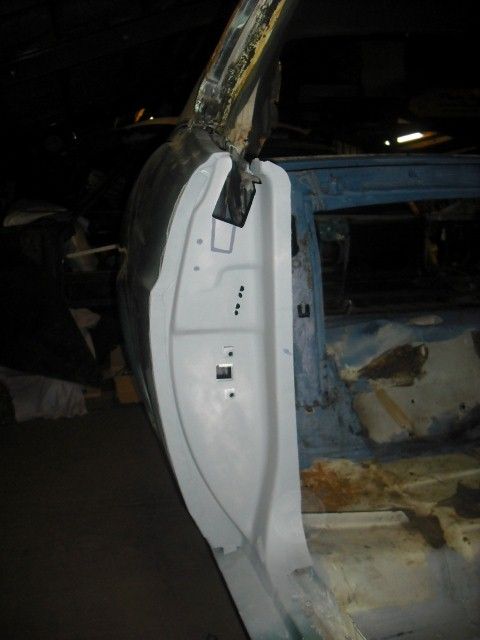 That didn't waste enough time so I had to find something else to do. Some may remember that the car came with a really dodgy looking LPG conversion which I got rid of. The enormous tank for that was squeezed into the boot (and not secured down in any way). In order to get it in there the "installer" had cut, bent and generally mangled the panel behind the rear seat i.e. the tank went into the boot through the car. Anyway, I straightened out the parcel shelf and all that, welded up the splits and threw Vactan at it all. 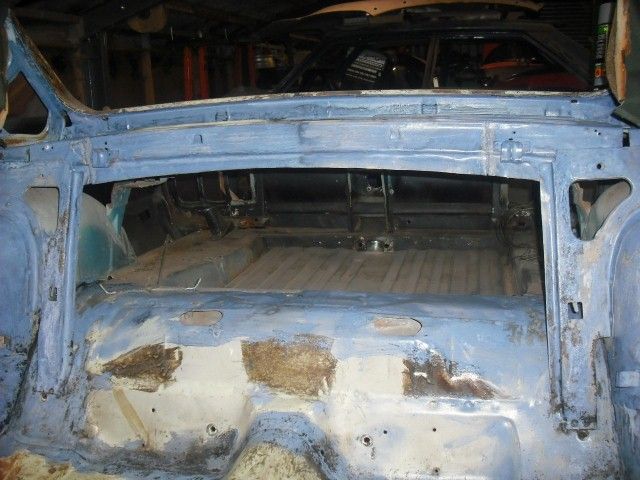 So that just needs some paint over it at a later date. Finally, I bit the bullet and started chopping the a pillar. 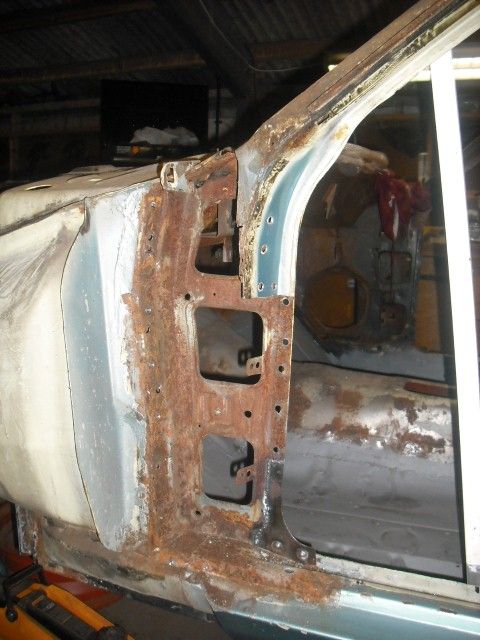 Once I got into it, it wasn't as bad as I thought. I had to patch up some of the inner panel, so out came the cardboard... 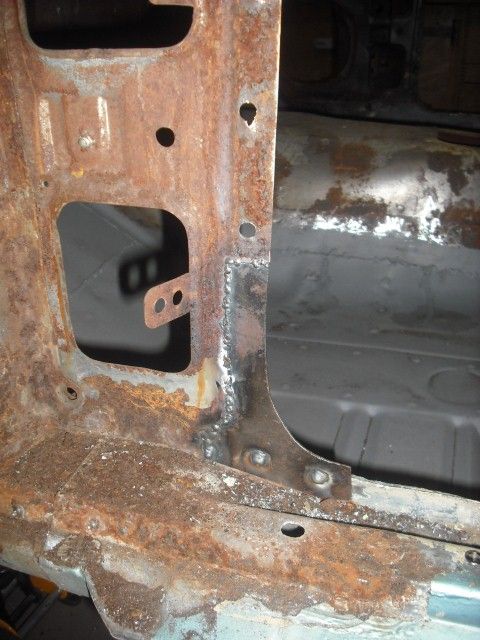 Then I had to have a day off for some reason or other. Managed to escape for the majority of Boxing Day where I continued with the a pillar. Another patch, or at least the hole I cut out and then never photographed again..... 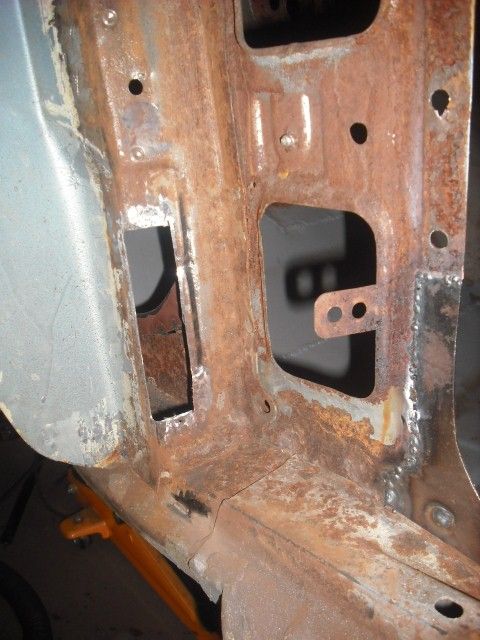 I did a little trial fit of the a pillar panel.  Seems to fit so no need to apply any more thought to that.... 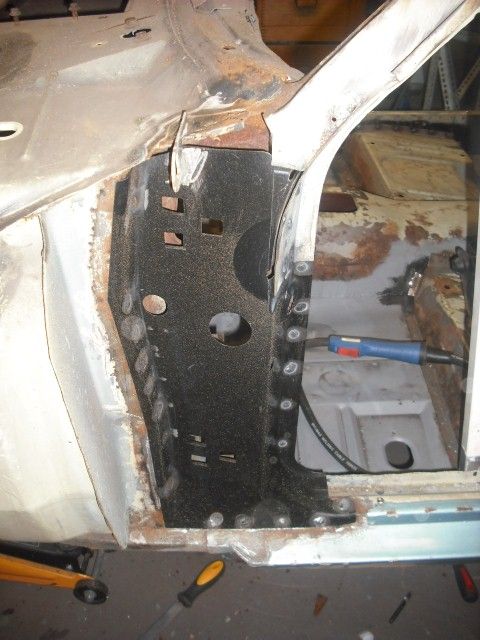 So all that is left is to repair the rust at the top and close up the gaps where the windscreen frame comes down: 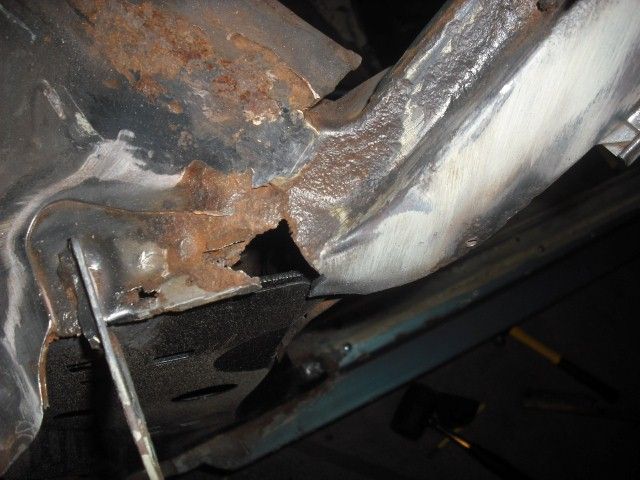 Loads of little patches later...... 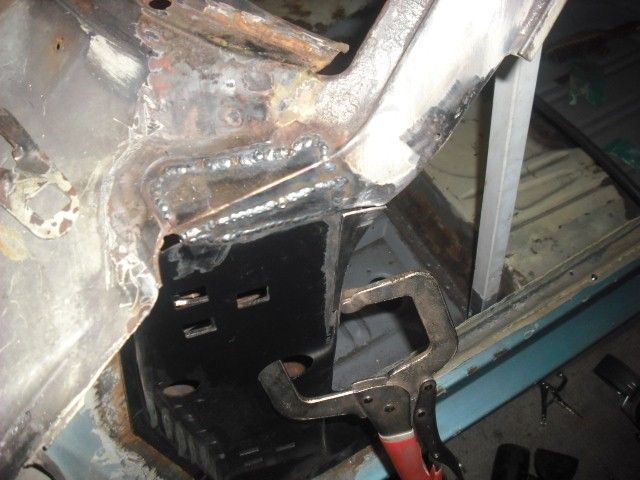  This morning, after changing the oil on my Merc I got back onto it. Did some grinding and reattaching of the bracket that holds the fender on. I measured where this went before cutting it off but then forgot about that and stuck it back on where it looked right, I'm sure that will work 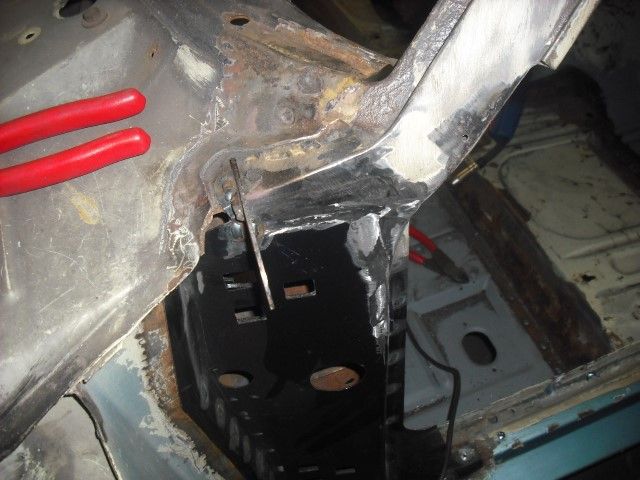 I'm on a roll now so better attack the windscreen frame: 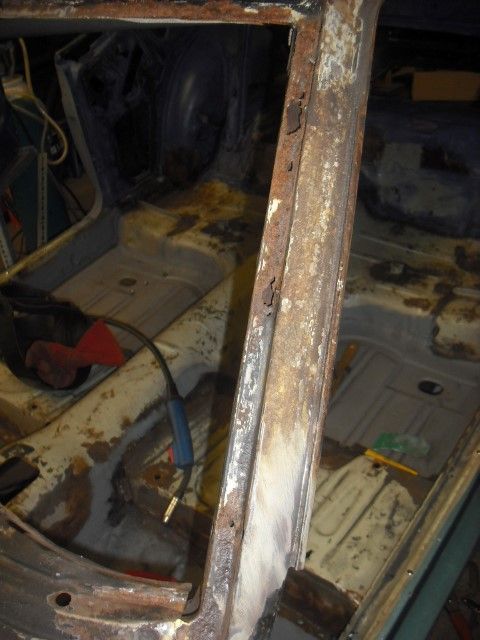 This is pretty rotten all the way up but I decided to attack it in sections. First bit: 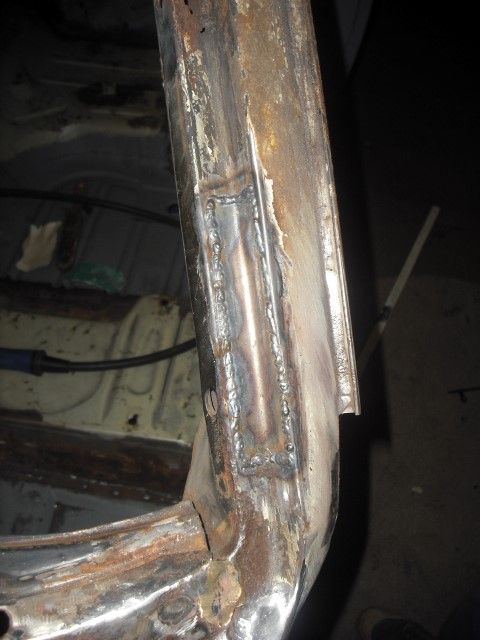 Second bit: 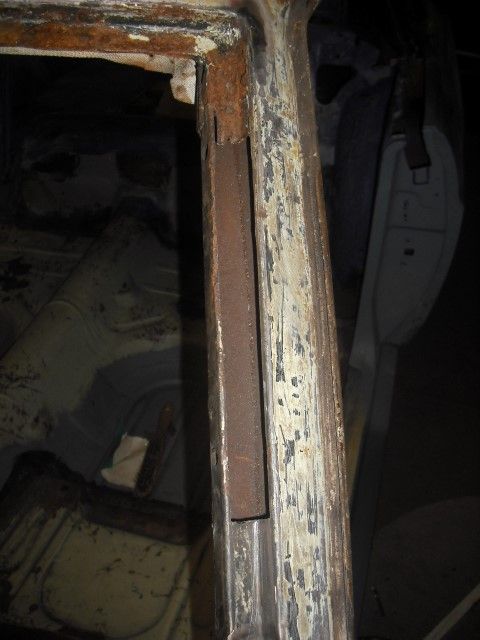 Then I hit a major snag. At the top of that opening I have cut the seam is full of lead. I found that out when I welded up a pinhole and molten lead started running down the side of the frame. I am not sure what to do about this, I can't weld the patch to lead, anyone got any ideas? All I can think of right now is to get rid of the lead with a blowtorch prior to finishing the repairs. I don't know if this is a good idea or dangerous or what. Since I'd come up against a problem and had only an hour left I thought I would repair the dash panel. 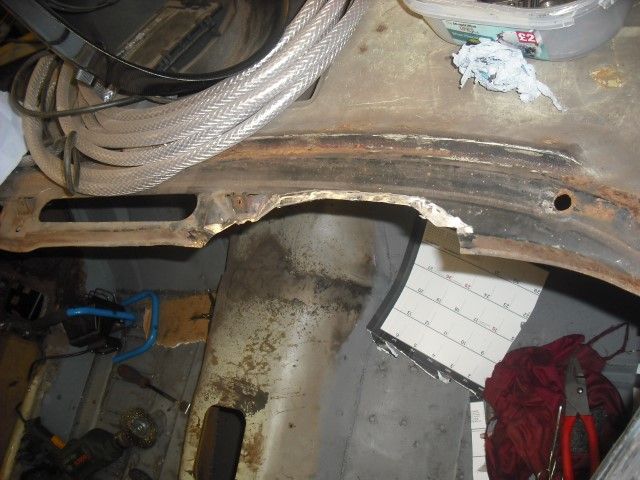 I genuinely think some muppet had cut this in order to make space to extract the heater box from under the dash without removing the lower part of it. This is bodgery of the highest order so I have to repair it, I have also cut my head on this sharp item whilst I was doing the floors so fixing it seemed like a good idea. This is as far as I got: 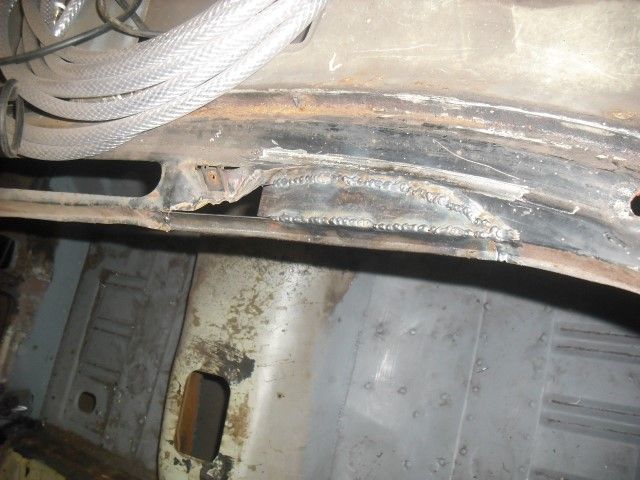 And then I cleared up and went home! I also happened to run out of welding gas so definitely the right time to stop. Plan for next time is to finish the dash, fret about the leaded windscreen frame and then crack on with the passenger side a pillar. Not sure when that will be but hopefully soon! |
| |
Last Edit: Dec 27, 2014 21:30:40 GMT by drdick
|
|
drdick
Part of things
Posts: 359
|
|
Dec 24, 2014 12:17:46 GMT
|
Christmas is a time for family right? My missus is in France with hers and my family are odd so it must be car time! I decided to not worry about trial fitting the door for b pillar alignment. It tucks inside the rear quarter and I haven't moved that so I convinced myself there is only one position it can be welded in. So I went for it..... 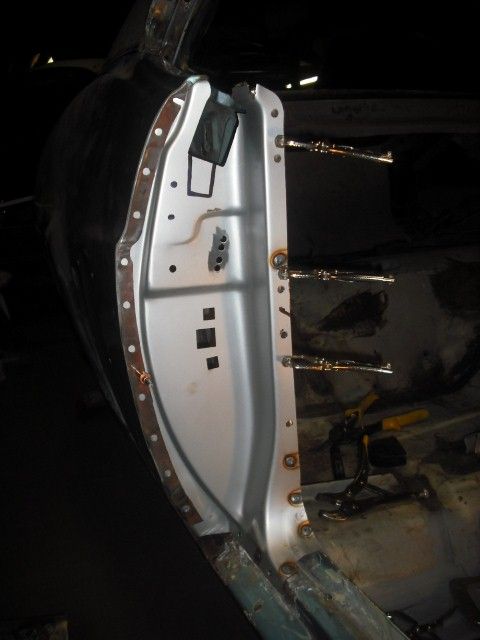 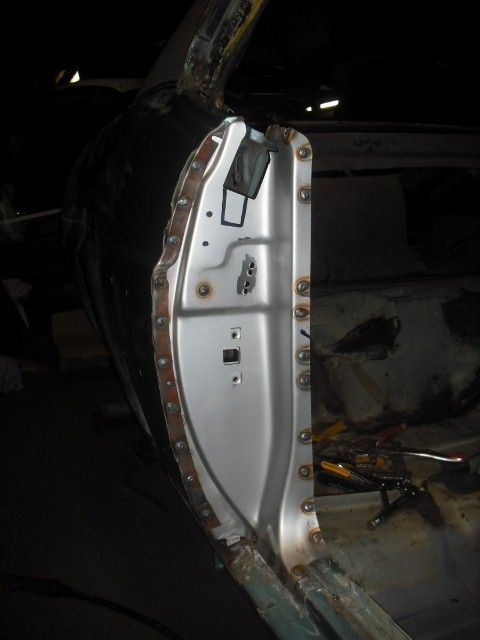 There is also an inner panel in there that holds the plate onto which the door striker bolts. I put the outer panel on and then post the inner through a hole and welded that on as well. Then I cracked on with the other side: 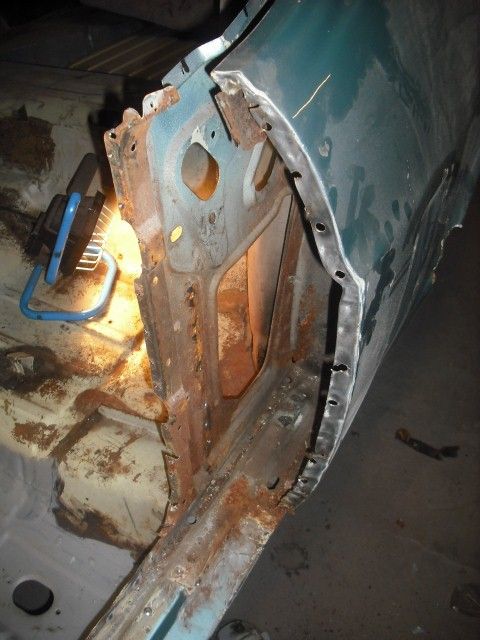 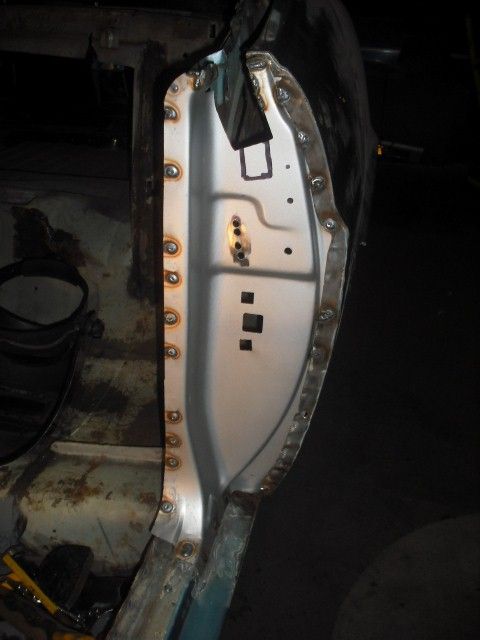 Good progress for yesterday I thought. Since we do have the drivers side door that got thrown on to see how things all fit, which turned out to be not too bad:  So the b pillars are done, on to the a pillars. I looked at them a bit, then I scratched my chin a bit, then I went online and found that most people put a bit of bracing in before doing any real chopping.  And, er, that's as far as I got. Ran all my errands this morning so a solid afternoon on it to come..... More later. |
| |
|
|
drdick
Part of things
Posts: 359
|
|
Nov 30, 2014 17:07:02 GMT
|
Thanks for all your comments guys, feels like the welding will never finish to be honest.... On a different note, your stablemate appears rather quiet of late. Do I fear the 'Beam resto is a no goer? Not for me to say really but other projects have taken priority! |
| |
|
|
drdick
Part of things
Posts: 359
|
|
|
|
|
|
| |
|
|
drdick
Part of things
Posts: 359
|
|
Nov 23, 2014 14:46:10 GMT
|
One tip for buying parts is to ship by sea through Ron at www.stsimports.co.uk/ if you don't need something urgently - I've saved hundreds this way. Another vote for Ron from me, I use him all the time. |
| |
|
|
|
|


 Since the Hairy one had so kindly made this it would have been downright rude not to use it...


 ) but that will depend on how quickly the guy I want to use can get it painted, how much time I can get off work/clear with SWMBO and whether the motor is any good. It isn't seized which is normally good enough for Yank V8s. I've also been thinking about how far I have got. I bought 21 repair panels for this car including two door skins that someone else fit for me. Of the remaining 19, 1 is the rear valence which bolts on, 1 is still in transit from Florida and 2 are sitting in the car. That means I have fitted 14 of them which isn't too bad. Most of what is left welding wise is stuff I will need to fabricate myself but that is just a time thing. If I could get the welding done by end of April then I reckon it's possible.


 . if you want to borrow another i am sure there are still some on the floor

 ?
?


