drdick
Part of things

Posts: 359
|
|
|
|
I am working on this I promise...... Still not welded in the new rear quarter as have been considering the problem putting it on has highlighted: New side: 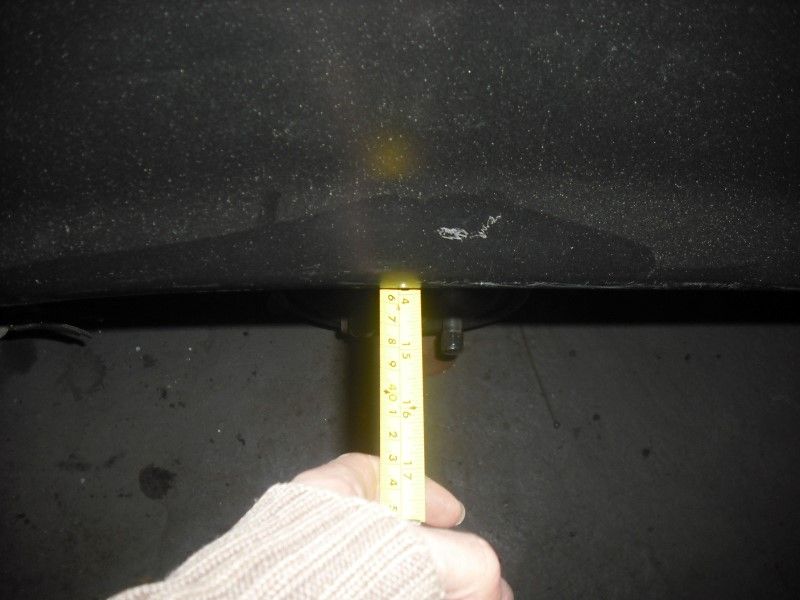 Old side (admittedly I'd already removed a tiny sliver of the edge here): 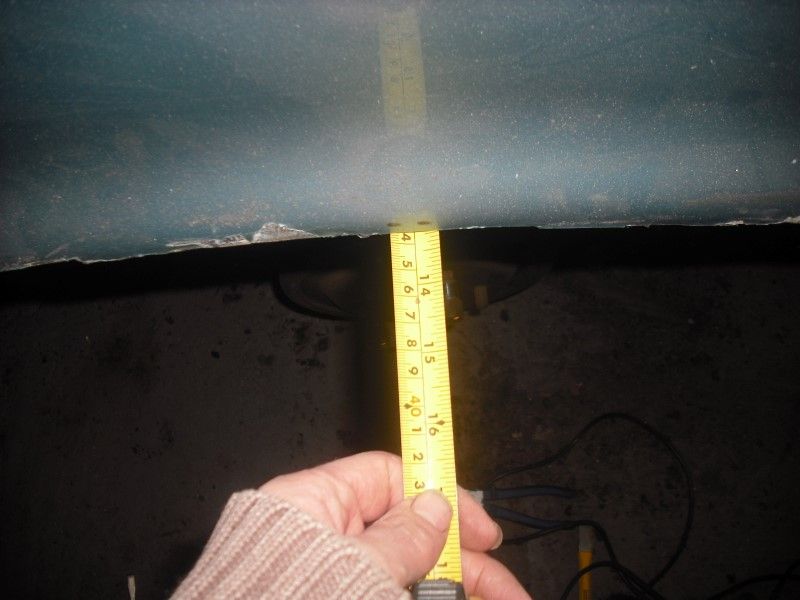 By comparing with another 69 I know that the dimension should be nearer the 14" rather than the 13". Now I don't really want to solve this by doing another rear quarter, especially as this side has already been repaired by gluing on a piece cut from another car as evidenced by this delight that I found under a serious pile of filler: 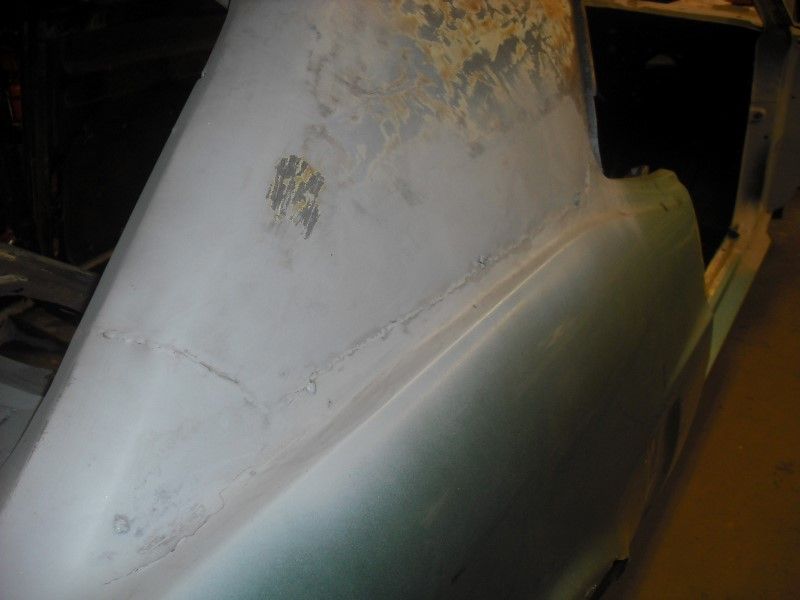 So my plan is to use this panel that I already own coupled with a new inner wheel tub to a) push the quarter into a better position and b) solve the crusty lip at the top of the wheel arch. 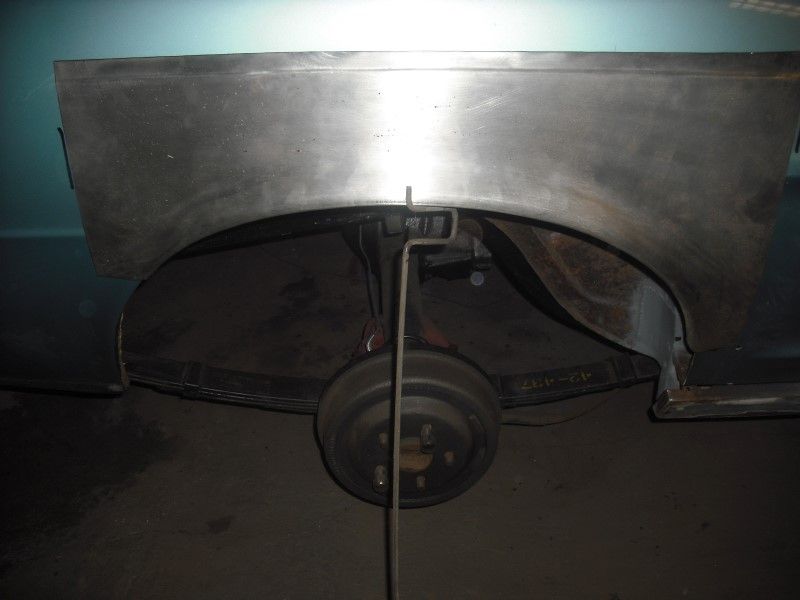 Obviously I intend to use the welder to hold the panel on rather than a piece of steel rod  Better get busy with chopping out the inner wheel well. This turned out to be a pain and what with all the grinding took the best part of a morning. It also involved several sessions of having to clean all the rust and grot out of my eyes. It's a good job I did go for this solution though, most of the inner housing was made of rust, seam sealer, braze and old patches. It also had the obligatory double-skinned section where someone had just brazed in a patch over the rust. Grim: 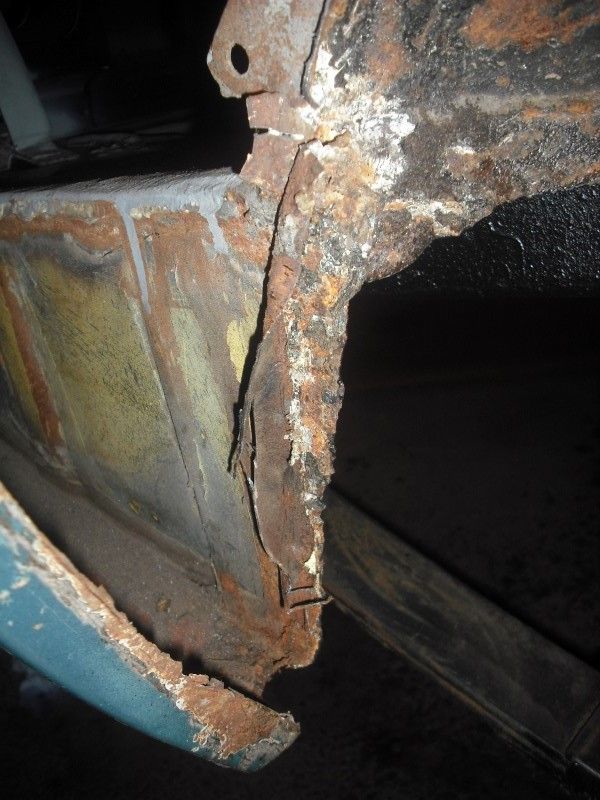 But now gone: 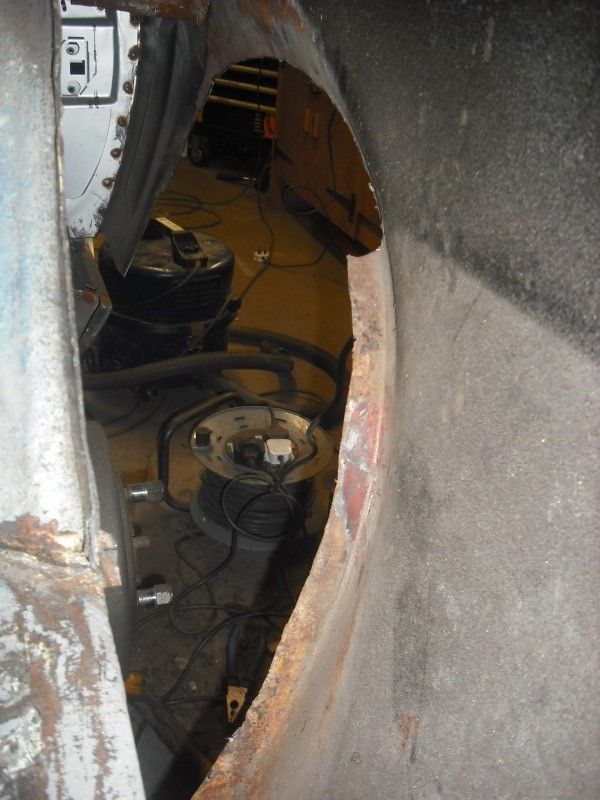 Got to wait for the wheeltub to arrive now  I've also been repairing the front wings: 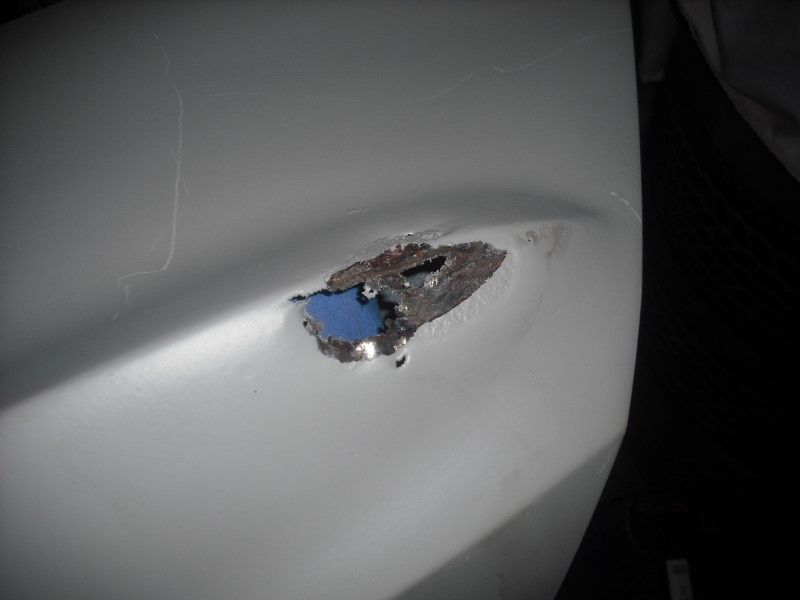 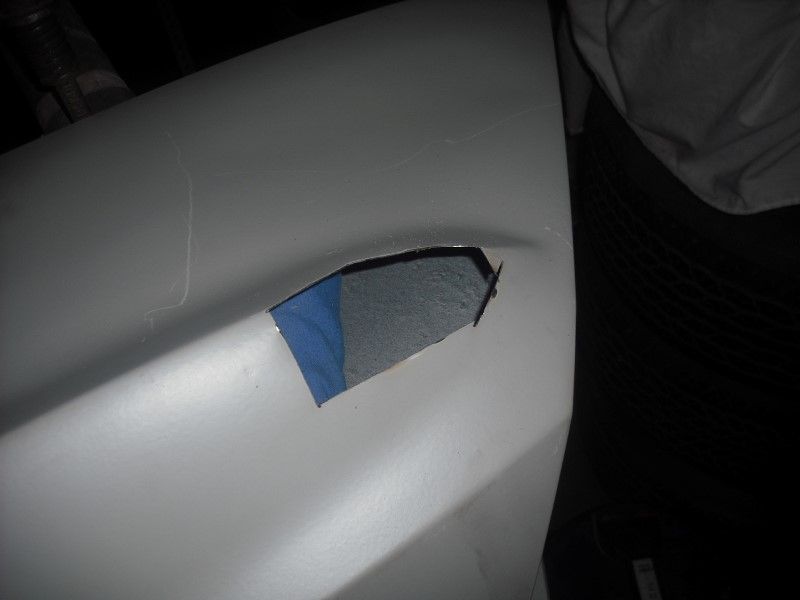 Shrink-stretch-hit with hammer then finally blob it in cos it looks about right:  Hide with filler: 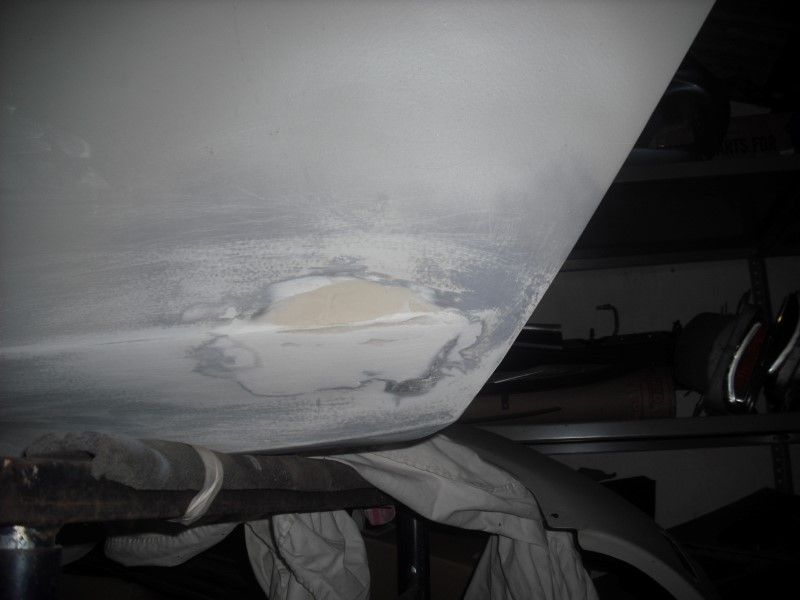 Should be ok  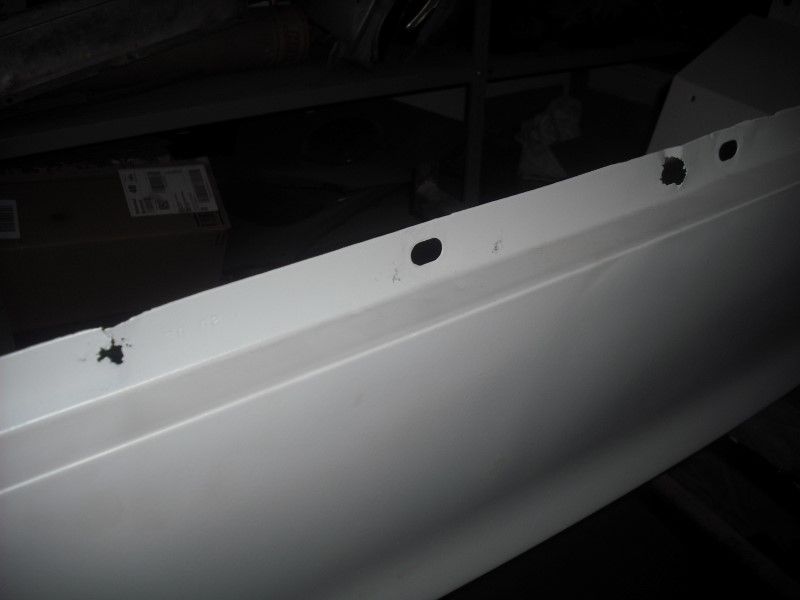 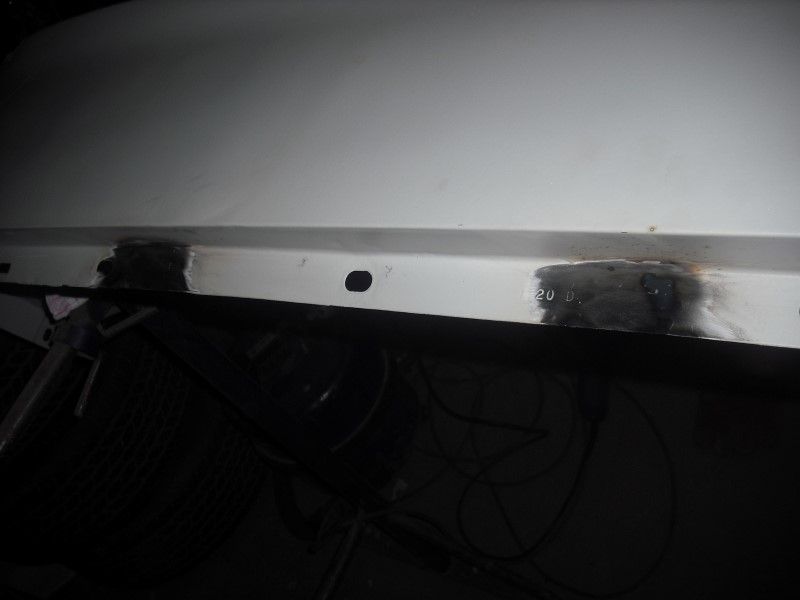 Someone also rolled the arches so I unrolled them which caused them to mostly snap off... 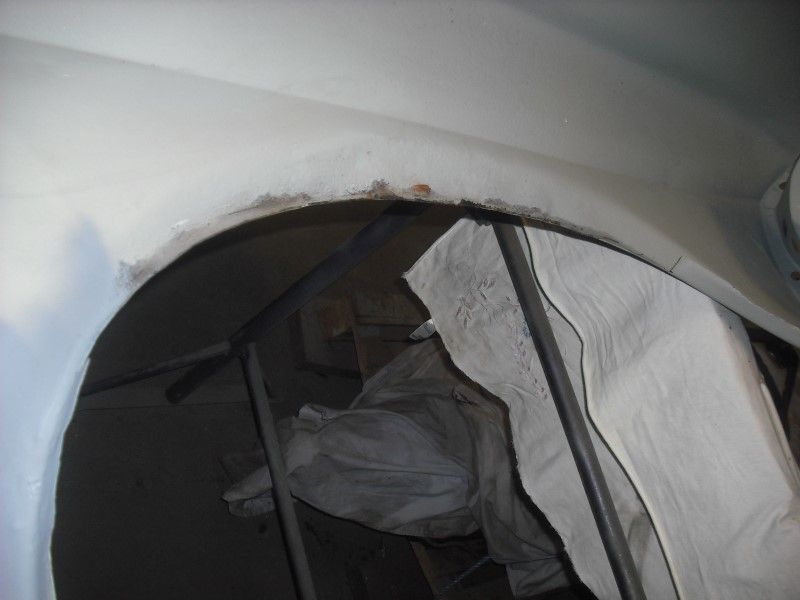 Will cut some strips on the guillotine at work and repair that, hopefully that will work... Started on this bit too but then ran out of time... 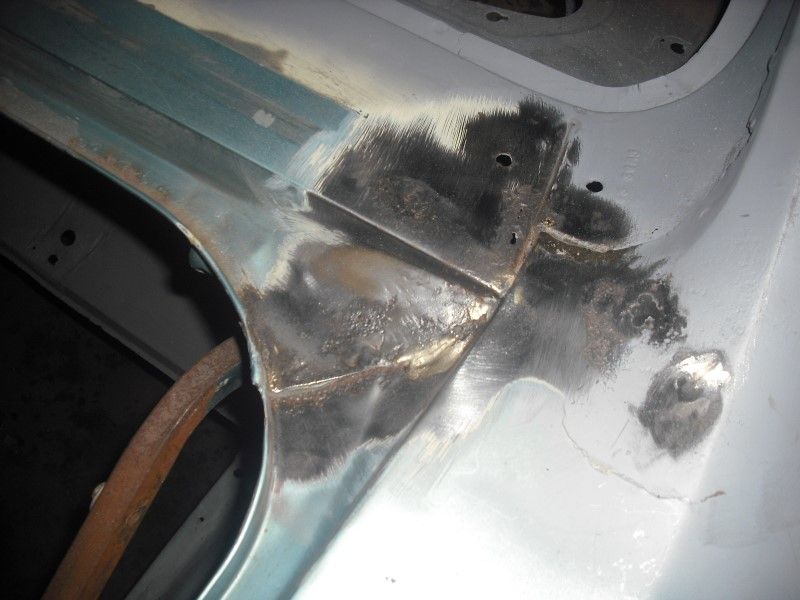 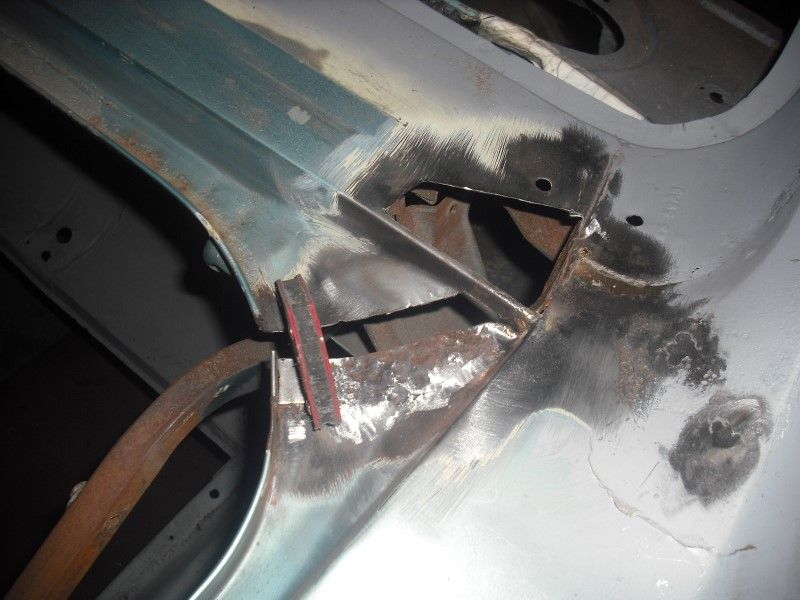 Threw some more bits on the front to enable movement.. 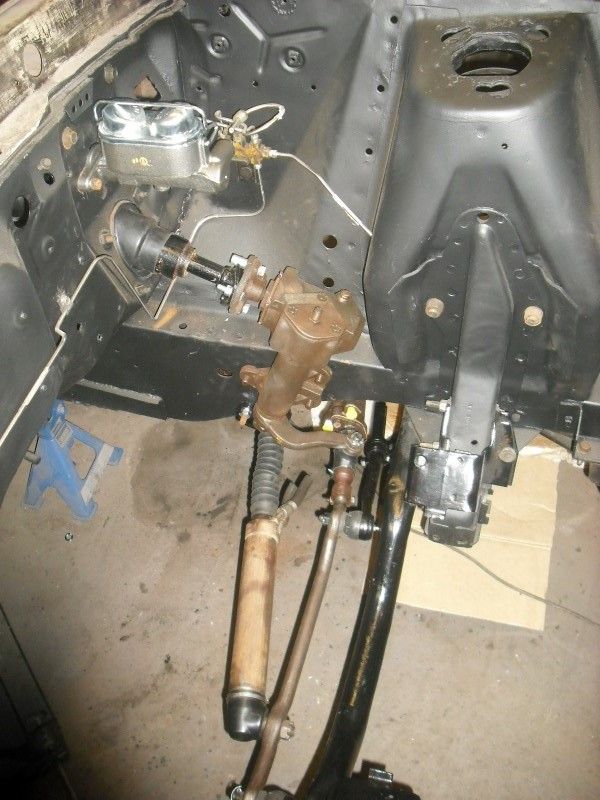  Obviously at this point I spent some time sitting there and going "broom, broom". And finally, since its within his skill set, my Dad got busy with seam sealer and chassis paint. 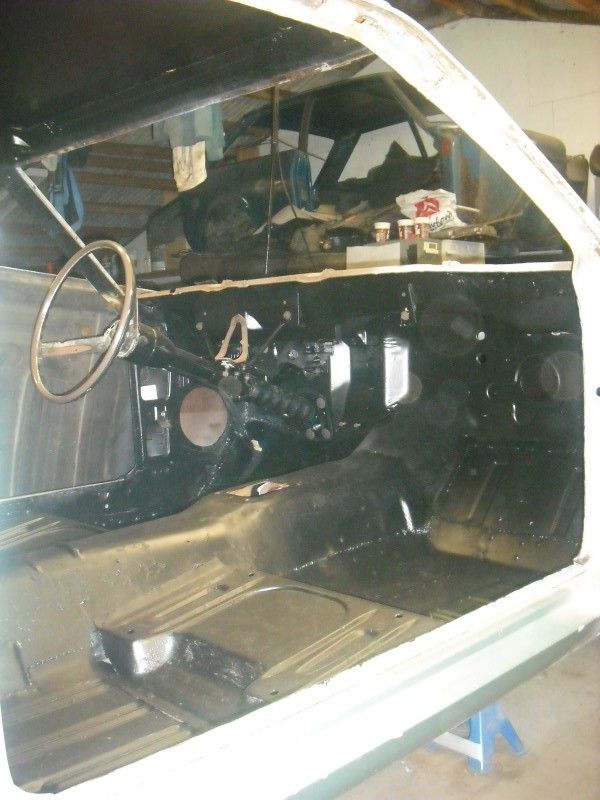 This thing is slowly creeping towards being done....... |
| |
|
|
|
|
drdick
Part of things
Posts: 359
|
|
Sept 28, 2015 18:54:53 GMT
|
Cleaning of the workshop, my OCD and I approve..... Nice car too  |
| |
|
|
drdick
Part of things
Posts: 359
|
|
Sept 24, 2015 22:02:48 GMT
|
|
Stop posting Rivieras, my pants can't take it.....
|
| |
|
|
drdick
Part of things
Posts: 359
|
|
Sept 23, 2015 20:56:56 GMT
|
|
Love this truck...
|
| |
|
|
drdick
Part of things
Posts: 359
|
|
Sept 23, 2015 20:21:09 GMT
|
 Plus  = WIN. I'm going to give you a second chance here and put this up again with a few details that will convince you that you are wrong and I, naturally, am all sorts of right. 1. Its a Boat Tail Riviera. 2. This is the ultimate in Luxury GT, I mean just look at it...Muscular plus, with the 455 goes like stink. 500lbft from the factory, I should say so. 3. No Manual. OK easy remedy Tremac T56 - 6 speed. Have to say I agree here, has to be a manual. Well done, bonus points. 4. 4 seats. Hold on...4 BUCKET seats. 5. Its a Boat Tail Riviera. Basically you have discounted the cars that meet your criteria so you will have to build one but then, that is why you're on Retro Rides...Right? P.  Everything about this is making me do a sex face |
| |
|
|
drdick
Part of things
Posts: 359
|
|
Sept 23, 2015 20:05:53 GMT
|
|
Do I get to see this fine new red fiesta device at the weekend?
I like the recycling of the cage which reminds me I have no steel for Mustang repairs.......
|
| |
|
|
drdick
Part of things
Posts: 359
|
|
Sept 18, 2015 22:02:44 GMT
|
|
Turns out my work can be fun, I saw this earlier in the week...
/video/1
I was immediately under the one on the right.....
Edit: hang on, those aren't cars are they....?
|
| |
Last Edit: Sept 18, 2015 22:09:06 GMT by drdick
|
|
drdick
Part of things
Posts: 359
|
|
Sept 9, 2015 15:00:59 GMT
|
That fiddly work of a corner here and a hole there is very bloody tedious. Bet its great to be mostly finished it now. Are you sticking with the original colour?? Yeah, that was fiddly but also satisfying to create the patch pieces and get it looking as smart as I could. The original colour? White when it left the factory and now a vile pastel blue, so, er, no! I was being kind to them do i start advertising for a new unit buddy now or would you prefer me to focus my energies into sourcing a new project for you Clearly if this goes to paint at Christmas I will need moar projects........ The criterion is; if Dez would buy it then that's good enough for me. |
| |
|
|
drdick
Part of things
Posts: 359
|
|
Sept 8, 2015 21:33:21 GMT
|
|
Love this and giving me bad ideas about my getting a bit shabby s-class. Interested on the graf paint details to come....
|
| |
|
|
drdick
Part of things
Posts: 359
|
|
Sept 5, 2015 11:26:49 GMT
|
June!!!!!! I really need to get a move on but holidays, the Gathering and other stuff have generally been consuming my time. I haven't been totally slacking though and have managed some stuff which I shall now present in no particular order. I finished round the rear windscreen then cleaned the whole thing up with the horrid knotwheel of doom. Pretty pleased with how that all turned out: 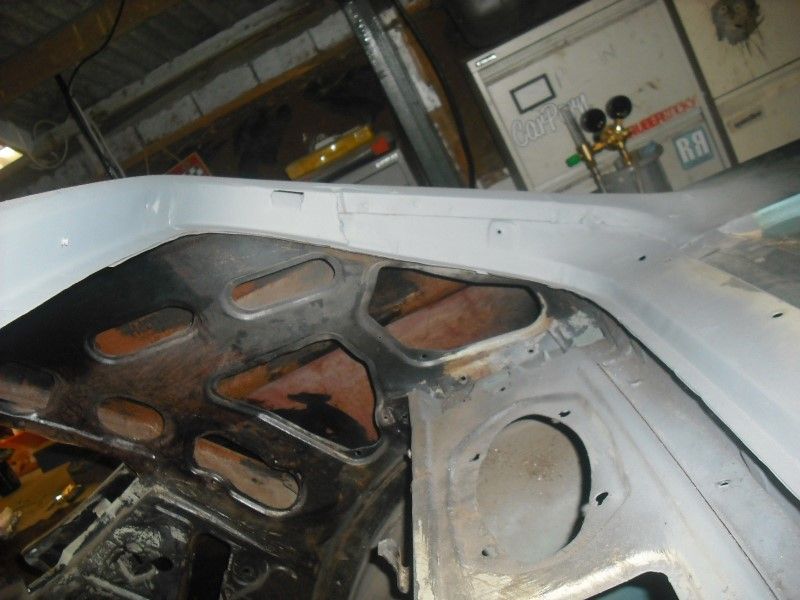  I also took a pile of panels to be shotblasted: 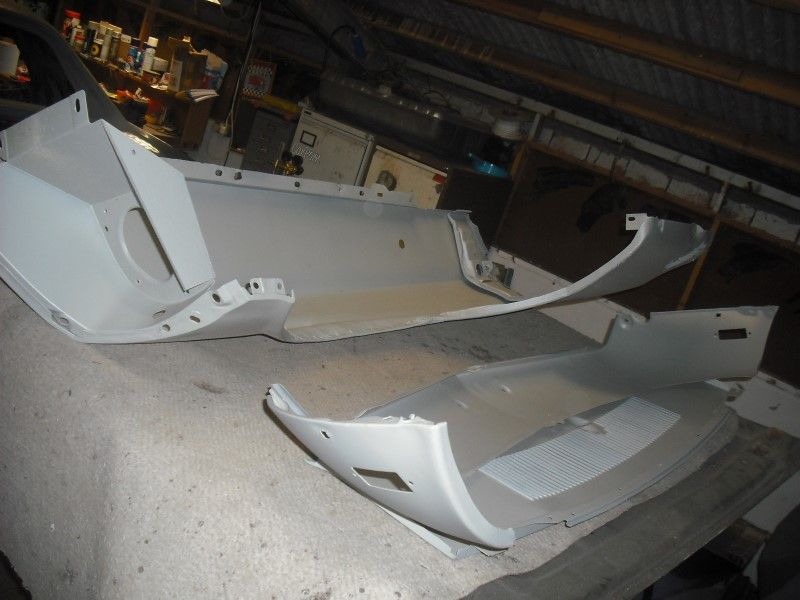 They are mostly ok although the drivers wing has taken a few whacks over the years and the passenger wing has some holes in it: 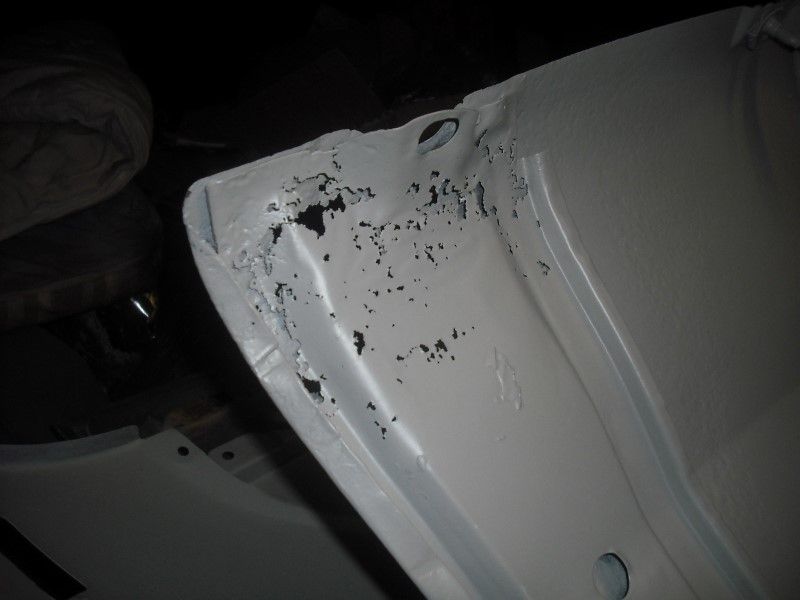 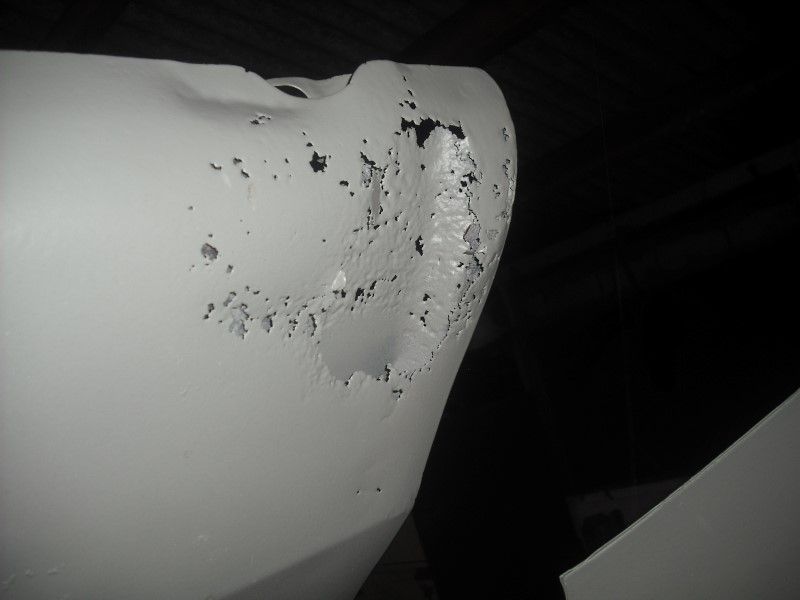 Shouldn't be too much to sort those out. Meanwhile, whilst no-one was looking this has got a lot worse: 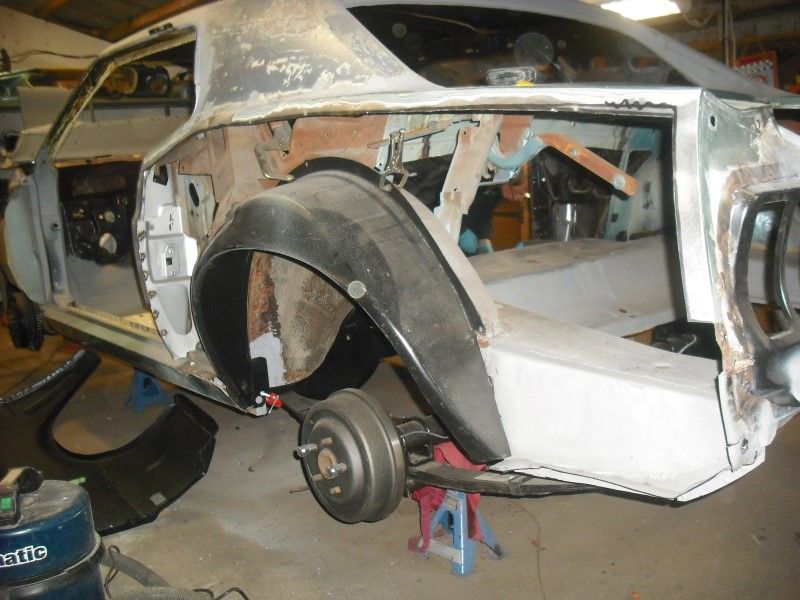 Although a small bit of it then got a bit better: 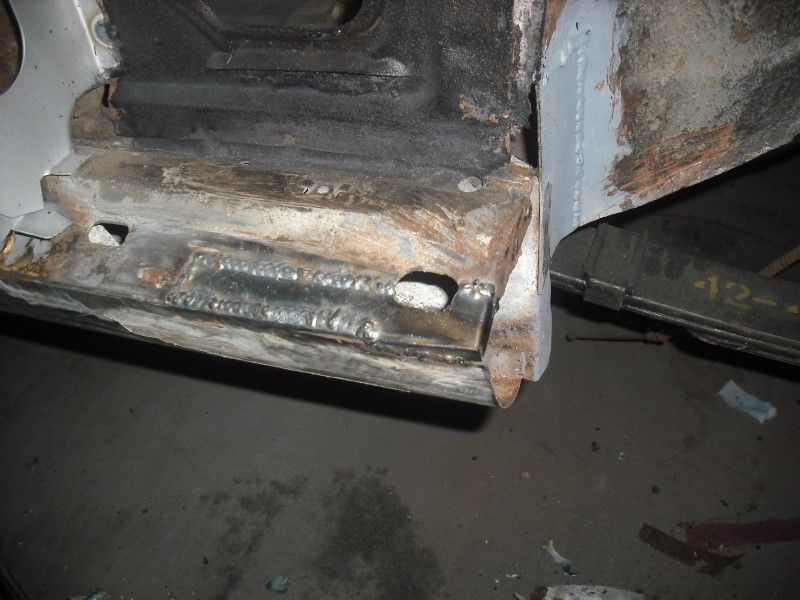 There is also supposed to be a small extension piece here so I used the shrinker-stretcher to make that as well: 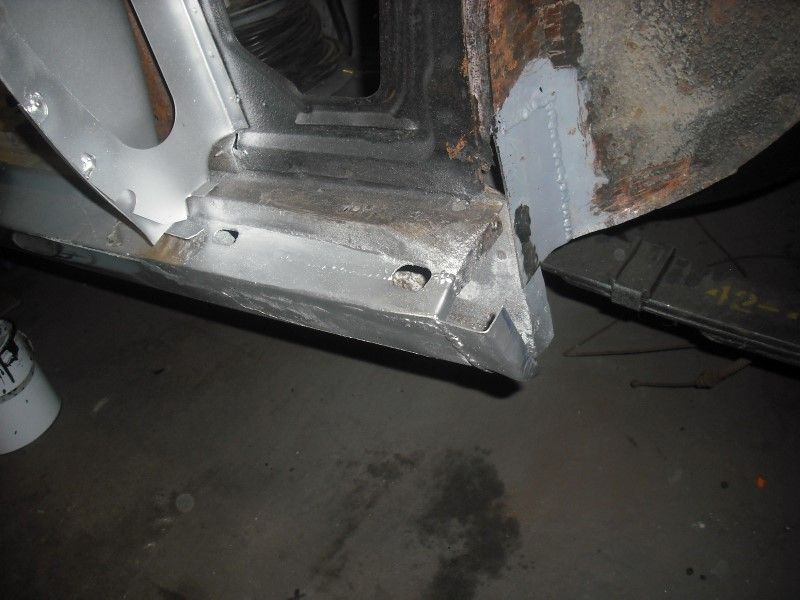 Frankly, this looked a bit curse word but luckily I hadn't twigged that the rear edge of this needed to end up aligned with the new rear quarter panel which, when I trial fitted it, didn't. So that gave me a good excuse to cut off this minor abomination.... Back to the main problem, the missing rear quarter panel. The plan here is to joggle the edge of the hole in the car then trim the repro panel to fit into the recess I created. So I had a little practice joggle (fnar) with my crappy Clarke hand joggler. It was a lot of effort, especially as at this point I measured 82" of edge to joggle at about 1/2" per squeeze. Since I'm built like the "before" picture in a Charles Atlas muscle gain ad I decided this wouldn't be fun so may I introduce edge setter plus: 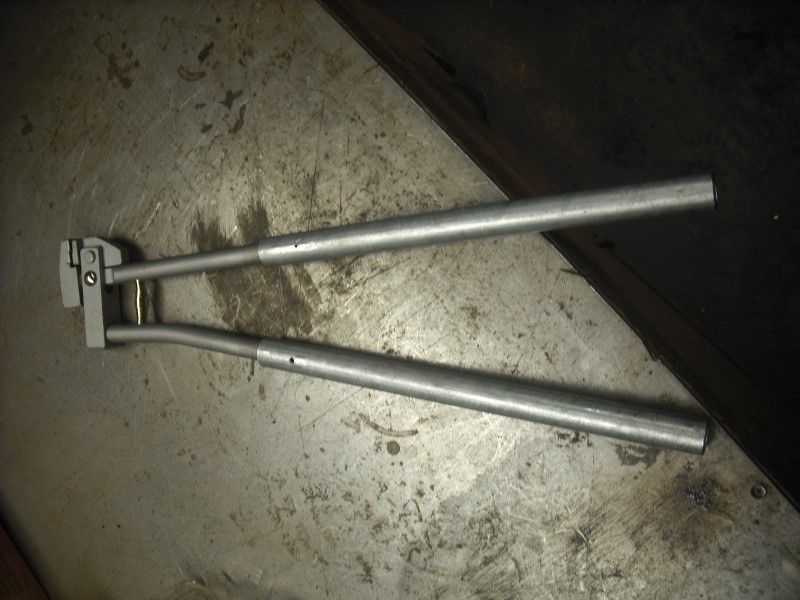 The eagle-eyed will note that it's the Clarke edge setter combined with 3 feet of steam pipe I took out of the skip at work. Either way, it makes my life slightly easier... 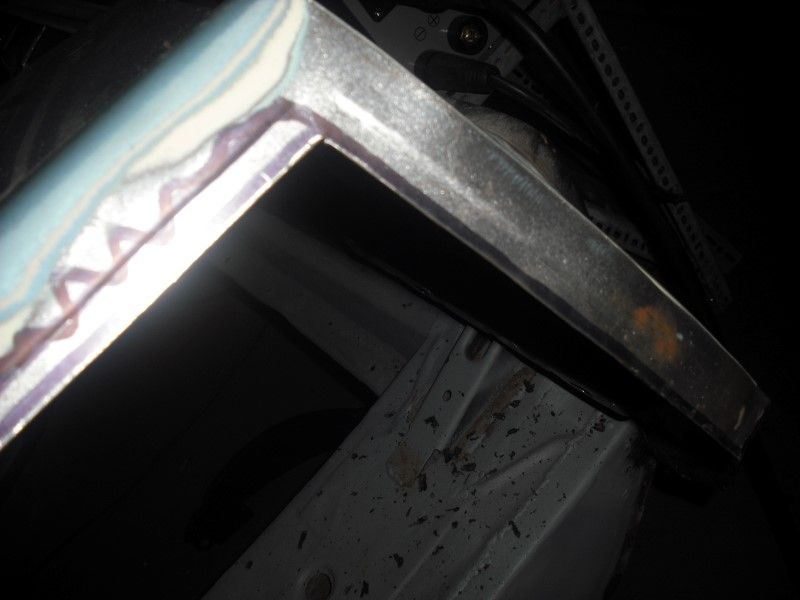 I joggled, I joggled a lot, and even with the extensions my arms ached. Either way, I now knew what size my panel needed to be trimmed down to, all I had to do was pluck up the courage to attack the mildly expensive panel with cutting devices. 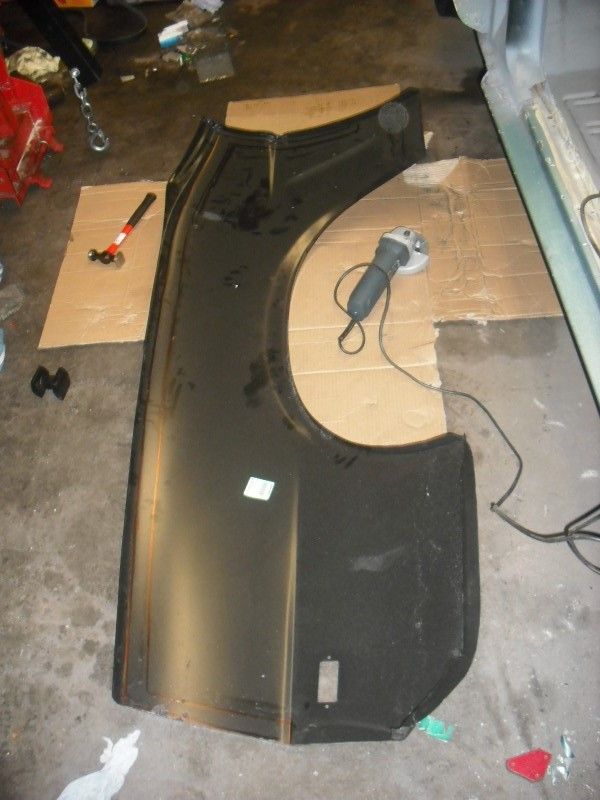 So after lots of cutting, filing and about 30 trial fittings up against the side of the car it was finally in place and held on with clamps and clecos.  This is where I stopped as I want to fit the wing and door in front to check the swage lines and gaps before I do any welding. I couldn't do that immediately as the door hinges are under my desk at work waiting for me to replace the pins in them  . There are also a number of little tweeks that it needs to get it perfectly into place. The other main issue that doing this has highlighted is that the opposite side rear arch has been very badly repaired in the past. The new side of the car is 1" wider (by measuring from the inner wheel tub outwards) than the other side, the larger measurement being confirmed as correct by measuring a different 69 Mustang. I have a plan for this which hopefully won't involve complete replacement again.... What else, need to finish the steering so the car can be moved (eventually!). Rebuilt the power steering control valve: 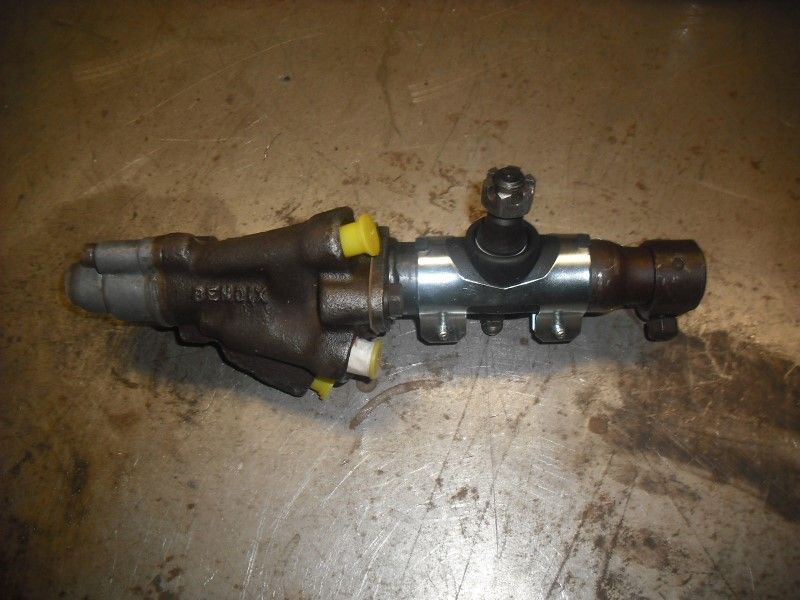 The Internet said this was very, very tricky. It wasn't, so either I have done it wrong or other users of the internet are not as skilled as me . I didn't even need many tools, did the whole thing on my spare room floor with only minimal staining to the carpet. You do need to set the preload on the internals by doing up a nut to 90 in-lbs of torque. Another excuse to buy tools!  And thats about it for now, hopefully back on it in two weekends time but have 5 days in Edinburgh for work taking up my time before then. My Dad and I realised that we will have been doing this for two years at Christmas as we sort of agreed to get as far as possible by then and then hand it over to the paint guy, I figure this is the latest it can go to him if I want to drive it to the Gathering next year.... |
| |
Last Edit: Sept 5, 2015 11:31:08 GMT by drdick
|
|
|
|
drdick
Part of things
Posts: 359
|
|
Sept 5, 2015 10:32:09 GMT
|
Felt my wallet clench when I saw your little shopping spree. When are you going to sell me this car? |
| |
|
|
drdick
Part of things
Posts: 359
|
|
Jun 20, 2015 17:28:56 GMT
|
Had some things to do in the vicinity of the unit so managed two whole hours action this morning. Basically got this far with the last hole in the rear windscreen surround: 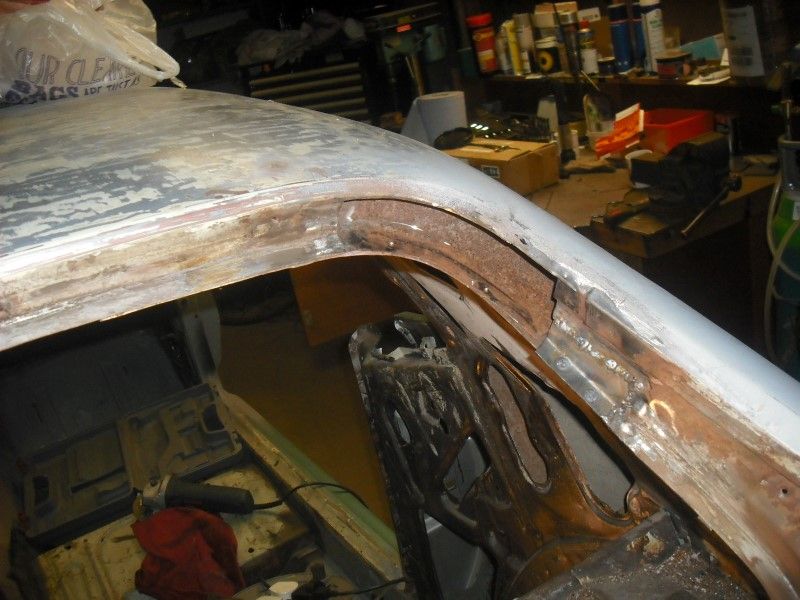 Not much left to do on that...... In my spare time when I can't get to the unit I've been refurbing things at home. Currently sorting out the centre console. First, take it apart..... 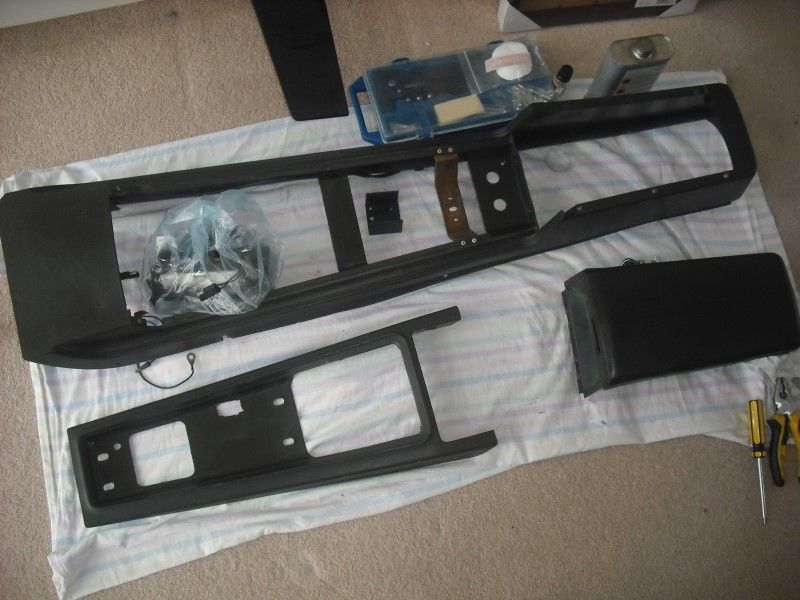 Because a mouse made a nest under it when it was stored in the shed it stinks of mouse curse word After a whole pack of those antibacterial kitchen wipes had failed to remove the smell I stuck as much of it as I could in the dishwasher which solved the problem but made SWMBO slightly unhappy. Still, always easier to apologise than ask permission is my motto. Then break out the secret sauce: 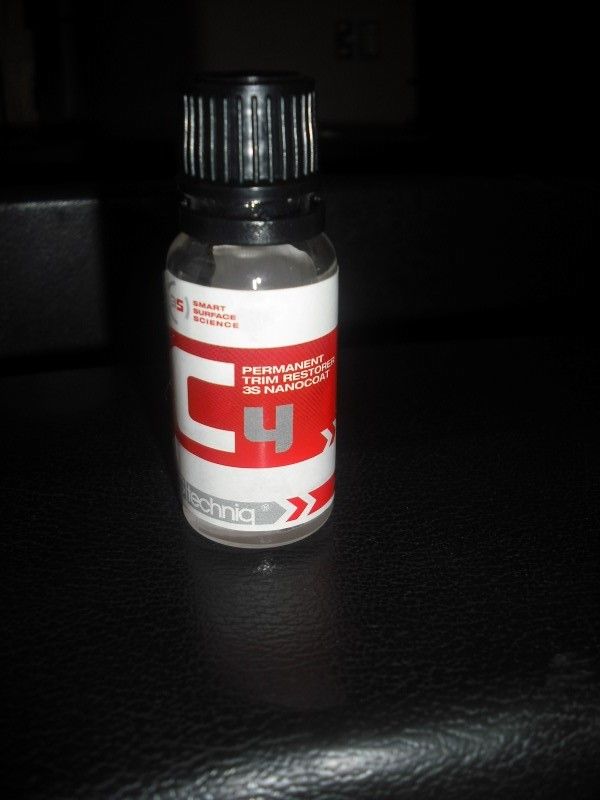 This is some strangely expensive chemical that is supposed to be like back-to-black but it lasts. I bought it on a whim really, 15ml of it was £25 but I thought I'd give it a try. Maybe on this bit: 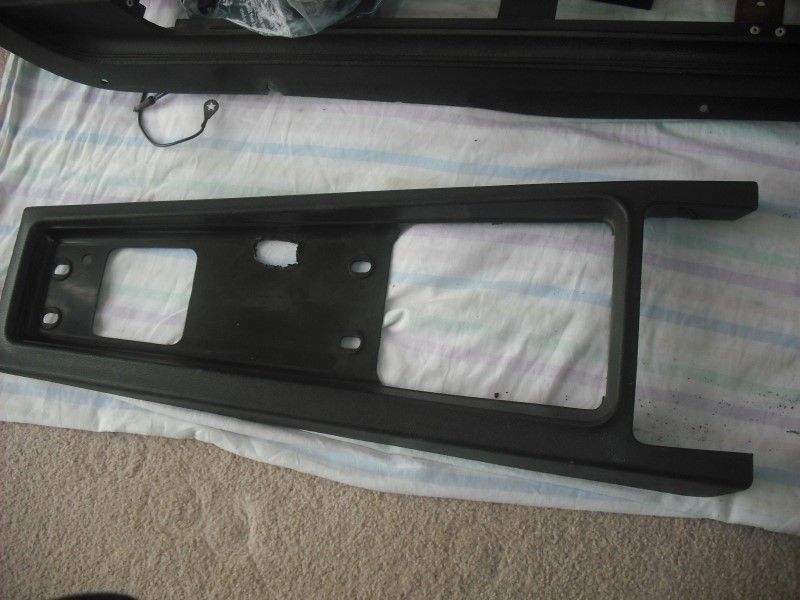 The whole console is supposed to be black but is currently that 45 year old greying plastic colour. Wipe the whole panel down with iospropyl alcohol (thanks work!) and then swab the mystery chemical over it with one of SWMBOs makeup pads. It really works, quite difficult to show you in a photo how much better it makes the plastic look but the bit I treated is at the top sitting on the base of the console: 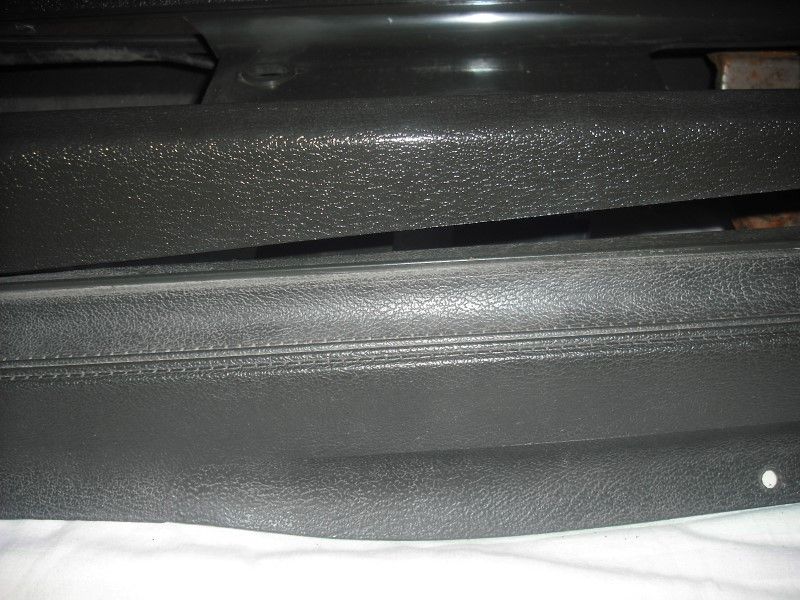 I also know it lasts because I dug a bit of my old Mustang out of the shed the other day that I treated with this stuff about two years ago and it is still shiney and black. Better crack on with the rest before the other half returns and finds me using up all her makeup pads |
| |
|
|
drdick
Part of things
Posts: 359
|
|
|
|
I'm really trying to press on and get this out to paint so found a few hours yesterday for a bit more action. There are three areas that need attention around the rear screen frame so I thought I'd try and get those done. Rust: 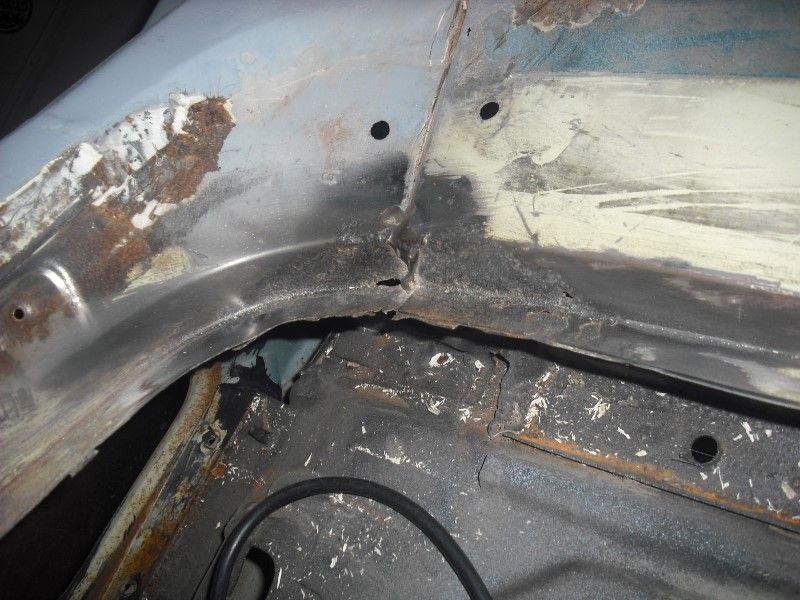 Chop: 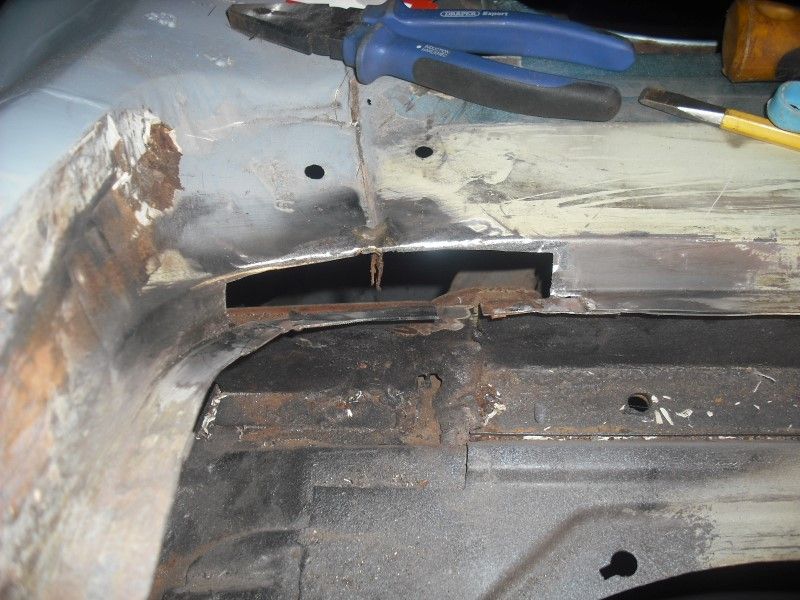 Apply shrinker/stretcher to some metal: 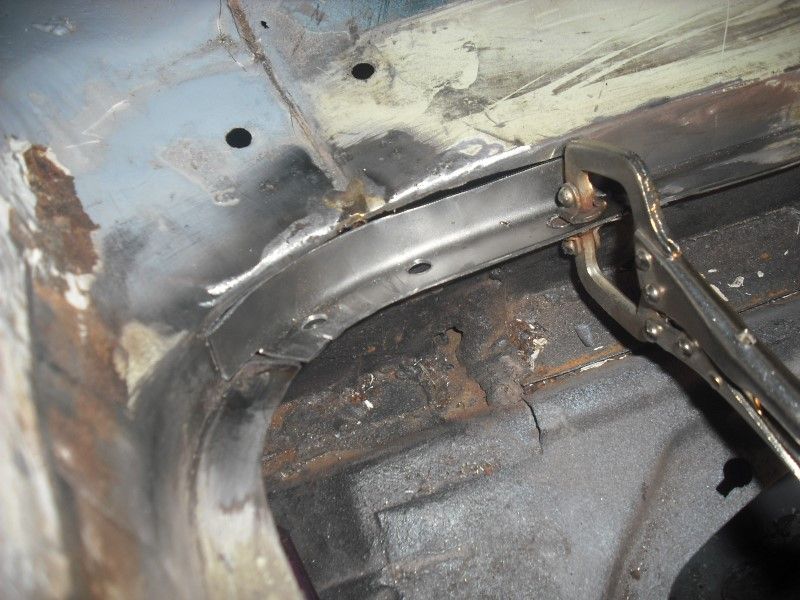 Apply hot spanner to the whole lot: 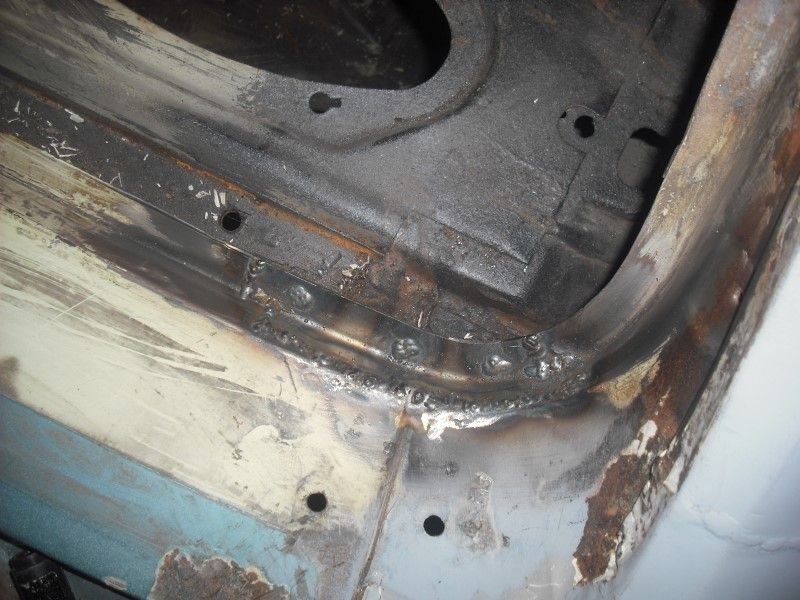 I have to say that the shrinker/stretcher I bought is great if anyone is thinking of getting one. It's a Metz brand one and there is a guy sells them on eBay (just looked, they are now £285! I got mine (new) via an auction listing at the very end of last year for £85). I also repaired one of the other holes but forgot to take a picture, hopefully my next visit will result in finishing this. The loose panels including the front wings are going out to be blasted later this week so there may be a lot of work required to get those back in shape but things are slowly coming together. |
| |
Last Edit: Jun 14, 2015 7:24:07 GMT by drdick
|
|
drdick
Part of things
Posts: 359
|
|
|
|
Thanks for the comments guys. What are you going to put in the cavities to hold back any further corrosion? Good question, so far I have been using various rust converters, paints, seam sealer and anything I think appropriate. In the end I suppose I will put some waxoyl type stuff down any cavities and underseal on the underside. from what I have seen recently : a big tip - apply fathadick to the roof for several days to remove glue  This works as a removal technique although has a weird effect on my camera:  Finished cutting out the rear wheeltub: 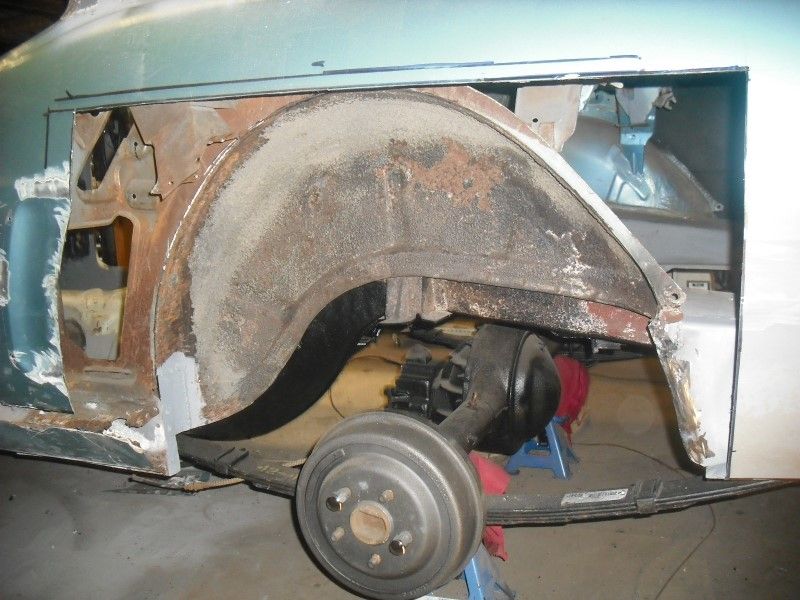 Mocked in the new one: 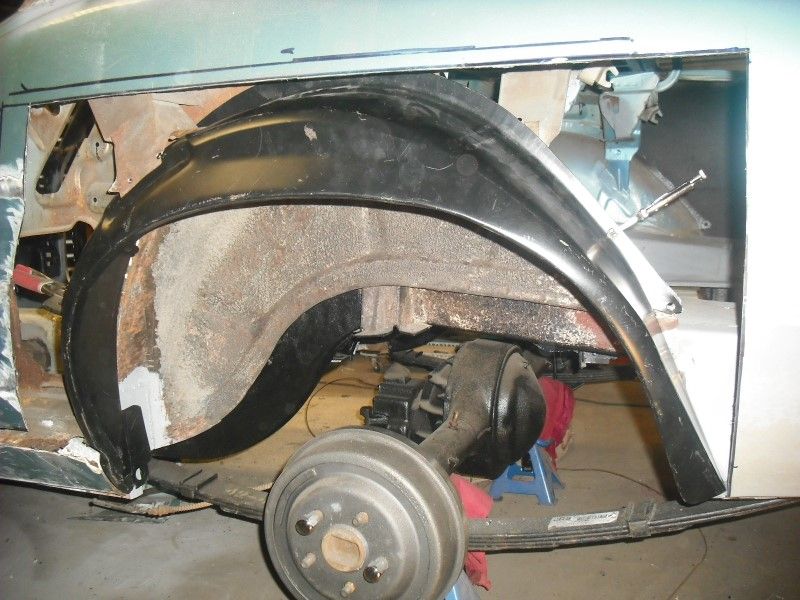 Once I'd got it this far I thought it stuck out quite a long way so have decided to wait until I get my quarter skin before progressing that part any further. Finally got some cajones and took a blowtorch to the lead around the windscreen frame. Ended up being a really simple job to remove enough of it to allow me to weld up the problems. 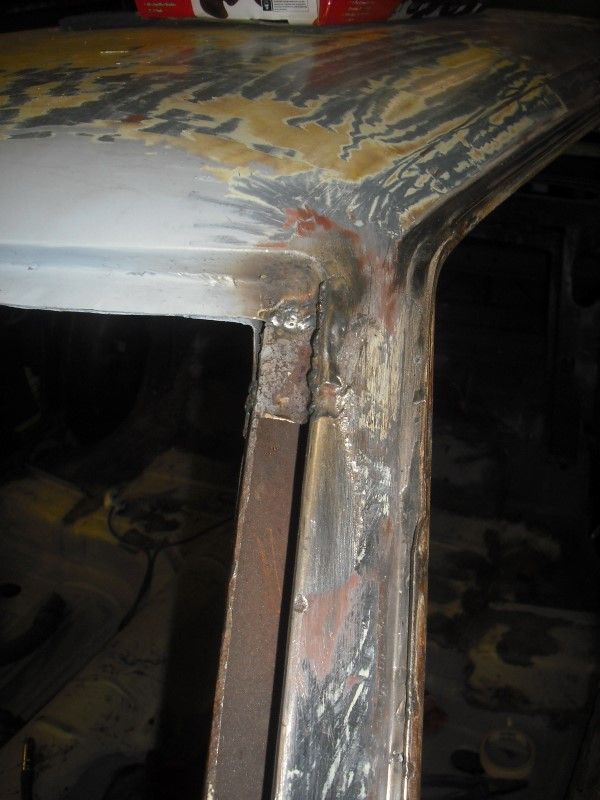 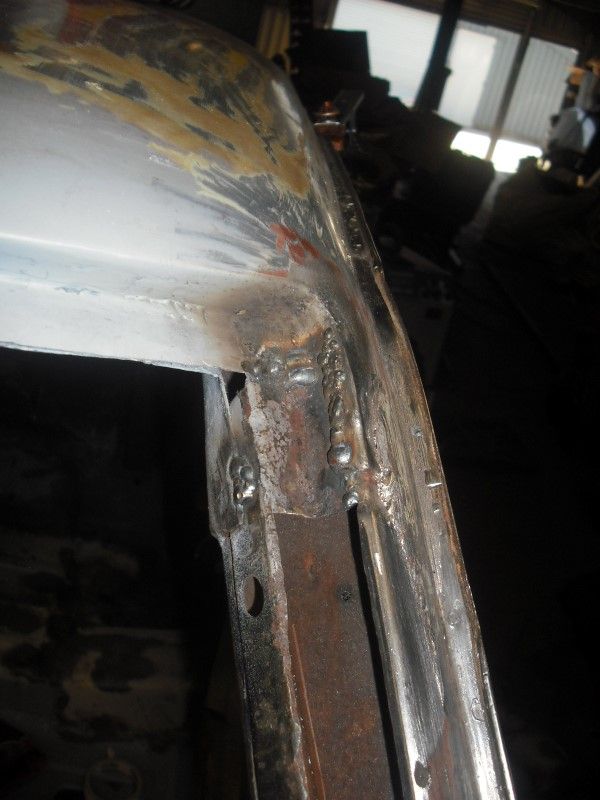 Certainly not pretty but I operate on the principle that all of that will be buried under windscreen sealant and trim Finally, finished off the top of the A pillar. 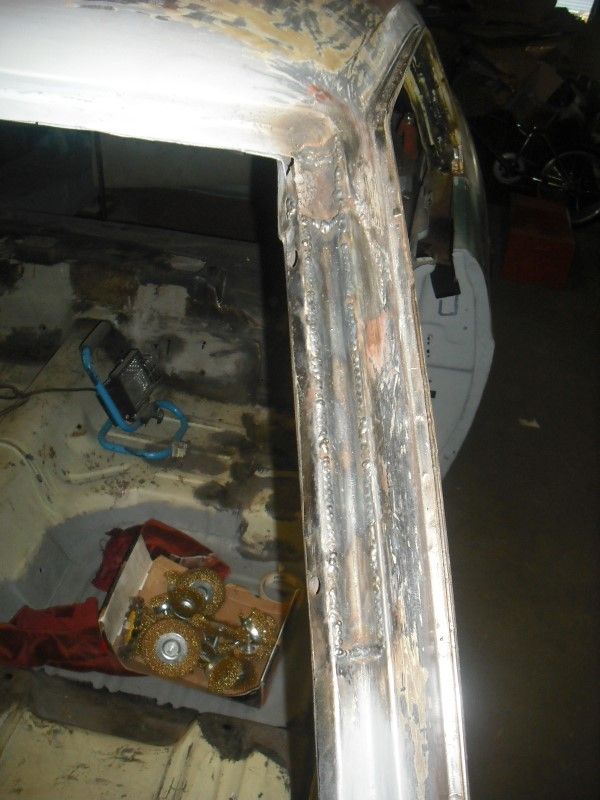 So, barring some grinding all the stuff round the windscreen is done! Another little milestone I guess. Hopefully get to do some of that this weekend. |
| |
|
|
drdick
Part of things
Posts: 359
|
|
|
|
After putting it off for ages I decided to attack the windscreen frame. I carefully chopped out the rust in little sections and made patches to fit, shrinker/stretcher being employed where necessary. I blobbed most of the patches in and then ground down the welds. Luckily the windscreen itself sits on a couple of support brackets before being bonded in so the difficult to grind bits of weld right down in the corner of the channel do not have to be super-flush. In all I ended up with five or six little patches. 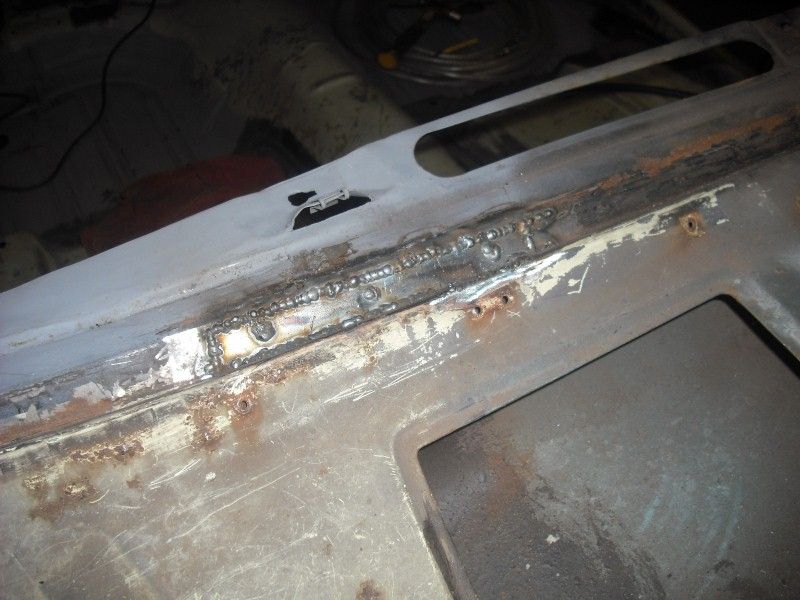 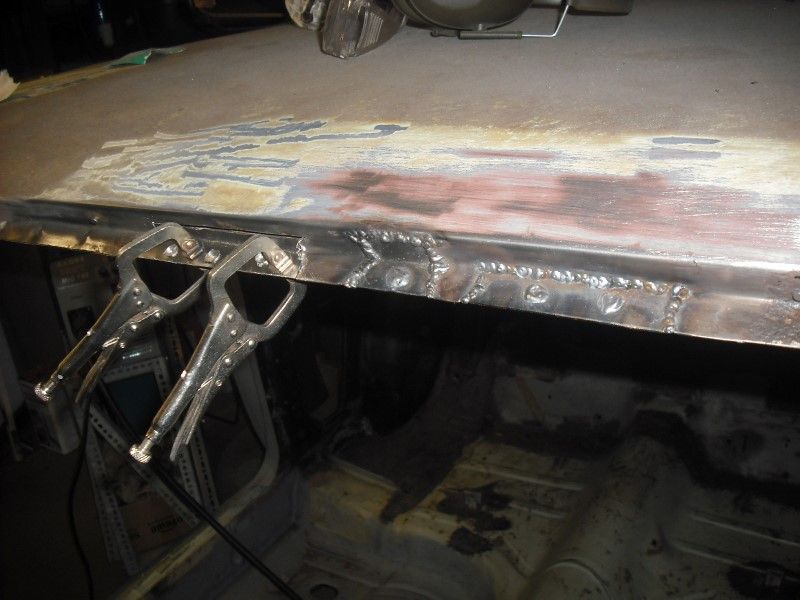 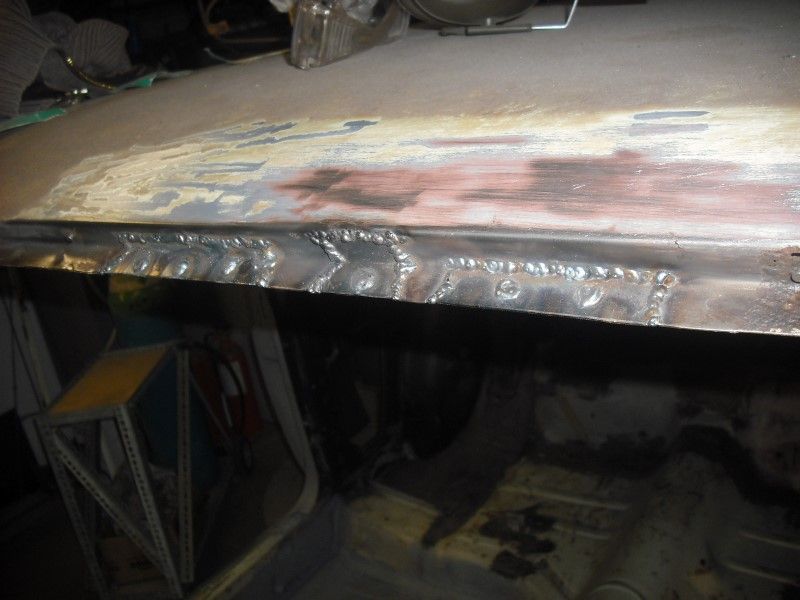 I took it as slow as I could but I can feel a tiny amount of rippling in the roof from the heat so a little bit of filler will have to be worked in there. Then Hairymel popped up and took an action shot of me cleaning the windscreen surround with the knotwheel of pain.... 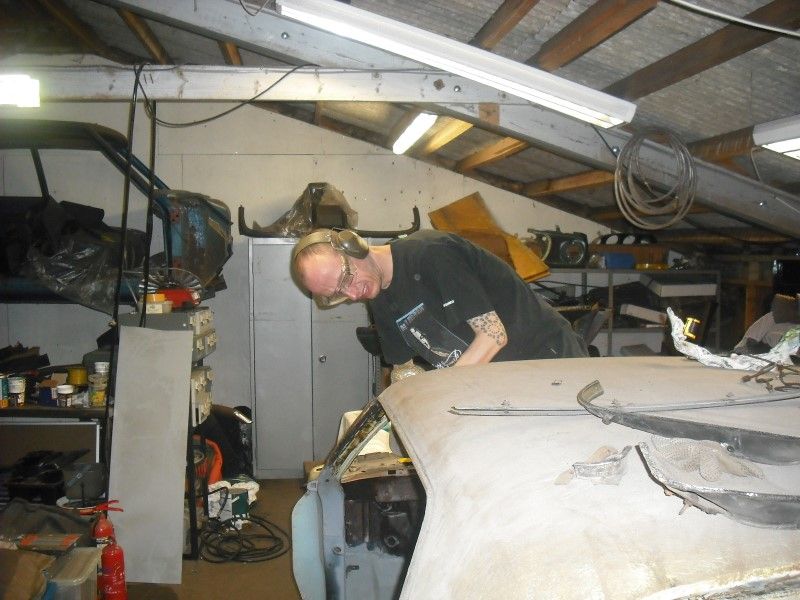 This is what I uncovered... 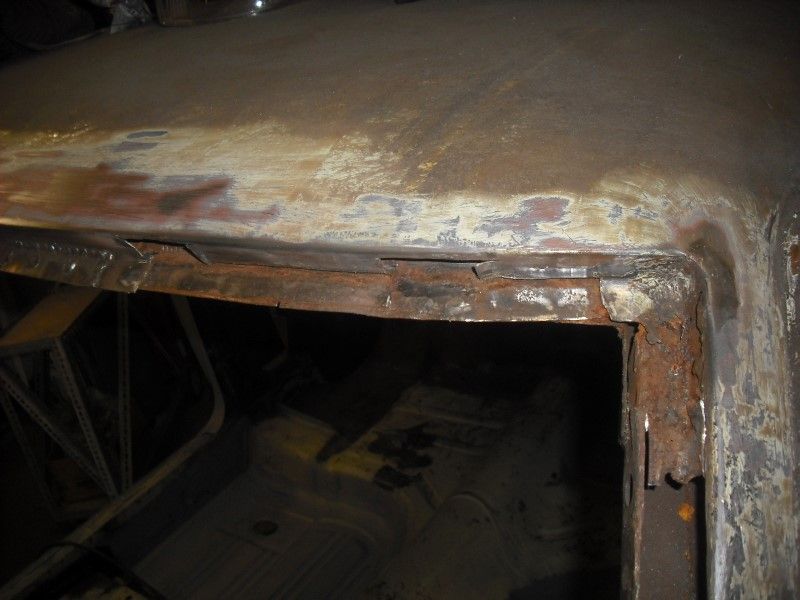 and patched and ground down..... 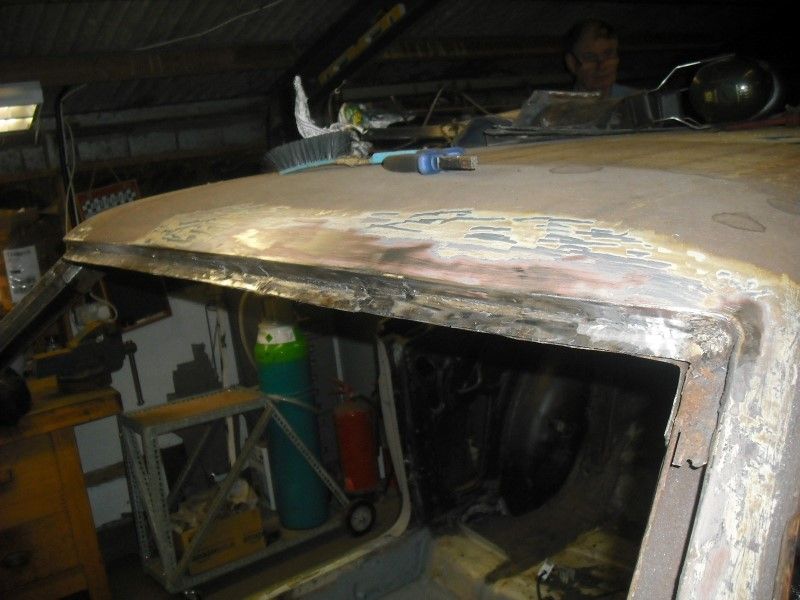 It ain't pretty to be honest but it's flat where it needs to be and will be entirely hidden by the windscreen and trim when finished anyway. Finally, to fill some time we started stripping the rest of the body concentrating on the vinyl roof glue to begin with. It softens if you pour panel wipe on it making scraping a bit easier and this is about as far as you can get in an hour........ 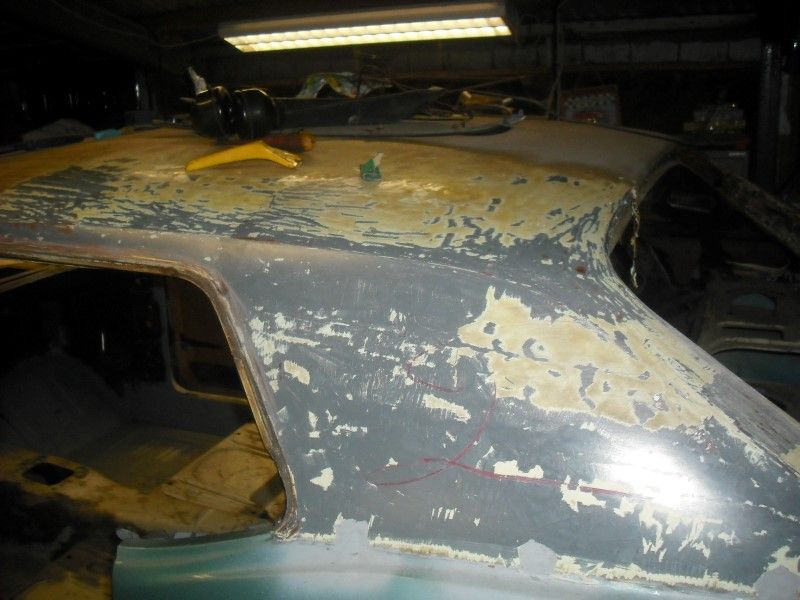 Tedious!  But if we do it then we don't have to pay someone else to............ More at the weekend! |
| |
|
|
drdick
Part of things
Posts: 359
|
|
|
|
seems to be the curse of american cars in this country. they're always bodged up and absolutely laden with filler for some reason. you'd think their comparatively high values would mean they're done properly, but it never seems to be so. Amen to that Dez, if there was a market for filler dust we'd be millionaires...... Once again, you are buying all the toys I want, love how this is looking already. |
| |
|
|
drdick
Part of things
Posts: 359
|
|
|
|
Wow! Quite a while since I posted anything on this. This is probably because quite a lot has happened but it's all been stuff like sanding, painting etc which doesn't really lend itself to bags of pictures. I've got this week off work so have been plodding along with the work in between large lunch and dinner breaks. First up, I've finished the front brakes and suspension so that I can put wheels on if need be. 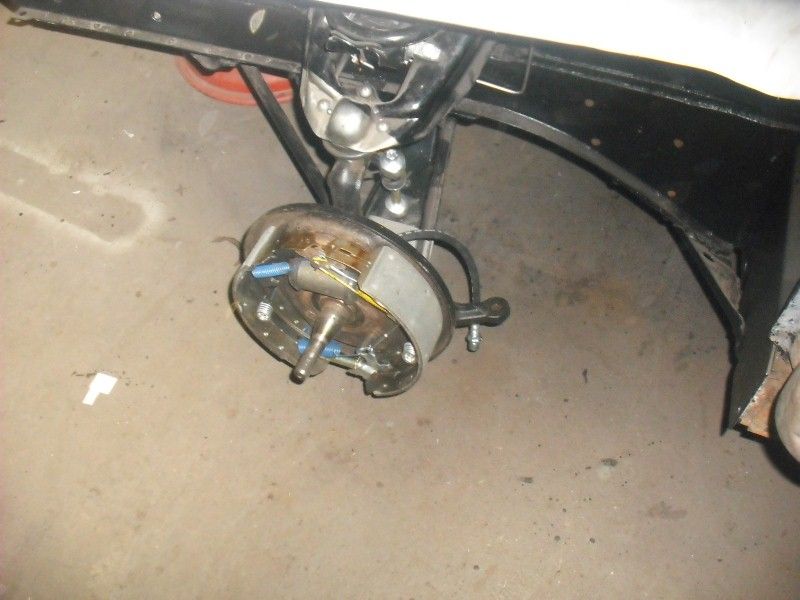 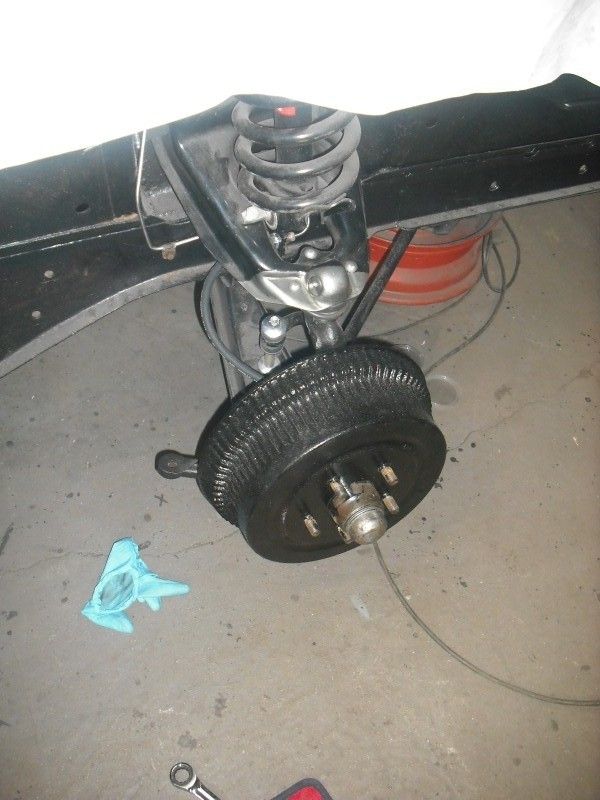 Then I thought that since only front wheels are a bit pointless I'd finish reattaching the rear. Because the rear axle takes up so much space under there I knuckled down (with the help of my Dad) and spent ages under the car treating, sealing and painting the underside near the axle. This doesn't lend itself to a photo at all really but here is one anyway: 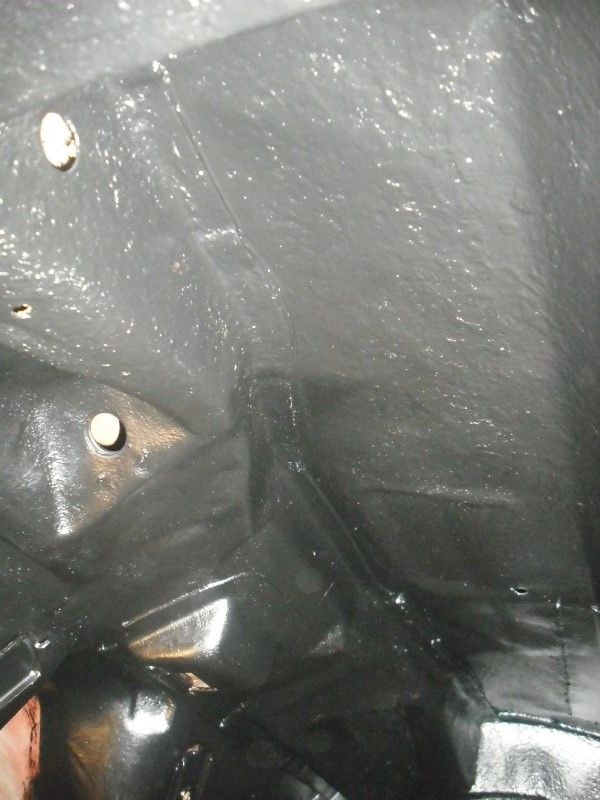 Enlightening! Doing all this filthy work meant I could put the rear end back on: 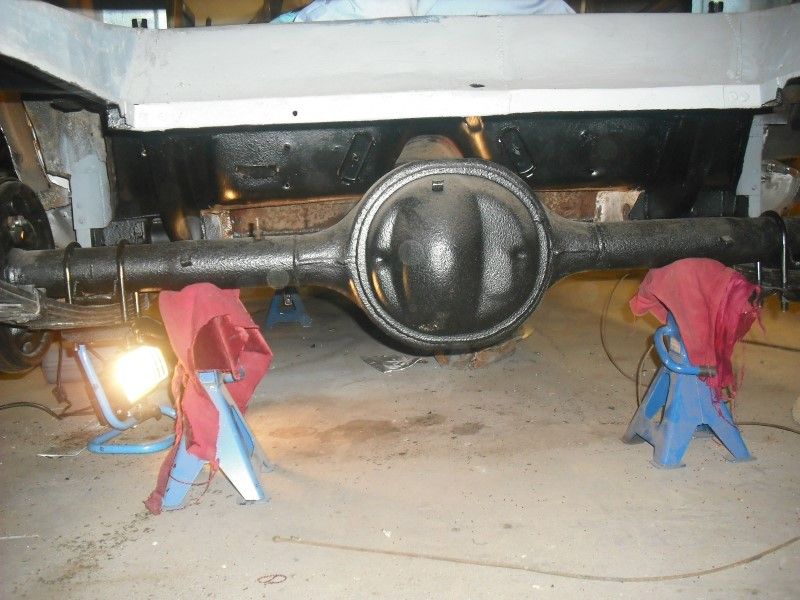 So now I could roll the car out and get it painted! If only I'd finished the body This bit has got a whole lot worse: 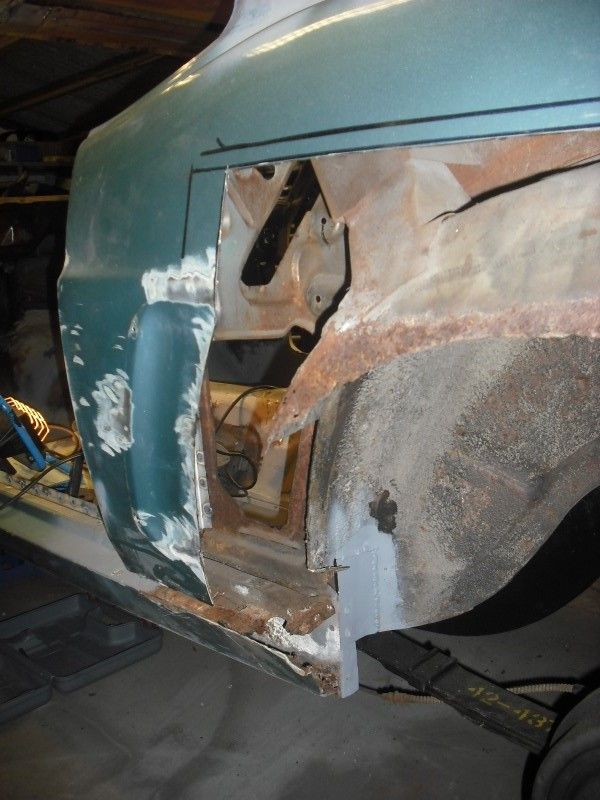 On the advice of my body guy I am going to replace the wheel tub and the entire rear quarter skin. This is particularly annoying as I had already repaired the rear of the wheel arch but I guess that will teach me something for next time, always check whats under the whole panel before you go repairing stuff. This panel is on order now so I hope to get that in a couple of weeks which means I can forget about that sorry mess for a while. So now I'm at a loss for what to tackle next so I stuck on a random boot lock bracket:  Then I thought I would have a go at the front windscreen surround but while eying that up I saw light through a pinhole under the dash. Half a day of lying on my back (again) and that pinhole ended up with this patch: 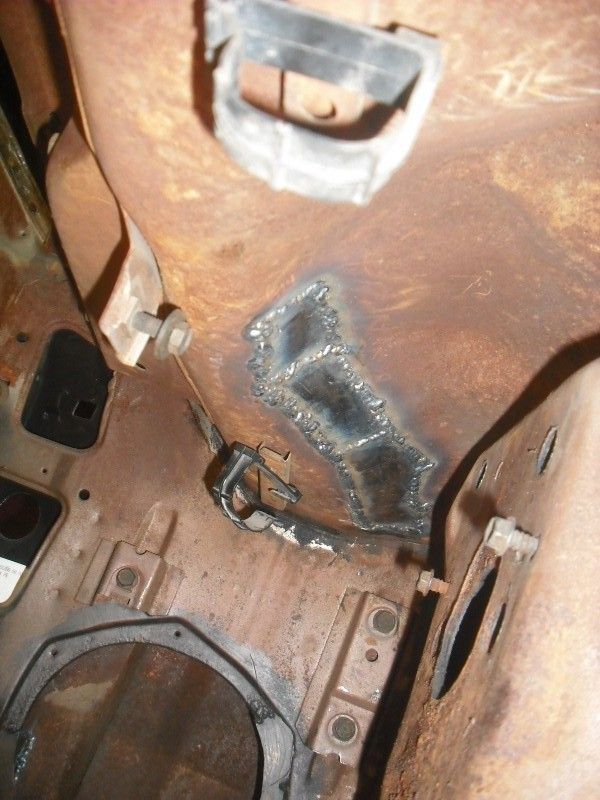 So another bit of work created and then done I also spent quite a long time going round grinding down welds which is something I'd put off because I hate doing it. Turns out 80 grit flap discs are far more efficient than I remember so this really didn't take too long at all. I've done loads more but that will have to wait for later as I am off out soon! |
| |
|
|
drdick
Part of things
Posts: 359
|
|
|
|
2015 project no.3 finished And I've managed almost nothing since the fingernail removal at New Year Must engineer some time...... |
| |
|
|
drdick
Part of things
Posts: 359
|
|
|
|
Ah, but what is the damage? Me want bumpy crash pics. Have you seen the front of my Merc? |
| |
|
|
drdick
Part of things
Posts: 359
|
|
|
|
Did a few hours yesterday having failed to use any of the Bank Holiday weekend for car fun. Thought I'd do some painting and sealing which I hate to be honest but it needs doing. I shoved seam sealer into all the things I'd welded down in the depths of the engine bay, dismantled all the previously mantled bits of suspension in the engine bay and then got busy with half a roll of masking tape and a 5 year old copy of the Sun:  Then I sprayed it with 2 cans of stonechip. This is the expensive way to do it plus it makes your "trigger" finger ache after a few minutes of waving the can around. Whatever my gripes with cans of spray paint I managed to get it looking ok with only a few little splats and runs: 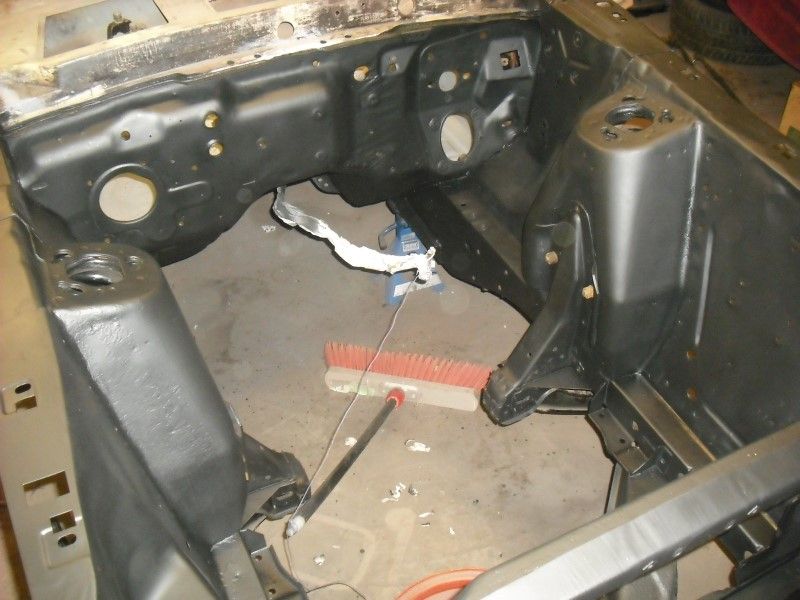 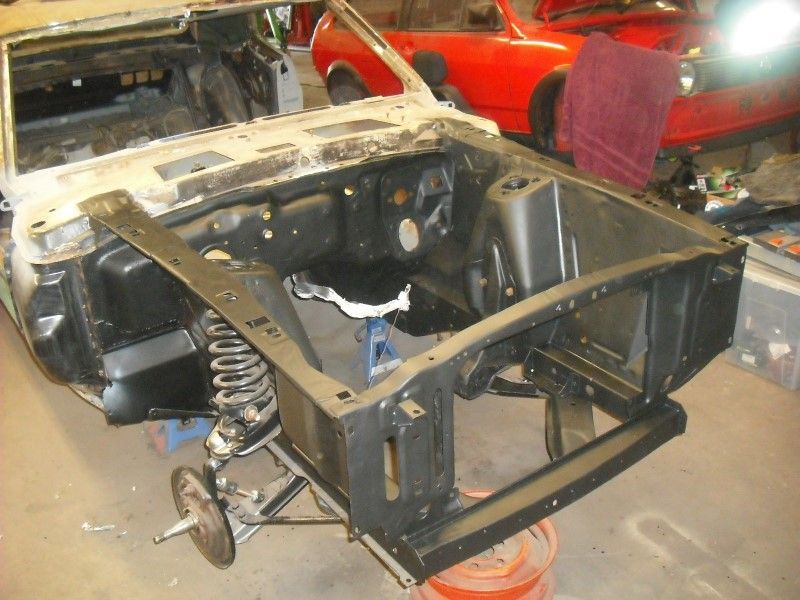 And all that took quite a while so there was just enough time to start sorting my rear end out: 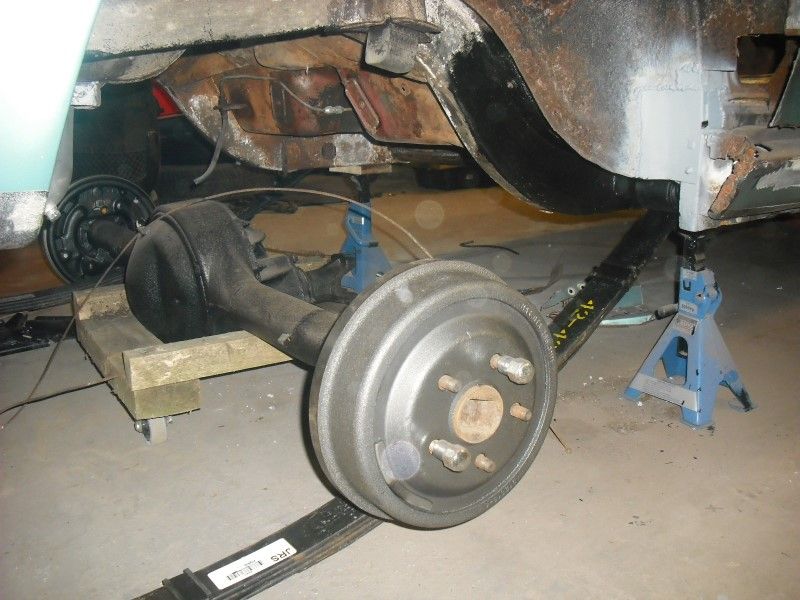 I may bite the bullet and spend a day on my back sorting out the rust treatment/painting under there before I go any further with the reattaching. |
| |
|
|
|
|


 Better get busy with chopping out the inner wheel well. This turned out to be a pain and what with all the grinding took the best part of a morning. It also involved several sessions of having to clean all the rust and grot out of my eyes. It's a good job I did go for this solution though, most of the inner housing was made of rust, seam sealer, braze and old patches. It also had the obligatory double-skinned section where someone had just brazed in a patch over the rust.


 . There are also a number of little tweeks that it needs to get it perfectly into place. The other main issue that doing this has highlighted is that the opposite side rear arch has been very badly repaired in the past. The new side of the car is 1" wider (by measuring from the inner wheel tub outwards) than the other side, the larger measurement being confirmed as correct by measuring a different 69 Mustang. I have a plan for this which hopefully won't involve complete replacement again....


 But if we do it then we don't have to pay someone else to............


