nze12
Part of things
 
Posts: 191
|
|
Jun 29, 2024 22:48:17 GMT
|
|
|
| |
1986 BMW E30 refreshed to original spec
1973 BMW E12 520 converting to Motorsport 530
1982 XJS V12 converting to 5 speed manual
Many landscaping projects overriding above!
Cogito cogito ergo cogito sum!
|
|
|
|
teaboy
Posted a lot
   Make tea, not war.
Posts: 2,113
|
|
|
|
I half expected many rust related problems to arise when you removed that heat-shield... thankfully not! With this old banger there is always that possibility but thankfully there seems to be a good five or six square inches of rust free metal under the car. "I'd better get a shift on, I'm picking her up from the airport..."Most blokes would be in an absolute panic at this point: - Bed not made for a week
- Copious evidence of only consuming takeaways
- Dead lettuce in the veggie bin
- Vacuum cleaner untouched
- Skyscraper of dishes in the sink
- Etc.
- Etc.
- Etc.
   I did reasonably well, having a dishwasher helps. I was planning a run around with the vacuum on Saturday morning but so that was my biggest faux pas but overall, I just about got away with it. The high point of the weekend, for Fat Al at least was this massive bag of sausages that he was given at Ten Acres cafe when we went for breakfast on Saturday morning.  He usually gets two or three sausages, depending on what they have available but these lasted the whole weekend. Fatty was thrilled. For one reason or another, I didn't get into the tent at all. I was planning on a couple of hours after the F1 on Sunday but my pal Shultz turned up just as the race finished so that was that. I have this hole in the tunnel that I need to weld up.   I think it is a leftover from where I screwed the seat crossmember down when I had to refit it after the floor repairs. I was going to do that first but, true to form, the weather which has been red hot all day decided to change to torrential rain as soon as I got home from work so I wasn't going to carry all the welding gear down in that. That meant that I had to do some more really thrilling clean up on the floor.  I peeled that black sound pad back which showed that I had a perfect place to hide the paint line.  This is possibly the most boring part of the job.  I spent an hour or so on it, which was about as much as I could take for one night. Whilst I was under there, I had a quick look at the passenger side floor. There is this grommet, which I prodded with my finger.   I didn't feel like attacking the sealer around it just yet but I am hoping that it hasn't spread too far. If you remember that last stud that I had to replace on the driver's side.  Well the corresponding one on the passenger side needs doing too.  At a glance though, the passenger side looks much better than the driver's side (he said hopefully). Cheers. |
| |
|
|
|
|
|
|
|
|
Kid is a cutie from what I can see.......
|
| |
|
|
|
|
|
|
|
|
I wonder if the e90’s, a couple of years younger than your e46, are showing similar corrosion?
John
|
| |
|
|
teaboy
Posted a lot
   Make tea, not war.
Posts: 2,113
|
|
|
|
Kid is a cutie from what I can see....... Thanks, Duckie. Obviously I would love to do the proud grandad thing and put a nice picture up but my daughter doesn't want them posted on the internet so I have to respect her wishes. I wonder if the e90’s, a couple of years younger than your e46, are showing similar corrosion? John I honestly don't know, John. The sun was still out when I got home tonight so I grabbed the opportunity to bring the welder down from the shed to sort that random hole out.  I decided to open it up with the drill first, to give me something to go at.  I got it welded up and cleaned off. 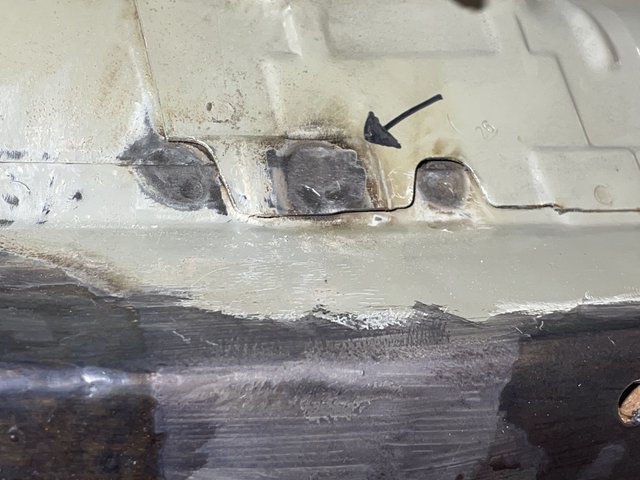 The sky started to bruise so I carted all the welding gear back to the shed before the inevitable rainfall. Then it was back to the boring job of cleaning off the undercoating in preparation for paint.  It is mind and arm numbing but I did find a couple of small areas under it that had surface rust so that alone justified it , in my mind at least. I did about an hour and a half cleaning before I had had enough. That grommet on the passenger side that I prodded yesterday.  Curiosity got the better of me so I pulled at the undercoating.  Of course it has spread more than I had hoped. I did say that I thought the passenger side wasn't as bad and if we look back at the same grommet from the driver's side.  That does seem to be the case. I do want to get the driver's side finished and painted before I start working on that other side. I've got loads to do at work tomorrow, not sure what time I will get home, we'll have to see how it goes. Cheers. |
| |
|
|
Norman
Part of things
 
Posts: 449 
|
|
|
|
|
I do admire your dedication to push this forward. Your attitude and work progress is to be applauded. You must be very happy with the work you produce although maybe not at the rate you would like. Keep at it and you will get it finished, all the best, Norman
|
| |
|
|
teaboy
Posted a lot
   Make tea, not war.
Posts: 2,113
|
|
|
|
I do admire your dedication to push this forward. Your attitude and work progress is to be applauded. You must be very happy with the work you produce although maybe not at the rate you would like. Keep at it and you will get it finished, all the best, Norman Thanks, Norman. You are right, it never goes quickly enough, does it? As I predicted, it was a long day at work today but everything at least went as well as could be expected. When I got home I did briefly consider giving it a miss tonight but as the lovely Doctor has gone to Lytham with our youngest daughter to see some rag and bone man. I don't know if he is anything to do with Steptoe and Son or not but anyway, sitting on my own in the house soon got boring so I went out to the tent. I had another hour of cleaning off the fiddly bits of underbody coating which was, if I'm honest, equally boring. Whilst I was under there I was thinking that I really ought to paint the floor and the sill in epoxy at the same time. The reason that the sills need painting is because of the holes where the clips which retain the sill covers were a bit rusty. I had cleaned and spooged them ages ago but because I have left tham so long without painting them, they need doing again.  That one doesn't look too bad, does it? Unfortunately, they are not all that good. 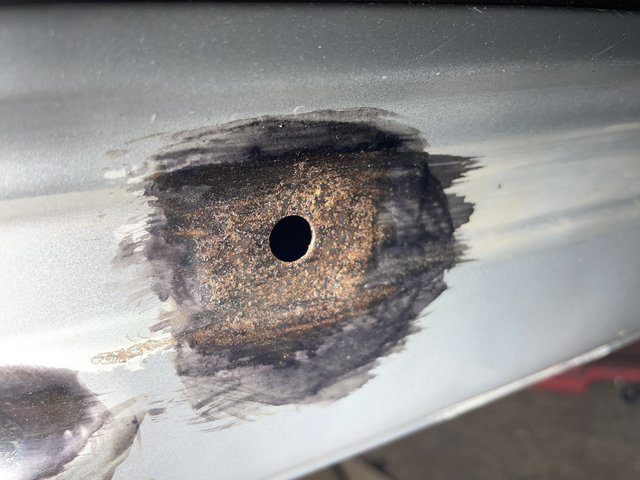 I think, actually I know, that some of them will need cutting out and replacing.  That last hole isn't even round anymore. I had a look through my pictures to remind myself what they were like.  That is not nice. The hole which is no longer round looked like this. 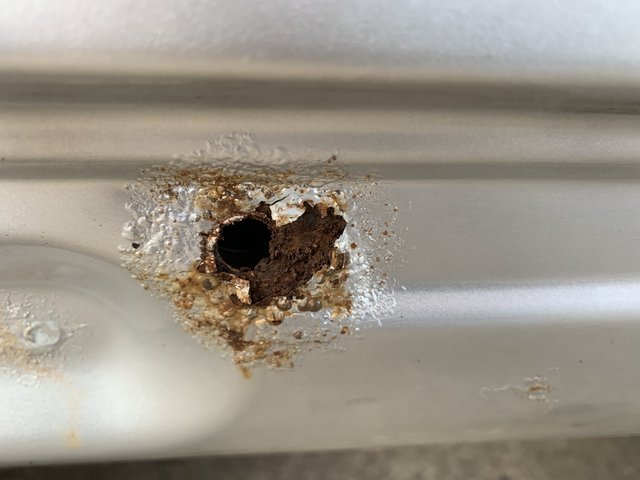 That is terribly scabby. As is to be expected, the job isn't as straightforward as it seems because, although it doesn't show up in these pictures, these holes are situated on a little raised section which I will have to replicate or the sill covers will not sit correctly. This added layer of complication must be the reason that I just cleaned them up and then ignored them. I suppose that I can ponder how I might do it whilst I am cleaning up the floor. Cheers. |
| |
|
|
|
|
|
|
|
|
I'd drill them out with a stepdrill to the outside diameter of an appropriate washer & weld that in. Would that work?
|
| |
|
|
braaap
Posted a lot
  
Posts: 2,709
|
|
|
|
|
How about glueing the sill covers on?
|
| |
|
|
teaboy
Posted a lot
   Make tea, not war.
Posts: 2,113
|
|
|
|
I'd drill them out with a stepdrill to the outside diameter of an appropriate washer & weld that in. Would that work? You are a legend! How about glueing the sill covers on? Don't fancy that, seems a bit of a bodge. Anyway, I've already bought new clips to go in the holes... These holes in the sill, I've been thinking about a way to tackle them and me being me, I came up with all kinds of complicated solutions which would be very difficult and time consuming to do. Luckily, before it came to that a much clearer thinker came up with the idea of opening the holes with a step drill then welding in a suitably sized washer. (Thanks sebastiaan) Such a simple and elegant method and far too straightforward for me to have thought of it. So first off I had to search through the enormous stash of bits to find the clippy things which go in the holes.  They were in the bag of sill cover parts, which is a good thing. This is what the clippy things look like.  Next I went through lots of drawers to find some washers. This looked promising.  And it does what it says on the tin.  The ones in the top left hand corner were just right.   What size hole do I need?  A bit of an oddball size because my step drill only does even numbers, so 18 and 20mm would be closest. It was at this point I came across a slight issue.  I need about 40mm depth to get to 20mm on the drill and whilst that might be possible on some of the holes it isn't on others due to strengthening structures in the sill. The worst hole which is the odd funny shaped one is a case in point. Plan B was to scribe around the washer.  Then open it up with the angry end.  Once I could get it in I tidied the hole with a drum sander on the dremel.  Now it is opened up you can see the thing behind which stopped me using the step drill.  I know that it looks like I could have gone at it with the step drill and it would have gone through the hole in the inner piece but the holes are not concentric. I have a little box of small magnets which would be perfect to hold the washer in place whilst it gets tacked in. I say would be perfect because I can't find them so I have to assume that the Lovely Doctor has put them somewhere 'safe'. There is every probability that I have put them somewhere but as she is still away I am not going to blame myself. I eventually stuck it in with a bit of tape and a much too large magnet.  It just needs to hold it in the right place whilst I tack it so it should work. I don't know for sure if it does work because as soon as I got to the point of needing the welder it started raining because English summer. The welder stayed in the shed and I packed up for the night. Ten minutes after I had packed up and gone into the house it stopped raining... Cheers. |
| |
|
|
|
|
|
|
|
|
That would be a good job for some generous friend with a TIG to stop by and complete while you make tea and serve Hobnobs, Garibaldis, Walker’s Shortbread, Cadbury Milk Chocolate Fingers, etc.
John
|
| |
|
|
braaap
Posted a lot
  
Posts: 2,709
|
|
|
|
|
But now You've got a good a mount of swarf in the sill. Any plans for preventing to rust the next hole into Your sill?
|
| |
|
|
|
|
|
|
|
I'd drill them out with a stepdrill to the outside diameter of an appropriate washer & weld that in. Would that work? You are a legend! Yay, fame! :-) Just wanted to say I am impressed by your progress. I think most of us would've given up and slapped the thing together already, ignoring what lies beneath for a few years. Keep at it! |
| |
|
|
misteralz
Posted a lot
   I may drive a Volkswagen, but I'm scene tax exempt!
Posts: 2,474
|
|
|
|
I know I would have. There's a point where 'good enough' is good enough, especially on what's supposed to be the daily, and especially when there's a lovely aircooled 911 needing attention - and needing using - waiting in the wings! But fair play to you for doing it properly. You're not me, and don't have the problems with energy that I do. Which makes for a cracking thread.  |
| |
|
|
Darkspeed
Club Retro Rides Member
Posts: 4,867
Club RR Member Number: 39
|
|
|
|
The problem is that one mans good enough is another mans unacceptable bodge - This thread has shown very clearly that MTB's idea of 'Good enough' is the same as, or equal to 'The best of ones abilities' Unfortunately for MTB as he's able to do things to a very high standard and that's where his good enough lands. One of the few threads that I never find myself saying - What the  was he thinking... He's very good, however, one area of criticism is that he's too bloody slow - He needs to maintain the quality whilst significantly upping the pace. The number of people that have failed to live long enough to see the end of his thread endeavours is growing alarmingly...... None of us are getting any younger Mr.T Too many distractions with Cake, Breakfasts, Pub Quiz nights, DIY, Gardening, Family..... Great work as always - keep it up. |
| |
|
|
teaboy
Posted a lot
   Make tea, not war.
Posts: 2,113
|
|
|
|
That would be a good job for some generous friend with a TIG to stop by and complete while you make tea and serve Hobnobs, Garibaldis, Walker’s Shortbread, Cadbury Milk Chocolate Fingers, etc. John The main reason that I haven't done much TIG welding on this is because my old TIG plant is big, heavy and it is buried at the back of my shed. I used it when I was repairing the exhaust but I did that job in the shed. But now You've got a good a mount of swarf in the sill. Any plans for preventing to rust the next hole into Your sill? There isn't going to be much swarf in there and what there is should be neutralised by the cavity wax that will be going in there. Yay, fame! :-) Just wanted to say I am impressed by your progress. I think most of us would've given up and slapped the thing together already, ignoring what lies beneath for a few years. Keep at it! Thanks, again. I know I would have. There's a point where 'good enough' is good enough, especially on what's supposed to be the daily, and especially when there's a lovely aircooled 911 needing attention - and needing using - waiting in the wings! But fair play to you for doing it properly. You're not me, and don't have the problems with energy that I do. Which makes for a cracking thread.  I do struggle with energy but I make myself keep doing a little bit just to keep the momentum, it is always difficult to overcome the inertia if you stop. I always try to do things the best that I can and sometimes I get frustrated that I can't do it any better. My 'good enough is good enough' is me doing the job and not ripping it out and having another go to see if I can do it better. The problem is that one mans good enough is another mans unacceptable bodge - This thread has shown very clearly that MTB's idea of 'Good enough' is the same as, or equal to 'The best of ones abilities' Unfortunately for MTB as he's able to do things to a very high standard and that's where his good enough lands. One of the few threads that I never find myself saying - What the  was he thinking... He's very good, however, one area of criticism is that he's too bloody slow - He needs to maintain the quality whilst significantly upping the pace. The number of people that have failed to live long enough to see the end of his thread endeavours is growing alarmingly...... None of us are getting any younger Mr.T Too many distractions with Cake, Breakfasts, Pub Quiz nights, DIY, Gardening, Family..... Great work as always - keep it up. High praise from a man of your stature, DS. I have never been that fast and might be slowing down with age. Speaking of age, there is no guarantee that I will make it to the end of this thread... Last night I got to the stuck in with tape and magnets stage before rain stopped play.  When I got home from work tonight the sun was out so I brought the welder down from the shed and finished off this first hole replacement.  I did burn through a couple of times where the metal was a bit thin so I had to be really careful. Once that was done, I looked at the next hole.  As you might see, the metal around the hole was a bit pitted which ordinarily wouldn't be a problem but because the metal is so thin to start with it makes it almost impossible to weld without blowing holes. What I needed was a bigger washer to repair it with.  You might notice that the hole in the larger washer is a little bit smaller than I need. The problem I had was that although the hole is about 10mm, any large penny washers I had with 10mm holes were slightly oversized, presumably for a bit of clearance, so the clippy things didn't fit them securely. This was why I started out with a smaller hole. I opened it out with the step drill but not all the way to 10mm. I wanted to be as accurate as I could be, so I reamed them to final size.  I trimmed the large washer to fit.  Which allowed me to mark out and remove the old one.  Once everything was trimmed to fit I stuck it in and cleaned it off.  The Doc and my daughter returned home whilst I was doing this and they decided that we were having a take away for tea so I just had time to spooge up the new holes and pack away before they returned from the Chinee.  Cheers. |
| |
|
|
|
|
|
|
|
Yeah! Hope you are paying attention teaboy ! I note that mr Darkspeed doesn't feel the need to criticise my progress on the MR2.    Oh my dear God, I think I might have wet myself laughing... |
| |
|
|
Darkspeed
Club Retro Rides Member
Posts: 4,867
Club RR Member Number: 39
|
|
|
|
I wanted to be as accurate as I could be, so I reamed them to final size.   |
| |
|
|
|
|
|
|
|
|
Re magnets.
I found that the neodyum....nyodeum....powerful magnets from old computer drives are great.
They can even hold against spot welding warp to a degree.
Really need to wrap them in cling film or tape though as they do attract rust n dust in the garage at a fierce rate. But tape etc makes cleaning easy(ier)??
Keep up the good work etc
|
| |
|
|
teaboy
Posted a lot
   Make tea, not war.
Posts: 2,113
|
|
Jul 12, 2024 22:43:52 GMT
|
Well then, it is Friday and I haven't been seen since last Friday. This is because I haven't been in the tent for a full week. Clearly this is abnormal behaviour for me but the reason for it was what happened in the tent last Friday. After I had finished fitting the new hole in the sill I was just laid under the car poking at things like you do, well, like I do at least, when some muck dropped into my eye. Without thinking, I quickly wiped it out with my shirt sleeve, not realising that there were lots of metal filings and stuff stuck to it. This didn't help so I went inside and washed it out with lots of eye wash stuff and I thought it was ok. It was a bit sore but I thought that was only to be expected. Anyway, on Saturday morning it was hurting quite a lot so instead of going to Ten Acres for breakfast I went to the hospital instead. They poured a load of yellow dye in there which made me feel like I was in an episode of the Simpsons. This enabled them to see that although there was nothing in there I had managed to put a nasty scratch on the pupil. They gave me some special eye spooge and told me to be more careful the next time I found myself laid under a car poking at things.  It is funny stuff, this eye spooge. When you try to put it in you squeeze the tube and the stuff curls up and goes the opposite direction to where you want it to go. When you finally manage to apply it it feels like you have just filled your eye with mashed potatoes and you can't really see anything. So, I didn't go in the tent on Sunday. Monday, even if I had been ready to go back into the tent it wouldn't have been well received by the Doc because it was our wedding anniversary so we went out to the beach with Fat Al then went for ice cream. Oh, 24 years if you were wondering. This is the card I got for the Doc.  And this is the one she got for me.  She never remembers our anniversary so it is the one day of the year where I am ahead of the game. My eye was very sore all week, and still is a little bit, so I decided to not mess with the car until I had finished the course of mashed potato cream. This meant that I would be ready for action on Thursday night but due to some ball game on Wednesday the pub quiz had been put back a day. We didn't win... Now all the excuses are out of the way, tonight I had a look at the next hole in the sill. I was optimistically thinking that I could just clean it up and re spooge it (not the potato spooge this time) but when I started cleaning I went right through, just below and to the left of the hole.  So out it came.  It was like this on the inside.  Quite scabby, I trust you'll agree. I tacked in the new bit.  Then carefully started to weld it in.  And sanded it off.  I sanded a bit below the new piece as well.  I noticed that it looked a but pitted in that area and I didn't like the look of it so I cut a new piece.  I gave the new bit a slight curve to match the sill by tapping it on the back of my toe dolly with a dead blow hammer which was just the job. It got a bit of weld through primer on the inside.  Whilst that was drying, I cut the old bit out.  On the whole, that piece wasn't too bad but it was badly pitted on the outside so I am glad I removed it. I stuck the now dried new piece in and cleaned it back. 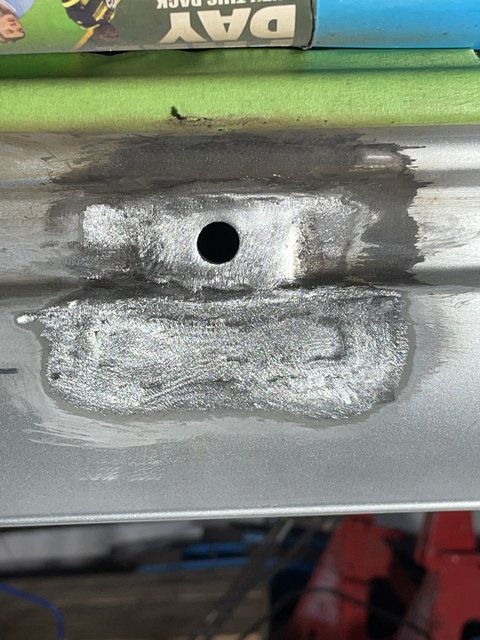 It did sink just a little bit but for something that will be hidden by the sill cover, I think it will be ok. After that, it was time for the usual spooge. 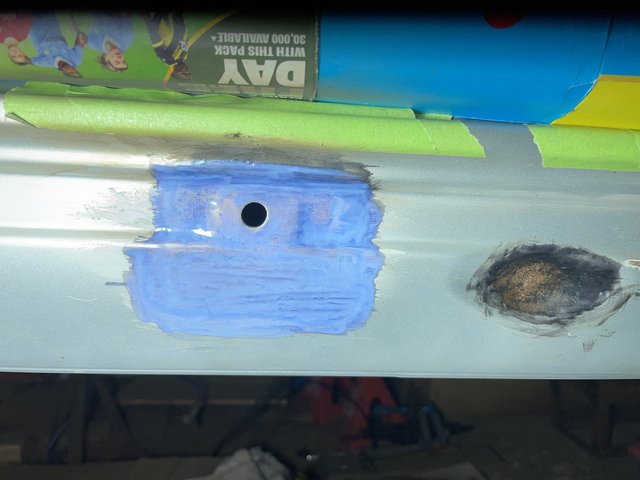 That is another hole replaced, I think there might be two more to do on this side, depending on what they are like when I clean them up. We have lots of things to do this weekend so it is unlikely that I will get to the next hole before Monday. Cheers. |
| |
Last Edit: Jul 12, 2024 22:51:37 GMT by teaboy
|
|


 was he thinking...


