Kai
Part of things

Posts: 276
|
|
|
|
Well, it took a little longer than expected but finally, my build thread! I got home last night and just thought 'SLEEEEEEP', and today i've just been dozing - two weeks of having your fiancee smack you at 3am because you're snoring makes for some poor quality sleepytime  Now, bear in mind that the work has been taking place since November '09, and i'm not happy with some of the earlier stuff - as it was a bit of a rush job in order to get me home (the Welding, for example). Here's the car, when I bought it: 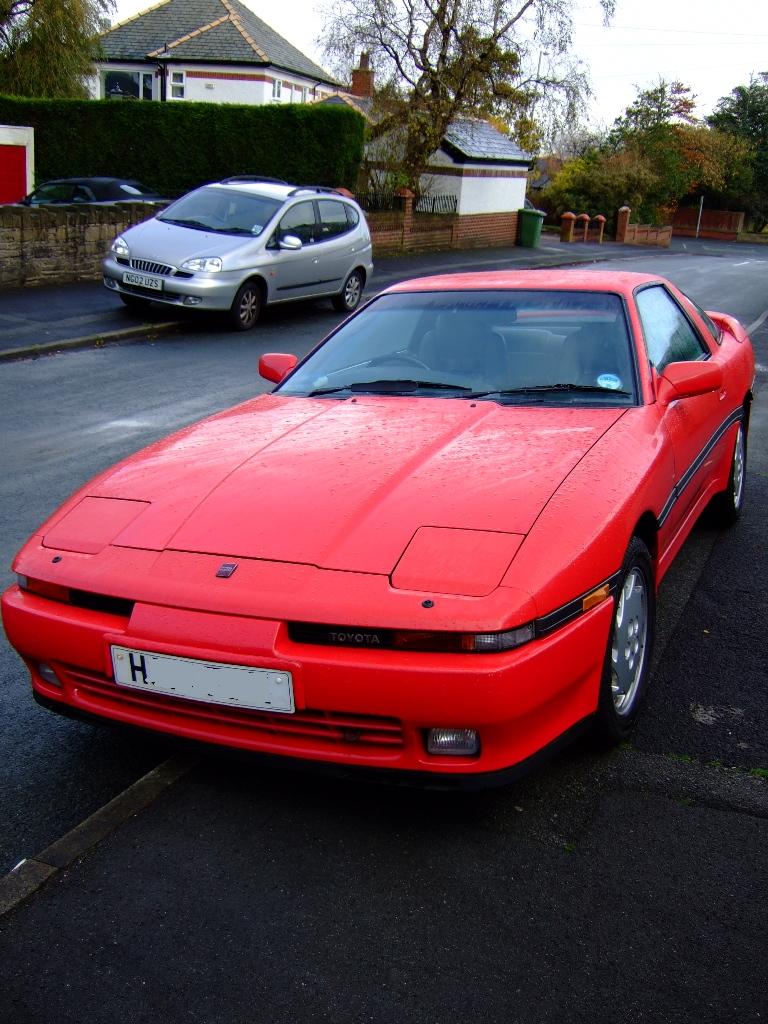 Looks nice and tidy, yes? Now, pay attention children - it's story time! I purchased the car from a supposedly reputable seller & 'mechanic' in Cannock, for £6800 (£2000 for the car + £4800 worth of parts). I did buy it sight unseen, but the photo's made it look fantastic, and I had no reason to doubt the authenticity, as the guy was an 'official vendor' on a forum. What I picked up, seemed fine, but as I arrived there with friends at about 5pm, he was shutting up shop. It was literally a 'grab keys and go' deal. First hurdle? The speed bump exiting the industrial estate tore off the centre exhaust hanging bracket. Okay, probably my fault for not getting out of the car while Sherif drove it over the bump. It's had a supposedly 25mm drop, so nothing too extreme. In actuality though, it's been given a 45mm drop. So, we drove to a petrol station, and proceeded to check it out as much as possible, while there was enough light. Here I shall list the issues: Rear Bumper sagging - only held in with two main bolts. Rear Arches welded up, but BADLY. 4mm Panel Gap between inner and outer arch. Filled with...well...filler. It'll rot before the year is out. Front Nose cone is on the verge of turning dull and pink, as opposed to the bright, red and shiny it was presented to me as having. The Side Trim was about to fall off on both doors - it wouldn't stay in place. The hood latch was so out of place, you needed a screwdriver to CLOSE it. The car pulled to the right, the brakes squealed badly, the 'Mk3 5-spokes' I ordered, are, in fact, Mk4 5-spokes ON SPACERS. There are no 550cc injectors in the boot, along with a bunch of other parts that i'd paid for (J-tube bypass, AFPR etc). The heater didn't work, and only blows out cold air. The A/C smelled like someone has DIED in it. Power Steering crapped out on me, brake fluid reservoir leaked fluid all over the place. Had to stop at a petrol station and buy a bottle of DOT4 just to get me home. Exhaust had fallen off, and the wheel arch liner on the passenger side had fallen off. Engine mounts had disintegrated - which is why the power steering belt failed, the engine canted forward and smacked the crossmember, slicing the belt in the process. I needed a new Alternator belt as well. Probably going to need a new gearbox mount and propshaft as well, at least half the exhaust system is going to need replacing, for at least as long as I can get my HKS LET-16 from Reading. Mechanically, the engine wss sound. Doesn't overheat, oil pressure at warm idle is 20psi, under load, it keeps almost constant 40/41/42psi. The gearbox is good too, no sloppy changes. The HSD coilovers would be 100% fantastic, if the car didn't pull to the right, although they could probably be raised up a little bit for speed bumps. The interior, with the EXCEPTION of the centre console (the gearshift surround upto the heater control panel) wss IMMACULATE. No rips or tears in the leather upholstery, everything where it should be. The Ashtray panel hasn't been secured properly, but thats only two screws. The intercooler I paid £500 for worked, although the welds could have been cleaned up a bit, and the oil cooler is plumbed in fine....although the stock one has, for some reason, been left DANGLING in the engine bay. And then the day after I got it home? The boot hinges disintegrated. Yay, more parts! :/ So it was a long trip to Toyota and a very depressing list of parts needed just for the basics. Unlike a lot of other marques - Toyota charge a stupid amount of money for even basic things like bolts (£1+ EACH, excluding VAT). I forked out £223 for nuts, bolts, screws, trim pieces, a new exhaust hanger and a few other bits. I then forked out another £90 for a pair of new boot hinges. Owie. My wallet DEFINITELY hurt. So then I had to go about the business of sorting out the engine mounts. Want to see the damage? Of course you do!  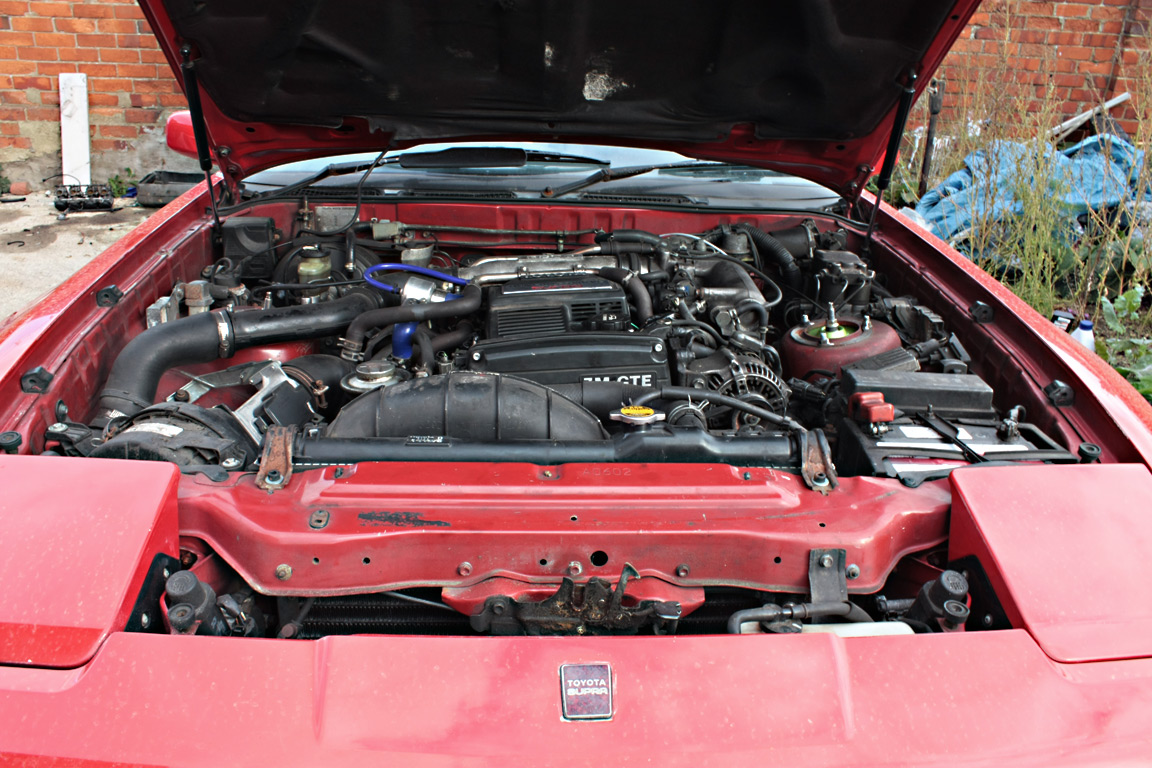 See how badly canted and angled the engine was? 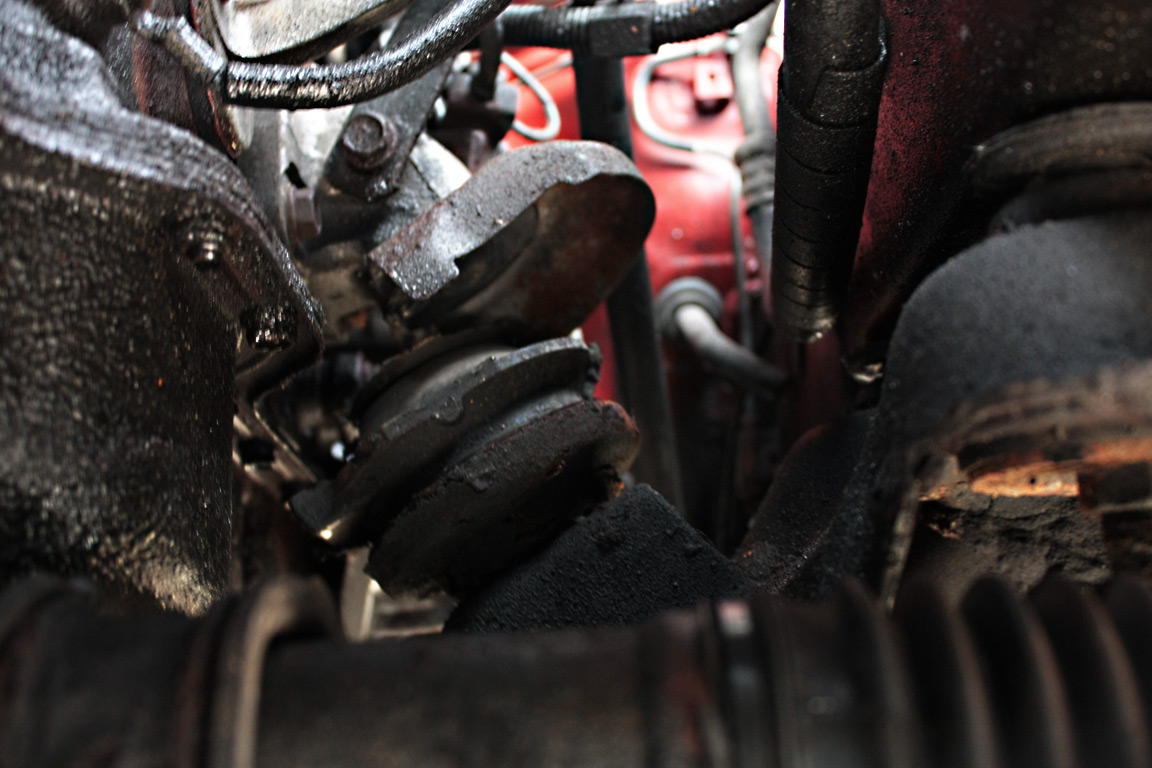 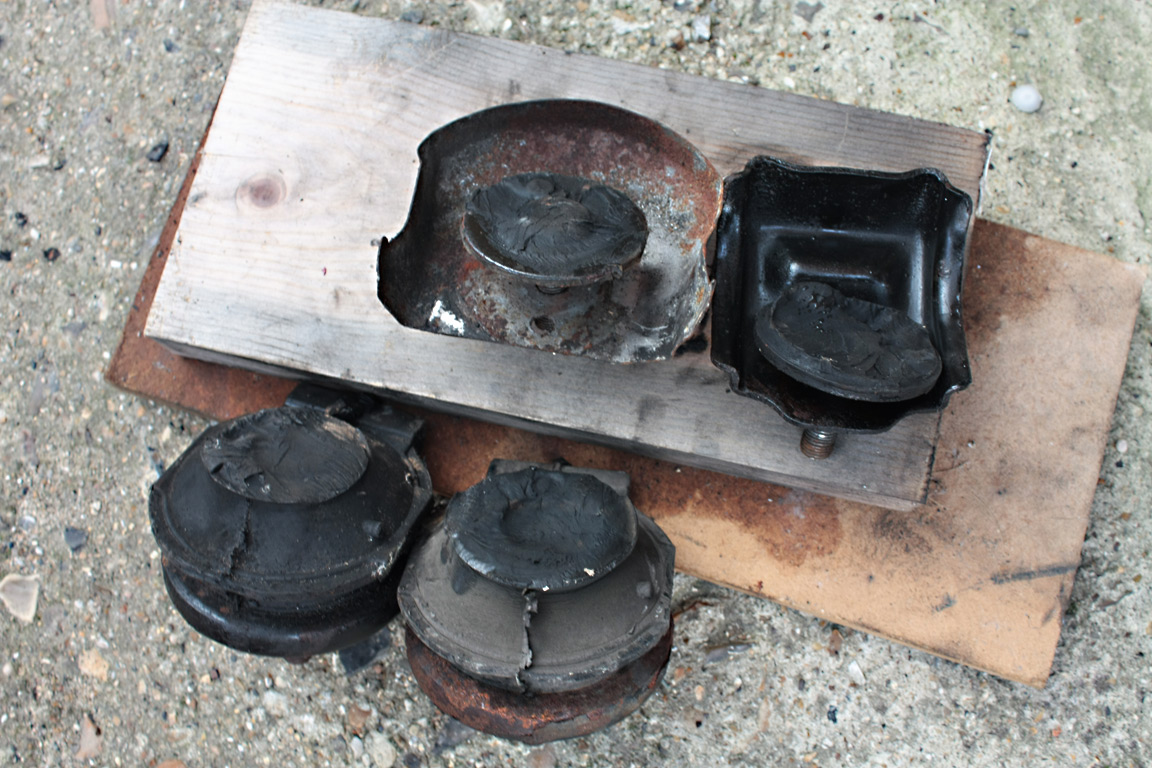 Those are the original mounts. No-one has EVER heard of these things shearing like that. Of course it being canted over so much, made the fan do this:  Thankfully, I managed to get a pair of second hand mounts in good condition for £20 a pair from a local member on the UK forum. The end result is an engine bay that doesn't look so skew-wiff:  Lovely, eh? Well you'd think that'd be the end of it, right? Wrong. We found this, lurking in the boot    I damn near cried when I saw that. In fact, I think I did! However, crying or not, I had to sort it in order to get me back to France safely. Please note, this is NOT a permanent repair - but a stopgap - til I can get a MIG welder, and maybe some rear sections from a shell in somewhere like california. So, my friend Ed broke out an angle grinder with a big twisty wire brush, and some U-Pol Weldthru Primer to create this: 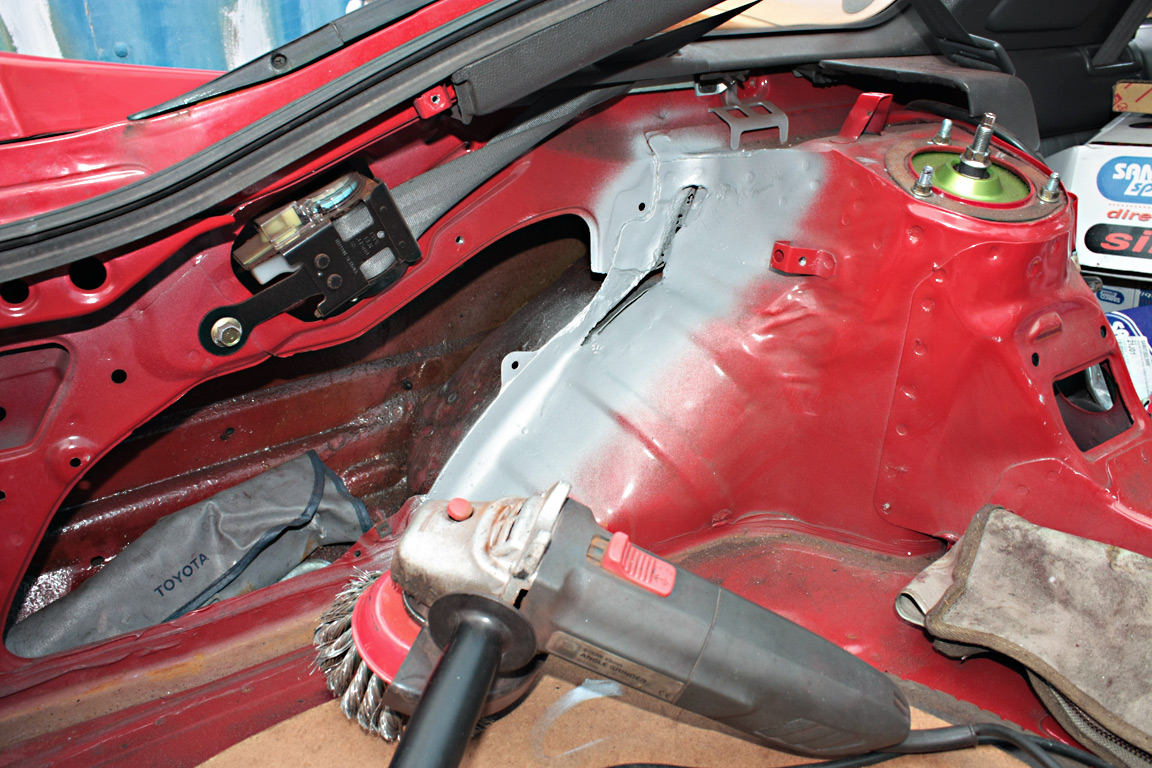 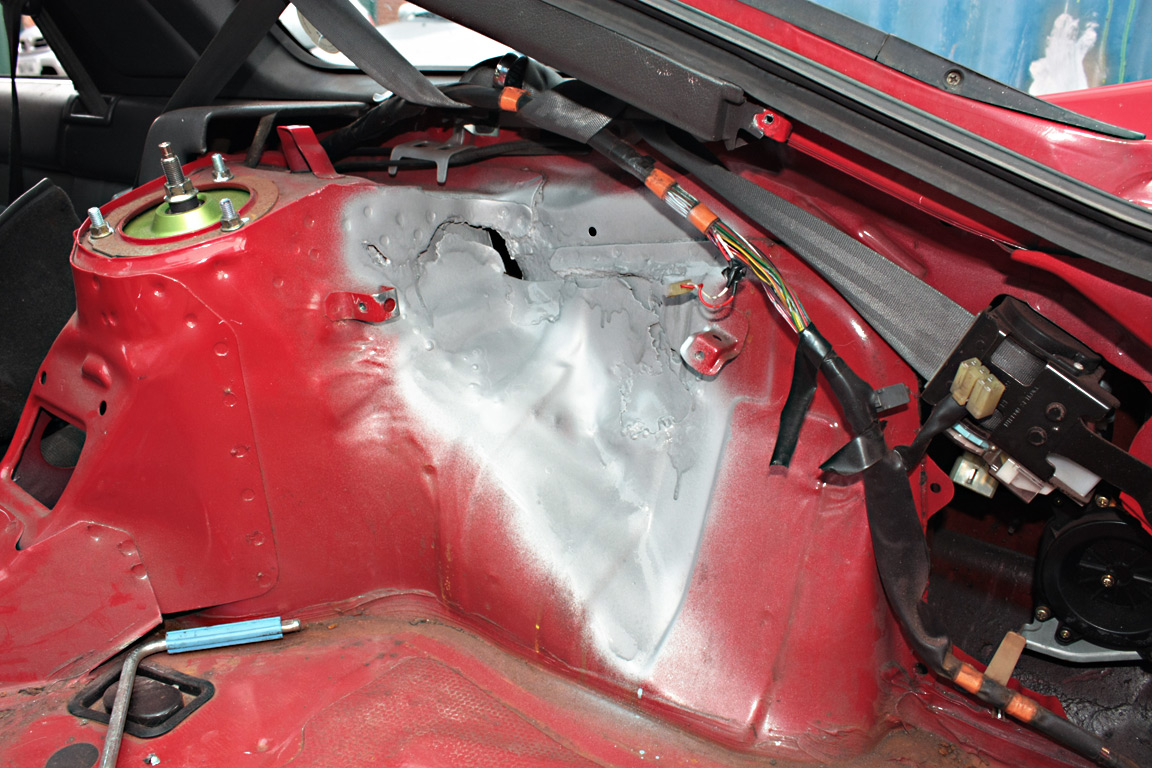 And then with a picky Mig Welder, and fading light, Ed patched the horrible looking bits with some metal hammered into place. No time or enough light to do the bits properly for now - it's to far gone to really do much without chopping out that whole chunk & starting again. Excuse the poor quality of these ones, they were taken on my phone! 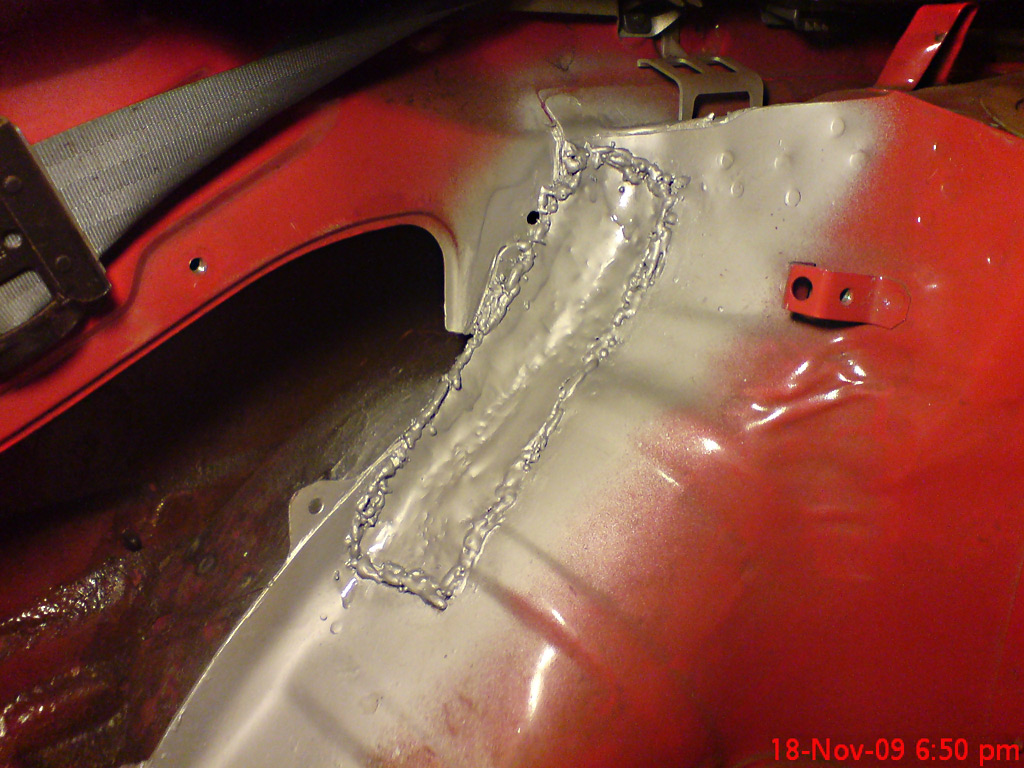 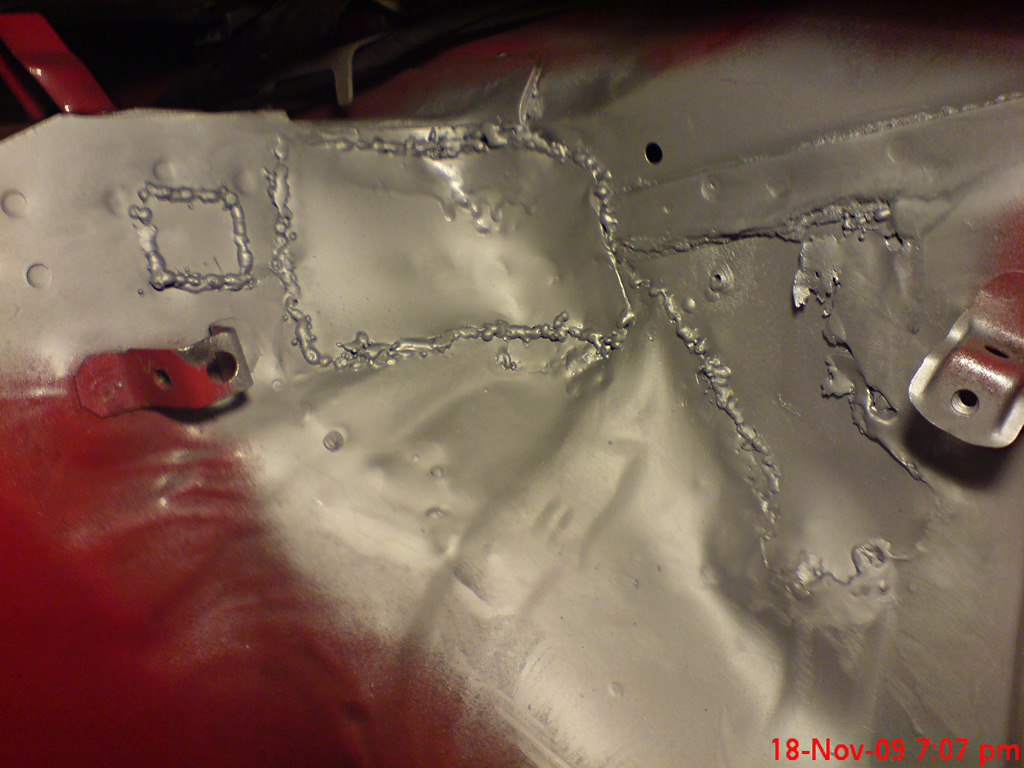 After this, another £200 was expended at a Toyota dealership on yet more parts, gaskets, bolts, all the other 'little' things that you overlook, but add up, pricewise, especially from Toyota! :/ Now - that covers the bodywork side of things, i'll get cracking on the engine side of things in a bit - I need food! |
| |
Last Edit: Jul 23, 2011 23:02:03 GMT by Kai
|
|
|
|
Kai
Part of things
Posts: 276
|
|
|
|
...wow, that bad eh? |
| |
|
|
|
|
|
Jan 10, 2011 12:30:05 GMT
|
|
If I paid that much for the car, I think I'd have cried...
Plus the money for parts that are half missing. Well, there are a few things that would be rather tempting... Glad I didn't buy the white auto one that was on e-bay not long ago though! It looked far far worse than yours does! Granted it was less than a 1/4 of the price.
Good luck when it comes to repair that properly.
|
| |
|
|
jonnyf
Part of things
Posts: 177
|
|
Jan 10, 2011 12:53:13 GMT
|
|
One of my favorite cars! Hate to say it, classic example of don't hand over the money till your happy.
Hope you fix all the issues with it. Good luck.
|
| |
|
|
|
|
|
Jan 10, 2011 12:53:15 GMT
|
Why didn't you take it back and ram it up his  ? |
| |
|
|
Kai
Part of things
Posts: 276
|
|
Jan 10, 2011 20:48:57 GMT
|
Well, to be fair - i *did* get all the parts i paid for in the end. £500 of the parts cost was a spare shortblock, but the head turned out to be annealed and warped. The block did need machinework, but that was to be expected, most 'spare' engines are in dire need of new bearings & a crank grind! Theres a lot of dodgy dealings going on with the cars past, but there's nowt i can do about it really, so i just have to get on with the build  I'm going to make something for tea and then post up the fun fun engine kaboom episode next |
| |
|
|
Kai
Part of things
Posts: 276
|
|
|
|
Right - so, engine. Well, I got it back here after all the welding, and there were a few more bits and pieces I twiddled with, like the Camshaft position sensor, and a temporary patch on the coil pack connector. And it ran fine. Until March 30th, when I decided that after doing an interior valet and clearout and getting it looking shiny, I took it for a drive as the sun was going down. However, on a hairpin bend, at about 50mph, the power steering went DEAD and nearly stuffed me into a tree. I figured it was the belt, as it has done it before. Immediately, I headed back home via the most direct route possible, but without power steering, you need forearms like popeye - it really is a heavy child born out of wedlock! Of course, if problems weren't bad enough - halfway home, there was a dull thud and the engine cut out. It wouldn't start. So, I coasted to a stop, popped the bonnet. What greeted me, was the sight of the power steering belt wrapped around all the other engine bay belts, which was odd as it should have dropped onto the road. I pulled what I could out of the engine, but there was still a tight wedge wrapped around the water pump pulley. I *had* to get home. So, I tried starting it and it sounded ROUGH. I babied it - doing no more than 20mph. When I hit my courtyard, the engine just coughed and died. Gave up the ghost. Wouldn't restart. Opened up the bonnet and a cloud of oily steam was released. Ohhhh lovely - blown head gasket. It's common on the 7M as the torque spec was given for an Asbestos gasket, but then asbestos gaskets were banned, and the gasket changed for a composite one. But the spec wasn't changed along with it. 56lb/ft is NOT enough torque on the bolts, so most have had at least one gasket go by now. I gave up for the night, as it was too dark to do anything with. Following morning it started, sounding like it was running on three cylinders, engine management light showing 'er, hi, yeah, we need to have a word' Managed to reverse it back into my hangar bay, and immediately started to strip down the engine. By 4pm, things looked like this: 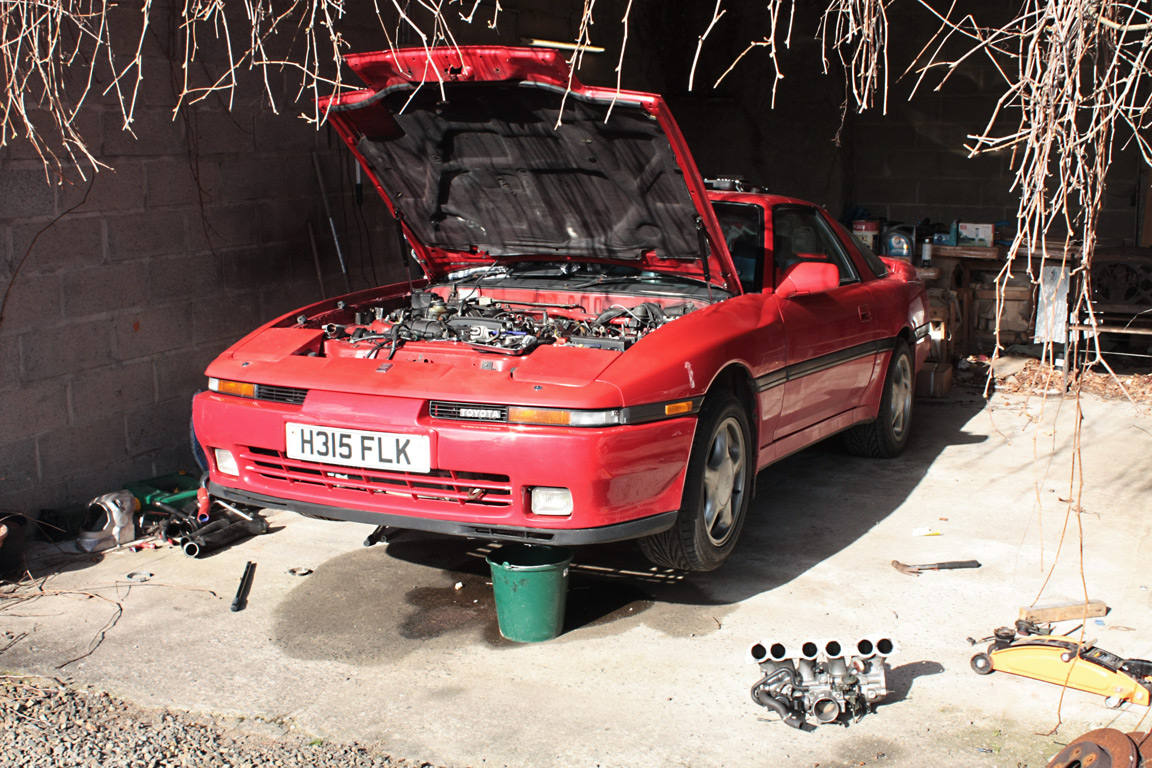 Yes, that is the upper intake manifold on the floor! 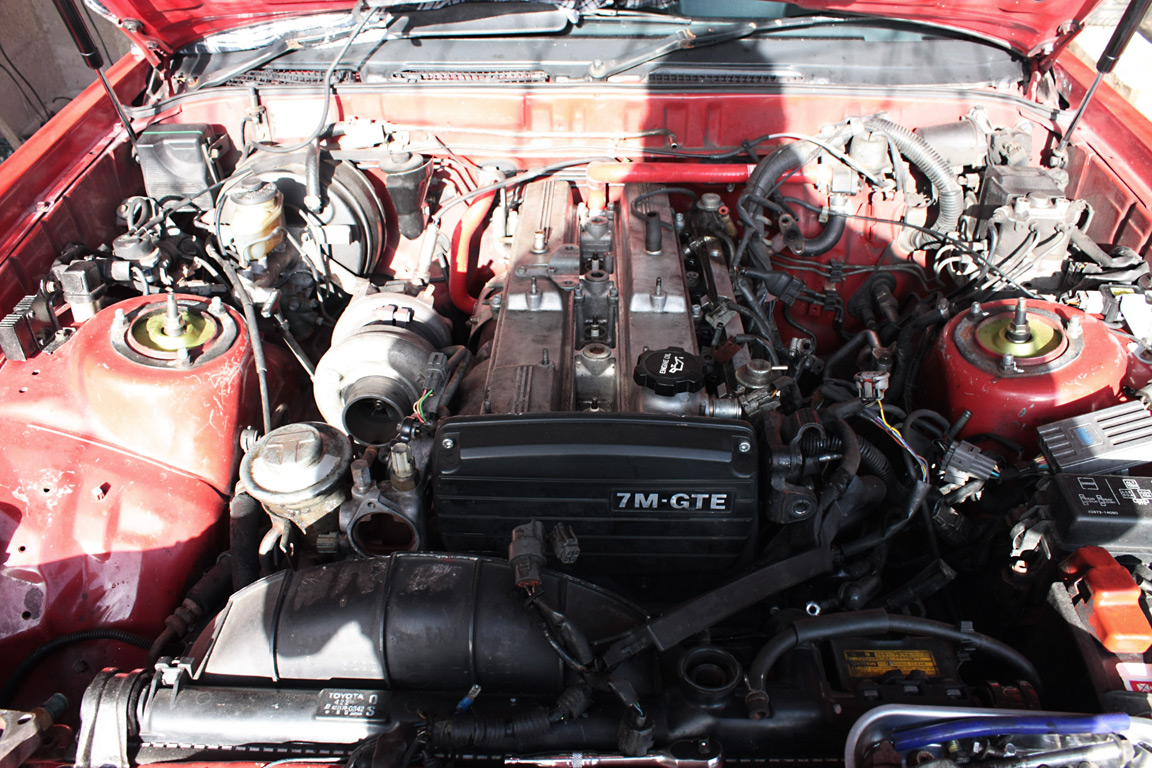 So the plan was to use a stock OEM Toyota Gasket set for the rebuild, with ARP Head studs, remove the EGR system, and use the top end failure as an excuse to do a proper job all round. Once I got the turbo off (an AWKWARD JOB) and spent 3 hours cleaning it, I found out that it was a Turbo Technics Stage 1 hybrid - the housing is a stock CT-26 thats been milled out to accept a modified CHRA. The compressor wheel in it looks almost identical to a Garrett T04B-S3 (70mm/48mm, 7 main fins, 7 sub) so it should be good for about 17psi or so, although i'd hit fuel cut at around 10psi until I get around to fitting a new AFPR, SAFC II/SAFC Neo, 550cc injectors and Lexus AFM. 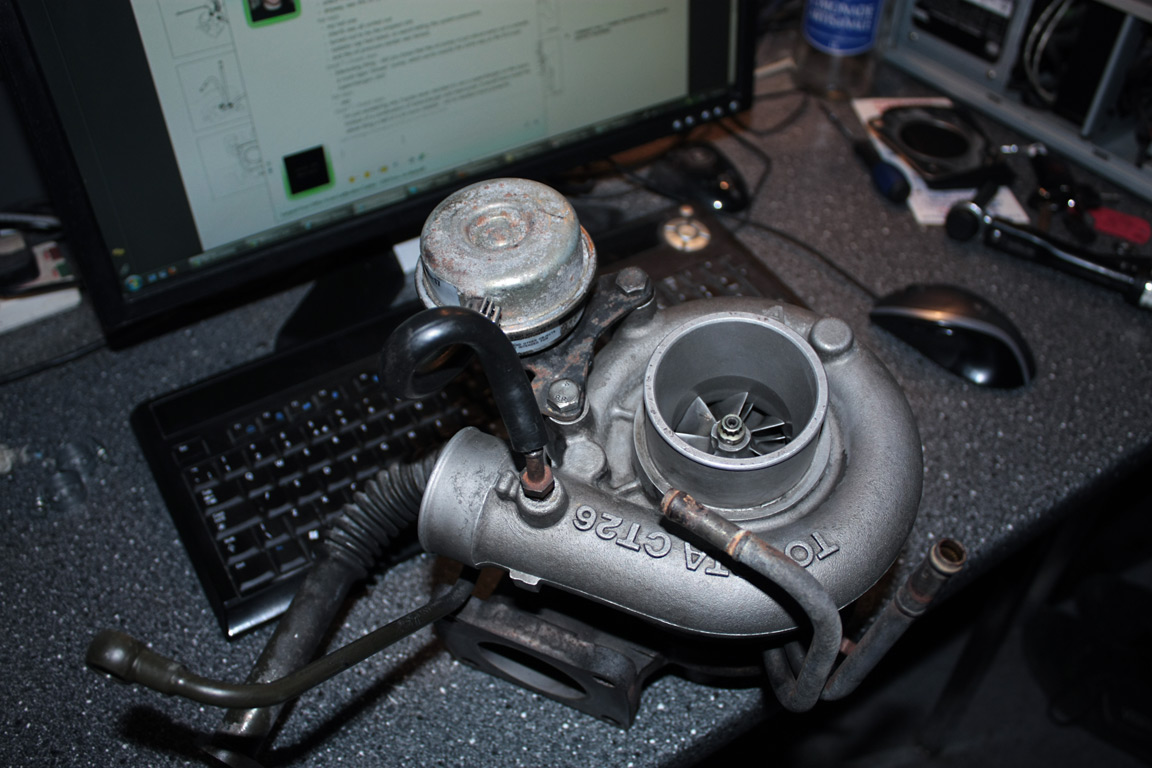 More and more parts were stripped away, and finally came the job of removing the half-crispy wiring. Ew. That's all I can say. The plastic bit that goes across the upper timing cover just crumbled away in my hands. Some fuckwit had decided to rewire the knock sensors with DOORBELL WIRE. With SCOTCH TAPE. The wiring itself was half baked after 20 years of heat cycling. Time for that to go away to my mate Johnny in Bracknell, who is a wiring loom GOD. And he does them for FUN (a little mental!) 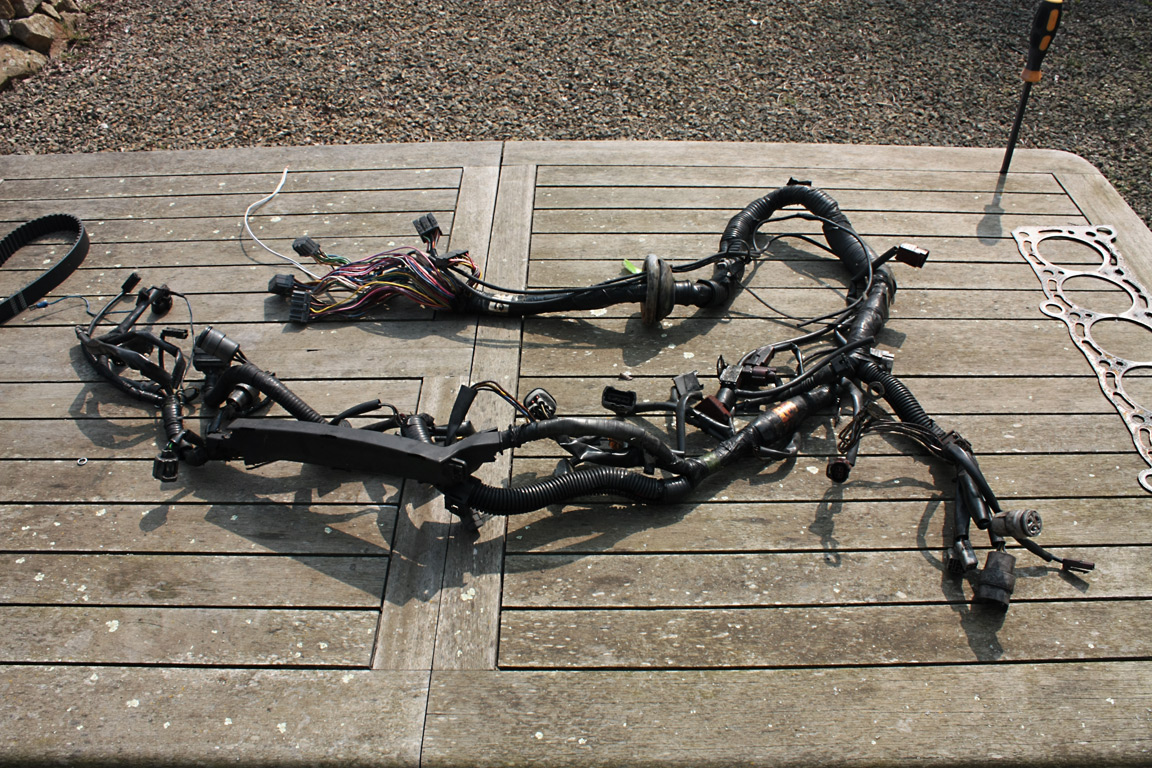 Before I tackled getting the head off, I started on cleaning up the rest of the parts i'd removed. First up, the Fuel Rail:  Then the Upper & Lower Intake manifolds   Following day, it was time for the head to come off!   The face of it was pretty good, no nicks or dinks out of it, and a green scourer and petrol brought it up nice and shiny, and when measured with a straight edge & feeler gauge, there was no appreciable warping. I removed the EGR cooler whilst I was at it, and about a half kilo of oil & carbon buildup along with it! 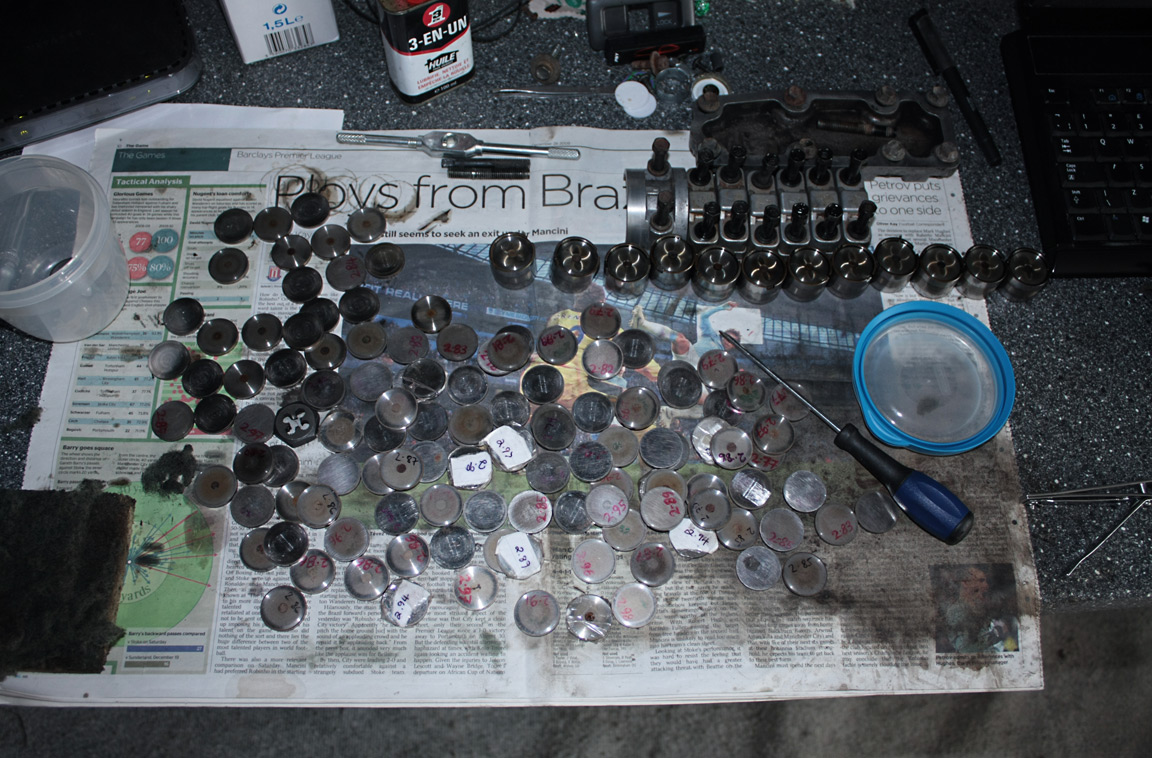 I've cleaned the cylinder head about as much as I can physically manage without having it hot tanked. A pressure washer and dishsoap did wonders for removing a huge amount of built up, baked on oil deposits, and acetone on a toothbrush for the fiddly area's. However, there are areas of the head that still aren't clean, but I just can't get to it, and honestly can't be bothered to do. I know it's probably a bad thing to say, but there's only so much 'clean' you need, IMO. At least, on an almost stock, budget build. The cams came out, as well as the buckets AND the shims. Upon measuring the clearances and the shims, it looks like i'm going to need some 3+mm shims, as most of the clearances I measured were 0.40 and even .45mm - way, way, WAYYYYYY out of spec! My right arm became exhausted through scrubbing with toothbrush & scourers - cleaning the cams til they come up near MIRROR finish on the lobes puts masturbating into 3rd place for arm cramp! All the valves were removed, cleaned along with the valve springs and seats, then ground back in with fine paste only. New valve stem oil seals were installed as well. After all of that, all that comes into my mind are the words: "I HATE COLLETS." Cam caps are all torqued down to 20NM and the #1 caps have been sealed with FIPG (using Loctite Copper FIPG instead of the Toyota stuff thats...silly money). CPS has been loosely installed, but i'm pretty sure it's about as bang on as I can get by eye. Front cam gear plate has been installed after being painted at around 6am, and all the lifting hooks have been installed as well. The fuel rail was then re-installed, but this time, with the set of 550cc RC Injectors, and to make sure I don't run pig rich, the Lexus AFM housing has had the Supra AFM electronics installed, and the accordion hose to turbo fitted (curse word of a job to do as you have to stretch the rubber over the larger opening). End result? Have a look for yourself! 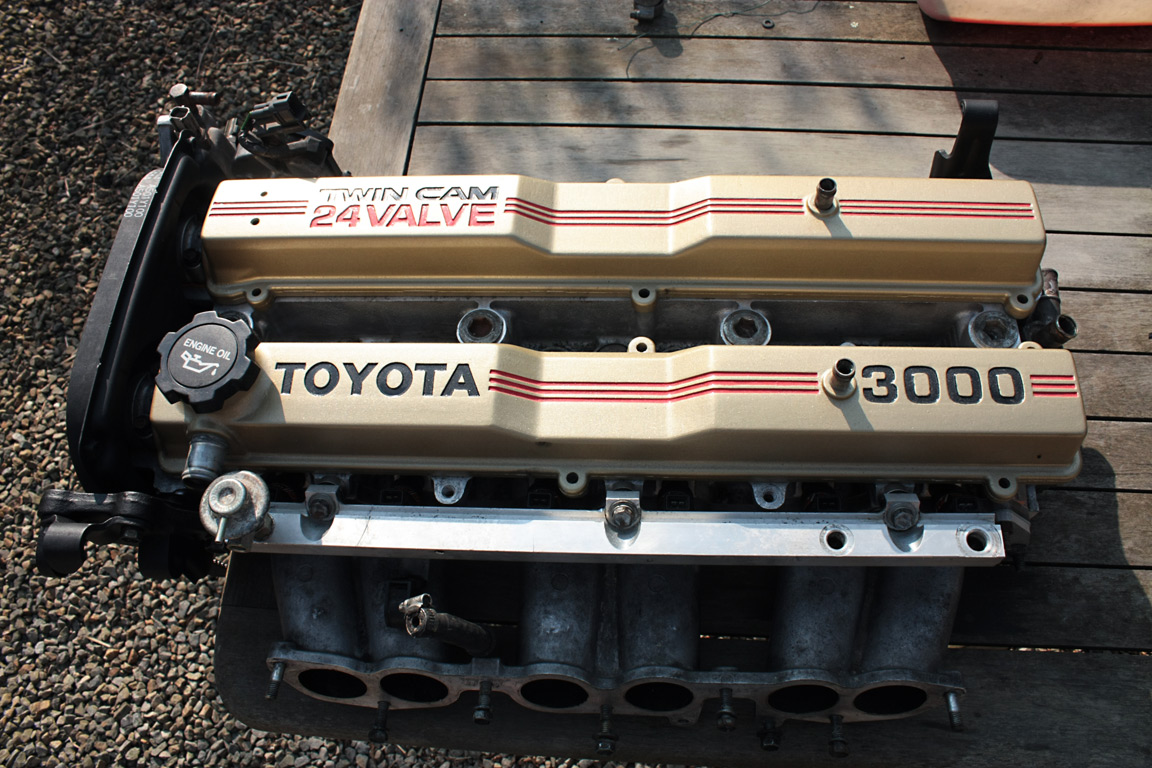 So - what about the gasket that came off? Well, here it is, next to a brand new one - note that Cylinders 1, 5 & 6 were all blown on the water jackets, and the gasket had all but disintegrated. 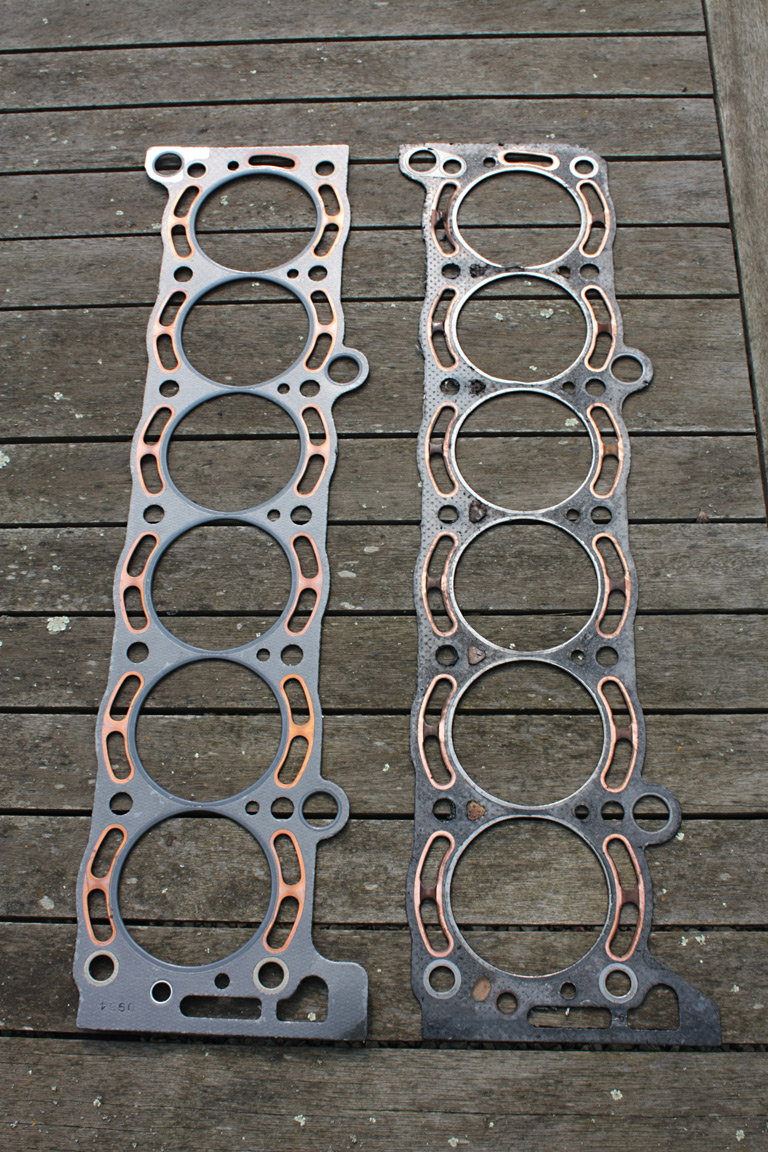 Next up? The block - but i'll leave that for after breakfast! |
| |
Last Edit: Jul 23, 2011 23:17:08 GMT by Kai
|
|
Kai
Part of things
Posts: 276
|
|
Jan 14, 2011 12:43:29 GMT
|
...either thats a very long breakfast, or I got sidetracked yesterday So - the block was still in dire need of cleaning up. I deliberately DIDN'T drain the oil, although I DID drain the coolant. My theory is, anything that gets into the sump via the oil passages, will be flushed out when I drain the oil and refill with 30 weight startup oil. Once it's been run to temperature, that oil gets drained, new filter goes on, 5w30 semi-synthetic goes in and that'll go for 500 miles or so before it gets switched out with another new filter and the last load of 5w30 semi-synthetic for the next 5000 miles. Anyway, the block surface was grungy as anything, with oil and gasket deposits, so what did I use to get it clean? Twisted wire brush on an angle grinder, then a green scourer, then 400/800/1200 grit wet & dry on a sanding block with 3-in-1 oil. 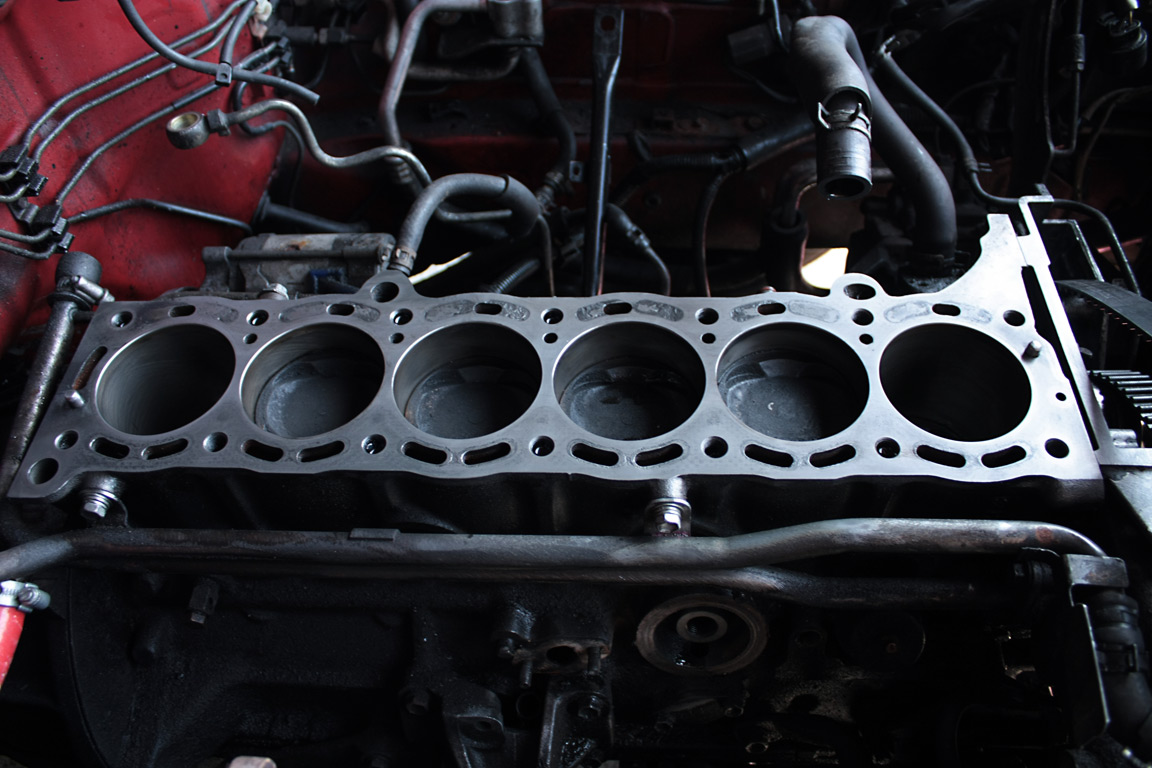 The waterways still look a little 'oogly', a bit pitted, but thats sort of to be expected I guess - not much that can be done about it without spending SILLY money on 5 thou skim (the charge at my local machine shop is several HUNDRED euro's!) It was finally time to install the head. I cleaned all the threads out with an M12x1.25 tap (bloody expensive!!), and in went the ARP's with moly lube: 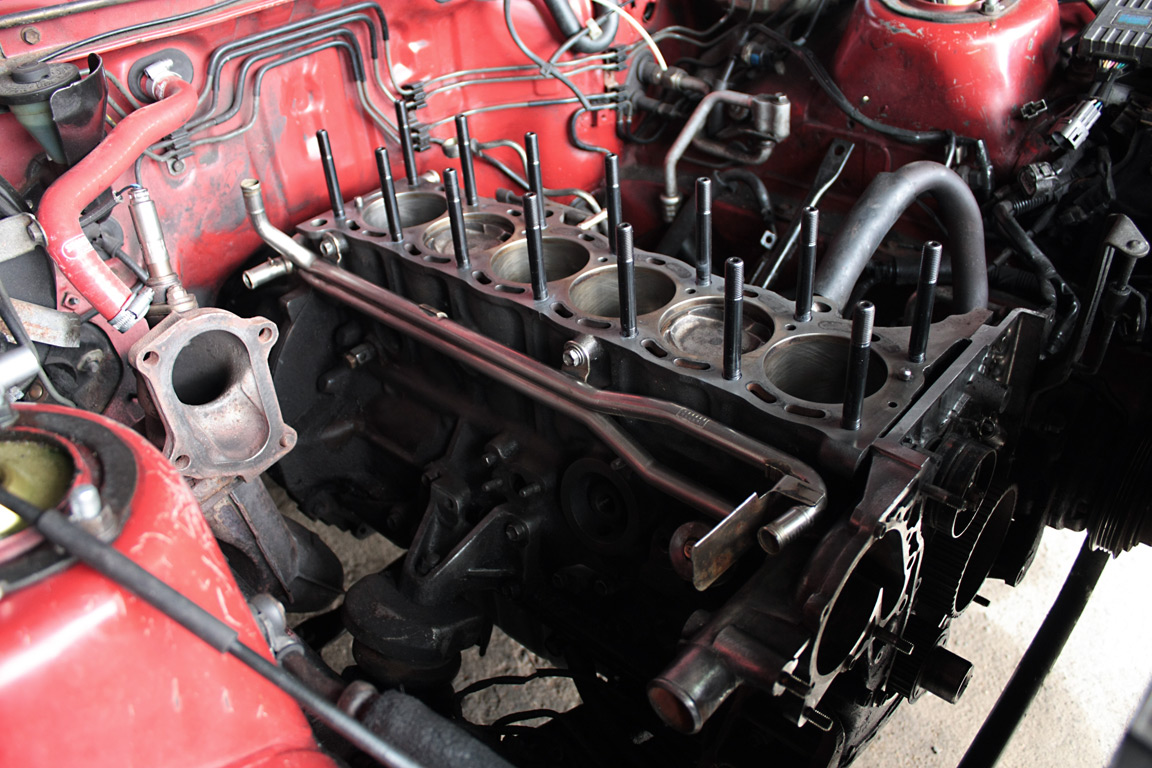 Unfortunately, there was a slight issue. Turns out that if you try to install the ARP studs in the block when the block is in the car, the head will foul against the firewall when you try to install it, so, the studs all came back out again, gasket was put in place over the dowel pegs in the block and the head put on top. ARP's then had the nuts installed (with plenty of moly lube) and the washers dropped into place. All the nuts on the studs were torqued up in stages (30, 40, 50, 60, 70 lb) and finally 75lb/ft for the final pass. I was thinking about going to 80lb/ft *but* the socket i'm using ran the risk of shearing before the nuts did! End result was this: 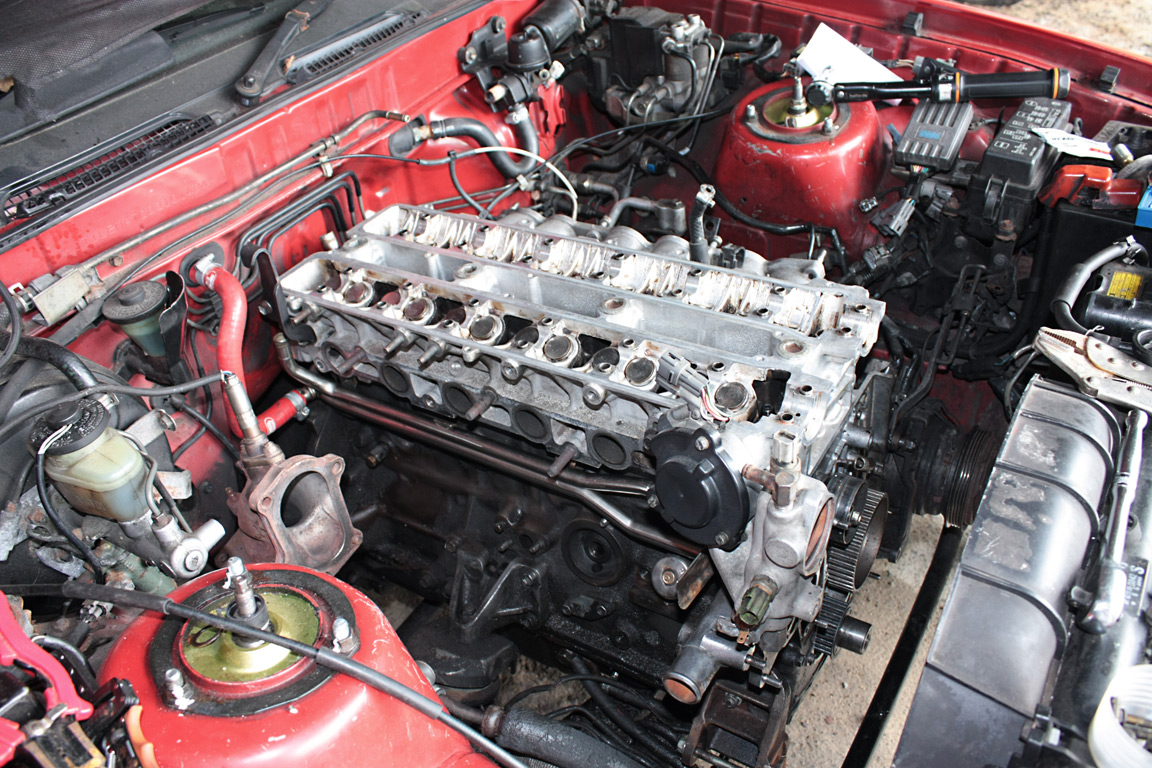 I considered leaving things like that, and waiting to install the camshafts when I got hold of the valve shims (shim over bucket lifter setup). However, I decided that ultimately, I could just deal with the two person ballache when I got everything back together and 'weather tight'. On went the upper timing cover, and then the cam pulleys, torqued to 36lb/ft. At which point the light was fading rapidly, and the rain started. Time to pack it in for the evening looking like so:  Despite everything going pretty smoothly throughout the day, there was ONE snag getting the water pump on though - the water pump housing uses two locating dowels, one at the top, one at the bottom (you can see them in the picture), and the bolts go through the middle of them. Sods law stepped in on my behalf - first bolt I decided to put in was the lower dowel bolt. Head sheared off as if the damn thing were made of cheese! *cue lots of swearing, tools being flung into the courtyard, face turning red etc* I thought - okay, as the bolt thread has just been tapped and the bolt ran through a die seconds before, it shouldn't be seized. The bolt just goes right the way through the housing, so I could feel it protruding. Tried unscrewing it from behind and it worked for about a turn, then I couldn't get enough torque on it. Again, cue swearing. I don't have any reverse drillbits or anything suitable to remove it. So, I considered leaving the bolt in there and just using some loctite sealant on the gasket around the dowel. But no, I ruled that out as being a bit cletus - and i'm a neat freak. Overengineered or not, I was determined to get this sodding thing out! Phoned my mate Ed, who explained that the dowels can be removed from the water pump housing (front timing plate) and you can buy spares. With the dowel out of the way, i'd have just enough protrusion to get a set of vice grips on the bolt and back it out that way. Time for a screwdriver and a hammer - sliced halfway through the dowel, and grabbed the lot with the vice grips - the dowel had mashed itself into the bolt thread still in there, and pulled it out when I turned the mangled dowel peg - WOOHOO! IT'S FREE & OUT! Thankfully, and most unlike Toyota, the parts are still available (Part Number 16185-70010, if you wanted to know ), and only €2.44 each + VAT @ 19.6% - I bought two as a "just in case" measure, and proper Toyota bolts, cause i've had quite enough of curse word breaking, it's why i've been anal about buying new studs for the exhaust side of things - you just KNOW they'll turn to cheese and shear! Despite the weather being dismal and the light all but gone, I still felt productive, and wanted to get on with something else. I decided that i'd clean off the N/A cam covers I had laying around (ultimately what I want to use with a set of IS300 coils, getting rid of the stock coilpack), and detail them back to as close to factory as possible. The covers were degreased (put through the dishwasher!), and all the old paint scraped off painstakingly with a craft knife from every little hidey hole, before being masked off. Grabbed a copy of the Daily Fail and promptly wallpapered an entire corner of my kitchen with it. One can of Halfords Primer and they looked very much like this: 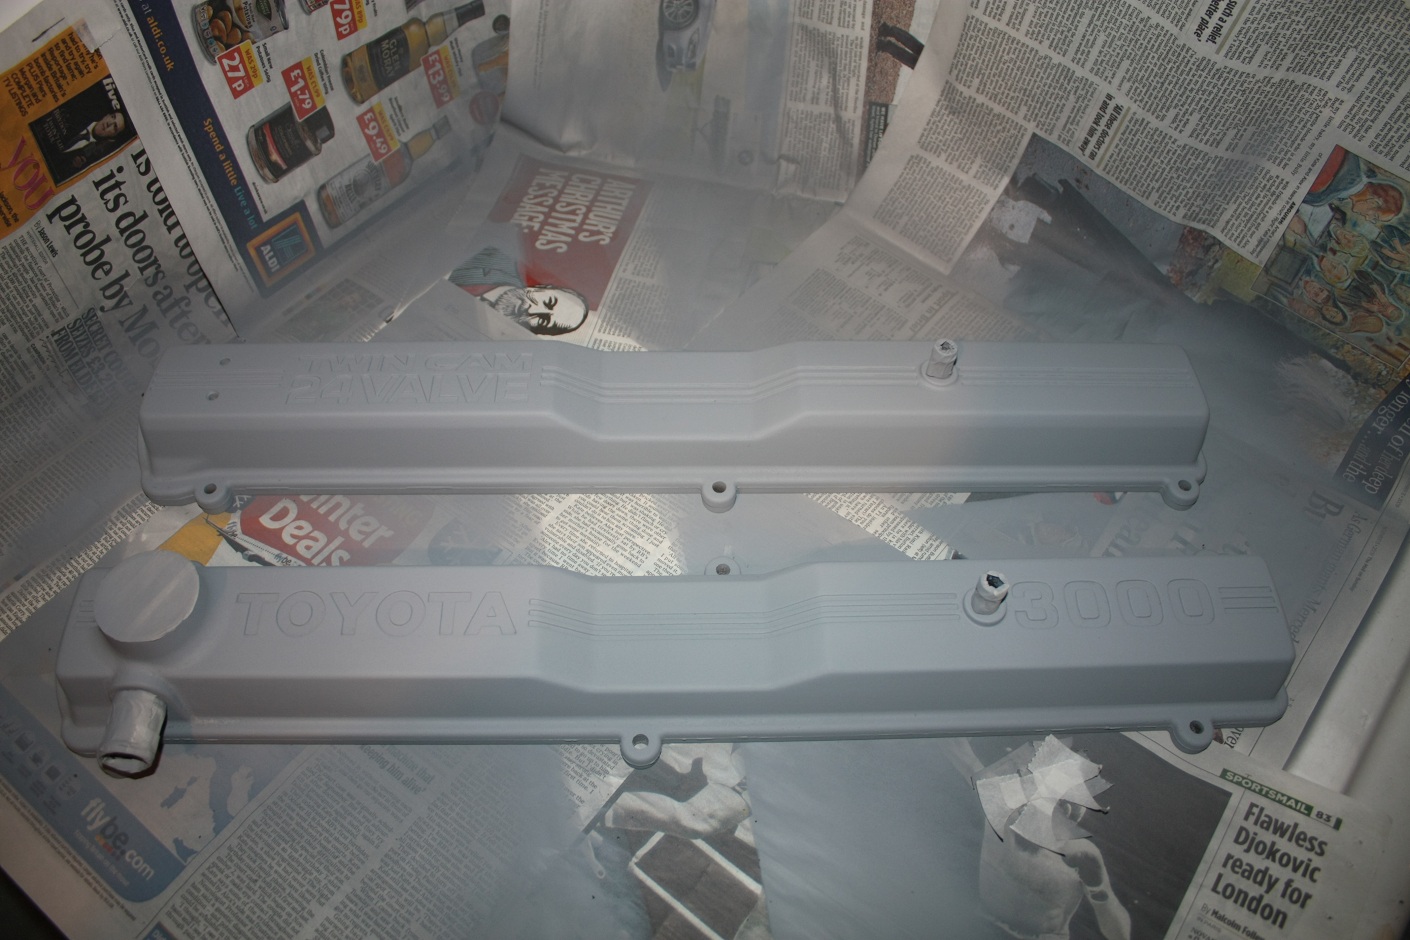 Once dry - out came the second rattle can, this one was Halfords own 'Ford Solar Gold' - it felt wrong, using a Ford colour, in a Toyota, but the results speak for themselves! 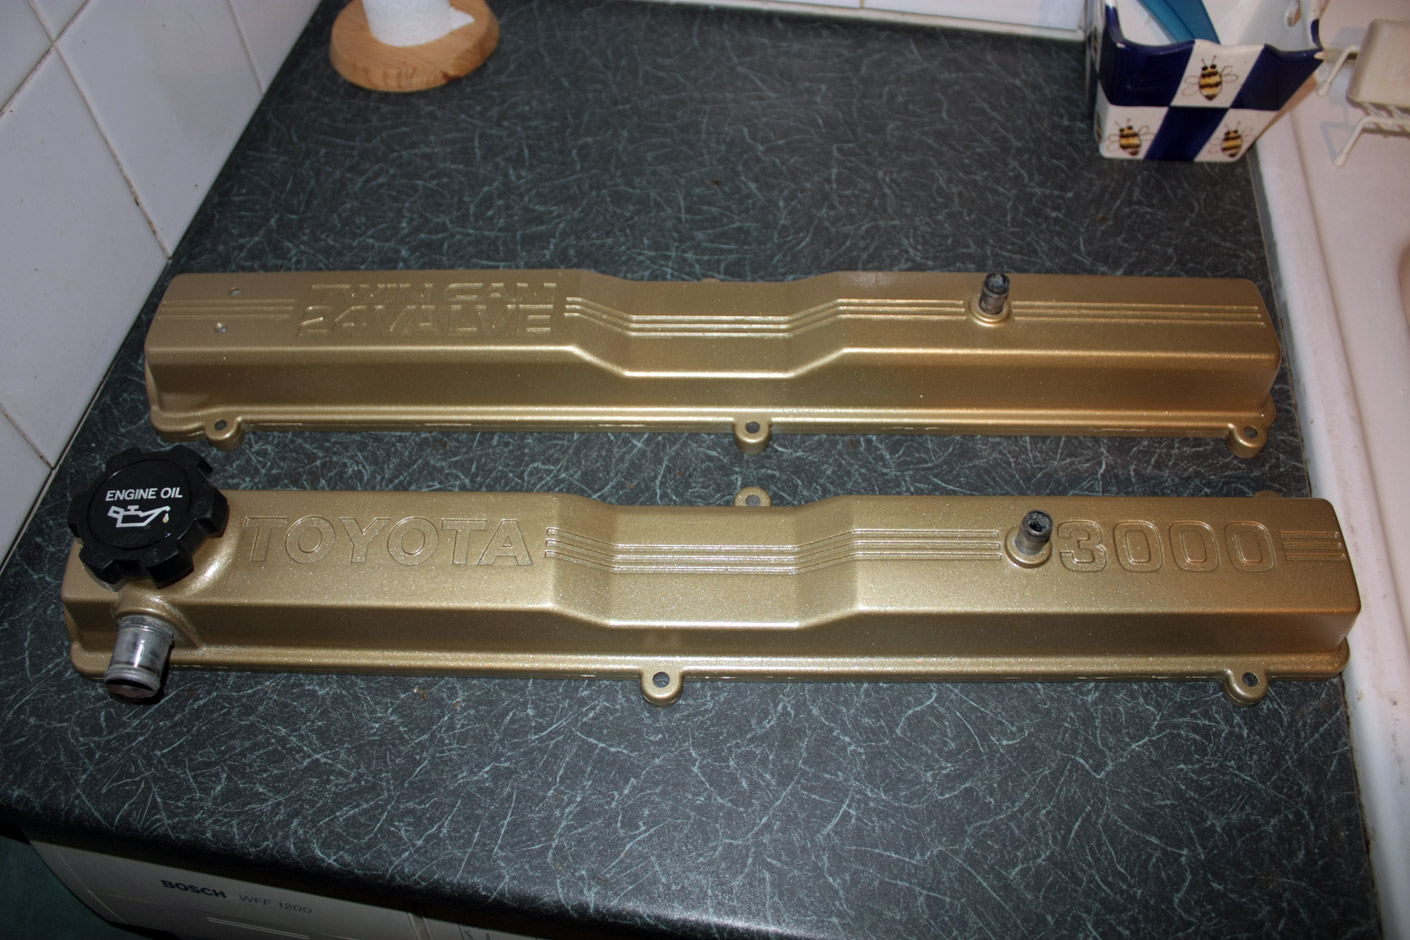 These were left to dry overnight, before I began the detailing process. I must admit, this was the bit I found the hardest, as I have Multiple Sclerosis, and my fine motor control is twitchy at best, you can see the imperfections, despite my best attempts at masking everything off, but overall, I was happy with how it all turned out: 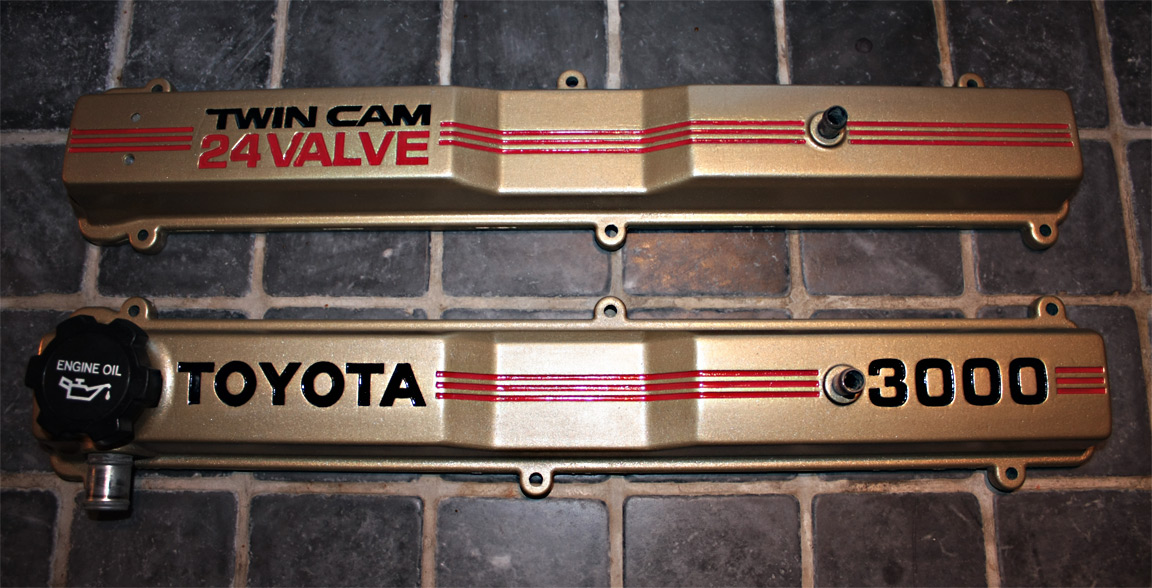 Again - all was left to dry properly overnight. I had a bit of a break from doing any mechanical work to let my hands recover! Following day, the cam covers were test fitted to the head: 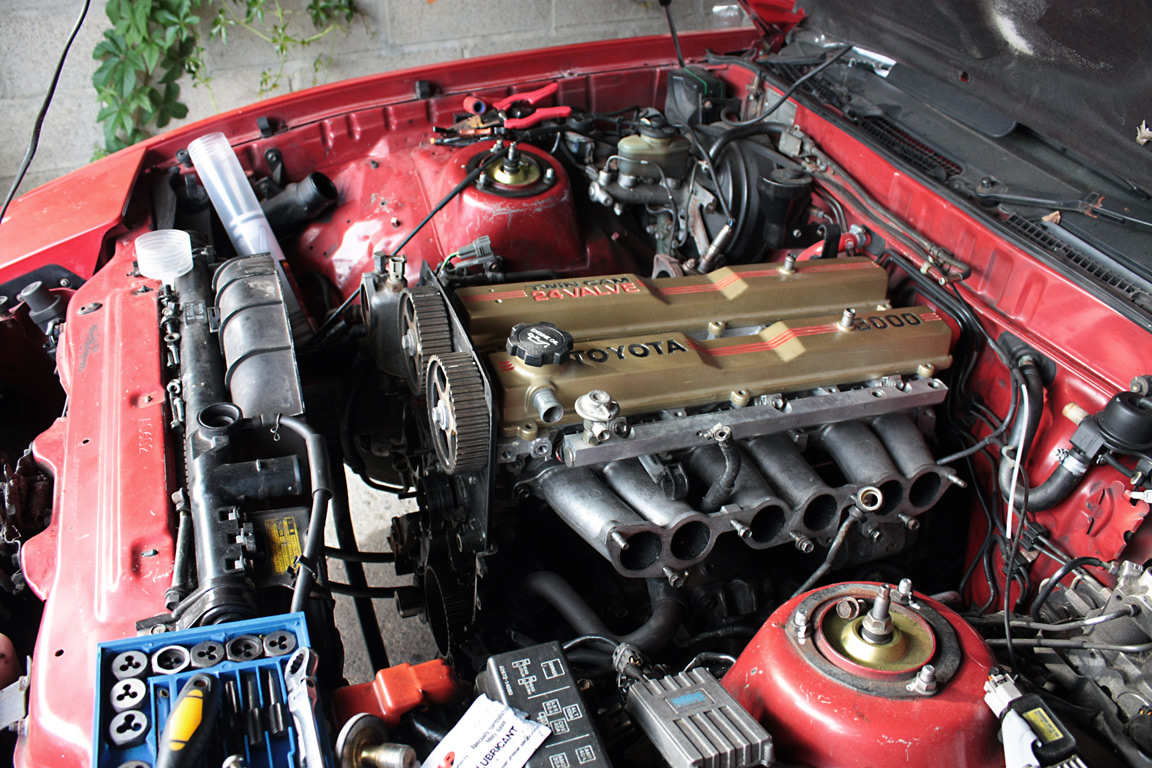 Showed this on SupraMania and the response was overwhelmingly positive, as the red/gold colour scheme seems to work rather well! Anyway, I had to get on with something productive, and thus the timing belt was installed, despite a fair amount of swearing. Looks so easy in the TSRM - just move the belt tensioner pulley over, bolt it up hand tight so it gives the belt slack...then stretch the belt over, right? The amount of swearing and scraped knuckles it's taken to achieve the end result is simply unreal! Still, it's was on! 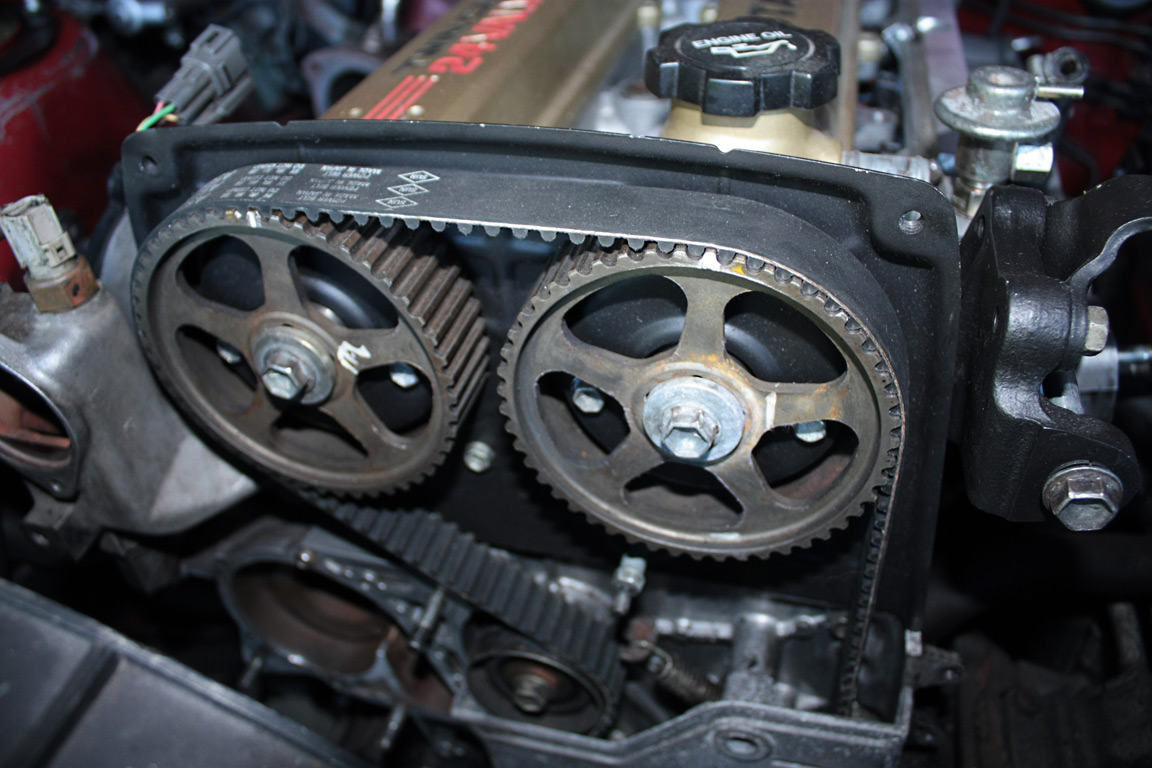 Notice the timing marks on the cam pulleys and the rear timing cover - makes timing these things a doddle, in terms of lining everything up, at least! Next up, the wiring loom! Remember what it used to look like, all baked and 'orrible? Well, my friend Johnny worked his wiring god magic on it, and it came back looking like this: 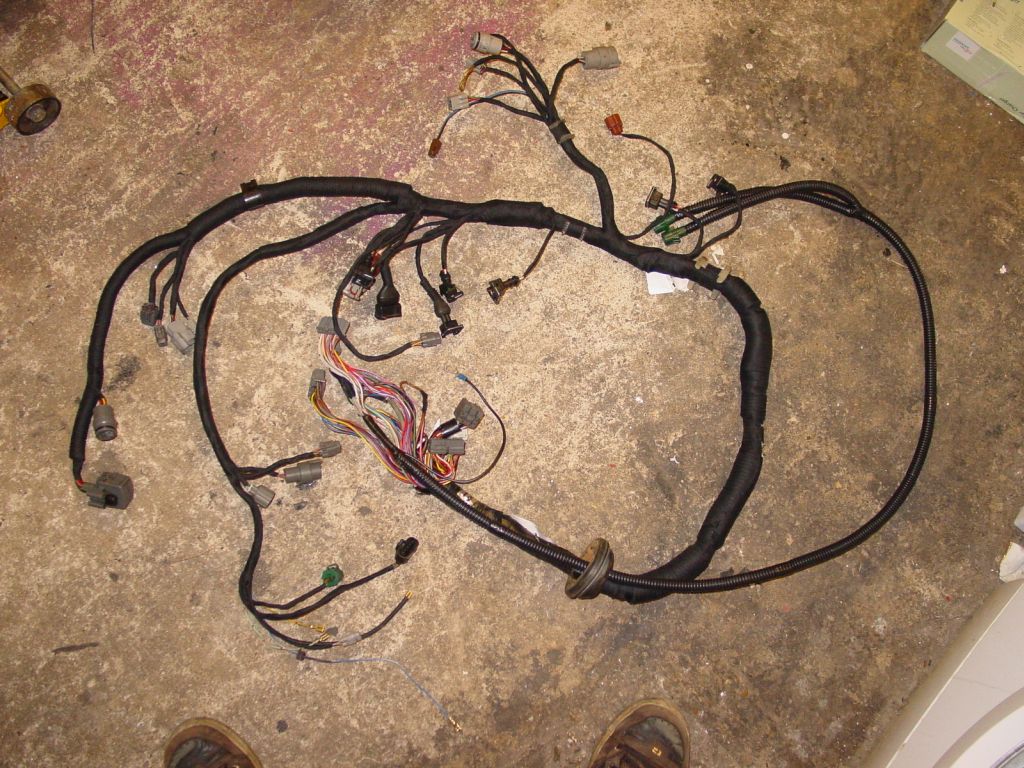 Net cost? A crate of beer. I had however supplied him with a few good condition connector housings, as some of the ones on my loom were definitely no good, and aren't available from Toyota anymore. For other people he charges from £100 to £175, depending on what its for, how big a job it is etc. All that was left after that, was installing the sodding thing, and all the exhaust side 'fun'....URGH! |
| |
Last Edit: Jul 23, 2011 23:22:15 GMT by Kai
|
|
Kai
Part of things
Posts: 276
|
|
Jan 14, 2011 13:12:00 GMT
|
I decided to investigate the odd problem of the rough idle on first starting, which I figured would be related to the cold start injector. Turns out I was right. When I pulled the injector out - it was COVERED in oil & carbon in an almost centimeter thick layer - so no fuel was getting out at all, therefore causing the crappy idle. The biggest build up was on the aft side of it - that points straight to the EGR inlet on the manifold. Good thing i've ditched the EGR then! The other thing I figured out, is that the full engine gasket kit *does* include a thermostat gasket - a bonus, because I was going to get another one for about $6 as the existing one was...how shall I say, baked? Yep, baked is a good word for it. Cracked, brittle, and about as useful as a rich tea biscuit at repelling water. I also figured out the new and improved vacuum routing, as due to the EGR removal, I have a Vacuum Switching Valve that needs to be removed, and a load of vacuum piping that needs to be arranged properly, if i'm to avoid any vacuum leaks. I considered cleaning the manifold even further, but honestly, as it's a stock rebuild, I don't see the point in spending hours with a toothbrush, scrubbing away like crazy - it's clean enough! I was missing a few ancillary bits at this point, one of them being the bolt that holds the Power Steering Pump Bracket Stay in position on the block side of things. Technically I only needed a standard 14mm headed 10mmx1.25 bolt that's 16mm long, but the hardware store won't stock them in that size, as 1.25mm pitch is a little odd for a 10mm thread. Being anal, I decided i'd rather get the proper thing from Toyota, than bodge it. I've already had to use two 13mm headed 8mmx1.25 nuts that were used for holding the fan onto the water pump pulley, to hold the power steering bracket in place. I'm basically trying to make sure that the engine is built properly as can be. Hence why I used a proper Toyota gasket, ARP head studs and new fixings where possible. The exhaust manifold finally went back on, after I replaced 4 of the 7 studs in the head. 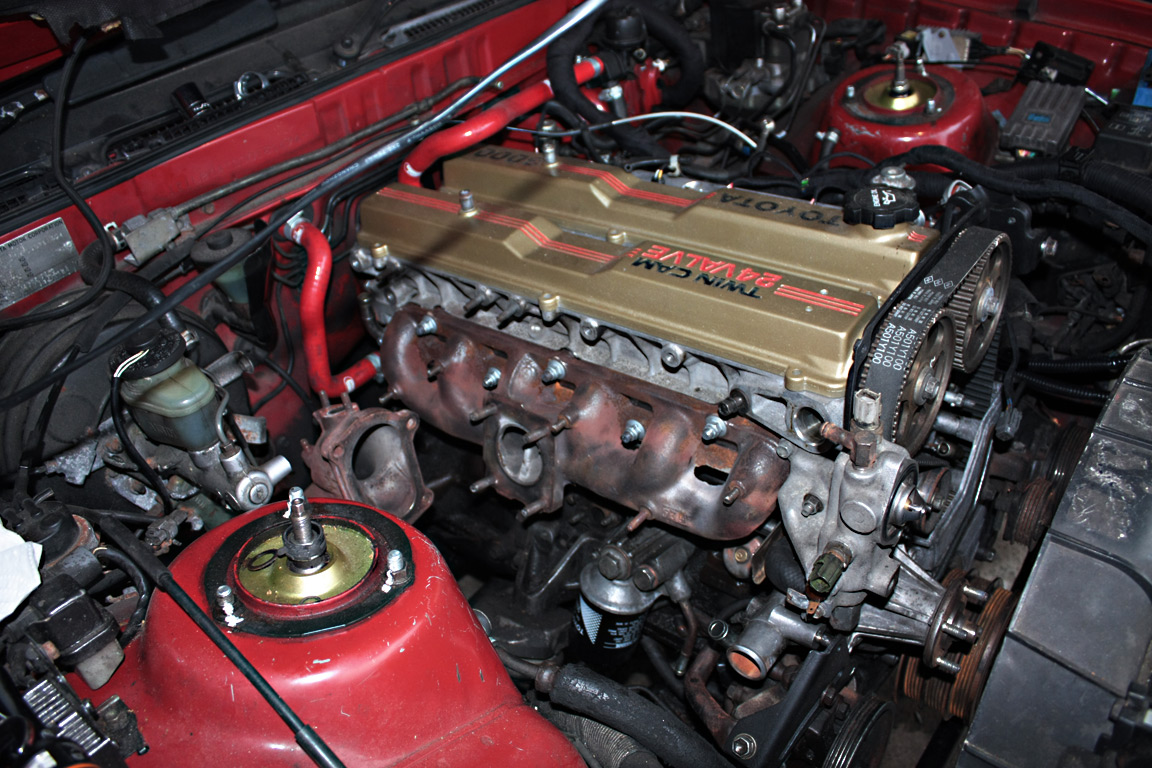 The 3 that remained in there stayed very much in place, as I know just how soft the alloy is that the head is made up of, and really didn't want to get into the hassle of drilling/tapping the threads in the head or helicoiling things. I did however, run a die down each of the exhaust studs in the head to make sure they were clean of curse word, and used ARP assembly lube on each of the threads to ensure that they wouldn't sieze. Bolting the turbocharger back up went pretty well for the most part, locating it is blasted fiddly though, not on the manifold or the elbow, but the oil feed and drain. For those of you unfamiliar with the CT26 - the drain is a solid piece of metal, with a 90 degree bend in it, that locates on two studs on the block. Locating it is fiddly, but can I get in there to tighten the nuts? Probably, but I got a headache after an hour of working on it. I managed to get the nuts located though, thank feck! The ballache is going to be getting a torque wrench in there, probably via a series of adaptors, extensions and spatial geometry, testing just how far my arms, wrists & fingers can be contorted before breaking bones & tearing ligaments! The oil feed was also being a sod. See, with the manifold heat shield on, the oil feed is about 1cm away from the hole, and of course I have to contend with two copper crush washers on either side of the bolt & banjo fitting. I held of on that headache for a little while longer! The PS pump was finally reconnected to the fluid cooler though, thanks to the double sided copper crush washer I bought, and now only lacks the fluid reservoir - something that gets connected last I think. Oh and of course, how could I forget the oil filter bracket, installed with new copper crush washers and a shiny new filter that's destined for a life of approximately 20 minutes!  The wiring harness was then connected up, with the exception of the thermostat housing (i need to bolt up the upper timing cover first), and i've discovered a potential worry, in that the green, single pin sensor on the thermostat housing, won't tally with the wiring harness. 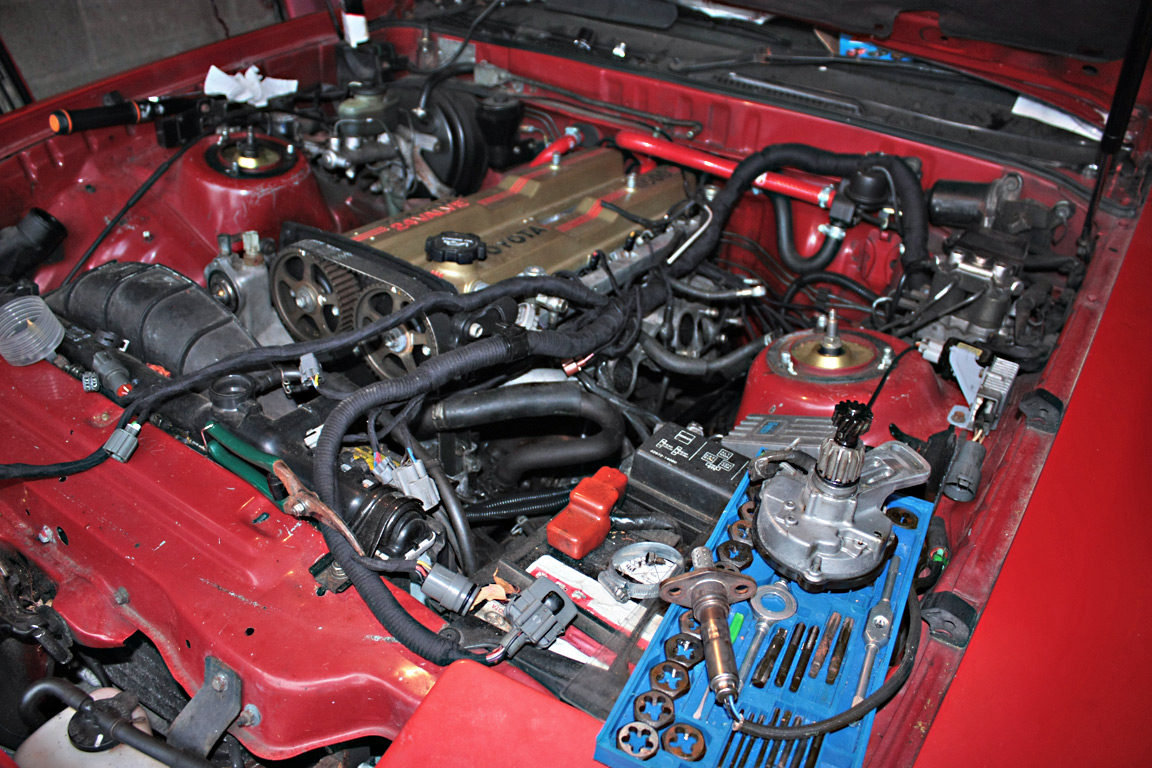 See, previously, my harness had been missing the correct connector, and someone had used a spade terminal as a bodge. Not knowing that, Johnny, who redid my wiring harness, put a brand new, gold plated spade terminal in its place. No biggie I thought, until I realised it was bigger than the one he replaced, and voila, it will no longer fit in the connector. So, i'm going to have to sort that out, otherwise i'll get a thrown code. Everything else is plugged in, barring the stuff on the upper intake, even the knock sensors are plumbed in, and far better looking than the bell wire that was in there. I also discovered that I had a load more Samco silicone hoses in a box, although, I had no idea what they were for, initially. Turns out that Samco went as far as to make the hoses to & from the throttle body in silicone, which is nice, as the ones that were there were starting to look a little tired, worn and threadbare around the connecting ends - which is a bit of a relief. I'll take the opportunity to plumb in the lower rad hose this time, but i'll still need a load of red silicone hose for the vacuum lines, and i'll need a longer section of silicone hose for the rear elbow on the head. See on the '90 spec, the water pipe that runs around the block, connecting the thermostat housing/water pump, to the intake side of things, is made of crappy steel, that corrodes and has a 60' bend in the pipe that connects to the elbow via a hose. Of course, the pipework I had needed to be replaced, but I got it off a '92, by which point the pipe was made of stainless steel and has a 90' bend in the pipe that connects to the rear coolant elbow, meaning the silicone section of pipe that I had, would no longer fit. Grrrrr. However, I had something of a revelation that has helped push my tinkering & improvising to a new level! Remember that section of pipe that I needed? Well, no more! Thanks to finding those Samco hoses, the short one that goes from the heater matrix to the VSV on the bulkhead was replaced, but thankfully, that short hose was the same internal diameter as the hose I needed. Some trimming with a kitchen knife, and I have a 90' bend that *just* clears the cylinder head, and only barely rests against the rear lifting hook. There is a very slight kink/ovalling where the bend is, due to the angle of the hose not being exact, but, it's not going to impede flow at all. Wierdly however, in the EPC, the bypass hose listed, is the same part number from 05/1990 to 05/1993 (yes, the Supra WAS still made in '93, although in Japan only). I might just have to get a generic length of samco hose in red at a later date. In the meantime, this should hold. The upper timing cover was bolted up, as was the thermostat housing, and I started to tie up all the loose ends, I was considering slinging the upper intake manifold & throttle body on, but it was gone 5am and I was starting to get lazy and tired, my thought was "curse word it, it's been 6 months, another 6 hours isn't going to hurt". Realistically, once I get the turbocharger oil feed banjo bolt in, I can start plumbing curse word in with regards to the intercooler, but that'll be a ballache, no doubt taking me several hours to just do one single bolt. The light at the end of the tunnel is definitely starting to appear, and after the engine is back together, the interior should only take an hour or two to bolt back together, and voila, fingers crossed, the child born out of wedlock thing will start. I have a mental list of everything that needs to be done, what bolts are just hand tight and need torquing up, so i'm going to do a big push. New coolant, 4.7 litres of Generic 30 weight oil to run it through for 30 mins, another 4.7 litres of 5w30 and another filter for the first 500 miles, and then I can get a wix filter, and some 5w30 in there for the next 5000 miles, assuming I don't throw a bearing first....no, wait, I take that back, fate, don't curse me now!!! *mumbles to self* think positive man, think positive...! You'll also notice in the photo below, that the cam covers that were sat on there, have been substituted for the GTE ones, simply as I no longer have the funds for the IS300 coil packs, so the stock GTE ones will have to stay for a little while longer. I will admit though, that tarting up the GTE covers took about 2 hours for both, as opposed to 6 hours each for the N/A ones - mostly due to the lack of any embossed lettering! Some 3/4 coats of primer and 2/3 coats of proper 3E5 spraypaint from Toyota sorted them out rather nicely - even if they are meant to be temporary. 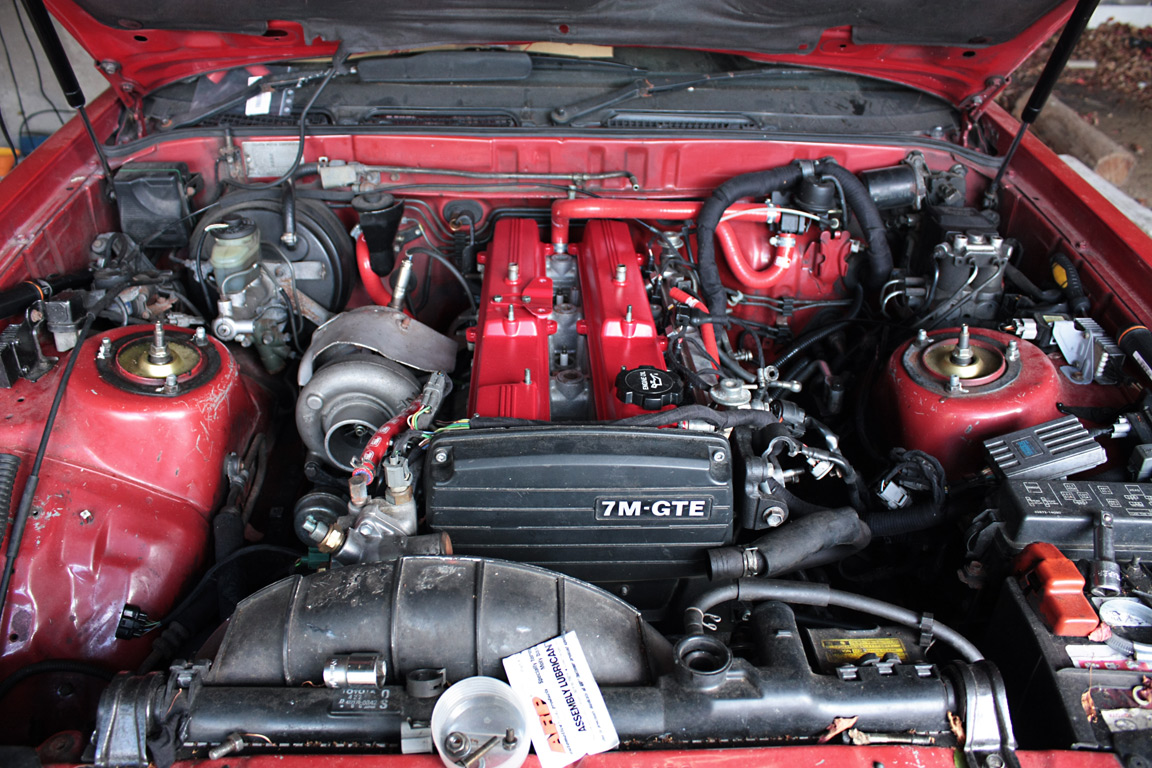 The following day, and thanks to my mate Dave, I managed to get the upper inlet manifold on, bolted up, all vacuum & water lines connected, TPS and ISCV plugged in and aside from the turbo oil feed, I was almost ready to go. 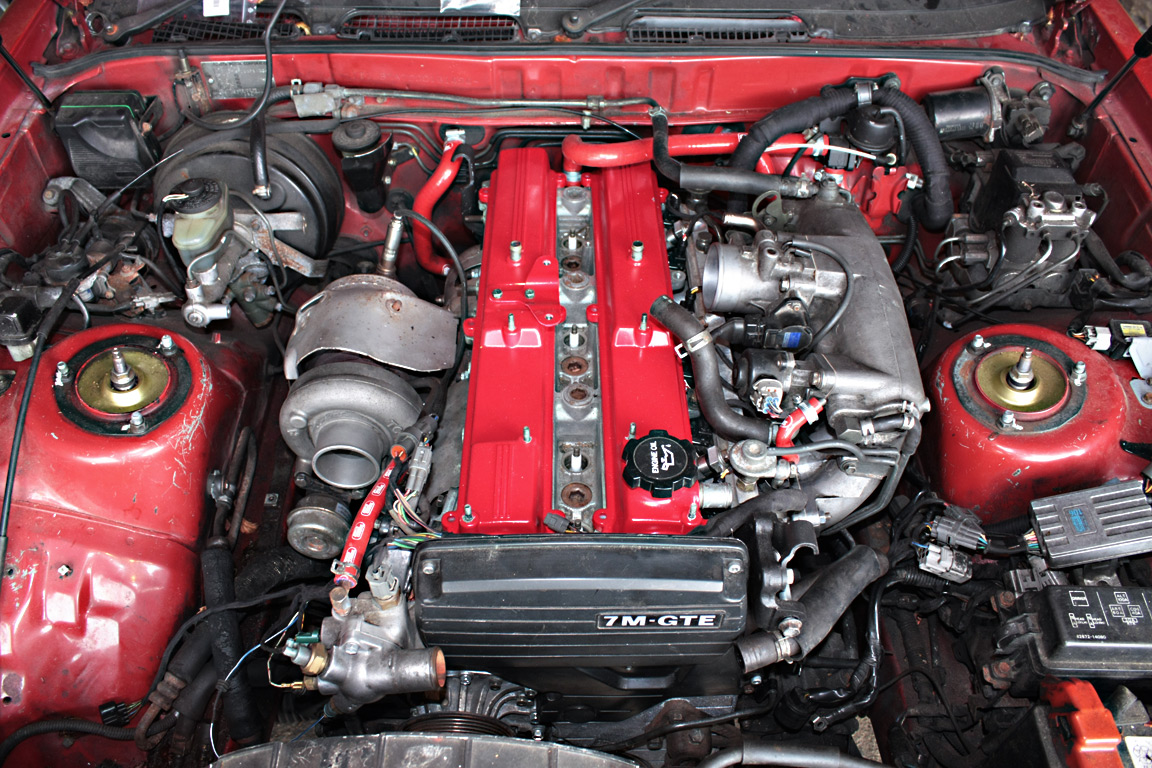 Of course, I would have needed 4 pairs of hands all about the size of a toddlers, with the strength of superman in order to sort that b'stard thing out! I decided to be a bit flash with the cash though, and shelled out for a set of braided stainless oil & water lines, that were FLEXIBLE. When they arrived, everything looked fine except that there were two errors I discovered only AFTER I had fitted the adaptor plates to the turbocharger. Turns out i'd been sent the adaptor kit for the Toyota Landcruiser, and NOT the supra, so although the lines were the right length, and fitted the adaptors - the adaptors pointed the WRONG WAY for the oil feed, and the water feed/return. the company I bought them off offered an exchange, but only if I spent £100 on mailing them back to Japan (how do they get it to me for £15, but 'La Poste' wants to charge me nearly 10x that??). So, it was time to get creative with a blowtorch and a vice and adapt the adaptors. Twisting/bending metal is something that honestly worries me - i've had way too many things just die from fatigue on me, so i'm considering replacing the plates as soon as possible, with something i've designed via CAD. The lines are fine though - so they're staying. I'll likely also switch from a Banjo bolt, for the oil feed, to an M12x1.25 to -4AN stud to eliminate any problems with flow. However, that's pretty much where my build comes to halt, at least for the moment. The weather here has been just all kinds of wrong for working outside on cars - from the freezing temperatures, to the rain and the 9 inches of snow...it wasn't happening! There are signs that the weather is getting more clement today though, being about 10/13*c here at the moment, and even blips of sunshine, but it's still a case of tools being firmly down for the next few weeks, and I need to get my mechanic-fu back before I do anything else! So - thoughts/questions? |
| |
Last Edit: Jul 23, 2011 23:25:22 GMT by Kai
|
|
|
|
|
Jan 14, 2011 20:21:55 GMT
|
|
I've allot of time for Toyota's of this era, they are great cars. Considering it was in a "bit of a state" when you picked it up, its looking to turn out great with all this work you're putting into it....
I love the detailing on the cam covers; shame you couldnt use them
|
| |
|
|
|
|
|
|
|
Jan 14, 2011 23:52:09 GMT
|
|
You must have the patience of a saint with all the issues you've had in such a short time. Big respect for keeping on it. Will be keeping a close eye on this car and keep my fingers crossed for you!
|
| |
Living the dream. Restore's classic car's for a living!
Project Racer: '99 Arosa
Project Touge Outlaw: '87 Porsche 924S
Project Street sleeper: '95 BMW E34 540i/A Touring
Project Mafia: '04 BMW E53 3.0d
|
|
Kai
Part of things
Posts: 276
|
|
Jan 15, 2011 15:02:41 GMT
|
Patience is the one virtue i still have! It'll be a year on March 30th that the car will have gone on the axle stands - i'd love to get it back on the road by then, it's only finishing off really, few things like bolts/screws and the power steering fluid reservoir from the N/A that's needed, as well as re-assembling the dashboard (i removed it to get to the foglamp switch wiring... Now the biggest worry in the whole project, is the bodyshell. The panels are fine - but the rear arches are a MAJOR source of worry. I really, really want a mig welder, and a crapload of metal sheeting so i can rebuild the arches myself, or get some patch sections chopped out of some US or J Spec ones. European Mk3's just rust to nothing thanks to the insane amount of salt poured onto the roads here :/ For the moment - the patchwelding that's been done will have to stay 'as-is' and i'll give it a good going over later - or re-shell, depending on whats the cheapest option. |
| |
|
|
grayb
Part of things
Posts: 86
|
|
Jan 15, 2011 17:06:29 GMT
|
Enjoyable write-up cheers  Star of the show for me is the 3-en-un huile that keeps popping up in various snaps I'm building my 7M up (in my dining room) and it's interesting to see someone else doing one, I'm curious why you didnt torque to 90lb/ft which the bit of paper in my ARP stud box told me to do? Have I gone too far? Worried  |
| |
1984 Celica Supra
|
|
Kai
Part of things
Posts: 276
|
|
Jan 15, 2011 18:06:51 GMT
|
|
For the stock gasket? 90lb/ft is WAY too far! The ARP's differ somewhat - some say 78lb/ft, some say 82lb/ft max - depends on the bit of paper you get in the box, but remember, 7M heads are notoriously soft, so too tight, and the stud nut will start eating into the head :/
The stock composite gasket isn't likely to be happy either - 80lb/ft is kinda the upper limit for them.
|
| |
|
|
|
|
|
Jan 15, 2011 18:28:49 GMT
|
|
Any pictures of the arches?
|
| |
Living the dream. Restore's classic car's for a living!
Project Racer: '99 Arosa
Project Touge Outlaw: '87 Porsche 924S
Project Street sleeper: '95 BMW E34 540i/A Touring
Project Mafia: '04 BMW E53 3.0d
|
|
grayb
Part of things
Posts: 86
|
|
Jan 15, 2011 18:44:10 GMT
|
For the stock gasket? 90lb/ft is WAY too far! The ARP's differ somewhat - some say 78lb/ft, some say 82lb/ft max - depends on the bit of paper you get in the box, but remember, 7M heads are notoriously soft, so too tight, and the stud nut will start eating into the head :/ The stock composite gasket isn't likely to be happy either - 80lb/ft is kinda the upper limit for them. Oh dear, thanks for the info. fortunately I'm using a Cometic MLS and I did get the block and head machined. I hope you don't mind me picking your brains along the way ;D |
| |
1984 Celica Supra
|
|
Kai
Part of things
Posts: 276
|
|
Jan 15, 2011 20:19:30 GMT
|
Ramirez - Pictures 7 to 12 on the first post are the rear arches  grayb - Cometic will take the hit - just a question of if the head can take it - and I hope you didnt get the head machined more than 5 thou! |
| |
Last Edit: Jan 15, 2011 20:20:31 GMT by Kai
|
|
grayb
Part of things
Posts: 86
|
|
Jan 16, 2011 11:45:38 GMT
|
Double doh The machine shop took 10 thousandths off and I'm certain it's not the first time it's been skimmed. I think I will give up and find a 5M to put back in again  Sorry for hijacking your thread have a picture 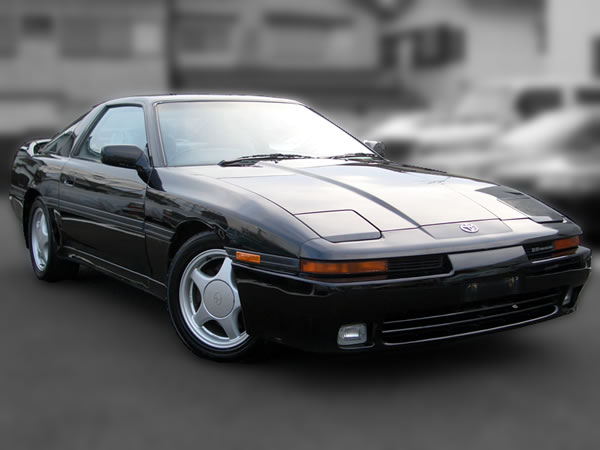 |
| |
1984 Celica Supra
|
|
Kai
Part of things
Posts: 276
|
|
Jan 16, 2011 18:03:32 GMT
|
The problem with skimming the heads is, if they're not PERFECTLY true when you do it, and if you do more than a 5 thou skim, you have to be VERY careful about the cams. Plastigage ALL the cam journals - if they're okay - you should be fine. Generally, the heads shouldn't need machining at all, the most i'd ever get done on any head, would be 2 thou - just to bring the face up nice and clean. Too many machinists treat the 7M like any other engine and just skim them without taking into account the specifications and tolerances. Do you have a copy of the TSRM? 5M's are good - but 5M head on 7M block = 6M Although - you could just get another 7M head from somewhere - i'm sure my mate Ed has one knocking about somewhere! |
| |
|
|
Kai
Part of things
Posts: 276
|
|
Jan 26, 2011 17:25:33 GMT
|
Btw - this is primarily for Gray - you might find this handy, if you haven't got a copy of it already! kai.robinson.free.fr/dropbox/Supra/TSRM/Every chapter in the Toyota Factory & Dealership Repair Manual, broken down into individual PDF's |
| |
|
|
|
|