How old are you? What do you do for a living? Whatever it is you are wasted there. I envisage a bloody impressive fabricating/custom shop business for you at some point. Top bloody work (again). Wow!!!!
I'm 26 right now and i restore cast iron fireplaces. The job is ok but i also dream of having my own car restoration business one day. Id love to have a house in the country side with a double garage at the end and work from home, that would be ace!.
Thanks for all the compliments on the trike everyone

.
June update - Quite a few photos, may have to wait a bit for them to load.
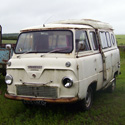
OK, so its been about 3 months since the last van update. I have been quite busy and haven't done as much as i wish i could have done. What with the trike to do, work and other stuff for myself. Anyway, the last time i wrote i was doing the drivers side of the van, where the lower part of the body joins the removable side panels.
You can see that all the way along its rusted and pitted. The awkward thing about patching this area is the panels are flat and so have some tension in them. I knew that as soon as i cut the panel would lose that tension and buckle, no way around it unfortunately.


I marked up the first panel to replace. The side isn't completely straight, its bows front to back as well so i couldn't do sections much larger than 300mm to keep the curve.

Once cut it let me see another section i will be needing to replace, as usual.......

I peeked inside the drivers door and thought i may as well cut out the other piece i need to replace whilst i have access.

The offending article.

With that cut out it revealed yet more horrors to replace. I found this to be a recurring theme as i was going along.
Inside:

Outside:

I thought about replacing these piece first but no, i decided to do the side first and i shall. Back to it then.

I used the original as a template. Cut a piece of 1.2mm out and mark it up.

Then using my folder and joggler i go t close to what i need.

Then tacked in place.


If you can forgive the shakey blurred photo you can see what i mean by the panel buckling/warping. This is supposed to be convex but its the complete opposite,, concave.

I wasn't too sure how to deal with this issue. The first thing i tried was to ol' cut and shut. Cut vertical strips, then push it out and re weld.


Then clean up

And check

Which did work ( the front edge is supposed to be that curved) . The draw back to this was that the panel had still lost some of its tension and would "oil-can" ( when the metal can pop in and out with your hand) . I carried on regardless anyway, I guessed i could come up with something to stop it popping later.
The next section cut out

There are 3 struts inside the van that go up against the body of the van to add some strength to the side. I was going to leave these in place but decided that i really should cut them out, glad i did as it looks like the felt vibration proofing stuff was holding the moisture in and rusting the panel from the inside out. The struts aren't so bad, il just clean them up and re-use them.

eep!

The next weekend i got another few more patches done.


I had also done a bit of research to combat the oil-canning effect. I read and watched a few videos on you tube on how to deal with it. It involved using a slapper to get the shape of the panel to pop out then use a blow torch (this is where i got nervous) to heat an are about an inch to red hot then use a wet rag to quench it. Doing this causes the panel to stretch then cool down quickly. The first time i tried it it felt like i was doing something wrong, Everything in my body was telling em that heat will distort the panel not fix it, but, it worked. the area i had treated had built up a resistance to being pushed in. You can see the first little spot i tried at the front of the drivers side.

Oh, i mentioned using a slapper, if you don't know what it is its basically a large flat hammer made from toughened steel. You can buy them for about £50 each or if your cheap like me you can use 2 old files and heat them up to bend a handle then buff the teeth off.


The next time i was at the garage i kept on with the sections. I bought a couple of magnets to help me hold the sections in whilst tacking.


As i had a bit more done i thought i would have a go at the whole heating up and cooling down thing again. I gave the panel a good hiding with he slapper to get some shape back then heat it up. I used the body file to highlight the areas that are too proud now, i think i will need to do a lot of work on this to get it smooth again.


That was the majority of the side done, to finish it off i just needed to do the rear corner. Alas, like the front this area also had some hiding rot to deal with, unlike the front though, i had to do this work before i could do the corner.

Namely, the rear door frame channel was rotting and the back of the arch has gone.


So, cut the door frame channel out first.....


Here's the little blighter here, whats left of it anyway.

Yes, that is a blockage made entirely of rust, no , i did not expect it to form like that either.

On the operating table, whats the stats?.


Evidently, not good.
The top part that holds the door hinge in place was OK, which is good because that piece has a complex set of curves that would have been a pain to replicate, just cut it off and make the rest.

I cut out the side piece and top separately as the side piece has a slight curve with a lip, i used the stretcher to stretch the curve on the side first then tacked the top on.

Welded up and then the hinge piece was tacked in with the aid of my magnets.

Cleaned up i had one section of the channel done.

Now for the back. As this piece was non existent on the rusty original Ive had to guess that this is how it looks. Not really much to go wrong with it anyway.

Before i welded them together i held it in place in the van to double check it was all OK.


Not bad, now to fold the little piece over to create something to weld to.


Joined together, holes drilled and tube inserts in for the hinges and side panels. All cleaned up, quite happy with it.


Few comparison shots.


At this stage i had to leave it again to do a set of railings for my sister-in-laws parents, took a few weeks but i got back to the van today (10/6/12).
The next piece i wanted to replace was the rear of the inner wing.


Like the door frame (everything else actually) it was rotten and not much left of it.


The trickiest part for me to do was the domed area that allows for the rear of the lights and wiring. I haven't tried to dome out a sheet before so this was new for me. I made a little template for me to work out how deep it was to be.

I missed a few steps out here (sorry) but i cut a sheet of 1.2mm to around 450mm square, then marked where i wanted the circle to be. I got my ball-pein hammer in the vice with the ball end up the way then starting from the centre of the circle and working out i tapped it with a flat face hammer to get the bump started. Then after it was defined i moved over to a bag of sand ( not a sand bag, just a plain old plastic bag of sand) and twatted it with the cross peon hammer to get it more sunk in then a lighter body hammer to planish the marks out and make it smoother. Then i measured and guesstimated a few of the sizes and marked it out using the dome as a reference. The dome came out quite well for my first go, thankfully.


There was 7 separate pieces i needed to fold up and getting them all in the folder or vice wouldn't be easy. I then remembered reading about body pliers in a book, i looked in the frost catalogue but they want £30 for just one so i made my own from an old pair of pliers and a flat HSS blade lying around.

With the edges folded up i welded the corners and curve pieces in then cleaned it all up.


To be honest, i was really proud of this piece, and it only took me a day to make, i think all this practise is finally paying off. I held it in place to make sure it all fitted like it should.


That's all folks.
Oh, good news. I have a week off beginning the 17th of June so i should get a lot more done. I'm actually getting it ready for a car show that I'm going to trailer it to, the Scottish ford day in Stirling on the 1st of July. I think it may be interesting for people to see it as it is now, then next year, then the year after etc,.. until it is done. This also means i now have to weld up a tow bar for the Lexus....


 .
. 


 awesome stuff.


