I wrote this a few years back for the Delica owners out in Canada. The same principles should apply to your motor hopefully? Please ignore some of the grammar - is was written for our friends on the other side of the Atlantic (wrenches etc...)
WHERE TO FIND THE TORSION BAR ADJUSTERIf you follow the long rod/bar a few feet back from the front wheel on the drivers side, you should be able to trace it back to the adjuster easily enough. It is easier to find it on the drivers side first (more room). Have a look at the photo below for what the adjuster looks like.
The passenger side is much harder to find if you don't know what you are looking for (under the sliding door) but it IS there and can be adjusted without having to remove anything! It's just an absolute bu@%er to do compared to the drivers side!
Find the drivers side first and familiarise yourself with the location of the adjuster before looking for the passenger side one.
HOW TO ADJUST THE TORSION BARPark the motor on flat level ground and measure the height of the centre of the wheelarch directly above the centre of the wheel.
Do this for the rear of the vehicle first to get a comparison of how low the front is. I always measure the distance from the centre of the wheel hub to the bottom edge of the centre of the wheelarch.
Once you have the height of the rear, measure the front so you know how far to come up. You don’t want the front to be higher than the rear, so bear this in mind….

Once you have located the torsion bar adjuster, you will need some 17mm spanners (wrenches?) and some spare energy!
I prefer to use ring spanners (wrenches) over 'open ended' ones because they don't slip off as easily....important for this job! However, the passenger side adjuster is easier with an open ended due to the lack of room around it!
Alternatively, you can make a custom tool which will make the job a LOT easier and saves time/effort/frustration and knuckle skin! More details can be found at the bottom of this post.
Under the vehicle (and using the photo below for reference) crack off the lock nut a few turns then measure & record the distance from the bottom of the adjuster nut to the bottom of the adjuster bar (the long threaded bar)
Adjust the nut up anywhere between 10mm and 15mm then tighten up the lock nut. 10mm adjustment equates to 15-25mm of lift (depending on how worn/sagging your torsion bars are!) Do the same for the other side, but if this side was lower, then add a little more adjustment to try and make it more even…..
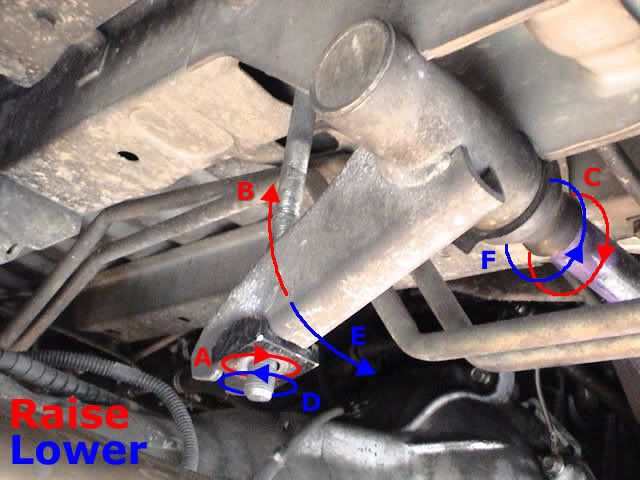 (A)
(A) = turn the adjuster nut this way to raise the torison bar adjuster arm UP
(B) which increases the rotational tension in the torsion bar
(C) which in turn pushes the upper suspension arm DOWN to give you lift and a firmer ride, better handling and better braking (less nosedive)
(D) = turn the adjuster nut this way to lower the torison bar adjuster arm DOWN
(E) which decreases the rotational tension in the torsion bar
(F) which in turn releases the pressure on the upper suspension arm and lowers the vehicle to give you a softer ride, softer handling and worse braking (more nosedive)
TIPS & TRICKSAlways make sure the car is parked on flat/level ground.
I have always done torsion bars with the full weight of the vehicle on them because this gives a truer reading than taking the weight off the torsion bar then having to wait for it to settle after a 5 mile drive! It also gives your arms a good work out!
Even when adjusting with the weight of the vehicle on the bar, the torsion bars will still some adjustment period to settle down before re-measuring – just not as much as when you jack it up!
If you are really stuck for space on the passenger side, maybe take the side step off first to give you more room from the passenger side. Whenever I have done it from this side, I've felt like I was going to puncture a lung on the bolts that stick down from the step! (not such a problem on the Mystery Machine now - I can literally sit up straight under it in certain spots!!)
The passenger side adjustment is actually easier to do from the drivers side – slide under with your head near the transfer box and feet down by the back axle…
Always remember to tighten the lock nut too...
Once done, go for a 15-20 mile drive to let everything settle then check the ride height. Adjust accordingly until you have an even ride height.
Don’t assume that adjusting both sides the same amount will give you even lift – check, double check and re-adjust if necessary.
You may need to adjust them a few times in this way until you are happy with the ride height….
If you raise it quite a bit, you might need to trim the upper bump-stops down, but this takes all of 5 mins with a hacksaw! Just unbolt and cut down by hand.
If you don't make the special 'torsion bar socket' tool mentioned in that post, then I find 17mm ring spanners best for the drivers side and 17mm open ended for the passenger side.
TECHNICAL DATAIf you are looking to go back to ‘standard’ height, then adjust the torsion bars until the clearance/distance between the upper bumpstop and the upper suspension arm is the same as the picture below:
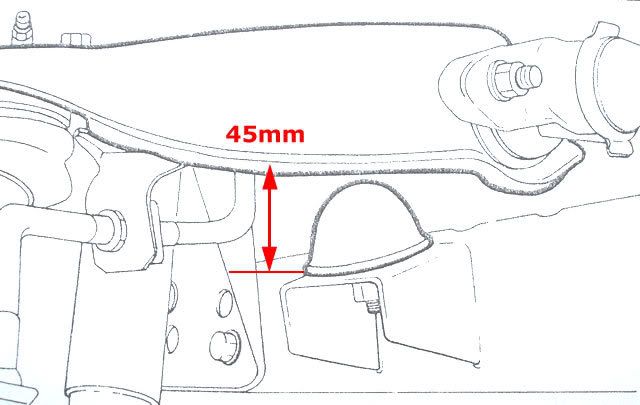
As mentioned above, you may need to cut the upper bump stops down if you lift the torsion bars a lot – but this is a really easy job!
Once you have finished adjusting the torsion bars, make double sure that the lock nuts are nice & tight and everything is sitting nice & level…..now enjoy a better ride and better braking! ;D
CUSTOM ADJUSTMENT TOOLOne top tip I can offer to anyone thinking of doing torsion bar adjustments:
Get yourself a 17mm extra deep socket, cut it in half and weld an extension sleeve into the middle to make it longer than the torsion bar adjuster thread. I've done a quick sketch below to illustrate (hope it makes sense??)
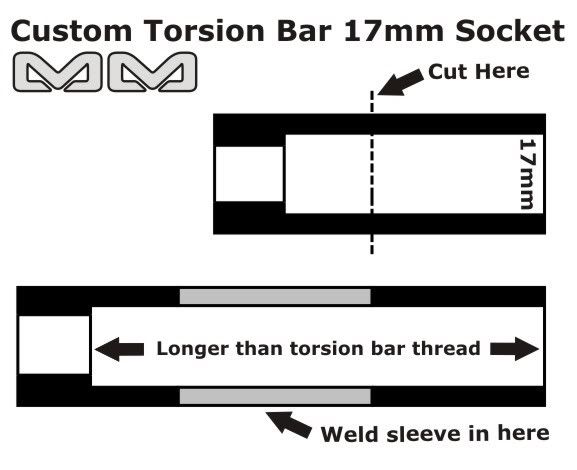
This will allow you to adjust the torsion bars MUCH more easily. You get better leverage, don't have to fumble around with 1/8th turns with a spanner, only to spend ages trying to locate the nut again! And it also saves a LOT of time!
Don't be tempted to use an air gun with the socket though, the heat build up could cause all sorts of problems like nuts seizing etc....and you don't get any 'feel' as the nut is tightened.
IMPORTANT:After adjusting your torsion bars,
always get your camber/alignment checked and changed to correct any changes caused by the adjustment. This is very important to make the vehicle safer and also save excessive/premature tire wear....




 [*]
[*] [*]
[*]




 )
)

