|
|
|
|
|
|
Chris
The first thing I would do is repair the top edge, while you still have enough bits left to show what size and shape it is supposed to be.
Firstly draw a line along the top edge to the right all of the rust, and then drill out the spot welds on the strut top reinforcing plate to the rusty left hand side of that line, don't cut through the reinforcing plate, only cut up to it. with the spot welds drilled out this should then come off. Once this is off, then joddle the edge of your repair panel and tack it into place, with the existing panel on top of your new panel, this will make it easier to blend the repair in as needed later. once you are happy that this is right, after trying on the wing etc then you can start on the section underneath.
For ease I would propose to make that in at least 3 sections, before cutting it off, either make a template from what is still there, or transfer your sizes directly to your steel and fold it up as needed, with the old piece still there you can check your sizes and offer your panel up as you go, once you are happy then cut off a section just bigger than your repair panel. This way you can still use part of the existing panel to position your new panel accurately, once this is tacked, then repeat as necessary.
I would tack all the bits in place first before fully welding, as if something goes wrong, it will be easier to take it off and reposition it, you will also find that once the box type construction is formed it will be a lot stronger and more rigid and less likely to distort with the welding.
Obviously try to clean up as much of the surface rust off the inside when the outer skins are removed, and use a rust converter and or zinc primer as needed
I hope that is clear, if not let me know and I will try to elaborate
Tony
|
| |
Last Edit: Dec 1, 2009 16:36:59 GMT by tonybmw
|
|
|
|
|
|
|
|
|
Great stuff Tony, thanks again for all your effort, the thread is coming along nicely. It´s nice to know that even when the Vauxhall is back on the road and the restauration thread has been forgotten that all your hard work isn´t falling off the bottom of Page 1 and can be read here. Thanks to your hard work i can see the standard of bodywork repairs in Retro Rides land rising in the near future, mine included.  |
| |
|
|
|
|
|
|
|
|
Thanks Oldbus, once I get the Victor finished I will try to post up some more tips and tutorials, meanwhile if anyone else has any panels that they have made, and want to show them off, and more importantly how they made them, then please post away
|
| |
|
|
drpete
Part of things
 
Posts: 125
|
|
Dec 16, 2009 20:08:17 GMT
|
|
excellent thread they don't teach that down your local collage,nice to see it do proper, just a small note on weldin glav, it a bit toxic, so wear a mask,I'm sure you did, but still a cool thread,
|
| |
|
|
|
|
|
Dec 17, 2009 20:28:51 GMT
|
Thanks DrPete, a good point and well made, Galvanise sheet does give of noxious fumes when welded and causes flu like and headache symptoms.  Called in the trade "Galvanise Flu" believe it or not Thats one of the reasons I use, and promote the use of Zintec sheet, this has a zinc weld through coating, with non of the nasty side affects.  |
| |
|
|
drpete
Part of things
 
Posts: 125
|
|
|
|
|
i know ive had it, never again and a mild form of lead posioning from a iso, blood old cars lol, where do you get them sheet from, i've never heard of them, are they safe to directly to paint over(i know etch first) as i know weld through primer isn't? very intrested now
|
| |
|
|
|
|
|
Dec 18, 2009 18:55:45 GMT
|
DrPete - Most local steel stockists sell it, its about £25 - £30 for an 8'x4' sheet of 20swg, and yes it paints fine. Some weld through primer is also an etch primer, there is an excellent one from Bilt Hamber that I use when I know the area is going to be painted www.bilthamber.com/etchweld.htmlOtherwise I use the one from Halfords which as you say is not an etch, but a zinc primer which I use for inside sills and areas that will probably never see the light of day again.
|
| |
|
|
khaOs
Part of things
 
Posts: 115
|
|
Dec 21, 2009 16:01:36 GMT
|
|
i've past the last hour or so reading this and the victor thread.. awesome stuff! i was wondering if you would mind maybe showing us some of the tools you use and for what ends. I think it would be a good starting point for the ones that don't have any real knowledge in this art. Plus maybe you have some tools you've made yourself on the cheap that would be interesting to show. Anyway, thanks and congrats!
|
| |
|
|
|
|
|
Dec 21, 2009 20:23:55 GMT
|
kha0s - I'll see what I can do, might be something I can do when its too cold to be outside  
|
| |
|
|
rtlkyuubi
Posted a lot
   Low and Slow
Posts: 2,922
|
|
|
|
|
Just a little question here. when working on metal that easily distorts, your supposed to weld a little at a time and allow for cooling inbetween. What I want to know is, how long do you leave it for before starting off where you finished? Do you leave it till its stop glowing red, or so you can touch it?
Or have I got this completely wrong and your not supposed to get the area red at all?
|
| |
|
|
|
|
|
|
|
Dec 28, 2009 10:10:42 GMT
|
Just a little question here. when working on metal that easily distorts, your supposed to weld a little at a time and allow for cooling inbetween. What I want to know is, how long do you leave it for before starting off where you finished? Do you leave it till its stop glowing red, or so you can touch it? Or have I got this completely wrong and your not supposed to get the area red at all? Best if you can stop it getting red in the first place, and best to leave it until you can touch it, if you weld while it is still hot, it has a cumulative affect, ie each time you weld it gets hotter and hotter, so your first weld might be 2 seconds long, and cool in 30 seconds, but if you start welding again after 10 seconds, it will still have some residual heat and it will be hotter than the first weld and take longer to cool. When you are welding on a large unsupported area it does not have to be red hot to start the distortion. The reason why the metal distorts is not necessarily due to the direct heat , it is largely due to the fact that the weld shrinks when it cools, and this shrinking is what pulls the panel out of shape, the hotter it gets the more it shrinks, and the larger the weld the more affect the shrinkage has. This is the main reasons for having lots of tacks in the first place to hold the panel in place, regardless of the distortion, if you just started welding at one end of say a wheel arch repair panel, by the time you got less than a quarter of the way around, the panel would have been pulled all over the place, by the weld shrinking When you weld with the welds far apart, the surrounding cold metal helps to dissipate the heat and also helps to hold the metal in place to prevent the shrinking weld causing any distortion, but the hotter that surrounding metal is the less able it is to stop it. You can use compressed air or water to help cool the area more quickly and prevent the heat building up, the only problem with water is that this can then get into your seam and cause the weld to spatter and may cause problem in the future with rusting between the seam If you are gas welding or Tig welding you can actually remove the distortion by hammering on the weld against a steel dolly, as this stretches the weld and relives the stress on the panel caused by the shrinking, unfortunately mig weld is too hard to dress down and therefore it is not really very effective, but in migs defence it is the coldest weld in the first place so much better for welding in sections when you are trying to minimise distortion, it is just harder to deal with it if does distort. There are actually times when you can use this shrinking affect to your advantage, if for instance you have a joint that you just cant get it to close up at one end, you start at the closed end, don't put any other tacks in, and do a really hot concentrated weld and allow it to cool, then move up just slightly and do the same again , and again and so on, each time the weld cools the gap above it is pulled closed, but you must let each weld cool to benefit from the maximum shrinking affect, obviously if you want to keep the gap and prevent it from being closed up then you need to have lots of tacks in place and spread you welding around as mentioned earlier Sorry that was such a long answer, but I figure that if you understand why it does it, you will be much better able to prevent it or work with it. |
| |
|
|
rtlkyuubi
Posted a lot
   Low and Slow
Posts: 2,922
|
|
Dec 28, 2009 10:37:17 GMT
|
Cheers Tony thats really helpfull  |
| |
|
|
|
|
|
|
|
Today needed to make a lower rear corner repair panel, to fix this section 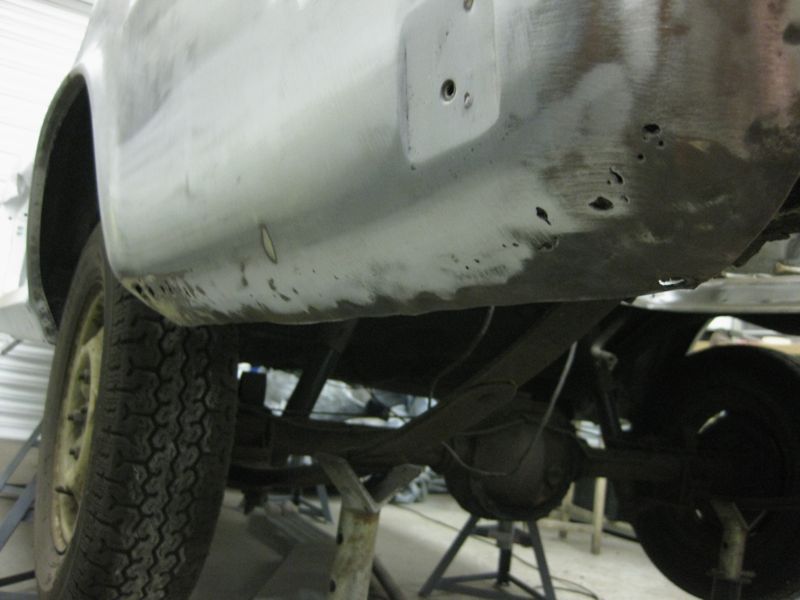 So start with a strip of 20swg and a piece of pipe, and pull it around the pipe  Then try it up for size, radius is about right for now 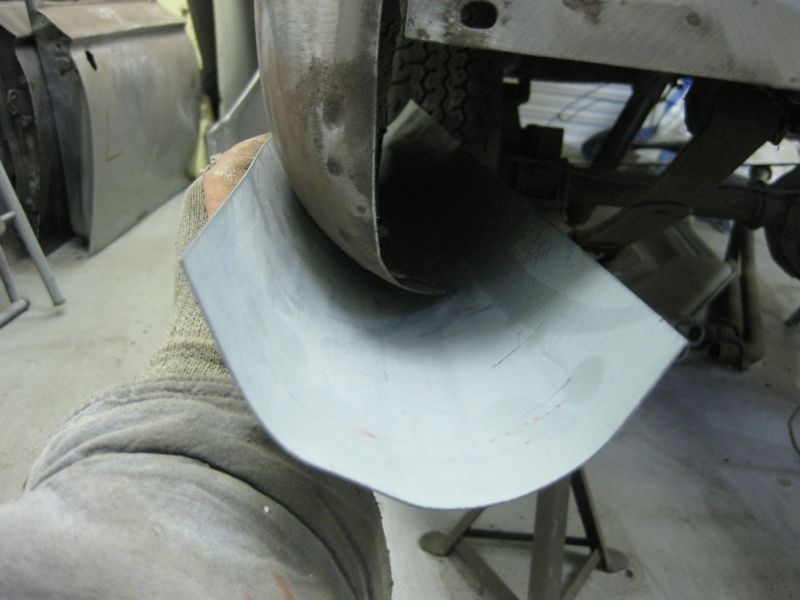 But it needs to curve up at the rear, to achieve this we need to stretch the middle and shrink the edges So to stretch we need a bossing mallet and sand bag, you can use a hollowed out bit of wood too if you have one of those instead  a few swift blows starts the curve, 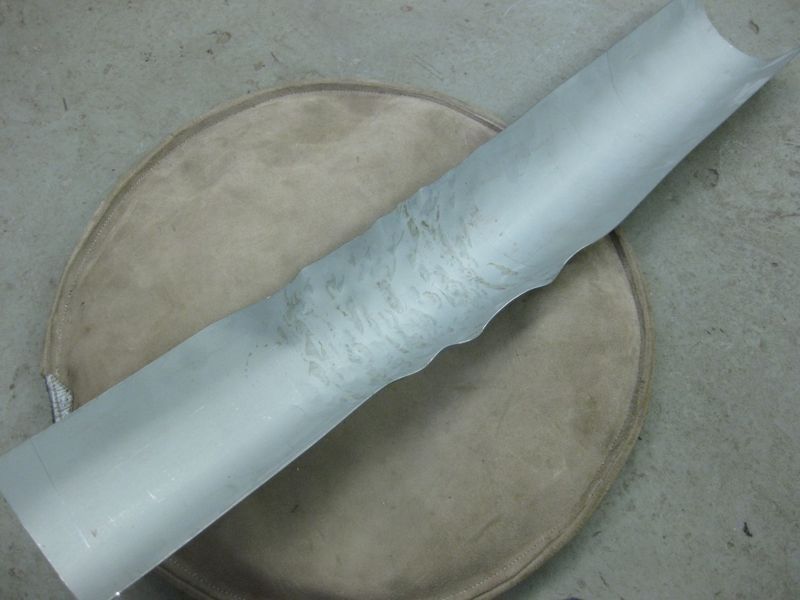 don't worry about the hammer marks, they will be dealt with later, we just need to concentrate on getting the shape right first  So try it for size 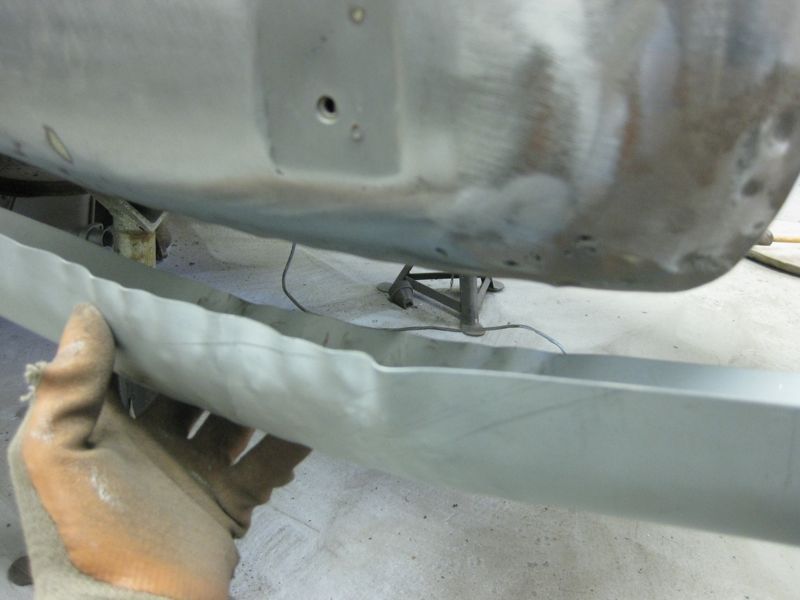 Thats pretty much the right shape  so now we need to shrink the puckers out, seems silly not to use the bossing mallet again, seeing as it is out  Then dress with the rawhide mallet to shrink 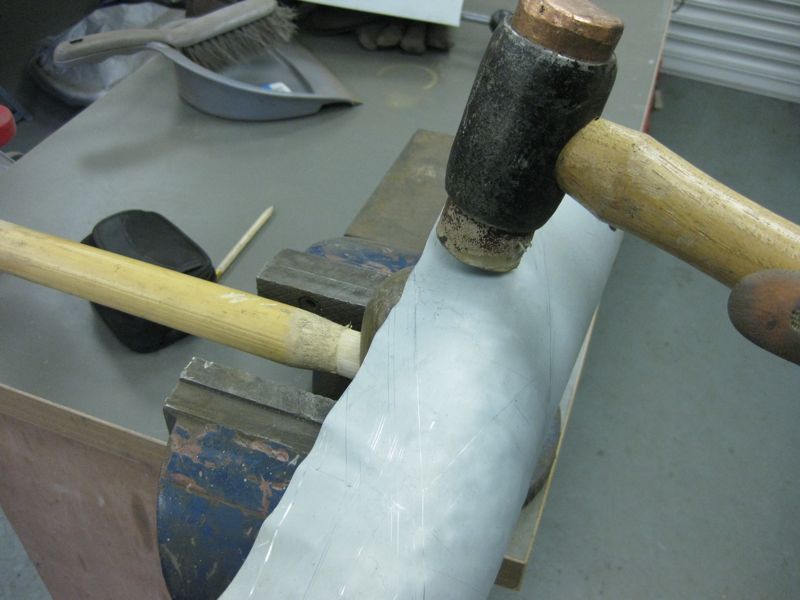 Some time later we have this, you can see the curve really forming now, I worked on the end profile too, to get that shape sorted  and try on again for size  check on the inside   from here we can mark and cut off some of the excess, so we can just focus on the bit we need, still leave it large though, because things can change as we go   thats the back end almost there  Now just the front to sort 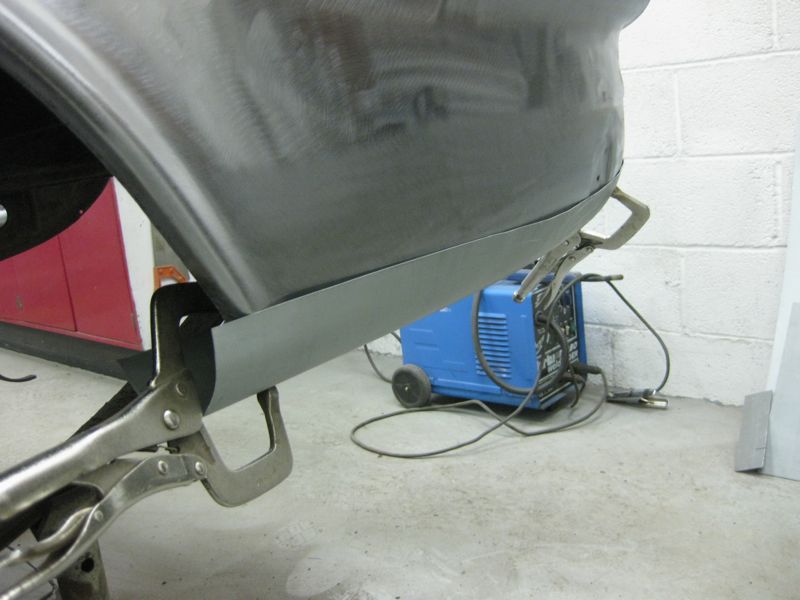 Needed to flatten the end out to start the flange  Then up against the block   Then shrink the flange in the shrinker to get the curve back  a bit of dressing for the the arch profile too  and try again for size    Now that we have the shape thats needed, we need to planish it to get rid of the lumps and bumps, this involves some various shaped hammers and dollies, the idea is just very small light hammering just to flatten the highs and raise the lows, do not strike too hard, or you will start to stretch it and change the shape 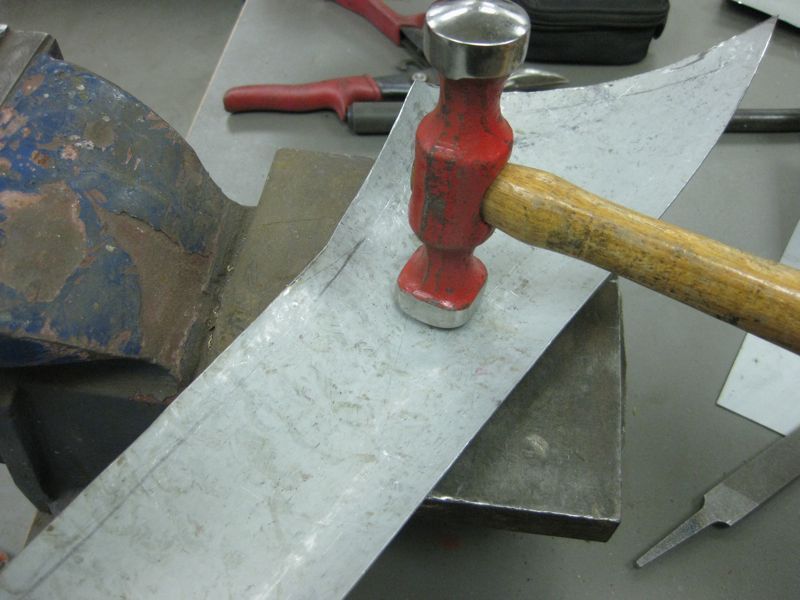  And there you have it  and here it is trimmed and clamped ready for welding  if you want to see more then pop over to the Victor thread and you can see it fitted retrorides.proboards.com/index.cgi?action=display&board=readersrides&thread=65793&page=13#970587 |
| |
Last Edit: May 19, 2012 20:25:06 GMT by tonybmw
|
|
purplevanman
Posted a lot
   Way too orangey for crows
Posts: 3,830
|
|
|
|
"and there you have it" LOL the man's a fecking genius and a generous one at that, to share his skills with us amateurs  |
| |
Welder, fabricator, general resto work
|
|
rtlkyuubi
Posted a lot
   Low and Slow
Posts: 2,922
|
|
|
|
"and there you have it" LOL the man's a fecking genius and a generous one at that, to share his skills with us amateurs  I thought the exact same! Truely inspiring work! To add onto the "how long to leave it" question I posted earlier in the thread. Roughly, how long did it take from the 1st tack going down to the last of the seam weld being done? |
| |
|
|
|
|
|
|
|
"and there you have it" LOL the man's a fecking genius and a generous one at that, to share his skills with us amateurs  I thought the exact same! Truely inspiring work! To add onto the "how long to leave it" question I posted earlier in the thread. Roughly, how long did it take from the 1st tack going down to the last of the seam weld being done? It was about 30 minutes, I can always find something else to do while the tacks cool down, normally I will start clearing up all the curse word that has accumulated to get to this stage, the worst thing you can do is sit and wait for them, as you are then too tempted just to add more |
| |
|
|
|
|
|
|
|
Due to popular demand, a few sketches and stuff to show how I made my Home Made Bender Constructed from 50 x 50 x 6mm Mild Steel angle The Bolts are M10, you can see on the photos that I adapted the ends to give a handle type arrangement, but have just drawn then as bolts, obvioulsy you can adapt as needed Lengths and heights could also be changed to suit your requirement Couple of Photos as a reminder  Angle moved in this shot to show the bolting arrangement, basically this angle is free to move in and out, or left and right, as needed and is nipped up by tightening the bolts  Now for some sketches 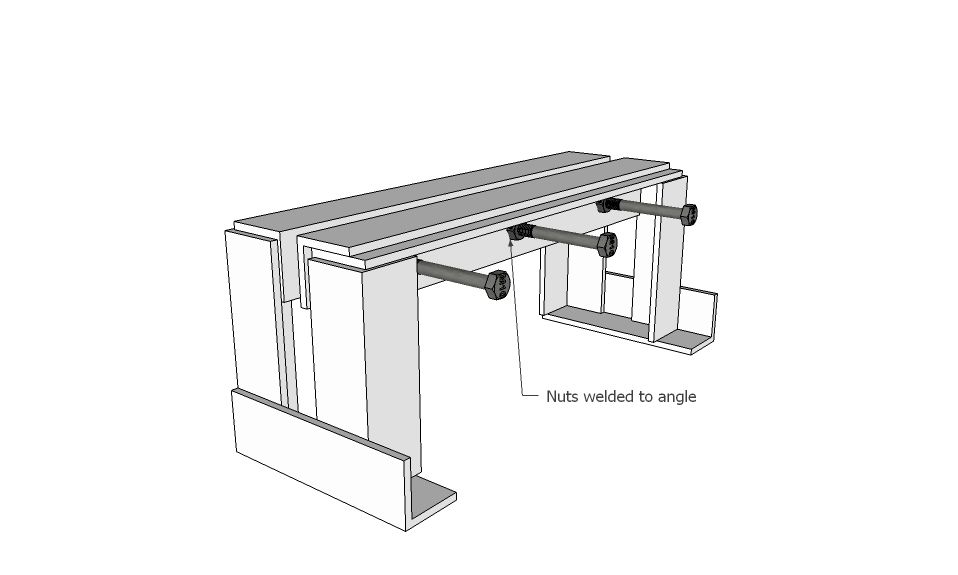 The bed angles are kept short from the upright angles, so that a strong weld can be laid down, that does then not need to be ground off. 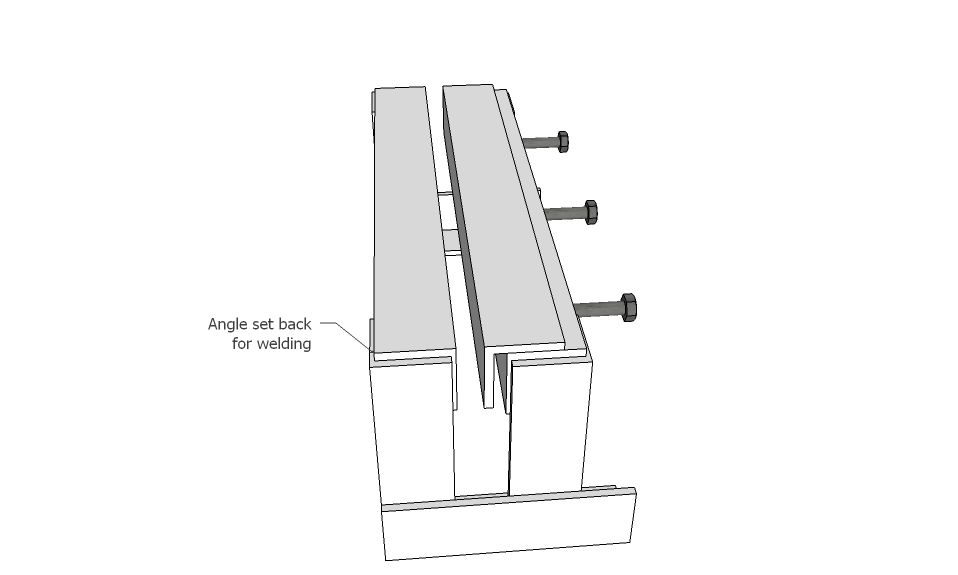 and here is an exploded view with some of the important dimensions on 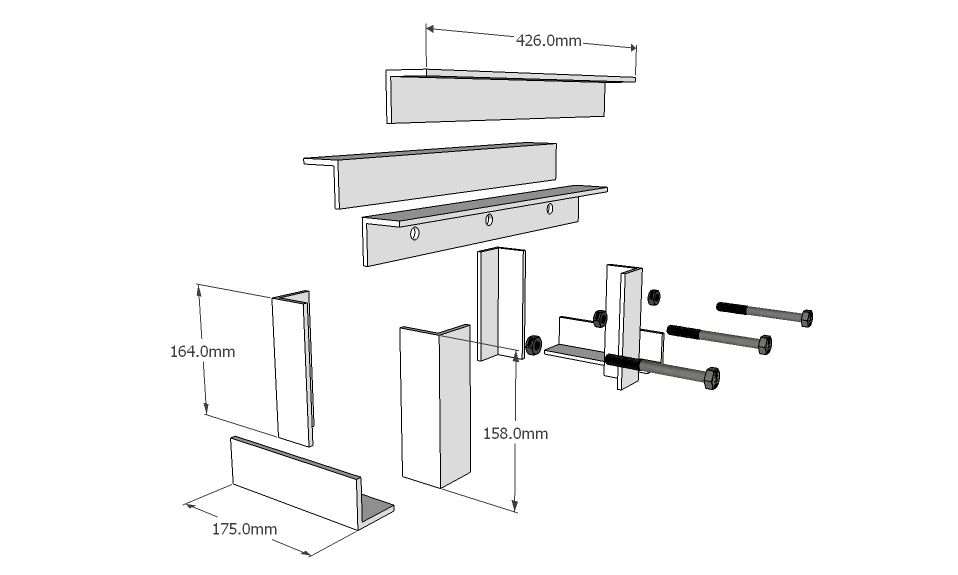 The 12 dia holes are only drilled through the fixed angle, for the bolts to pass through, I welded the M10 Nuts to this angle, and then the bolts screw in and right through the holes to push against the loose angle And I have set the 2 fixed angle about 35mm apart So for a parts list you will need 2 off 50 x 50 x 6 angle at 164mm long 2 off 50 x 50 x 6 angle at 158mm long 2 off 50 x 50 x 6 angle at 175mm long 2 off 50 x 50 x 6 angle at 426mm long 1 off 50 x 50 x 6 angle at 426mm long with 3 off 12 dia holes 3 off M10 x 100 Bolts 3 off M10 full nuts Any queries just ask |
| |
|
|
mirafioriman
Posted a lot
   My next project.......
Posts: 1,361
|
|
|
|
|
Thanks for theat Tony I'm going to have a go at making one. Do you also have another metal folder?
|
| |
|
|
|
|
|
|
|
MM - the other one is to the left in the top photo, it is a Sealey DF760, it does an Okay job, but if I had to have only 1, it would definitely be my home made one, the other great thing is that its portable, so I always take it with me when I do welding on someone else car, unlike the Sealey one, which needs to be bolted to the bench  www.ccw-tools.com/product.asp?P_ID=1651 www.ccw-tools.com/product.asp?P_ID=1651 |
| |
Last Edit: Jan 7, 2010 19:21:33 GMT by tonybmw
|
|
mirafioriman
Posted a lot
   My next project.......
Posts: 1,361
|
|
|
|
|
Thanks!
|
| |
|
|
|
|


