|
|
|
|
|
Update on the Subframe Rebuild. Here is the Subby with both Main Spars, Support Plates and Brackets made and welded in: 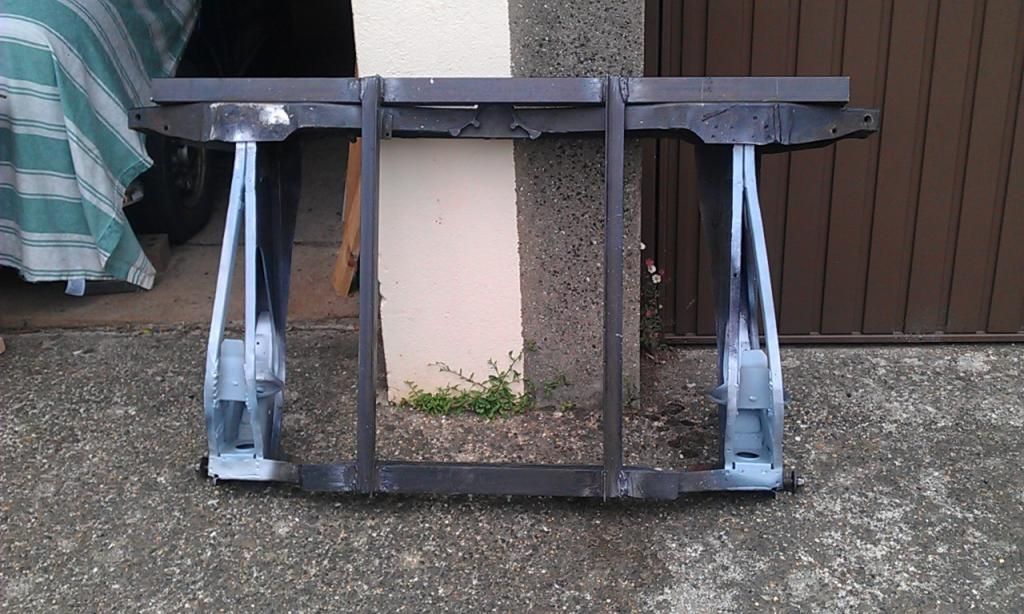 And here it is with both bottom plates finished and test fitted: 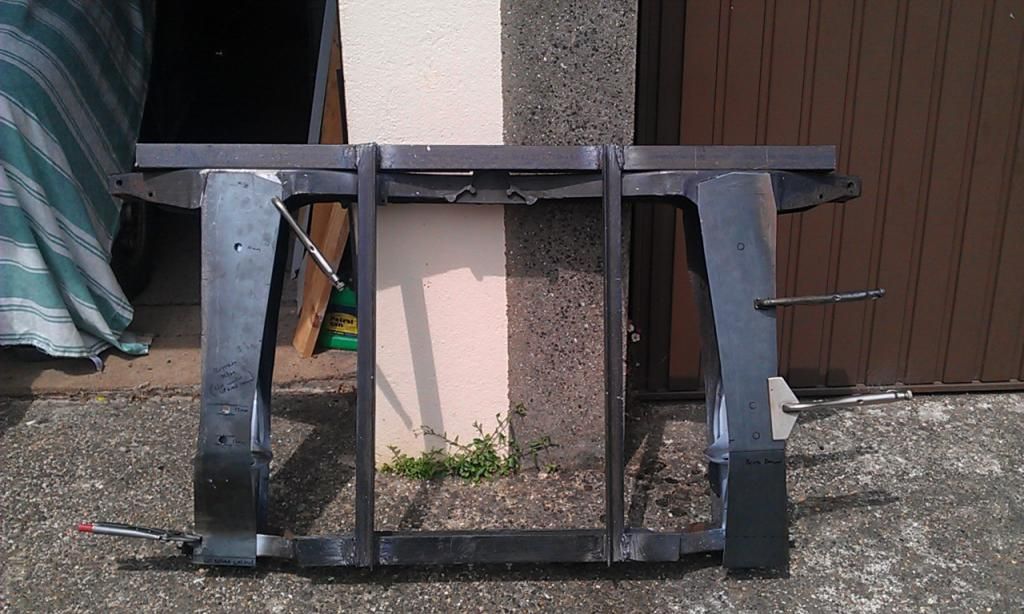 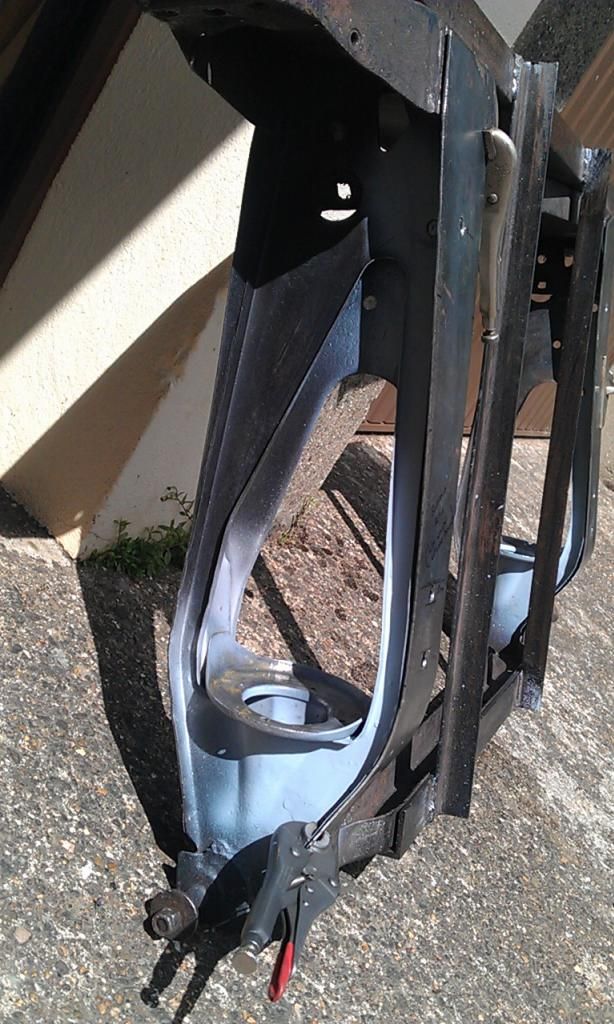 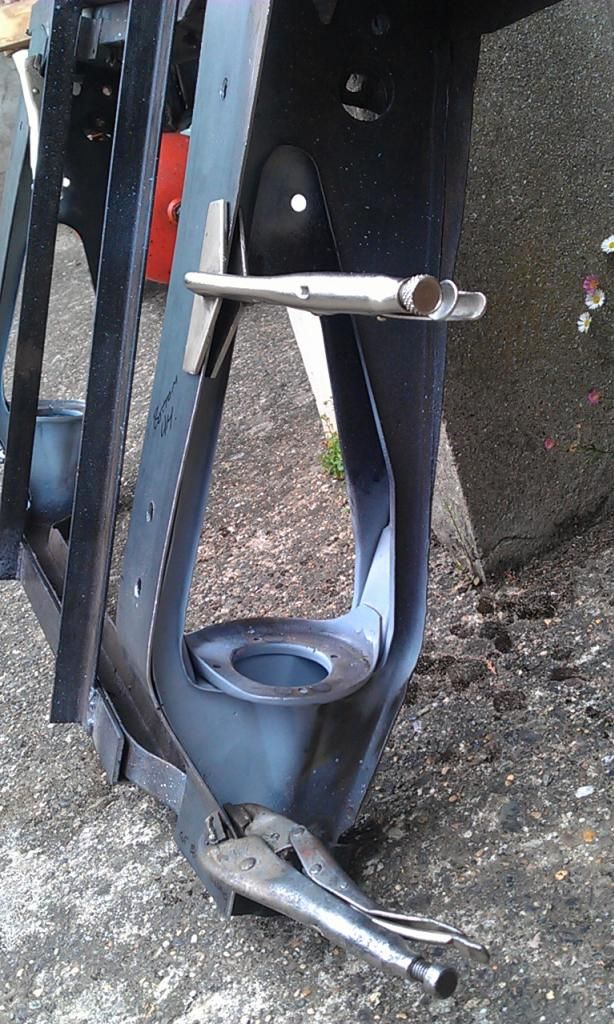 Still a bit rusty on top so time for a Twisted Knot, small repair to make to the end of the Left Plate and a tiny repair needed on the Right Plate: 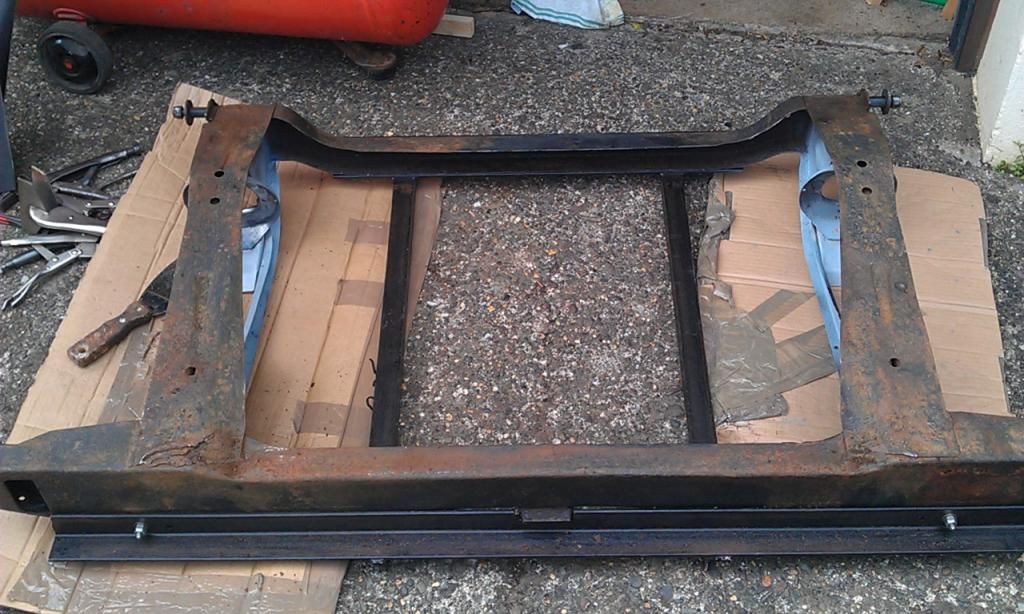 Spent a hour or so cleaning and scraping and then applied some KRUST to any rusted areas: 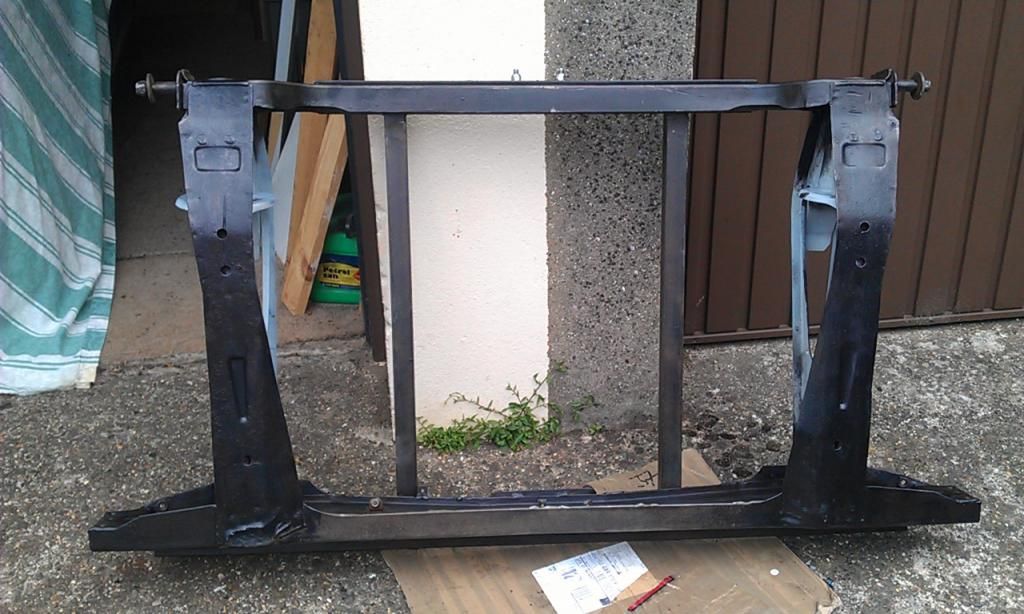 A little more scraping required, a lot of holes to be drilled in the skid plates so that they can be plug welded in place, weld on the Rear Cone Support Cups, seam weld anywhere required, sand down again, prime with Epoxy Primer and Top Coat TBC? |
| |
|
|
|
|
|
|
|
|
|
|
You should be very proud of that achievement, well done
|
| |
|
|
bstardchild
Club Retro Rides Member
Posts: 14,962
Club RR Member Number: 71
|
Making panels.......bstardchild
@bstardchild
Club Retro Rides Member 71
|
|
|
|
I know I said I wouldn't and you shouldn't and it was easier and cheaper if you cost you time above 50p an hour but I doff my hat in you direction.
I still wouldn't have spent the time but as Tony said you should be chuffed with that work
|
| |
|
|
bstardchild
Club Retro Rides Member
Posts: 14,962
Club RR Member Number: 71
|
Making panels.......bstardchild
@bstardchild
Club Retro Rides Member 71
|
|
|
|
Just tucking into some humble pie... Doesn't taste that bad tbh
|
| |
|
|
|
|
|
|
|
hi first panel with bends and a joggle 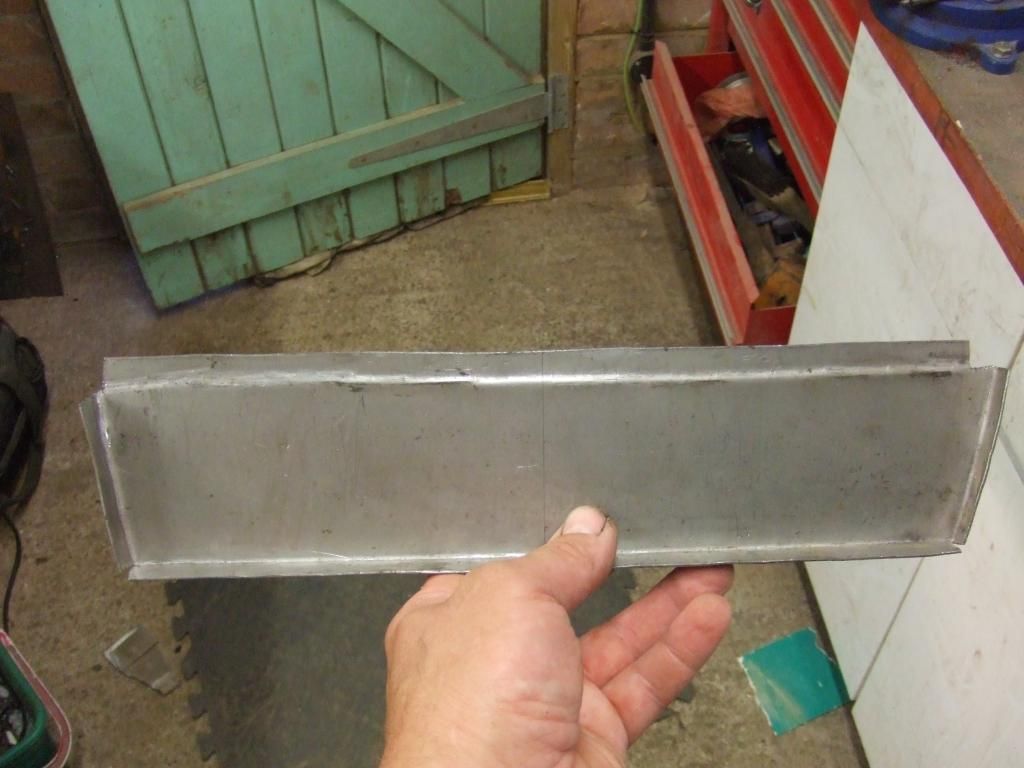 test fitted in the battery tray hole 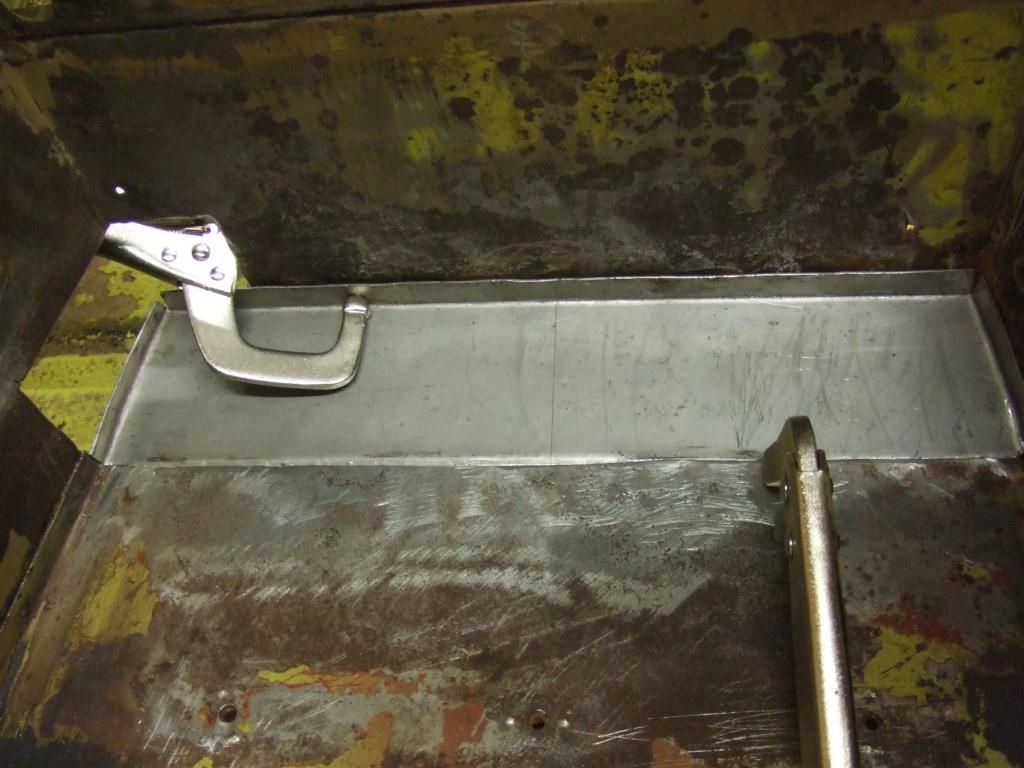 bit more fettling and two drain holes then weld it in |
| |
2
|
|
|
|
|
Jun 10, 2014 13:52:52 GMT
|
I know I said I wouldn't and you shouldn't and it was easier and cheaper if you cost you time above 50p an hour but I doff my hat in you direction. I still wouldn't have spent the time but as Tony said you should be chuffed with that work My like buttons gone walkies so... 'what Bstardchild said'  |
| |
I would be rich if i had not spent so much money on Cars and fast women...oh, i did waste some of it as well!
|
|
|
|
|
Jun 10, 2014 19:08:46 GMT
|
|
tonybmw, bstardchild and maybachman;
Many thanks, it makes all the hard work worth while to get praise on how its turned out, but if it wasn't for the inspiration from reading this thread I would not have started and without the support on this Forum and the Mig Welding Forum I would not have achieved what I have.
I have learnt an awful lot and can now use what I have learnt to progress with the rest of my restoration project.
|
| |
|
|
|
|
|
Jun 10, 2014 19:13:15 GMT
|
hi first panel with bends and a joggle  test fitted in the battery tray hole  bit more fettling and two drain holes then weld it in Good start, is that hand joggled? I have borrowed a Joddler like this one off of a mate at work, found it hard work, think i'll stick to me hammer, chisel and a straight edge :-) |
| |
|
|
|
|
|
Jun 10, 2014 19:39:34 GMT
|
Subframe rebuild update: Spent the day in the workshop fabricating the indents in the bottom plates and drilling the plug weld holes: 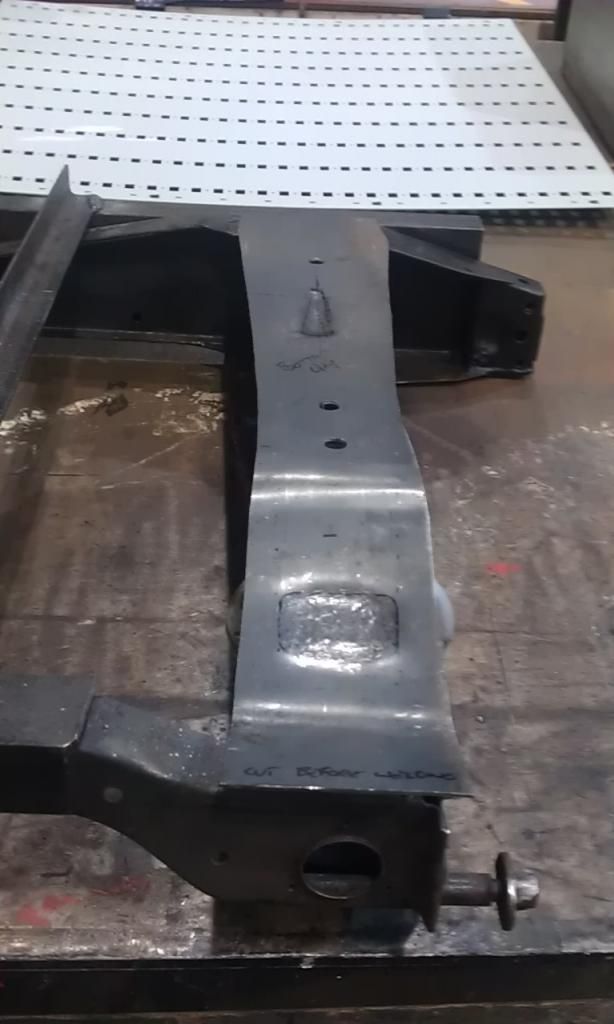 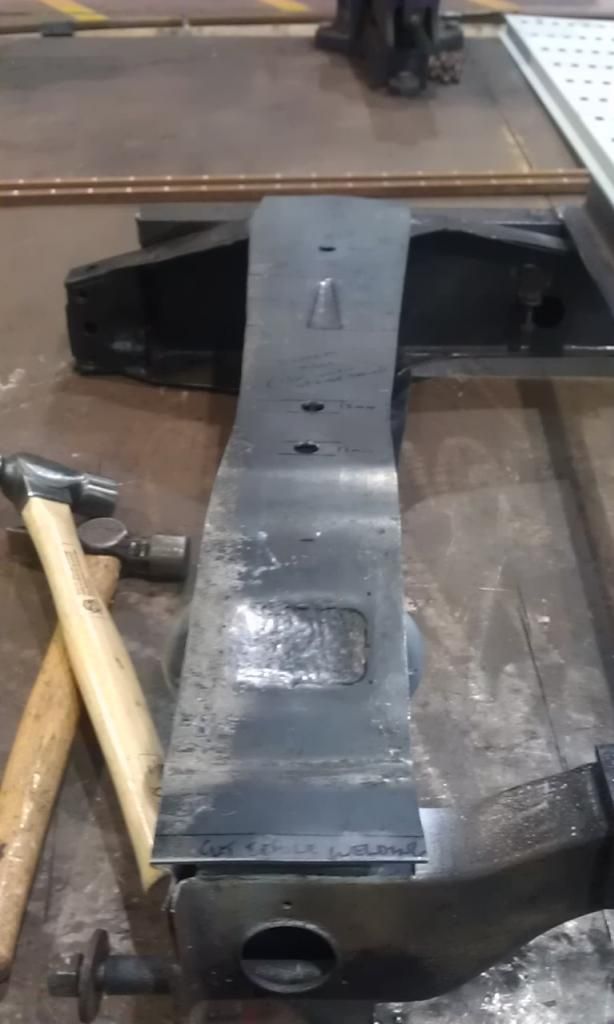 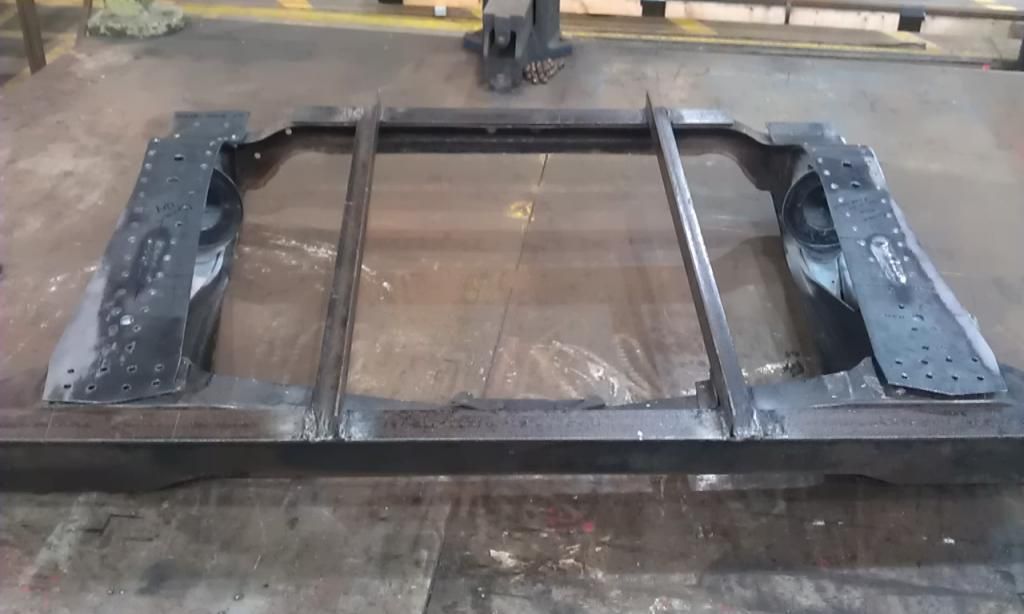 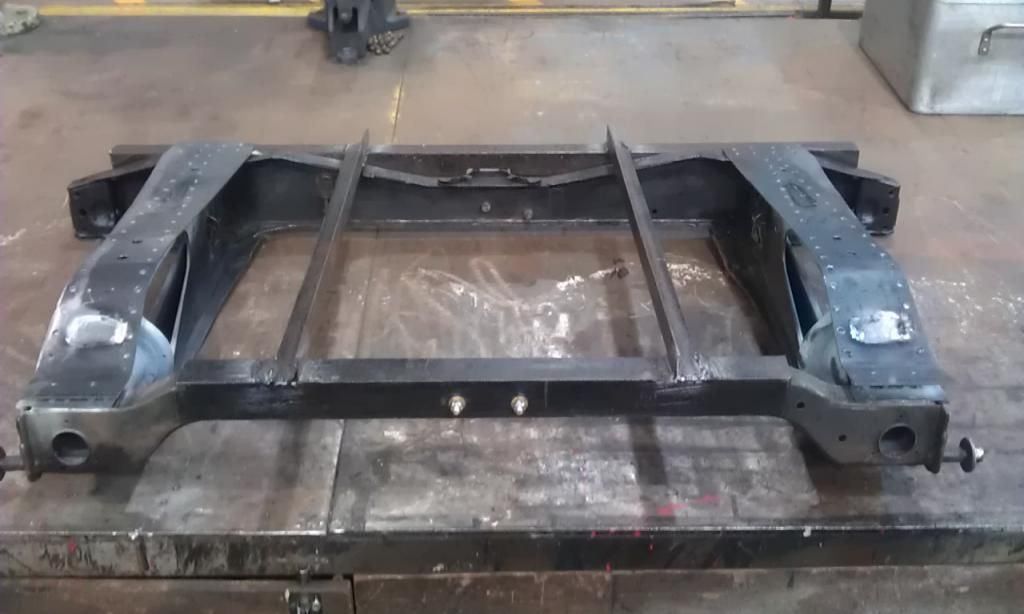 The indents need tidying up but I can do that at home, just wanted to get the bulk done and the holes drilled using the Anvil etc and Pillar Drill as I only have a Hand Power Drill at home. Clean, Prime and Paint next :-) |
| |
Last Edit: Jun 10, 2014 20:15:48 GMT by jonnyalpha
|
|
|
|
|
Jun 10, 2014 19:39:48 GMT
|
hi first panel with bends and a joggle  test fitted in the battery tray hole  bit more fettling and two drain holes then weld it in That is an excellent first panel, look forward to seeing it welded in and dressed off |
| |
|
|
|
|
|
|
|
Jun 12, 2014 10:34:16 GMT
|
I have borrowed a Joddler like this one off of a mate at work, found it hard work, think i'll stick to me hammer, chisel and a straight edge :-) If you want a really nice joddled edge, the Rolastep thing does it very well - a much better defined step that the one like in the link (or than my one, anyway). You still need some kind of straight edge to run it along as it's very easy to go off-course, and a 16mm ratchet spanner is useful as well. Trouble with my 'normal' joddler is that if you look at the jaws, there's quite a gap in the 'step' area which leads to quite an angle rather than an almost 90-degree step down. The rolling one is more like a hand-held bead roller so seems to be able to apply more pressure. Unless my joddler is no good of course. |
| |
|
|
|
|
|
Jun 12, 2014 10:38:56 GMT
|
Okay lets go, this first picture is the part where the door slams shut and the lock hooks onto the torx pin sticking out.This is the same on both sides. 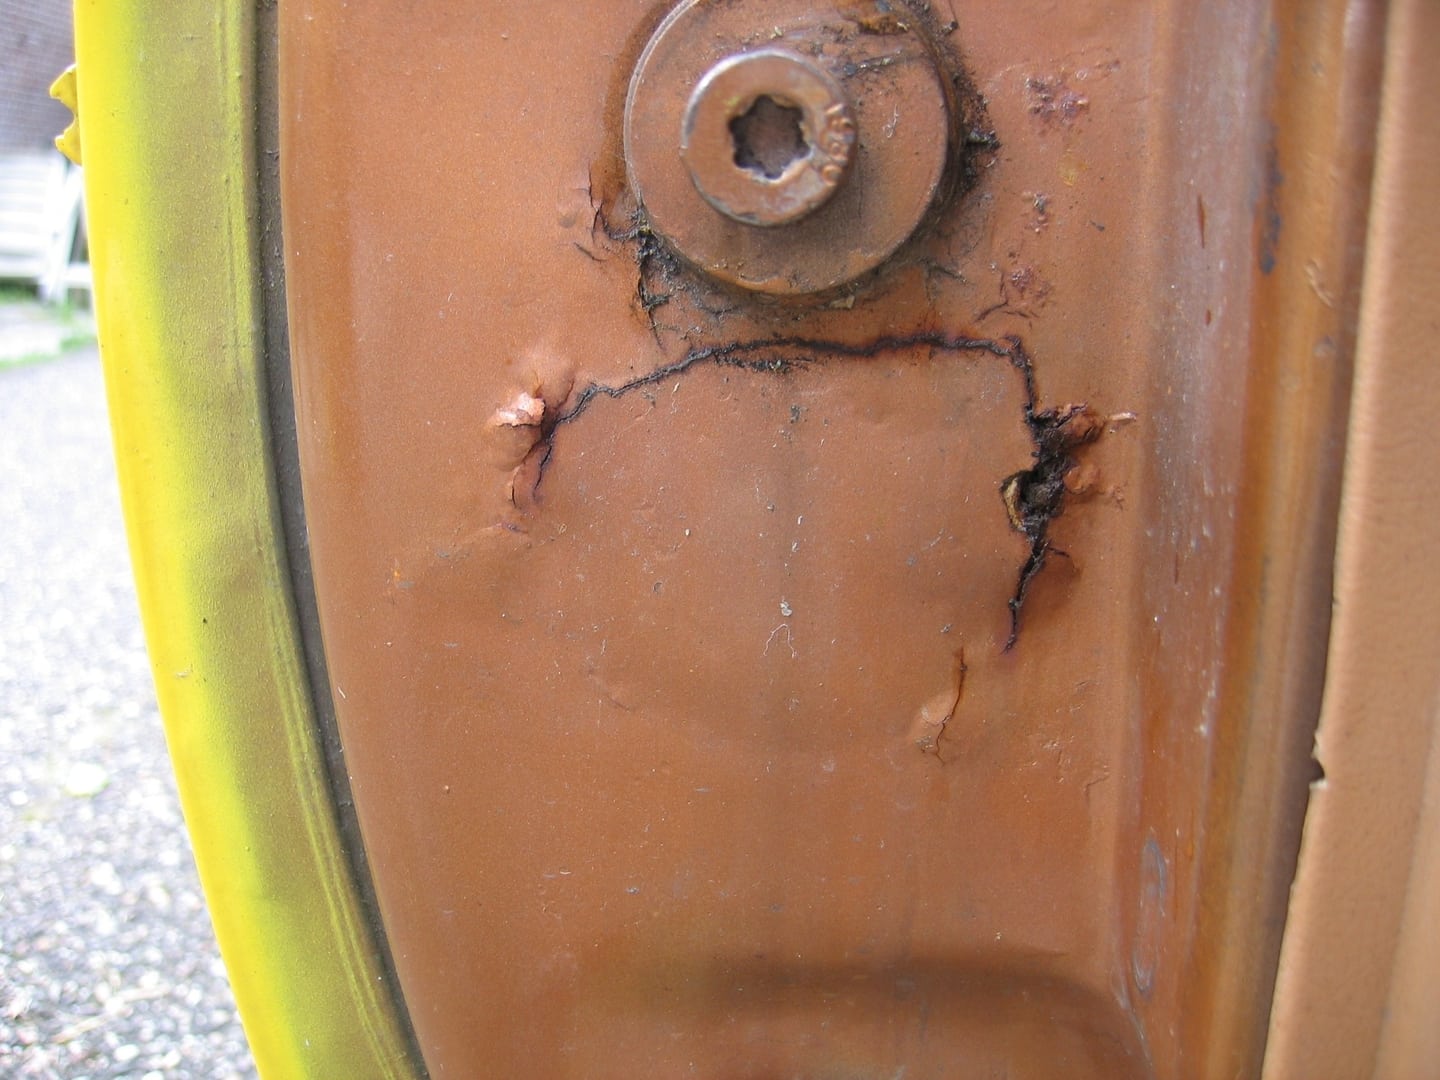 First thing you've got to do is get the pin out and clean all that paint off, so you can see how bad it is. Once you know that, you can decide how much repair is needed. There's a nice big rusty scab under that paint, but we can't see if it is limited to where it seems to be, or (more likely, given how rust is) it extends further out. So, clean it all up and see where to go from there. Can't help you on the others I'm afraid. If the glass is bonded in place, could a mobile windscreen repair person come out and use whatever technique they used on bonded screens to remove it? I'm tempted to say get a hairdryer to soften the glue, but you don't want to take it too far and damage the glass. I don't even know if that would get it hot enought to cause trouble. Same for the bottom of the door - it's tempting to say place a big piece of wood across the bottom edge (to spread the load) and hammer it back true, but I suspect that might cause more damaage than it fixes, and some knowledge of how the previous repair was done, and how extensive it was, is needed. So perhaps paint off again? |
| |
|
|
|
|
|
Jun 12, 2014 10:50:02 GMT
|
I tried cooling the beads with compressed air and I used a dolly and a hammer to smooth the surfaces out, but they never look as "it was never wielded" I was told not to try to cool the metal down - leave it to cool naturally. I have the same issues as you do - no matter how many times I lok through this thread for advice and inspiration, I can't get the same kind of invisible welds that Tony manages to get, as I'm scared that if I grind too much off, I'm just going to weaken the steel. One of the issues I have is when I'm replacing a flat piece of steel, once I've cut the patch it's hard to keep it completely flat. For example the bench shears curve the steel while I'm cutting it, the tinsnips put a series of bends and marks into the edge when I'm cutting it down, and no matter how much I try, I can't get it straight again, the best I can achieve is for it to be a bit wavy, perhaps in different parts than it was before. Then I figure that I'll hold it onto the original part with magnets, weld where the two are level, then once that holds it in place, attempt to level the rest of it up bit by bit. Of course, that never works because that would need the first welds to 'slide' somehow. But it's frustrating. Krum, if you go back quite early on in this thread there is some detail on dressing the welds, grinding down and so on, but for me it's a flatness issue which means the discs aren't working against a flat surface sometimes. Of course, it works a bit better when the patch is on a curve. |
| |
|
|
|
|
|
Jun 12, 2014 18:29:38 GMT
|
droopsnootThanks for the info, i am gathering courage to get started and i am very afraid to f... things up.
|
| |
|
|
|
|
|
Jun 12, 2014 19:57:13 GMT
|
droopsnootThanks for the info, i am gathering courage to get started and i am very afraid to f... things up. I think That pin is welded to a plate what is stitch- or spot welded to doorshunt. If You take the interior panels away you may see the backside of that plate. Like Droopsnoot says, a car glass guy can -at least should- remove Your rear window. To doors, if it's my car, I would like to take the door apart to see how bad door are. Start from a easy spot. Don't rush to hard spots first or You could loose Your motivation when it does not go as you plan to. I know, been there a couple times. And if You dare to start, make the thread to Reader Rides. -Antti |
| |
|
|
kv77
Part of things
 
Posts: 62
|
|
Jun 24, 2014 20:35:41 GMT
|
Hi, My car had this rusty corner that I cut out and made a repair panel for, using the many tips in this thread. With the corner cut out, i had a look inside the sill, and the bottom half really needs replacing, as its full of rust and filler. I have a repair panel for that, so it should be an easy fix. My plan is to make the cut on the red line, cut the repair panel length wise and joddle the top edge it so it's easier to weld it in and grind the weld flat. The bottom flange can be spotwelded to the inner sill. Now, the thing is that I can't put any seam sealer on the rear of the weld when the new sill is in place. All i can do is spray in loads of cavity wax. Would that be okay, or is it really better to but weld the repair panel in? 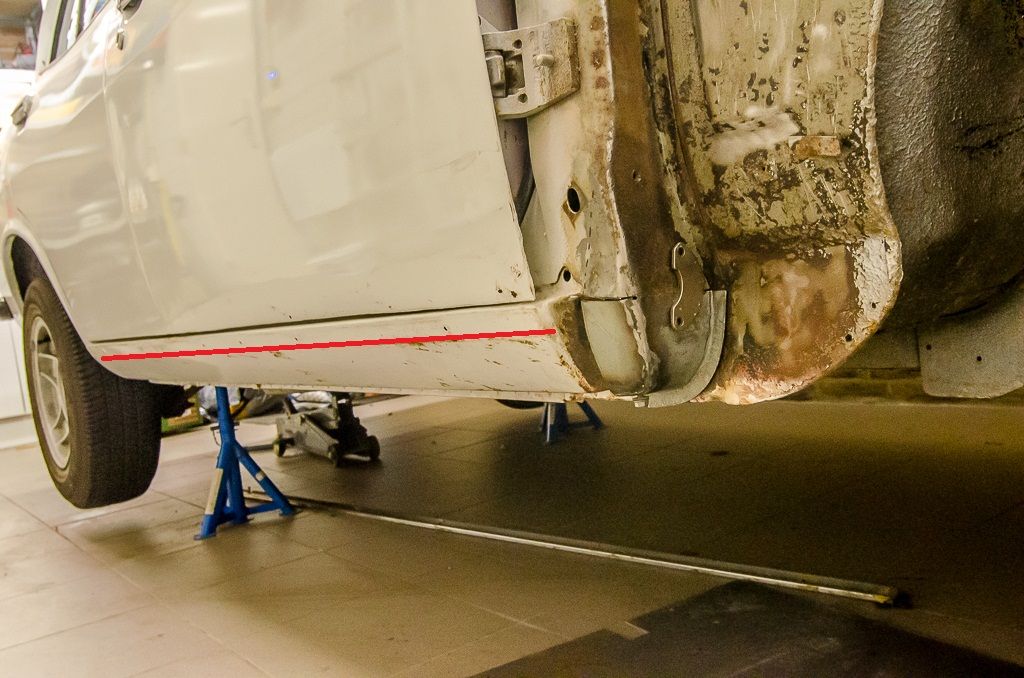 |
| |
Last Edit: Jun 25, 2014 7:17:39 GMT by kv77
<a href="http://retrorides.proboards.com/index.cgi?board=readersrides&action=display&thread=81096&page=1"> My 1975 Mazda 616</a>
|
|
bstardchild
Club Retro Rides Member
Posts: 14,962
Club RR Member Number: 71
|
Making panels.......bstardchild
@bstardchild
Club Retro Rides Member 71
|
Jun 24, 2014 23:16:26 GMT
|
|
Can you not butt weld the pannel in or joddle the car body so that there isn't a rust trap J lip going up but down if you see what I mean?
|
| |
|
|
kv77
Part of things
 
Posts: 62
|
|
|
|
|
Yes, joddling the car body is possible. I just figured it would be harder for the wax to creep in the joint that way... And a butt weld (my buttwelds anyway) would not be as strong and neat
|
| |
<a href="http://retrorides.proboards.com/index.cgi?board=readersrides&action=display&thread=81096&page=1"> My 1975 Mazda 616</a>
|
|
|
|
|
|
|
|
Good point about the wax creeping, but the other thing to consider is if you're welding is going to possibly be porous, doing it the other way might result in the wax creeping a bit too much and coming through the painted repair later on. There's only so much you can do with these things - the "proper" repair would be to remove the old sill at the spot welds and put a new one on. Try to make sure that there's as little overlap as possible on the joddled edge might also help - that is, joddle the edge, test fit, mark where the panels overlap, and trim as close to that as possible, rather than leaving 1/4" lip.
Now, if you'd left the repair you've already done until later, you might have been able to fashion some kind of applicator (small roller, perhaps) on a stick in from the front end of the sill, apply seam sealer, then close up the front section. Perhaps too far-fetched to actually work. Do you have good access into the sill box section to get wax in there?
|
| |
|
|
kv77
Part of things
 
Posts: 62
|
|
Jun 27, 2014 20:47:16 GMT
|
|
Yeah, access to the inside of the sill is pretty good..
Thinking about just removing the whole thing now. But that would mean I have to brace the car, right? Or am i fine because the inner sill is sound?
edit: Oh well... braced the thing and just got on with it.
|
| |
Last Edit: Jun 28, 2014 17:59:55 GMT by kv77
<a href="http://retrorides.proboards.com/index.cgi?board=readersrides&action=display&thread=81096&page=1"> My 1975 Mazda 616</a>
|
|
|
|


