|
|
|
Apr 10, 2014 19:51:39 GMT
|
In order to fabricate the last piece needed for the side I have been working on I had to start welding in my repair pieces, quite an anxious time as having successfully made the repair pieces the last thing I wanted to do was screw them up welding them in. Here's the circular repair welded in place: 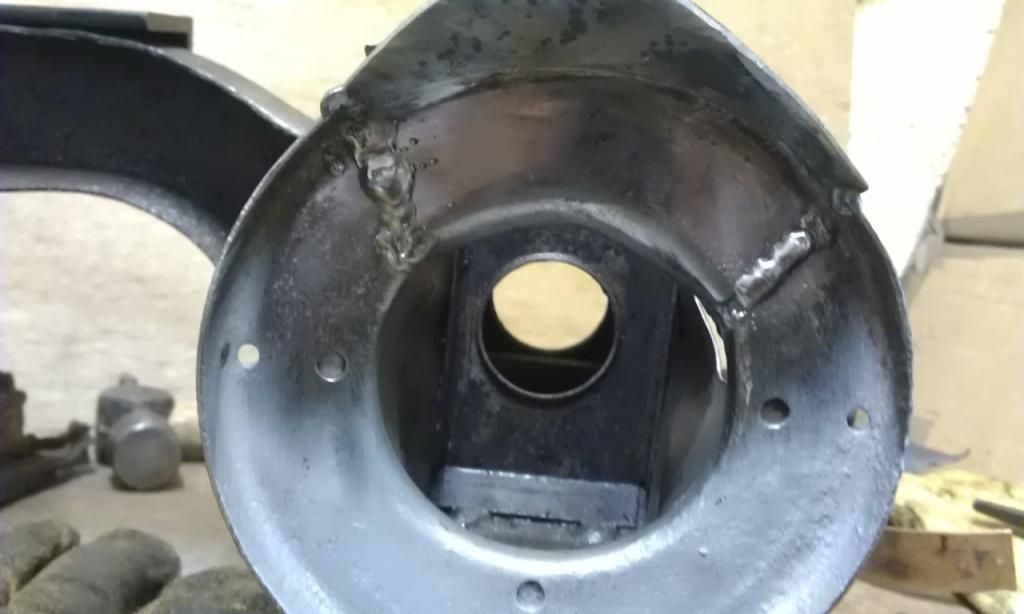 Heres the back being dressed down: 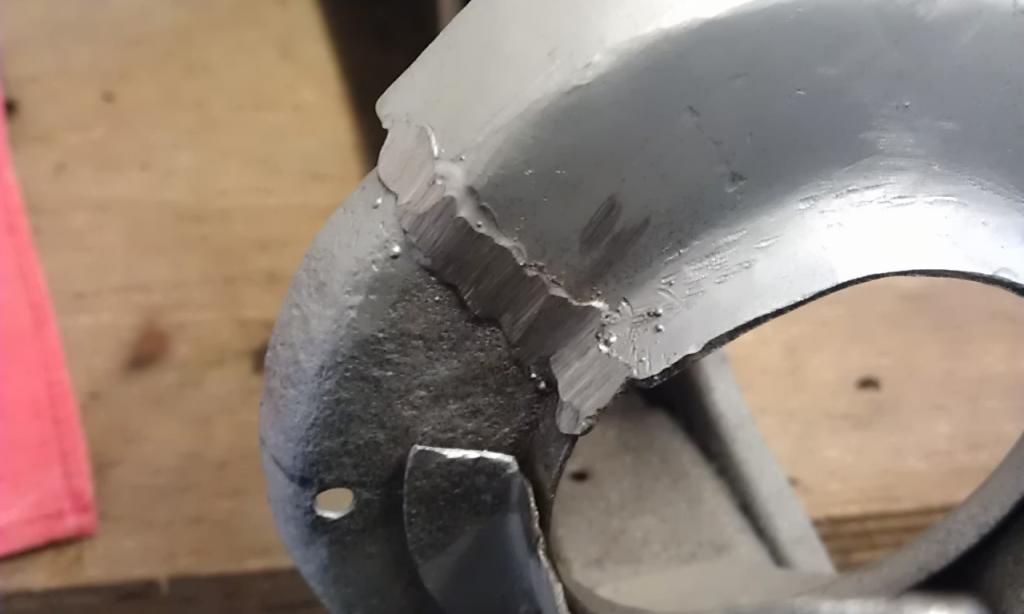 Here it is dressed down and primed: 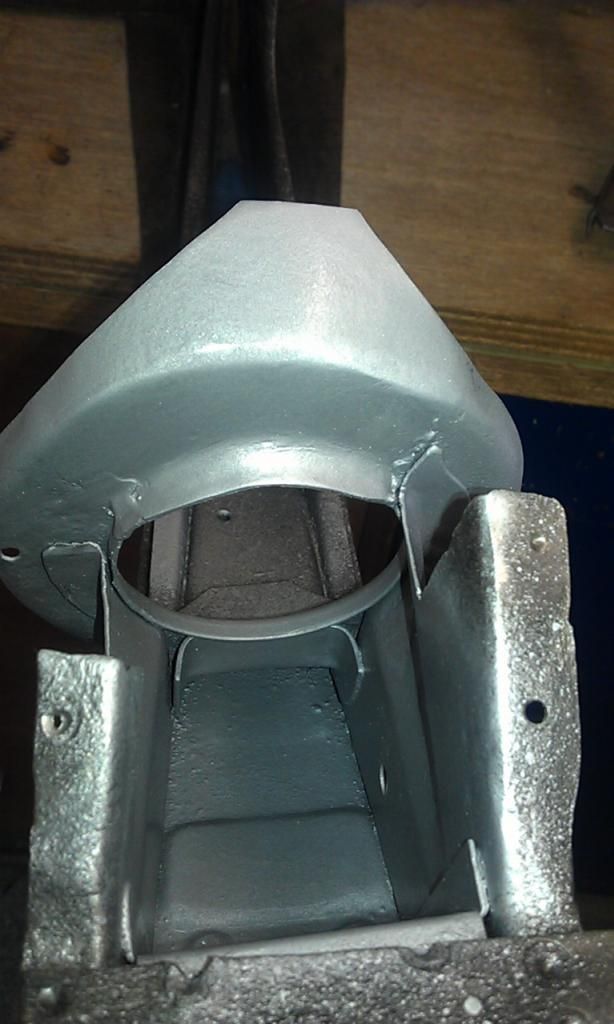 Cleaned all the internal area up as suggested and applied Hammerite KURUST. Here's a pic showing it starting to come together: 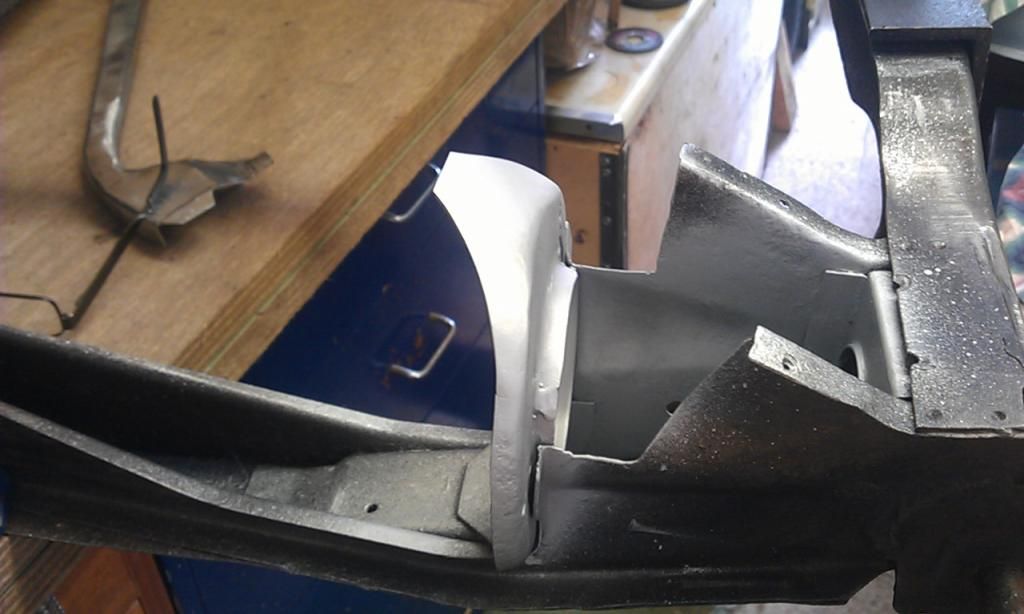 And heres the first main spar getting welding in place: 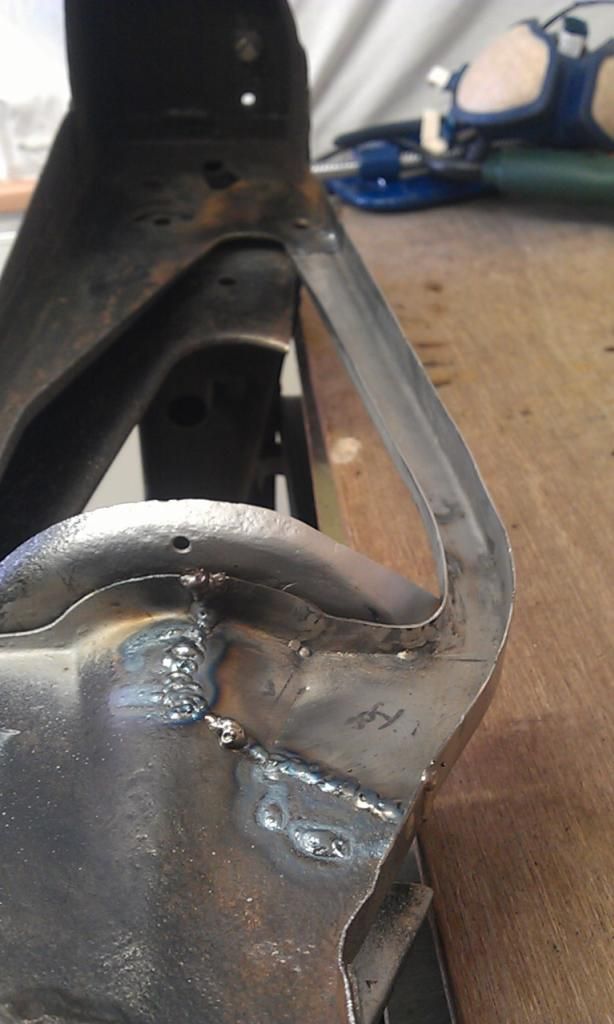  And then I ran out of gas - pick up a refill tomorrow :-) |
| |
|
|
|
|
Wild
Part of things
  Mini Restoration
Posts: 12 
|
|
Apr 10, 2014 20:14:35 GMT
|
|
Looking good Jonnyalpha! Keep up the good work man :-)
|
| |
“On a given day, a given circumstance, you think you have a limit. And you then go for this limit and you touch this limit, and you think, 'Okay, this is the limit'. And so you touch this limit, something happens and you suddenly can go a little bit further. With your mind power, your determination, your instinct, and the experience as well, you can fly very high.”
- Ayrton Senna
|
|
|
|
|
Apr 20, 2014 21:04:50 GMT
|
|
Yes looking good
Your learning some good lessons as you make these parts, that in itself is very good, and worth all the time and effort you are putting in
|
| |
|
|
|
|
|
Apr 21, 2014 21:18:00 GMT
|
Looking good Jonnyalpha! Keep up the good work man :-) Thanks Wild :-) |
| |
|
|
|
|
|
Apr 21, 2014 21:22:45 GMT
|
Yes looking good Your learning some good lessons as you make these parts, that in itself is very good, and worth all the time and effort you are putting in Thanks Tony, if it wasn't for your posts on here I never would have started :-) I have now welded on the second main spar and dressed down the welds where required, only one piece left to make and then the R/H side will be completed. Also made a couple of repair pieces for my Mini bodywork and using what I have learnt doing the subframe I managed to knock up a rear quarter repair and weld it in place in a couple of hours - smokin!! |
| |
|
|
Wild
Part of things
  Mini Restoration
Posts: 12 
|
|
Apr 21, 2014 22:07:44 GMT
|
Yes looking good Your learning some good lessons as you make these parts, that in itself is very good, and worth all the time and effort you are putting in Thanks Tony, if it wasn't for your posts on here I never would have started :-) I have now welded on the second main spar and dressed down the welds where required, only one piece left to make and then the R/H side will be completed. Also made a couple of repair pieces for my Mini bodywork and using what I have learnt doing the subframe I managed to knock up a rear quarter repair and weld it in place in a couple of hours - smokin!! Would love to see some pictures of the mini repair mate if you have any :-) |
| |
“On a given day, a given circumstance, you think you have a limit. And you then go for this limit and you touch this limit, and you think, 'Okay, this is the limit'. And so you touch this limit, something happens and you suddenly can go a little bit further. With your mind power, your determination, your instinct, and the experience as well, you can fly very high.”
- Ayrton Senna
|
|
|
|
|
Apr 22, 2014 13:12:39 GMT
|
Thanks Tony, if it wasn't for your posts on here I never would have started :-) I have now welded on the second main spar and dressed down the welds where required, only one piece left to make and then the R/H side will be completed. Also made a couple of repair pieces for my Mini bodywork and using what I have learnt doing the subframe I managed to knock up a rear quarter repair and weld it in place in a couple of hours - smokin!! Would love to see some pictures of the mini repair mate if you have any :-) Here goes: Heres the area to be repaired, it's the lower part or the 'Rear Quarter': 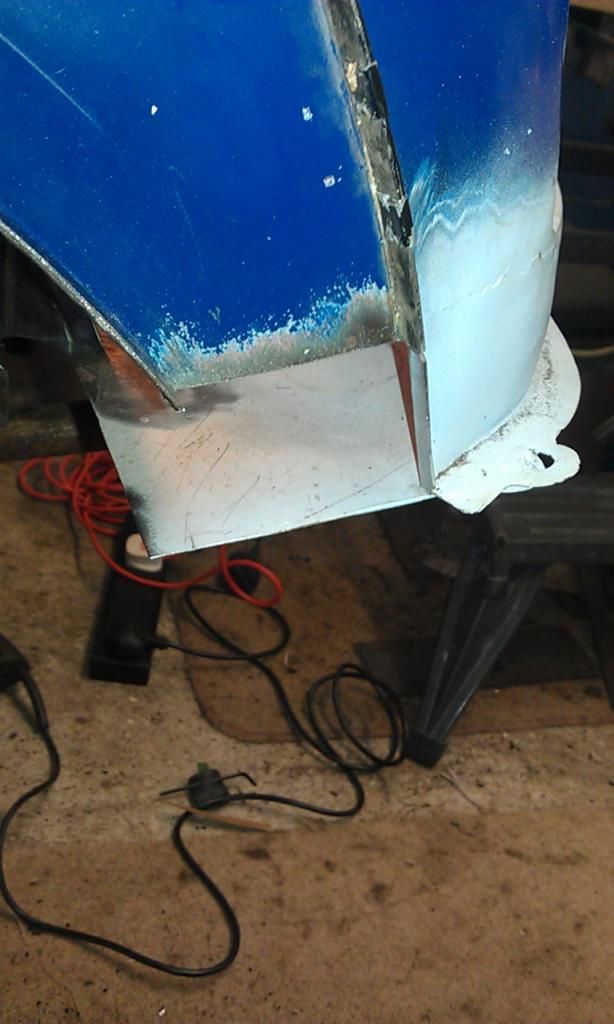 As I had cut the old damaged area out a long while ago I had to fid a pic on the web of what the finished article should look like, a quick search on google pulled this up - perfect. Started with a template made from an old cereal packet (made a mistake when cutting it, I missed of the folded edge on the RH side but spotted it before I cut the metal): 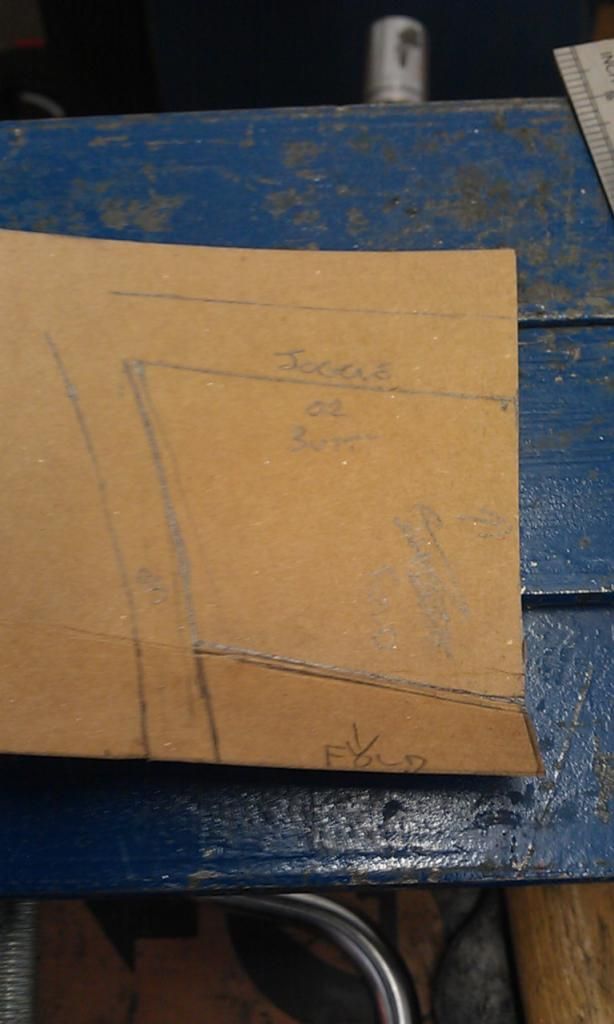 Next cleaned up some spare sheet steel: 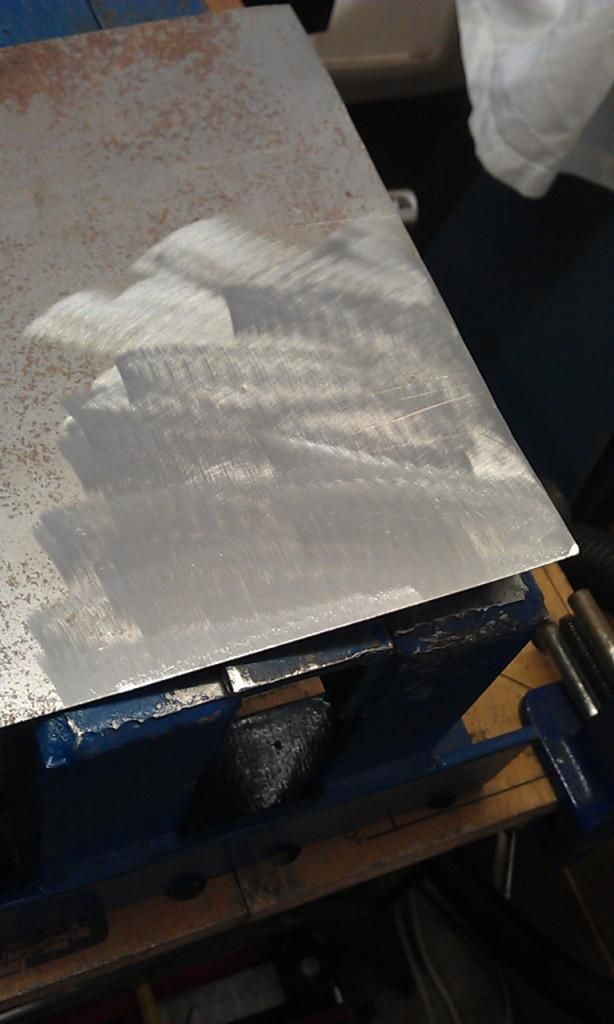 Folded the repair piece: 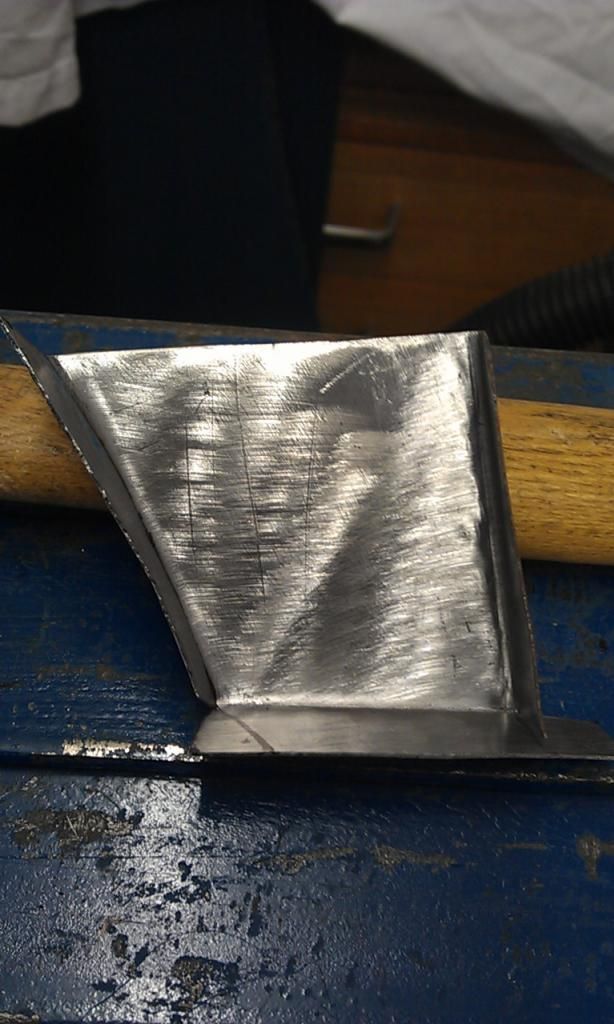 Sorry no step by step pics, I started with the curved fold (the wheel arch profile) and then the bottom and RH folded edge. To get the wheel arch profile I simply folded a piec of card over the existing wheel arch and marked the curve and then transferred this curve to the correct part of the template. Next I joddled the edge using my latest Home Made edge setter (don't get exited but it works). 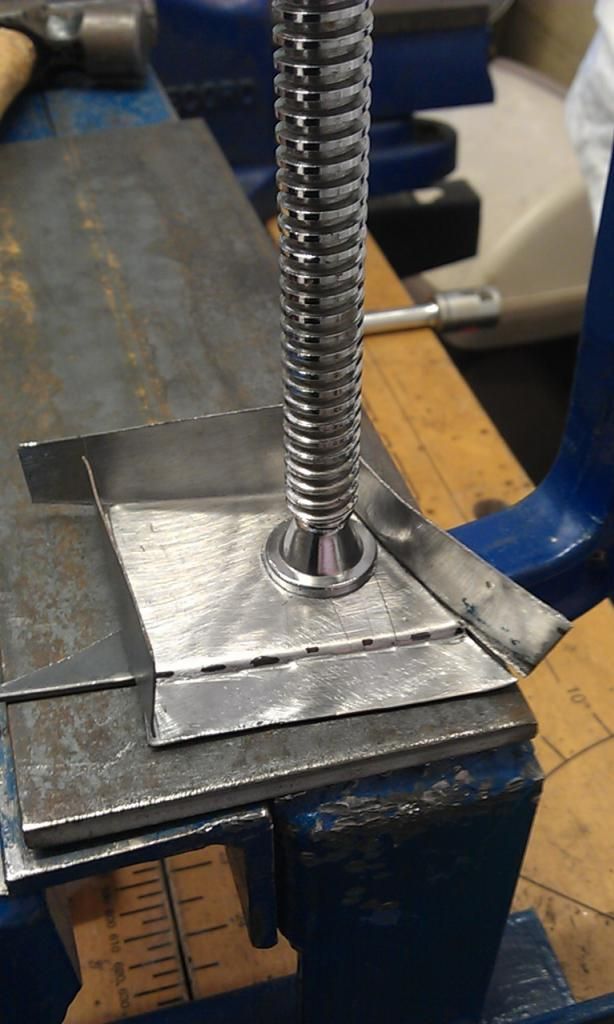 Thats a piece of 4mm plate to create a flat surface and a piece of 2mm to create an edge, seems to work fine for 1mm repair pieces, which is about right for Mini bodywork. Clamped the piece in place and made some adjustments: 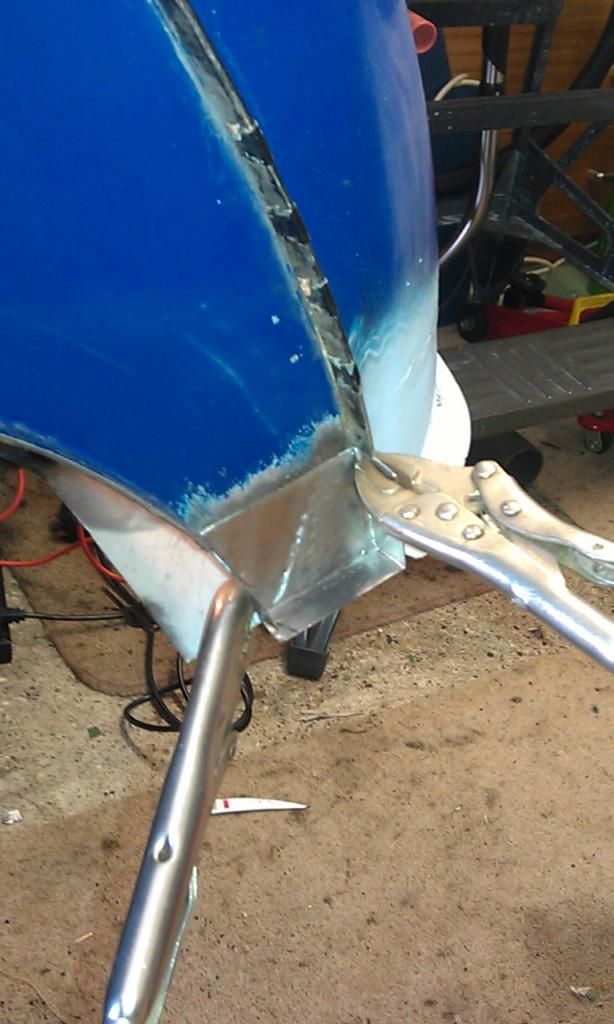 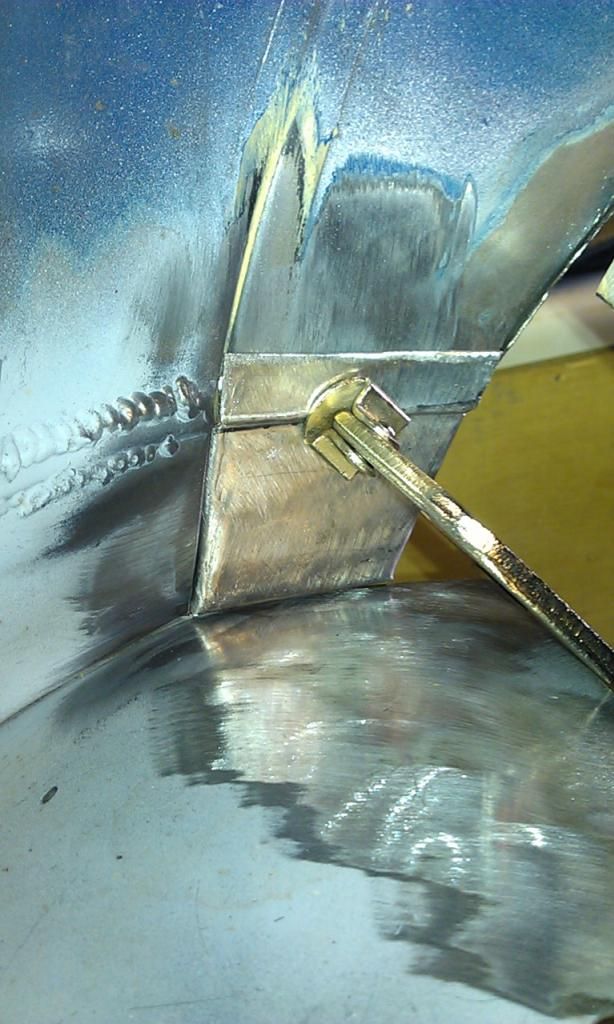 Then hit it with the welder: 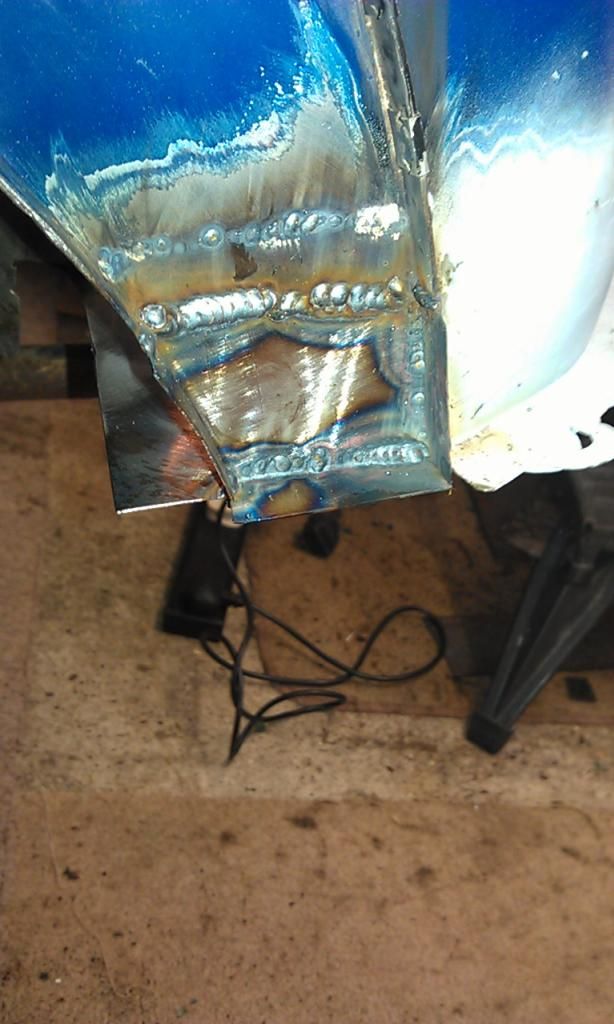 I rushed a bit with this and did not plan the welding, the top and right and side is OK but I should have been a bit more careful with the bottom edge, what you can see is the penetration, which is good however it will now be a B*** to clean up so I may have to use filler :-( I'll need to filler the top weld anyway so no real dramas. Just need to dress down the edges and paint.........Job done :-) |
| |
|
|
|
|
|
|
|
|
A nice job with the panel, and a lesson learnt with the welding, and planning, its all good
|
| |
|
|
|
|
|
May 30, 2014 20:36:30 GMT
|
First i have to say Tony you are the bomb with welding and sheet metal. I have an 1979 Chevrolet Monte Carlo that needs some TLC here and there, especially undersides of both doors, there has been some previous repairs which resulted in doors sticking outside the car at the underside, i am not quit sure how to repair this so i wanted to ask here if i can get some advice on how to tackle this problem. Have a Kemppi kempomat 150 mig welder with 0.6mm wire, working at the dutch railroad i have plenty spare parts for the welder cause the whole company uses Kemppi. 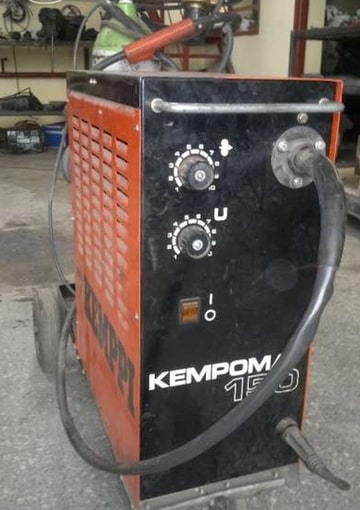 Its a simple welder, current and wire feed and thats it, welds like a dream when welding the normal houshold stuff like a tonybmw bench bender. Have bought myself some hammers and dolly's and only need some sheetmetal {again from work} to get started. Please let me know if its okay to ask my questions here or if i need to go elsewhere for information Thank you John |
| |
|
|
|
|
|
|
|
Small update on the Subframe rebuild, been slow going as I switched back to the Mini for a while. Just finished the last main strut. Small patch on the one strut that did not need replacing: 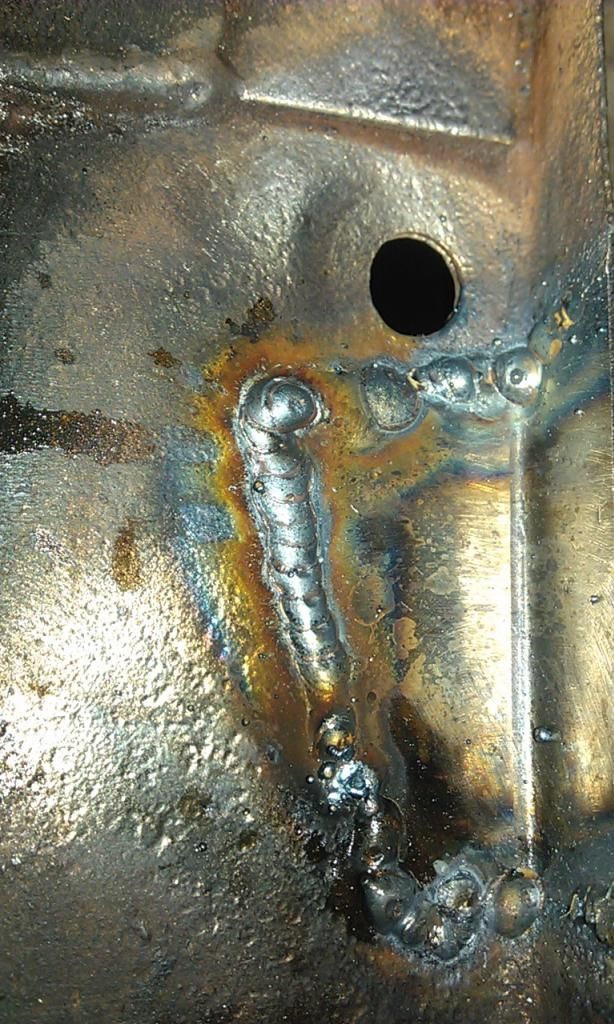 This was Butt welded all the way around, I'm getting a lot more confident with my welding and my welder, for 1mm metal I have sorted out the settings but often pre heat the area with a gas blow torch. The neat run above shows the results of Pulse Welding after being pre heated - sweet :-) And here it is dressed down: 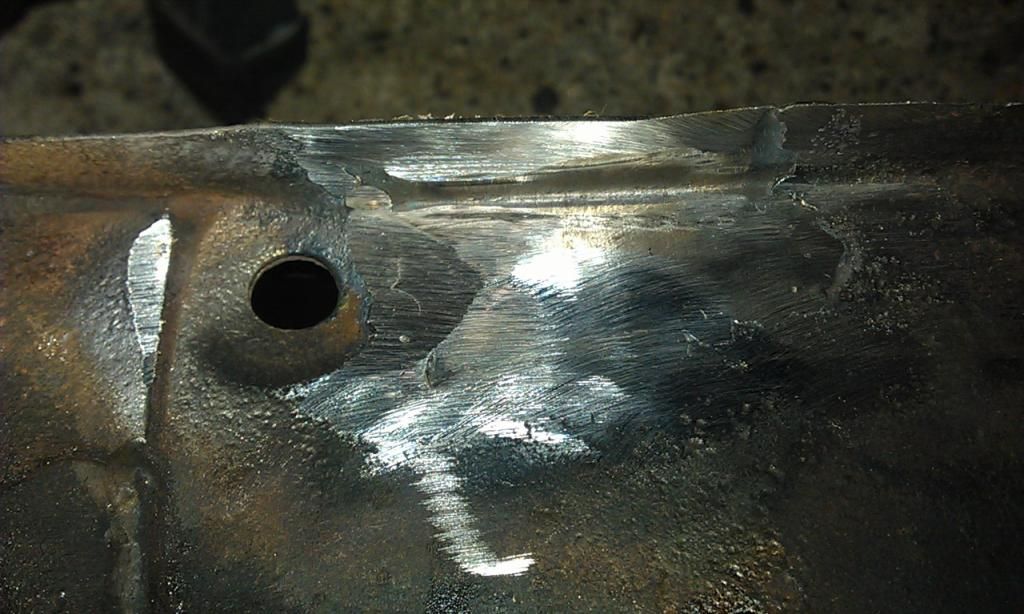 Here's the second main spar part welded: 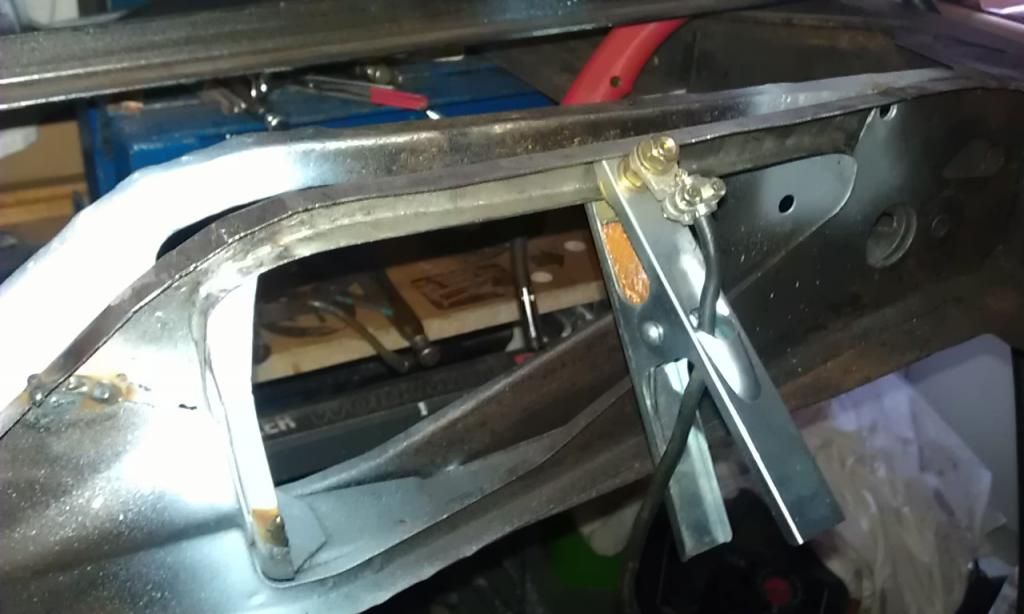 Whilst I was cleaning up the area, I noticed that then Rear Cone support seemed to have loosened somewhat, then with a little tug it came off: 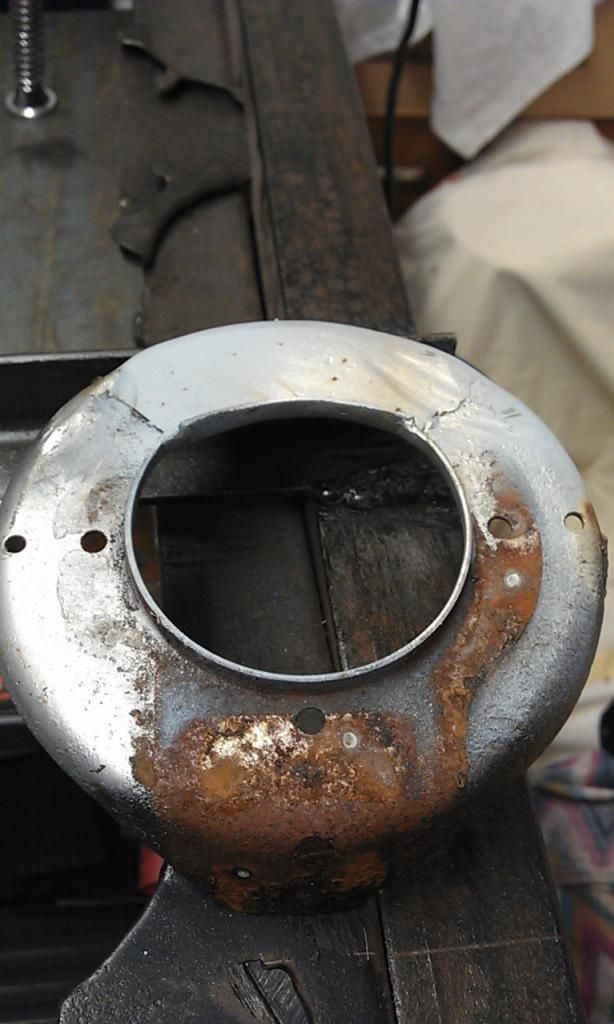 You can see three very small spot welds that were holding it in, one underneath and two on the RH side. I'll drill some holes and Plug Weld it back in place but now its off I can clean it up properly and spray it. Here's the RH side nearing completion: 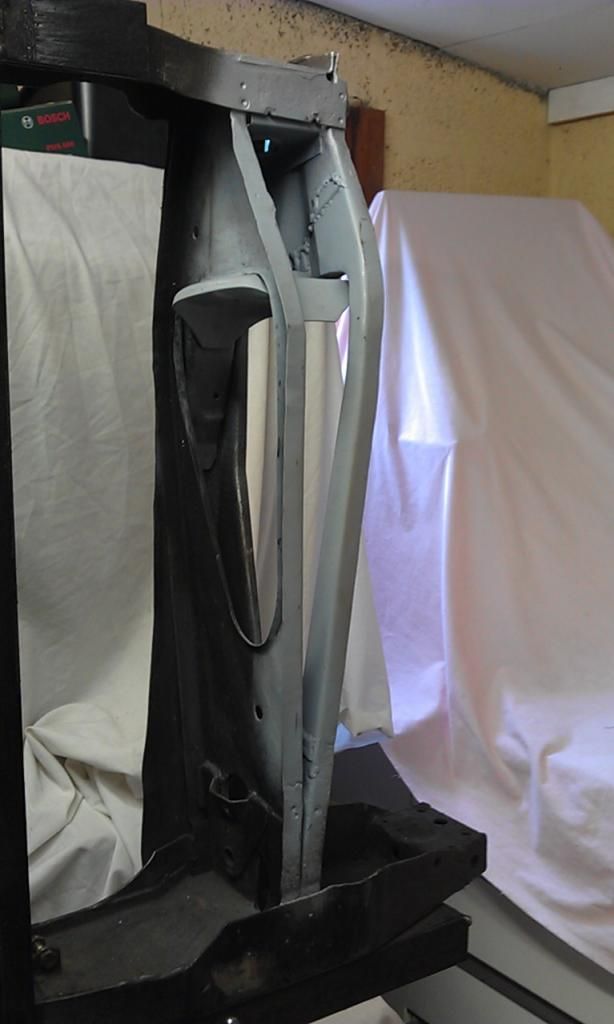 And here is the LH side: 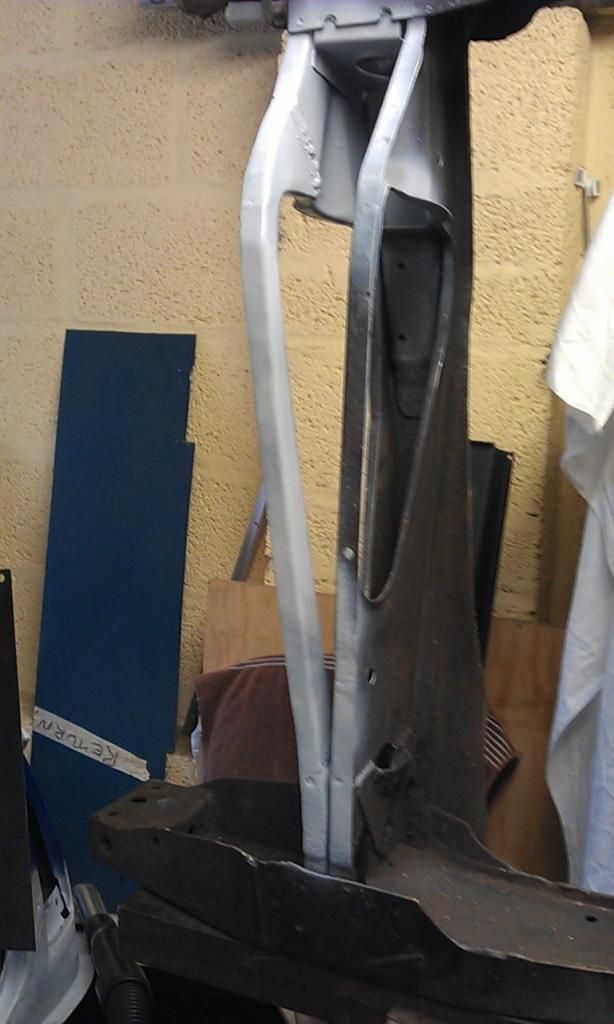 All I need to do know is make a couple of small brackets that I have already templated and make the second skid plate and weld it all up, Job Done, thanks to all the advice to make this possible :-) |
| |
|
|
|
|
|
|
|
|
|
First i have to say Tony you are the bomb with welding and sheet metal. I have an 1979 Chevrolet Monte Carlo that needs some TLC here and there, especially undersides of both doors, there has been some previous repairs which resulted in doors sticking outside the car at the underside, i am not quit sure how to repair this so i wanted to ask here if i can get some advice on how to tackle this problem. Have a Kemppi kempomat 150 mig welder with 0.6mm wire, working at the dutch railroad i have plenty spare parts for the welder cause the whole company uses Kemppi.  Its a simple welder, current and wire feed and thats it, welds like a dream when welding the normal houshold stuff like a tonybmw bench bender. Have bought myself some hammers and dolly's and only need some sheetmetal {again from work} to get started. Please let me know if its okay to ask my questions here or if i need to go elsewhere for information Thank you John If its questions about making panels then I guess here's where to ask. Just Googled 1979 Chevy Monte Carlo - nice car :-) |
| |
|
|
|
|
|
|
|
|
Great welding on butt joint, that looks good penetration
Yes "Collector "all questions answered, ask away, If I can't help then I'm sure someone will be able to
|
| |
|
|
|
|
|
|
|
Great welding on butt joint, that looks good penetration Yes "Collector "all questions answered, ask away, If I can't help then I'm sure someone will be able to Thanks all, its a relief i can ask away here, the welding on my oldy is as a stone on my stomach, if i have the time i will make pictures of the parts i have questions about, working full time and a wife who is handicapped doesn't leave me with a lot of spare time so i hope you all have a little patience with me |
| |
|
|
|
|
|
|
|
Great welding on butt joint, that looks good penetration Yes "Collector "all questions answered, ask away, If I can't help then I'm sure someone will be able to Thanks all, its a relief i can ask away here, the welding on my oldy is as a stone on my stomach, if i have the time i will make pictures of the parts i have questions about, working full time and a wife who is handicapped doesn't leave me with a lot of spare time so i hope you all have a little patience with me Please ask, as we all learn something, and everybody has some part of life that comes before projects, Well almost everybody:) |
| |
I would be rich if i had not spent so much money on Cars and fast women...oh, i did waste some of it as well!
|
|
|
|
|
|
|
OK here's the last bracket to be made on my Subframe: 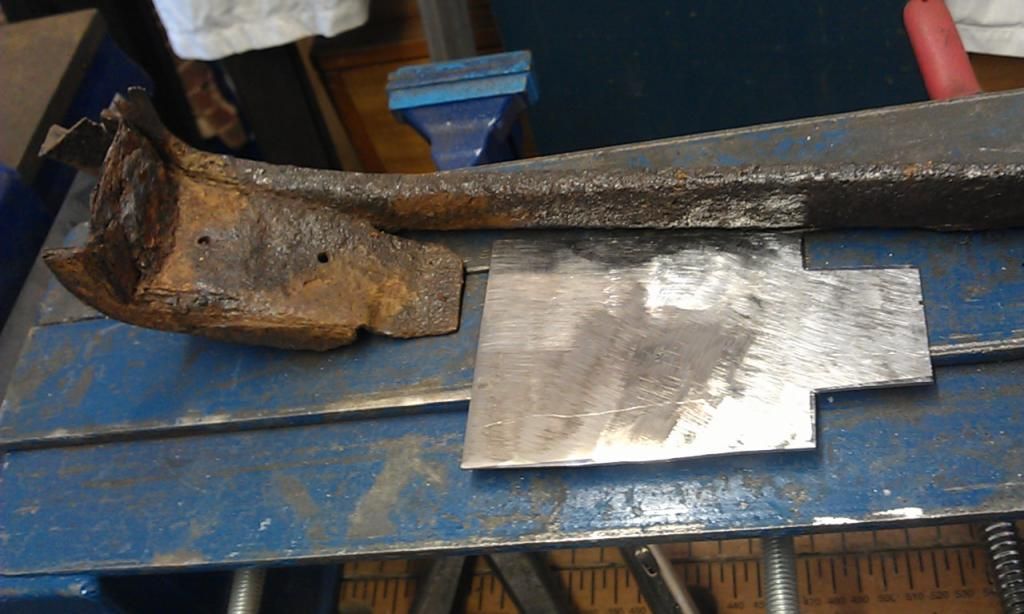 As you can see I already made a template and cut out the metal (1.5mm for this one). Here's what a good one should look like: 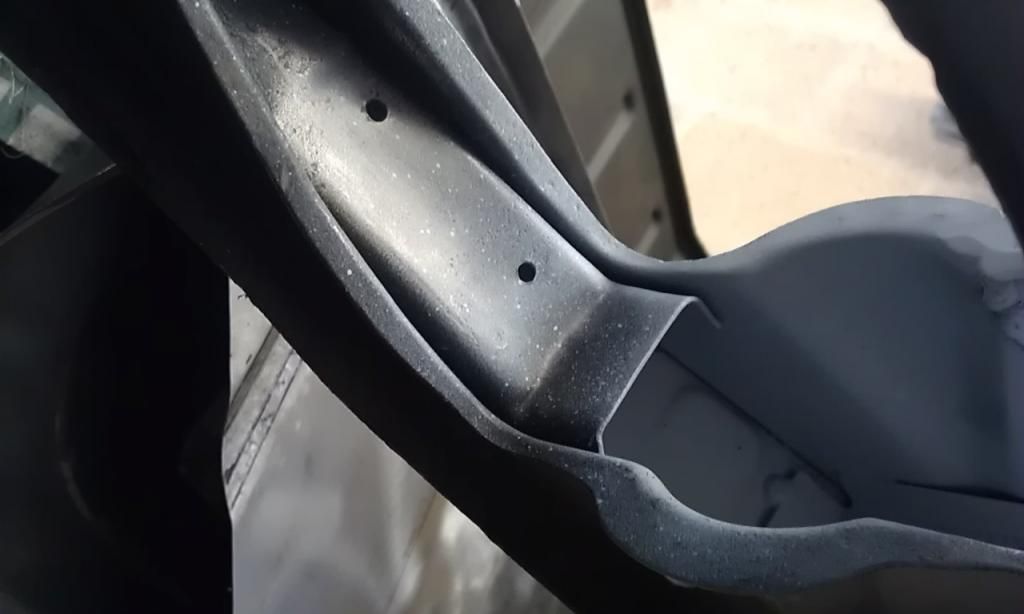 Its got a complex fold so I cheated by making a cut: 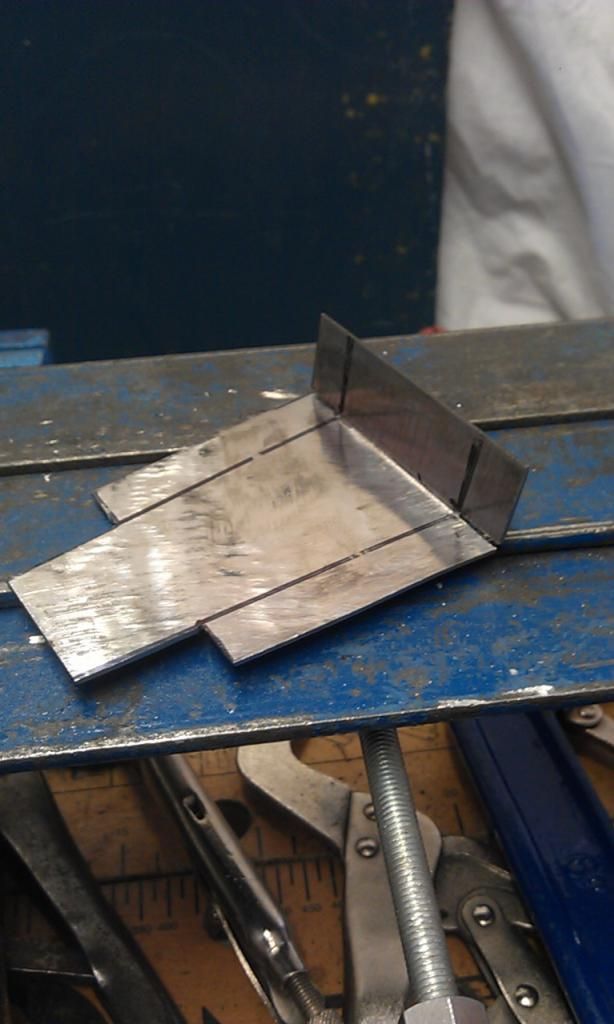 Here's all the folds done: 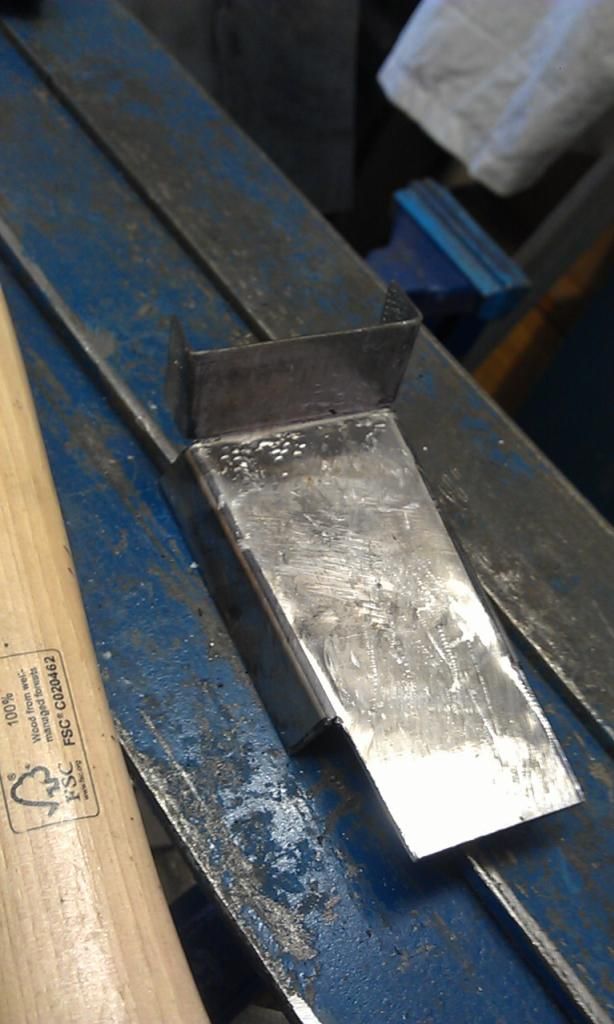 After a bit of adjusting here it is in place: 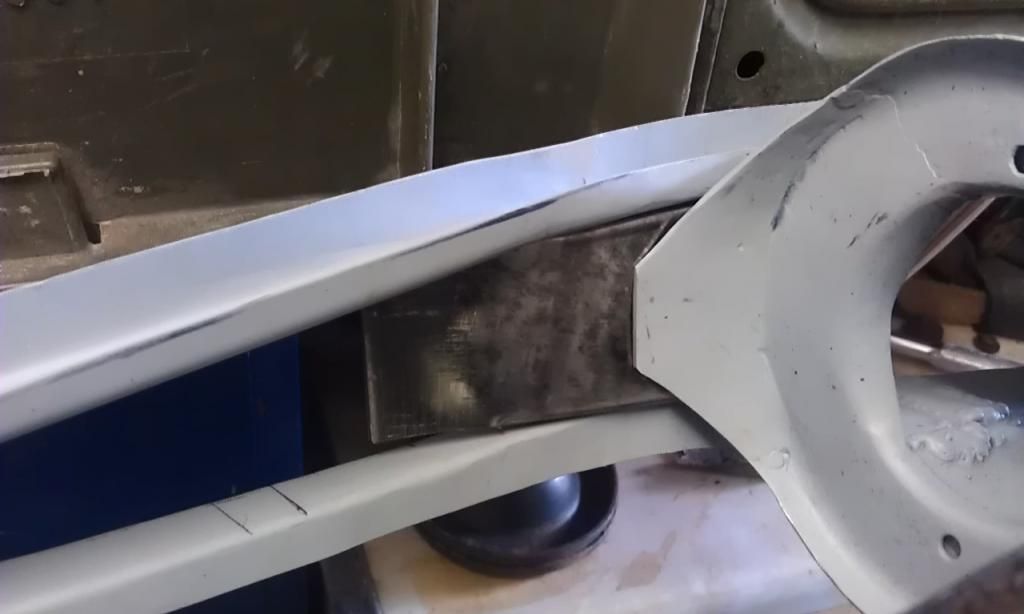 I then welded in the corner pieces: 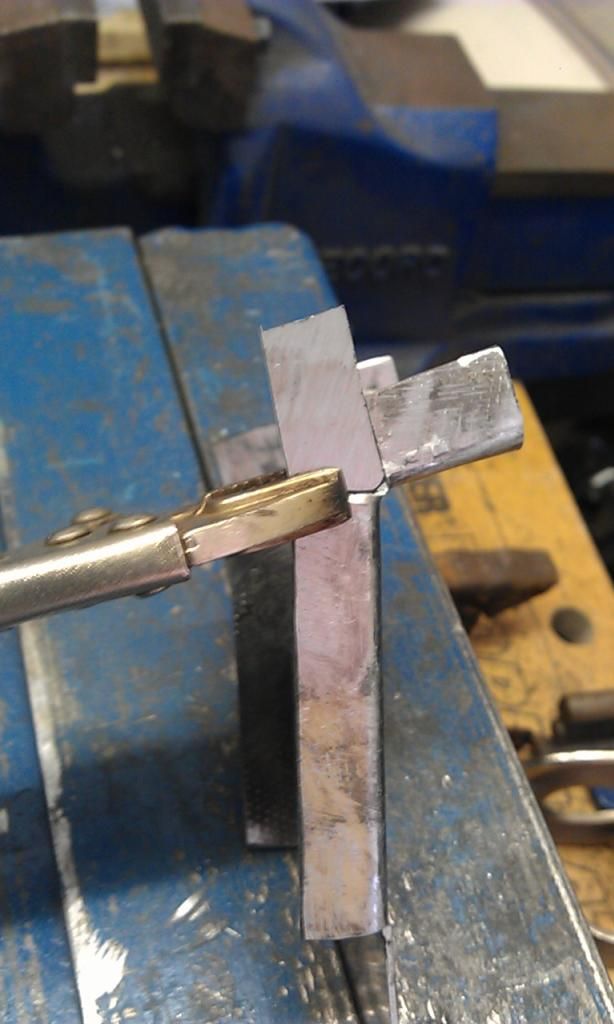 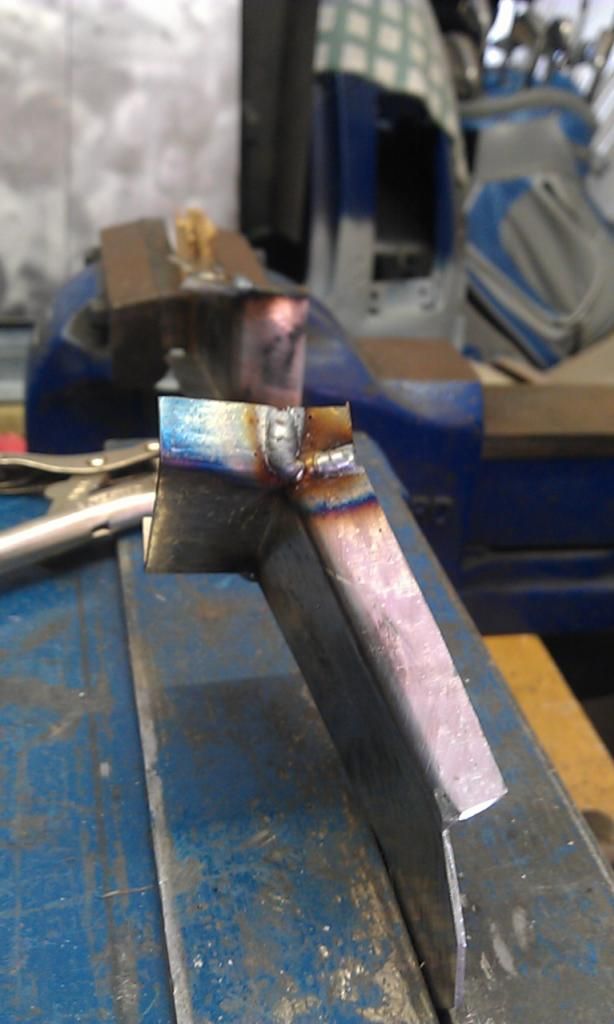 And here are the finished pair: 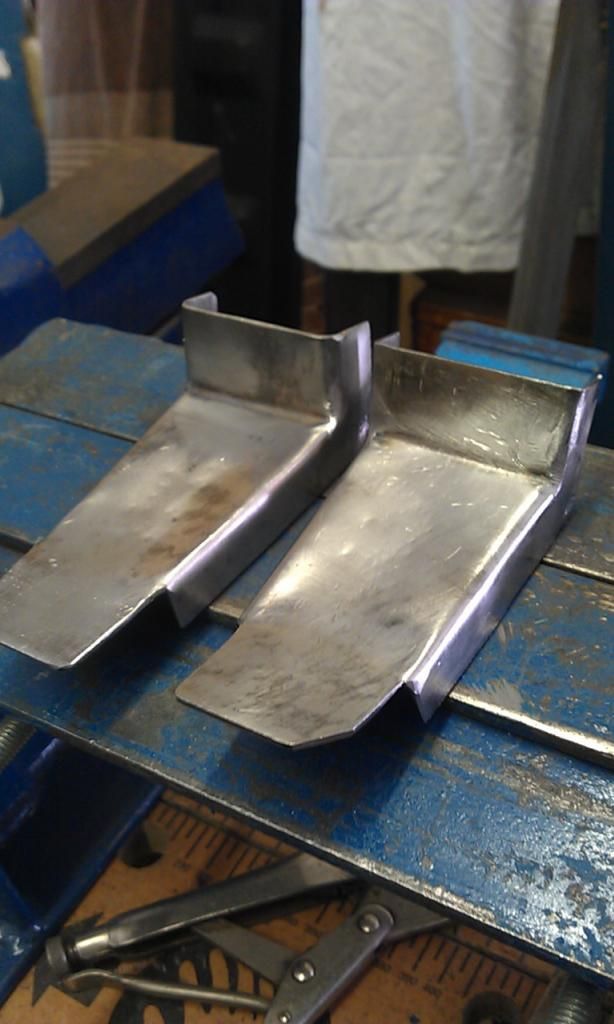 Just got weld them all up and make the last bottom skid plate. |
| |
|
|
krum
Kinda New

Posts: 3 
|
|
|
|
|
|
| |
|
|
|
|
|
|
|
|
Krum
It looks as though you are grinding the welds with only a grinding stone, if you use a flap disc to finish off you will be able to obtain a smoother finish
That said, your welds and cleaning off are more than good enough, and given the thickness of the steel that you are welding too, there is certainly not a lot of room for error
and you certainly have the right technique in preparing and tacking in the panels
|
| |
|
|
krum
Kinda New

Posts: 3 
|
|
|
|
Toni, thank you for the fast answer. I am using a 80 or 120 flap wheel abrasive disk like these for finishing:  I am taking care not to grind through the metal, since it is very thin. Probably I am too cautious. What bothers me is that the "original" sheet metal always comes a bit weavy, no matter what I do - I tried cooling the beads with compressed air and I used a dolly and a hammer to smooth the surfaces out, but they never look as "it was never wielded" |
| |
|
|
|
|
|
|
|
Okay lets go, this first picture is the part where the door slams shut and the lock hooks onto the torx pin sticking out.This is the same on both sides. 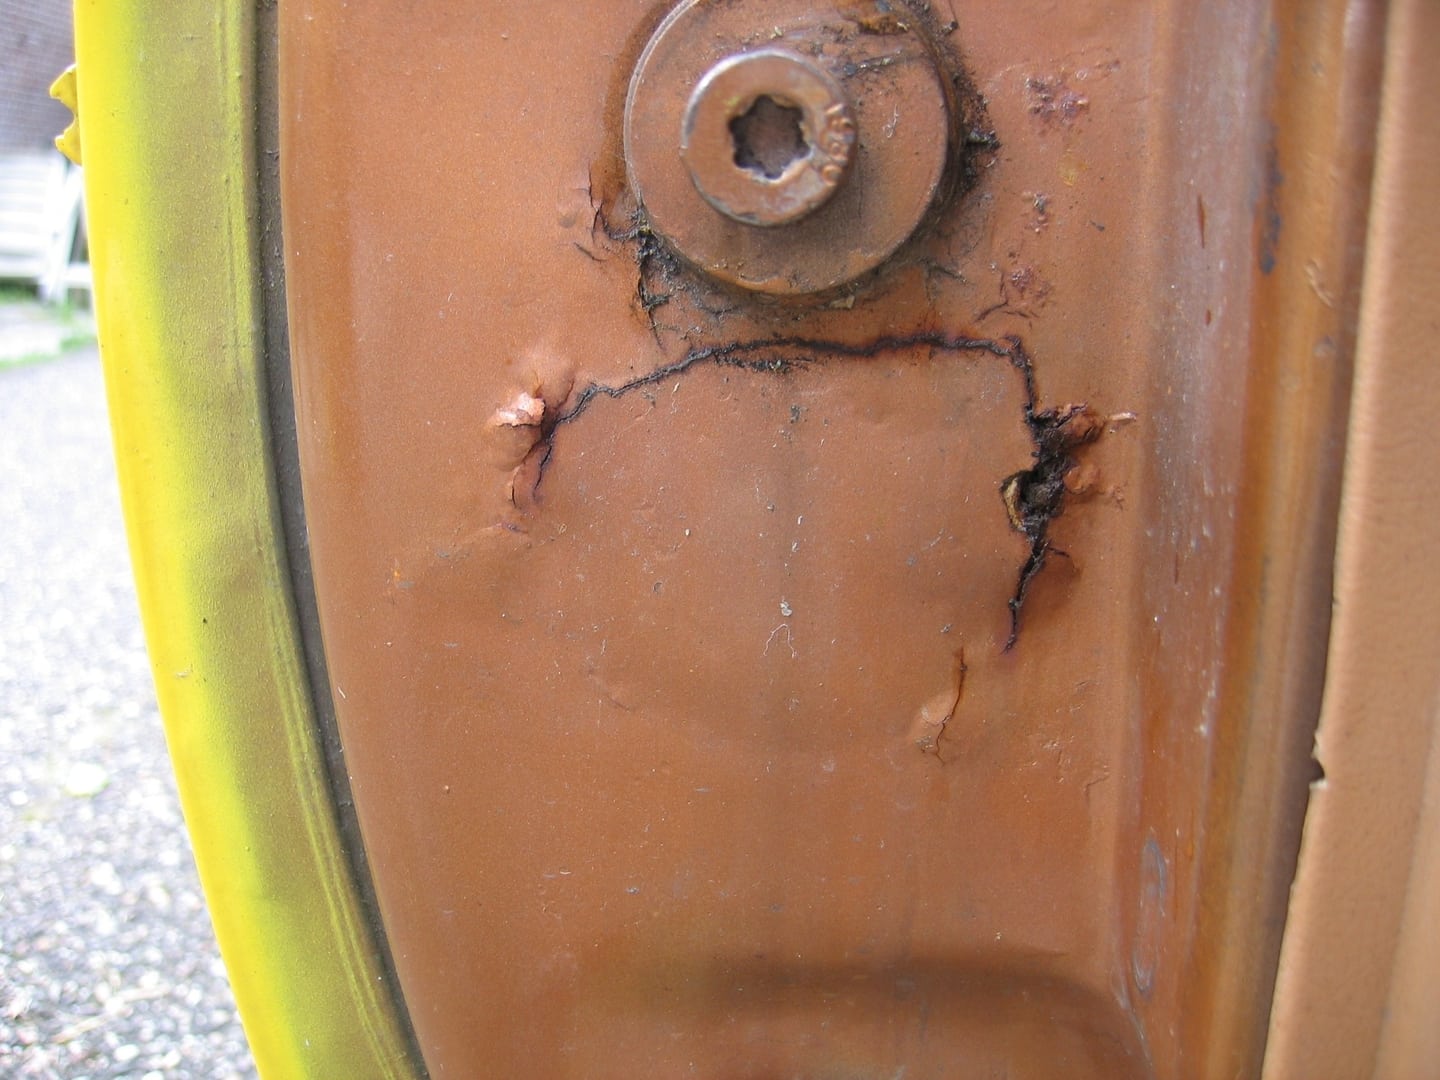 Second picture is the door sticking out like a wing, previous restoruins have made de outerdoor panel distort somewhat, i can live with the distortion but not with doors sticking outside the car, there is some rust at the underside of the both doors. 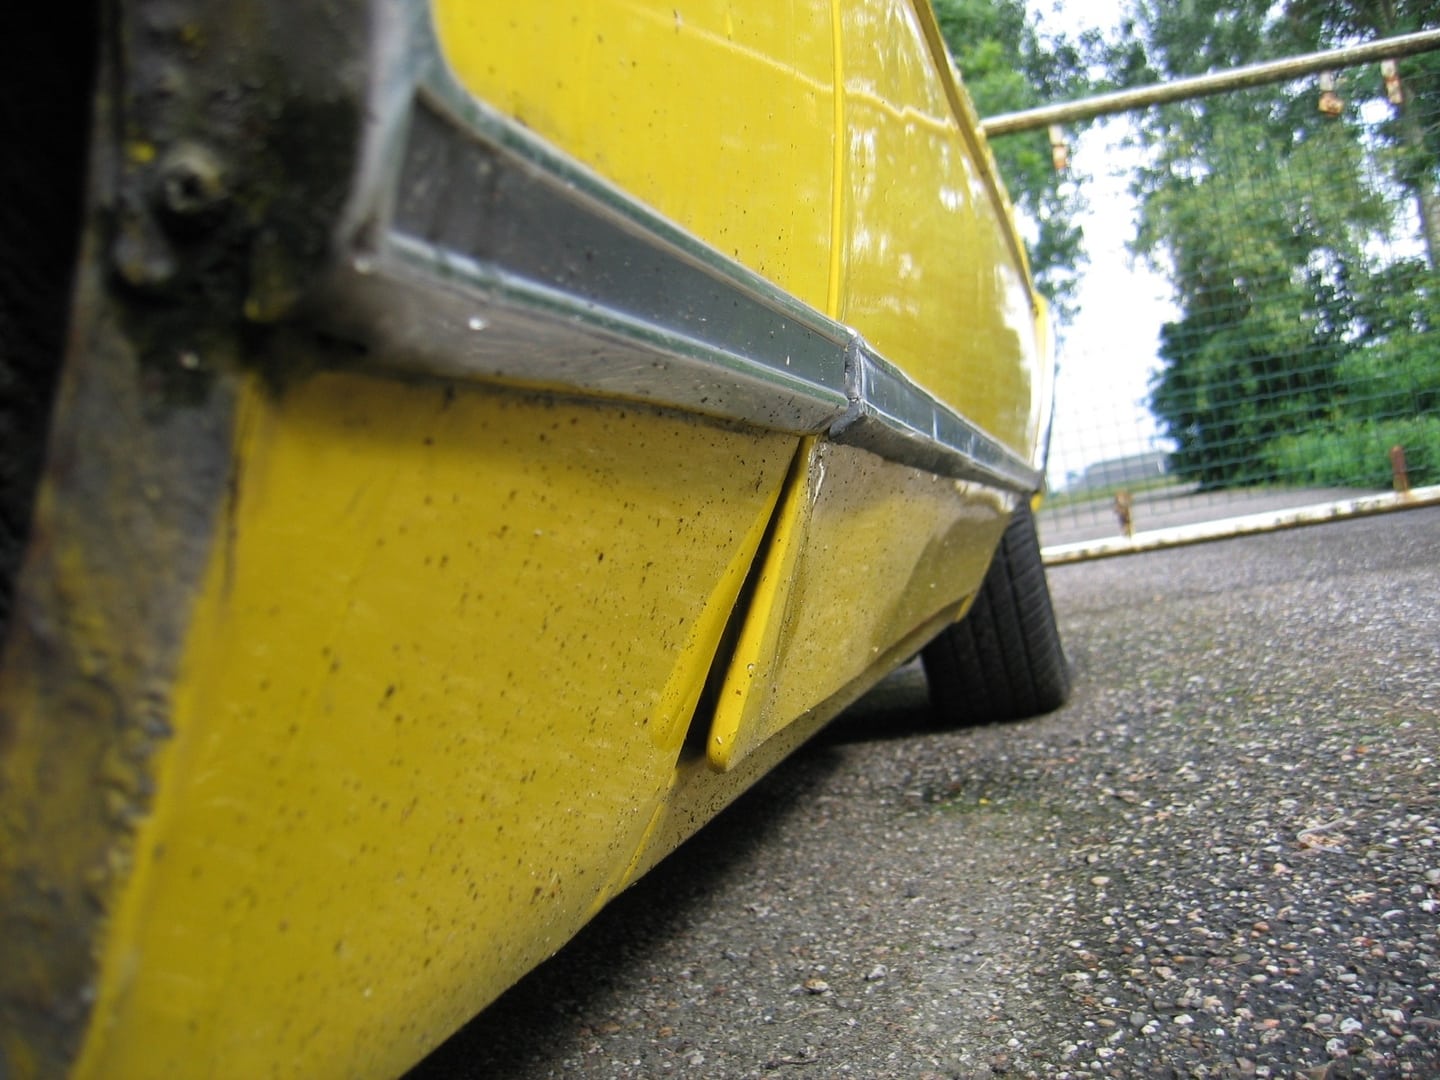 Third picture is 2 rusty spot besides the rear window , i know the glass has to come out and its glued in anybody got tips on safely removing thiss glass, the two rusty spots ar 1 at each side of the glass. 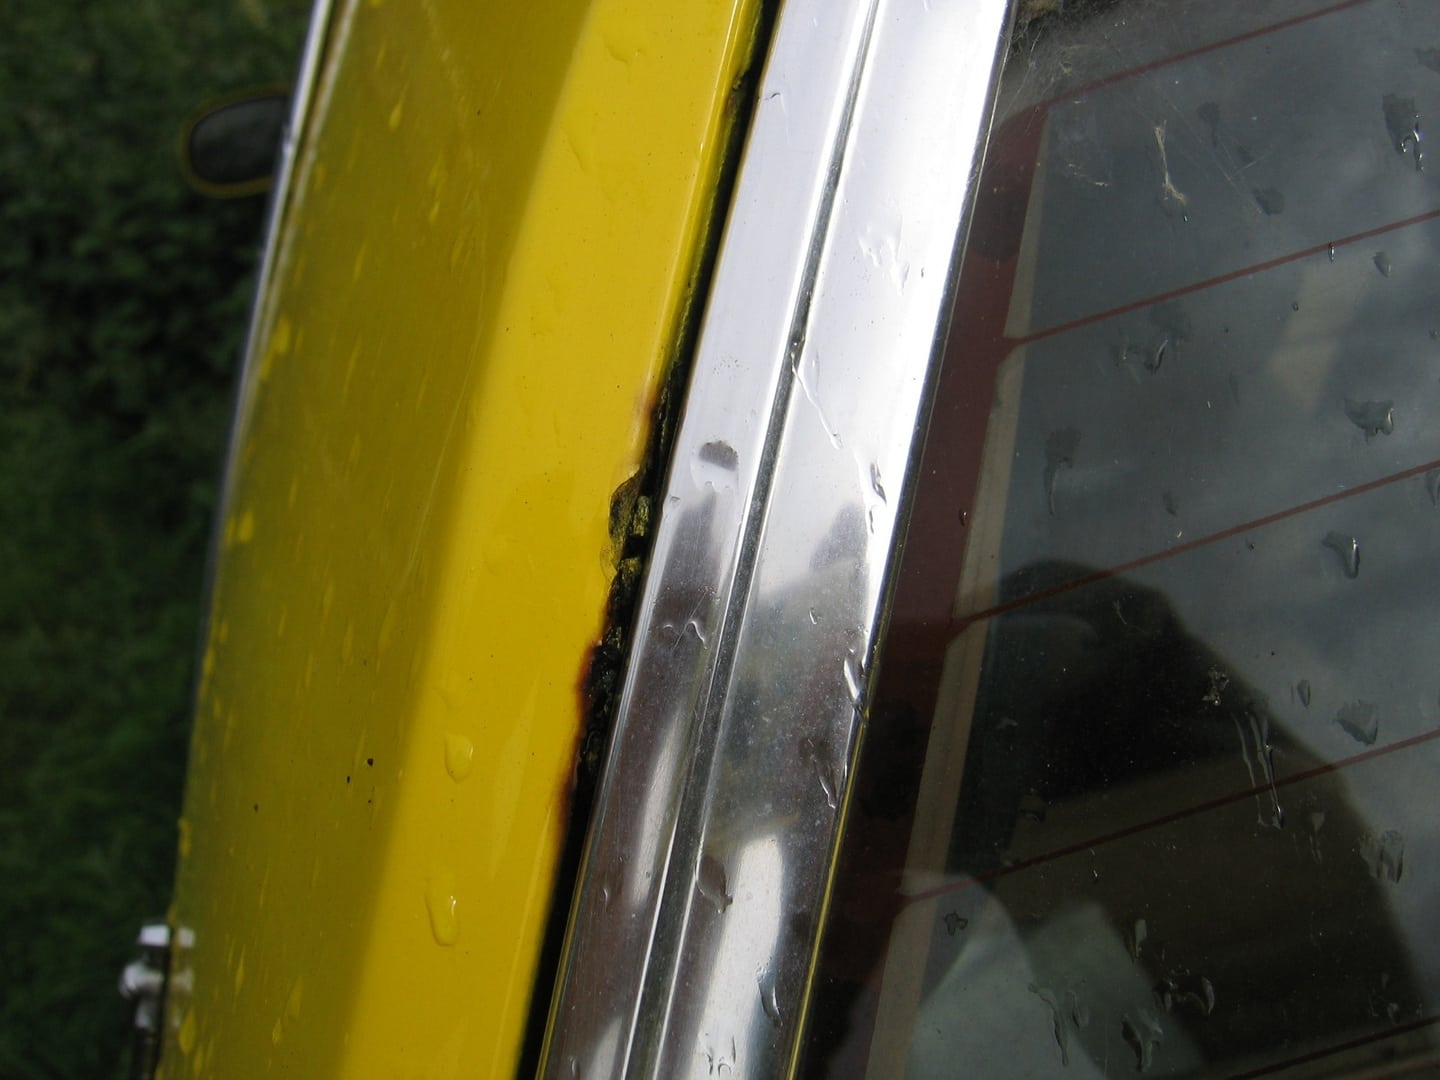 There are more spots needed welding but those are easy to reach and with the info from this thread i think i can do those. Any info on how to tackle those spots is more than welcome Thats it for now its a lot i know and thank you guys for helping me out. |
| |
Last Edit: Jun 7, 2014 18:14:51 GMT by collector
|
|
|
|
|
|
|
|
Krum
Your certainly on the right track, just keep doing what your doing
|
| |
|
|
|
|


