melle
South West
It'll come out in the wash.
Posts: 2,006
|
|
Jan 31, 2014 23:11:40 GMT
|
Five years ago I've been given a '77 Saab 95 V4 that was a bit poorly. Did some repairs and then decided to strip the whole car and improve it a bit whilst I was at it anyway, you've heard that one before... I live 400 miles away from my workshop, so progress is a bit slow. I'd appreciate your opinions on repairing the vent panel under the windscreen. It's quite bad in places and I have a slightly better donor piece that I can repair prior to fitting. I first thought drilling the spot welds and replacing the whole part would be the easiest, but whilst preparing the donor piece I found hacking the thing out is a pain because there's also a couple hard to reach seam welds. Patching it with a MIG welder won't be a good idea because it'll be hard to get a piece of copper under the welds or clean them up on the inside afterwards. Not that that matters much, but I want to do it best I can. My mate can TIG weld patches/ one big piece in, that could be an option. I've contemplated repairing it with lead, but I'm not sure that'll be a durable solution, covering it with filler as it sat before is no option as the vent cover that should go over it doesn't fit that way and I hate filler anyway. What do you think is the best way to go about? Hard to see, it's not only rotten, but also a bit bent/ hollow as if someone has been hammering it in the past:  Donor part:  Overview (couldn't find a decent pic of the white 95):  And with the vent cover fitted (yet another 95...):  More on the car here: www.saab-v4.co.uk/speedball/topic.asp?topic_id=3027 |
| |
www.saabv4.com'70 Saab 96 V4 "The Devil's Own V4" '77 Saab 95 V4 van conversion project '88 Saab 900i 8V
|
|
|
|
Clement
Europe
ambitious but rubbish
Posts: 2,095
|
|
|
|
Cool Saab... but I don't have the answer. Just came here to post a little tiny thing I've done today. I started an 8-month metalwork training course on Jan 20th, and I've been yearning to try out some of the stuff seen here!!   It's not very neat (too hard hammer blows in places) but I just wanted to see if it worked and it did!  I basically started this course because of RR and tonybmw among others, so it's kind of a thank you note if you will  edit : no that's not someone's finger, it's a chalk stick to give you an idea of the size! |
| |
Last Edit: Feb 4, 2014 17:58:04 GMT by Clement
|
|
melle
South West
It'll come out in the wash.
Posts: 2,006
|
|
Feb 10, 2014 22:04:59 GMT
|
Decided to chop the whole thing off instead of trying to bodge it in situ. Glad I did, as the firewall was worse than I hoped for.    First patch is in, hope to find some time in the coming days to finish the firewall, repair the air box and put everything back in place. Thanks for looking! |
| |
www.saabv4.com'70 Saab 96 V4 "The Devil's Own V4" '77 Saab 95 V4 van conversion project '88 Saab 900i 8V
|
|
Clement
Europe
ambitious but rubbish
Posts: 2,095
|
|
|
|
Good job! Here's what I tried to make yesterday:  One piece is just a random arch with a shrunk lip (done with 80% hammer and 20% shrinker), the other is just as random, it's more of a bicycle wheel mudguard. I used the hemispherical end of a hammer and a pair of welding gloves underneath! It's not finished yet, but it's fun to make  I'll take a better picture later. |
| |
|
|
|
|
|
Feb 11, 2014 18:30:29 GMT
|
Decided to chop the whole thing off instead of trying to bodge it in situ. Glad I did, as the firewall was worse than I hoped for.    First patch is in, hope to find some time in the coming days to finish the firewall, repair the air box and put everything back in place. Thanks for looking! Hi, Melle. Your Saab need own thread on to the Reader Rides, because We here in RR love good weldaton threads, specially if it's done to a interesting car like Yours. But still, Looking good. |
| |
|
|
melle
South West
It'll come out in the wash.
Posts: 2,006
|
|
Feb 12, 2014 21:42:44 GMT
|
Cheers! Might start a thread here in the future, in the meantime check the saab-v4.co.uk forum (will update soon). |
| |
www.saabv4.com'70 Saab 96 V4 "The Devil's Own V4" '77 Saab 95 V4 van conversion project '88 Saab 900i 8V
|
|
|
|
|
Feb 13, 2014 13:11:58 GMT
|
Decided to chop the whole thing off instead of trying to bodge it in situ. Glad I did, as the firewall was worse than I hoped for. That's often the case though - I made some small repair sections for my boot floor, and recently discovered that some of the parts I thought I'd get away with also needed replacing, so it would have been neater to do it all in one go instead. That said, on the first repairs I also had to consider not cutting out so much that I lost the structure of the car, so a number of early repairs are several pieces where one would have been nicer. |
| |
|
|
|
|
|
Feb 21, 2014 21:22:11 GMT
|
|
Looked at this site a couple of years ago when I acquired a Mini that was in need of lots of TLC, project has been on hold as I have been working away and now I have started to get into it again. When I first found this thread, either through the Miniforums.co.uk or the Mig-Welding.co.uk metal fabrication section, I thought it was fantastic. Now that I have registered and come back I have just soent the last 3 hours looking through all the absolutely fantastic work, help and advice - well done to all involved the gods of sheet metal work!!!
I'll be posting lots of questions real soon once I'm allowed in the garage again!!!
I have just removed the Rear Subframe and found some bad rusted areas, advice has been to get a new / replacement but looking through this thread has inspired me to repair it??
Most of the repairs are small and pretty simple ish shapes however a couple of areas require making some circular bowl type objects 0 or parts thereof. I'll post the pics before I ask for any real advice :-)
My garage is not very well stocked for metal fabrication, in fact all I have is an Engineers Vice, a cross pein hammer and a rubber mallet!!! however for the next 3 months or so i'll be able to use a metalsmiths workshop that will have most of what I need (hopefully).
Keep up the good work :-)
|
| |
|
|
|
|
|
Feb 22, 2014 18:05:00 GMT
|
OK heres my dilema, I have recebntly removed the Rear Subframe on my Austin Mini in order to complete some repairs I have already started in the boot. On removing the Subframe I noticed some tin worm holes!! I have stripped the the Subframe to get a better look and it is worse than I thought. I need some advice on whether it can be repaired and if so how? Most of the rot is on the bottom rear of the main spars that run back to front as these are the areas that hold the water. Looking at the fantastic advice in this thread, these parts should be easy enough  to fabricate and replace. There are however some parts that need renewing that look very hard indeed. Here's the complete stripped subframe:  This is the RH top skid plate of which the front end at least needs to be replaced:  This is the LH top skid plate which also needs the same treatment:  This is a view of the inside RH main strut which looks a relatively easy part to replace:  And here is the rear of the same main strut:  The other side of the same strut is not as bad but does need repairing at the rear and the outside LH main strut also needs repairing at the rear and towards the front, as seen here: 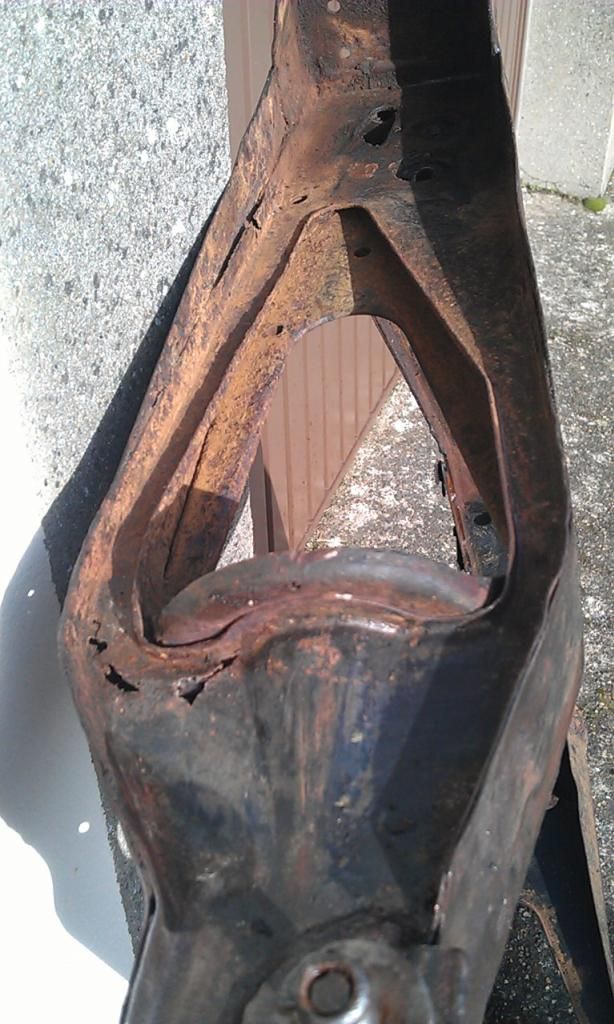 And here is another (better) view the inside RH rear bottom strut:  Now here comes the tricky part. The mini rear suspension consists of a radius arm on which the rear wheel drum is fitted. The bumps are absorbed by both the rear shock and by a rubber cone that sits in a cup in the rear subframe attached to the radius arm by a rod (trumpet) knuckle joint. The rubber cones I think (not sure) have a metal rim around the base which sits in a cup which in turn is welded to a support plate? The cups (if that's what they are called) are welded in a recess toward the rear of the subframe, one side is pretty bad and the other could also be part replaced. the worse side actually came apart when was a little over ambiguous in removing the trumpet and cone. In the following pic I have put the trumpet and cone back in position to give you an idea, the other trumpet is just there to hold it in place temporarily: 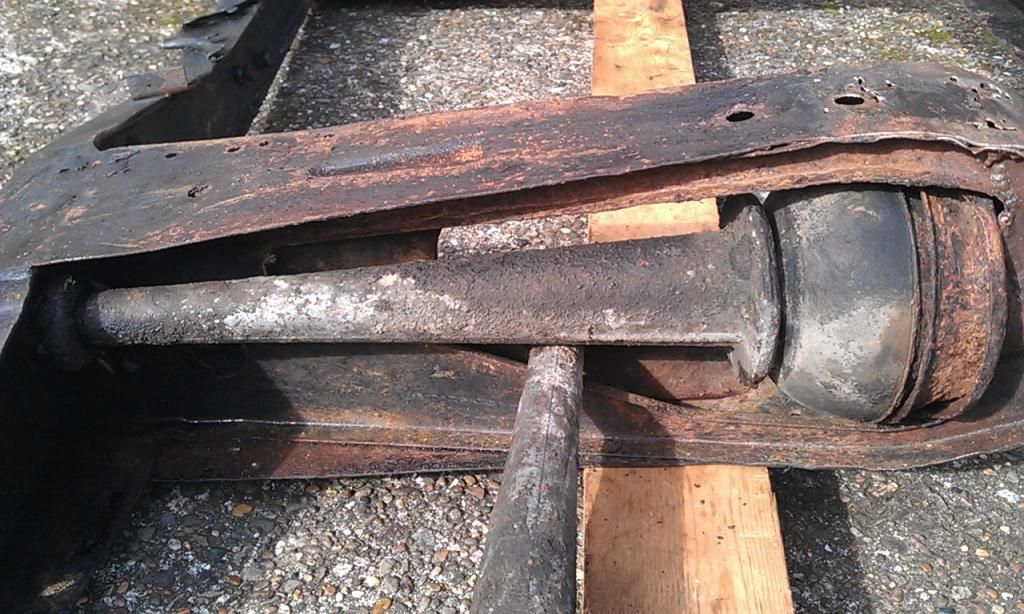 And here's the knuckle end that would sit in the radius arm if it where in place:  Here are the two cones, the RH one in the pic is the LH cone on which is the metal cup that ripped out, looks like it may have been spot welded? 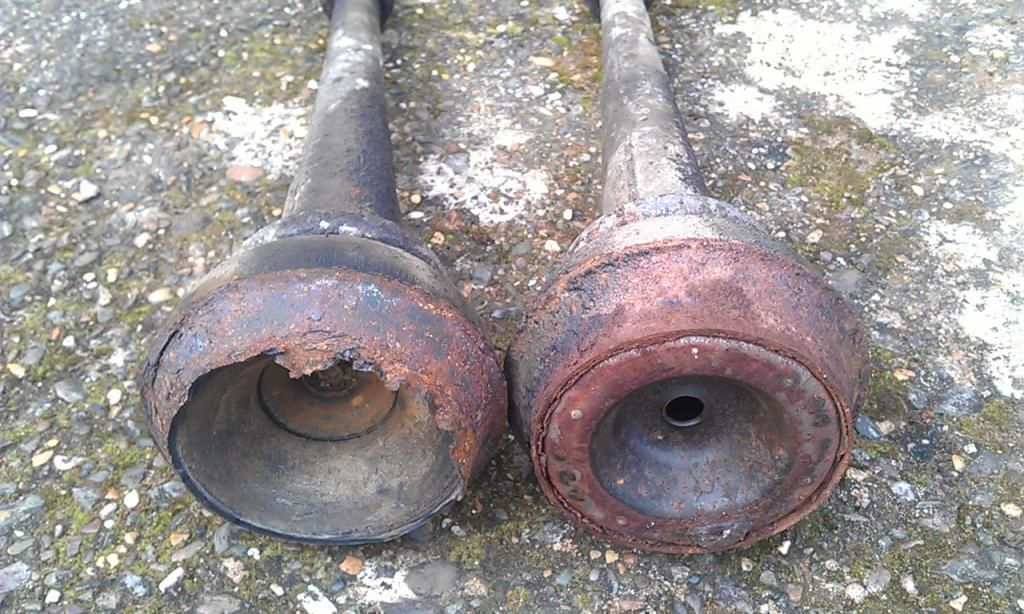 Here is a pic of the base of the rear cone support that appears to sit on a support piece located on inside of the bottom and the top main strut. This pic shows what it should look like (apart from the main cup which ripped out) the top support in this pic is rotted as is the support piece that it sits on. Question - how on earth will I replicate this circular cone cup support?  And here is another pic of the support piece that sits on the top and bottom plates in between the main struts: 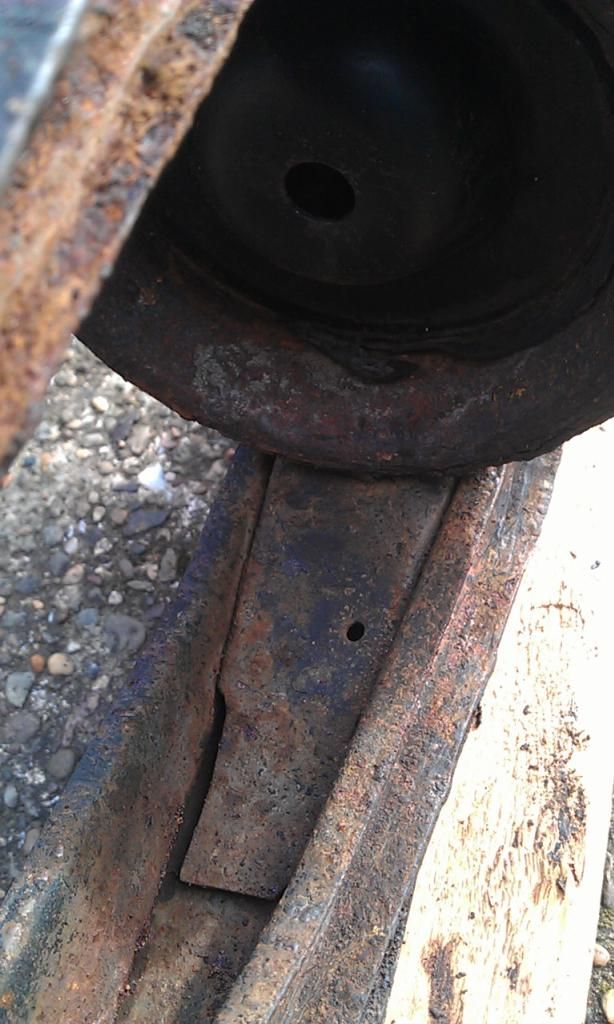 And here is a pic of an intact (but badly corroded) cup, once again how on earth can I replace these? 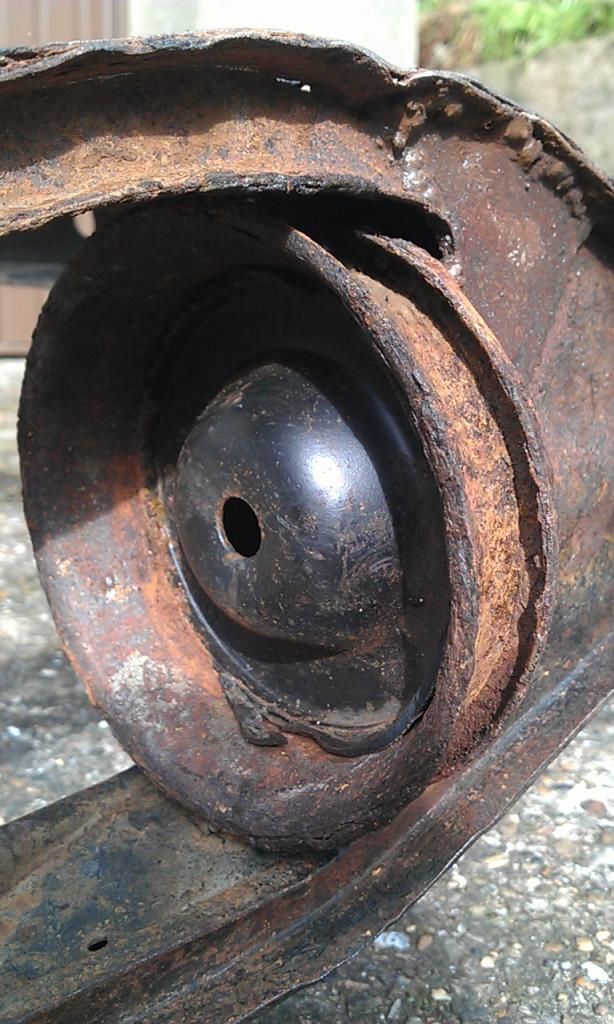 And here's a pic of a corroded support piece and cup support that will need replacing:  Questions: Is this bad boy repairable? How can I make the various circular pieces in the pics above? Should I get it shot blasted before I start or just attack the parts with a grinder (twisted knot attachment)? If and when I do start to repair it should I brace the Subframe before I start cutting bits off of it? E.G. weld some support bars between the front and rear cross members to prevent the subframe from getting distorted? Should I do small parts at a time to avoid distortion? Should I just cut out the rusted parts or try and make complete parts using a larger gauge metal? Is there a list of recommended minimum sheet metal fabrication tools? Sorry for the uber long post and dumb ass questions but help would be appreciated :-) P.S. Here is a pic of what I hope it will end up looking like, in this pic the guys has fitted an adjustable Hi Lows? instead of the standard trumpets, interestingly the metal ring around the base of the rubber cone looks like it has been replaced so maybe I don't need to make at least the large circular bits that the rubber cones sit in? I'll ask on a Mini web site to be sure and confirm what is and is not part of the subframe. 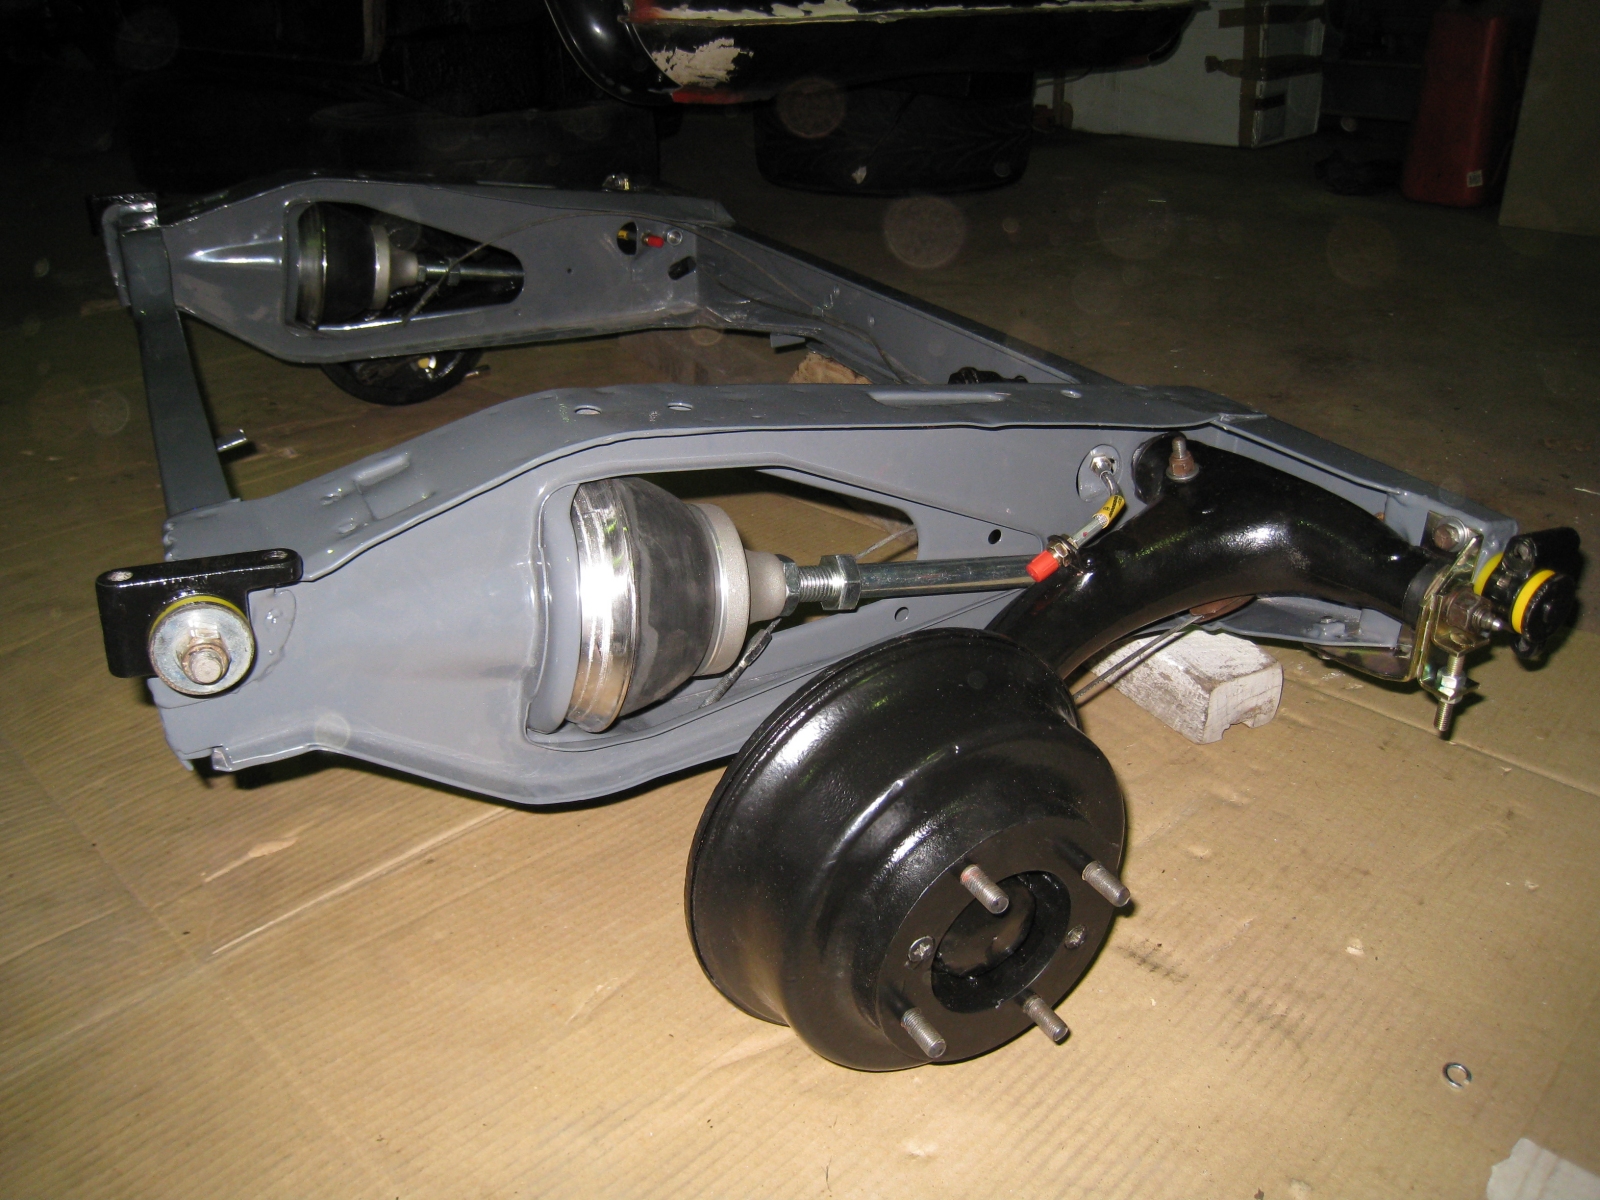 |
| |
|
|
bstardchild
Club Retro Rides Member
Posts: 14,962
Club RR Member Number: 71
|
Making panels.......bstardchild
@bstardchild
Club Retro Rides Member 71
|
Feb 22, 2014 18:55:05 GMT
|
|
That looks pretty rotten - personally I'd buy a new one - You aren't supposed to weld a suspension component (technically a mini subframe is) so if you do weld it it needs to be a really good repair and invisible.
If you were to repair one I reckon you'd have to make a jig up to hold it straight while you welded in new sections
|
| |
|
|
|
|
|
|
|
Feb 22, 2014 21:21:07 GMT
|
That looks pretty rotten - personally I'd buy a new one - You aren't supposed to weld a suspension component (technically a mini subframe is) so if you do weld it it needs to be a really good repair and invisible. If you were to repair one I reckon you'd have to make a jig up to hold it straight while you welded in new sections I get what your saying however I don't have the cash for a replacement and with regards to the legality I started a thread here and a reply from Hotrodder with references to the regulations suggests that it is OK. |
| |
|
|
|
|
|
Feb 23, 2014 16:55:38 GMT
|
|
In my opinion (not worth alot:)) for £190.00 i would buy one as if you are not Tony BMW i think it will take along time, hows your welding? However there are some drawings for this on Google...good luck whatever and remember to qualify for this forum we need pictures....lots of pictures!!!!
Geoff
|
| |
I would be rich if i had not spent so much money on Cars and fast women...oh, i did waste some of it as well!
|
|
|
|
|
Feb 24, 2014 11:34:23 GMT
|
|
I think as long as you have some basic skills, it is worth trying to repair the one you have, especially if you have some welding skills. Right now, you have a mini subframe that is worthless, so you can't really lose a lot by trying to sort it out, and you'll gain experience however it pans out. Some of the parts that you need to sort out will be quite easy to make and fit, some will be more challenging.
First thing is to get that subframe stripped down. If you can get it blasted, then do so, failing that clean it up with a selection of whatever you can get. A grinder with a twisted wire cup will make short work of a lot of the weak metal, but you won't get it into the corners unless you've found a very small one - and if you have, tell me where please as I could do with one. Watch as you work with the wire cup - if it catches an edge it will jerk and can cause quite nasty injuries. Also you could look into electrolytic rust removal - that's a nice passive way of cleaning rust off and can work very well.
Pay a lot of attention to how you cut out the bad sections and weld the new bits in. In particular if you're going to do the easy bits first, make sure that once you've welded your repair in, it doesn't block access to one of the harder repairs - there's nothing more annoying than doing a nice repair job, then having to cut it out again because it's the only way to get to another section. Take a lot of measurements and photos, and if you can make some sort of jig to reference the important parts, that would be a good thing to do. As for what tools you need, you'll soon find out when you need to make somthing. Looking at a thread I posted some years back, it seems it's possible to do anything with a hammer and a big piece of wood, but maybe also need a lot of experience.
In your second to last photo it looks as if the subframe has already been repaired, I would think your new welding will need to be better than that was done. As for your question "Should I just cut out the rusted parts or try and make complete parts using a larger gauge metal?" I'm not sure what you mean - to repair this, you need to cut out the rust. Repairs need to be the same gauge as the original was, or maybe a little thicker - certainly no thinner - BLMCs bean-counters will have calculated the minimum thickness to save money but still retain the required strength, even back then.
|
| |
|
|
|
|
|
Feb 24, 2014 20:58:28 GMT
|
I think as long as you have some basic skills, it is worth trying to repair the one you have, especially if you have some welding skills. Right now, you have a mini subframe that is worthless, so you can't really lose a lot by trying to sort it out, and you'll gain experience however it pans out. Some of the parts that you need to sort out will be quite easy to make and fit, some will be more challenging. First thing is to get that subframe stripped down. If you can get it blasted, then do so, failing that clean it up with a selection of whatever you can get. A grinder with a twisted wire cup will make short work of a lot of the weak metal, but you won't get it into the corners unless you've found a very small one - and if you have, tell me where please as I could do with one. Watch as you work with the wire cup - if it catches an edge it will jerk and can cause quite nasty injuries. Also you could look into electrolytic rust removal - that's a nice passive way of cleaning rust off and can work very well. Pay a lot of attention to how you cut out the bad sections and weld the new bits in. In particular if you're going to do the easy bits first, make sure that once you've welded your repair in, it doesn't block access to one of the harder repairs - there's nothing more annoying than doing a nice repair job, then having to cut it out again because it's the only way to get to another section. Take a lot of measurements and photos, and if you can make some sort of jig to reference the important parts, that would be a good thing to do. As for what tools you need, you'll soon find out when you need to make somthing. Looking at a thread I posted some years back, it seems it's possible to do anything with a hammer and a big piece of wood, but maybe also need a lot of experience. In your second to last photo it looks as if the subframe has already been repaired, I would think your new welding will need to be better than that was done. As for your question "Should I just cut out the rusted parts or try and make complete parts using a larger gauge metal?" I'm not sure what you mean - to repair this, you need to cut out the rust. Repairs need to be the same gauge as the original was, or maybe a little thicker - certainly no thinner - BLMCs bean-counters will have calculated the minimum thickness to save money but still retain the required strength, even back then. Although I have only been welding for a short while I am improving and the last welding I did I was quite impressed with :-) Here's the pic before I dressed down the welds:  And what you say makes absolute sense, I either need to repair this subframe of replace it so before I do either its as you say useless and as long as I can afford the cost of the repair (time and the consumables), it will, as you say be good practice. Cleaning - as you point out there are some many knooks and crannies that manual cleaning will only scratch the surface so I was going to investigate chemical cleaning but I believe that's mainly for paint? You mention electrolytic cleaning - just googled it, looks like you can do it at home but i'd need a big bucket!!! Ref Twisted Knot - yeh used these before and they can be dangerous, both to weak metal and hands!!! I will plan out the stages to avoid double tapping and will take measurements and photos and I'll make up a jig around the frame that i will secure using the existing captive nuts, or I may weld a couple support bars between the front and rear main spars to hold the frame in place. What I meant by using a different gauge was to try and repair especially the damaged struts and skid plates with heavier gauge metal. If I use a heavier gauge metal and opt for cutting out rust and inserting patches on the struts I'll have to ensure that the repair is invisible. To do this i'll probably have to toggle the join and seam weld ensuring that the over lap hidden on the inside? I could achieve this by removing the bottom skid plates first, as these need to be replaced, that way I can get at the inside of the struts. This kind of repair would also be stronger than butt welding. As for the existing repair, that's coming off and will be re-done so its invisible. I'll post up my results. |
| |
|
|
|
|
|
|
|
|
Good on ya for taking that on! Even if it ends up being scrap, you'll still get some valuable welding practice out of it.
That weld you posted looks a bit cold, you should increase power a bit, or reduce wire speed (assuming you're using a MiG machine)
Cheers!
|
| |
|
|
|
|
|
Feb 25, 2014 11:42:46 GMT
|
Cleaning - as you point out there are some many knooks and crannies that manual cleaning will only scratch the surface so I was going to investigate chemical cleaning but I believe that's mainly for paint? You mention electrolytic cleaning - just googled it, looks like you can do it at home but i'd need a big bucket!!! Electrolytic cleaning is quite good, you can do a bit at a time. I've used various containers of different sizes and shapes, cheap plastic storage containers can be handy and you could stick one half in, clean it, then turn it over and clean the other half. Recently been given a surplus bathtub, so will be trying that out when it's not likely to freeze. Talking to one of the strippers at the NEC in November, even acid dipping doesn't get everything out (between flanges, for example) so there's no magic bullet. Ref Twisted Knot - yeh used these before and they can be dangerous, both to weak metal and hands!!! Yes, if your metal survives one of those, you know it's pretty solid. Mate of mine was using one to dig out some of an old tree stump, let go of the switch but then put it down on top of his thigh - even though it was slowing down, it did hurt "like a b*****d" apparently. |
| |
|
|
|
|
|
Feb 25, 2014 20:38:37 GMT
|
Good on ya for taking that on! Even if it ends up being scrap, you'll still get some valuable welding practice out of it. That weld you posted looks a bit cold, you should increase power a bit, or reduce wire speed (assuming you're using a MiG machine) Cheers! Thanks for the enthusiasm, ref the welds yup its a Clarke EN160 Mig (I think - not in the garage at the mo) I could crank it up a notch. |
| |
|
|
Wild
Part of things
  Mini Restoration
Posts: 12 
|
|
|
|
|
This really has inspired me to attempt to make my own panels for the mini that I'm restoring it will save me a lot of money if I can do it as I live in the Highlands and therefore postage is a joke, I'll have to buy the wings and the front panel as they're is no way I'll manage to make them but I'll definitely give Sills, Door steps, Flitch Panels, Boot Floor, Rear Quarter panel, Floor, Inner Wing, (Possibly bulkhead) repairs a go!
I'm going to order some angle iron at work on Monday and build the metal bender, Thank you TonyBMW for the design and everyone for there inspiration!
Hope to post some progress soon, cheers guys!
|
| |
“On a given day, a given circumstance, you think you have a limit. And you then go for this limit and you touch this limit, and you think, 'Okay, this is the limit'. And so you touch this limit, something happens and you suddenly can go a little bit further. With your mind power, your determination, your instinct, and the experience as well, you can fly very high.”
- Ayrton Senna
|
|
|
|
|
|
|
|
Tony / Anyone?
I am going to build the tonybmw bender next week and may opt for the sizes in the plan i.e. around 1/2 metre wide however before I do go firm on the sizes can someone help with this question:
I will be making some inner sills for my Mini, I have just measured the length and they will be about 130cm long - would his bender be ok for this kind of fabrication or do I need a metal brake?
I may be able to borrow a metal brake at work so it might not be a problem however for future reference, can you bend panels longer than the bender or a folder, i.e. do a little bit at a time?
Whilst I was typing this a solution just popped into my head.
If you build the tonybmw bender (Or any bender / folder) to the width based on (a) Your workbench and (b) if you want to be able to transport it. Then in order to cope with wider panels just have a couple of extra long loose pieces of angle iron wide enough to take the panels. Open the bender and Insert these additional pieces of angle iron and clamp in you panel. If the panel is particularly wide you could also clamp either end of the additional angle iron with G Clamps.
Same principle for lifting an extra deep pallet with a Fork Lift - just add fork extensions.
|
| |
|
|
|
|
|
|
|
|
Jonny
You can just fold it in sections and then keep moving along, to make it easier I'd only bend 1/3 of the angle you need, then slide along creating that same angle, once you've done the whole length, then add another 1/3 of the angle and move along to the other end, then the final bend to complete the required angle, this will prevent a lot of distortion and stretching that would be created otherwise
I have to agree with the other guys re the subframe, thats a bit to far gone in my opinion to be considering to repair, especially without some sort of jig to keep everything in line
Perhaps you can get a better secondhand one, rather than having to buy a new one
|
| |
Last Edit: Mar 2, 2014 19:44:36 GMT by tonybmw
|
|
|
|


 I basically started this course because of RR and tonybmw among others, so it's kind of a thank you note if you will


 to fabricate and replace. There are however some parts that need renewing that look very hard indeed.


