|
|
|
|
|
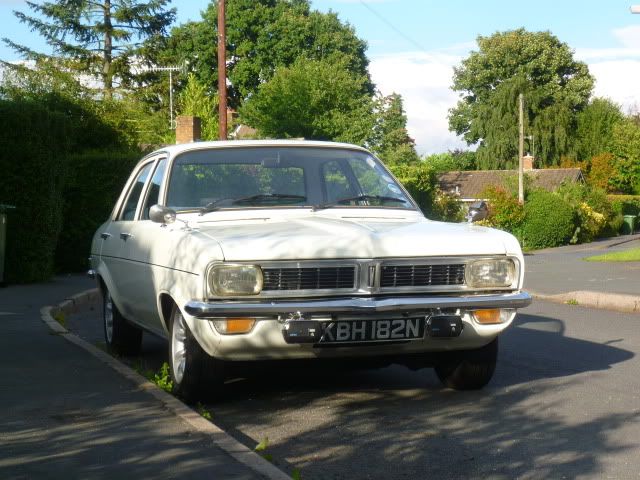
Need a bit of help with a panel, not really got any clue how to form/beat/make it out of sheet metal. droopsnoot, you may well have made this section for repair for yours so I'll have a quick look through when I have time. It's the lower part of the inner skin of the outer arch on the Viva. Goes here to form the bottom part of the panel nearest the camera.  It was in pretty bad shape (and several pieces). I tried to mark dimensions out on card to make a template but somehow ended up making a 3D model out of card, which helps as I now have a complete panel that I know fits into place. I'm just not sure of the best way to make it from metal. 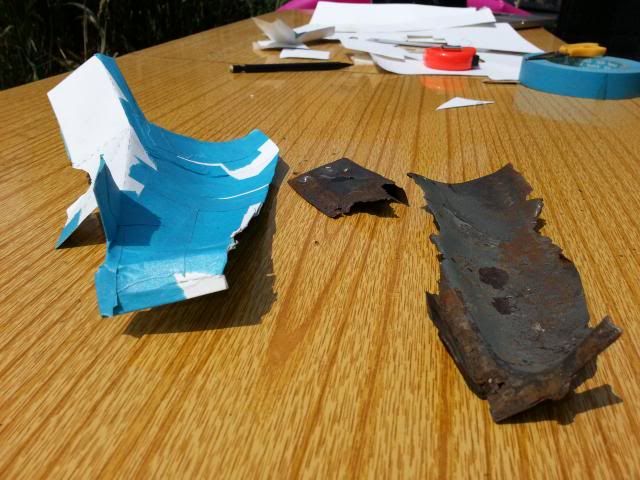 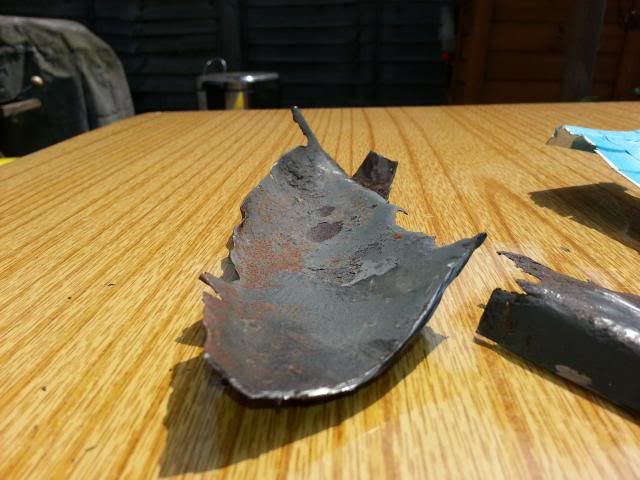 |
| |
Project Diary1975 Viva / 1988 T25 Camper / 1989 Mini / 1991 MX5 / 1992 Mini / 1994 Saab 9000 / 1997 Saab 9000 / 2008 Saab 9-5
|
|
|
|
|
|
|
|
|
Yes, I've done that part, leading corner of offside rear wheel tub. It's a pain because it's three sections that come together - the inner tub, the outer tub, and the back end of the inner sill that sits between them with a part of the structure nearby I think. I made them as separate sections, partly through obsession and partly to minimise how much I cut out at one time. OK, this is nearside but it shows roughly the inner bit, this is a part of the structure that welds in behind the join between inner and outer tub: 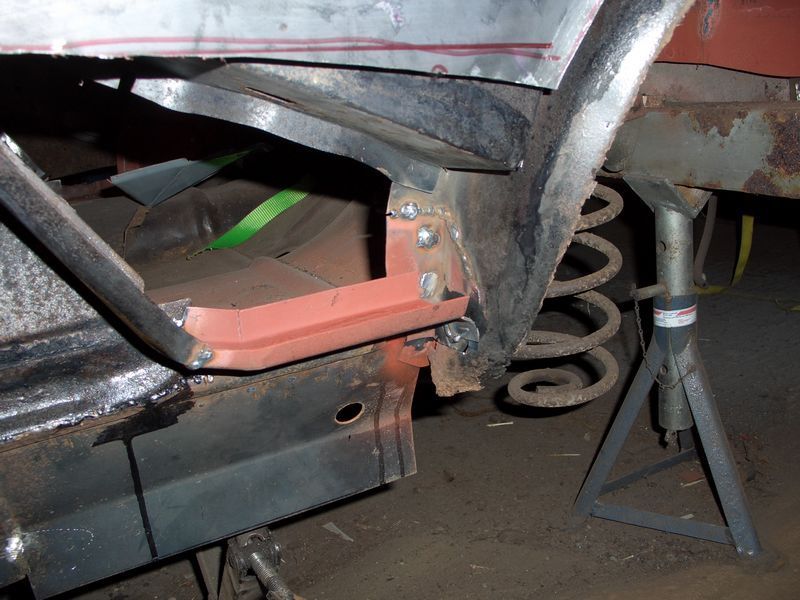 This is the repair for the inner tub corner - this started as a flat sheet bent to fit the curve of the inner tub (the shallow bend), then had the flange bent in the opposite direction to join the outer tub. The lower part of this, where it bends to fit the line of the inner sill, had a wedge cut out and then re-welded and ground down: 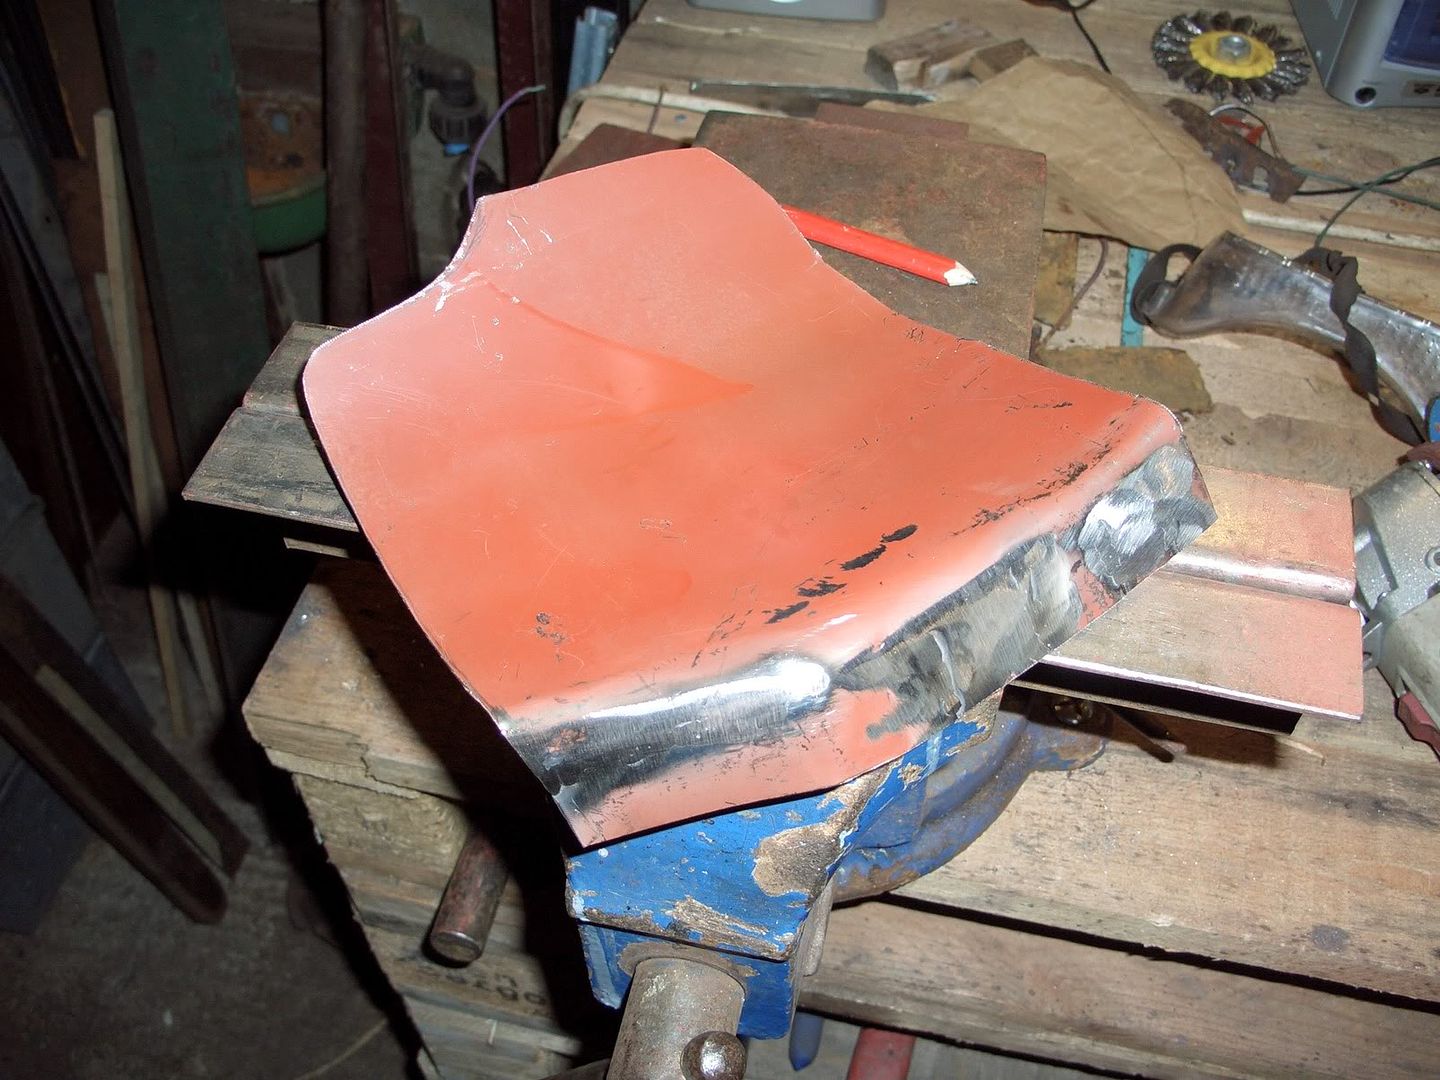 This is the repair fitted, and below that the back end of the inner sill which I seem to recall fits between the inner tub and the outer. It looks as if I made a small repair section for the outer where it joins the inner, so I could weld them together from the inside. The remainder of the inner section was made later: 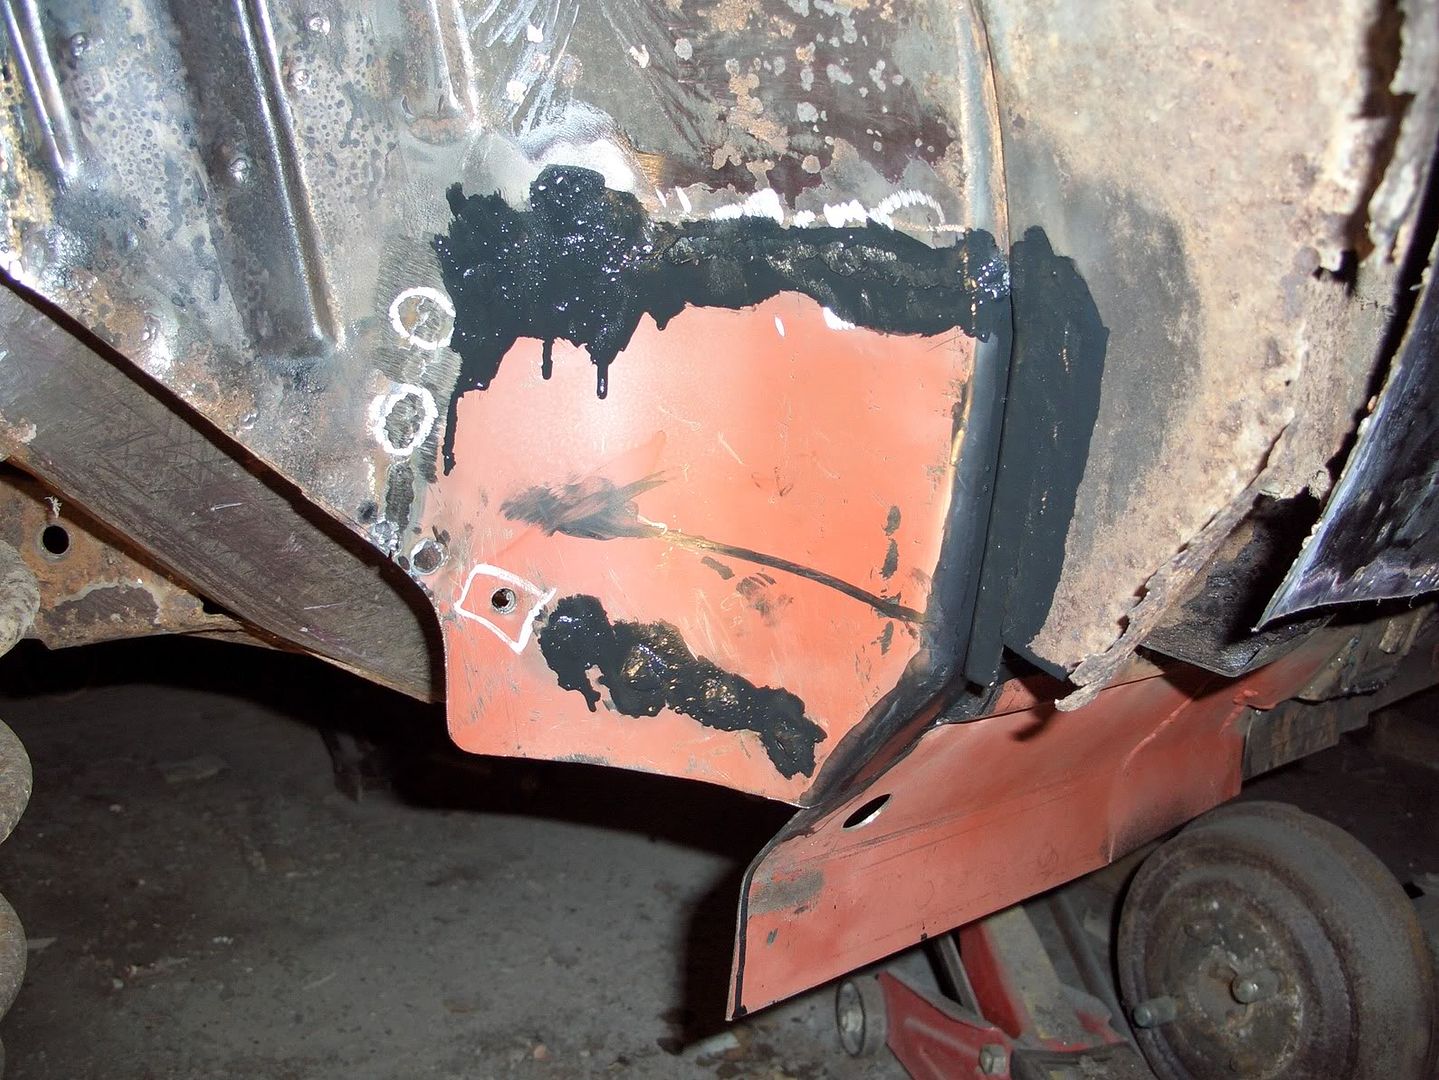 I did the repair the outer tub once the quarter panel was trimmed and clamped in place, so there's not much to see there. If you need any more photos let me know. I don't seem to have uploaded many |
| |
|
|
|
|
|
|
|
|
Thanks droopsnoot. However, I've made that bit, or the corner bit anyway and then I'll sort the big hole in the inner arch when I've finished. The part I'm struggling with is the bottom of what I think you call the outer tub. The concave panel as the camera sees it in my photo - sits behind and should be welded to the outer arch. Tomorrow I'll try to remember to get a pic of my card panel in place so you can see which one I mean.
Edit, I'm also guessing that channel that comes down the rear quarter and runs across the top of the inner sill towards the arch is a Coupe feature? Mine doesn't have anything like that, but then I have a door in the way.
|
| |
Last Edit: Jul 9, 2013 21:54:36 GMT by oli8925
Project Diary1975 Viva / 1988 T25 Camper / 1989 Mini / 1991 MX5 / 1992 Mini / 1994 Saab 9000 / 1997 Saab 9000 / 2008 Saab 9-5
|
|
|
|
|
|
|
Edit, I'm also guessing that channel that comes down the rear quarter and runs across the top of the inner sill towards the arch is a Coupe feature? Mine doesn't have anything like that, but then I have a door in the way. I don't remember on the coupe, this is the Sportshatch so it's an estate but probably the same or similar. Yes, I'd forgotten you have a big gap there. Hmm, the bottom of the outer bit. I test-fitted the outer arch, clamped it in place, then made it in small sections to fit. It's hard work to make as one piece given how it curves back in on itself, then has a 90° flange to weld to the arch lip, so I cheated. I have one part that forms the bit from the join to the inner tub, then I have an L-shaped section that forms the outer bit. Fitted the inner part first, then made the outer part (in short sections all the way around) to fit. Quick weld to hold in place, then remove outer arch and weld properly around the outside. The shrinker came in useful to get the shape towards where it joins to the outer arch, but you could do it by cutting wedges out, curving it in and welding back together. I was fortunate in a way, because I'd removed so much of the outer section I could get to the back to weld it as well. You can just about see it in this photo, although this was from the back end but you can see the welds where I've attached the outer L-shaped bit having made the inner parts in pieces. I've no doubt it could be made as one if you're really skilful, but this way took long enough. 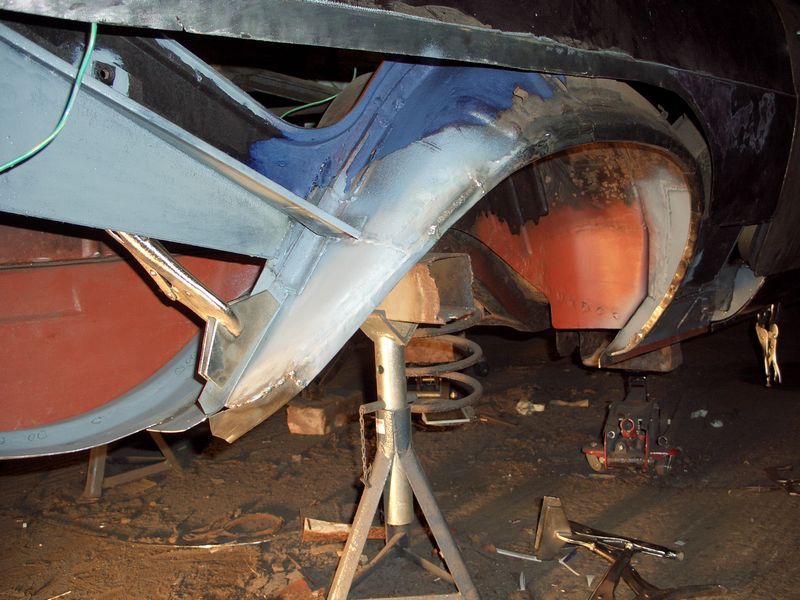 |
| |
|
|
BLU
Part of things
 
Posts: 347
|
|
Aug 13, 2013 20:19:38 GMT
|
Whats the best way to beat an XR2 spare wheel bulge/bubble into a standard rear valance. I'll fancy giving it a try before shelling out for a panel, just need pointers to push me in the right direction  Pic of bulge on car  close up of a new (usually hard to find and expensive) panel  I can always practice on a flat piece of steel and graft it into the rear valance (might be more sensible tbh lol  |
| |
Last Edit: Aug 13, 2013 20:20:52 GMT by BLU
The future's bright, the future's BLU
Silver 1987 MK2 Fiesta Ghia
White 2006 MK6 Fiesta ST150
Yellow 2007 MK6 Fiesta Zetec S Anniversary #279
Green 2007 MK6 Fiesta Zetec S Celebration #471 (diesel conversion)
Red 2008 MK6 Fiesta Zetec S Anniversary #893
|
|
DMS
Part of things
 
Posts: 57 
|
|
Sept 24, 2013 8:44:26 GMT
|
My tribute to Tonybmw's lessons in welding I learned here: This is my fourth revision of the housing for the E28 speedometer. But it looks like I'll be satisfied when I'm done this time. Í made this out of a piece of 0.8mm sheet. I've not made enough pictures to show every step but you'll get the idea. The electronic speedometer as it should sit.  The housing in flat steel:  Folded up:    Now it comes to the trick I learned form Tony: Welding steel this thin is really difficult especially on the edges. So using a copper heat sink as Tony demonstrated.  Just after welding:  Using a copper pipe hammered flat and then formed in the same radius for the curved part of the housing:  Made the base plate:  Cut out the opening for the housing:  Tagged the housing on the base plate with everyting aligned to get the angles exactly right:   From the top:  From the rear:  And the front (note the original face is still on. The E28 260 km/h face is slightly smaller so it falls through the hole. I'll make a sticker to put on the E12 one):  So I might have gone a bit crazy in making this piece but it was nice practise and I've learned a lot. I want the details to be right so minimise the possibility of stray yellow light getting on the cockpit faces. The speedometer will be completely boxed in within its casing. A few more hours and it will be finished. Thanks for reading. |
| |
|
|
|
|
|
Sept 27, 2013 11:10:38 GMT
|
|
Interesting you get a lot of brown-black marks around the weld. Reading elsewhere that seems to suggest not enough gas flowing, but I get the same even when I turn it up quite high. So I've gone back to running quite a low rate - if I'm still going to get the same thing I might as well save gas.
|
| |
|
|
|
|
|
Sept 27, 2013 18:28:03 GMT
|
|
That's the zinc coating burning off, you get lots of weird gases and contaminants when you weld it without cleaning back thoroughly, it does highlight just how far the heat does travel when welding.
|
| |
|
|
|
|
|
Sept 27, 2013 20:23:35 GMT
|
|
DMS
some great fabrication with the speedo cowl
Too high a flow rate can have the same affect as too low a flow rate
When the flow is too low, you obviously don't get the correct shielding affect
When it is to high, the speed of the gas sucks in oxygen from the surrounding area
|
| |
|
|
|
|
|
Sept 27, 2013 20:27:28 GMT
|
Whats the best way to beat an XR2 spare wheel bulge/bubble into a standard rear valance. I'll fancy giving it a try before shelling out for a panel, just need pointers to push me in the right direction  Pic of bulge on car  close up of a new (usually hard to find and expensive) panel  I can always practice on a flat piece of steel and graft it into the rear valance (might be more sensible tbh lol  BLU Probably the easiest way would be to take a bit of wood with and cut a hole in it the same size and shape as the bulge and then gently with a hammer dress the steel into the hole on the wood, this will create the bulge and create the shape that you need, the trick would be to ease it down a bit at a time, rather than trying to bash it into shape with one or 2 hefty blows |
| |
|
|
|
|
BLU
Part of things
 
Posts: 347
|
|
Sept 27, 2013 21:06:20 GMT
|
Whats the best way to beat an XR2 spare wheel bulge/bubble into a standard rear valance. I'll fancy giving it a try before shelling out for a panel, just need pointers to push me in the right direction  Pic of bulge on car  close up of a new (usually hard to find and expensive) panel  I can always practice on a flat piece of steel and graft it into the rear valance (might be more sensible tbh lol  BLU Probably the easiest way would be to take a bit of wood with and cut a hole in it the same size and shape as the bulge and then gently with a hammer dress the steel into the hole on the wood, this will create the bulge and create the shape that you need, the trick would be to ease it down a bit at a time, rather than trying to bash it into shape with one or 2 hefty blows Awesome, that was what I was kinda thinking. WIll give it a bash when I get 5  |
| |
The future's bright, the future's BLU
Silver 1987 MK2 Fiesta Ghia
White 2006 MK6 Fiesta ST150
Yellow 2007 MK6 Fiesta Zetec S Anniversary #279
Green 2007 MK6 Fiesta Zetec S Celebration #471 (diesel conversion)
Red 2008 MK6 Fiesta Zetec S Anniversary #893
|
|
|
|
|
Sept 28, 2013 18:22:43 GMT
|
|
Damn this thread ......! Every panel,crease and indentation I make has to pass the " Tony Test " now .
|
| |
|
|
DMS
Part of things
 
Posts: 57 
|
|
Sept 29, 2013 19:39:17 GMT
|
Damn this thread ......! Every panel,crease and indentation I make has to pass the " Tony Test " now . That feels familiar, but it's good to be challenged to perform at your best. I've a huge restoration project ahead of me so I'm glad I found this place and topic. |
| |
|
|
|
|
|
Sept 30, 2013 16:27:59 GMT
|
Damn this thread ......! Every panel,crease and indentation I make has to pass the " Tony Test " now . That feels familiar, but it's good to be challenged to perform at your best. I've a huge restoration project ahead of me so I'm glad I found this place and topic. thread linky please!!! |
| |
I would be rich if i had not spent so much money on Cars and fast women...oh, i did waste some of it as well!
|
|
DMS
Part of things
 
Posts: 57 
|
|
Sept 30, 2013 20:36:03 GMT
|
I've posted on a few other forum too but I'll see if I can copy it over. Tonight I started with cutting these:  Which magically transformed into this:  |
| |
Last Edit: Sept 30, 2013 20:49:14 GMT by DMS
|
|
|
|
|
|
|
We're going to make Tony regret he hasn't patented that bender  |
| |
|
|
|
|
|
|
|
Too high a flow rate can have the same affect as too low a flow rate When the flow is too low, you obviously don't get the correct shielding affect When it is to high, the speed of the gas sucks in oxygen from the surrounding area That's interesting - I thought I was getting shielding because it's noticeably worse when the gas runs out, but even upping the flow rate to silly numbers didn't seem to improve matters, so it's useful to know that's not necessarily wrong. |
| |
|
|
DMS
Part of things
 
Posts: 57 
|
|
|
|
That feels familiar, but it's good to be challenged to perform at your best. I've a huge restoration project ahead of me so I'm glad I found this place and topic. thread linky please!!! |
| |
|
|
|
|
|
Oct 17, 2013 19:53:24 GMT
|
|
|
| |
|
|
|
|
|
Oct 18, 2013 12:10:46 GMT
|
|
I'd be interested to see how to do that as well as I have something similar - a piece of boot floor that has a stepped edge, but two strengthening ribs that end on the edge, not before it.
I was planning on folding the edge first, then cutting out a small half-moon section of the step, then beating the rib into mine.
|
| |
|
|
|
|


