stevea
Part of things

Posts: 281
|
|
Feb 27, 2012 21:48:54 GMT
|
I haven't broken any studs yet, the thought of all that leverage on them 3/8ths studs keeps me from exploring the handling! Lol ... An easy upgrade for the old 3/8" wheel studs used on Spitfire GT6 etc, can be upgraded to M12 X 1.5 threads using Landrover Freelander wheel studs, part No. CLP9037L They fit straight in and the threaded section is just the right length for steel wheels. |
| |
|
|
|
|
MrSpeedy
East Midlands
www.vintagediesels.co.uk
Posts: 4,789 
|
|
Feb 28, 2012 19:05:58 GMT
|
Yh, I have heard of that. I've also seen them replaced with the larger 7/16" studs (from the big saloons IIRC) It's something i'll do sooner or later, but for the mean time I'll just take it steady and mooch about this year. Probably take it off the road next year and rebuild the rear end with some different driveshafts to eliminate the Rotoflex couplings and uprate the studs whilst it's all apart. I also have plans for fully adustable tubular wishbones, so I can play with camber a little  |
| |
|
|
|
|
|
|
|
Hi Speedy Just been having a look at your beasty Herald and those flared arches. What's you wheel track as mine might be about the same width and I may need to flare my guards as well. As for you comment on braking wheel studs-Thats why I went for the 5 stud setup as I thought this might be an issue. I love the "purposeful" look of this car. I haven't broken any studs yet, the thought of all that leverage on them 3/8ths studs keeps me from exploring the handling! Lol Just done a quick in the dark rough measure and rear track is somewhere around 1600mm now SamR380, the best pics I have are copied from the top of this page Thanks for the compliment tho ;D Speedy -Thanks for getting out in dark to have a quick measure on the track. Mine's 1500mm so a small flare of the guards may be fine. Apologies for calling your Vitesse a Herald. Bit like calling us Kiwis an Aussie. |
| |
69 Herald 13/60 with Turbo 1600 MX5 engine, Lexus 5 link rear end, 17in wheels,300mm ventilated disc's and subaru 4 pot calipers
|
|
smeden
Part of things
"Full throttle until you see God,then shift to second"
Posts: 356
|
|
|
|
love the look of this.. Nice work the arches looks spot on. I like the type 9 too. I'm preparing to fit a 5 speed box on my Jag.. but i was lucky and found an orignal (probber poor quality wobbly children's play pony poo) keep up the good work and thumps up from Denmark  |
| |
Jaguar xj6 S1 swb manual
VW Bay Camper
Audi A3 1998 1.8
VW Beach Buggy (sold)
Ford Mondeo mrk I RS Celebration (written off)
Ford Escort Mrk II RS 2000 (rust in peace)
|
|
MrSpeedy
East Midlands
www.vintagediesels.co.uk
Posts: 4,789
|
|
|
|
Cheers peeps  Soooooo, last time I was working on the engine, I'd established that the valve springs were binding due to the high lift cam. How do we solve this? Buy longer valves? Nooooo! I'm tight remember. So I decided to machine the spring platforms down by 0.050" to allow clearance between the spring coils. Now, I didn't want to be removing the valve guides as that could stretch the job even further so I needed a cutter with a hole in the centre to clear the guide, if you follow Not having said cutter there is only one option. Make one !! So, take one knackered hole saw and cut the end off; 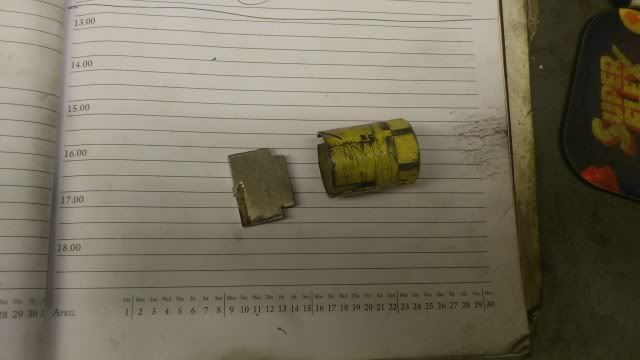 Add a HSS cutting blade from a 'Lambs' spot face cutter brazed into place Turn up a spindle from high carbon steel; 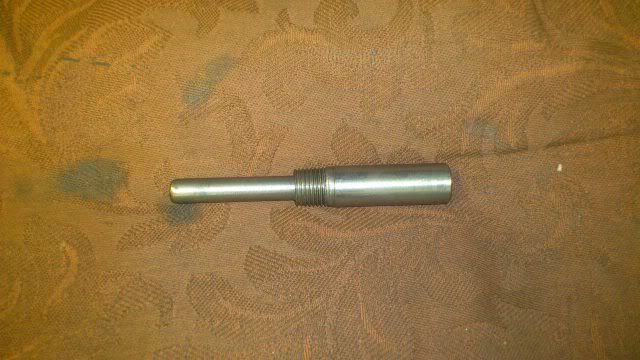 Remove centre piece of cutting blade and assemble onto spindle;  And Voila. A spotface cutter exactly the shape and size to machine the spring platform and nothing else. So, with new tooling, it's over to the Bridgeport again. First one done, looks good;  Action shot 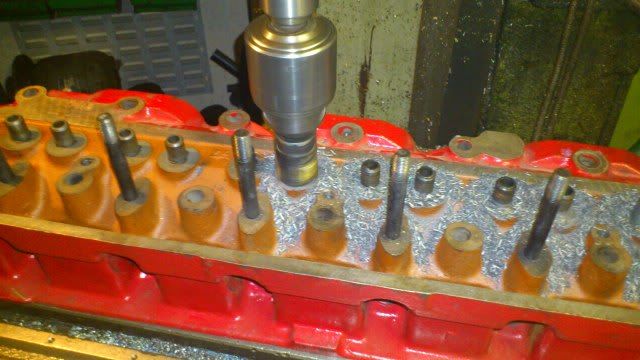 And a feshly machined head with 0.050" lower valve spring platforms;  Now I can crack on and build the head up. Then flip the engine over and fit the new ARP big end bolts and do the final assembly |
| |
Last Edit: Mar 29, 2012 22:23:40 GMT by MrSpeedy
|
|
MrSpeedy
East Midlands
www.vintagediesels.co.uk
Posts: 4,789
|
|
Mar 17, 2012 10:49:48 GMT
|
Ooooh, got a little bit excited last night and fitted new spangly ARP big end bolts, then bolted on the sump with new bolts! 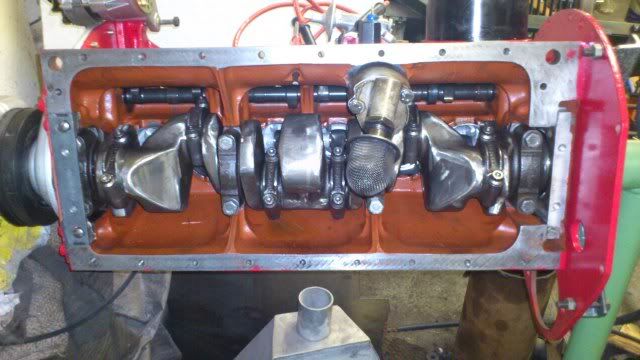 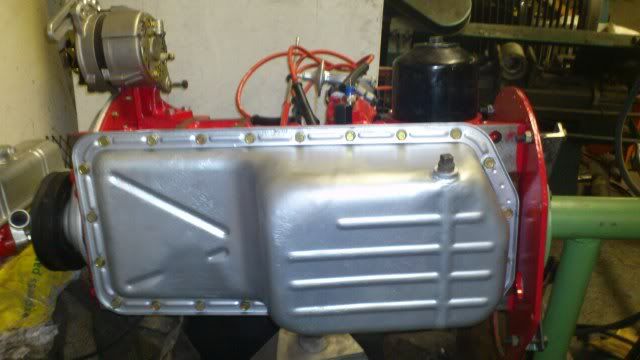 Little things amuse little minds eh |
| |
|
|
MrSpeedy
East Midlands
www.vintagediesels.co.uk
Posts: 4,789
|
|
Mar 20, 2012 18:23:52 GMT
|
Well, another small step is assembling the cylinder head, fitting it to the engine and torquing it all down. I picked up a NOS Stanpart copper/asbestos sandwhich gasket which hopefully will hold better than these aftermarket jobbies  You can see in this picture just how much lift this camshaft has, even with standard ratio rocker arms  Should make driving in traffic interesting! lol Having a night off tonight to sort out my greenhouse  but tomorrow should see the waterpump fitted along with the alternator. Then making plans to pull the car apart and swap the engines over! |
| |
Last Edit: Mar 20, 2012 18:25:48 GMT by MrSpeedy
|
|
|
|
|
Mar 20, 2012 19:35:56 GMT
|
|
Wats that, about an inch of lift? :-O
|
| |
Koos
|
|
Em
Part of things
Fuel Injected? Carb Infested!
Posts: 601
|
|
|
|
|
Ingenious tooling making Mr. S!
Engine's looking fantastic! Got an E.T.A?
|
| |
|
|
MrSpeedy
East Midlands
www.vintagediesels.co.uk
Posts: 4,789
|
|
Mar 21, 2012 10:39:07 GMT
|
@ MDH - Ha ha, yeah it does look a lot doesn't it. It's actually 0.470" lift with a timing of 47/37 83/37 so I'm not expecting a particularly smooth idle! @ Em - Cheers. There's always a solution As for an ETA, I'm thinking about making a start on the swap this weekend! The engine will be ready by the end of today bar for fitting the flywheel and manifolds, but the flywheels only a 5 minute job and the manifolds will get fitted in the car |
| |
|
|
|
|
Em
Part of things
Fuel Injected? Carb Infested!
Posts: 601
|
|
Mar 21, 2012 10:47:23 GMT
|
Woo-hoo! You don't hang about, do you?! Just in time for the nice weather! (Not envious at all...!) |
| |
|
|
MrSpeedy
East Midlands
www.vintagediesels.co.uk
Posts: 4,789
|
|
Mar 21, 2012 19:33:58 GMT
|
Woo-hoo! You don't hang about, do you?! Just in time for the nice weather! (Not envious at all...!) Really?? HA HA HA I've been building this engine since 2009 Anyhooo, it's now all together as far as I can go ready for the swap. Probably gonna make a start on Sunday if the weather holds out Getting a bit nervous now tbh, wondering how/if this new engine will run! lol |
| |
|
|
|
|
|
Mar 21, 2012 23:22:07 GMT
|
|
Get it in, get it in, get it in! :-)
Idle is over rated anyway!
|
| |
Koos
|
|
MrSpeedy
East Midlands
www.vintagediesels.co.uk
Posts: 4,789
|
|
Mar 26, 2012 12:14:31 GMT
|
Yeah, not too fussed about idleing anyways. TBH, I'm kinda hoping it does run as rough as a badgers  at tick over ;D Anyways, Nice day yesterday wasn't it, so I rallied the troops and headed off down to the workshop for some tinkering. Plan was to get the engine loose somewhere near ready for hoiking out My helpers for the afternoon 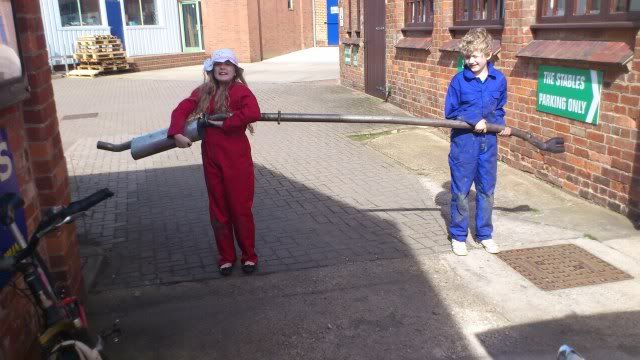  2 hours later we were further down the line than I expected 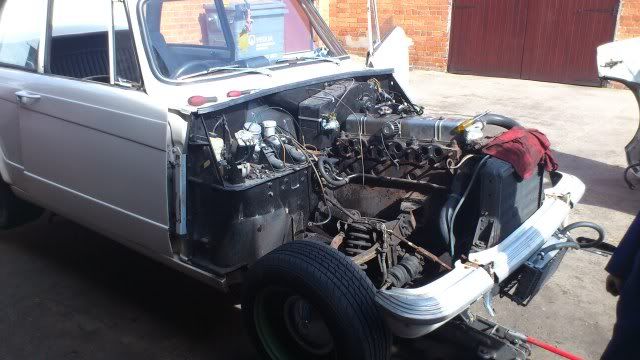 So the next logical step was to get the crane out  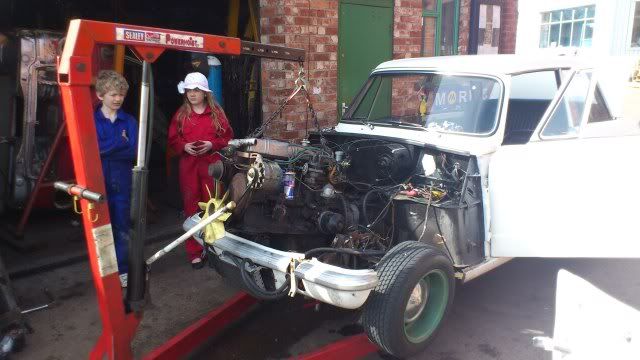  They may be young, but they already have the 'R-R' ethos  |
| |
|
|
|
|
|
Mar 26, 2012 12:47:01 GMT
|
|
Get them at it early l say, my youngest one like's to use the hammer so heading in the right direction!
You don't hang about with that engine out, being able to take the bonnet off makes it much easier to work on. The new engine looks the bizzyness, as you say will be a bit lumpy!
Are you still going to run SU's on the new engine?
|
| |
|
|
MrSpeedy
East Midlands
www.vintagediesels.co.uk
Posts: 4,789
|
|
Mar 26, 2012 14:24:49 GMT
|
Yeah, they really enjoyed their time tinkering. Had to keep them busy tho, so they're attention didn't wander! lol Got Strombergs on it off of a V8, so we'll see how it goes with them. I've not totally rulled out the idea of bike carbs tho |
| |
|
|
MrSpeedy
East Midlands
www.vintagediesels.co.uk
Posts: 4,789
|
|
Mar 27, 2012 19:06:32 GMT
|
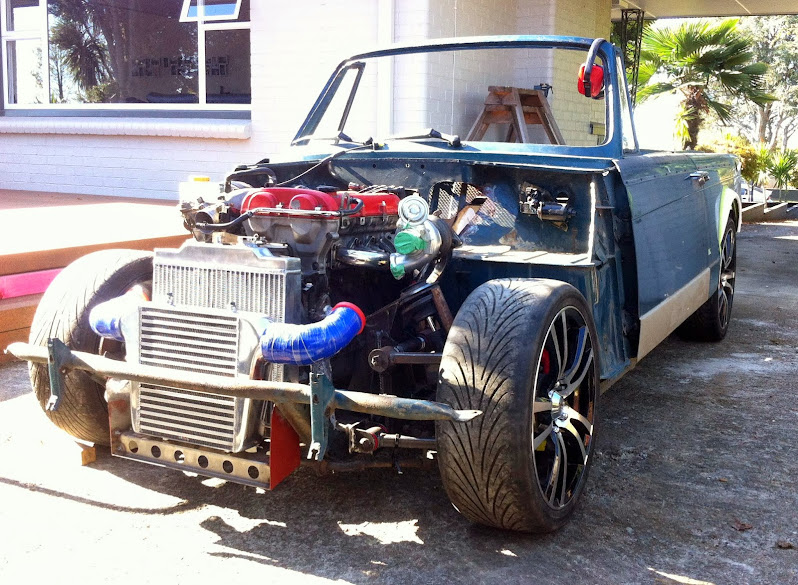
Mini update! Engine bay all pressure washed ready for paint tomorrow Another problem that reared it's head when I recommisioned the old gal last year, was the tubular manifold I've fitted. It's impossible to get a spanner on the nuts to tighten them properly, resulting in a very annoying blow on most of the flanges, not to mention the fumes in the cabin  Sooooo, having studied the set up again on the new engine, I determined that the only real solution was to make some long 'tube nuts' A little hexagon bar, a lathe and some tapping resulted in these little beauties.  However, there's always one that wants to be awkward. This one on the end needed more relief to clear the primary runner as it begins to cross over the front of the flange  Anyways, that's that little problem sorted. Next up is paint the chassis and engine bay, then make up an adaptor for the oil temperature gauge I've aquired |
| |
|
|
|
|
|
Mar 27, 2012 20:23:17 GMT
|
|
Couldn't you have used allen key headed bolts and extended an allen key?
BTW if you wanna go efi I have a set of M3 throttle bodies, cheap to you guv'nor!! ;-)
Whats your old 6 pot like? Useable? Saleable?
|
| |
Koos
|
|
MrSpeedy
East Midlands
www.vintagediesels.co.uk
Posts: 4,789
|
|
Mar 28, 2012 12:11:09 GMT
|
I possibly could've, but they would be extrememly fiddely to installand there's the risk of them seizeing in the head or stripping threads. Plus I'd never get one in on that awkward one on the end I may one day go EFI, but only if I turbo/supercharge it Bike carbs would be a lot easier for the N/A The old engine is a good motor. It could do with a new set of shells in the bottom end, but looking in the ports, she's been runing nice and clean and dry. I was going to sell it on, to recover some costs, but I'm thinking I might rebuild it and shelve it incase I need a spare |
| |
|
|
MrSpeedy
East Midlands
www.vintagediesels.co.uk
Posts: 4,789
|
|
Mar 28, 2012 19:02:19 GMT
|
Little tinkering session tonight. Made an adapter so I can fit an Oil Temperature gauge I found lying about upstairs and also fitted a Tee piece to run a pressure gauge alongside the warning light 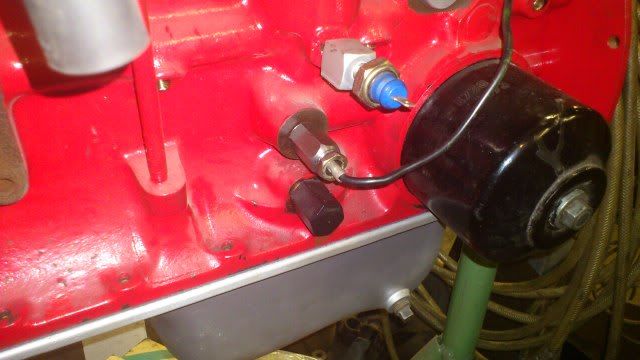 Then addressed a long standing issue since the gearbox conversion. I've never had the speedo working!! Now, obviously the Triumph cable won't fit the Type 9 'box, so I stuck a bit of brass bar in the lathe and spun up this little adapter 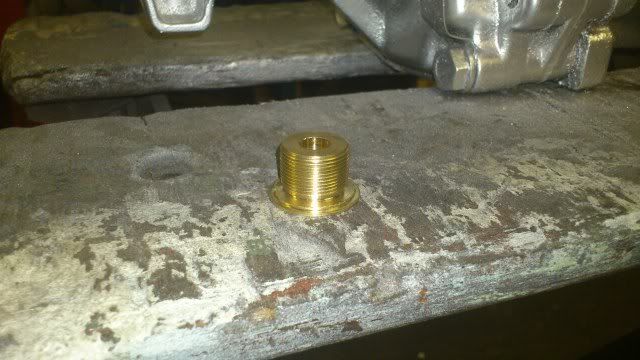 After identifying the thread as an old British Cycle Thread and also establishing the lack of Die I had to screw cut the thread with a single point tool, to allow me to screw on the angle drive adapter. Anyways, it fits in the gearbox, retained by circlip 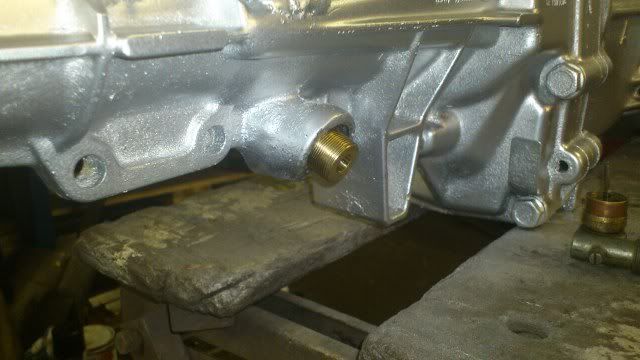 Then the angle drive screws to that 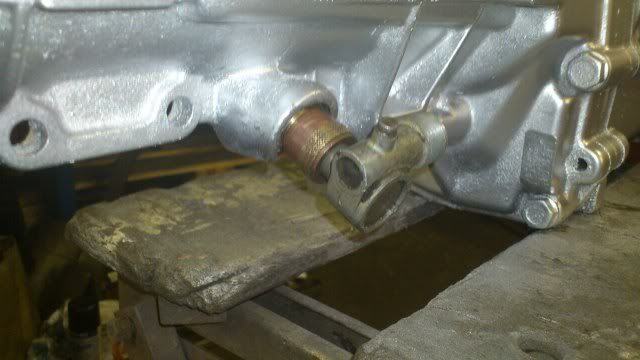 So, in theory, I should now have a speedo that registers something even tho it will no doubt be a mile off calibration! |
| |
Last Edit: Mar 28, 2012 19:04:11 GMT by MrSpeedy
|
|
|
|


 but tomorrow should see the waterpump fitted along with the alternator.