|
|
|
|
|
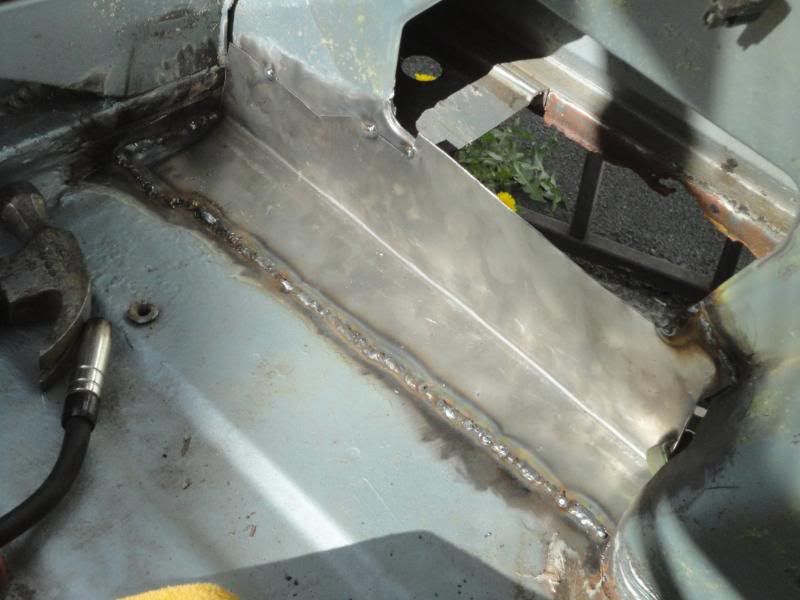
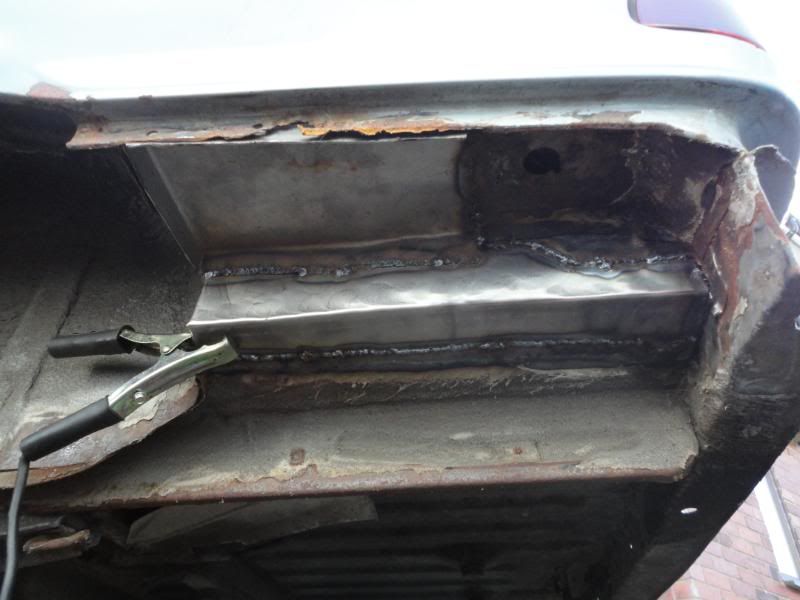
yeah, 10/10 from me too steve. Lots of garages charge money for worse work than that! Good to see you persevering with the welding, anyway. What you need now is a much older ford with much more rust... lol. PS, when I'm welding sills on cars with the seatbelt reel in the pillar I always umbolt it and move it out of the way before starting. This is because I once had one catch fire (you wouldn't believe how close it is to the sill outer  ) |
| |
To get a standard A40 this low, you'd have to dig a hole to put it in |
|
|
|
|
|
|
|
|
|
do you do lessons ;D
1 non rusty escort lol
|
| |
2001 HONDA CT110 (NOT RCV)
|
|
|
|
|
|
|
|
you have just inspired me to teach myself to weld, (ok i did do a tiny bit many years ago but that is long forgotten) if my first results turn out half as good as yours i will be well pleased.
|
| |
|
|
|
|
|
|
|
|
If you are a beginner......you are going to be really good...you are already there! You have started on the most difficult areas. took me ages to be able to to that standard, many would be put off by the extent of that rust. My top tip for welding rusty holes is use slightly thicker gauge steel, its easier to weld and if you have to do more in the future it gives a solid place to start. If you keep a car for years it really helps, and maybe a bit stronger.
|
| |
|
|
stevek
Yorkshire and The Humber
Posts: 728
|
|
|
|
Thanks for the response, its a great encouragement. I Love the tips, they help me and hopefully other people avoid pitfalls. Obviously important to know when patching a sill for MOT, glad I didn't have to find that out the hard way. I did however find out the hard way that if a wing is originally spot welded on that any replacement must be refitted that way too. I bolted the wing on as is the case on many other cars but this was not acceptable for MOT and I had to have the garage weld it for me. (Could do that myself now  but that was 4yrs ago when I bought the car as a salvage write off.) Good Tip! I can vouch for this too because the MOT garage the fitted my cover sill some years ago scorched my seatbelt reel, unfortunately I didn't notice for months being the passenger seat belt. I did remove and tie it out the way for welding, the pics must have been taken after as I see its back in place. I'll get one ASAP, If its anything like the revaluation that was the knot wheel for prep it'll be valuable. There seem to be a few styles of flap wheels which is best? For drill or grinder? Water wheel style or flat pancake style? (good descriptions eh!) I'm not sure what gage I used as the neighbour had it spare in his garage, May have been marginally thicker than the piece cut from the boot for the fiesta patch. I will add here that bending the metal over the rails was quite tough, Its much easier if you blow torch the metal (until it just changes surface colour) along the line to be folded. That was a useful tip from my neigbour. My tips: The £25/30 ish ebay auto darkening mask I bought works great, not got the build quality of a Speedglas but good enough. Its a real must buy piece of kit makes the world of difference compared to a flip down one when your on your back in the small space under a car on axle stands. Have a hose pipe and fire extinguisher near by too and a fire watchman too if poss. I set fire to the underseal a couple of times and while its easy to deal if your ready I wouldn't want to be unprepared. I was over concerned with getting the cardboard template just right, but really just get it rough as when you get the metal up and start hammering it forms and twists/stretches to shape much easier than cardboard. Also if you cut a bit short/long its not too bad to add a bit or cut a bit more off. Question: I had a go at welding one patch latish on an evening (read a little cold, but not like the current snow cold) and the first welds I tried welded to the patch as normal but there was no penetration to the floor metal, It could be broken off with a firm yank of the screwdriver. I tried adjusting the settings on the welder (something I'm not good at yet) but couldn't get any better. The higher power just obliterated the patch while not really attaching it either. More wire speed just sat on top more. It seemed to sort its self out so I came to the conclusion that It was the temperature of the car and my failed efforts had eventually heated up the area enough? Is this likely to be right after all i tried moving the earth clamp, welder settings, clamping it up firmer, cleaning it more etc so not sure what made it start welding normally again in the end. And finally... I'm sure you don't really forget this stuff but one reason for adding to this post is to try and give something back to the forum. If it encourages someone to have a go or if just one tip helps someone else along the way it'll have been worth it. Ha Ha might be blind leading the blind but if I can help I will. -Steve- |
| |
|
|
|
|
|
|
|
|
The pancake style ones mate, that fit in a grinder. they move with the contours and really flatten the welds to make it look like there is no welds, but a normal panel !
|
| |
|
|
|
|
|
|
|
|
good point made about hose/ bucket or extinguisher and watch person.....probably the most important, I'm sure all of us have a few excitments and brown trouser moments! A mate was once welding away under his astra, heard a scream, and found himself shooting out from under the car feet first. Neighbour saw car completely engulfed in flames and pulled ! He had no idea what happened, but felt a breeze getting up! lol
|
| |
|
|
|
|
|
|
|
|
+1 on the flap wheel. If you can butt the panels together instead of overlapping, the flap wheel over the top, then the repair is all but invisible. Make sure that the butted panels are tight together though, otherwise you'll just be chasing burn holes around...
+1 on the fire-watch too - I always keep a clear run out of the garage behind me, and a CO2 extinguisher with the pin out next to the job - it is so easy to set things on fire... Treat the extinguisher charge as a consumable, and don't be afraid to use it. Watch out for sparks from grinding too. Also - don't just finish welding, the leave the car to stand - Go back after a couple of minutes and have a quick over-check for anything smouldering away inside closed sections - it can take a couple of minutes for the smoke to come pouring out... Not sure about hoses or buckets - a quick blast of CO2 into a hole usually does the job.
|
| |
|
|
|
|
|
|
|
|
seeing those pics has given me encouragement about attacking my mk1 fez. been teaching myself to mig weld on scraps of metal in the shed in preparation to starting the sill and floorpan.
so is overlapping new metal and welding is acceptable then, i was under the impression it had to be butt welded??
|
| |
|
|
cam
Part of things
 
Posts: 158 
|
|
|
|
great thread. has inspired me to actually learn/practice my migmanship. I can weld like a champion with oxy/acetlyene, and can mig both new alloy and stuff that's soaked with years of cattle effluent but never ever got the hang of doing mild steel for some reason. all too easy to let my old man do it for me :\ probably going to give it a go this weekend, even. floor and sill repairs on the Citroen  will get flap discs also. |
| |
|
|
|
|
Mark
Club Retro Rides Member
Posts: 2,097
|
|
|
|
|
Good work, very very impressive.
|
| |
|
|
stevek
Yorkshire and The Humber
Posts: 728
|
|
Oct 29, 2010 21:36:33 GMT
|
So its been about a year since the Escort weldathon (well in terms of my welding experience) which has just passed another MOT needing no work this time  so off we go again with another challenge, meet victim 3... 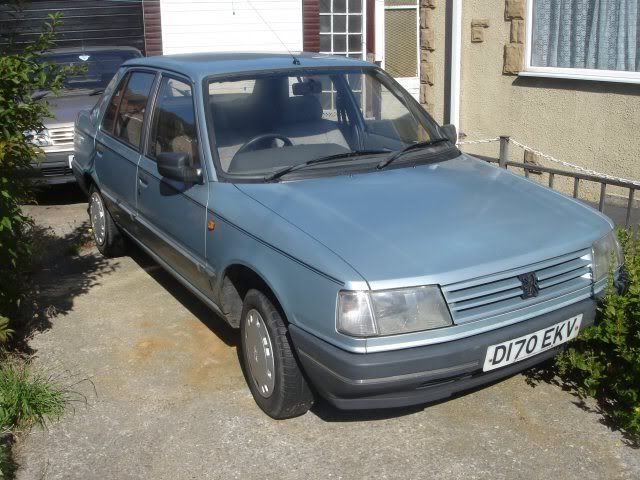 It has 6 problem areas. Both front jacking points/sill ends, Both rear jacking points/sill ends and the rear boot floor area on both sides where road dirt from the rear wheels is splashed up. I have stripped the rear carpets out, removed the exhaust and removed the fuel tank as its plastic and next to the rear jacking points. 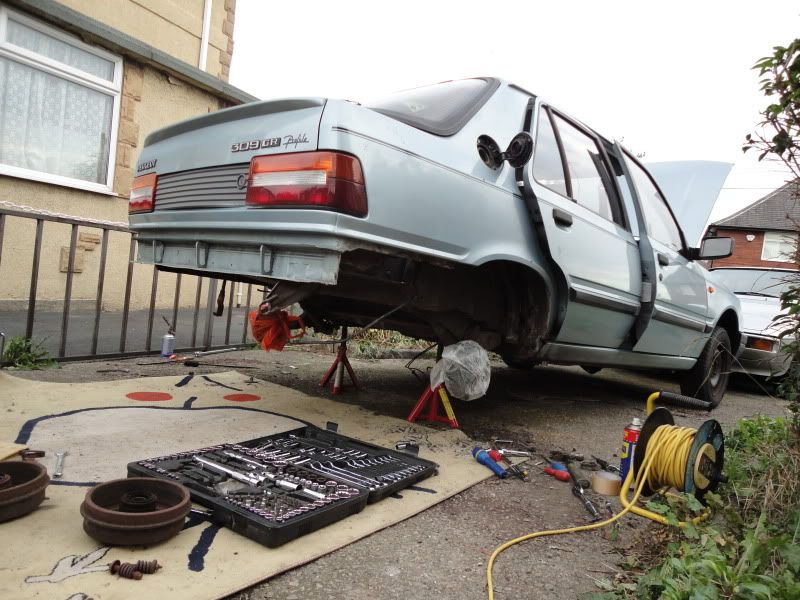 Rear boot floor crustyness... 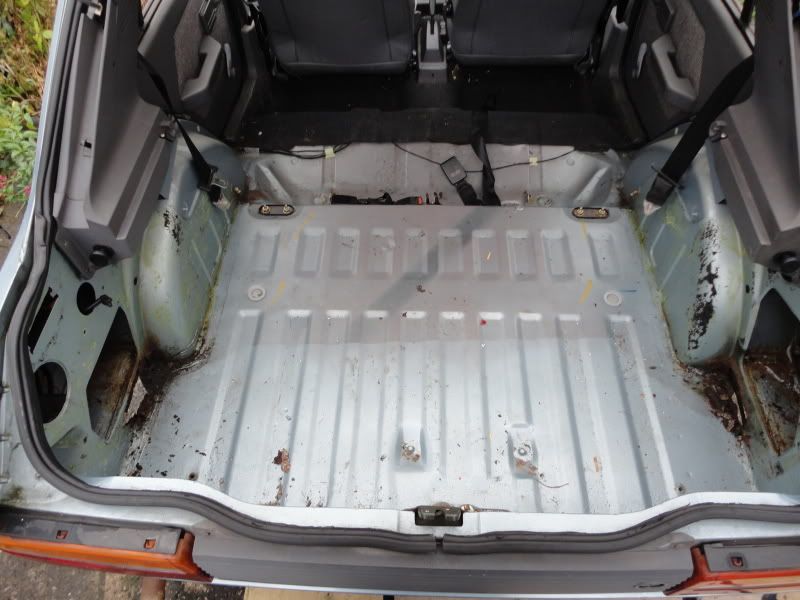 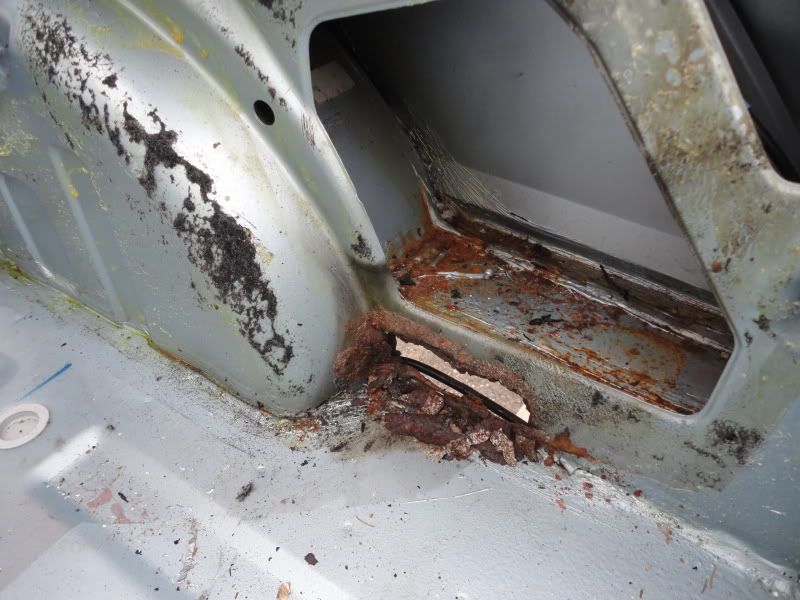 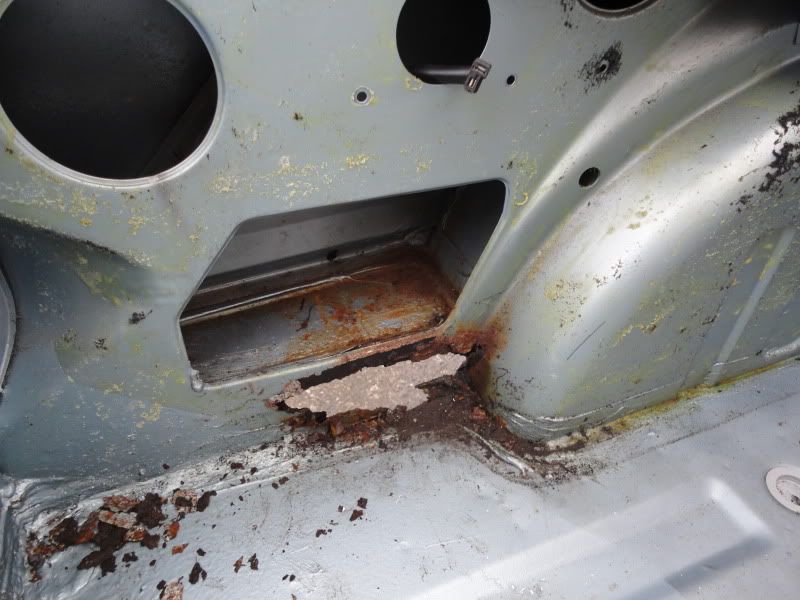 Prodded to become this... 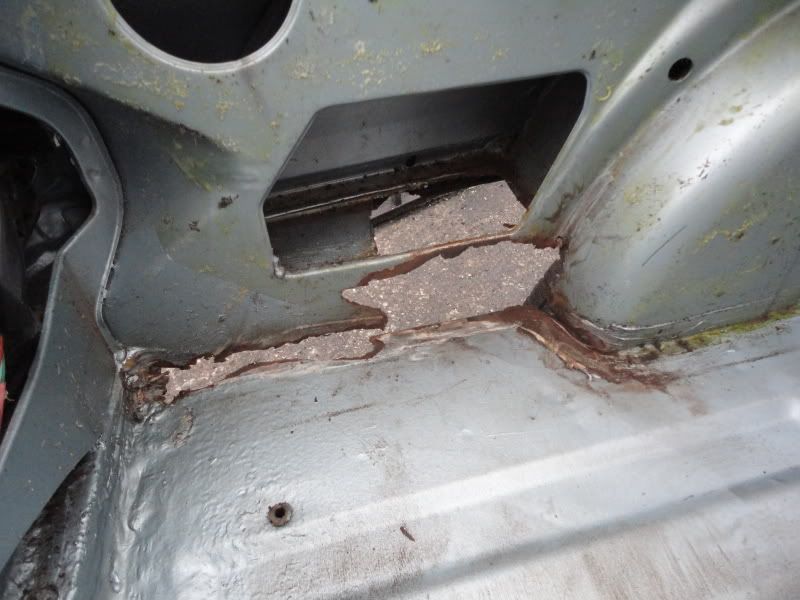 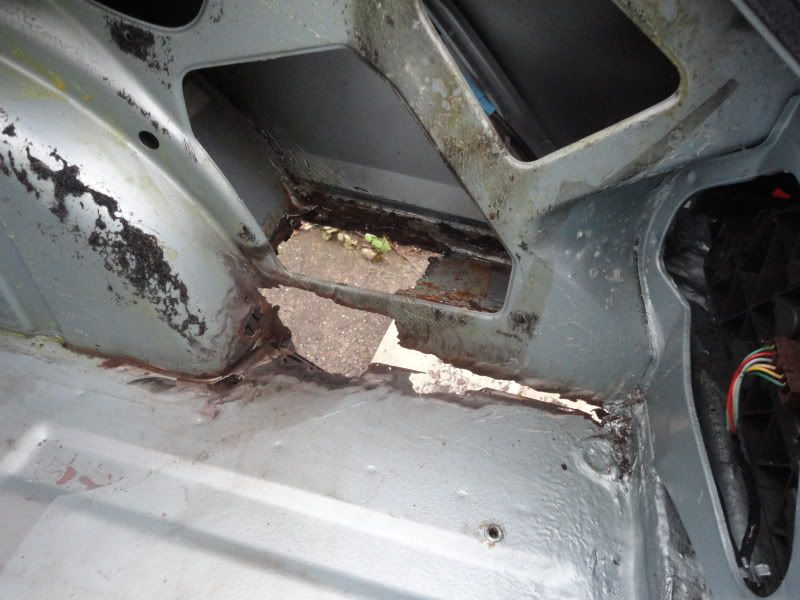 Front drivers side sill end (dint have one of other side but its not as bad) Previous repair patch looking a little frilly. 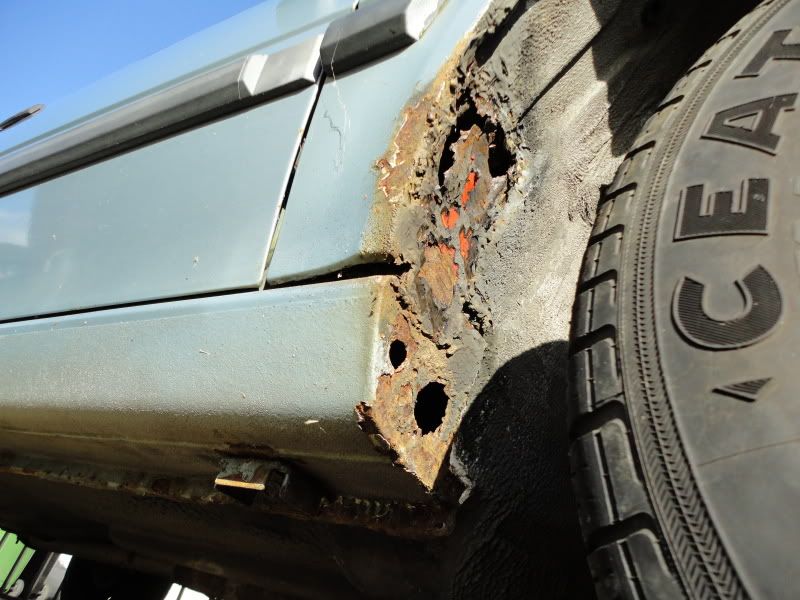 Drivers side rear sill... 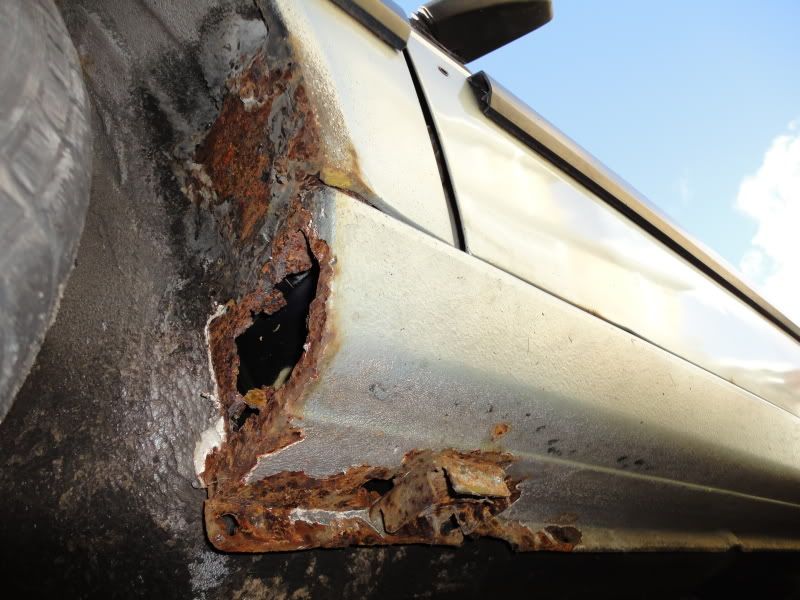 & the inside view... 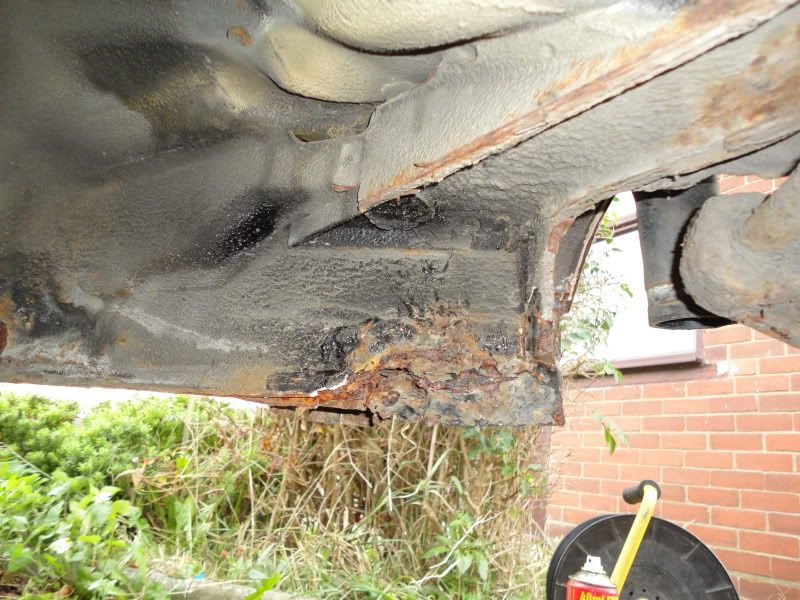 Passenger side rear sill. (Previous patch only welded on bottom side pealed back by hand! This would have been slipped up the side of the fuel tank so not visible to any MOT tester.) 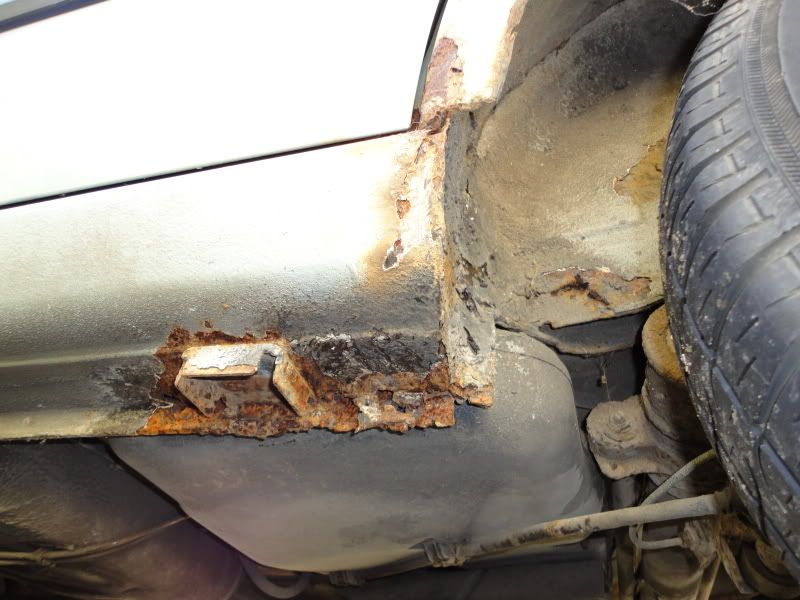 & the inside view... 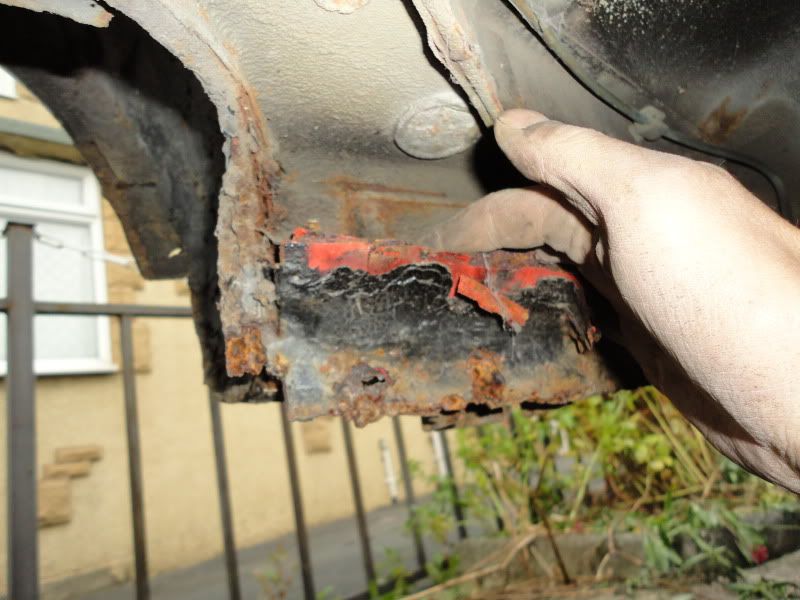 So thats the challenge, only one way to find out if I'm up to it. |
| |
|
|
|
|
|
Oct 29, 2010 22:41:30 GMT
|
I think that welding is good, it looks solid and you have something to burr back the bumpiness, so who cares! I've been doing it for years and I'm still absolutely rubbish. I forget to put gas on and everything, but at least I can get metal to cling to metal! 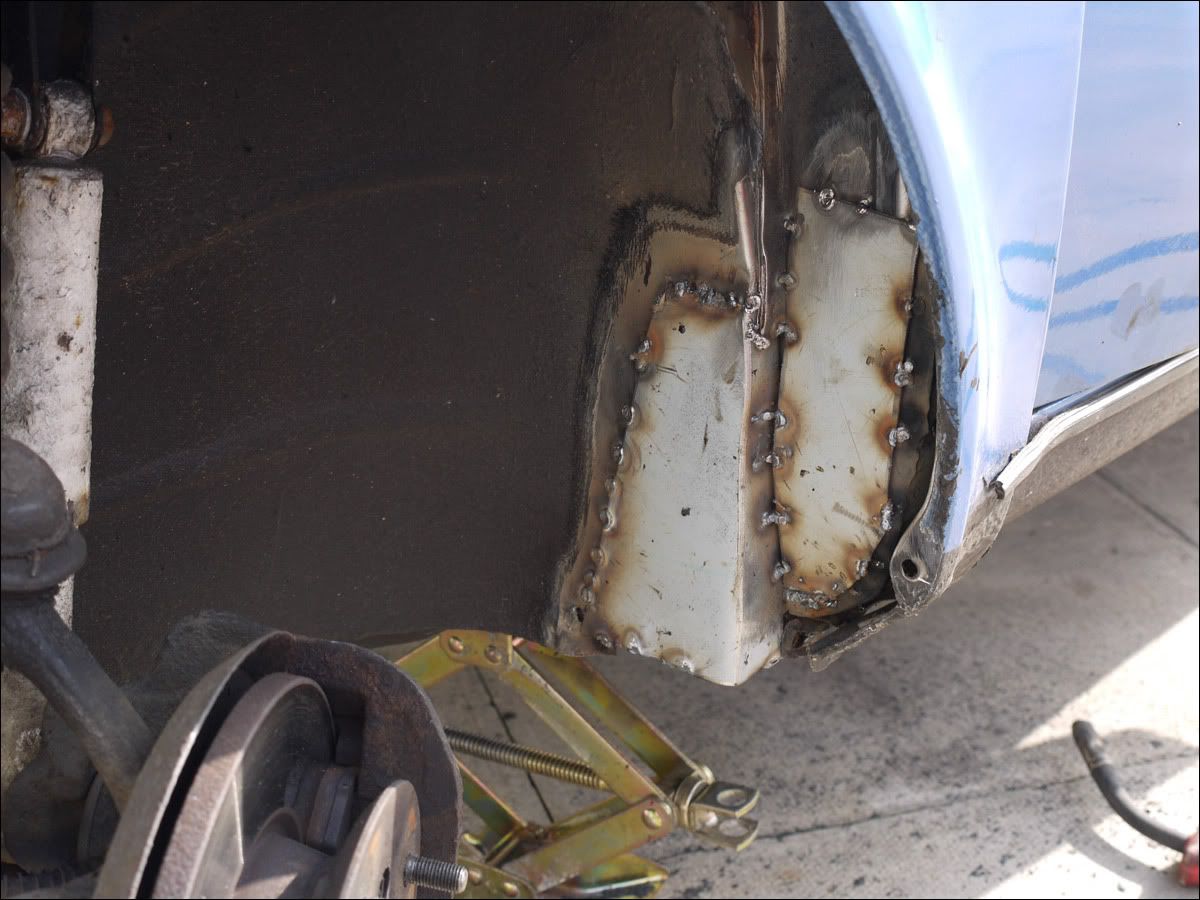 |
| |
|
|
|
|
|
|
|
|
You know what, I think it's high time we had another North-east welding day. Those area 52 guys are having all the fun! Who's in? Steve, you can help teach ;D
|
| |
To get a standard A40 this low, you'd have to dig a hole to put it in |
|
will
Posted a lot
  
Posts: 4,023
|
|
|
|
|
You can do it Steve, no worries.
Nice thread mate it's given me hope and tips to improve my own metal gluing skills. Every time I weld it's different, sometimes good other times bad (must set up proper). I've bookmarked this and the scary welding thread, thanks for that and good luck ;D
If I happen to be in the North East I'll be at the next one and no mistake.
Hmm, AA route finder says 270.4 miles and 5hr 8mins to Durham.
|
| |
Last Edit: Oct 30, 2010 8:02:21 GMT by will
|
|
|
|
|
|
|
|
Balancing one's perceived ability to do a job with the courage to actually wade in and do it is tricky, but you seem to have the balance just right so that you're being methodical and careful and getting some really good results. Never, ever be afraid of sharing what you acheive, even if you think it's a failure, because someone will learn from it and be able to spot mistakes in their own work.
With your current attitude, that Pug shouldn't give you any trouble at all.
|
| |
|
|
stevek
Yorkshire and The Humber
Posts: 728
|
|
Oct 30, 2010 19:09:17 GMT
|
|
Scary - Some northern competition to Area52 would be nice. If there's enough demand another welding day should be organised, it sure helped me. I would sure make the effort to attend although I work a lot of weekends.
Will & volksangyl -
Thank you both, It's why I keep adding to this thread. I welcome all constructive criticism, tips and advise. If you see something that worries you or that could have been done a better/neater/easier way then I ESPECIALLY want to be told about it. It helps me and hopefully others too.
|
| |
|
|
stevek
Yorkshire and The Humber
Posts: 728
|
|
|
|
Have cut back some of the boot floor rust, quite big areas to fill but not too complicated shapes to put in. 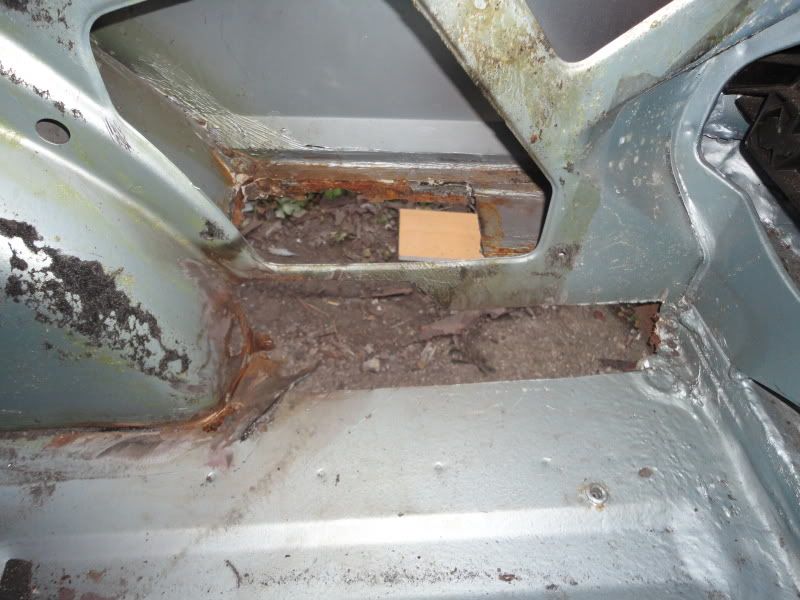  I have learnt that rust you can see is usually the tip of the iceberg. Started looking at the worst bit, the drivers side rear sill, after a bit of prodding... 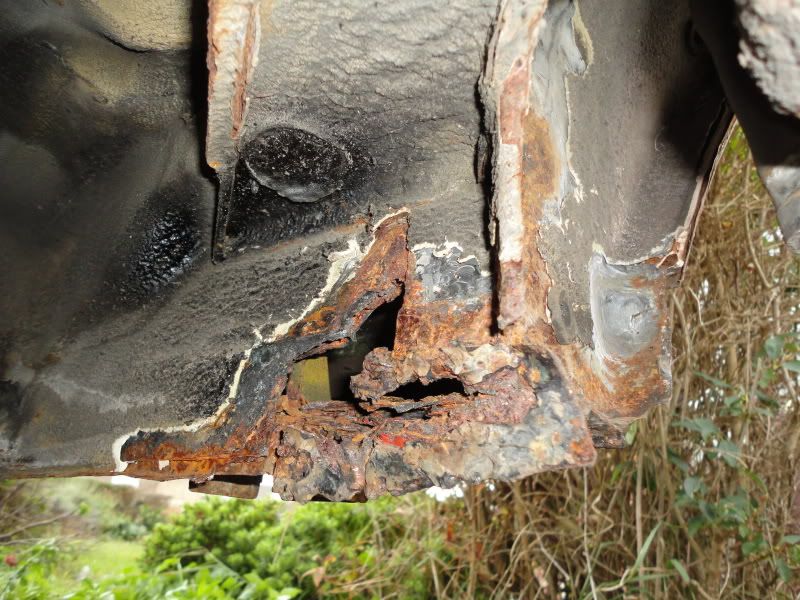 As the rust was both sides of the jack reinforcement i drilled the spot welds out and removed it. I think this is best so that I can put a single piece back in rather than risk small patches either side to probably still rusty metal. 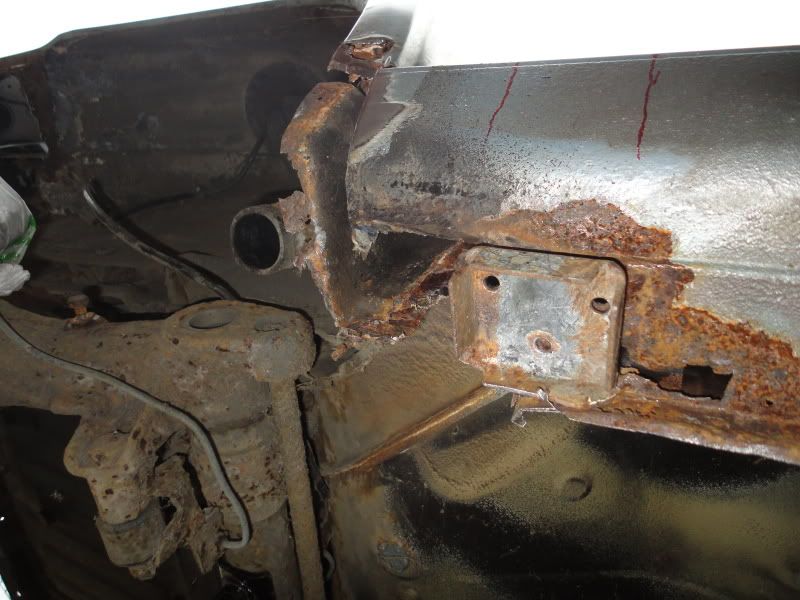 Marked up for cutting...  and made a big hole...  |
| |
|
|
bmw156
Part of things
 
Posts: 796
|
|
|
|
just read this, and you are progessing perfectly. the escort was a "big" project IMO and i would of got rid, but you have patience. welding upside down is the worst, so it can only get better for you. get a big gas bottle from BOC, you don't need to be in the trade etc, and its about 100 to get set up, but from there the gas is cheap. you will save so much money over the smaller gas bottles. and the renault will be tricky, just carry on making up cardboard templates, and put in each part one by one, don't try to make a massive part to cover it all lol. keep up the great work  |
| |
|
|
stevek
Yorkshire and The Humber
Posts: 728
|
|
Apr 12, 2011 16:55:29 GMT
|
|
|
| |
|
|
|
|
 )
) )
)


 but that was 4yrs ago when I bought the car as a salvage write off.)



 ]
]