|
|
|
|
|
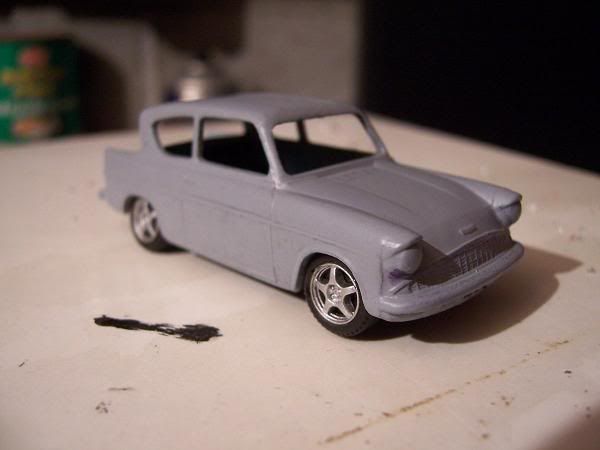
had to put the crimbo decorations back in the attic today, and the urge to have a rumage through my bag of toy cars was more than I could control. there wasnt much of any interest in there, except for this   as you can see 25 or so years ago I thought it was a good idea to half colour it in with permanent marker. so I'm gonna refurb it. what id like to know is how do I separate the body from the plastic chassis without damaging the plastic? and so I'm able to clip it all back together when I'm done. heres a couple of pics of how its attatched. front  rear  is it possible to detatch and re-attatch it like that, or am I looking at just glueing it back together. heres a couple of real binz's that I'm going to try to replicate   any advice gratefully recieved.  |
| |
|
|
|
|
|
|
|
|
|
Gently drill the pressings using a drill bit which is about 2mm bigger than it needs to be. It'll take the pressed adges off thus allowing rhe chassis to come away. Then a few dabs of superglue will do for its re-mount. It's what I did on a Dinky Anglia.   Chris |
| |
|
|
|
|
|
|
|
good thread ive got a mk3 escort van i was wanting to do something similar too if i ever get around to it  |
| |
|
|
|
|
|
|
|
Gently drill the pressings using a drill bit which is about 2mm bigger than it needs to be. It'll take the pressed adges off thus allowing rhe chassis to come away. Then a few dabs of superglue will do for its re-mount. i had thought of drilling them, but wondered if there was any other way. drill out tomorrow it is then. that anglia looks great. tony, crack on lad and get some pics up.  |
| |
|
|
|
|
|
|
|
i want the wheels off one of them.  |
| |
Volvo back as my main squeeze, more boost and some interior goodies on the way.
|
|
|
|
|
|
|
|
Yeah like said above just drill it out. But be warned, I had to drill out the glass plastics from a Matchbox tranist once and them diecasts aint very strong before i knew it i'd gone though the roof and the toolbox underneath pmsl
|
| |
|
|
|
|
|
|
|
got the drill out today and sepatated the body from the chassis.  I used a cotton bud and some nail varnish remover to remove the residue of the sticker that used to be on the bonnet, don't know if I really needed to but I did anyway.  a liberal coating of nitromors.  cleaned up  and assembled for a quick pic.  ready for primer now. more pics when its dry.  |
| |
|
|
|
|
|
|
|
|
Aint Nitromors the mutz nutz! It looks like u've managed to melt the whole thing in that pic! Good work!
|
| |
|
|
|
|
|
|
|
Aint Nitromors the mutz nutz! It looks like u've managed to melt the whole thing in that pic! Good work! ha ha, yeah. reminded me of the bruce willis death scene from planet terror. ;D |
| |
|
|
|
|
|
|
|
|
been 6 hours where ya been ;D
make with da pics
|
| |
2001 HONDA CT110 (NOT RCV)
|
|
|
|
Seth
South East
MorrisOxford TriumphMirald HillmanMinx BorgwardIsabellaCombi
Posts: 15,543
|
|
|
|
Surely its getting lowered while in pieces?  Don't go too heavy with the paint or it'll end up really blobby. Put just enough on to cover but not hide the detail in the mouldings  Love the fact its ended up with blue glass all round presumably so it would have a blue light. ;D |
| |

Follow your dreams or you might as well be a vegetable. |
|
|
|
|
|
|
Surely its getting lowered while in pieces?  LOL reminds me of the days u used to lower matchbox's and corgi's with the single tin plate spring by stamping on them on the kitchen floor  ;D |
| |
|
|
|
|
|
|
|
|
Could you drill and tap the metal behind the rivets and hold the base on with little screws?
|
| |
1987 Maestro 1.6 HL perkins diesel conversion 1986 Audi 100 Avant 1800cc on LPG 1979 Allegro Series 2 special 4 door 1500cc with vynil roof. IN BITS. HERITAGE ISSUES.  |
|
TS
Part of things
 
Posts: 558
|
|
|
|
 Great pic. |
| |
|
|
|
|
|
|
|
couple more pics. in primer  guide coat    |
| |
|
|
|
|
|
|
|
|
would be cool if you fitted LEDs for the lights.
Plenty room in there for the batteries
|
| |
|
|
|
|
|
|
|
|
|
body painted and most of the detailing done.     slammed, can you tell?  reading the post about the lights, maybe some of you think its bigger than it is, or have more confidence than me in my skills. heres a pic with a 50p piece for scale.  need to let the paint harden for a few days then i can mask it up for the red stripe it need down its flanks. so, from this  to this  I'm really pleased with the way its come out. might have a rake about in the bag of cars again to see what else i can have a go at.  |
| |
|
|
|
|
|
|
|
|
good work! Gets adictive tho, Before u know it u have more little cars lying around than toys R us ;D
|
| |
|
|
|
|
|
|
|
|
Oh I didnt realise how small it is.
You can get tiny LEDs
but would be fiddly to mount properly.
|
| |
|
|
|
|


 ;D
;D


