79cord
Posted a lot
  
Posts: 2,617
|
|
Jul 24, 2017 10:00:31 GMT
|
With the Bodged Blue Integra sitting about with its seized engine, & my cheap wrecker engine sitting in the shed I thought I'd better fit it into the car to confirm it was sound & make moving Blue about much easier. Not that working outside in the middle of winter inspired work!  I'd also spotted a cheap lightweight alloy flywheel on Ebay & was unable to resist buying it after the comparison my '77 & '79 Accords had provided with the '77 feeling much revier & more fun than the '79 despite a longer stroke thanks to its lighter factory flywheel. It was lighter than I would have intended at 3.8kg (8.5lb) where the internet suggests factory was 8.1kg(18lb) & Type-R 7.2kg(16lb) so I was a little concerned it might be awkwardly light... So another thing I wanted to test.  New engine didn't inspire confidence when I drained water from the sump, but hopefully that was from it's time outside at wrecker after cam-cover was sold, timing belt looks good & engine turned over easily. Spark plugs all looked pretty similar so hopefully head gasket is OK.. One way to find out... Glad I hadn't left the engine for much longer like that!  Engine & G/box separated & lightweight flywheel fitted along with new crank rear-main seal. Old clutch re-fitted. As mentioned previously the Blue Integra had been fitted with some aftermarket extractors but they had clearly been intended for the older CRX / Civic / Integra's with the Oxygen sensor mounted on the front of the engine rather than rear so the clowns had cut the sensors wires off ! I also noticed the lower portion of the extractors had a terribly constructed Y-junction under the engine, so figured I'd rather use the factory cast iron upper manifold & double skinned lower portion that I'd got with my new engine. Unfortunately the wreckers had put a slice though the lower portion before they realized it was easier to cut the bolts mounting it to the CAT converter, so I had to cut open the outer skin to weld up the inner, before welding it all back together. Since the B18C Vtec engines have a deeper sump for more capacity than the std B18B I assume this part of the manifold might also be different & harder to replace.   I couldn't resist attacking the upper end of this lower manifold to remove excess weld constricting flow. The power file opening it up from 38mm to 42mm, though it must be admitted the cast iron upper manifold before it is only 40mm ⌀ anyway & thanks to the double skinning these 2x42mm pipes are reduced to a single 40mm before the CAT anyway. Besides the fact the Type-R went bigger Dia. & lost 3.3kg of Cast iron with its extractors so Blue's extractors will probably have to be reconstructed & improved one day. Since I'd got my engine without Cam-cover & distributor they were swapped over from Blue's engine, though Honda had changed Distributor plugs from 2 plugs (2+8) to a single 10-pin plug so I had to convert the distributor over to the older plugs. Didn't trust Blue's engine wiring harness which would have made it easier since the plugs & wires for the VTEC solenoid & oil temp sensor seemed to be missing.. Curiously the engine number also suggested the engine fitted to Blue was MUCH older than the car.  So now my cheap engine it is fitted into Blue with Blue's painted cam-cover & the factory cast iron exhaust manifold ! Trying to start it had me worried since after trying 4 batteries I had been trying to keep charged in the shed it barely turned over despite easily turning by hand. Did I re-plug distributor correctly? Sensitive to distributor timing/mounting angle? Does car have other wiring problems? But finally after recharging Black Integra's battery it fired up & seems to run well & smoke free, though managed to spray soot over the shed door from the embarrassing 4" resonator, & pretty loud with that & the bigger 2 1/4" exhaust leading to it (glad CAT converter intact & hadn't been gutted).  Clutch feels pretty mushy & is rattling slightly but seems to work OK regardless & effects of lightweight flywheel not too noticeable around the driveway. Not sure of next step for clutch, pulling apart would have to wait until drivetrain is removed for another car. Pulling it apart certainly hi-lighted what a dog of a car it is. Bolts missing everywhere - including mounting intermediate driveshaft to engine block and A/C & engine torque mount to block . Seized engine much older than the car. Radiator support panel is from a Japanese sedan. Left wheel seems to have positive camber. Left door hinge mounting body structure has been bent by some accident that must have pushed the wheel back into it. Floor under frt seats has been bent upward by thoughtless trolley jack placement. Airbag fault light on. So not just shiny paint over body filler. Glad I had already given up upon it but couldn't sell on such a disaster. At least I now know I have a good spare drivetrain for another project.  Also spotted these at a wrecker, so were cheaply bought to match another pair I was given a year earlier.. Need repainting with powder coating peeling away in sheets from some areas. Paint schemes.?.. |
| |
Last Edit: Jul 24, 2017 11:53:09 GMT by 79cord
|
|
|
|
79cord
Posted a lot
  
Posts: 2,617
|
|
Jul 27, 2017 23:36:57 GMT
|
|
I adjusted Blue's clutch pedal which has improved pedal feel taking up the slack pedal movement between the thrust bearing & clutch, which changed the slight rattling to slight grinding unless the pedal is being pushed, so am blaming that bearing. I'll complain at the trouble adjusting the hydraulic clutch though since it has to be done @ the pedal instead of the easier to access slave cylinder like my Accord & the cable Civics/CRX/early Integra, made more difficult by a damper between the pedal & M.cylinder pushrod requiring a very slim spanner to undo the locking nut, & very little adjustment thread. At the very least they should have put some flats on the pushrod so it could be held to stop it turning.
Still haven't been able to confirm Vtec actuation on the drive since it requires at least 5500rpm underload, though confirmed it has the correct ECU given my confidence in the cars history.
Confident the head gasket is OK though so drained the water I had in it for testing & replaced coolant.
Older recharged batteries still can't seem to start the car despite showing 13v to Multimeter.
|
| |
Last Edit: Jul 28, 2017 0:38:54 GMT by 79cord
|
|
79cord
Posted a lot
  
Posts: 2,617
|
|
|
|
Finally ordered some cheap frt wheel bearings for '79 from the US at a fraction of the price local suppliers wanted.. But otherwise only silly progress to report. Painted & detailed a shift knob for the DC2, as it just looked too cheap in standard form. I already had a cheap Type-R style alloy knob stored away, though they are COLD in winter & still a bit stark. Tried shaping some thick aluminium foil for the top of the knob that looked promising but could not provide the sharp definition of the shift pattern & numbers on top, an effort with vinyl film had the same drawback. So I ended up painting it with a chromey paint before filling the pattern with clear-red paint and topping with a layer of clear vinyl film to keep the pattern from filling with filth (as it was), giving a smooth glossy top with nice depth down to the red-chrome pattern below. Unfortunately the soft paint really doesn't like being covered though & was reduced from chrome shine to a dull silver, so I will try again on another one day.. fine foil leafing? I also carefuly picked out the molded 'stitching' with red paint 'threads' .  Of course I also have to do something similar with the 'H' molded on to the steering wheel airbag.. '79 Accord wheel bearings next though |
| |
Last Edit: Aug 25, 2017 10:11:53 GMT by 79cord
|
|
logicaluk
Posted a lot
   Every days a school day round here
Posts: 1,373
|
|
Aug 26, 2017 21:02:18 GMT
|
|
I changed franks knob for one from a 2000 civic slightly heavier but it just feelsso much better in the hand.
Dan
|
| |
Last Edit: Sept 12, 2017 11:39:46 GMT by logicaluk
|
|
79cord
Posted a lot
  
Posts: 2,617
|
|
|
|
|
Lots of interesting options about for shift knobs. I do like the shape & angle of this standard DC2 Integra 'pistol grip' knob, it just needed finishing off.
Do wish Honda had mounted it & it's pivot point 2" higher up & closer to wheel like EP3 (well not that close); as they had for '81- Accord & Preludes, though with mechanical linkage that would entail cutting, relocating & welding floor tunnel. Something I'd like to experiment upon Blue... Though I've other priorities.
|
| |
Last Edit: Aug 28, 2017 8:50:41 GMT by 79cord
|
|
pegwie
Part of things
 
Posts: 95 
|
|
Sept 11, 2017 22:44:17 GMT
|
|
What a collection! I feel like this thread is a goldmine for information just from the few pages at the end I've read through so far! Are integras pretty common over there then? We barely have any over here, well, normal ones. It's pretty much just type R's which all have a huge price tag.
Great to see the salvaged engine was ok, always a scary time. That exhaust can on the back of blue reminds me of an old 200sx I had, it would set the car alarms off as I drove up the street. When I look back on it now, I realise how awful it was haha
|
| |
|
|
79cord
Posted a lot
  
Posts: 2,617
|
|
Sept 13, 2017 10:29:15 GMT
|
|
Yes Integras sold fairly well here, though we only received the hatches & not handsome sedans offered to N.America & Japan (many Japanese ZC 'D16' SOHC).
Top spec. DC2 B18C Vtec models much rarer than DC4 B18B due to cost before 'std.' DC2 were effectively replaced by DC2 Type-R here end of 1999, so much rarer again & still command a big premium..
Like N.America we didn't get B16A EG Civics (only in Del-Sol CRX), which shared the same floorpan with shorter overhangs & less weight so obviously they must have been worried about the sibling rivalry.
|
| |
Last Edit: Sept 16, 2017 10:05:12 GMT by 79cord
|
|
79cord
Posted a lot
  
Posts: 2,617
|
|
Sept 13, 2017 11:03:17 GMT
|
Managed to get new frt wheel-bearing into '79 Accord. Outer race predictably reluctant to separate from the Hub, & naturally the jaws of my bearing puller didn't seem to fit so the race was cut/ground to within a mm of hub before I managed to bash it off. The hub already showing marks from movement of the inner race so I may have to buy a new one one day (fitted with one from '82-3 for 4x100).  Fitted & tightened everything up... & the dratted thing is still allowing more wheel movement than I'm comfortable with! Steering rack gaiter I fitted 2?years ago to the same side also seems to have split. For the time being I give up & I will try again later. Then a local wrecker had a $50 all you can carry day for charity so I went along. Unfortunately the DC4 Integra I was hoping to grab excess bits off was recently scrapped (still on website), so no luck there. Grabbed ED Civic bonnet (few small dents), Hatch struts, Black ctr light garnish (to experiment painting/vinyl wrap), some side trims (to paint), rear parcel shelf supports (to cut & mount speakers), interior door trims, '88 dash cluster (experiment with Blue gauges), '88 roof spoiler without stoplight (experiment LED strip &/or enlarged spoiler). EG there on fairly new aftermarket King springs & Excel-G KYB shocks so thought I should grab those, though will have to go back for the last one due to rounded nut... looking up numbers afterward suggests they are only std height anyway?   Carried them through & realized I had left the spoiler behind so went back & got black leather VW Bora frt & rear seats as well for another $50 +30 (couldn't carry heavy rear backrest as well). Stopped in to see my friends '90 Civic at his parents afterwards & confirmed to them that if it were to be sold as intended I would like to buy it from his widow. It won't be particularly cheap, hasn't seen the road in years & at 288km has higher mileage than any of mine, but he did look after it so it still looks very nice & has spare (EG) 1.5 engine, 16" wheels, some rear discs & some new rubber mounts to fit. Headliner coming unstuck, door window sill trims deteriorated, drivers seat foam dead, slightly noisy g-box & had not noticed unusual, slightly rearward mounting of aftermarket sunroof before (retracing into roof to affect rear headroom). So ironically I probably have to get the 200km '88 Civic up to sound sell-able standard (floor-rails & frt paint), since it is looking less like my mother is going to need it. |
| |
Last Edit: Sept 14, 2017 0:49:09 GMT by 79cord
|
|
79cord
Posted a lot
  
Posts: 2,617
|
|
Sept 16, 2017 8:23:52 GMT
|
So avoiding other tasks I thought I'd better sort out Concerto wiring fitted to '91 Civic to refit its proper cluster Not sure that info will be of much use to others given rarity of Concerto here & significant differences between Japanese & British built cars....  '91 ED Civic GL (top) & '91 Concerto Clusters So mapping their printed circuits to show Plug contact -> funtion/light numbered L-R '91 Civic1 - Earth- 2 - Speedo 3 - 4 - Boot Open 5 - **making this low Fuel** 6 - Fuel Gauge 7 - Power supply+ 8 - Right indicator 9 - Left indicator 10 - High beam 11 - Temp Gauge 12 - Cluster lighting (red-black) 13 - Cluster lighting (red) 14 - - 15 - Brake 16 - Oil 17 - **Making this Check Engine) 18 - Battery (Black-Yellow) 19 - Battery (White-Blue) 20 - Tachometer '91 Concerto1 - Brake 2 - Boot Open 3 - 4 - Low Fuel 5 - Fuel Gauge 6 - Speedo Gauge 7 - Earth 8 - Right indicator 9 - High beam 10 - Left indicator 11 - Tachometer 12 - Cluster lighting (red) 13 - Cluster lighting (red-black) 14 - Temp Gauge - 15 - Check Engine 16 - 17 - Battery (Black-Yellow) 18 - Battery (White-Blue) 19 - Oil 20 - Power supply+ Plugs match but every wire moved to match cluster Concerto() moves to Civic () - Concerto wire colour (1)->(15) - Green,Red,2spots (2)->(4) - Green,Yellow (3) (4)->(5) - Green,Red (5)->(6) - Yellow,White,2spots (6)->(2) - Yellow,Red (7)->(1) - Black (8)->(8) - Green,Yellow,1spot - (9)->(10) - Red,Blue,1spot (10)->(9) - Green,Blue,1spot (11)->(20) - Blue,2spots (12)->(12) - Red,Black,2spots (13)->(13) - Red,1spot (14)->(11) - Yellow,Green,2spots (15)->(17) - Green,Orange,1spot (16) (17)->(18) - Black,Yellow,1spot (18)->(19) - White,Blue,1spot (19)->(16) - Yellow,Red,1spot (20)->(7) - Yellow,1spot So now I have to open up two lenses in the Civic warning light cluster for new Check Engine & Low Fuel lights in blanked unused holes.  Cluster retaining clips popped apart. Warning light lens removed & paint thinners on a cotton-bud used to remove the paint from the blanked light positions, self adhesive black vinyl film cut & used to redefine the edges of the new light windows & hand-cut new symbols for Top-left & Bottom right of light cluster. Some scrap 3mm Red Acrylic sanded down to 1mm thick & appropriate size for press-fit into light paths of cluster. Hand cut ' Si ' from some red vinyl film to make it feel special, since the car is now has N.American ' Si ' spec drivetrain.. Think I'd better scrounge Head, Distributor & ECU to upgrade to the more impressive Japanese ' Si ' DOHC though. Then removed the old Honda & GL badges from the rear hatch with hot water. |
| |
Last Edit: Sept 16, 2017 10:07:36 GMT by 79cord
|
|
pegwie
Part of things
 
Posts: 95 
|
|
Sept 17, 2017 21:06:53 GMT
|
|
Just slowly getting through your thread, so what do you actually own right now?! haha, so many!
I haven't got to the section to explain the above post of yours, what happened to the original civic wiring to require the concerto loom/clocks in its place? That pin out is great though! Copy & pasted that
|
| |
|
|
|
|
79cord
Posted a lot
  
Posts: 2,617
|
|
Sept 18, 2017 9:05:34 GMT
|
|
Still driving my first car, with others hidden away (or deteriorating). Haven't gone into the 4 Lancia Beta Coupé's (3 HPE donors) & Cortina's either...
I was in a bit of a rush to get the Civic mobile after the headgasket failed so just thought it quicker to use the Concerto harness rather than figuring out exactly which wires could have been added to the Civic loom. Still have to re-connect the door harnesses yet though since plugs differed with Concertos many extra wires to drivers master electric window switch, power locks & door lights.
Removed the Concerto door looms last week but they aren't long enough to use in the Civic's longer doors, assuming Concerto electric door locks, or more likely latch actuators fit Civic latches/doors if I want to add that feature &/or door lights (Mine already has power windows). So 2-3 extra lock wires, & 1-2 more for door lights I'm not sure whether to cut larger hole in the door for Concerto harness plug or run wires through separately with whatever plugs I can find. Must have another look @ Civic door harness plugs.
Note I think there were also some wiring changes to cluster with the late '89 facelift.
|
| |
Last Edit: Sept 18, 2017 9:50:12 GMT by 79cord
|
|
79cord
Posted a lot
  
Posts: 2,617
|
|
|
|
Noticed Black Integra was weeping oil from the cam seal/plug behind the Vtec Solenoid so finally replaced that which involved cam-cover & Cam holders. Aftermarket Ebay alloy item with std. o-rings hopefully better than Hondas big rubber plug (P30) that invariably hardens (shrinks?) & leaks over time. Hope the cam-cover seal don't decide to leak now, though I think it's been replaced fairly recently... along with failed attempt with silicon around old plug. Shame I hadn't found a silver seal/plug   And pulled out ED Civic door harness for plug comparison, showing why they obviously don't connect to Concerto harness. Concerto having big 27-pin connector while Civic has 8-pin for passenger & 18 for Driver. Unfortunately Door mounting hole is heavy gauge & flanged making enlarging it for Concerto plug harder than it could be. I'd like to add Concerto's extra wires for central locking & door lights but Civic's Passenger Plug is already at its design limit even though Drivers has pins to spare. So I'll hunt down another pair of Civic drivers plugs for the Passenger side & swap the wires of both harnesses to suit. Unfortunately Concerto's lock actuators won't fit to Civics latches & latches differ with 3dr interior lock 'button' location, so if I want that feature it'll be with generic aftermarket actuators.  I also decided to do some work on some aftermarket steering wheels I've had for a while. Momo bought cheap & obviously scruffy from a swap-meet while dished suede was spotted cheap & unused on Ebay. Unfortunately both had been re-drilled for a slightly larger bolt pattern. Dished wasn't done badly but wasn't completely perfect, while Momo had been butchered with misplaced odd shaped holes & notches in the centre hole. So I filled the hole's with a metal-filled epoxy & sprayed with a cheap can of black. Was & am still tempted to apply some modern clear-coated mock carbon vinyl over spokes as well, though now worried paint might come off with removal if I didn't like it. Still need to hack-down some ugly Honda wheel into a mounting adapter for the dished wheel since I can only find long 90mm ones intended for flat wheels for sale. Also bought new g-box seals in preparation for CR-X trans swap/repair, & thermo fan switch for Accord that has failed. Should have been more patient & ordered fan switch from the USA since I could have got 3 for the price local suppliers charged. |
| |
Last Edit: Oct 1, 2017 10:58:32 GMT by 79cord
|
|
79cord
Posted a lot
  
Posts: 2,617
|
|
|
|
Bought some parking sensors since the poor visibility of Integra's overhangs intimidated me, with plenty of previous owners scrapes as evidence why.  Drilled & mounted outer sensors as recommended on the corners but decided to strip the inner ones from their supplied plastic mounting surrounds to reduce diameter 22->16mm in order to fit them at the bottom corners of the no. plate recess. (Would also like to cut off & fill un-necessary lower plate mounts sticking out of bumper). Still not sure where I want to drill & mount the front sensors & small interior display yet & looking for a suitably discreet switch to activate the frt sensors before I wire it all up.    Windscreen surround & cowl plenum getting attention for minor rust. The windscreen having been replaced before with many cuts upon upper rubber trim & broken clips for side trims that had then been stuck on with windscreen adhesive over scraped paint letting rust continue underneath so they were removed for cleaning & painting with a slightly longer replacement rubber sourced from '94 Accord & trim clips from EG Civic (easily & often broken removing trims).  I was extremely dismayed to realize that the levers to close the dash air vents do not control air from the cowl plenum like my Accord, & to a lesser degree 4g Civic/CRX (drivers only) but merely stop air supplied from the heater box, so airflow is inevitably going to be useless without fan assistance with no possibility of cool air to face vents while heating floor & rest of cabin without the crudity of opening windows. Power windows, A/C & opening sunroof are a poor substitute. Old Accord has forever spoiled me with the gale its vents supply while I have to drive the older Integra with its fan on &/or windows forever open so this has me seriously looking for locations to cut holes to supply fresh air to face vents. There is a slim possibility for a plenum hole & new duct to the drivers vent past re-located fusebox & miscellaneous wiring, passengers even more difficult with heater fan box in the way. Cutting a bigger hole behind the mirror mounting sadly looks easiest with a new mirror mount to direct air in to an additional new handmade eyeball vent inside!  Either way drivers mirror is off for filling its pointless 'E' code proclamations & painting/sanding the noticeably inappropriate & badly applied matte black paint complete with paint runs & some paint reaction over the white paint of the obviously replaced mirror. Mirror glass pulled off its mounting sockets for access to the cover mounting screws.  Grabbed this Silly big Subwoofer box (inc. amp.) a neighbor tossed out so I guess I could turn white CR-X into a better example of the teenager fantasy it had previously, if badly, been ... Chipboard construction has seen better days & flimsy 1mm plastic ctr trims on speaker cones has broken. Glue on replacement plastic? Not sure what else I'd need to cobble up for the rest of system & connecting cables. Also got another very dubious amplifier with no markings to indicate output, blown fuses & evidence of smoke. Not things I've even looked into since I don't think I've ever bothered to change a car radio, so would only be considered cheaply.  I've also visited wreckers a few times & excitedly bought a cheap set of 5 of these 2003 Mazda 323 15' alloy wheels (made by Enki) that I have admired for a long time. Unfortunately I was far too excited to notice the many balance weights applied to some, variety of tyre profiles & it had started to rain as I was carrying & loading them into the CR-X & had somewhere else to be.... So I'm afraid I probably took out the luggage cover to speed loading & forgot about it! Didn't even notice it was missing for a few weeks.... Replacement will be a challenge. Can't even fit the wheels to anything yet, since although stud pattern matches, the Centre bore hole is 2mm too small for Honda's. (Holesaw with plastic or wood guide?)  Also found & bought a JDM Civic hatch rear bumper with the much smaller No. plate recess that is obviously preferable to the crudely cut & patched factory alternative designed to accommodate any number of large European plates since our plates are only 2cm larger than the narrow JDM plate recess. I'd prefer to fold the plate edges into the JDM bumper, just have to try & straighten out the noticeable dent right in the middle & top of this one.... Bought a remarkably nice pair of original '90 Civic hatch frt seats with my friends Civic in mind, his having had one bolster re-trimmed with slightly miss-matched fabric (as is my '91) but also suffering from collapsed or damaged foam on another bolster. I can also now confirm that '90 Civic, Accord, Integra & Prelude ALL have different door harness plugs & even the JDM car that supplied the above bumper was a cheaper spec without electric windows so I still don't have the plug I want to sort out my Civics door harness conversion. EG Civic might fit but does differ so I'd prefer to wait for another Civic plug to match drivers & passenger sides. |
| |
Last Edit: Nov 16, 2017 9:27:47 GMT by 79cord
|
|
79cord
Posted a lot
  
Posts: 2,617
|
|
Nov 16, 2017 11:09:40 GMT
|
I'd eagerly removed an old 'Spy' (remote start?) car alarm from the black DC2 Integra as soon as I got it since I didn't have control fobs for it and eventually ordered a cheap new remote locking 'keyless entry' system for it as replacement, hoping there'd be an easy way to add immobilizer functionality to it. Unfortunately it doesn't seem to readily support the idea with dedicated ground wires like alarm setups so that's still for the future once I figure out relay arrangements required that will not require a constant power supply. Will add separate (auto-arming) manual immobilizer switch anyway, not just to starter though: 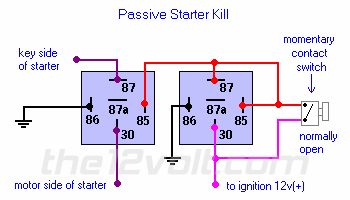 www.the12volt.com www.the12volt.com In the meantime I got to work installing the system, stripping out interior trims for accessibility. 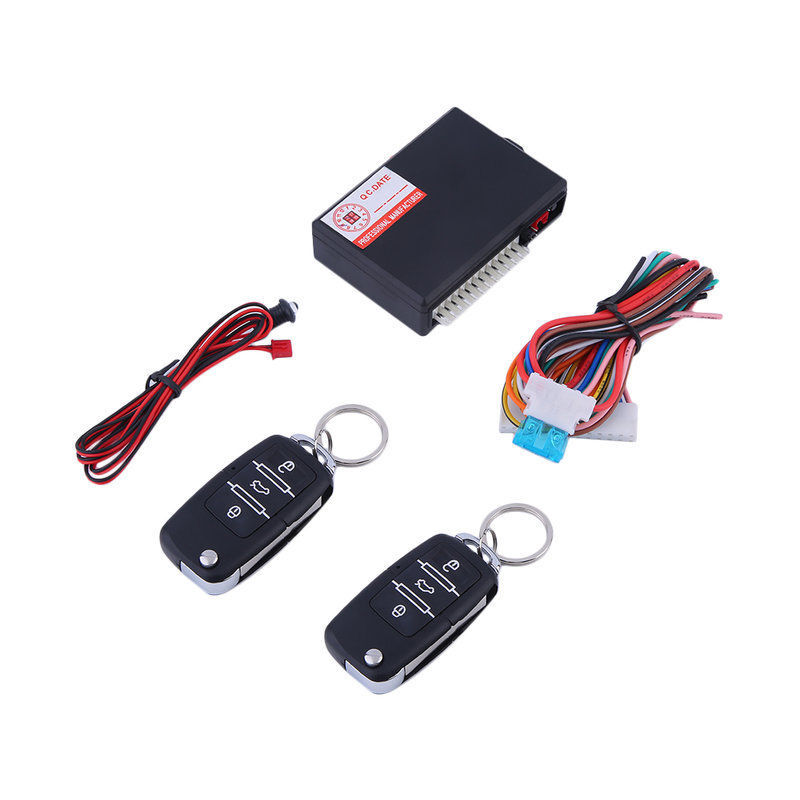 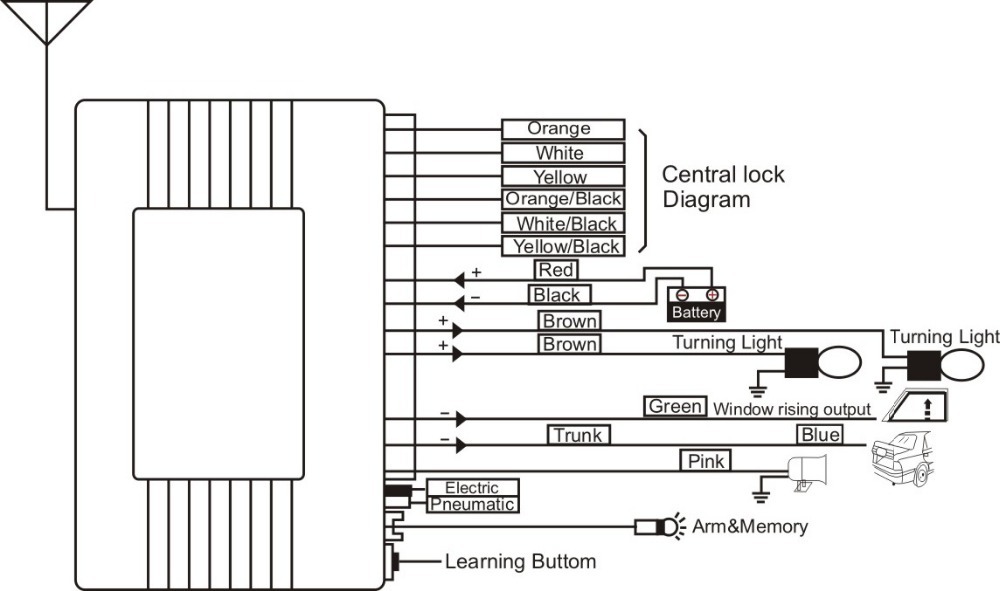 The car has factory central locking from the drivers door though no actuator to lock/unlock that, so a generic kit actuator (2-wire) had previously been added to the drivers door then leaving the factory system to control the passengers. Though currently not working I'm thinking the pressure of the actuator may be confusing the old system's drivers lock switch since it semi-regularly locks the passenger door by itself despite the removal of the aftermarket control unit? So I bought an early CRV rear door latch actuator to see if it would fit the drivers door as some online parts-book hunting indicated, for a more integrated factory arrangement. 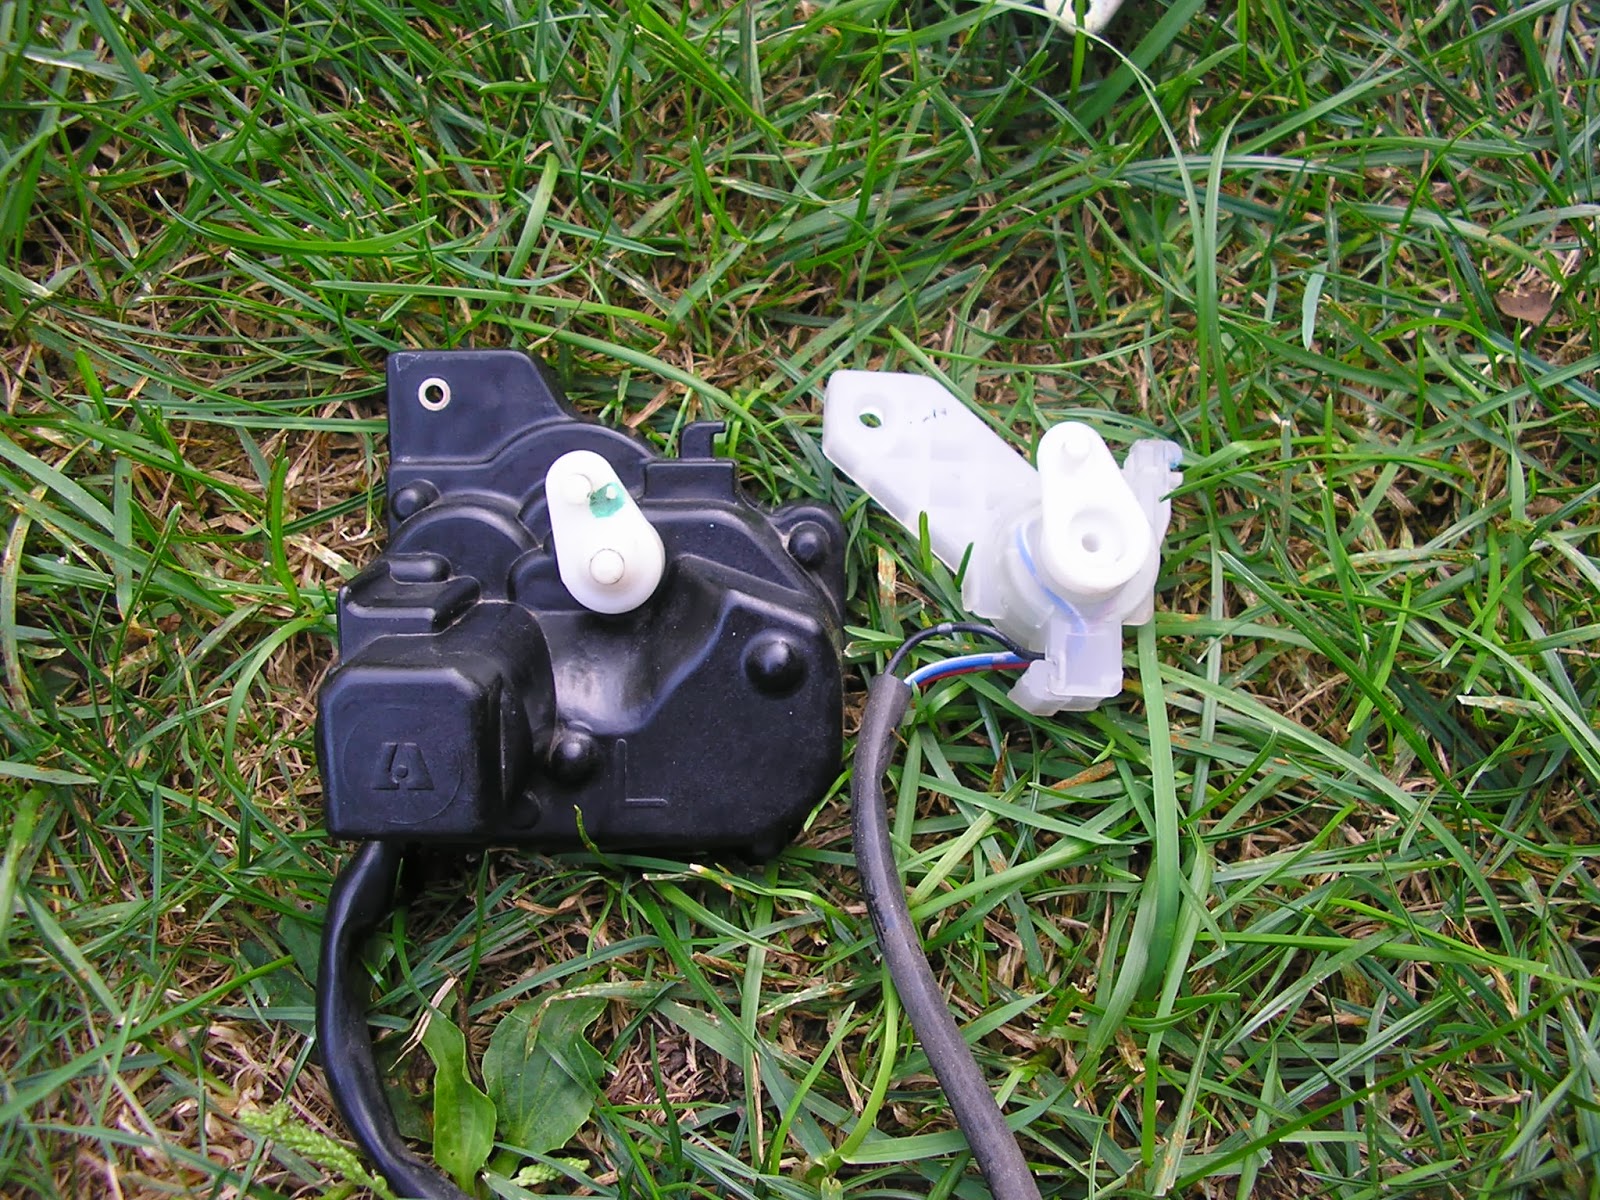  Black CRV actuator fitted to door latch in place of factory (grey) lock switch. The complete latch mechanism was clearly closely related with the addition of extra levers riveted on for child safety lock. CRV Frt would differ due different interior lock button location, though CRV frt latch actuator might have been the proper factory choice to retain the central locking controlled from the drivers lock (but hard to confirm with few RHD online honda partsbooks to be found (LingsHonda removes/hides proper Honda parts no's).  Found this for encouragement: itr1920.blogspot/keyless-entry-modSince mine would be controlled by the remote locking I thought it would simplify wiring to bypass the original central locking unit in the drivers door so I would not have to add extra wires between the drivers door & body. So instead of following the above wiring suggestion the power wire into the door mounted central locking unit was diverted to my new remote unit (in the cabin {thoroughly hidden}), and it's lock/unlock signals tapped into the factory signal wires at the drivers door harness plug. The drivers door signal wires de-pinned from the old central locking unit & connected direct to the latch actuator with an appropriate plug from wrecker CRV.  Replaced damaged lock barrel linkage with parts from Blue Integra while at it. Remote rear hatch release next. Additional SPDT Relay, wiring & aftermarket rear actuator fitted to allow remote hatch release, largely as per: 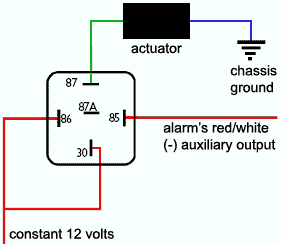 www.civic-eg.com/causeforalarm/trunk_pop/index.php www.civic-eg.com/causeforalarm/trunk_pop/index.php Cut up a newly bought key to fit the flip remote key fob  Was worried I might be likely to knock the remote control with my knee so added / cut another detent into the flip mechanism so it could be folded to a 90° position closer to the steering column ignition lock ( Just clears the indicator stalk ). Have already noted warnings from RRides they can be fragile... Remote lock units "Locked" blinking LED light connected up to an unused warning light in the instrument cluster for discretion & light flashers also connected up at the clusters indicator light signals. With half the interior apart I figured I might as well install some 'new' (wrecker) speakers since the original cones were dead.  Drilled out the rivets retaining old speakers connecting plugs & soldered on std female spade plugs for harness adaptors. Bought a defroster style antenna amplifier from an '05 Accord to consider since I welded up the hole for the damaged retractable electric aerial though not sure how useful it will be yet since Accord antenna wires are independent of the defroster with another wire connection to the defroster wires ?? |
| |
Last Edit: Nov 16, 2017 11:45:38 GMT by 79cord
|
|
79cord
Posted a lot
  
Posts: 2,617
|
|
|
|
Still looking for an appropriate latched relay to incorporate a remote controlled immobilizer switch, but finally got around to wiring up the (auto arming) manual switch using the "switched" relay wiring arrangement, the right one of this pair:  Wired up to a spdt relay added to the ignition power supply for the cars main fuel/ignition/ecu relay,  (number 5) So starter will still crank the engine but it can't start. Hidden Momentary micro-switch must be pressed once key is turned to "ignition" to turn on power to this main relay. This had the bonus of lighting the cars "check engine" warning light until the main relay was supplied with power, providing a reminder without having to add another. Powering wire de-pinned from existing connecting plug with another returning wire fitted in its place (conveniently a std female spade terminal in plug), so no cut/joined/spliced wires for evidence & a factory type relay sourced from wrecker so my added relay matches others under the dash. Took a while deciding upon appropriate switch location & mounting it with a new covering trim (a scrap of sheet metal covered with self-adhesive vinyl), that both hides it & makes it easier to press (bigger area). Even though that took two tries due to access making pressing it too hard to press & insecure switch mounting (double sided tape) causing thin wires to be pulled from the switch on first attempt, but now sorted.  Also removed side trims while I had the interior trims out. Very tempted to fill the 20 mounting holes rather than refit the trims for the cleaner look. Would probably cheat with metal filled epoxy to fill the holes to keep it reversible & avoid the risk of warping the panel welding the 10x14mm rectangular holes.. This also frustrated me:  The interior sunshade blocks almost half the glass sunroof, admittedly the roof doesn't open any further than that but I'm too used to the light from the fixed glass roof of my CR-X. And Blue was sitting there with it's sunroof there to play with & Black's original cracked glass to sticky-tape in the hole.... So out it came:  Weighs in around 14kg, 6 of which is the glass while the padded vinyl covered & steel reinforced sunshade weighs 1.2kg on its own.  Cut the bottom out of the sunroof frame to match the glass size, trimming 1.4kg away thanks to the 6mm steel plates attached as vibration dampeners! Headlining will need trimming to match & new/relocate roof light now required. Considering self-adhesive strips of LED on both sides. I could probably do without a sunshade with the laminated metal-tinted glass that seems to have been fitted to '93 -95 Integra before Honda switched to (cheaper?) toughened glass with a printed dot 'tint'. But...  Bent down the rear edge flange & cable guides by a few mm. So I now think I have room for a sunshade to slide much further back than Honda envisaged. Though to cover the enlarged opening without blocking it when slid back it will have to be two piece & much thinner than Honda's 7mm thick effort, though I might have 12mm available. Cardboard prototype has proven too floppy to prove anything but rough sizes. Tried some steel I have about but at 0.8mm it's much heavier than I want & not so easy to form. Considering aluminium or flimsy 0.5mm steel sheet covered with thin self adhesive leather-grained vinyl wrap given the possible heat of the location. Will need some reinforcements glued on & a turned up outer edge to hook into a revised guide rail to withstand possible wind suction when back of sunroof lifts, before sliding back & pulling the sunshade with it. |
| |
Last Edit: Dec 27, 2017 12:30:50 GMT by 79cord
|
|
logicaluk
Posted a lot
   Every days a school day round here
Posts: 1,373
|
|
Dec 10, 2017 12:14:51 GMT
|
|
Nice work nice work with that sunroof. Good luck with the wiring.
Dan
|
| |
|
|
79cord
Posted a lot
  
Posts: 2,617
|
|
Dec 11, 2017 11:23:42 GMT
|
Speaking of wiring I've been working upon the '91 Civic's door & rear body wiring. I eventually got another drivers door harness plug for the passenger side. Since it had extra wires for central locking & door lights already I de-pinned the Concerto harness plug from it's loom & fitted the Civic plug, for the passenger door & similarly replaced the body harness-to-door plug to retain wiring for later upgrades & revise the harness to match the Civic door. Concerto body harness plug to drivers door also swapped so I finally have working electric mirrors & windows again! Not that it was easy to reconnect them as the harness had become tangled with the heater fan box on the passenger side, requiring unbolting that (& that side of dash), before I could pull the harness through the door pillar enough to reach the door. Getting at the plug to the drivers door was going to be similarly difficult so I removed the drivers frt guard for access instead. Also had a look inside the drivers door which confirmed my suspicions that it's had some panel beating & filler work previously, so I'll be keeping eyes out for a better door if cheap enough. Integra/CRV door latch/actuator experience also makes me wonder if Concerto/Civic sedan REAR door latches could be adapted for central locking. On the the rear-body harness. I'd fitted the Concerto Harness complete & swapped it's rear light plugs to suit, though it wasn't entirely appropriate since the Concerto's reverse lights were in the rear hatch instead of the main lights, so wires not long enough & hatch plugs to change as well. So I had intended to revise and refit the Civic harness. In theory two extra wires for the electric fuel pump & tank empty warning light, though comparing them the plugs connecting the rear-body harness to main harness & fuse box were also revised & wiring re-routed between the plugs as well.  So instead I dismantled the Concerto loom to remove superfluous wires to the rear doors, & re-route wires along the drivers side instead of splitting R&L under the rear seat. Hatch plugs swapped & reverse light & 'hatch unlatched' wires extended, different earth location required due to wire length. A foot (?) of extra tail-light wire length looped & rebound into the harness with one wire shortened an inexplicable 4'. Reverse lights & hatch electrics work again!  If you look really close you might also spot that the right rear corner of the boot floor also looks slightly more bent up than it should be. So I guess I'll have to remove the obviously repaired rear bumper one day to check the body there too. Looks good but it's certainly no virgin. |
| |
Last Edit: Dec 11, 2017 12:12:07 GMT by 79cord
|
|
79cord
Posted a lot
  
Posts: 2,617
|
|
|
|
Since I still had '91 Civic's interior trims apart it made sense to attack that bent right rear boot floor.   So after jacking the car up & lowering the bent area directly onto a plate of steel on an axle stand I attacked it with hammers & other chunks of metal. Plug welded 6 failed welds, re-sealed the seams & brushed of some white 'Killrust' enamel to yield:   & so you get to see something car-like  The outer rear corner, rear panel must have been replaced? Plastic interior trim mounting clips missing from the panel. Followed by fitting up the JDM bumper. |
| |
Last Edit: Dec 27, 2017 13:08:03 GMT by 79cord
|
|
79cord
Posted a lot
  
Posts: 2,617
|
|
Dec 27, 2017 12:18:24 GMT
|
Started refitting interior trims, lifting rear side window seal to fit rear interior & find pesky rust to attack @ frt lwr corner.  So hinged rear window removed, wire-brushed, rust converter, Sikaflex white polyurethane adhesive used to seal panel joins all around & brush painted. Right window surround. Then noticed drivers seat still loose after bolting down.  Spot welds to frt outer mount had all torn from the seat base, dismantled seat & removed cover to also find 40mm crack to the side of the seat pan.  Welded up, painted welds. Glued together some tears in the cushion foam, reinforced by gluing some cloth on the outside afterward & reassembled. Then found weldnut on the rear mount had also come adrift, so some more welding. Together & back in car. Driven up & down the drive & given a wash.. Still needs clay bar to remove sap spots & a proper polish & wax.   Japanese bumper is the creamier '87-'90 Polar white compared to cars '91 Frost white. & need to make & add an extra bracket to the bumper's plate recess to mount the No. plate to. Added slightly trumpeted stainless exhaust tips from a '92 Prelude. Floor straightening & left side windscreen frame rust welding still required... Obviously still avoiding those issues... |
| |
Last Edit: Dec 27, 2017 12:49:14 GMT by 79cord
|
|
79cord
Posted a lot
  
Posts: 2,617
|
|
|
|
Bit to catch up upon. Got a bit frustrated making up sunshade for Integra's sunroof, used some thin 3-ply wood soaked & slightly bent to the curvature of the roof. Still quite flexible & light but rigid enough not to fall on my head & hopefully heat resistant. Painted grey to match the headlining, though wanted a leather-grain finish rather than wood so used some thin texture self adhesive vinyl I already had... though not enough... more ordered from EBay & china, since no one local seemed to have anything comparable. Delays. Decided to tint the windows myself with film I already has which turned out OK, though before I did the rear window I wanted to rid it of the original high stop-light blocking the view.. so needed a replacement. Decided to use some generic LED strip light across the top of the window where it would be less obtrusive behind the roof structure. LED strip stuck to 15mm aluminium U section pushed over pinch-weld flange rubber. 1x 8mm LED strip 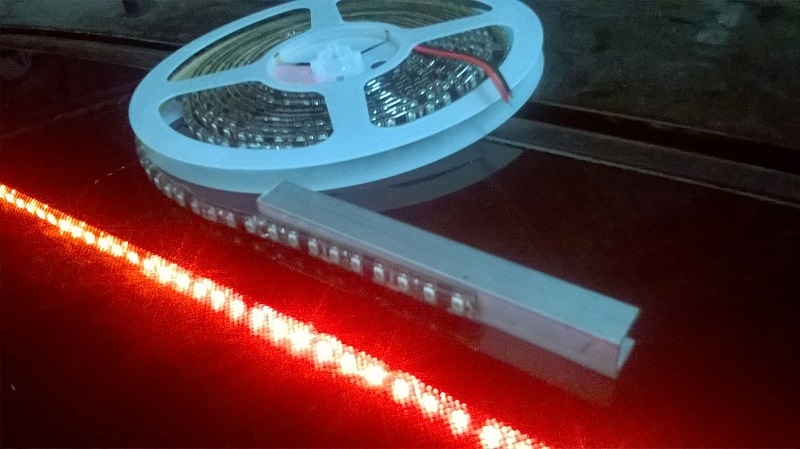 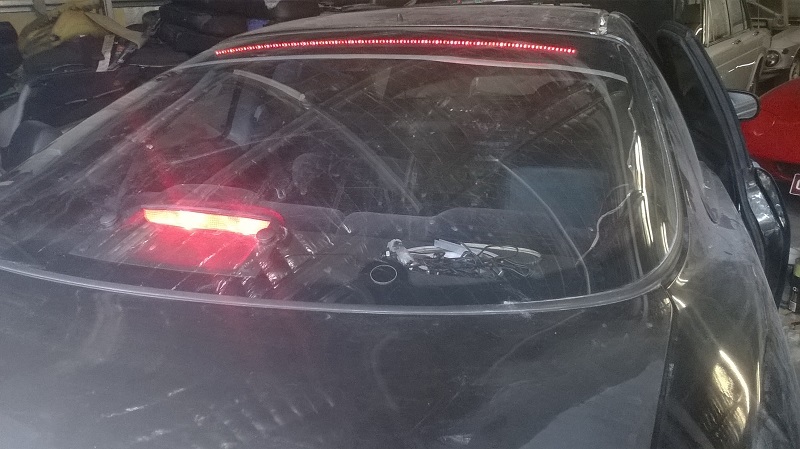 ![]() Elegantly slim, though was worried that it was not bright enough beneath the windows printed dot-fade. However the strip was too wide to fit two strips easily on the aluminium section. So a thinner LED strip was ordered. 3 x 5mm LED strips used with a lower shield to stop it illuminating the boot & covered by some 'black chrome' vinyl wrap to reflect the light. Soldering wires to the ends of the strips wasn't too easy, but done. 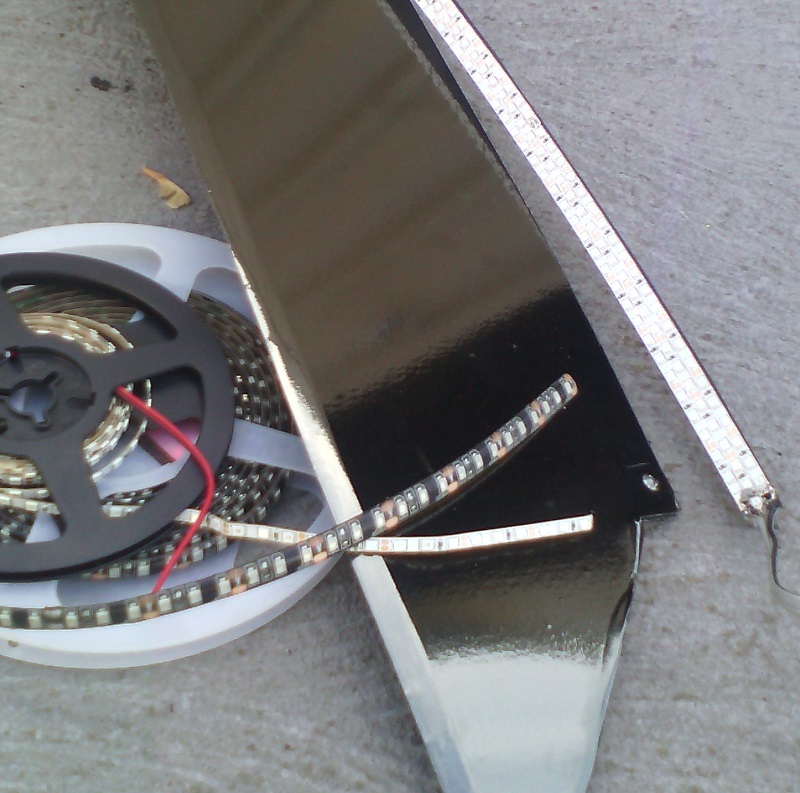 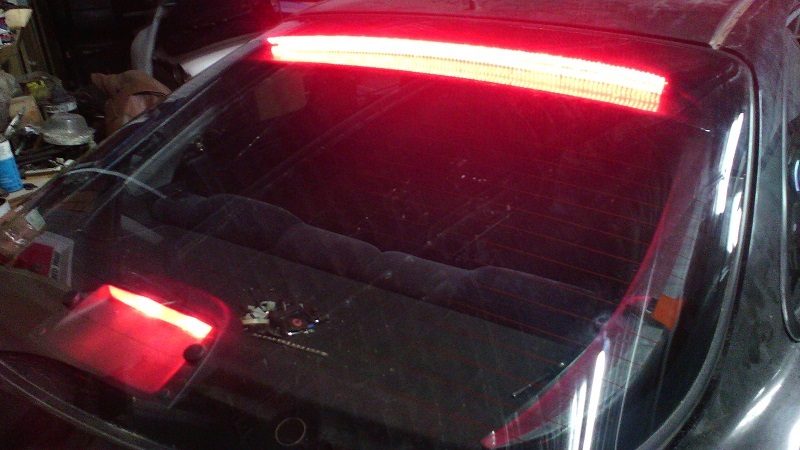 Bright enough, if not so elegant. Lower shield reflections making it look much bigger from some angles. Not visible from frt seat or rear-view mirror unlike the original. Now to remove the stop light & fill the mounting holes in the glass. Rear wiper already removed & hole neatly plugged. |
| |
Last Edit: May 4, 2018 12:45:52 GMT by 79cord
|
|
|
|


 Also spotted these at a wrecker, so were cheaply bought to match another pair I was given a year earlier.. Need repainting with powder coating peeling away in sheets from some areas. Paint schemes.?..


 Found this for encouragement:


