79cord
Posted a lot
  
Posts: 2,617
|
|
|
|
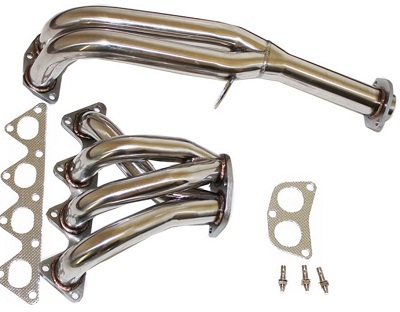
Predictably I succumbed to the temptation of the USA/China stainless steel exhaust headers. Playing it "safe" with some listed for a B18B non-vtec for a 4-2-1 design of similar design & proportions to the factory cast-iron effort with only slightly larger dia. & 50mm rather than late "type-R" 60mm outlet to avoid the need to enlarge or eliminate the original CAT. Also noting with interest that some better branded Headers also retained these proportions/dimensions before tapering outward near the end to a larger dia. CAT.. in case I wanted to revise the end & get a larger CAT later.... 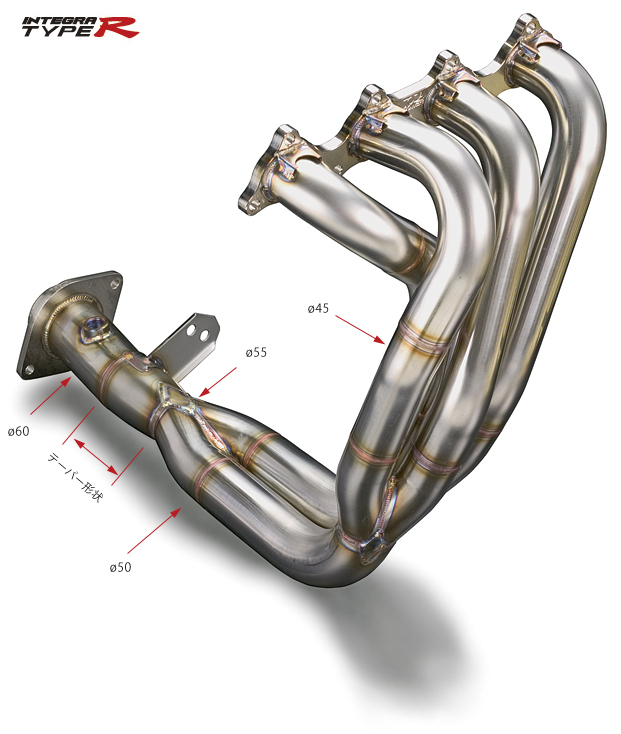 But I bought> 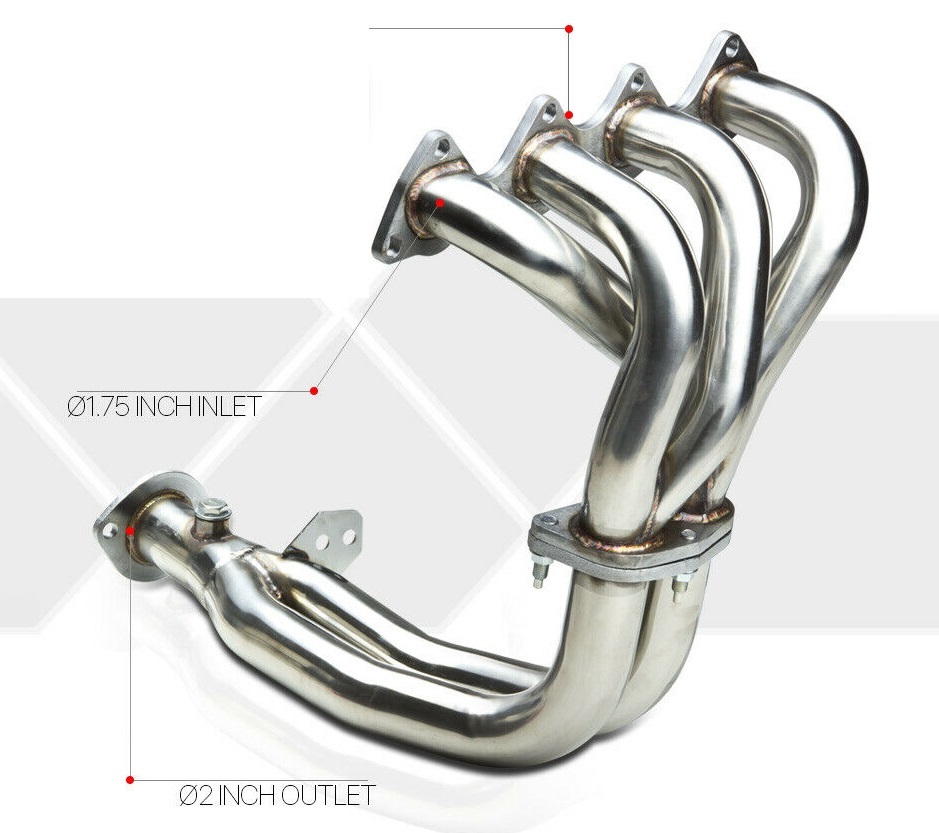 However it seems the earlier (pre'98) B18C1&2 Vtec also had slightly longer header & shorter CAT than B18B. So I'll still need a 50mm joiner between Old exhaust (or Cat) & the 'B18B' SS header pipes I've bought. I'm putting that off though until I've some access to a car hoist to work upon replacing my rusty exhaust to the muffler. I couldn't resist ordering one for the H22 Prelude as well even though Honda provided them with a welded tubular header factory, though this has much smoother unions. 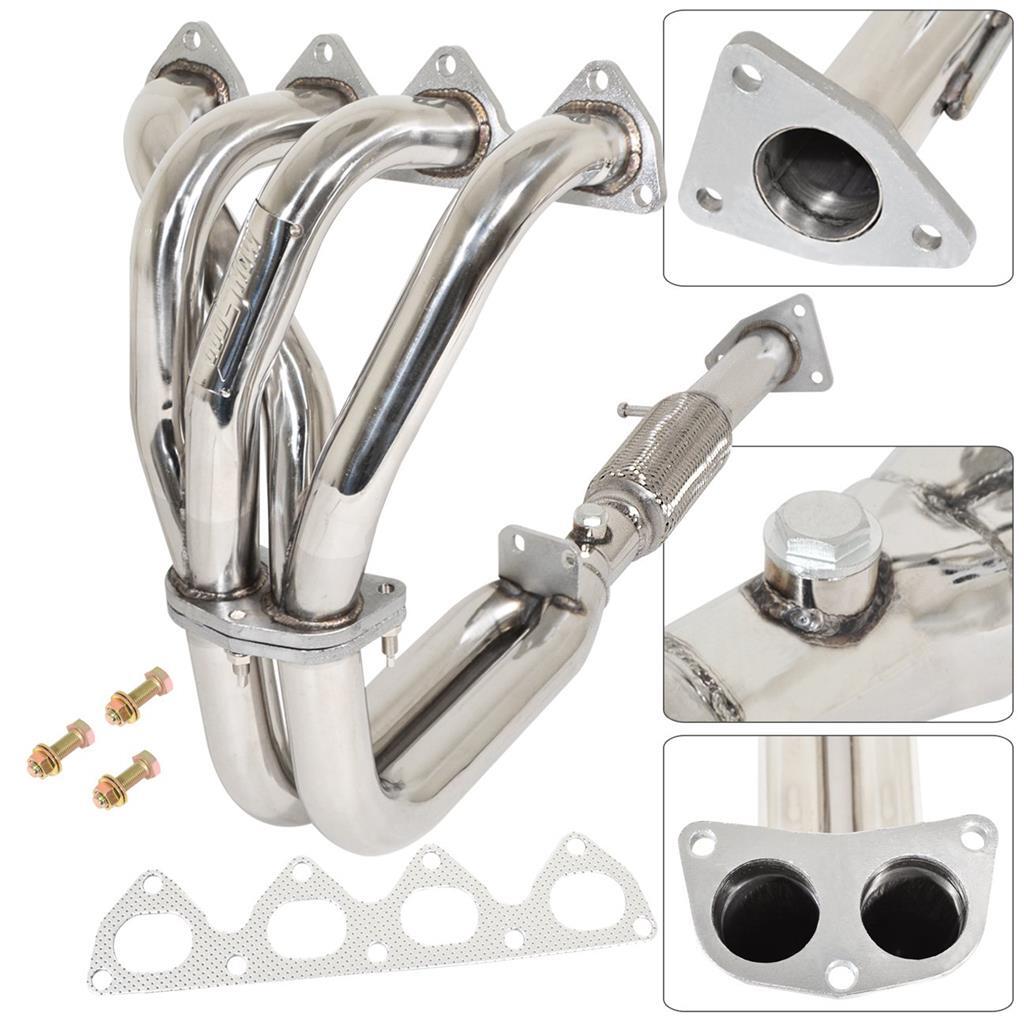 I means I won't have to extend my O2 sensor wires to suit the '98 H22 Prelude headers I had.. though that also means I probably have to revise the Exhaust system I'd welded up for it. Quality for both headers looks great, especially for the price. Much better design & fabrication than some of the older examples I've seen around (like Blue Integra). |
| |
Last Edit: Dec 4, 2019 10:58:07 GMT by 79cord
|
|
|
|
79cord
Posted a lot
  
Posts: 2,617
|
|
|
|
Closer to home I also bought a slightly larger glass sunroof panel to try on the Prelude in a custom effort to reduce the work straightening the silver car's badly dented roof whilst improving upon the looks of the old sunroof. 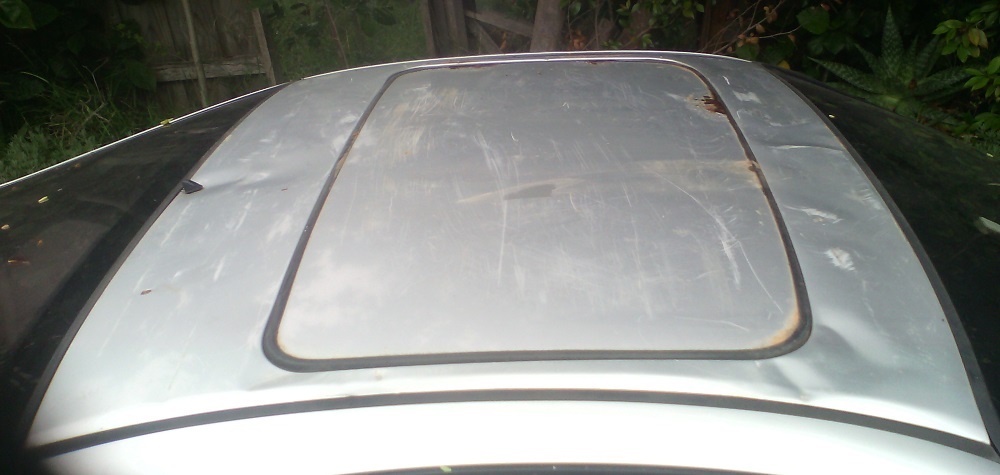 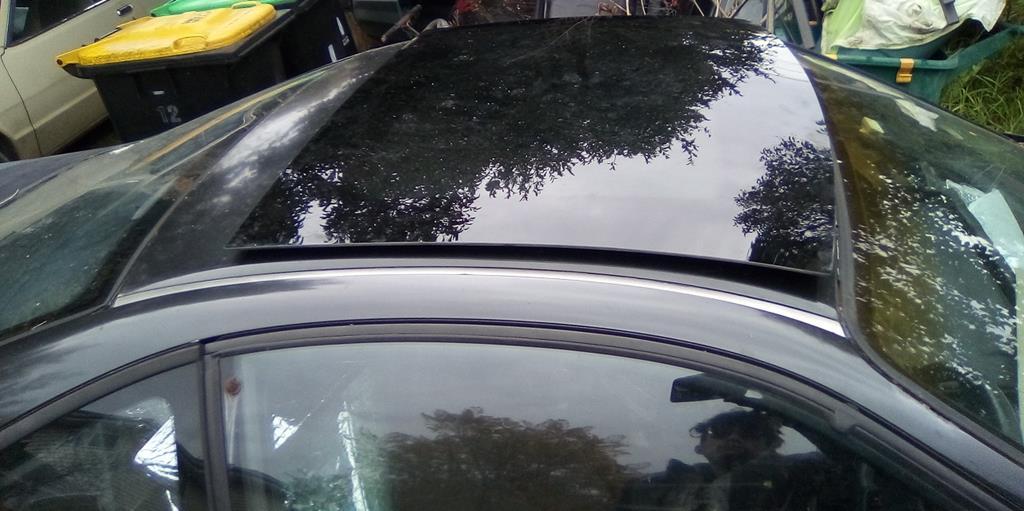 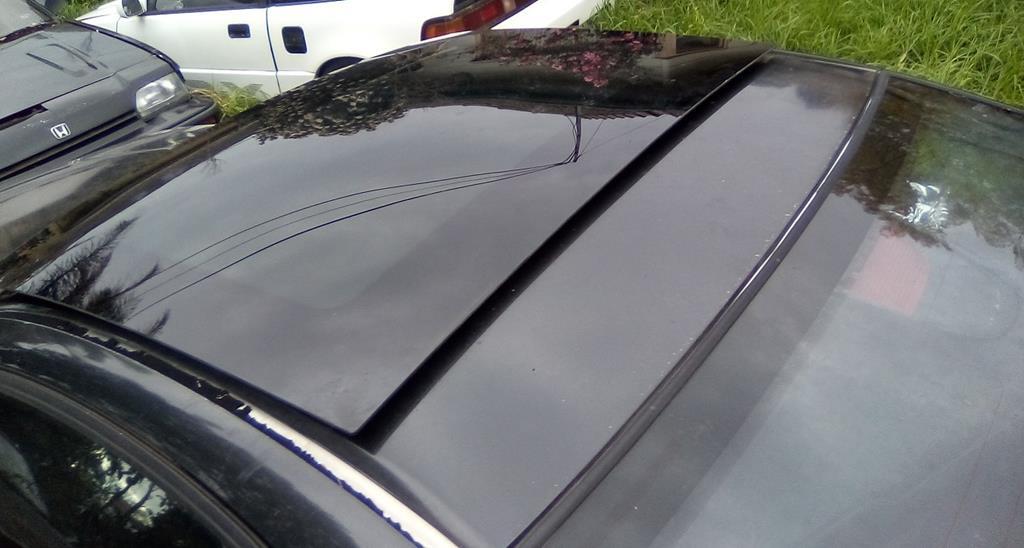 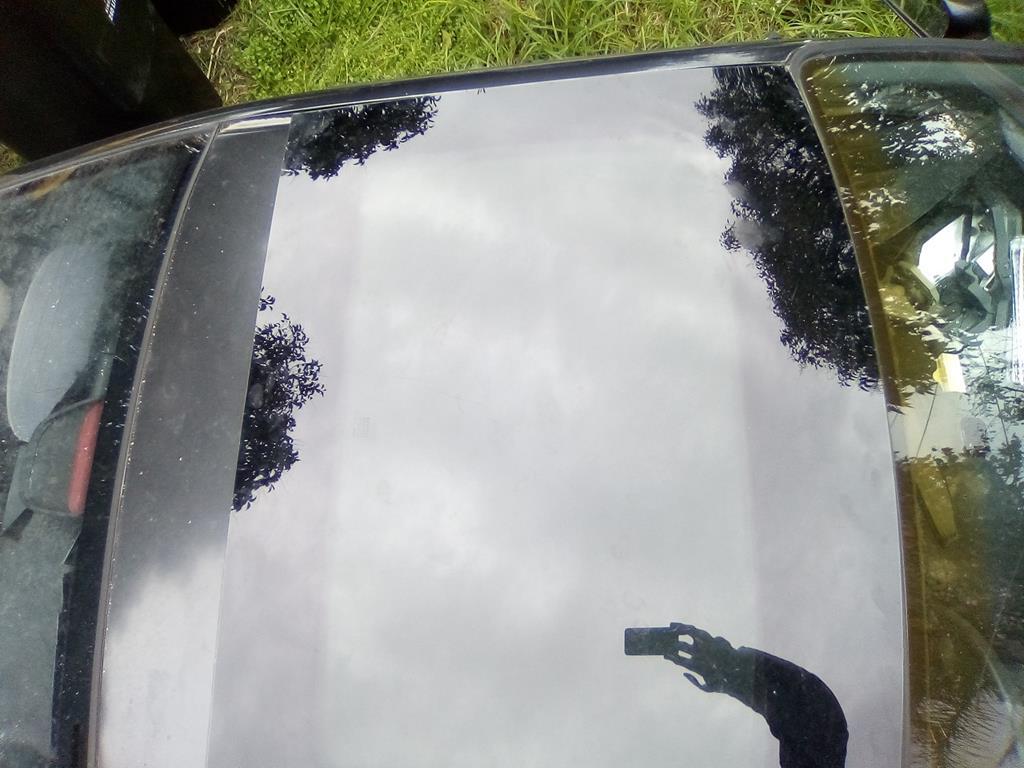 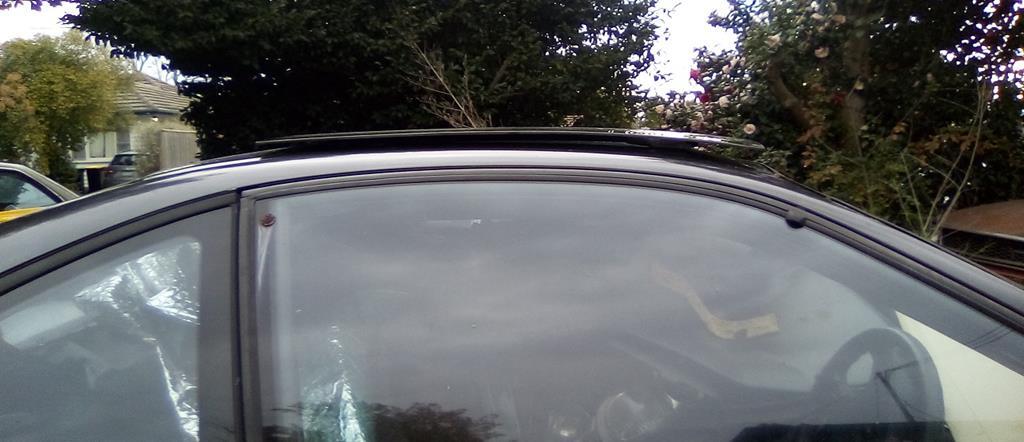 It's actually off a 2nd gen Renault Megane 5dr. 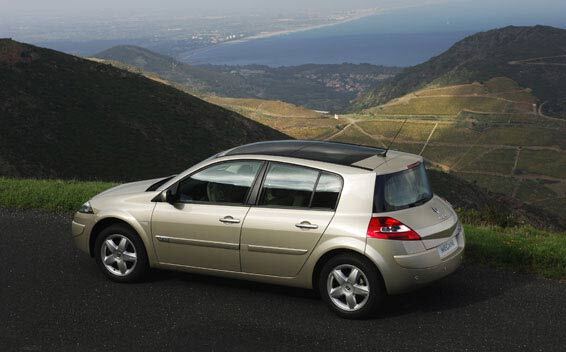 & doesn't look far off, though might flatten off slightly too much towards the rear.  Plenty of cars have had slightly flatter roofs than their side 'rails' even if I've never liked or understood such styling (except R16 perhaps), but would want a smooth transition to the rear of the roof and would need clearance to the structure at the bottom of the weld channel. Would welcome any other ideas/suggestions. Noticed newer Megane sunroof were narrower than the Preludes original, as was similar sunroof on Mercedes C-class hatchback . Ideally I'd keep 2" of frt windscreen header exposed, which won't leave much exposed roof area to work upon/recreate, though plenty to revise underneath without touching real structure under the roof skin. I can make up trims to glue onto the glass to widen it out to the side rails but don't expect I could trim the toughened glass. New mounting brackets will be glued to the glass to match the original Prelude sunroof mtgs. to it's mechanism (slides up & back over the roof). Old Renault mtg. brackets poly-urethane adhesive already removed with Acetone. Shame the ceramic blackout print can't be removed easily if the Preludes sunroof opening turns out to be larger. Remarkably close to the rather rare glass-roof on my CR-X too. 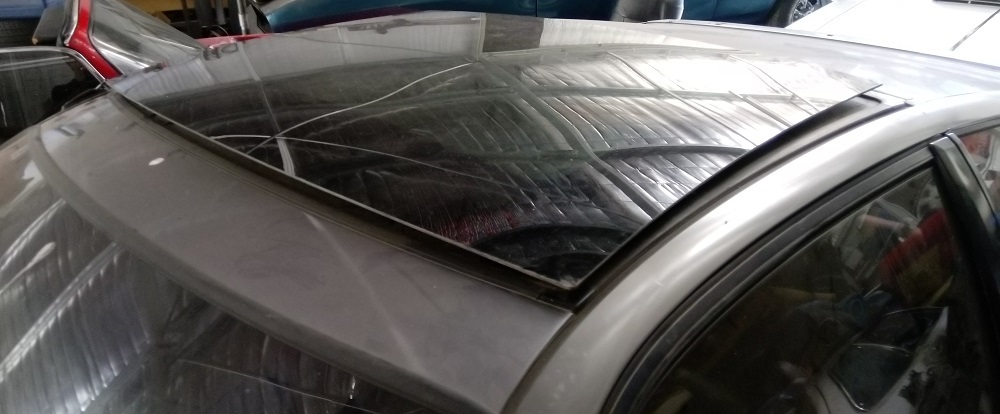 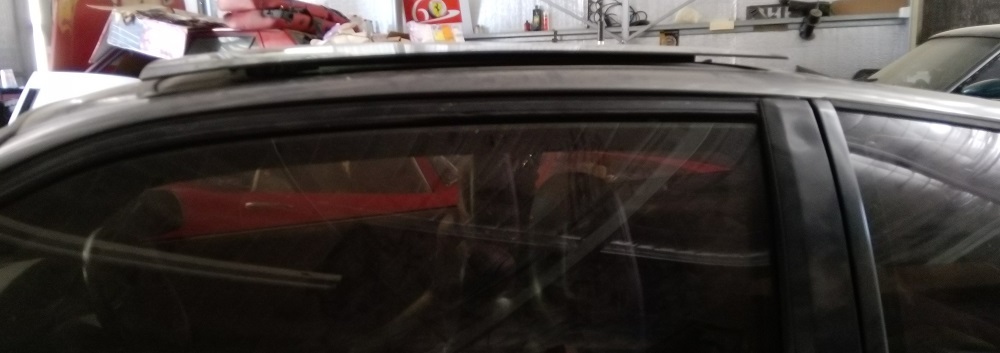 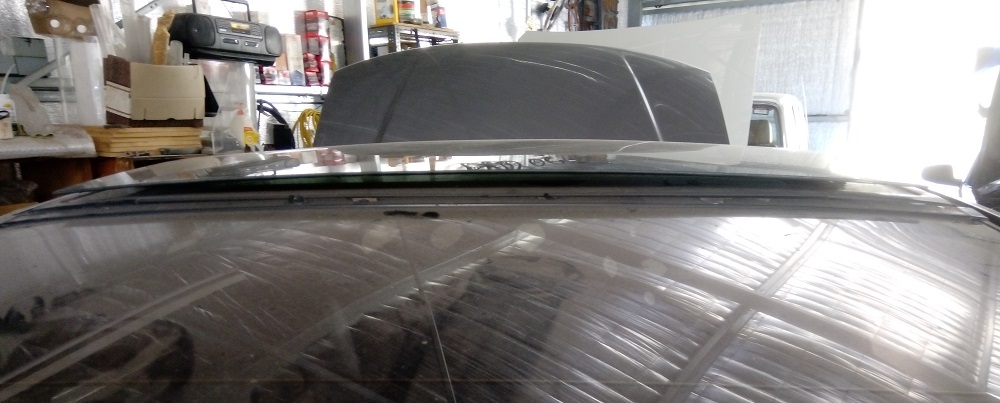 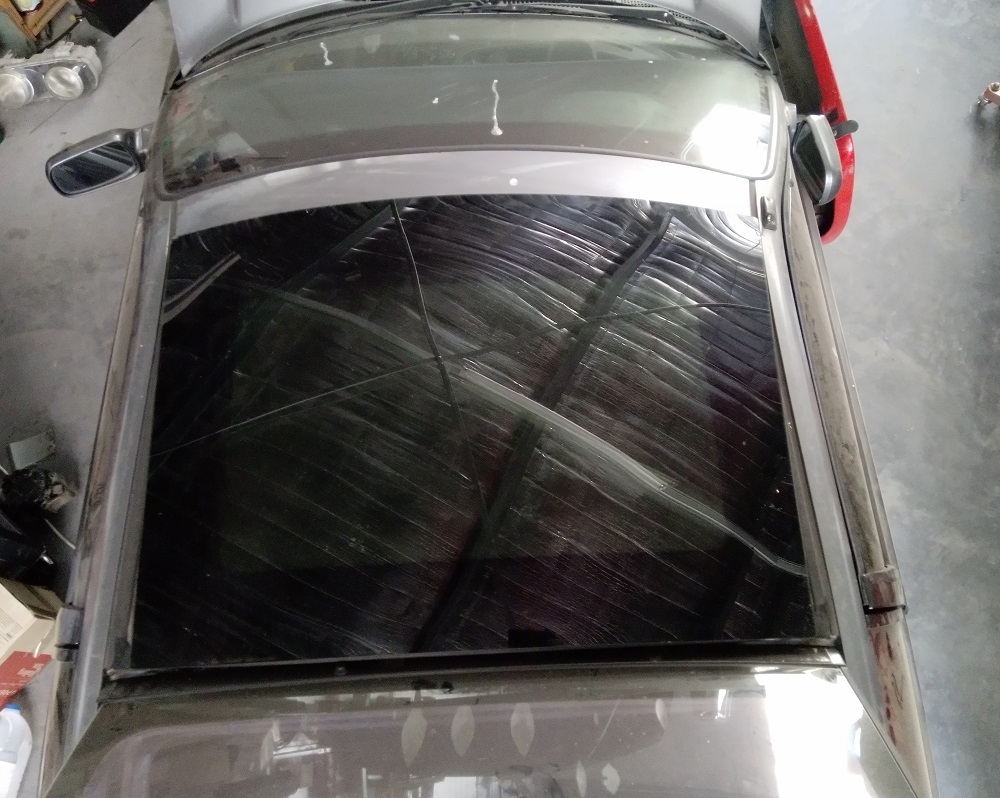 Makes it tempting to consider replacing the rusty & ridiculously small sunroof on the white 'Mugen' CRX with a similar opening custom effort. Though probably slightly too curved across car compared to the hatch glass... |
| |
Last Edit: Nov 3, 2019 12:14:43 GMT by 79cord
|
|
79cord
Posted a lot
  
Posts: 2,617
|
|
|
|
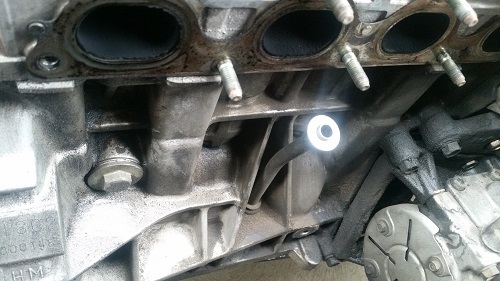
Tried the Preludes new exhaust manifold on for size a few weeks ago. As said the factory effort was pretty nice to start with hidden under it's heatshield 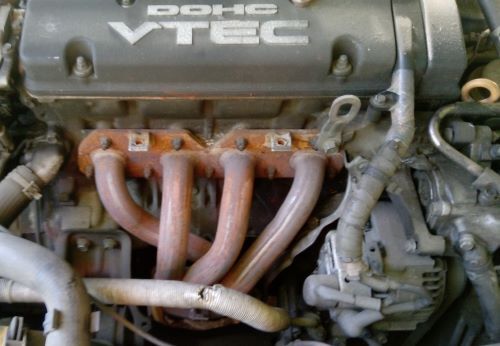 Though new is fractionally smoother at collectors joins 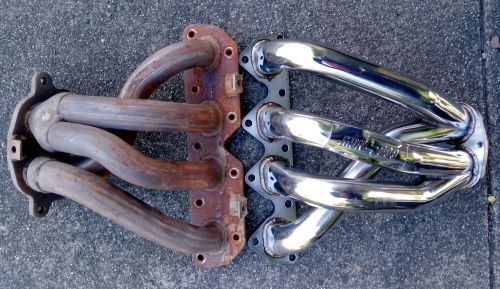 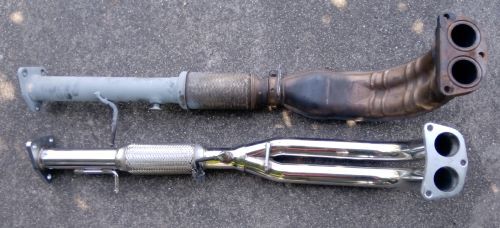 At least this puts the oxygen sensor in the factory location so I don't have to lengthen wires. Though as expected my customized 5th gen system had ended up a different length underneath, so I'll have to cut & add 50mm to my centre exhaust/muffler to suit the new system & am also missing two hanger brackets underneath... One bit fitted to the engine. 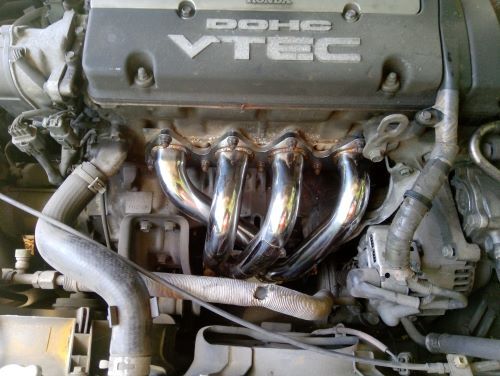 |
| |
Last Edit: Dec 5, 2019 7:59:07 GMT by 79cord
|
|
79cord
Posted a lot
  
Posts: 2,617
|
|
|
|
Also spotted an early Integra / Rover 416i @ the wreckers & grabbed its rust free rear hatch without the standard Integra spoiler holes. 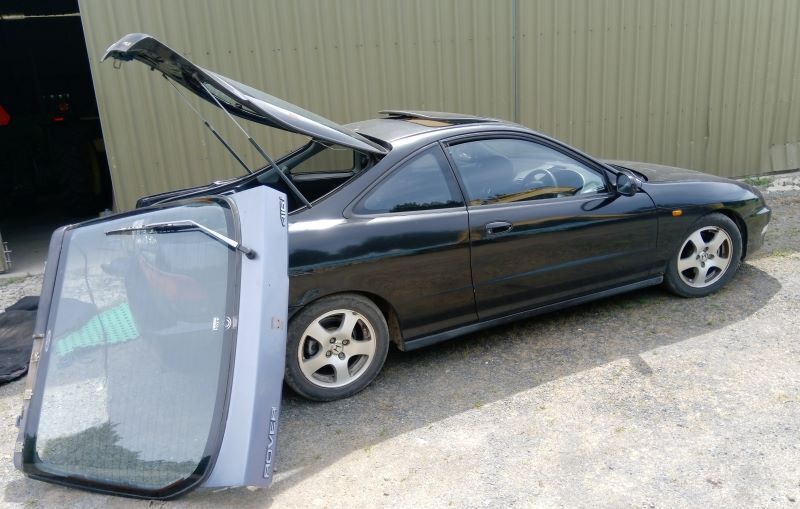 It did fit! Though I had (re)move the rear side interior trim... While another wrecker had got someones collection of 3 rough CRX, sadly only one was actually bad enough to really deserve wrecking, but enabled me to get some bits for the White example. 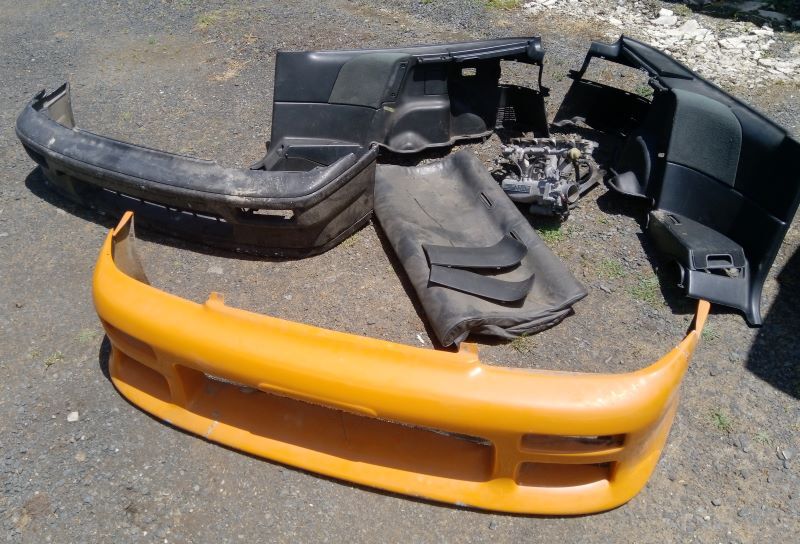 Also got Drivers door, kit side skirt, carpet, a rough pair of frt guards & some cabin wiring harness. Unfortunately the rest of the harness had already been cut & hacked about so I'll be combining it with base (twin-carb) ED & Concerto wiring harness to replace the white CRX damaged, brittle & hacked harness. For the ED Civics I bought the CRX DOHC D16a8 intake manifold since I've 3 heads but no matching intake, & close-ratio gearbox which unfortunately seems rather worn with input shaft movement, and from an '88 model with their much rarer spline count (1 less than '89-01 civic/crx ). |
| |
Last Edit: Aug 12, 2020 17:29:34 GMT by 79cord
|
|
79cord
Posted a lot
  
Posts: 2,617
|
|
Dec 10, 2019 10:39:27 GMT
|
Despite parts temptations/distractions I'm also working towards getting Darren's '90 ED Civic "Nessie" back on the road... Predictably it's rear trailing arm pivot bush needed replacing, & wanted to upgrade to rear discs while I was at it. I'd already bought 2nd gen Integra (disc) handbrake cables for it years ago. & found it cheaper to buy a set of EK Civic rear hubs, discs, hoses & calipers separate from their trailing arms. Since I still had them I set to work upon my '88 Civic's old drum brake trailing arms (removed for it's disc conversion years ago), so I could swap the arm asm. in quicker. Any '88-00 Civic/Crx, Concerto {Rover 400?} or '94-01 Integra arm would have suited though (except for rare 4wd models ), possibly even '89-93 Integra, though their rear pivot bush is slightly bigger & a bit obscure). The Civic's rear hub/spindle differs between Drums & Discs with caliper mtgs, but can be unbolted from the trailing arm even though Honda never mentions it in their workshop manuals. It's fastened by a 24mm nut & 4x T50 torx bolts, and in the '88's case blue thread-lock (unlike my EK parts), so I could only unbolt half of them with difficulty before I had to get out the propane torch to heat the hub-spindle mounts & soften the thread-lock to undo the remainder. The ctr of the pivot bushing was torn & perished enough that I could twist it & cut the remaining rubber with a sharp blade before inserting a hacksaw to cut a slit to weaken the metal edge of the bushing so I could tap it out easily (and they are slightly tapered). 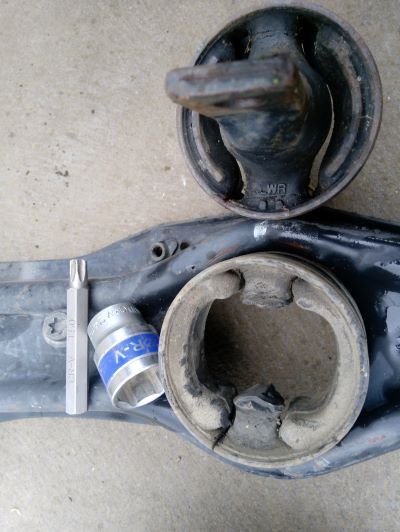 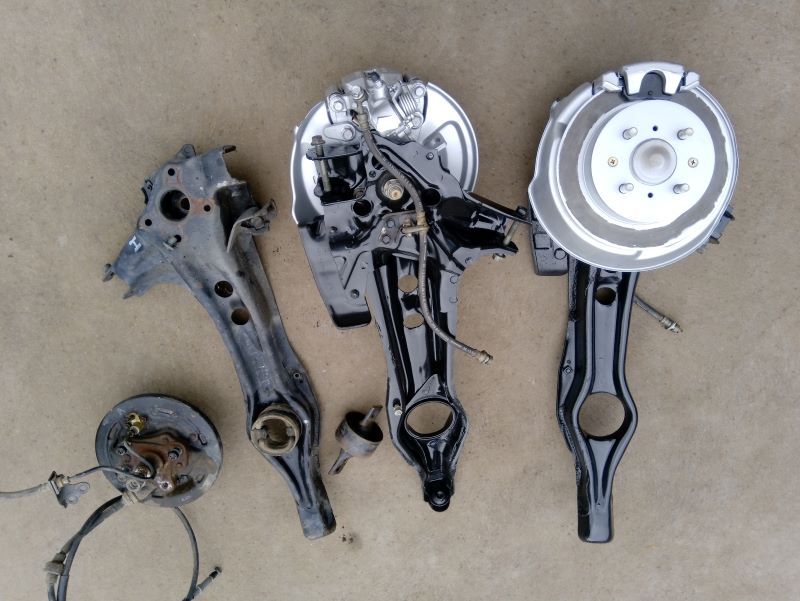 Arms dismantled painted & re-assembled with new bushings, discs & calipers 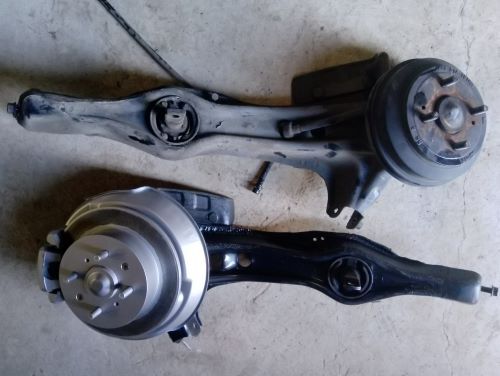 And a comparison between an original ED CRX rear caliper & the EG/EK arrangement. 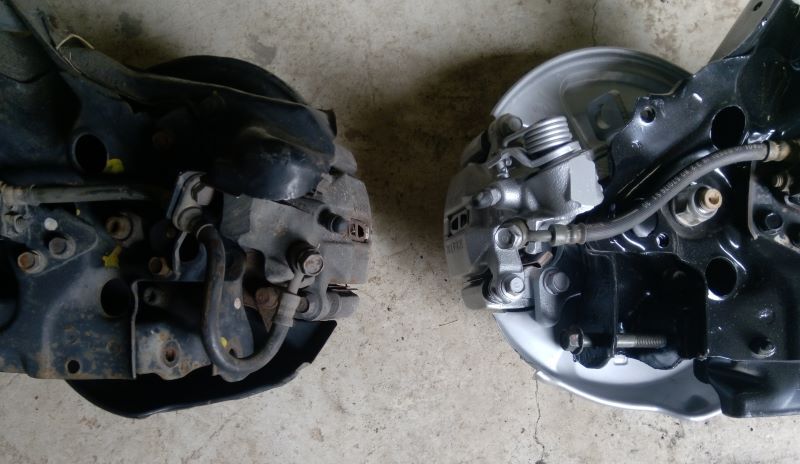 Note the different Brake hose routing & mountings, the Calipers & handbrake dust cover mtg differing slightly to accommodate this. It seems the ED/EF Civic/CRX Hubs also had slightly smaller wheel-bearings resulting in a 10mm narrower rear track width so you wouldn't want to randomly inter-mix those with the bigger hub assembly despite being interchangeable. 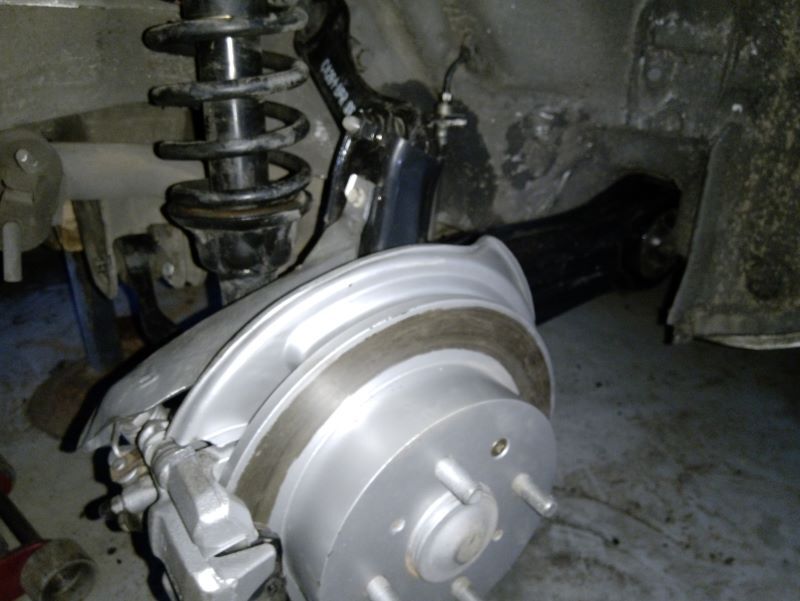 And back on the car, along with DC2/4/upper spec. EG Civic lower rear transverse arms for their sway bar mounting holes, though note there were also two different types; cast-iron where the bottom shock mounting forks over the arm, or pressed-steel where the shock is mounted in the middle ('88 Civic & favoured by JDM cars & Type R) as I'd fitted to my DC2 earlier. |
| |
Last Edit: Dec 16, 2019 11:59:08 GMT by 79cord
|
|
|
|
|
Dec 10, 2019 13:34:44 GMT
|
|
I've been meaning to bookmark this thread for a long time now. Now, bookmarked.
|
| |
Last Edit: Dec 10, 2019 13:37:02 GMT by Woofwoof
Still learning...still spending...still breaking things!
|
|
79cord
Posted a lot
  
Posts: 2,617
|
|
Dec 16, 2019 10:13:45 GMT
|
I finally pulled the dented fuel tank out of the silver Prelude (on the right), Fuel gauge said it was empty & the car had not started last time I gave it a half-hearted try, so I jacked it up & & undid the drain plug to the rear, no fuel came out so continued with removal. It has obviously been out before with hose-clamps missing from the filler pipe(!). Unbolted its mounting straps to find it still had plenty of OLD fuel in it.. & I still had to unclip its pump & sender wires that I probably should have done first, but are on top accessible by a removable plate in the boot.. Except someone decided to mount that big 4WS computer half over it. Managed to unclip it from below anyway with the tank hanging down but hope & haven't damaged the wire connections... Drained out nearly 20l of rusty fuel... 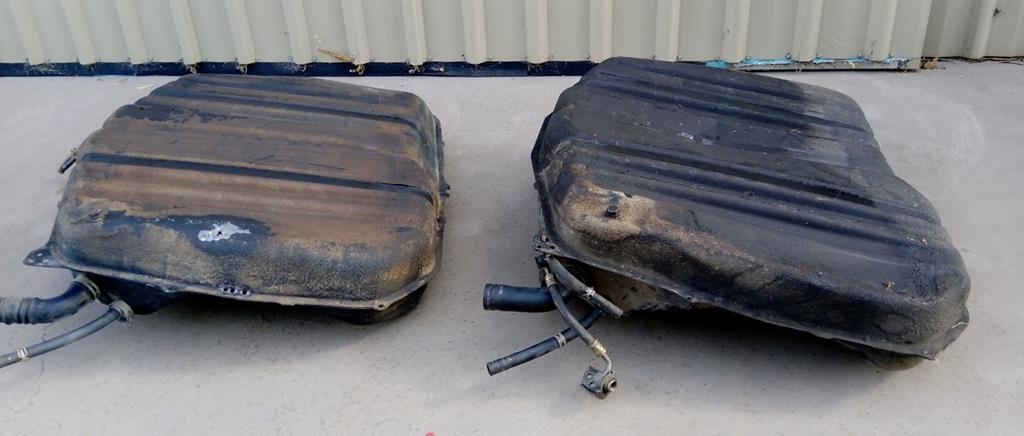 I'd already; reluctantly bought another tank from a wreckers (left). Not many Wreckers tend to keep tanks with low demand for them & this one had already had half a dozen holes punched in it to lazily drain the fuel upon that assumption. I'd been tempted to see about pulling out the dents from the original but although still sound it looks like the inside is fairly rusty. 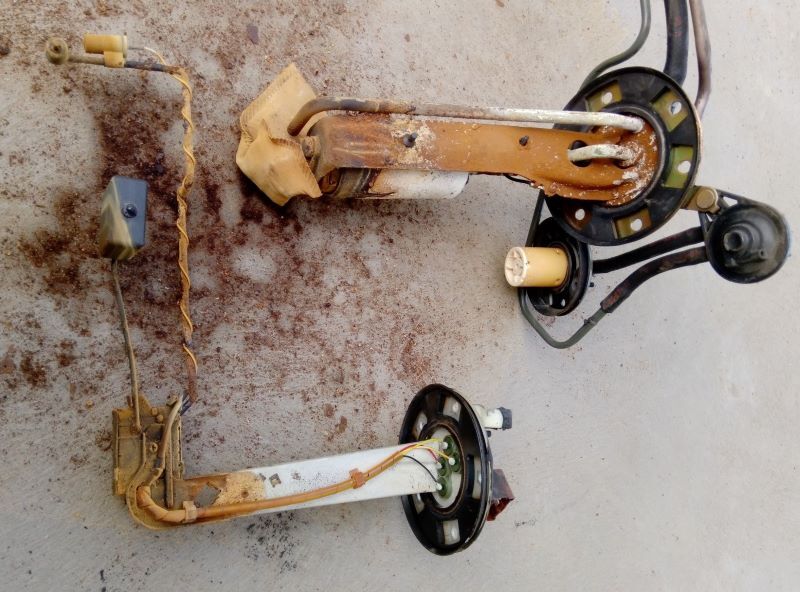 Old pump & sender, the rust makes me regret not getting more with my replacement tank... The sender read empty because it was stuck with the rust. So still have to ask around which tank I should continue with. Dents & rust, or holes. And Fuel proof paint for sender, Pump & tank, or at least the repair areas of the replacement tank?
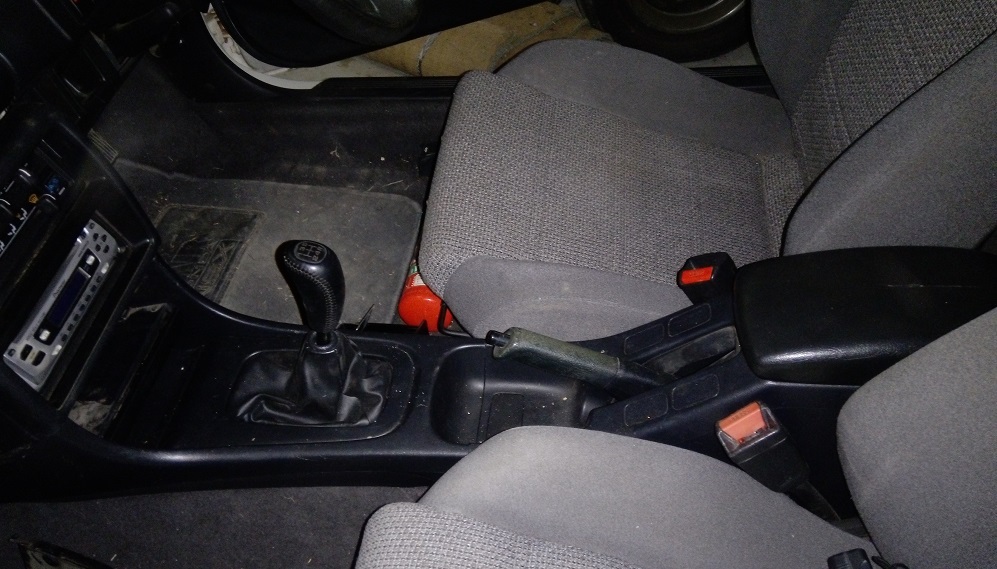
I also took a picture of my test-fit of a DC2/4 centre console/armrest in the ED Civic. Don't think the DC2 Integra Type R had the console as it didn't fit between the bulky Racaros. I'd read about the console fitting ED Civics & love the look, lining up with the dash/radio console very well, but it does rub badly against the sides of the front seats. So I'll probably have to pull it out again unless I want to attack the foam of the perfect front seats, which I'm reluctant to do given the difficulty finding good ones or even properly matching the slightly speckled grey fabric.
 Then I set to work swapping Nessie's (ED Civic) noisy gearbox, so here's a picture with it removed. 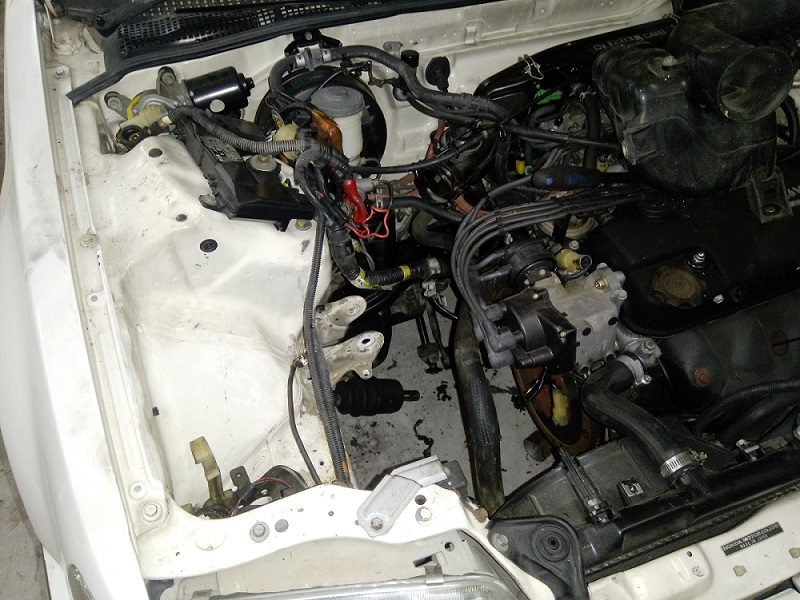 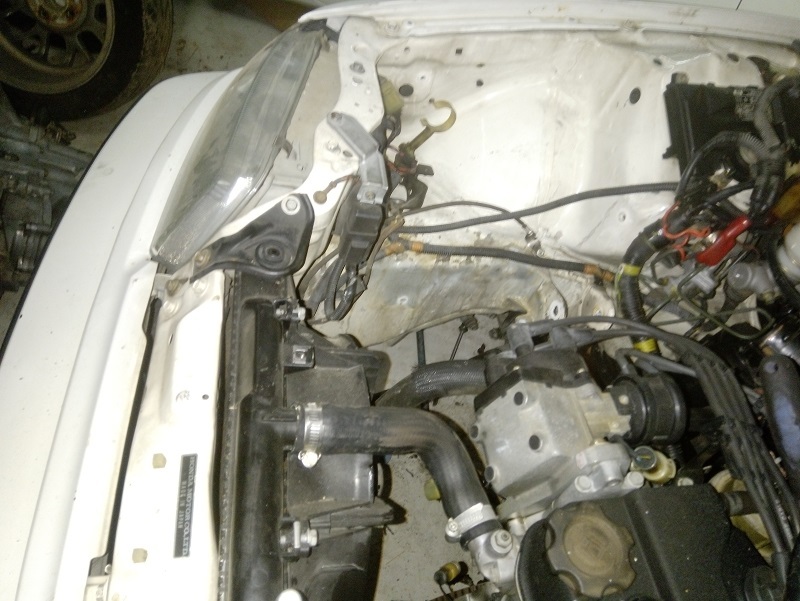 Must get some white paint for that frame rail under the battery support, which is already getting some fresh black paint. 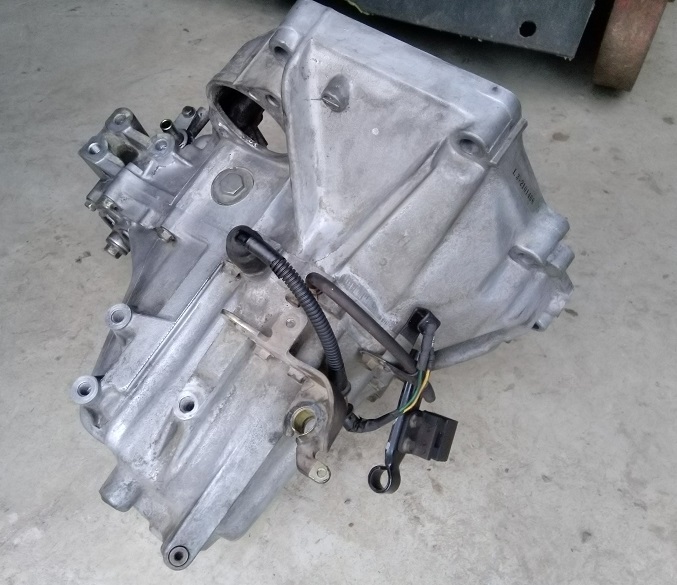 Lots of scrubbing to get my replacement gearbox clean... But now I'm stalled again as I'd foolishly thought I might be able to reuse Civic's old clutch disc or the one I'd got with the g/box but there isn't much life left in them. Seems there were also two different sizes available: 200mm⌀ with 21 input shaft splines (usu.'88 Civics/Crx), & much more common 212mm⌀, 20 splines used '90-01, glad both mine are the latter.
I might still have another old one I'd grabbed with the Blue EG Civic in mind... But obviously new would be sensible given the difficulties removing g/box. I found I could probably get one a bit cheaper from the USA even with Shipping & taxes with some delay.. which lead me to finding a new 'Stage 2 sport' clutch kit with lightweight 8.5lb/3.8kg steel flywheel for an extra $150; cheaper than I could buy them separately, even if they did end up costing a little more than I'd anticipated... Tempting since it's going to be more of an occasional use toy car anyway, even if it sounds a bit silly with the std. old engine.. regardless of the desire to give it the injected DOHC D16 engine one day. So now I probably have to wait until the new year for that to arrive from the USA.. & should order rear-main engine crank seal for replacement when flywheels off. 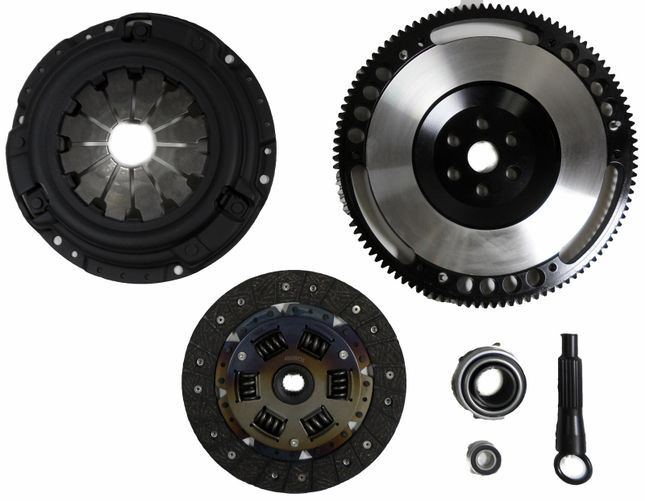 Left steering rack boot/gaiter replaced in the meantime. Rubber engine mounts removed & given a clean along with a new front 'torque' mount.
Darren's 15x7" TSW wheels might also raise legal querie's with the rim;if not the treads past the wheel arches, so I've got '91 Civic/Concerto 14x4.5" steel wheels & hubcaps lined up next to it to save any hassle.
|
| |
Last Edit: Dec 16, 2019 10:59:57 GMT by 79cord
|
|
79cord
Posted a lot
  
Posts: 2,617
|
|
|
|
I bought a spraycan of Duplicolour white that claimed to approximate Honda's Polar White to repaint the bodywork under the battery tray so that's now done. New Years eve saw Civic's new flywheel, clutch & rear crank seal arrive. 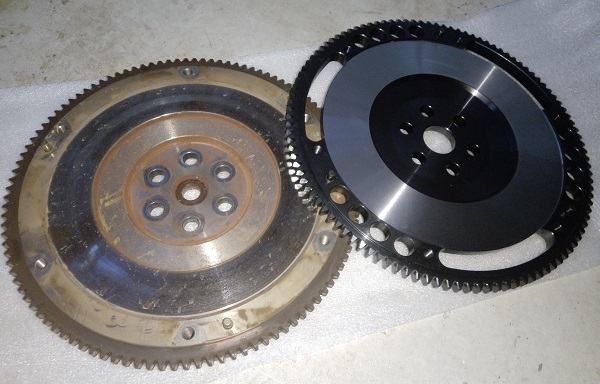 Originally 7.5 kg, now 3.8 kg Fitted on New Years day, followed by the replacement G/box. 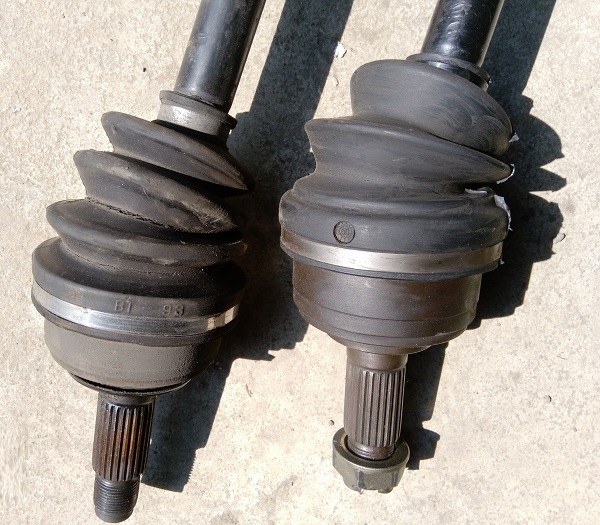 Figured driveshaft CV joint rubber was going to fail when inconvenient so fitted the one from the '91 Civic (removed when I'd fitted the Concerto drivetrain & it's equal length shafts). 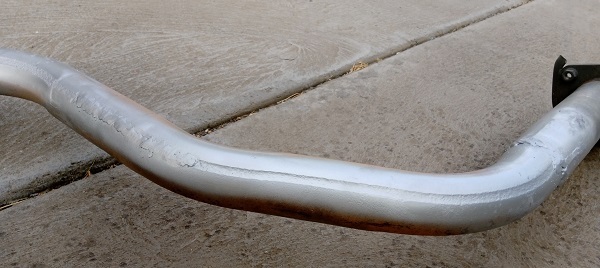 Last foot of the exhaust had been repaired before with a leaking slip joint so I welded that up.. & spotted a tiny hole in the welded seam of the original pipe that grew to 6" as I tried to weld it up. At least it is now back on the car 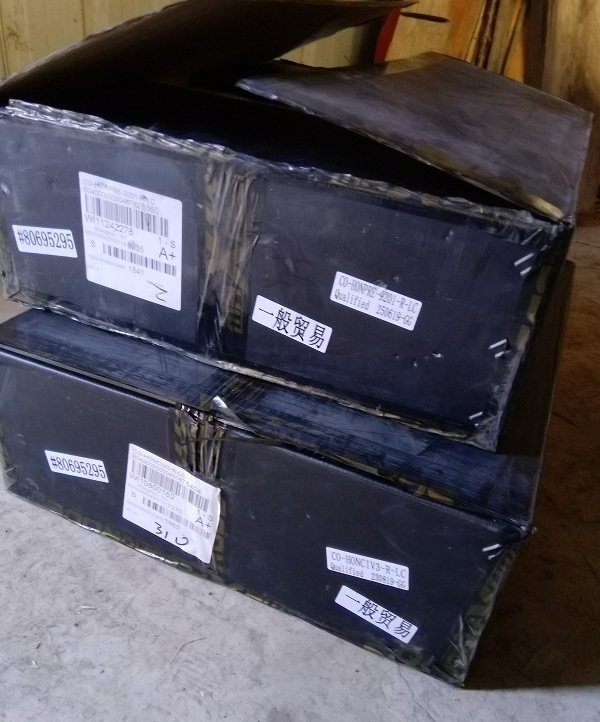 2 moderately large boxes arrived in the post... Ordered/bought on Christmas eve.
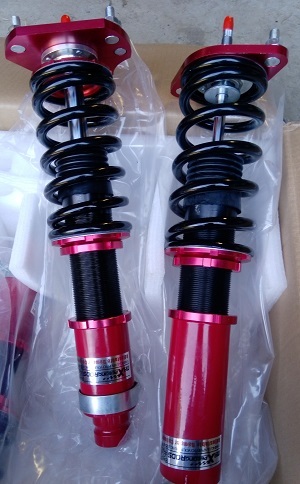 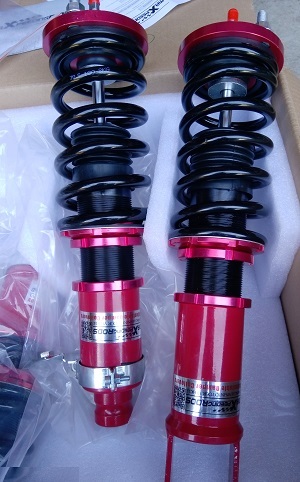 ![]() Cheap Chinese adjustable coil over damper sets bought for A$330 & A$385 for the Prelude & White CRX (with cut springs) that claimed 25% & 18% off respectively. I did at least get the more expensive models with adjustable dampers. And since the sun goes down over the city this time of year...
 |
| |
Last Edit: Jan 3, 2020 10:15:43 GMT by 79cord
|
|
79cord
Posted a lot
  
Posts: 2,617
|
|
|
|
Got Nessie out today for a brief run up & down the drive & some pictures. 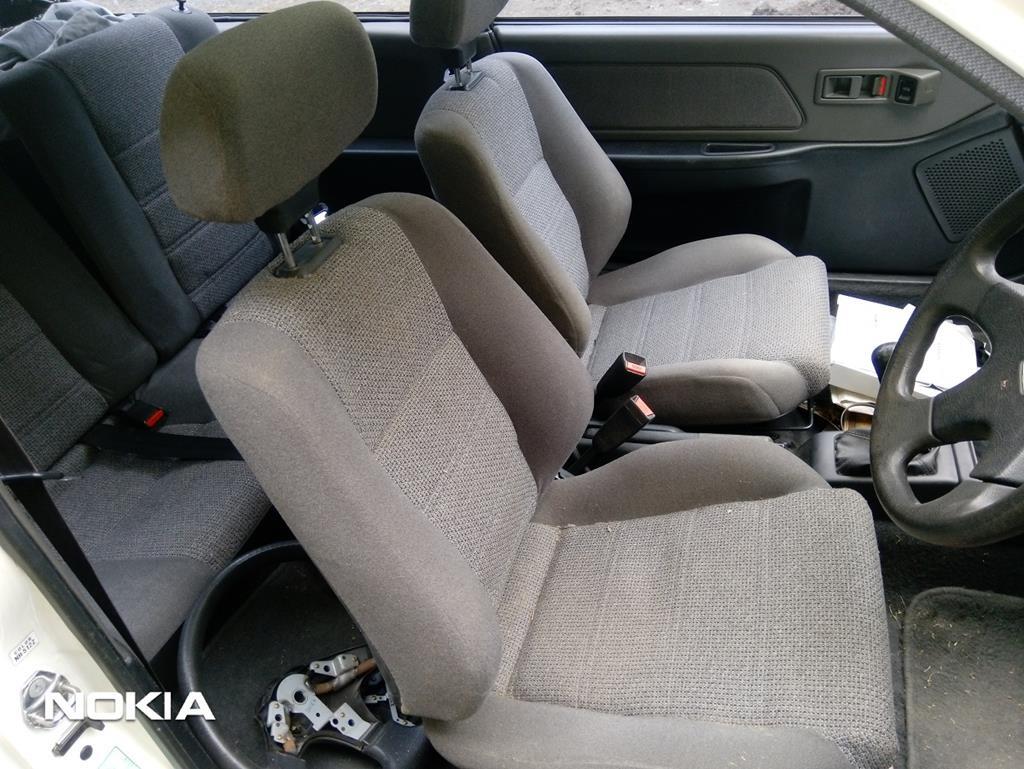 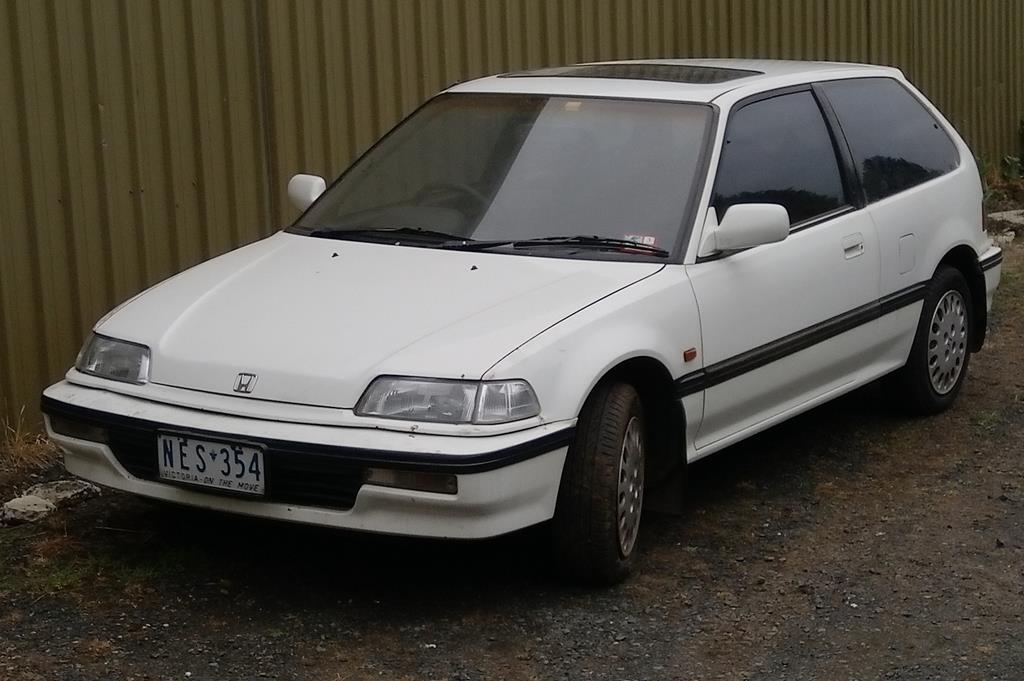 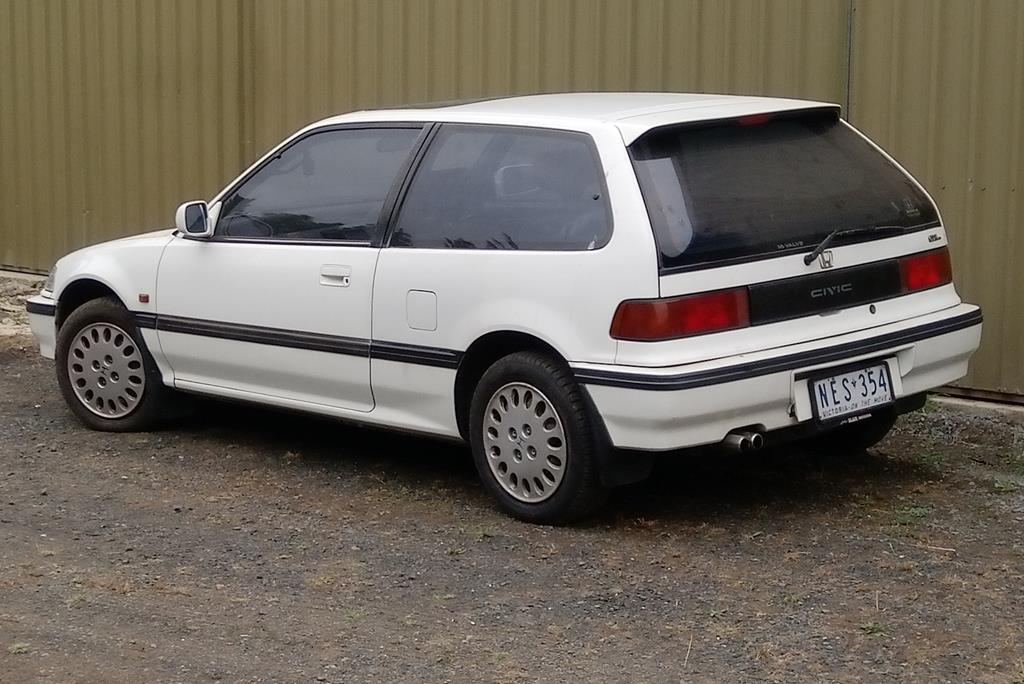 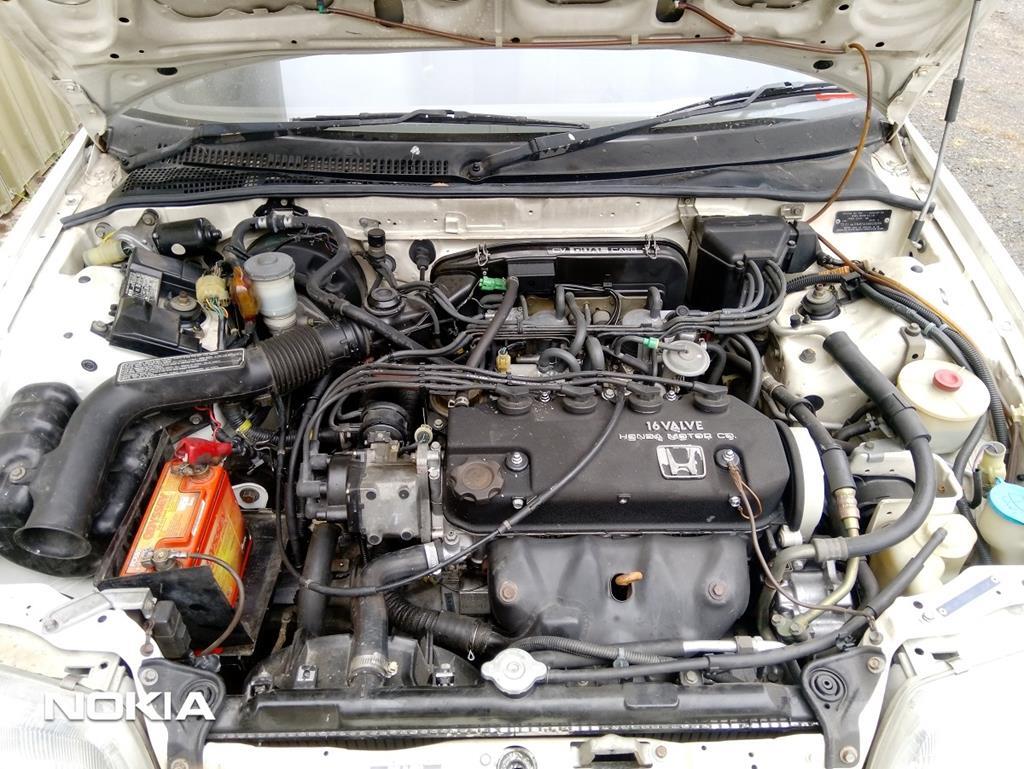 Has been off the road & hiding in garages since at least May 2014. Might have to increase the idle speed since it wasn't. Clutch shuddered a bit when first used but I didn't really notice it much afterward. Spotted a small chip in the windscreen so will have a go repairing it, & hope I don't have to replace as original style windscreen trims aren't cheap, if they can still be bought & are often destroyed upon removal. |
| |
Last Edit: Jan 7, 2020 9:09:37 GMT by 79cord
|
|
79cord
Posted a lot
  
Posts: 2,617
|
|
|
|
Overdue update time again. Nessie the white ED Civic is back on the road! 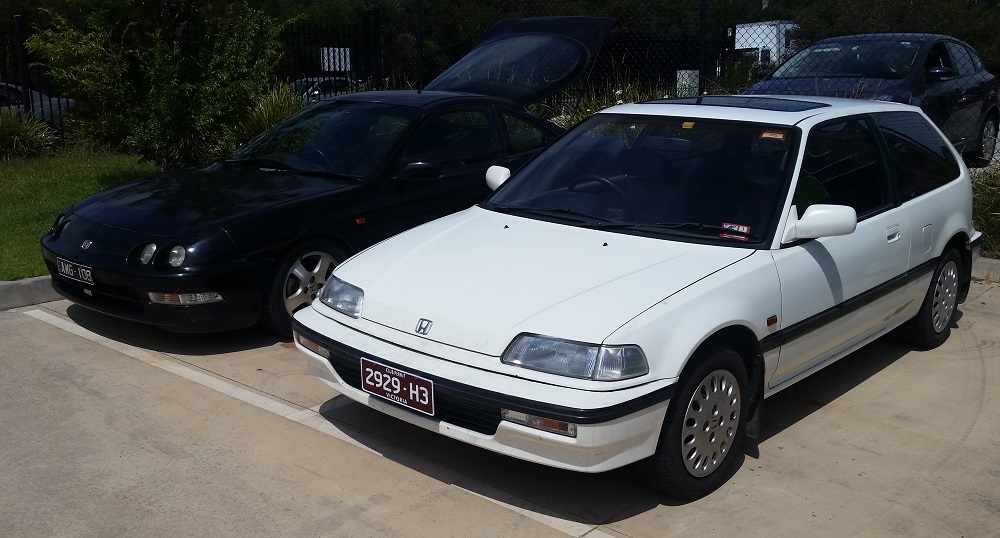 Naturally the usual worries about passing tests were involved. Used a resin windscreen repair kit to repair a small chip high on the passengers side that was starting to crack (12mm across) so this it was far less noticeable and scrubbed & polished any suspect areas underneath to identify (hide?) any slight oil leaks. Found the drivers seatbelt wasn't retracting with much strength so took that apart for a thorough clean & de-fluff which improved things. Worried about front shock/spring bushings that often show their workload long before they're likely to fail so order replacements. Realized the R steering rack gaiter I'd already replaced had previously failed because the Pwr steer rack was leaking into it... No time for replacement with test booked so in it went. Failed on a bad earth connection for rear roof spoiler brake light, my too obviously homemade battery tie-down & poor running from cold start... Auto-choke strangling things for a massively rich mixture that quickly fouled the plugs with a few cold-starts to move it around. Honda's electronic solenoid & vacuum controlled twin CV carburetors made that rather more intimidating, but some fresh plugs, dose of injector cleaner, some enthusiastic driving & a vaguely warm engine saw it's test passed & the car on the road. I'd already investigated a seal rebuild kit for the steering rack @ ~$100 from the USA but spotted a reasonable looking rack on an Auto sedan at a wreckers for $60 so wasted no time in removing it. Refitting that to my car I realized how much easier Automatic shift cable & removed CAT had made it to get it off at the wreckers.. Steering Fluid drained & replaced with genuine Honda fluid in case any previous use of std. hydraulic fluid had been the cause of those failed seals. Reminds me I must get or do a wheel alignment check! Also pulled out the noisy Speedo cable for a good dose of grease. Took a few tries to get that re-engauged properly at both speedo & g/box ends! I think I've finally figured out the overly choked & rich/smokey cold starts too. Suggested adjustments in the factory w/shop manual didn't look too appropriate but I spotted another grub-screw adjustment just under the thermo-wax choke actuator that was allowing the choke/throttle butterfly to close too far. Fingers crossed. Already considering fitting those cheap adjustable springs/shocks I'd intended for white CRX.. 31 yr old originals feel a little soft after Koni/Tien on Sir CR-X & DC2.... Custom mounting brackets required to fit a DC2/4 rear swaybar.... Need to find & fit a slightly bigger, better & more 'factory' looking sunroof.... |
| |
Last Edit: Mar 16, 2020 11:10:05 GMT by 79cord
|
|
|
|
79cord
Posted a lot
  
Posts: 2,617
|
|
|
|
Predictably, these found their way on to Nessie last weekend, should try them before whatever warranty runs out.  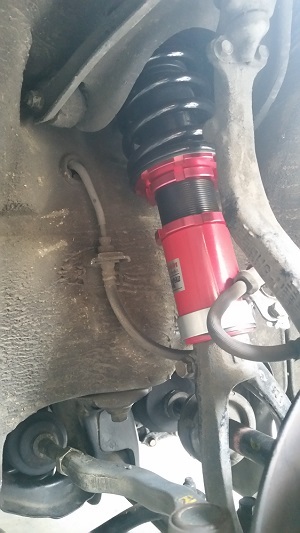 Along with the return of Darren's 15x7" et35 TSW wheels.    Letting the jack down for the first time after fitting the adjustable coil-overs I immediately dented the muffler against the jack! Back up again to adjust the rear up as far as I dared; 25mm of thread engaugement. It doesn't look like they could achieve the factory ride height, though it is not too ridiculous as is.  Not so sure the wheels/tyres fit though with rubbing against the rear arch weld flange looking inevitable, though there's no evidence of that from their previous fitment & I haven't driven it enough yet to prove interference... Perhaps Darren never carried a full load of passengers? Or perhaps the extra 10mm rear track provided by the Integra rear disc conversion proved too much. Guess I'll have to try the wheels on the '88 Civic which had received Concerto rear discs to see if the difference is critical. I also got around to removing the '91 Civic's radiator due to material missing from the cap seating surface. 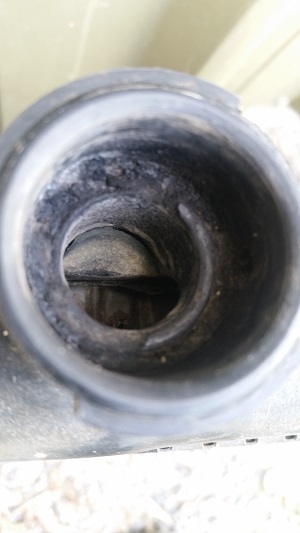 I'd bought a bigger capacity Chinese alloy radiator for it when I'd done the Integra's headgasket/radiator. 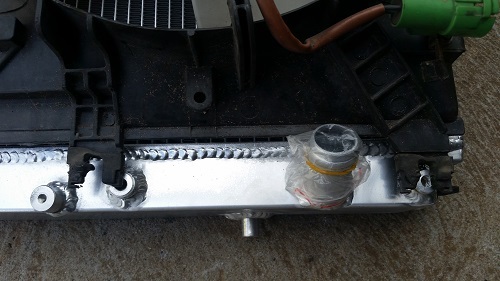 Like the Integra they'd also welded on the lower fan mountings in the wrong place so one had to be cut off & the other adapted. 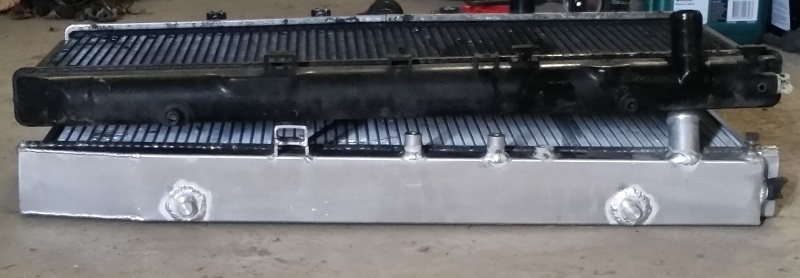 Unfortunately the bottom mounting pins were also 10mm offset & had to be cut off. I'll make up a adapter bracket to sit in the cars lower locating holes since the top mountings already control side/side. |
| |
Last Edit: Apr 4, 2020 10:44:48 GMT by 79cord
|
|
79cord
Posted a lot
  
Posts: 2,617
|
|
|
|
After cutting off miss-placed lower radiator locating pins & making up 'saddle' brackets for the radiator to fit into I again tried fitting the thicker alloy radiator into the Civic only to realize there is no way it is going to fit in the narrow gap between the front panel structure and the front subframe (for frt tie-rod and engine stabilizer mts), short of bashing a weld-flange out of the way or fitting an aftermarket subframe. So that's now stored away in case another car can use it and the eroded area of the old radiator cap sealing surface was instead replaced with JB-weld epoxy. For more cheerful progress I decided to fit a rear sway-bar to the rear of Nessie. I'd already fitted lower rear arms with the required mountings & had a sway-bar from a Concerto or 2nd Gen Integra whose mounting points corresponded with pre-punched holes in the Civic's rear frame rails, though those rails had not received weld-nuts nor reinforcing plates I expect they would need inside the light gauge rails(1mm or less) to spread the loads & prevent fatigue cracks. Short of cutting holes my only access into the rails was a 30mm hole hidden behind the bumper so I folded up some 1.5mm steel to the maximum size available & welded mounting nuts to those with 30cm of wire stuck to the end so they could be poked into the rails ready for sway-bar mounting. 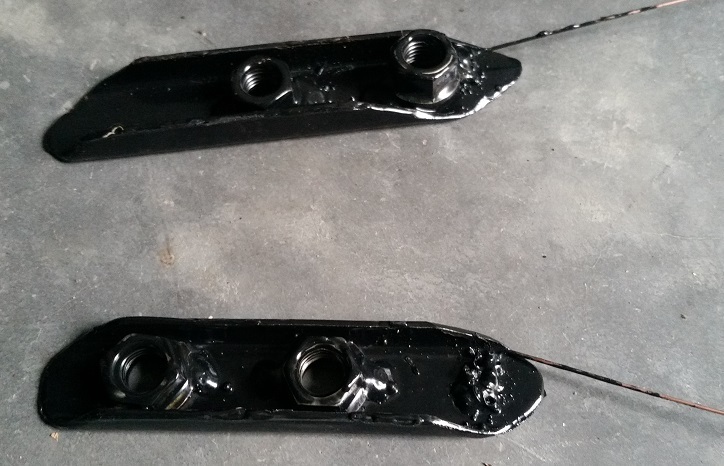 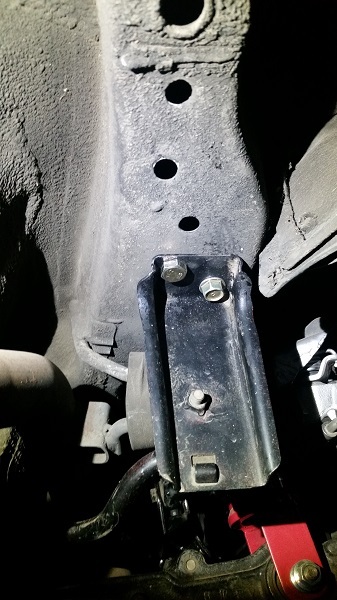 And mounted up. Still wonder if thin spreader plates outside would help spread the loads even with the thin sway-bar. Later Civic's & Integra's used a different arrangement to mount the sway-bar closer to the suspension arm mountings.. So their bar would take more creativity to mount upon this car. Other task progress has been Prelude fuel tank. The replacement tanks wrecker punched drain holes were bashed mostly closed & welded closed with my MIG welder (left open & empty without sender or pump for a month or three). 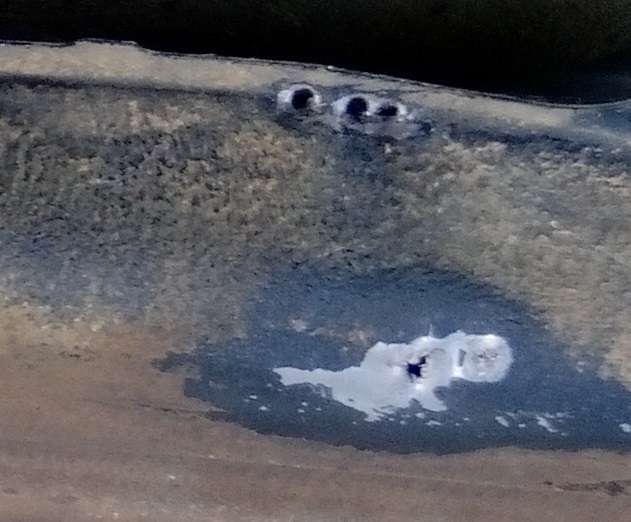 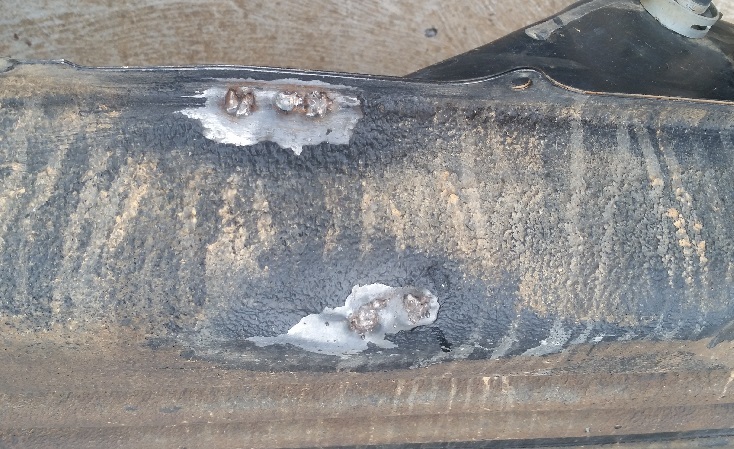 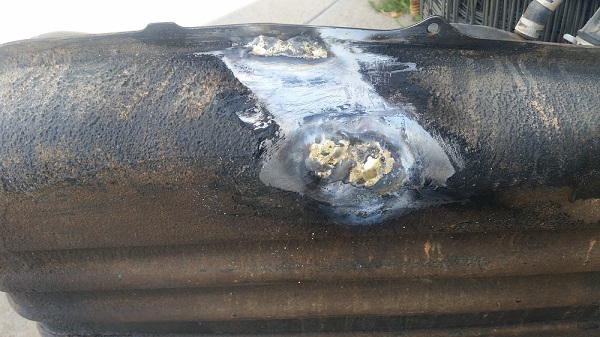 Brazed over the welds to ensure they were sealed, 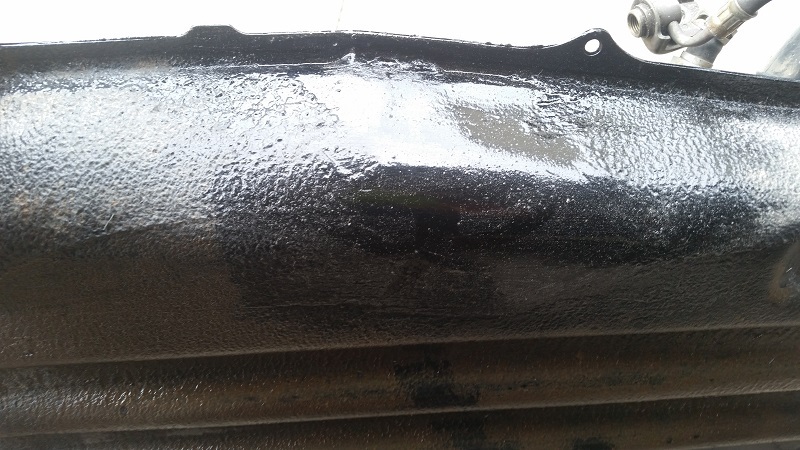 filled & painted with a fuel resistant polyurethane paint. And an experiment with a badly damaged ED Civic/CR-X steering wheel which somehow had a huge chunk of its foamed rubber rim missing/worn away. But I like these wheels with no awkward to hold spokes in the usual locations, a slightly smaller diameter for the pwr steering models, and a recessed hornpad to make the most of the dished design & lead the eyes into the dash. The missing area replaced with a few layers of sikaflex windscreen adhesive. Thumb tabs also added for interests sake. 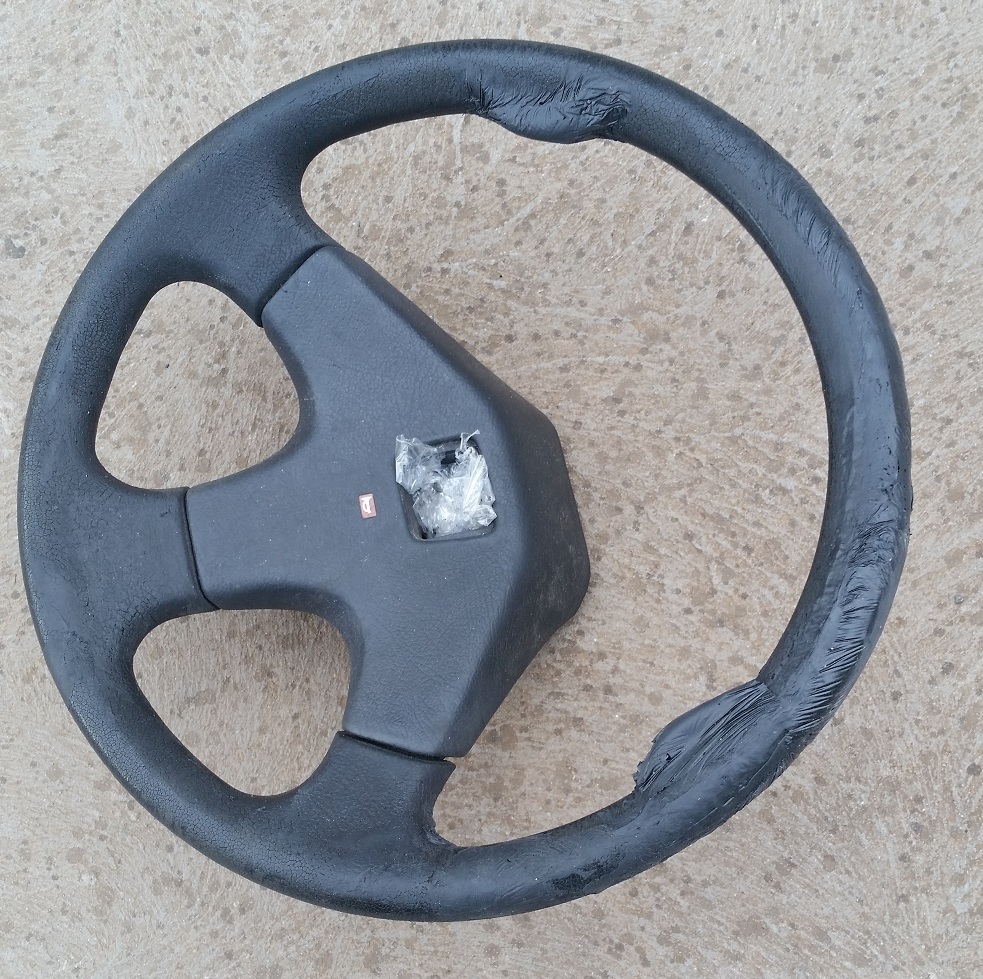 The surface cleaned up afterwards with a belt sander & now ready for when I feel enthusiastic enough to sew leather around it. |
| |
Last Edit: Jan 15, 2021 23:45:27 GMT by 79cord
|
|
79cord
Posted a lot
  
Posts: 2,617
|
|
|
|
Easter was spent upon the DC2 Integra exhaust system as its main pipe had rusted & obviously split along its weld seam. 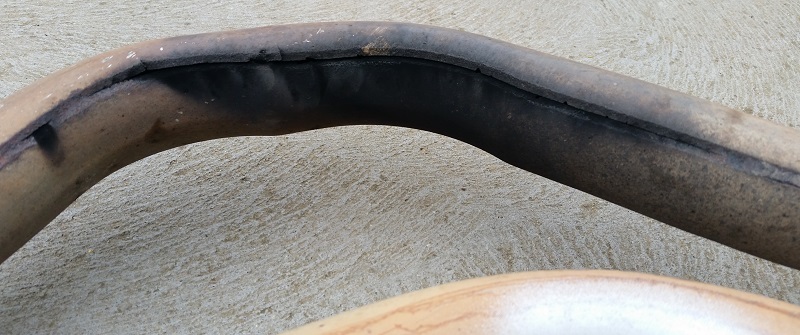 I'd bought a similar aged DC4 exhaust (Non-Vtec B18B engine), though that was approximately 50mm longer for a slightly different CAT & interestingly even positioned it's resonator closer to the engine. Tuning for Vtec engine revs? I wanted another exhaust for Blue integra's future drivetrain use anyway. 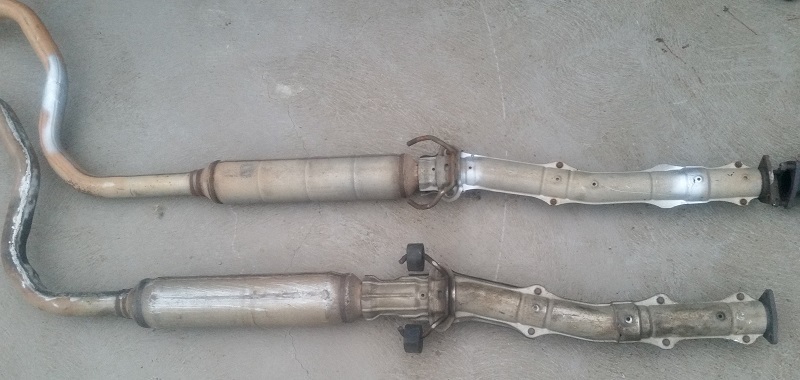 So after wire-grinding away the rust DC2's old exhaust & some of its resonator weld seams were welded back up. 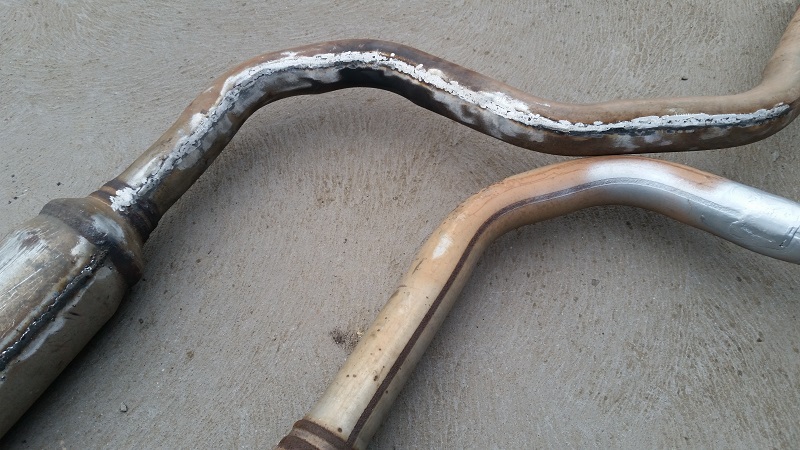 |
| |
Last Edit: Apr 20, 2020 7:48:58 GMT by 79cord
|
|
79cord
Posted a lot
  
Posts: 2,617
|
|
|
|
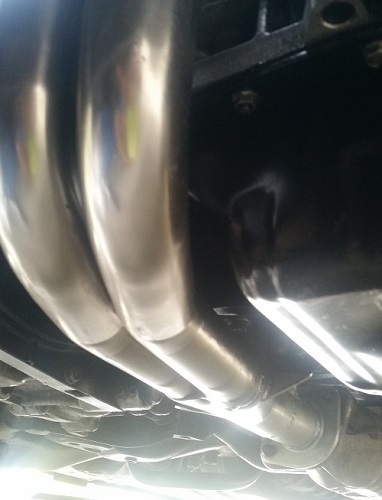
Part 2 of Integra exhaust was to fit the cheap Chinese/American manifold I'd bought last year As said previously I'd stayed cautious & stuck with a largely original layout not wanting to compromise ground clearance under the sump nor eliminate, enlarge or relocate my CAT converter so had chosen one actually advertised for non-vtec B18B in preference to late B18C Type-R.
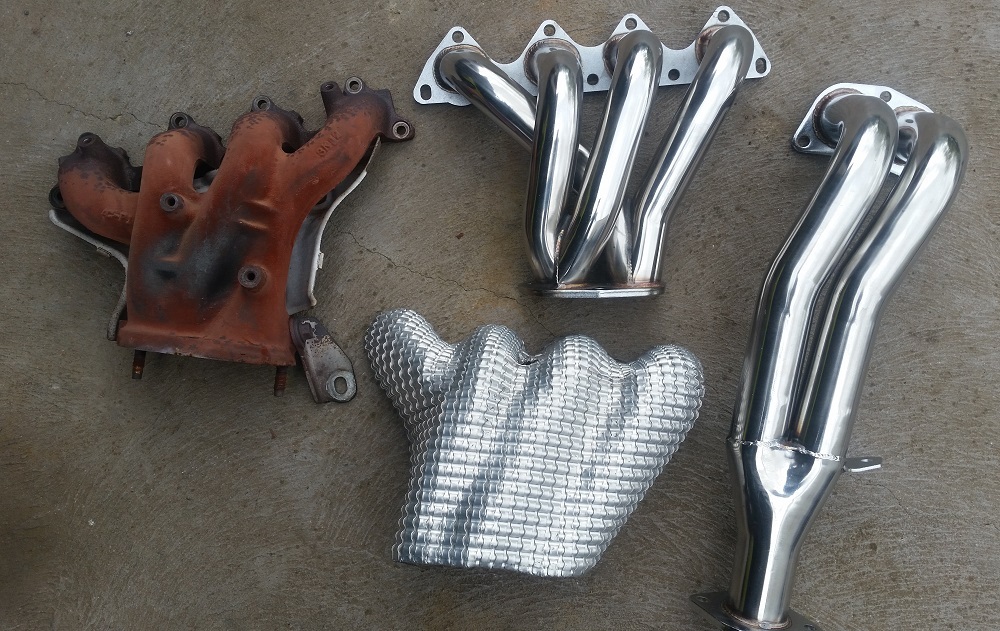 Not expecting much change in power or torque with internal dimensions matching Honda's pretty closely & the original cast iron manifold & double skinned downpipe are already nice & smooth. Should loose about 5kg in weight though & the new item certainly looked shiny, smooth & nicely welded.
Original heat shield wasn't doing to fit though & I didn't want to fry wiring, A/C or Pwr steer hoses so formed a new one from a 70x26cm sheet of shielding material gently hammered & pressed over the new manifold (protected by a thick blanket). Managed to shape it to be nicely provocative of the shapes beneath it.
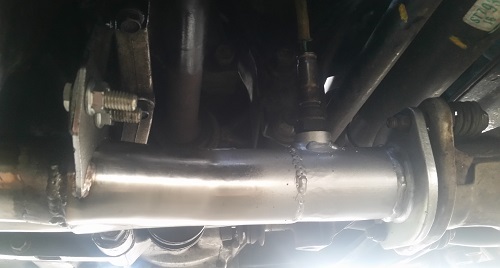
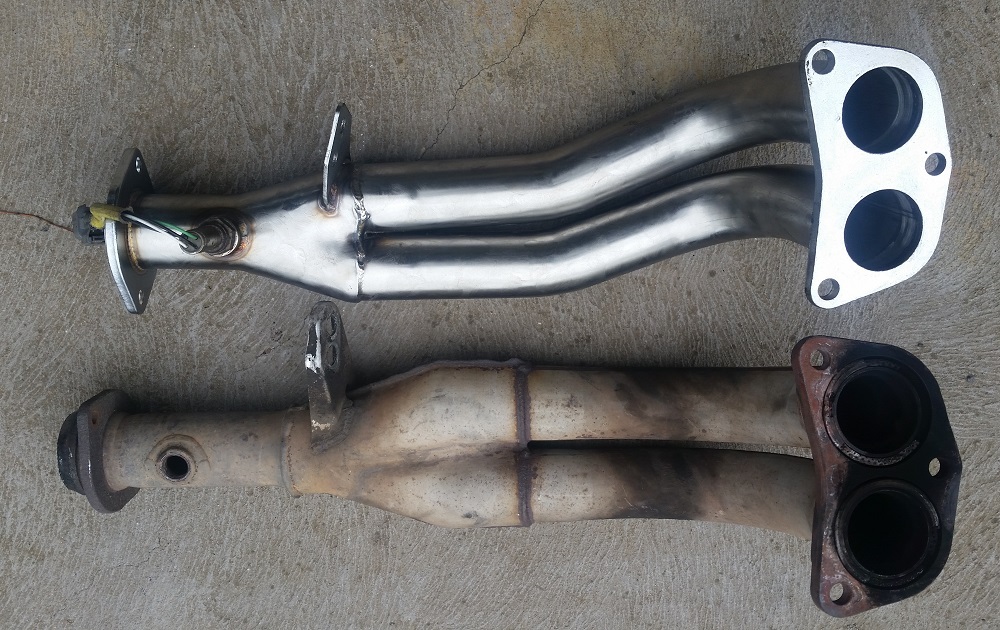 Unfortunately the new down-pipe was approximately 60mm shorter though that might be blamed upon changes Honda had made later in production to standardize parts between Vtec & Non-Vtec models, (with typeR differing as well). That doesn't explain the Pipe hitting the sump & not lining up with the exhaust though.
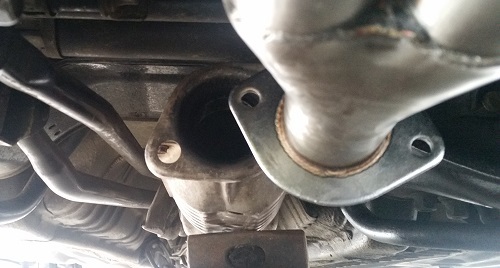 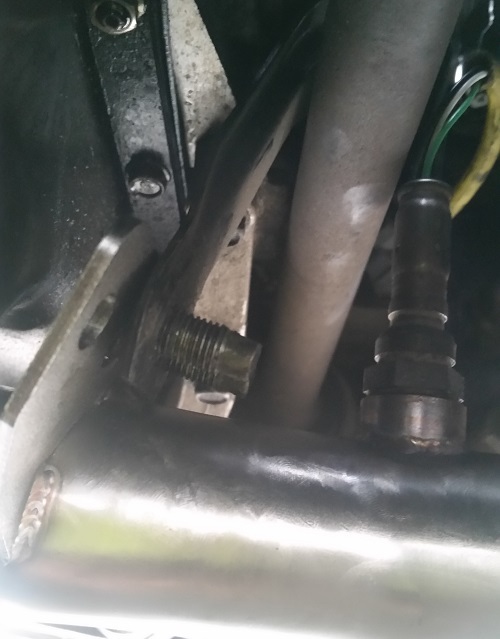 Nor the Oxygen sensor rubbing upon driveshaft & middle mounting not lining up with Honda's mount hanger. Whether the upper manifold or lower down-pipe was at fault, the down-pipe would be easier to revise, though I didn't think there'd be much hope trying to bend it. So with much regret I had to cut it up to rotate the upr mtg flange and lengthen one side 10mm
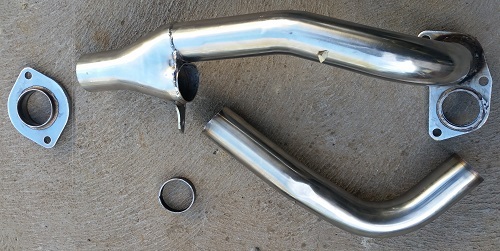 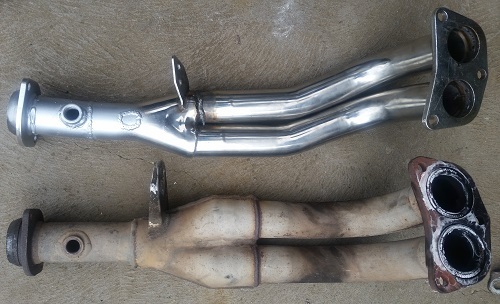 And all welded back together with my MIG welder (No stainless wire unfortunately), with added 60mm length, rotated end mounting flanges & relocated O2 sensor. Everything clears now though I made up a new hanger bracket for the middle mount.
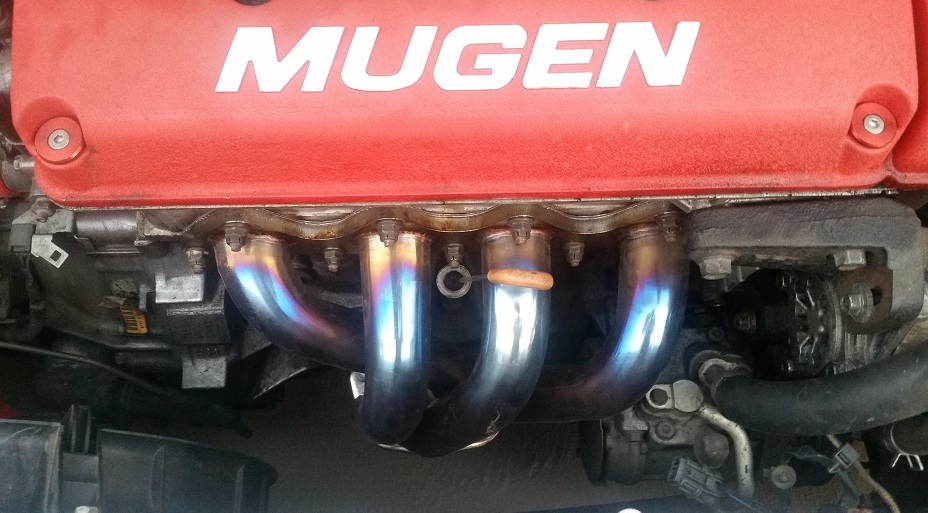 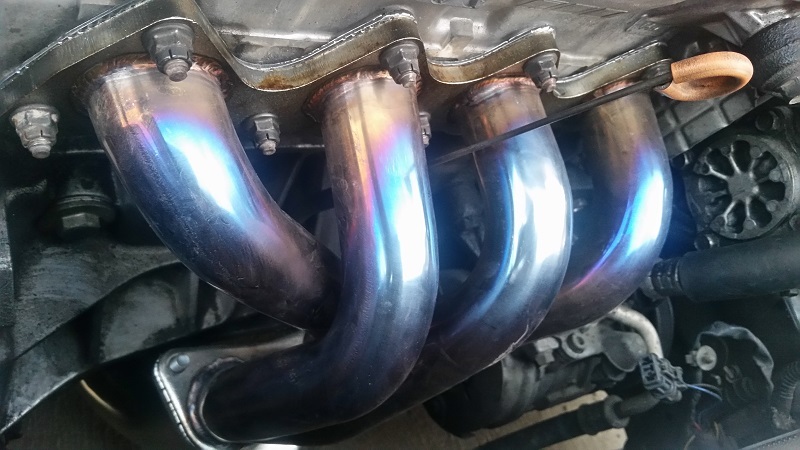 Stainless steel blued up immediately with use, though being a lower quality grade surface rust probably won't be too far behind without regular polishing. 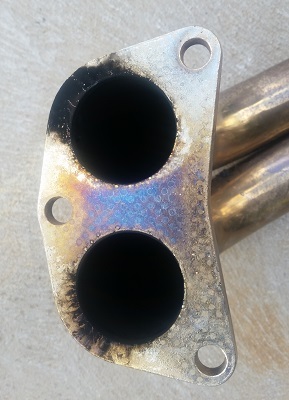 A bit noisy though, the intermediate gasket blew out & de-laminated pretty quickly. The mounting flange was now warped, if it weren't beforehand. So a bead of weld was applied followed by grinding & hand sanding to improve flatness. Not having a replacement gasket the old one was wrapped in 0.5mm Aluminium flashing sheet & refitted. 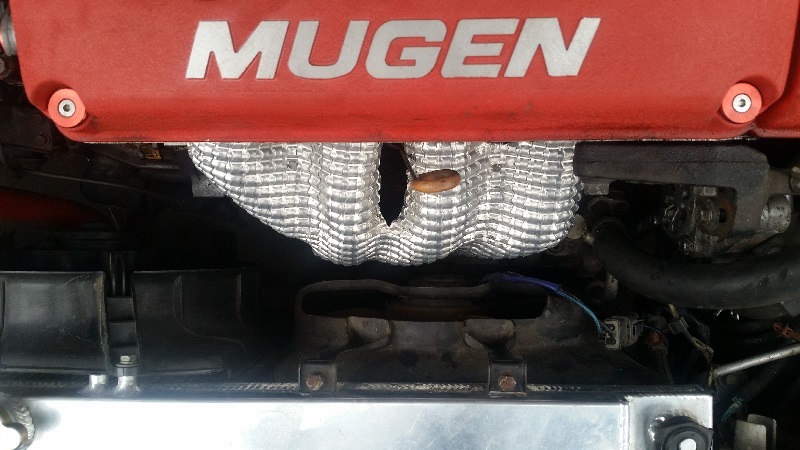 Heat shield mounted with some screws into metal tabs I fitted to manifold/head mtg studs. Clears the secondary (A/C) cooling fan too. I also pushed / hammered a washer onto the end of the dip-stick tube since it's too easy to miss when poking the dip-stick into the gap in the manifolds. |
| |
Last Edit: Apr 21, 2020 4:57:03 GMT by 79cord
|
|
|
|
|
Apr 21, 2020 23:20:28 GMT
|
How expensive is stainless wire here?! D: Dipstick washer is a good idea.  |
| |
|
|
79cord
Posted a lot
  
Posts: 2,617
|
|
Apr 22, 2020 11:56:33 GMT
|
|
It's been a while since I looked, obviously more than std steel but not ridiculous.. Though I was under the impression it worked better with a different gas. And normal steel would rust more quickly alongside stainless making my welding with std steel wire sound worse now that I think about it...
Hope the new metal I added is a low-grade stainless... leftovers from 2000 Prelude exhaust I adapted for the JDM Prelude.
|
| |
|
|
|
|
|
Apr 22, 2020 22:18:32 GMT
|
|
It's pretty damn expensive up here is Brisbane!
I wanted to get some to weld up my workbenches but at the cost, I couldn't justify it and had to just use galv spray instead.
Would have cost more than double what I paid for the rest of the workbenches/materials!
|
| |
|
|
79cord
Posted a lot
  
Posts: 2,617
|
|
Apr 24, 2020 13:16:50 GMT
|
Part 3 of Integra's exhaust system would be the muffler, and perhaps surprisingly after 26 years mine was still intact, just boringly doing its job far too well for interest after the sonorous leaks in the main pipe were repaired. I'd read some where about Americans fitting 2007 Civic Si mufflers, the closest relative we received in Australia was the 2007 "FD2" Civic Sport, superficially a bland sedan, though a least the "Sport" badging meant more than alloy wheels & a rear spoiler. 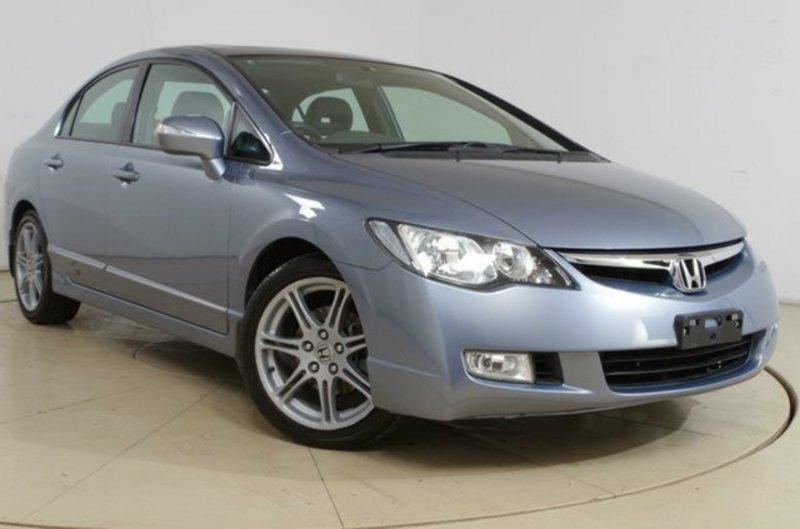 Unlike the majority of their brethren arriving from Thailand these were actually Japanese & fitted with the K20 DOHC iVTEC engines (even if they only claimed 114kw). So when a friend was throwing out a rear muffler from one with a dented chrome tip I grabbed it. Noting that although looking similar to the normal sedan mufflers it had much larger tip trims & was from a different supplier. Overall size & the pipe into them looked similar to the Integra but for the twin tips and different rear hanger locations. Stainless steel construction should be an advantage so I was happy to give it a try. 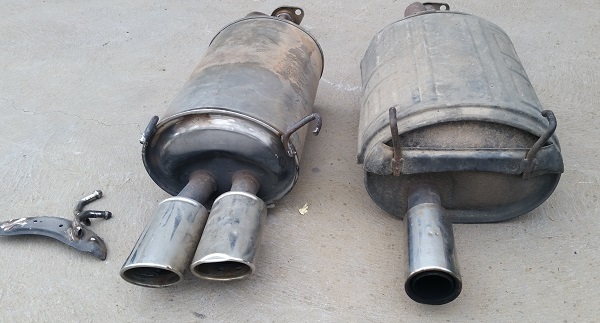 Inappropriate old mounting hangers cut off and new ones welded on. After I tried to fit it in place however it was obvious the pipe into the muffler was shorter than the Integra so the front of the muffler & rear sway-bar weren't going to be friends. 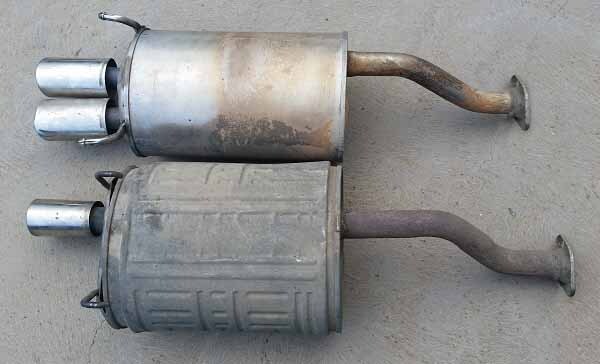 So exhaust pipe lengthened 45mm just before the muffler. 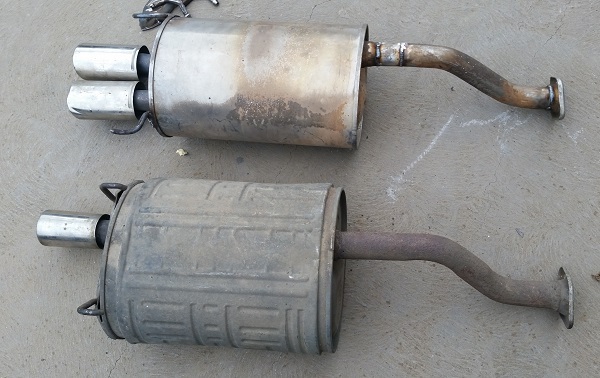 Then after another try of course I found the Integra exhaust pipe, & thus its mounting flange & socket were 3mm larger diameter & wouldn't bolt up so I had to cut off & replace the muffler pipes mounting flange... 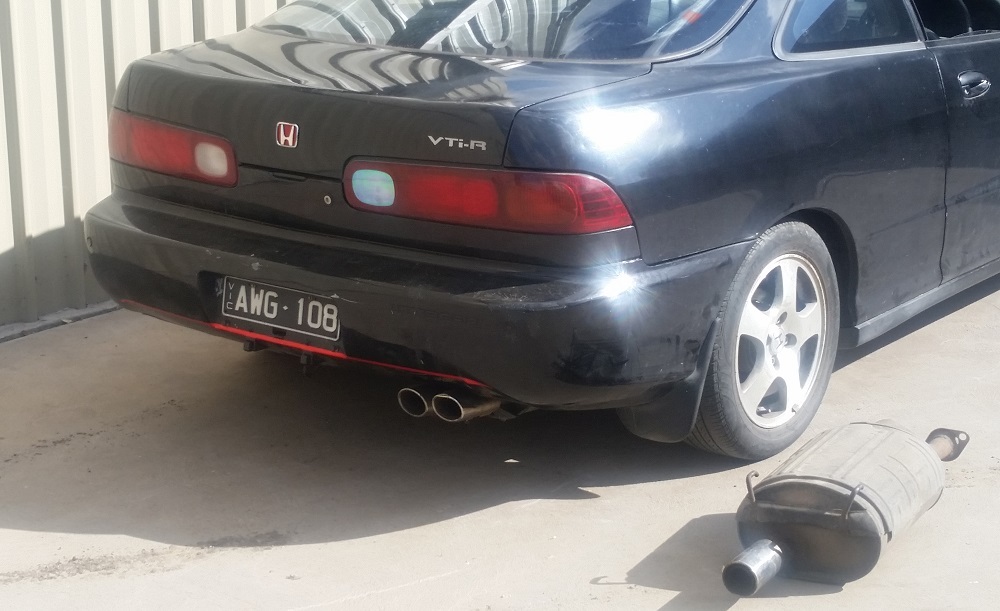 But it's now on & I'm very pleased with the results. Twin exhaust tips rather than one better match the clearance notch in the rear bumper and the muffler offers much more variation in sound according to engine revs without being obtrusive at lower revs, and reveals the 5k cam-lobe changeover that Honda tried so hard to smooth out before they realized many preferred to hear it with the Type R (though for this muffler it's mostly a resonance period). Guess I need to try & replace that chrome tip now. |
| |
Last Edit: May 23, 2020 10:07:39 GMT by 79cord
|
|
79cord
Posted a lot
  
Posts: 2,617
|
|
|
|
Latest experiments I heard about a fairly cheap windscreen wholesale warehouse & thought I'd better order some for the Blue EG Civic & JDM Prelude, though the '91 ED Civic also needed its (good) windscreen removed to repair a small rust hole visible under it's trim half-way up the A-pillar, so I realized I'd better remove it before I found I needed a 3rd screen. Glued in doesn't make it easy and I wanted to take extra care to ensure I didn't damage the surrounding trim that could cost more than the glass to replace, hence many cars wind up with generic extruded sections that don't include side channels to guide water up & away from the side windows (as had been fitted to my CRX when Mum had the screen replaced). 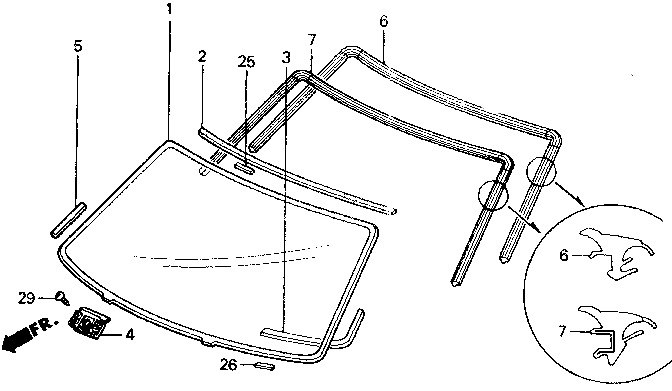 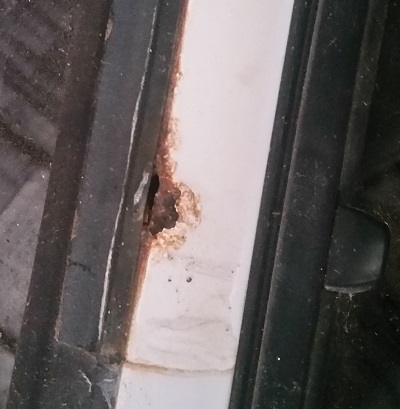 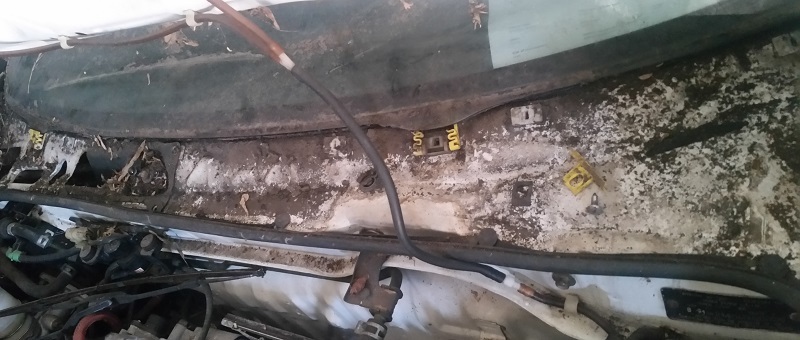 Cowl trims removed for access to the lower edge from both in & outside the car, followed by bonnet for convenience, interior pillar trims, sun-visors, mirror & front edge of headlining unfastened before I set to work slowly cutting at the adhesive with a knife. Apart from the lower edge I had to do this from inside the car cutting close to the body side (rather than glass) as the surrounding trim moulding is fitted around the edge of the glass before it is bonded in place, making it near impossible to remove in-situ. 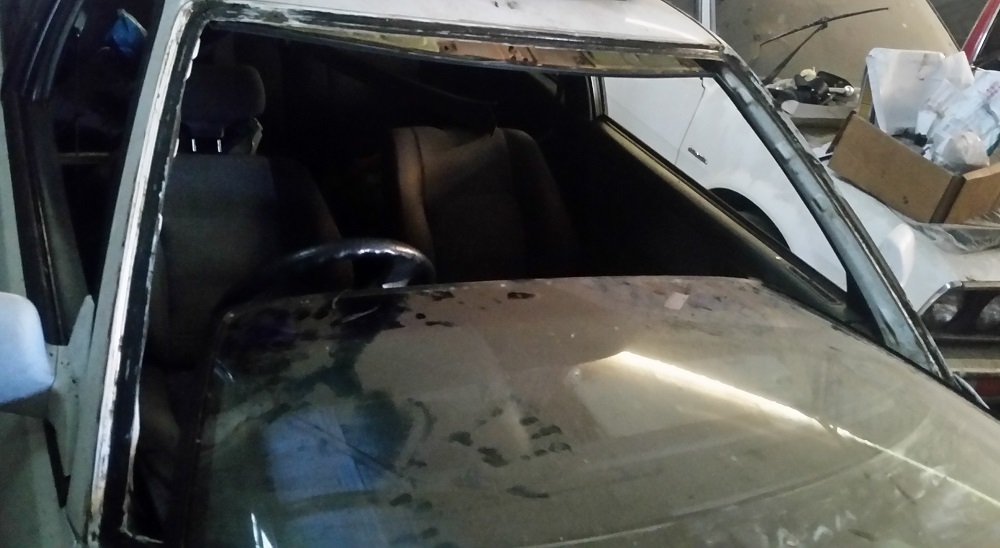 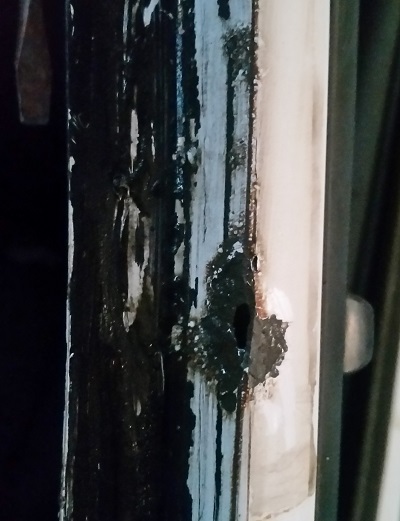 Finally after most of a day cutting away at it I managed to cut the windscreen free, screen & trim undamaged, anti-climatically revealing the hole to be little bigger than that visible before I started, though there is another one about the same size above the driver that was completely concealed. Cleaned up remaining adhesive with more cutting and wiping it down with Acetone or nail-polish remover. |
| |
Last Edit: Jan 15, 2021 23:58:17 GMT by 79cord
|
|
79cord
Posted a lot
  
Posts: 2,617
|
|
|
|
Another thing I've been meaning to do for ages has been to add red detailing to the trim recesses of the side and bumper rub-strips of the Civic's, having bought many metres of 10mm reflective red tape for the purpose several years ago & so far having only used it to detail a styling crease on the DC2 rear bumper. So finally this happened to Nessie: 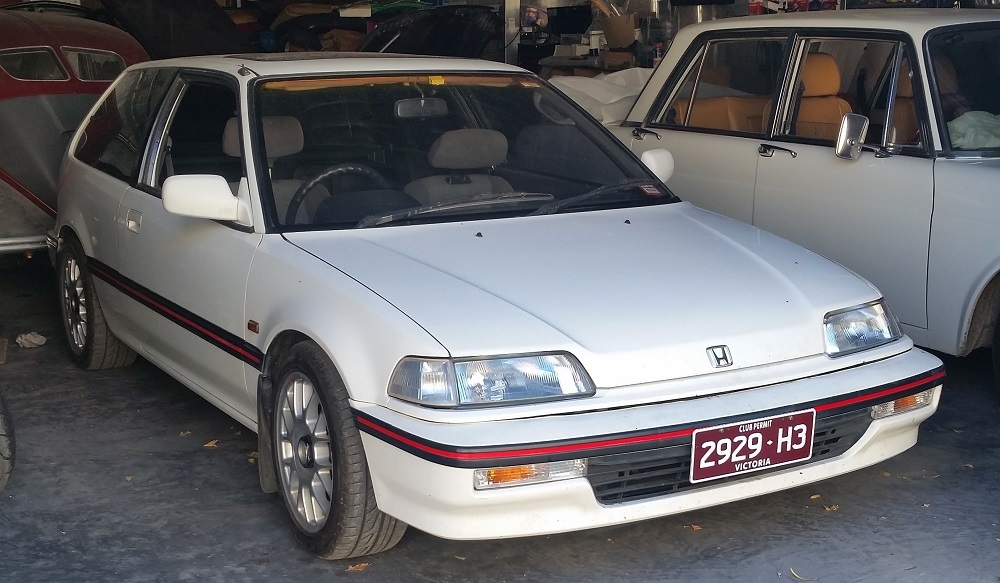 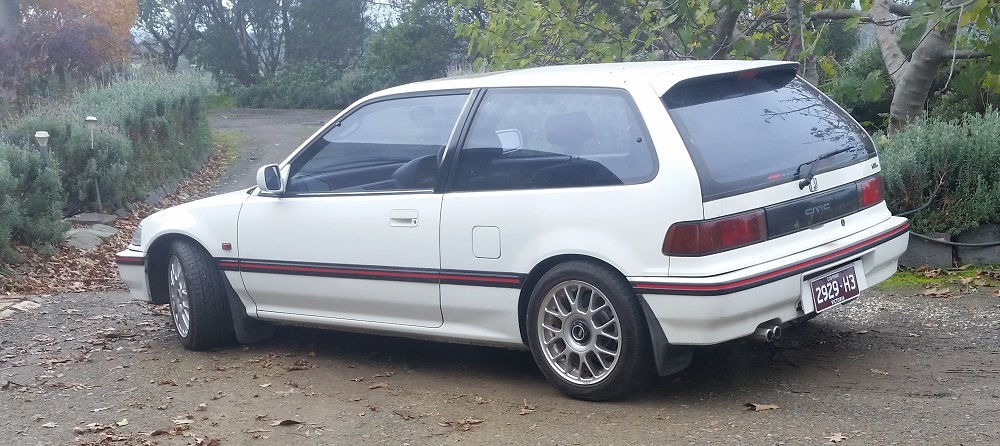 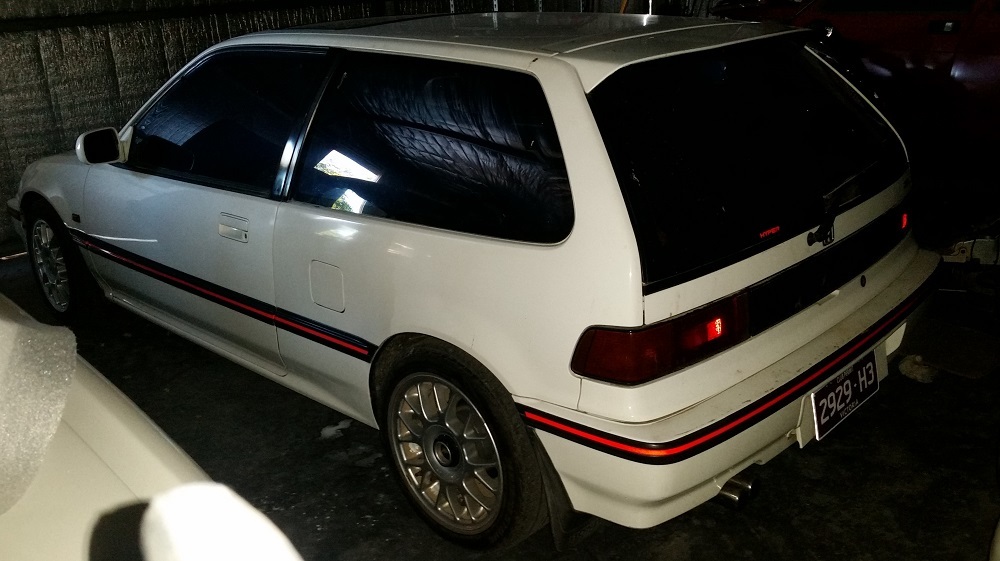 Being reflective it REALLY stands out when light shines upon it at night! Though very '80's & something I've been meaning to do for a loong time I still wonder if it isn't too fussy against the black rub-strip & would look much better with white rub-strips.. & since I'm reluctant to paint them I should buy white vinyl film to wrap the strips instead before re-applying the red. 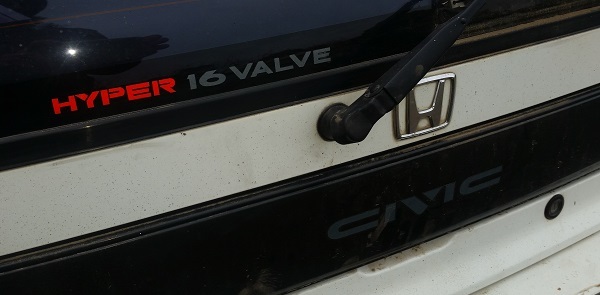 I also hand cut some of the tape to add HYPER to the factory 16 VALVE sticker upon the rear window, matching the engine description Honda had used in Japanese publicity material for their first SOHC 16-valve after 15yrs of 12-valve experiance. 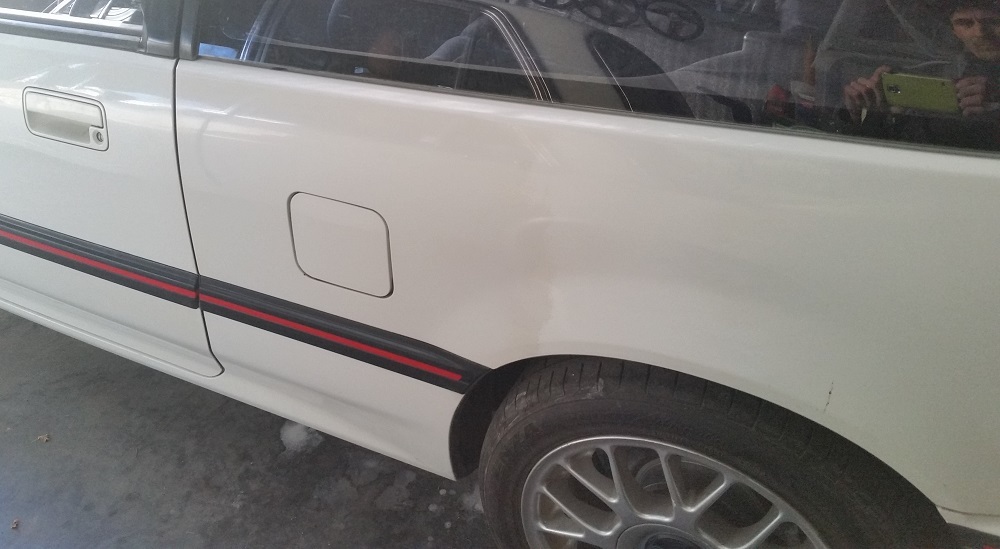 And I finally polished up rough paint Darren had sprayed around the fuel filler in fear of rusty paint chips. Unfortunately revealing a poor colour match. 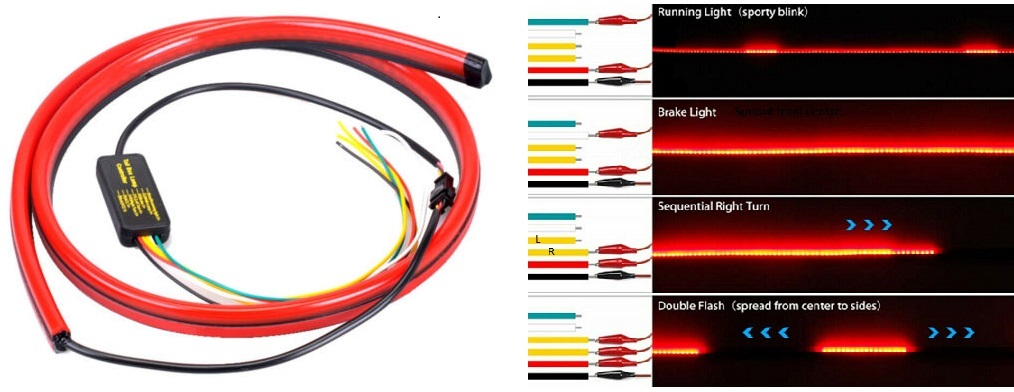 I've also bought one of these 1m long LED strip brake lights with the intention of fitting it into the edge of the roof spoiler instead of the original lamp. I liked the idea that it could remain lit as a full width running/parking light before brightening from the centre as a brake light emphasizing the closing gap to following cars, but also include a turn indicator function. Unfortunately the 'running light' function also incorporated a flowing/strobing hi-light that would make it too gaudy/distracting for me to use that feature unless I can find a way to bypass the light controller & wire this function to the three wires exiting it so that it simply stays on as I had expected. Another problem was discovered when I dismantled a spare wing (steel) I had bought for the purpose to find metal retaining structure hidden behind the plastic lower trim where I wanted to install the 8x16mm light strip. This makes it tempting to make up a new & much lighter wing instead from fiberglass... I should be doing more important things.... |
| |
Last Edit: May 23, 2020 10:03:38 GMT by 79cord
|
|
|
|
 But I bought>

 But I bought>


 Originally 7.5 kg, now 3.8 kg

 2 moderately large boxes arrived in the post...






 A bit noisy though, the intermediate gasket blew out & de-laminated pretty quickly. The mounting flange was now warped, if it weren't beforehand. So a bead of weld was applied followed by grinding & hand sanding to improve flatness. Not having a replacement gasket the old one was wrapped in 0.5mm Aluminium flashing sheet & refitted.
