|
|
|
|
|
So I got started on the throttle bodies last night. Firstly the secondary butterflies had to come out as they're not needed:  The tiny screws holding them to the spindle were a total pain and had to be drilled out. As a result the spindle then wouldn't slide out in one piece afterwards, so I cut, bent, chopped, and pulled the spindle out bit by bit, was a bit of a ballache to be honest: 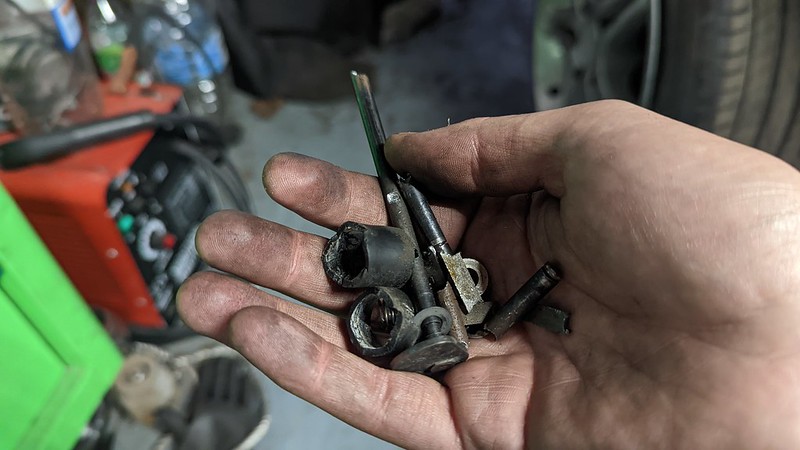 Unscrewed the fuel rail and removed the injectors. Cleaned everything up and cracked out the good old JB Weld to fill the injector holes. Smoothed the JB Weld out on the inside so it follows the shape of the ports. Also filled all of the holes left from the secondary spindle that I removed. This is the exact same process I did on the MX-5 and that setup was still running reliably over 3 years later, so I'm happy with this being a permanent solution. 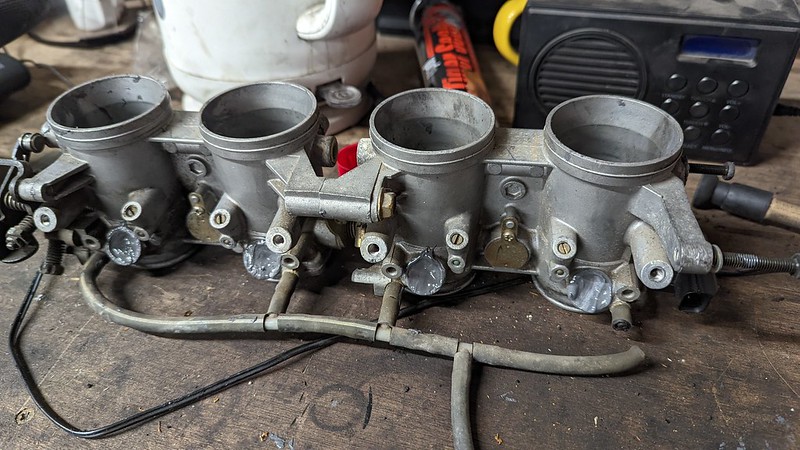 Now, onto making the intake manifold itself. This took a lot of thinking and working out exactly how I wanted everything. The VVT MX-5 cylinder head has the intake face angled down slightly. I wanted these throttle bodies angled up by about 20 degrees, so I had to got a bit further than that to compensate for the head angle. Anyway, as I mentioned before, the port spacing on the intake flange is 91-91-91mm, and the GSXR bodies are 75-80-75. Given that I wanted them angled up, and also the runners needed to be angled to change the port spacing to suit the throttle bodies, I wanted to jig the flange and the throttle bodies so we had a fixed position to work with. Luckily my mate was at the workshop today who has a ton of experience with all sorts of motorsport fabrication, so he gave a few pointers on making a basic jig. Now it's hardly the most professional looking setup you've ever seen, but if it works it works. 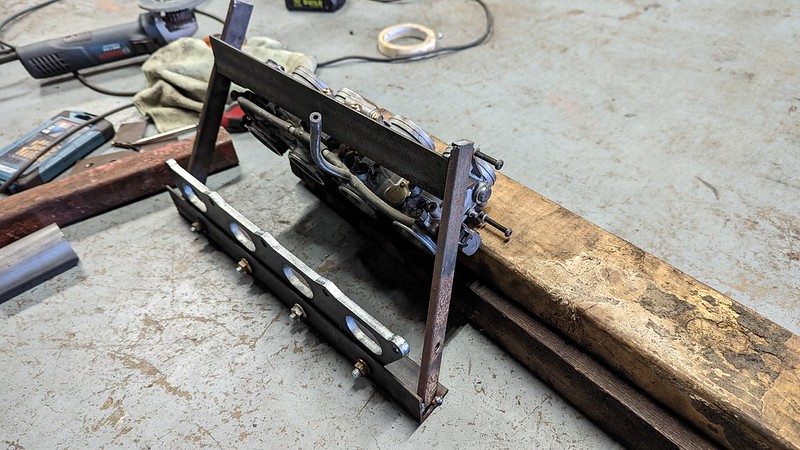 Drilled out some angle iron and got both parts bolted to it. Then got them set in the exact position we needed, and while I held it still my mate welded the side pieces on, to hold it all firmly in place. As a stroke of luck, the threads in the casting that held the GSXR fuel rail on sat at about a 30 degree angle, so after bolting the angle iron on to them, we set the angle iron perfectly flat and the throttle bodies were sat at the exact angle I was looking for. 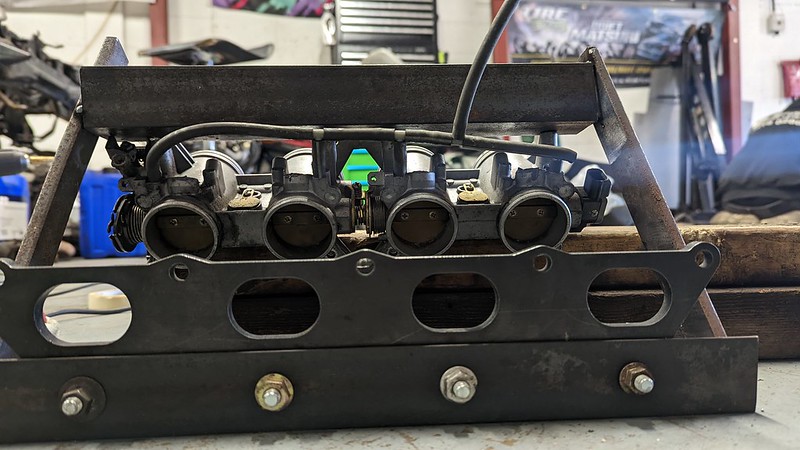 I bought a load of bits to get these built and finished, one of them being 1m of 45mm 2mm wall steel pipe. I did some rough calculations and worked out that this pipe size when ovaled out in the vice should roughly match the 50x30mm port size on the flange. It sort of does, but more on that in a minute. I started cutting the pipe to test fit. The 2 centre ports needed to be moved in by 5.5mm each. It took a little bit of working out.  Not a bad initial try. So I got the 2 centre runners made up first. Used a triangle calculator online because despite an A in GCSE Maths, that was now 14 years ago, and it all seemed like too much work. Anyway, to get a 30 degree angle on this size of pipe I needed to mark 25mm in on one side, and then cut the pipe from that mark, tapering down to the original straight end on the other side of the pipe. Worked pretty well. I got both made up and tacked on:  Not bad going so far. Now the outer ports needed more angle put into them. With the centres being 5.5mm further in, and the 1-2 difference being 11mm, I needed to bring these runners in by 16.5mm. So we did a bit more measuring, and after one failed attempt I managed to make the correct cut,and got the outer runners made up. 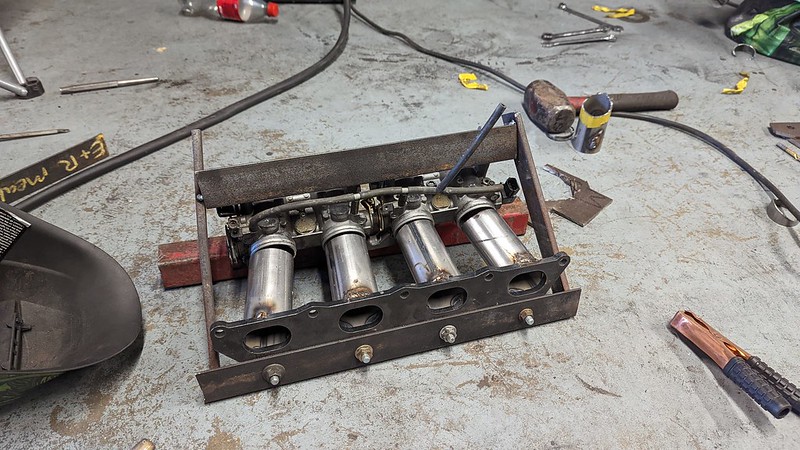 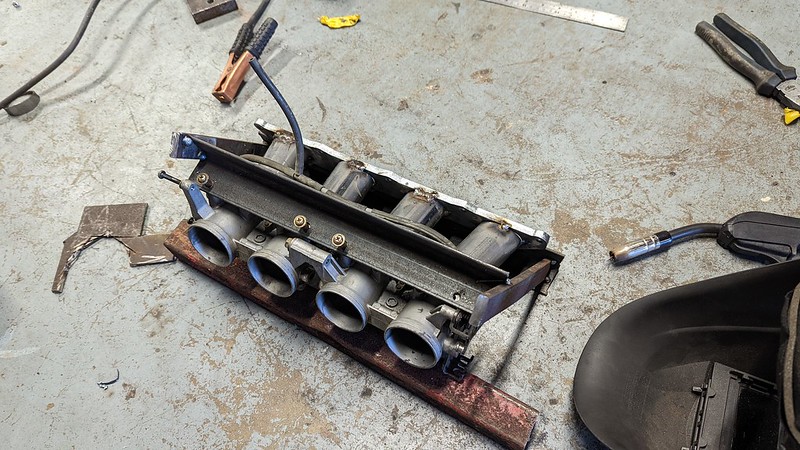 Now these are going to be connected with silicone joiners. The pipe internal diameter and the throttle body internal diameter matches nicely, but as you can see the outer runners are at a bit of a different angle. The main point of this jig was to get the upward angle and port spacing sorted. Now I can add a small amount of additional bend to the ends of each runner to get them sitting perfectly straight to the throttle bodies. Currently this setup is exactly 17cm long from flange face to the inlet of the throttle bodies, A standard intake manifold on the 5 engine is approximately 20cm, so I still have some room to work with and not take up any additional room in the bay (obviously trumpets will add length, but we'll work that out later). The ovaled ends I made on each runner in the vice worked pretty well. Width wise they are bang on 50mm and match the intake flange. Height wise they are a couple of mm larger, so once the manifold is fully welded up, I am going to die grind the intake flange on the runner side, to taper the size out to the runners a bit better. It's not the most perfect setup ever, but there should at least be no major air flow disruptions when it is done, which is what I'm hoping for. As I got the GSXR bodies for free, this setup including all the pipe, joiners, jubilees, JB Weld, and intake flange has cost me under £100. The most expensive part will be the trumpets, but even then this is a massive saving over any off the shelf setup you can buy anywhere, and once again it's been great to learn some new stuff as I go. Hoping to have these done and on the car next weekend all being well! |
| |
1980 Vauxhall Cavalier - MX-5 VVT engine/box conversion, GSXR ITBs
|
|
|
|
|
|
|
|
|
Been busy. Went away with the girlfriend for my belated birthday present. Nice hotel, pool, managed about 3 minutes in the steam room before I felt I was going to die 😂 There was a big old Jag in the car park  anyway, enough pampering myself, had to get back on the ITBs. My mate has a spare VVT engine lying around on the engine stand, which was ideal. I mounted up the bodies and I'm pretty happy with the angle they sit at (note, silicone joiners are too long in these photos, it was just a basic test fit).  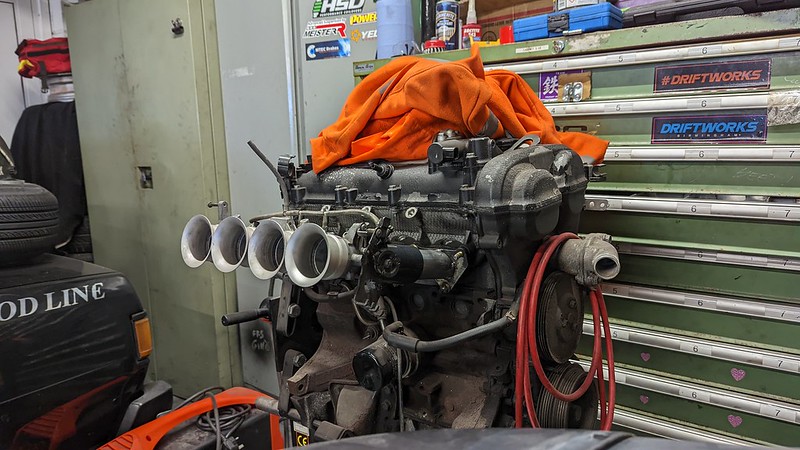 With the downward angle of the mounting face on the head, these are sitting right about where I had imagined they would angle wise. Due to the absolute ballache of a job getting the intake manifold off of my engine in the car is going to be due to brake master/booster location, absolutely zero fitting to the actual application has occurred. I am simply winging the entire thing haha, these are getting finished as they are, if anything is in the way, it is getting moved, removed, or bent out of the way. Anyway I bolted all 9 nuts down to the head, and welded it up. Not my prettiest welding ever, had to go over a couple of bits, but I think it's come out alright. Flange appears to have survived just fine, straight edge still sits nice and straight on the mounting side, so no warping has occurred from what I can tell. I think bolting it to the head worked well and seemed to take a fair bit of heat away from the flange as it was being welded. As these are steel and I have MIG welded them on, to prevent corrosion I have slapped a fair amount of sealer over the welds themselves. The sealer isn't particularly pretty, but none of the welds are exposed at all, so it'll do the job. I'm not in this for #weldporn or internet clout so I don't really give much of a sh*t how it looks, as long as it works as intended.  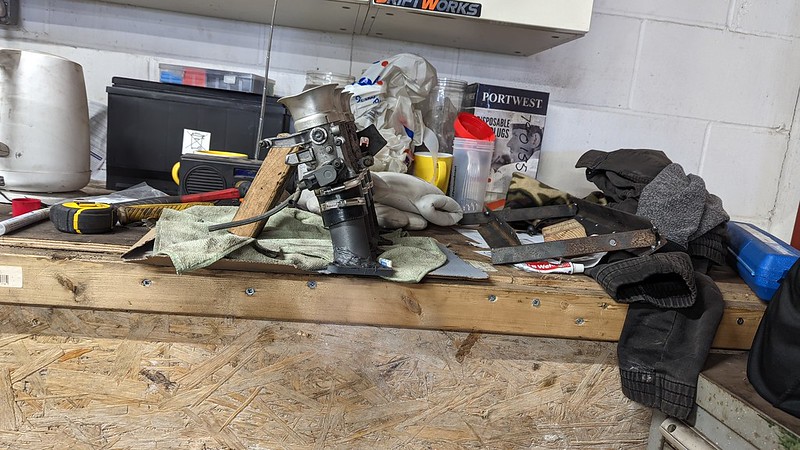 The trumpets here are the original ones I had on my mk1 5 before I swapped to the big 90mm ones. They're off an older GSXR 1100, carbed model. They have slots you can tighten a clamp over to press them tighter. I thought I'd offer them up as I've already got them lying around, and with a little tap they slid straight on the inlet ports perfectly, in fact they're tight enough sans clamp that you can literally pick the entire setup up just by the trumpets, so they'll do for an initial setup until I work out some better ones to buy. Port match wise they're about 1 or 2mm too big judging from this photo, but good enough as a temporary measure for sure: 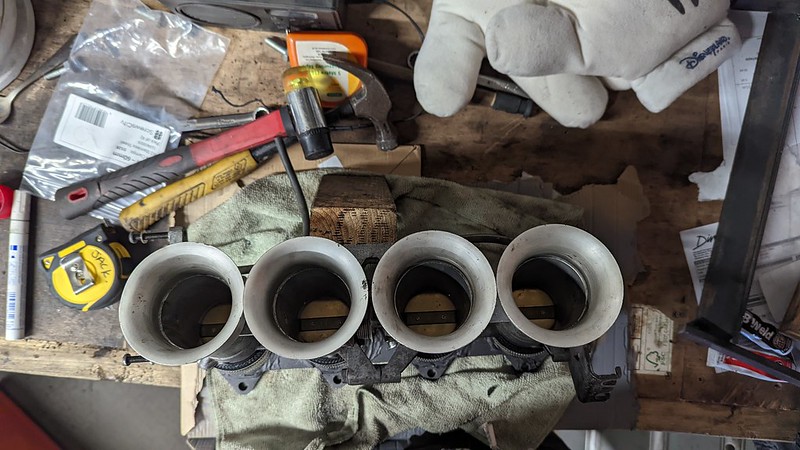 I really liked the 90mm trumpets on my mk1 5 setup, so I'll likely end up doing something similar on this. Doing some vague measurements with the original intake manifold in situ on the Vauxhall, I may need to relocate my brake fluid reservoir, but I think with some gentle brake pipe bending, the upwards angle I have made should just about clear the brake master cylinder, and the booster is essentially out of the way I think as cylinder 4 should sit further forward than it anyway. Just the reservoir will be the challenge, I'll work that out somehow. One question, brake fluid reservoir, does it need to be above the master if I relocate it? I'm sure can make that work, but wasn't sure if it was important that it could gravity feed to the master cylinder or not? Or will the master cylinder simply suck in the fluid it needs regardless? |
| |
1980 Vauxhall Cavalier - MX-5 VVT engine/box conversion, GSXR ITBs
|
|
thomfr
Part of things
  Trying to assemble the Duett again..
Posts: 694
|
|
|
|
|
One question, brake fluid reservoir, does it need to be above the master if I relocate it? I'm sure can make that work, but wasn't sure if it was important that it could gravity feed to the master cylinder or not? Or will the master cylinder simply suck in the fluid it needs regardless?
I think you will have a nasty air bleeding issue if you position it lower and it might overflow (communicating vessels) but that is just my basic physicks thought.
Thom
|
| |
Last Edit: Jun 6, 2023 8:42:24 GMT by thomfr
73' Alfa Giulia Super
64' Volvo Duett
65' Volvo Duett
67' Volvo Amazon 123GT
09' Ford Focus 1.8
20' VW ID4
71' Benelli Motorella
65' Cyrus Speciaal
The difference between men and boys is the price of their toys
|
|
|
|
|
|
|
|
The reservoir needs to be above the cylinder otherwise you risk air getting trapped in the link hose and drawn into the cylinder with a consequent sudden loss of brakes.
There are a variety of plastic push in fitting for the master cyl out there that allow you to re-locate the reservoir, last time I needed some very low profile ones I found ones intended for a Lancia Motecarlo.
|
| |
|
|
|
|
|
|
|
One question, brake fluid reservoir, does it need to be above the master if I relocate it? I'm sure can make that work, but wasn't sure if it was important that it could gravity feed to the master cylinder or not? Or will the master cylinder simply suck in the fluid it needs regardless? I think you will have a nasty air bleeding issue if you position it lower and it might overflow (communicating vessels) but that is just my basic physicks thought. Thom The reservoir needs to be above the cylinder otherwise you risk air getting trapped in the link hose and drawn into the cylinder with a consequent sudden loss of brakes. There are a variety of plastic push in fitting for the master cyl out there that allow you to re-locate the reservoir, last time I needed some very low profile ones I found ones intended for a Lancia Motecarlo. Perfect, thanks both. After doing some more reading earlier it seems this is the consensus from everyone. I got my mate at the workshop to pull the reservoir out of my mk1 5 I'm breaking and measure the ports for me. Now purchased some 13mm push connectors and hose to relocate the reservoir. Plenty of room above the master cylinder so this should be a simple job, just need to make up a bracket to hold the reservoir. |
| |
1980 Vauxhall Cavalier - MX-5 VVT engine/box conversion, GSXR ITBs
|
|
|
|
|
|
|
Right, so Friday afternoon I went to the workshop, and started fitting the ITBs. I had made no alternative plans on getting home, I was driving home. So there was my motivation to complete the job properly in 1 day haha. Started by removing the intake manifold. This is always a pain in the a*se, but got it sorted eventually:  With this off I cleaned up the mating faces, fitted a new gasket, and got the throttle bodies bolted on. 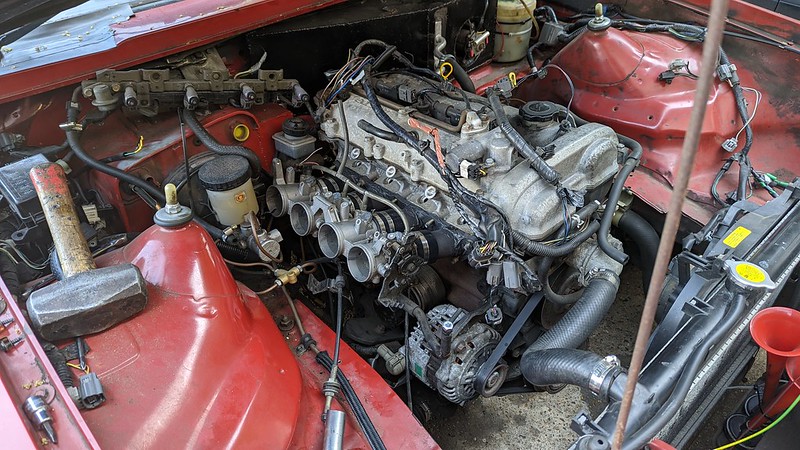 Please ignore the also partially fitted air horns haha, that's a job I was finishing at the same time. Anyway yeah so they fit, the flange didn't warp when welding them up, and they bolted on nicely. So one very obvious issue here, the brake master cylinder haha. Not the end of the world, I am making up a plate and deleting the booster tomorrow night, will give me tons more room. So bar the clearance for trumpets of anything more than 20mm everything looked good. I then got the vacuum block mounted into the bay, and ran all my vac lines, re-attached fuel rail and injectors etc. etc. 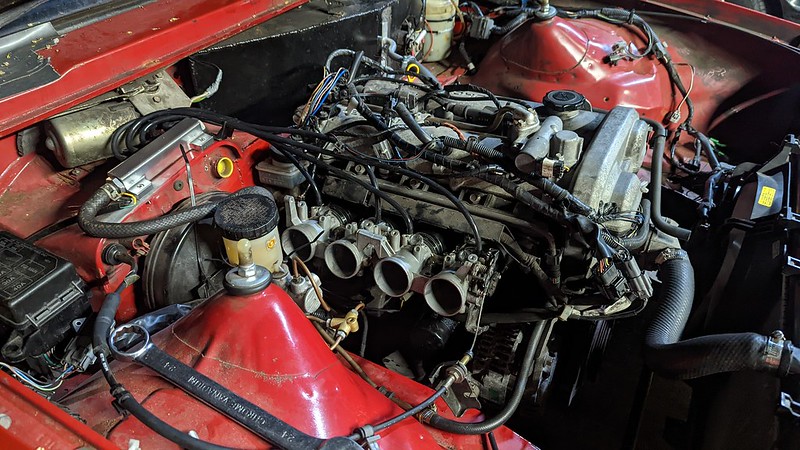 Need to tidy some wiring and stuff of course, which will all happen this week. Main thing was getting it in, making sure it ran and there were no vac leaks etc. Re-did the map on the ME221 to be TPS (Alpha-N) based, uploaded some basemap "ITB" VE and spark tables into my map, and fired it up. Started on the button, absolutely lovely, and idles great. Seeing around 50kPa on idle which is basically exactly what I had on my mk1 ITB setup on idle, so I'm pretty happy with the physical install. All seems well. TPS calibrated fine, and seemed fine, but when running I had a lot of TPS noise, like way too much. This map relies heavily on a decent consistent TPS reading, so yes I did manage to drive it home, but it wasn't ideal. So the last few days I've been messing with it on the drive. Tried applying a new ground to the TPS ground, getting a 5v from another source, everything I could. Nothing worked. The TPS is the problem, it's faulty. Bought a used genuine GSXR TPS but it won't be here for a few days, so I bought a cheap no-brand one on Amazon Prime just to try out, it was like £11 haha. Anyway obviously that was complete curse word and literally gave no signal whatsoever, don't buy cheap sensors people haha. Anyway I still had a spare from my old Daytona 600 setup, and it just so happened to fit. It's on, it's calibrated, and it'll do until the proper GSXR one arrives later this week. Drove it tonight, slowly sorting out the VE table as it wasn't that good at first, taking time to smooth the table out, get rid of any lean and rich spikes etc. Still a long way to go, but it is driveable now. Both cold and hot start are both really really good to be honest, very pleased with that. Flat out is absolutely glorious, there is literally zero sound deadening between you and the engine bay in this car, so it is just pure ear melting ITB scream, it's absolutely amazing. When I'm a bit more happy with the map and don't have my laptop riding shotgun constantly I will get some videos of it. Oh yeah this also happened last night: 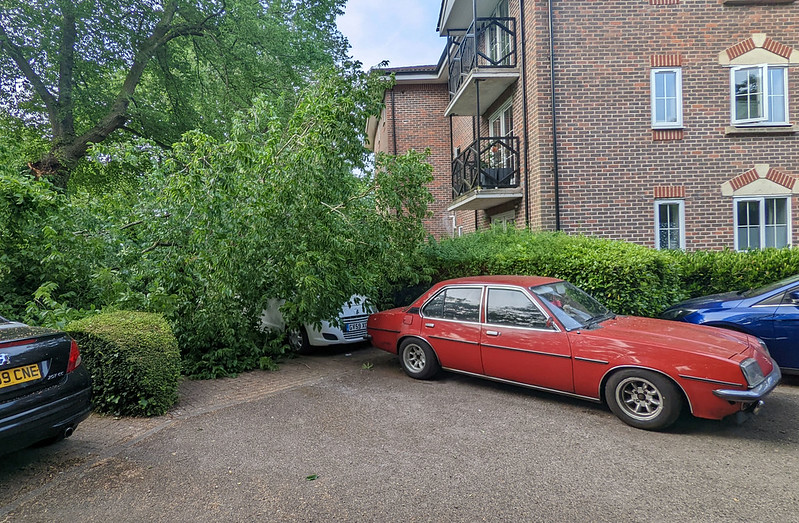 Doesn't look like much but that is an absolutely enormous branch/trunk of an old tree that came down. I'll fix the girlfriend's Alto, just a smashed rear screen and some nasty roof dents, but in all honesty I'm so glad it wasn't the Vauxhall, much harder to find spares like that for it haha. But anyway yeah absolute nightmare, it was so loud, I was sat in the living room having a tea at 1am and it sounded like upstairs balcony fell down, mad. Scary thing was I was stood under that tree barely an hour before having a cigarette haha, so I feel lucky considering. Vauxhall dodged a bullet there! Anyway, stuff left to do on the ITB setup: - Make up an ali plate to delete brake booster (with the lack of manifold vacuum now with ITBs compared to standard it isn't doing a great deal anyway) - Fit trumpets - Tidy/tuck and finish off wiring - Get the synchrometer out and check the balance of the throttle bodies. They run well but want to fine tune. - Fit genuine GSXR TPS when it arrives - Continue mapping it to run better All being well the car should be plenty ready for the run out to Goodwood for Players on Saturday. |
| |
1980 Vauxhall Cavalier - MX-5 VVT engine/box conversion, GSXR ITBs
|
|
ChrisT
Club Retro Rides Member
Posts: 1,670
Club RR Member Number: 225
|
Bilbo's mk1 CavalierChrisT
@christ
Club Retro Rides Member 225
|
|
|
Excellent addition, I bet it sounds awesome now   Obviously with the booster removal you'll need to shorten the actuator rod as well, I ended up moving the mounting point on the pedal to give a bit more mechanical advantage - I've read a pedal ration of 6.5-7:1 is best for non servo brakes. |
| |
|
|
|
|
|
Jun 13, 2023 12:39:33 GMT
|
Excellent addition, I bet it sounds awesome now   Obviously with the booster removal you'll need to shorten the actuator rod as well, I ended up moving the mounting point on the pedal to give a bit more mechanical advantage - I've read a pedal ration of 6.5-7:1 is best for non servo brakes. Sounds so good mate, I'll get some videos soon! Yeah for sure, we'll make something up so we can still use the adjustable threaded clevis section on the brake pedal to fine tune it. As for pedal ratio you're right, I think the MX-5 pedal setup is around 4:1 in standard form. Obviously I shortened it a little when fitting so it may be even less, I'd like to move the hole up as much as I can on the pedal to increase leverage, while obviously still keeping the pushrod straight enough to work correctly. The brake pedal was pretty soft before ITBs, likely because it's an MX-5 booster/master on the Vauxhall brakes. Even now with way less vacuum it's still good enough. I think with it removed it won't be an insanely hard pedal, and if it is I may even consider moving to a smaller bore master cylinder to counter-act it. |
| |
1980 Vauxhall Cavalier - MX-5 VVT engine/box conversion, GSXR ITBs
|
|
thomfr
Part of things
  Trying to assemble the Duett again..
Posts: 694
|
|
Jun 13, 2023 12:47:58 GMT
|
|
You say the brakes are a bit soft. Did you bleed it another time after a bit of use? Could improve that.
Thom
|
| |
73' Alfa Giulia Super
64' Volvo Duett
65' Volvo Duett
67' Volvo Amazon 123GT
09' Ford Focus 1.8
20' VW ID4
71' Benelli Motorella
65' Cyrus Speciaal
The difference between men and boys is the price of their toys
|
|
|
|
|
Jun 13, 2023 12:58:11 GMT
|
You say the brakes are a bit soft. Did you bleed it another time after a bit of use? Could improve that. Thom Oh yeah they got bled a couple of times after I had an initial leak on one of the rear lines after the first couple of drives. I suppose really what I mean by "soft" is more that it feels softer compared to how my MX-5 felt, with a similar booster/master setup. There's still plenty of brake feel when you press a little harder and they're not spongey/unresponsive, it's just not a tough pedal. Which I think should play in my favour when deleting the booster entirely, as hopefully it will still have a good amount of feel without it. |
| |
1980 Vauxhall Cavalier - MX-5 VVT engine/box conversion, GSXR ITBs
|
|
|
|
|
|
|
Jun 15, 2023 16:44:51 GMT
|
Ok, so we've sorted a load of stuff re: the brakes. More to do, but it's been a lot of hours the last couple of days, not the most fun experience haha. So I started by removing the brake booster/servo from the car. Simple enough. Then made up a plate out of 5mm ali which bolts through the original 4 servo mounting holes, with 2 additional holes for the master cylinder to bolt on to. Offered up the master cylinder and it sat nicely. Actually with the thicker plate over the firewall a noticeable amount less flex on the brake master when being operated, which is good. Made up a pushrod pin to thread into the original brake pedal clevis, and got it all bolted down.  Lines are ugly but this was just to test it out to see if it would work. It did work, but my god it was terrible haha. Using an MX-5 brake pedal, so 4:1 pedal ratio, and as it turns out as this is a 2001-2005 MX-5 master cylinder, it is 1" bore. The pedal was so hard it was just disgusting to try and use. I drove home, and then back to the workshop and ripped it all off and started again. This time I opted for a 5/8" master cylinder. Less fluid displacement, but way way less pedal effort required. The brakes on this car aren't exactly massive, front calipers are small and the rears are only small drum cylinders, so the 5/8" master seems plenty to make them work as intended. So I made up another plate for the new master cylinder, and bolted it onto the firewall again. Working in driver's footwell in any car is never elegant, not a nice experience haha. Needed another pushrod made, but this time something a little slimmer to fit the master piston. So me and a mate modified this bolt, chopped the head off, cut it to size, and then clamped the threads in a drill. Ran the drill flat out and gently skimmed the non-threaded section up and down with a flap disc on the grinder. Basically like a makeshift lathe. Rounded the end off for a smoother contact patch when we were done. Worked a charm, looks good I reckon: 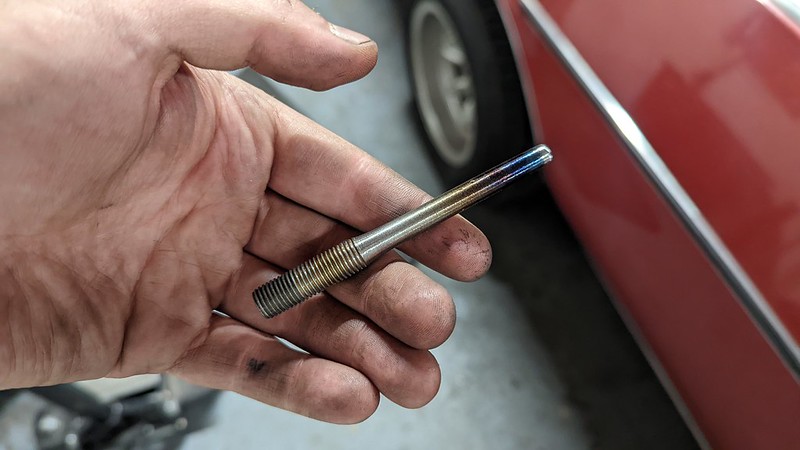 That threaded straight into the brake pedal clevis no trouble, and I adjusted it so it just has a tiny fraction of movement before engaging the master cylinder, then tightened up the lock nut. All done. So back to the engine bay. We made a mistake, well I did. My tee piece brake splitters, we obviously undid everything and had to re-bleed the braking system. Well I modified the front lines, re-flared and stuff. Everything leaked badly. Stripped out a brake splitter trying to do it up too tight. Basically had a nightmare, my mate stuck it out with me until after the sun came up to get it done haha. Anyway turns out the splitter wanted a bubble flare, not a double flare as I had been making. Ffs, literally just me being an idiot and using the wrong flaring tool. Oh well, it's done now. Spare trumpets on and with good clearance now: 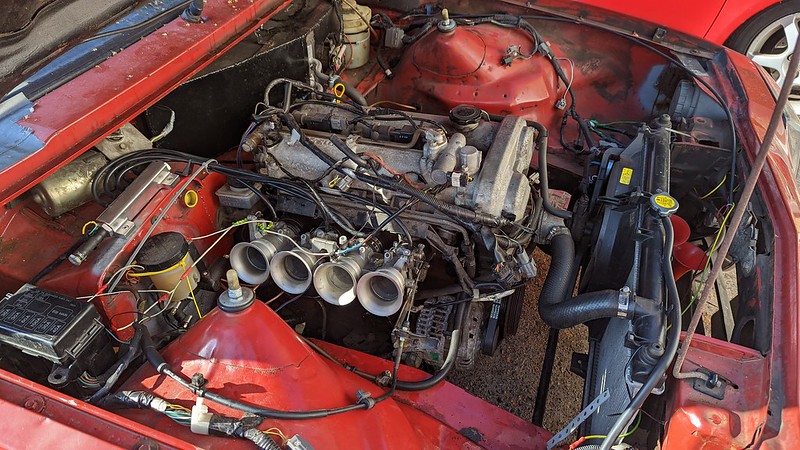 Need to finish some wiring, tuck some wires away, TPS wiring needs re-doing properly, it was just twist and taped here as the genuine TPS arrived and I had to re-wire it again and get that calibrated. Also note my throttle cable bracket we made, bolted to the throttle bodies this time! In my tiredness last week when first fitting these, I very stupidly made a throttle cable bracket that had a chassis mount point. Awful, can't believe I overlooked that. So when the engine jolts over a bump, leans on throttle etc. the throttle bracket didn't move with it. Hence super jerky throttle cable. Now fixed, it's like a different car haha. 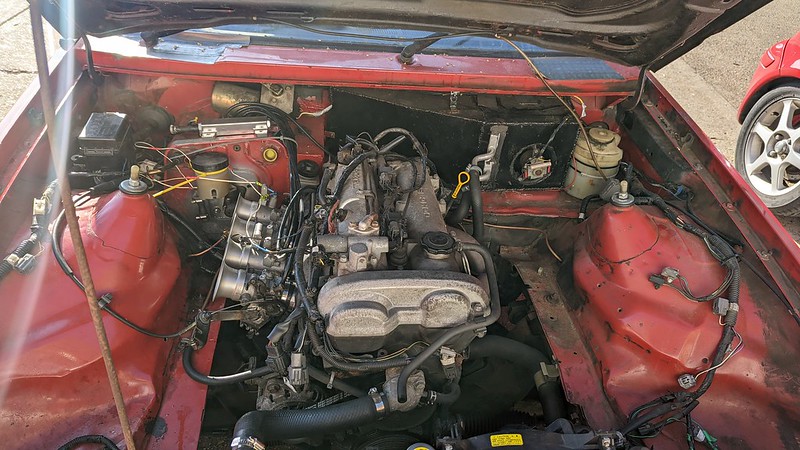 So much room for big trumpets now! Can't wait to get some monster ones haha. Going to redo my brake lines again, neaten them up properly, and while I'm there put a bias valve in for the rears, which I've been meaning to do for ages now. Anyway, the brake pedal. It's lovely now. No servo, no problem. It's not rock hard at all, and has good brake pedal feel, plus I have a ton more room in the bay, which is great. |
| |
1980 Vauxhall Cavalier - MX-5 VVT engine/box conversion, GSXR ITBs
|
|
|
|
|
Jun 19, 2023 13:50:02 GMT
|
Went to Players Classic at Goodwood on Saturday. Good show, lots of great cars there. Hayfever absolutely killed me though and I was just dying all day haha. There were a few patina cars in the Auto Finesse Concourse D'Elegance area, but it was still amusing seeing the Vauxhall amongst all these absolutely mint polished paint cars. 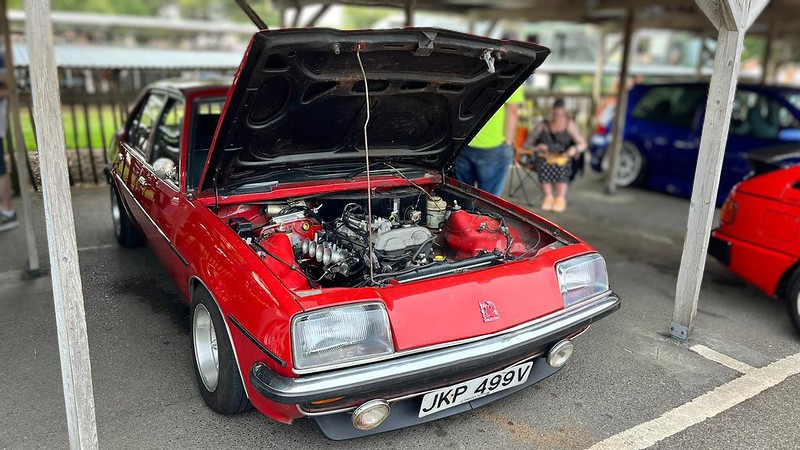 Was parked next to an absolutely beautiful Isuzu Piazza, I've seen it before at Retro Rides show. Really interesting obscure car, great to see it out and about. I've tidied up a bit more wiring now. Fitted the replacement genuine Suzuki TPS, got all the TPS wiring loom wrapped and tucked away. Fitted the throttle cam wheel/quadrant off of the MX-5 onto these throttle bodies now. It's so much better, it's way bigger than the GSXR one, completely OE pedal travel now, it makes driving with the ITBs, particularly in traffic, a lot more comfortable. The throttle also feels a little lighter, which is nice, it was a little heavy before. I just want to add an additional return spring of some sort, as I'd rather it snapped shut a little more aggressively than it does at the moment. 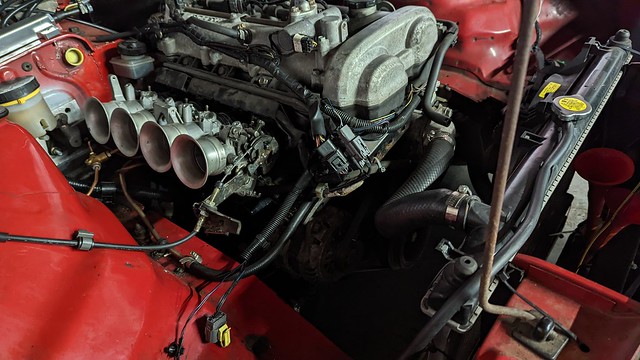 The setup is getting there now, been out with the laptop a fair bit. Cold and hot start are both spot on, really really good straight from the basemap. Idling immediately after hotstart I want to look at, as it idles extremely lean at first when hot, likely a result of heatsoak in the bay with it sat parked and hot. A bit of additional afterstart enrichment should sort that. Slowly smoothing out the VE table to get the fuelling right, takes a fair bit of time, but it's already way better than it was. Intake temps are good, when moving at a constant speed not much higher than atmospheric temp, when in traffic or driving slow not so good. I'm going to make up some form of shielding to separate the throttle bodies from the rest of the engine bay, and run a cold air feed to it. Should be fairly simple and make a decent difference. Overall it's getting there, still some bits to sort but very happy with the progress so far on the ITBs. |
| |
1980 Vauxhall Cavalier - MX-5 VVT engine/box conversion, GSXR ITBs
|
|
|
|
|
|
|
So, brakes. Again. The setup I had after the booster delete was just awful really. Not good, pedal too hard, everything a bit janky, it didn't leak but that was about all it had going for it. I spoke to a mate who helped me with a load of questions I had re: converting to dual master cylinders. So I decided to bite the bullet and just do it. I will pre-face this by saying another all nighter occurred during this a few days ago, and it really was a lot of research, reading, measuring, cutting etc. to get this done. So we start off with the balance bar: 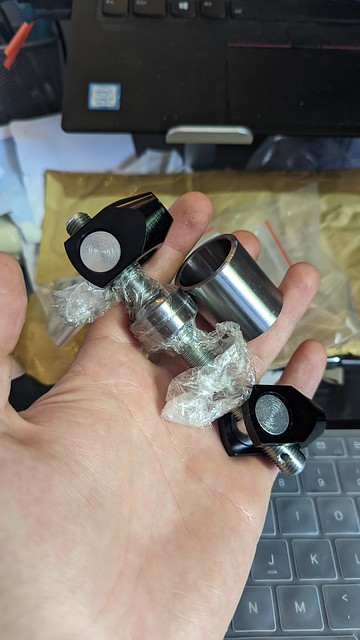 This is a balance/bias bar from Compbrake. Doesn't cost much, and in all honesty has done the job perfectly well. Had to get a couple of holesaws, the smaller of which to cut the pedal. Due to several different space constraint reasons I couldn't really raise my pushrod pivot point by much more than 13mm, so I marked 13mm up on the pedal from the original clevis lock pin point, drilled a pilot hole, and got the pedal cut for the balance bar centre tube. 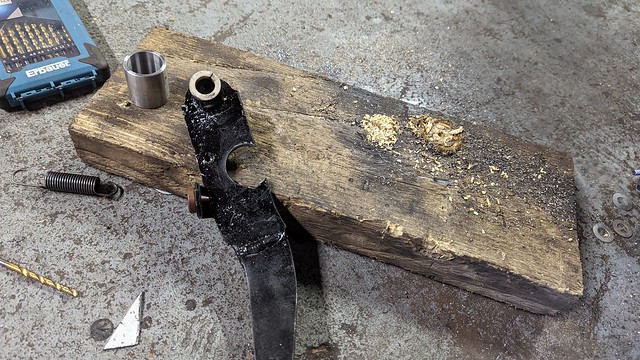 A good fit: 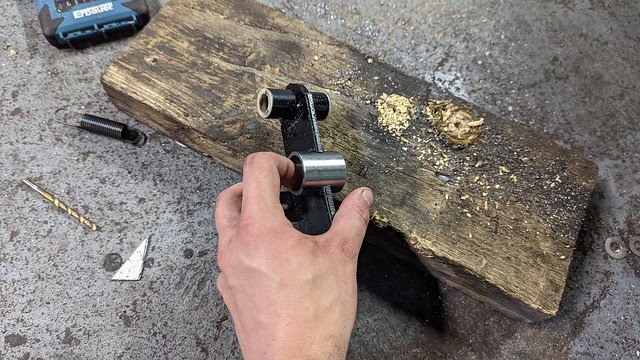 Why this far forward jutting out and not further back in the pedal? I didn't want my pushrods to be too long and when measured and mocked up this was the best spot for it. Not exactly the most godly welding you've ever seen, but that isn't going anywhere I can assure you haha. 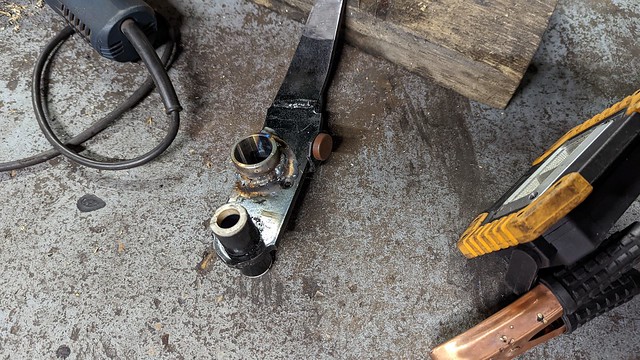 The inside didn't warp and the centre spherical bearing still slid in smoothly. So, onto the master cylinders. I had approx. 4.25" of space from the firewall to my cylinder 4 trumpet. That really isn't much. One dual circuit master cylinder was totally out of the question. So 2 single port master cylinders were all I could fit. I looked at various options, weighing up quality and cost. The Wilwood compact masters seemed like an absolute no brainer to me, really inexpensive, and only 4.1" long from firewall mount point to the end of the cylinder. Just small enough. Went with 0.625 bore for the front, and 0.70 bore for the rear, seems to be around what most resources recommend in general for a non-servo dual master brake setup. Now onto the pedal. It's a mk2.5 MX-5 brake pedal box from the car I sourced the engine/loom and just about everything else from. Well it was once. I already lopped off the throttle pedal portion a while back. Bolt pattern on it to mount through the firewall was 60mmx80mm, too big for what I needed now. With the balance bar set up with the clevises in the recommended position (just a few mm away from the centre tube on both sides) I needed the master cylinder through bolts to be 67mm apart, and the master cylinders use what appears to be a standard bolt spacing of 57.1mm for their 2 mount holes. So I welded up the original holes in the pedal, and drilled out new ones. Again 13mm higher, I wanted the pedal box in the exact same position in the car, and this would keep the raised pivot point on the pedal in line with the pushrods on the Wilwoods. I then used a larger holesaw in the centre of each pair of mounting holes, and drilled through to allow both new master cylinders to slot through: 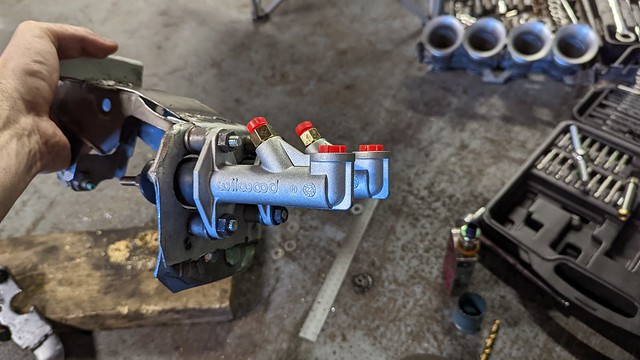 Note the spacers between the masters and the pedal, these were on the original pedal box, but I cut them off to make them a little shorter when I first made the original setup last year. We tacked these securely back in place once we were happy with everything. They both slot through nice and straight, 67mm apart as required by my balance bar. 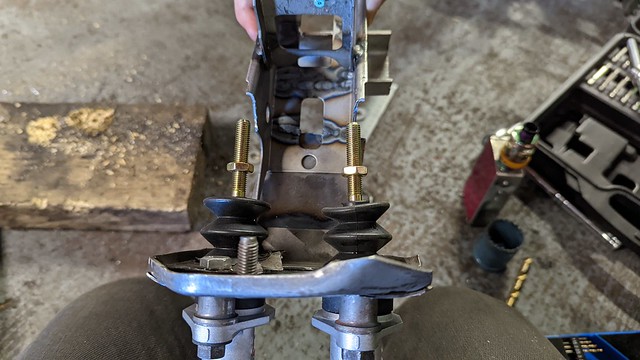 As you can see, a lot was cut off of the pedal box, so after this I added various bracing on the sides that angle up to the top, reinforcing the firewall face to the pedal mount part of the box. I also double skinned the front of the pedal box as I had removed the brace points on the inside, just to make it a bit stronger. Felt nice and sturdy. I needed as much engine bay space as possible, so I binned off the 5mm ali I used before and went with a thinner piece of steel. Much less soft than ali of course, but still works well as a bit of a load spreader plate type thing. Initial test fit: 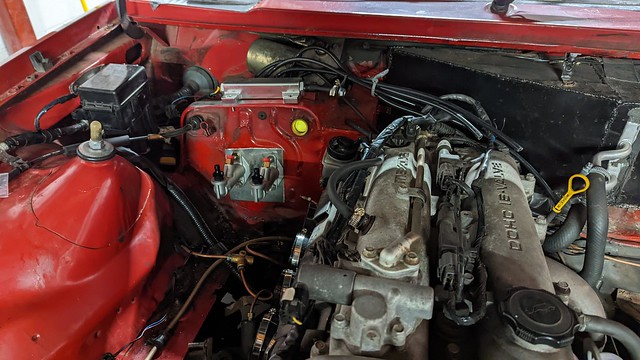 Of course I had to re-drill the firewall with the new bolt spacing, and holesaw the 2 new holes for the master cylinders. Again 13mm higher than before like the other bits, to keep the pedal box exactly where it was previously. When we were happy with this I got the pedal mounted inside, made up a sleeve and lock/jam nut for the balance bar, as Compbrake supply a remote adjustor cable for this balance bar separately, which I didn't go for, they don't include a lock nut. Was fairly simple to sort, I just had to go to a nut and bolt store to get a 7/16 20 nut, because apparently every chain hardware store literally only sells metric "M" sized stuff and literally no packs of imperial nuts. Oh well, it was 44p for 2 haha. Used a couple of very large washers between the clevises and the centre tube as recommended by Compbrake's fitting documentation, seemed to help a lot with keeping the clevises level and behaving, so I'm glad I did that. Brake lines were of course a total nightmare and took 2 days to sort out. Everything was done and then re-done again, this time it all seals properly, and not for lack of trying. A load of new unions, T pieces etc. Put a lot of hours into those bloody brake lines, thankfully a couple of mates helped me out a lot. We got it all bled, worked out a reservoir solution for the time being, and here we are: 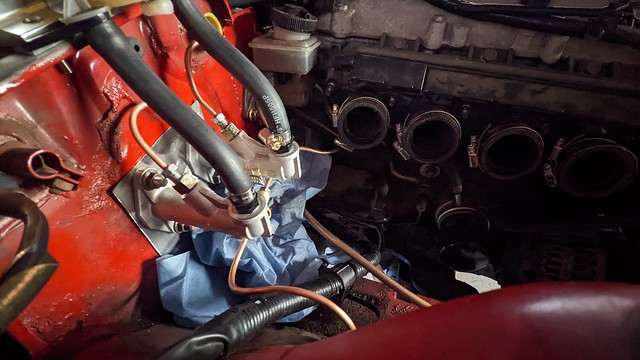 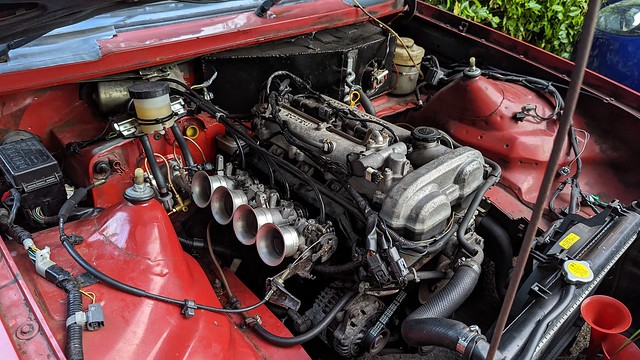 Just about short enough to clear the trumpets. 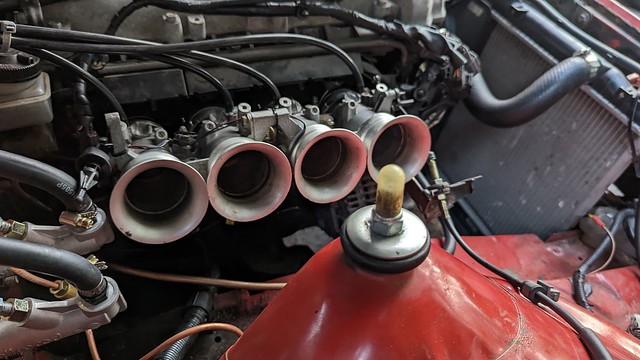 Still using the MX-5 brake reservoir for now, it has a divider at the bottom so if one cylinder/line fails, the other still has fluid up to the MIN level, which is good for now. But I am going to buy either a large single reservoir with completely isolated dual chambers, or 2 completely separate reservoirs. It will mean re-bleeding, but re-bleeding can't hurt, probably worth doing it again anyway. The pedal feels so much better. It's softer on initial braking now, so light braking is a lot nicer even with no booster now. When more braking is required the force is obviously higher than before when it was assisted, but it is a manageable amount of foot force, you don't have to brace your back into the seat and stand on it. Completely independent master cylinders too, so nice and safe, and with enough fluid displacement between them to power any potential brake upgrade I may do in the future. Seems funny running this setup with original front calipers and NOS pads, and rear drums, but in the long run this is the hard part, and it's now done and can be left alone, save for any adjustments to the balance bar, which can be done without disturbing the master cylinder or brake lines at all of course. But god it was a total slog to get it done, and honestly if I never have to deal with a leaking brake line ever again in my life I will honestly be so happy. Horrible job. Anyway the car is great now, bigger trumpets will be sorted soon ( I measured and have clearance for approx. 110mm trumpets) as well as the heatshielding I mentioned before. No filters are planned for them, this is a £200 engine. If a stone goes in, a stone goes in. We die like men.  I absolutely love this car. |
| |
Last Edit: Jun 27, 2023 1:23:07 GMT by bilbomk1
1980 Vauxhall Cavalier - MX-5 VVT engine/box conversion, GSXR ITBs
|
|
v8ian
Posted a lot
  
Posts: 3,832
|
|
|
|
|
When I built my cortina, the brakes were princess 4 pots on the front and mk3 Granada callipers on the back, at the time, I had free access to a breakers and could amble at will, I just walked round and round looking at brake servos, and checking what brakes were on the car, I was looking for 4 pot fronts, and single pot rears, and similar to what I already had, and, the ability to dismount the reservoir and go remote, of all the cars I looked at, a BMW E34 yielded exactly what I needed, I must have been dead lucky, cos the braking system was without a doubt, the best I have ever had on a modified car, which is where I am now, my current car, The Toledo, the brakes are modified, but not very inspiring, I must confess your work ethics and speed is inspiring, I too have ITBs to fit, and bigger wheels so I can get better brakes too, how the he-l do you get it done so quickly..... TOP WORK BTW
|
| |
Last Edit: Jun 27, 2023 7:20:46 GMT by v8ian
Atmo V8 Power . No slicks , No gas + No bits missing . Doing it in style.
Austin A35van, very different------- but still doing it in style, going to be a funmoble
|
|
|
|
|
|
|
When I built my cortina, the brakes were princess 4 pots on the front and mk3 Granada callipers on the back, at the time, I had free access to a breakers and could amble at will, I just walked round and round looking at brake servos, and checking what brakes were on the car, I was looking for 4 pot fronts, and single pot rears, and similar to what I already had, and, the ability to dismount the reservoir and go remote, of all the cars I looked at, a BMW E34 yielded exactly what I needed, I must have been dead lucky, cos the braking system was without a doubt, the best I have ever had on a modified car, which is where I am now, my current car, The Toledo, the brakes are modified, but not very inspiring, I must confess your work ethics and speed is inspiring, I too have ITBs to fit, and bigger wheels so I can get better brakes too, how the he-l do you get it done so quickly..... TOP WORK BTW Ah mate that's the dream, knowing there's parts out there and being able to go and check/measure all the different possibilities. I think for me I'll probably fit the earlier type 2 pots that came on the earlier year Cavaliers, people say they're better, less prone to seizing etc. MantaSport do a caliper conversion kit to run MK4 Astra calipers on the rear, only thing is I'm not sure they'd fit under 13s. I don't really want to run bigger wheels as I love small wheels on old cars. We'll see. Haha cheers, now I've broken the 5 for parts it's a case of it needs to be done or I don't have a car and have to rely on borrowing my girlfriend's Alto 😂 so there's the motivation to get each job done in a day when I can, so I can actually get home from the workshop haha. It's been a lot of learning so far, but it's great, it's given me a lot more confidence to take on any job on the car now. |
| |
Last Edit: Jun 30, 2023 0:45:12 GMT by bilbomk1
1980 Vauxhall Cavalier - MX-5 VVT engine/box conversion, GSXR ITBs
|
|
|
|
|
|
|
|
Hi there. That’s a fantastic job you have done. I need to do the same on my mk1 except the engine swop. That’s too adventurous for me lol.
I need to order the same parts. Springs, bushes, ball joints, dampers etc. is there anywhere I can order the job lot or do I just search the internet. I’m mew to the cavalier world. Cheers
|
| |
|
|
|
|
|
Jul 10, 2023 10:52:37 GMT
|
Hi there. That’s a fantastic job you have done. I need to do the same on my mk1 except the engine swop. That’s too adventurous for me lol. I need to order the same parts. Springs, bushes, ball joints, dampers etc. is there anywhere I can order the job lot or do I just search the internet. I’m mew to the cavalier world. Cheers Hey, good to see another being saved. So in terms of parts, I got them from here there and everywhere haha. You may struggle for certain things to find parts that are listed for mk1 Cavalier, but I found a lot of parts listed for a Manta B also fit, as they're essentially identical underneath. The 2 main things I recall to be careful to order the right parts were front brake pads, and rear drum cylinders. The pads on the front are dependant on the year of car, and the rear cylinders seemed to be offered in different sizes (I ordered the wrong ones at first). I found it easier to remove the parts I wanted to change and compare them to the photos on the ad sometimes, check the parts look like the same fitment, check any measurements are the same etc. Same with the discs actually, I measured the diameter of mine and made sure the new ones were the same size before ordering. I got some new old stock stuff from eBay, I also found AutoDoc and similar parts websites stocked a load of stuff, just be careful with AutoDoc as I noticed some parts in the listings clearly didn't look right. The lowering springs I got from eBay, shocks from AutoDoc. Shocks fitted fine I just had to put some little spacer washers on the lower mounts as the new ones had slightly smaller bushes that weren't quite tight in the mount. Pretty sure I got the ball joints, stabiliser links, and brake caliper slider pins from eBay. There's a load of stuff out there for them, just takes a little bit of time working out what parts will be right as there seems to be some variations on what is offered. Overall though other than exterior panels I've found most things can be found without too much trouble. Also just one thing to note about brakes, be careful if yours are old and original as the pad material is likely made with asbestos. I drenched everything brake related in brake cleaner to make sure there was no dust, I also drenched all surrounding parts like the drums themselves etc. in water, and I wore a full painters respirator when I was removing the originals, not worth the risk! |
| |
Last Edit: Jul 10, 2023 10:57:23 GMT by bilbomk1
1980 Vauxhall Cavalier - MX-5 VVT engine/box conversion, GSXR ITBs
|
|
|
|
|
Jul 10, 2023 12:47:40 GMT
|
Had a lovely week off from cars and work and everything. After the brake line misery it was honestly very nice. Bodrum in Turkey, nice place. We got food poisoning on the last day and it was the worst flight home ever, absolute misery. But if we block that memory out it was an otherwise lovely holiday haha.  Good times. Anyway, I've wanted a rev counter for a while now. Could just get some clocks with one in, but the plug pins are different and it'd mean re-wiring the whole bloody thing and I literally could not be bothered. So I bought a standalone rev counter. Made a mess unplugging everything: 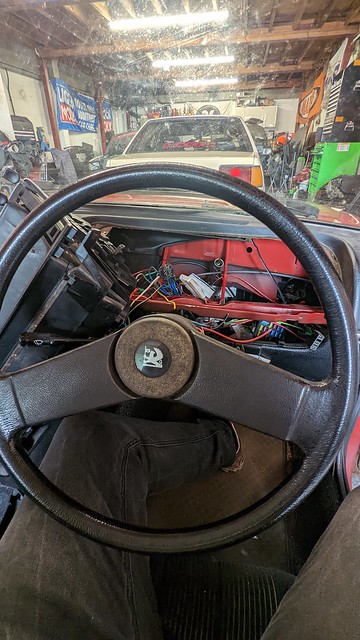 I was looking at some vintage/retro Smiths tachos, some up for a reasonable price on eBay. But I was a little put off by various discussion I found, obviously old cars the gauges have a different engine rev reference to more modern cars. It all confused me a bit and I wasn't sure if I could get an old one to work. So for now I bought a cheap one. I mean like literally the cheapest one ever haha. From Amazon. It was the only cheapy tacho on Amazon with almost unanimously favourable reviews, apart from one seemingly very angry Italian man. I simply ignored the Italian man's review and bought it anyway. I'm not completely sold on the blue LED lighting, but there is the underglow/neon loving child inside me that is still vaguely alive, so I kind of do secretly like it, though I may put a red LED in it at some point instead. 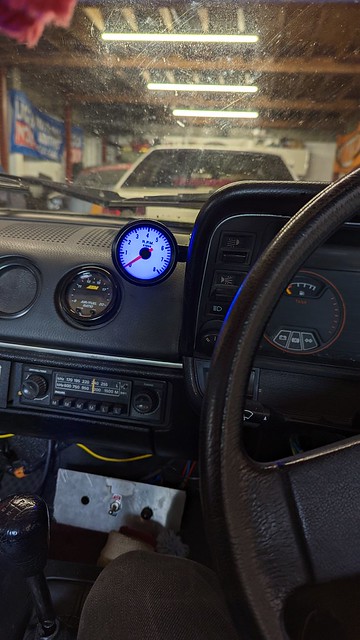 I attached it to the side of the instrument cover and it looks pretty cool there I guess, I like it which is the main thing. I'm actually pleasantly surprised by it, I've seen cheap tachos that can be really notchy looking as they sweep, but this one is pretty smooth, and bang on accurate it seems too. When you switch the engine on it does the cool 0-8k needle sweep, which I quite like. I'll probably replace it with something more retro and a bit larger eventually, but honestly it was under 14 quid, if I get a few months out of it I'll be happy. I don't need a rev counter, but there's something nice about having one I've always felt when driving. Just doing little jobs for the next month or so really. Next things on the cards are bigger trumpets for the ITBs, an engine service, and sealing off some rain water leaks that have appeared in the footwells, only minor but I'd like to look into it. Might add an on/off switch for launch control. Oh and I might fit some interior lights as well, as I don't have any wired up currently and it's a bit dark in there at night! |
| |
Last Edit: Jul 10, 2023 12:50:40 GMT by bilbomk1
1980 Vauxhall Cavalier - MX-5 VVT engine/box conversion, GSXR ITBs
|
|
|
|
|
Jul 17, 2023 16:29:28 GMT
|
My water temp gauge has never been correct, due to the sensor being the original Mazda one, and the cluster being the Vauxhall one. Incorrect resistance that needs sorting. Anyway regardless of that, it doesn't actually give a number reading, so I've always wanted to get a proper one that does. Again an inexpensive gauge was purchased, as well as an 18mm water hose joint to locate the sensor. Some people fit these on the front radiator hose, but as this is near the thermostat, when the thermostat isn't open it won't give a true reading. So I went with the heater matrix hoses that most people recommend to use on 5 engines. Pretty simple, I just drained the coolant, cut about an inch out of the pipe, and popped the sensor joint in. Made sure the gauge came with a 1/8 NPT sensor, which it did. It threaded in nicely. No leaks, and fresh coolant put in, all bled and happy. Can't complain. 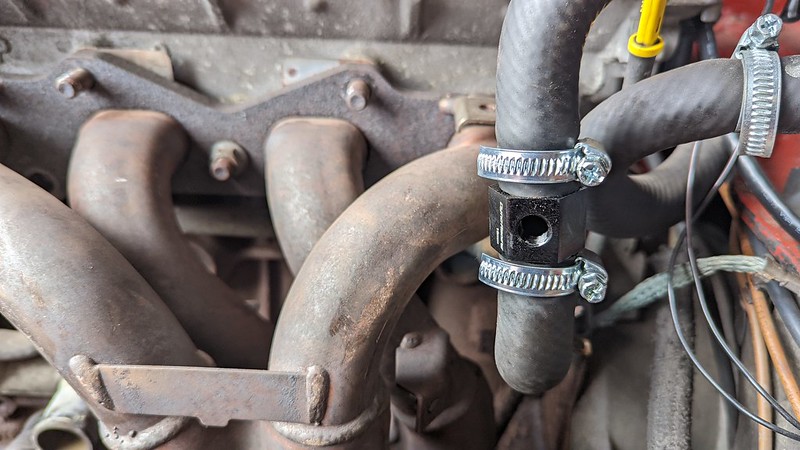 Yes there are 2 manifold nuts missing in the background, I'm sorting out some dodgy stud threads haha. Anyway, due to the large amount of loom under the dash, I have never connected up the eye vent pipes, meaning the eye vents have no function. So I popped the other centre one out next to the AFR gauge, disassembled the disc part that allows you to open and close the vent, and slotted the new gauge into the surround. It fits very snugly. 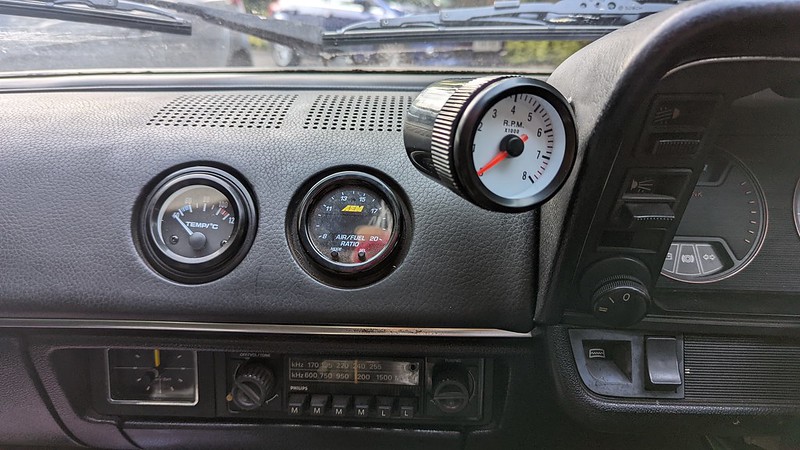 Tapped into the wire to allow it to only illuminate when the light switch is turned on, and it's sorted: 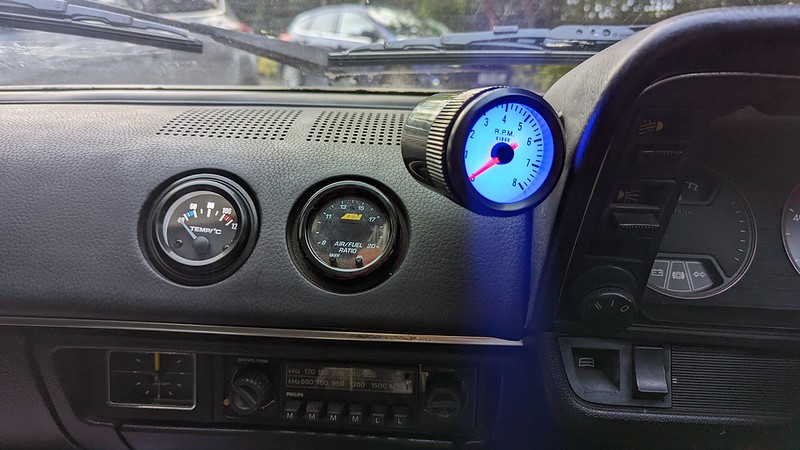 And it works. Sits bang on the correct temperature and appears to be functioning perfectly, so I'm happy. Just a little extra peace of mind over the vague OE temp gauge. I must concede that the rev counter is a little too bright at night. It's not horrendous, but it is slightly uncomfortable haha. Oh well. Got some other bits I want to do, but money is a little tight at the moment, so I'll likely end up doing some maintenance jobs I've been putting off for a while. |
| |
1980 Vauxhall Cavalier - MX-5 VVT engine/box conversion, GSXR ITBs
|
|
thomfr
Part of things
  Trying to assemble the Duett again..
Posts: 694
|
|
Jul 17, 2023 18:43:11 GMT
|
|
Good job!
Nice that classic (but probably awful sounding) Philips radio!
Thom
|
| |
73' Alfa Giulia Super
64' Volvo Duett
65' Volvo Duett
67' Volvo Amazon 123GT
09' Ford Focus 1.8
20' VW ID4
71' Benelli Motorella
65' Cyrus Speciaal
The difference between men and boys is the price of their toys
|
|
|
|


