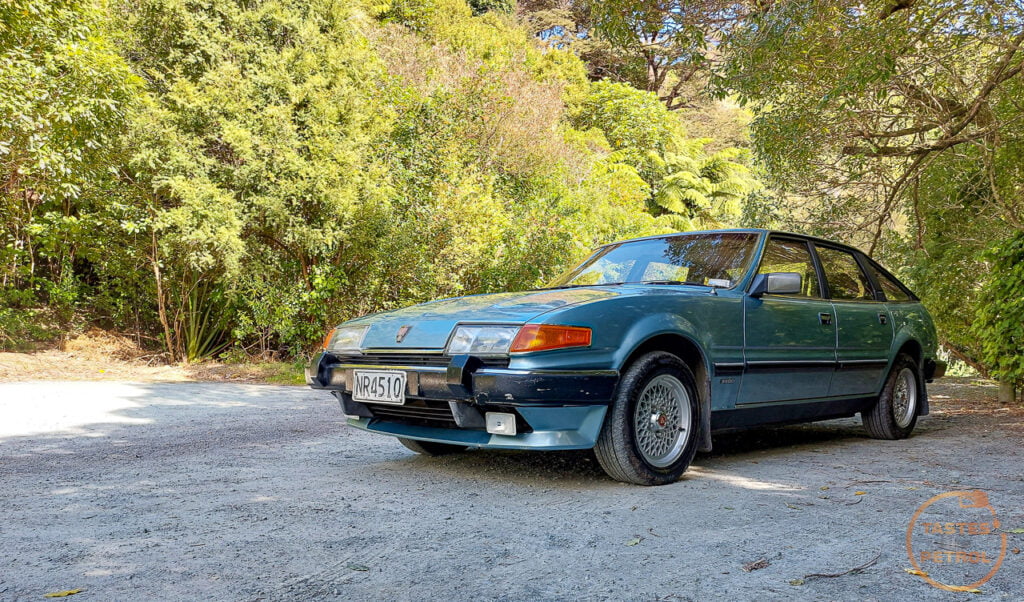
Woah what a week it's been! I have spent almost every night (Thursday was rest day) in the garage until well past my bedtime working on Lucas, trying to make sure I was on track.
Right, so we left off with the basic 3.9 in the car, but nothing attached to it.
My first goal this week was to get the crank pulley on, but before I could do that I needed to strip it down and fit the trigger wheel for the Speeduino crank sensor (just some "futureproofing").
This is the original SD1/EFI pulley. Since I converted to the original V-Belt front end I couldn't use the 3.9 Serpentine pulley.

This is what a bad crank seal can do to the pulley. The hardened, almost plastic, seal can wear into the metal.
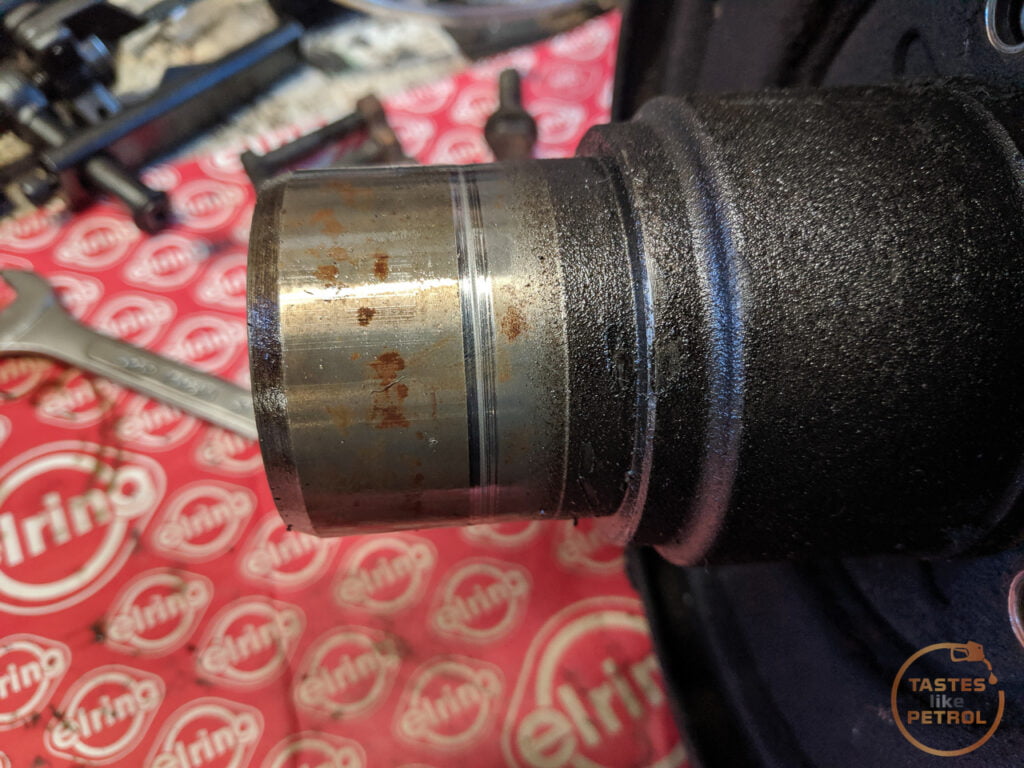
I will keep an eye on the seal and if it leaks I will either need to source another pulley, or fit a Speedi-Sleeve, which is a thin tube of steel that goes over the damaged surface to give the seal something to seal against.
A quick zip with the rattlegun removed the three bolts

Because it worked, I am replicating the same install that Effie had, with the trigger wheel (the same 6 bolt 36-1 2.5mm thick trigger wheel from Lloyd Specialist Developments) mounted between the balancer and the PS pulley, so I slipped the rear section of the pulley off

This allows the trigger wheel to slip on. I have marked the same spot I aligned Effies pulley to

A+ reference material

Before it can be fitted, you need to hammer down the roll pin that locates the pulley

The trigger wheel should now fit flush

And the rear pulley can now be bolted back on
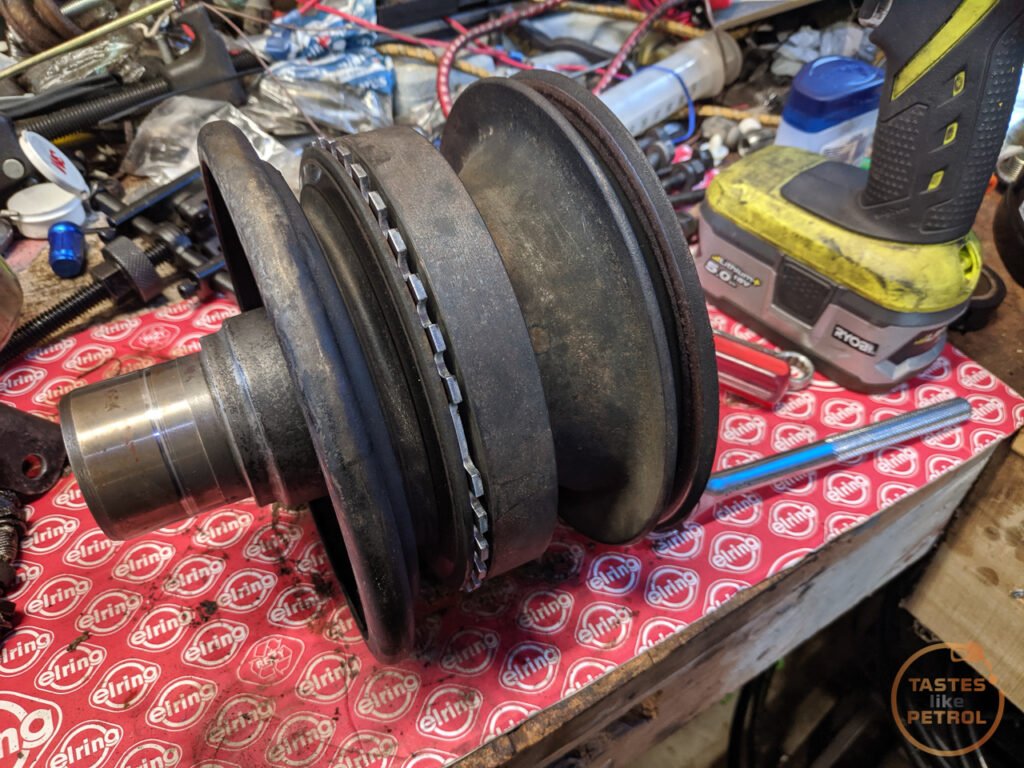
Compared to the Serp pulley, it's quite different. They're the same basic length in terms of pulley alignment, but the snout on the Serp one is much shorter to account for the crank driven oil pump.

The crank pulley bolt is 15/16", if anyone was wondering

Now, this is where it's interesting. I had done a lot of research and asked around, and as best I could tell I needed a crank spacer, so I paid a hefty amount to get one from Rimmers. The spacer goes on after the pulley, and allows the crank bolt to secure the pulley if the crank end is too long (otherwise if you did the bolt up without it, it would only touch the end of the crank and not the pulley).
This example image shows the spacer. It's just a thick ring of steel.

Long story short, I didn't need it. My pulley fit perfectly, and the bolt secured the pulley against the end of the crank. Oh well, I love paying lots for surplus parts.
So, yes, the pulley was then slipped into place

Where it promptly fouled on the timing pointer. I remember this from Effie, and the fix is to file the mounting area down to about where the orange line is, to clear the now slightly offset rear pulley.

I refit the modified pointer and did the main crank bolt up to about 6 ugga duggas.
Next I thought, "oh, let's install the power steering pump bracket". Nope. Should've done that BEFORE fitting the pulley.

So I undid the pulley bolt again, slid the pulley forward enough to get the bolt in and secured the bracket. The lower bolt on the front needs to be spaced away as it's used to having the TDC sensor bracket mounted on it. I tried to do this with washers, but in the end just smashed out the old sensor and mounted the bracket. I think this time I might end up modifying this bracket to work with the Speeduino crank sensor as it's quite a neat little mount, instead of making. my own bracket again

With that little segue done, it was time to get messy, swap out the valley gasket and install the intake manifold.
First I had to split the manifold from the trumpet base, so I could clean it all up. This proved to be harder than expected, and I had to use a chisel to carefully separate them.
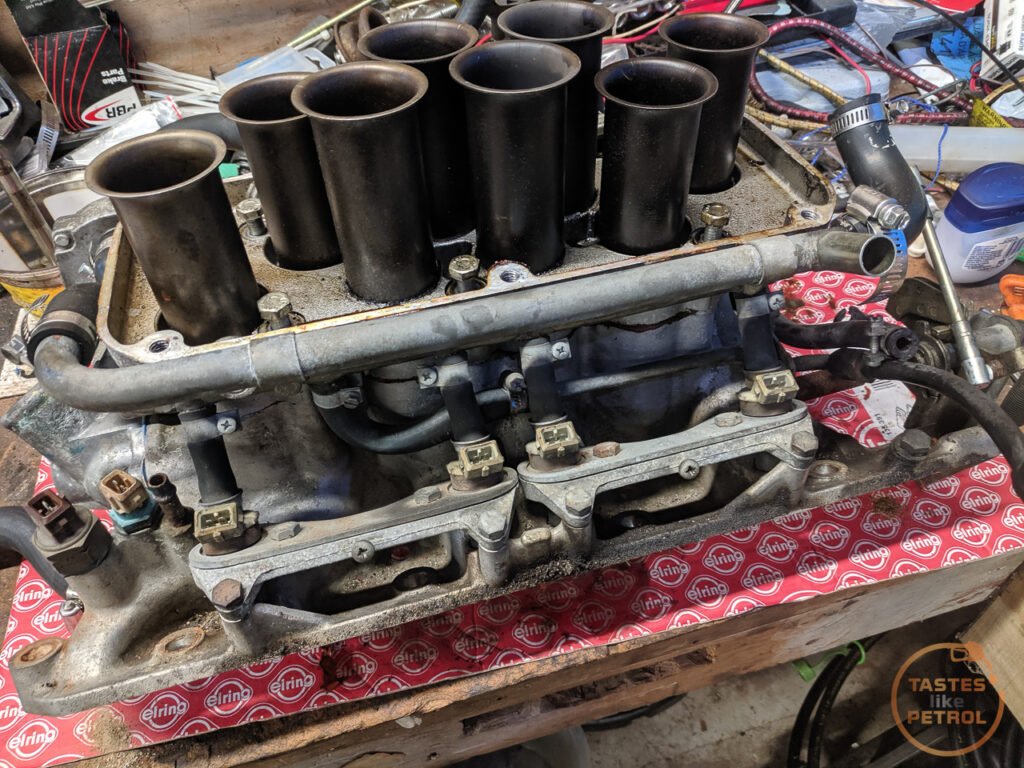

With the trumpet base off my plan was to just replace the main feed and return hoses, and the injector seals
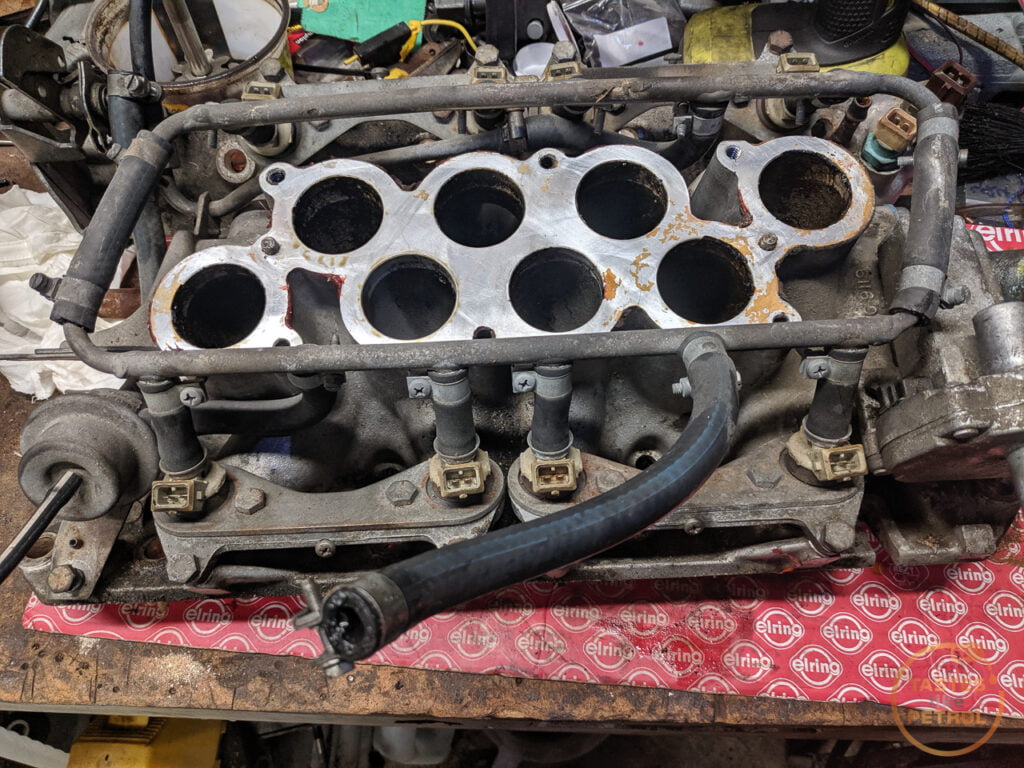
I removed the rail and injectors

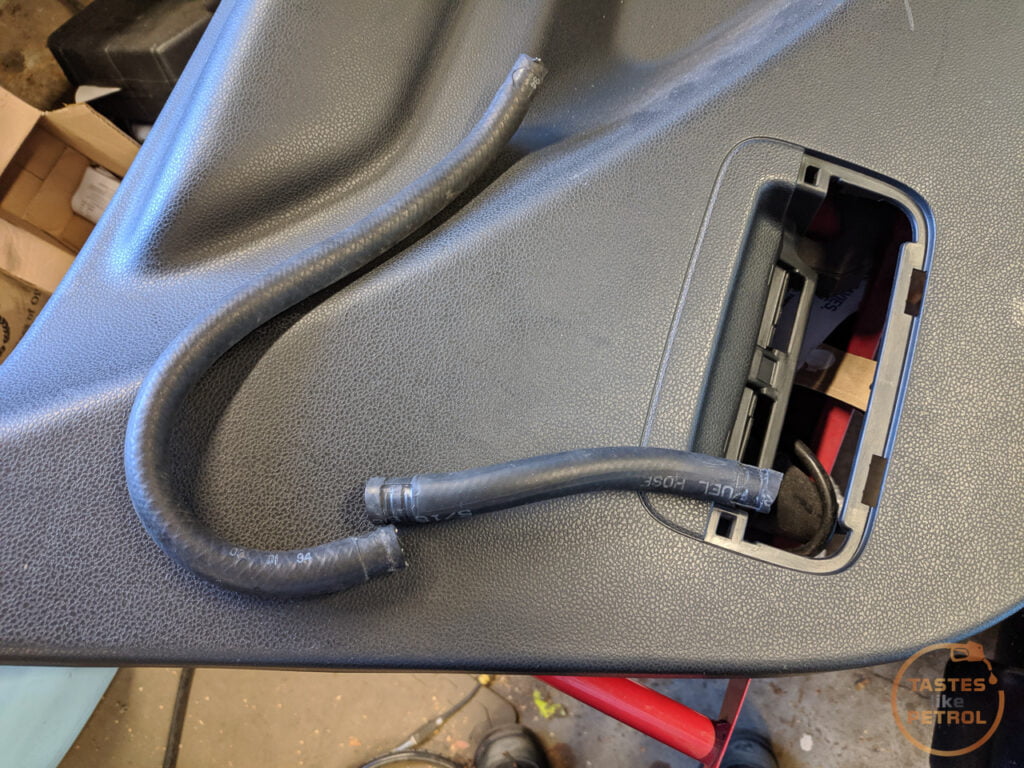
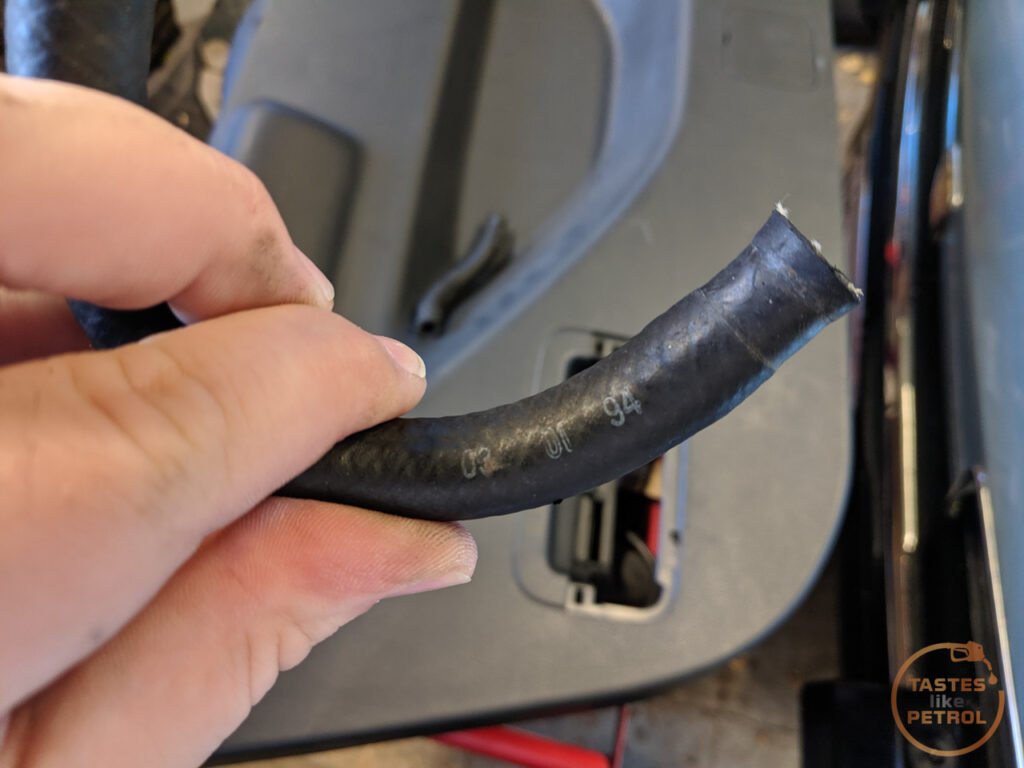
The old hoses weren't looking too hot. They weren't leaking though.

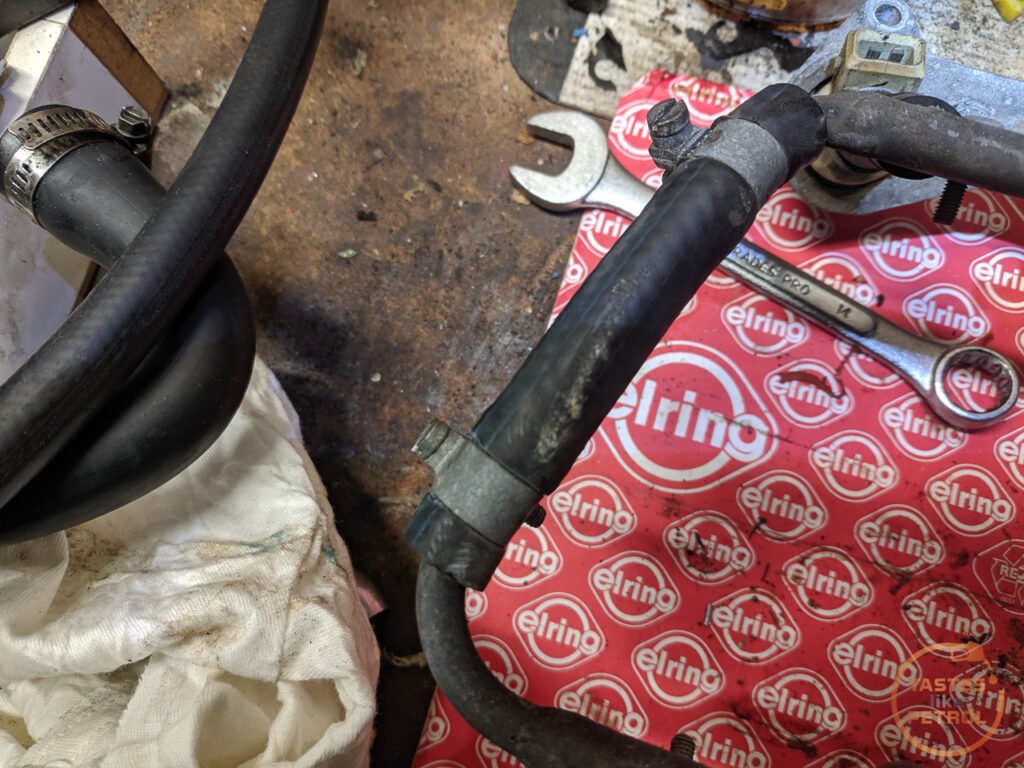
The return to the regulator had a somewhat clever attachment, as in it almost wasn't attached

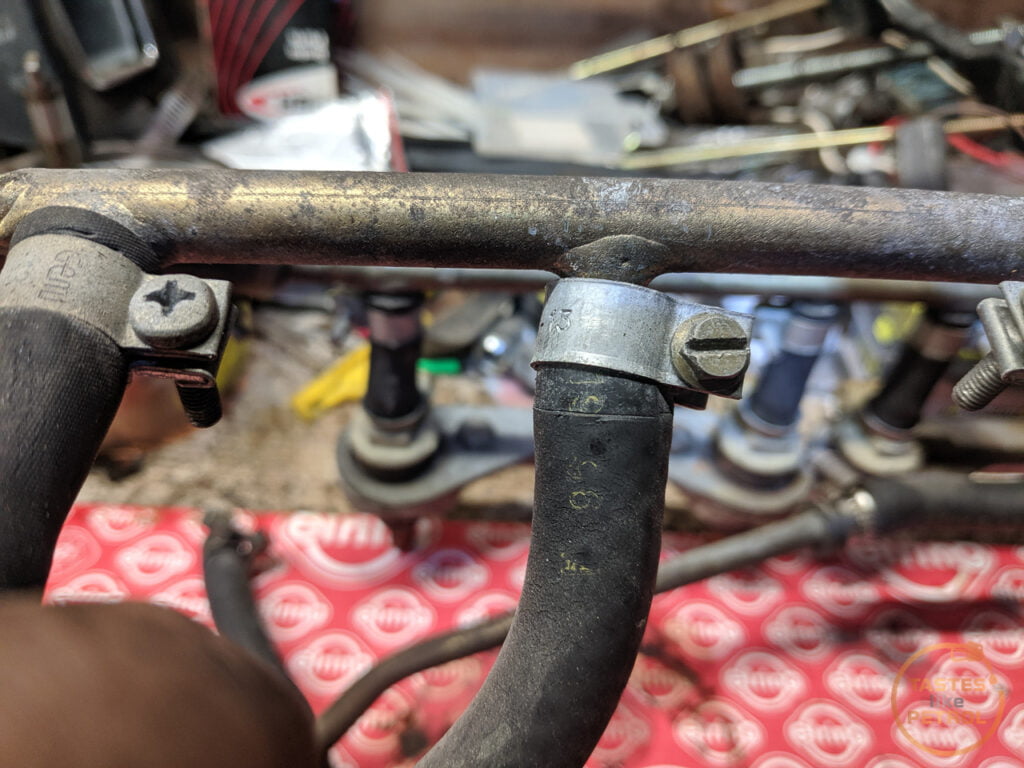
It had deformed the hose too
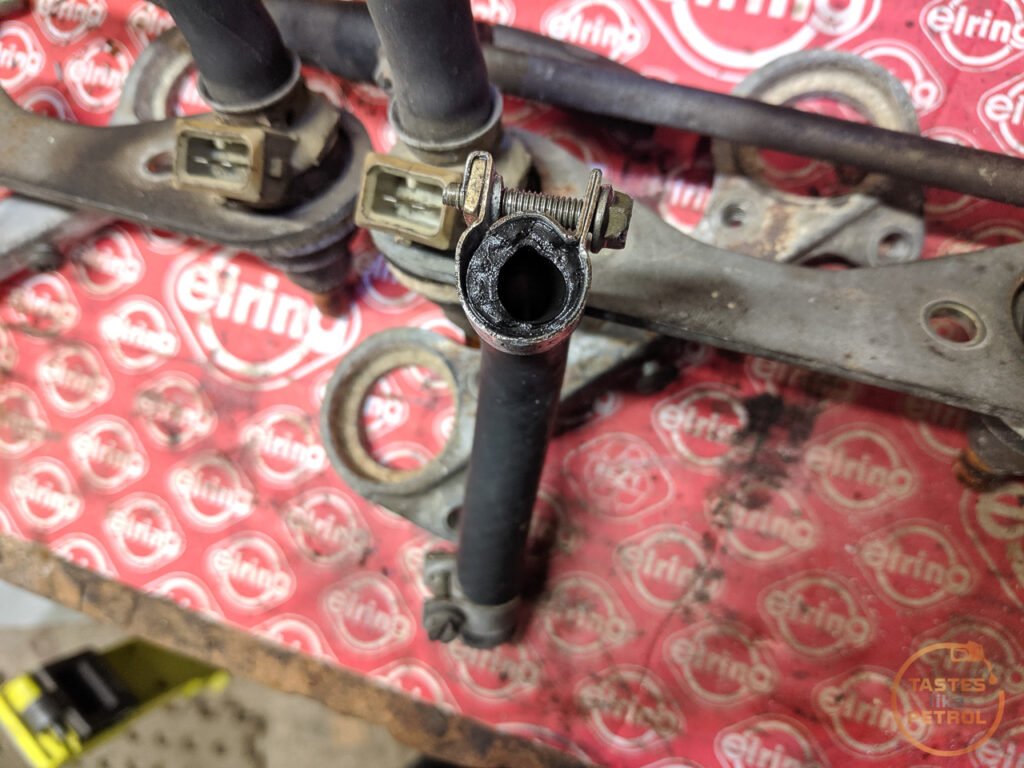
Regulator with new hoses. I tested the regulator and it held vacuum, so that's a win.

I removed the injector clamps, taking care to only poke my finger with a pick once. Use said finger poker to carefully lever the big rubber upper seals out of the housing as it'll be corroded in there.
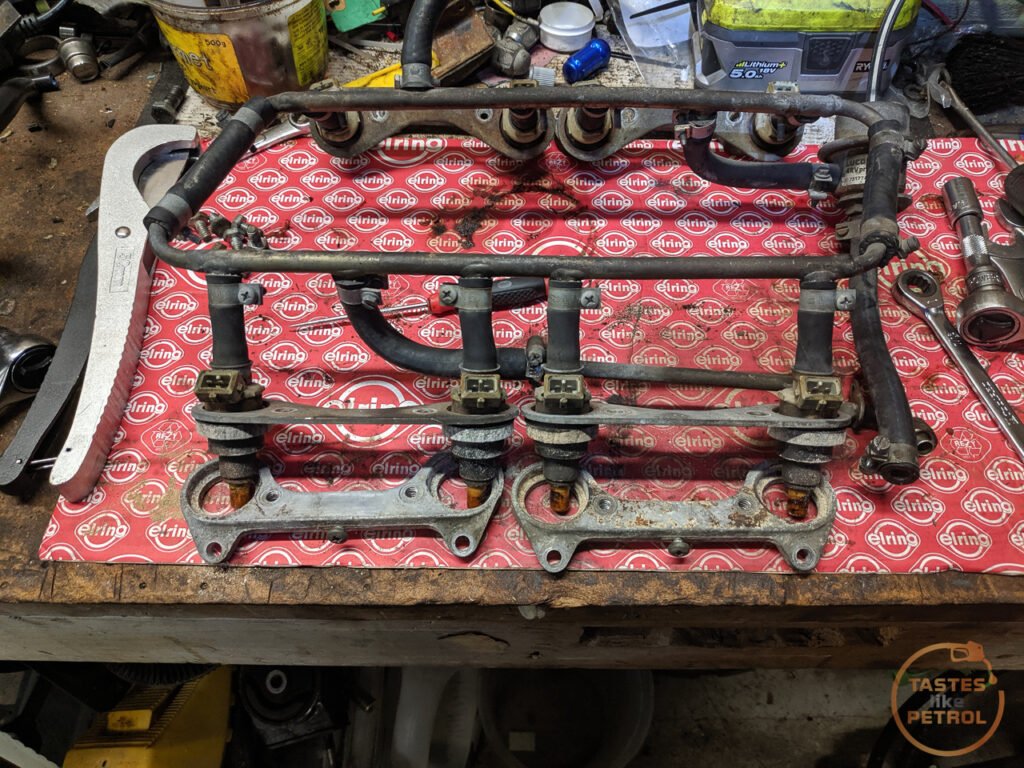
I replaced the two hoses that link the pair of rails

The old seals look pretty gross

I used a sharp knife to carefully cut them off. The lower seals were stuck in the manifold, and hard as plastic. A few of them were quite deformed too.

I hadn't originally planned to replace the hoses on the injectors as they weren't leaking and didn't appear cracked (not like the ones on Effie), but upon closer inspection, there were fine cracks in the rubber
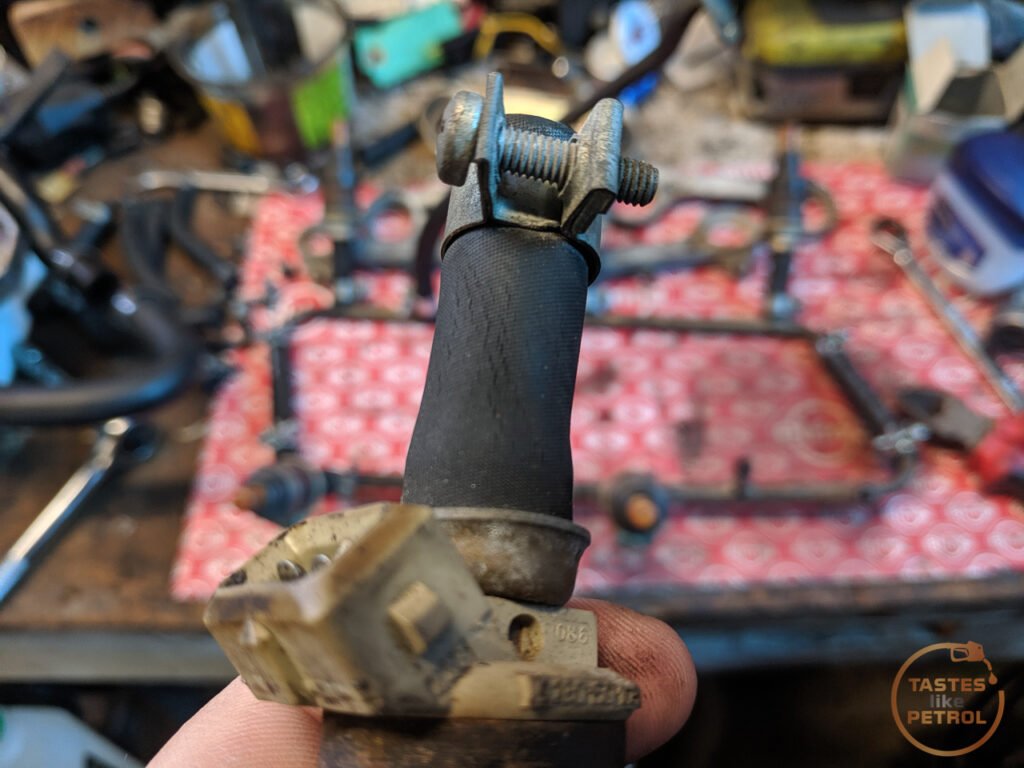
As it turns out, the inner layer of the hose had basically turned to plastic and crumbled when cut. Don't presume the hoses are OK just from a quick glance.
Thankfully I bought a kit from Mr Injector in the UK that came with new seals, hoses and the retaining ferrules (the metal cup at the base of the hose).
I set about cutting off the old hoses and ferrule. The instructions are very strict that you must not use a knife to cut the hose off, so in the end I used a combo of "aviation" snips and side cutters.

I got it down to a fine art, and took only a matter of seconds to strip the hoses off. I would use the snips held upright to cut vertically through the ferrule, which would usually take two snips do, then use the side cutters to twist the cut ferrule out. I would then use the side cutters to munch horizontally at the bottom 1/4 of the hose, until it was damaged enough that I could push sideways on the top of the hose where it would rip through the cut section and come off.

The new hose and ferrule are straightforward to fit. Slip the ferrule on, dip the end of the new hose in fresh engine oil, and push it onto the injector, using a hard surface to push against and force the hose into the cup of the ferrule. That locks the hose into place.
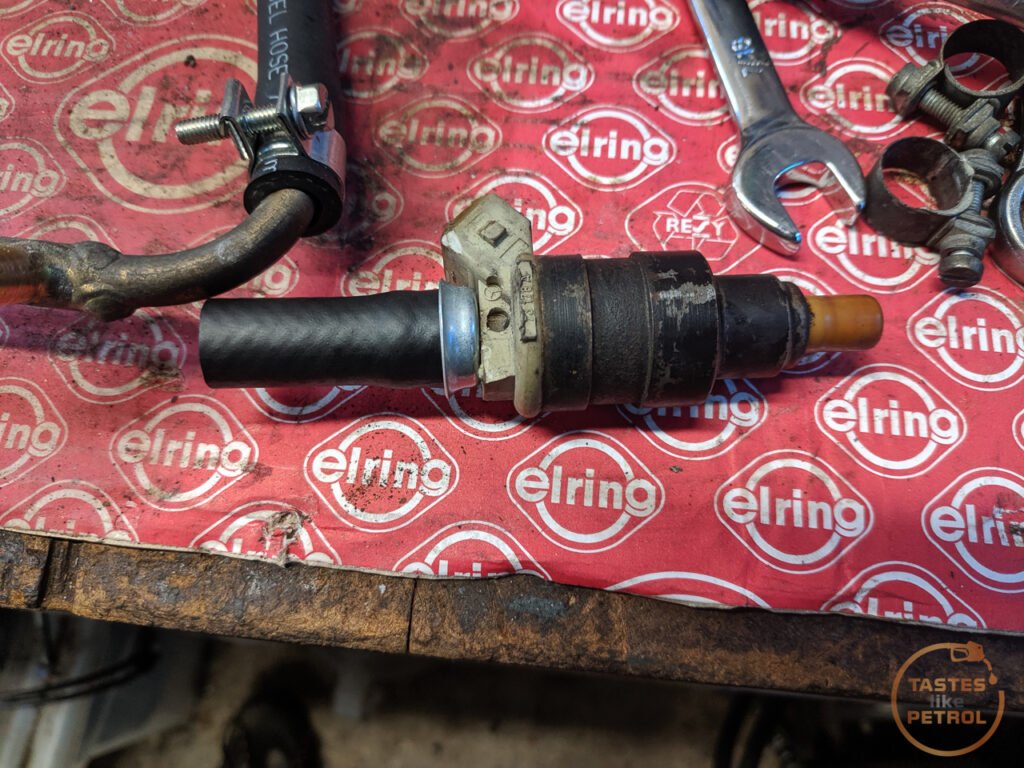
Injectors with fresh new hoses
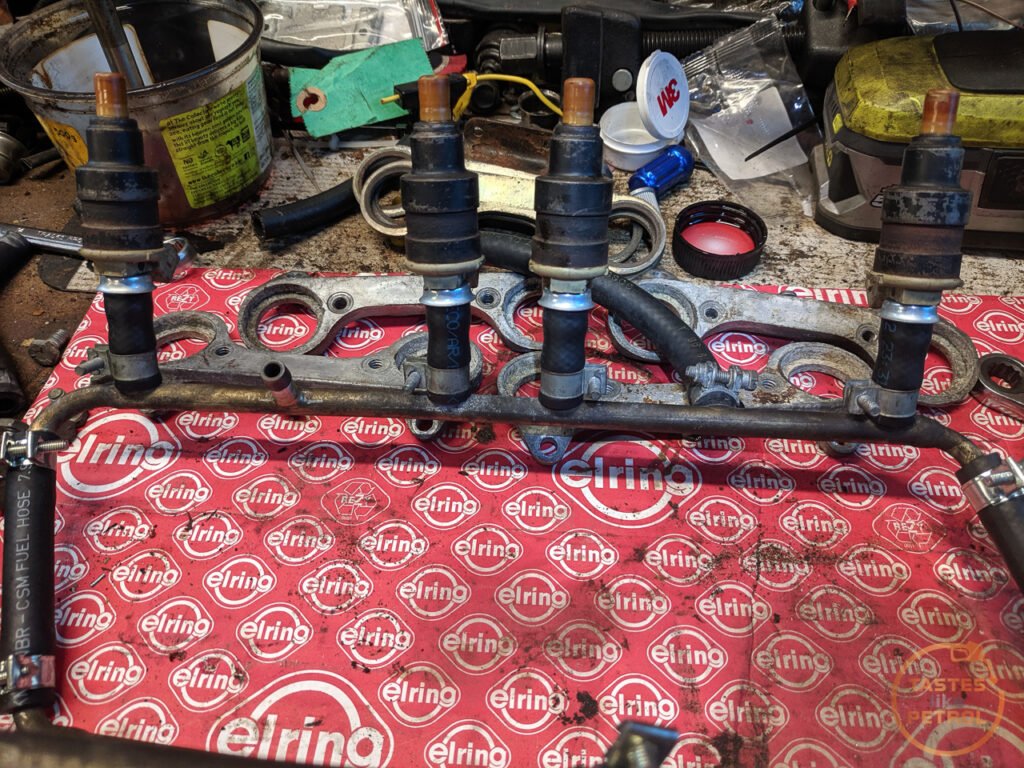
Now the new upper seals can be fitted. Don't be like me, and for the second time, forget to put the upper retaining plate over the injectors first. Thankfully I remembered before the first seal dropped into its groove. You cannot fit this plate with the seal in place.
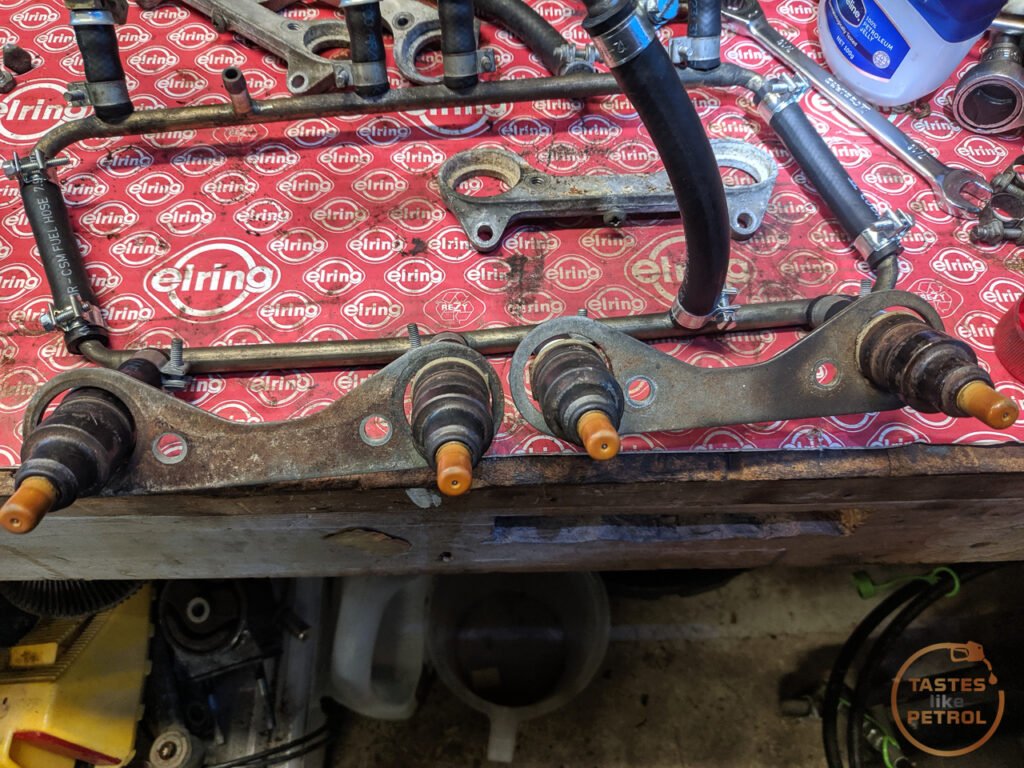
Lube the seals with some rubber grease and slip them into the groove

I cleaned the corrosion off the bases with a wire brush in the drill, and loosely fitted them, along with new lower injector seals.
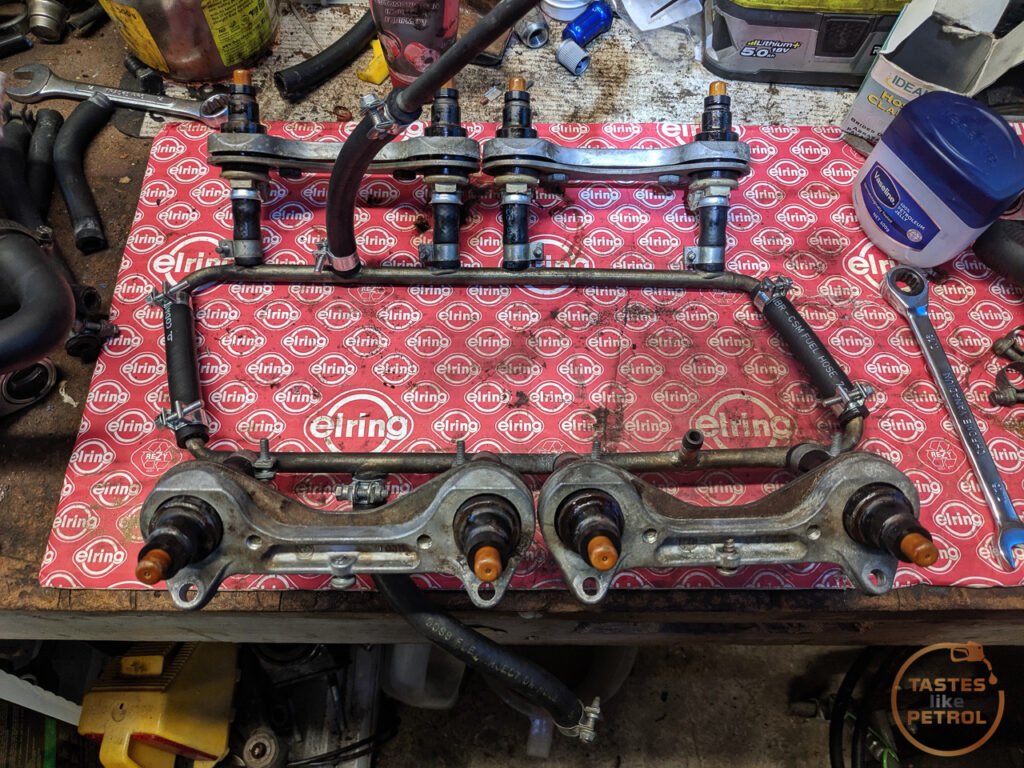
Next, it was time to clean the manifold up. I removed all the old sealant and wire-brushed the under intake coolant pipe. Speaking of, I had bought a nice new, remade, stainless pipe in anticipation of this job, only to find it's not needed. I think someone has been here before as the pipe fitted is in good shape, and made of a thick-walled steel pipe.

With the intake cleaned up, I moved to the valley gasket. There aren't many photos of this because when refitting I was against the clock to get the manifold back on before the sealant went off.
I removed the old one and promptly directed it to the nearest bin. Like the heads, the valley is coated in a layer of burnt-on oil. No sludge though, and the cam appeared visually ok (some wear but had lobes and the discolouration wasn't abnormal, it'll do for now).
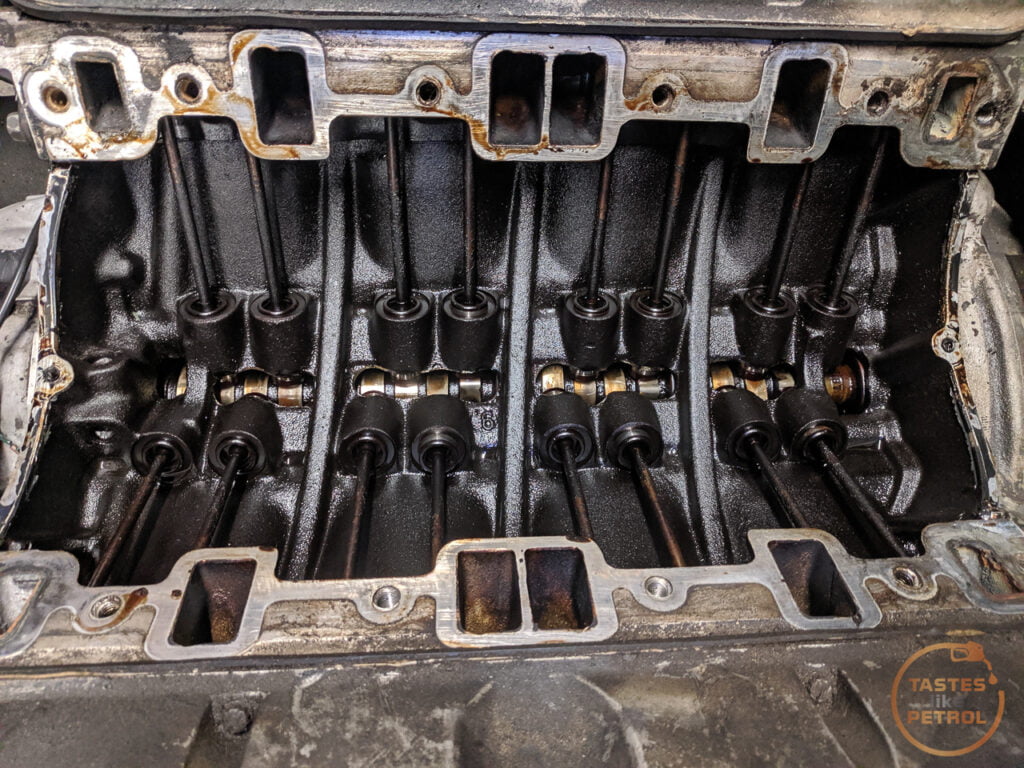
The new gasket and inlet manifold went on easily enough

Starting to look like an engine again, with the injector rail fitted too

The intake was promptly covered in a rag to stop anything falling down the holes, and then I used my engine brace to lift the engine for the sump gasket replacement. I recall commenting when I did the sump gasket on the Tess, how much easier it would be with an engine brace, and I can confirm, it's much easier.
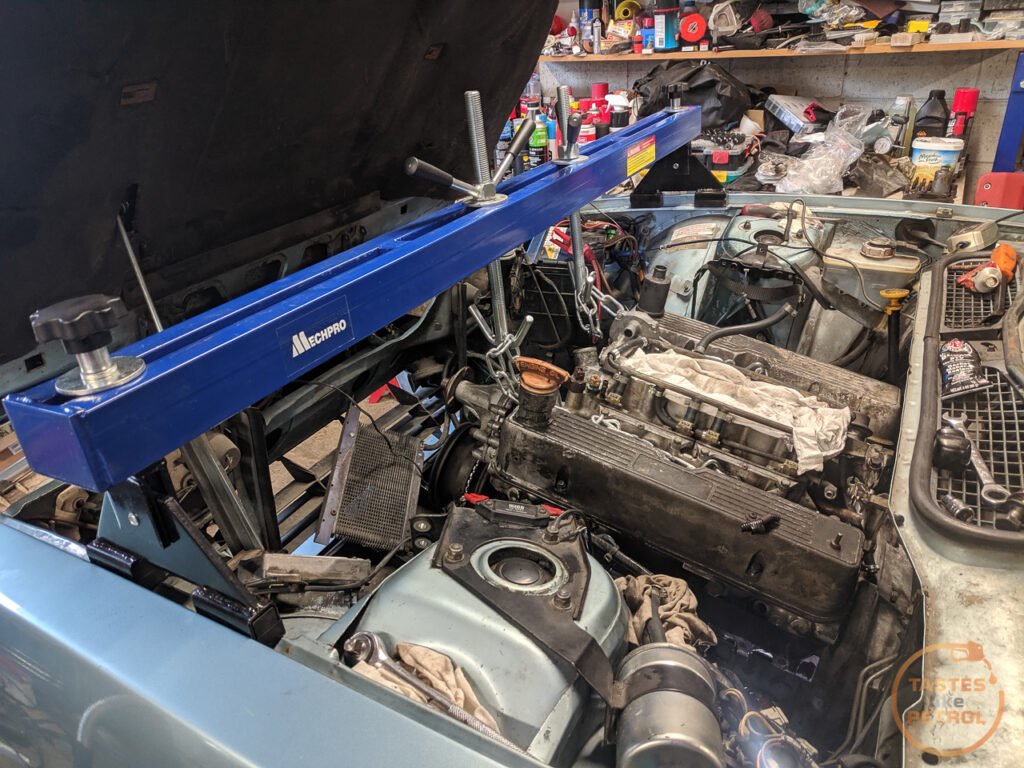
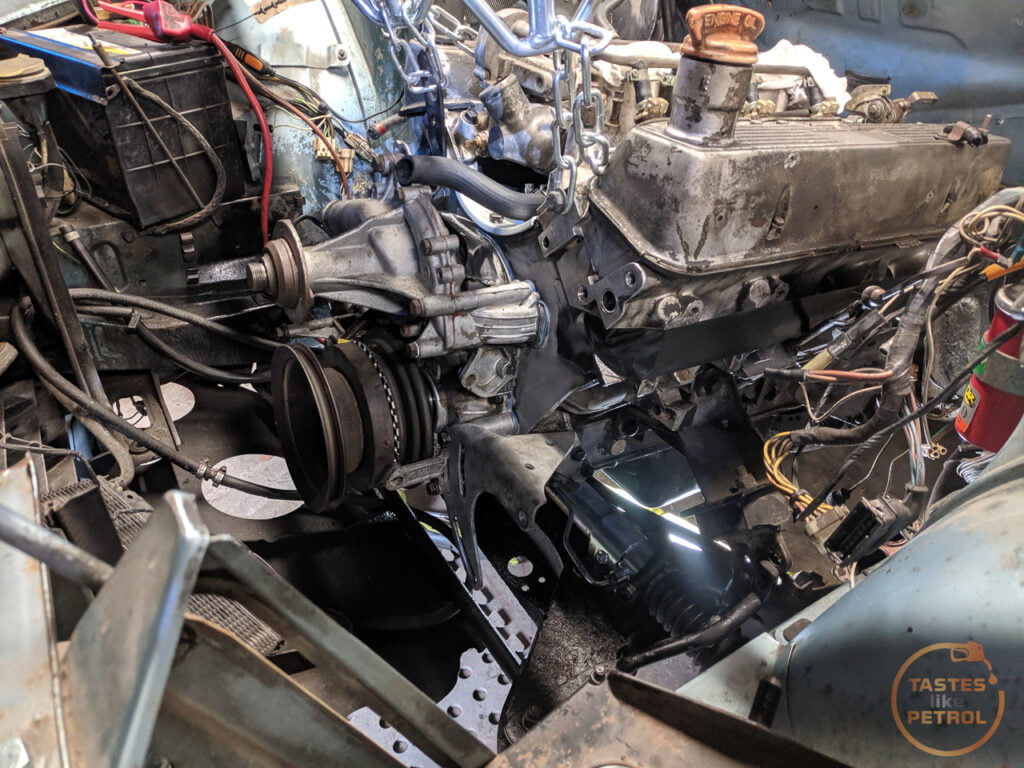
Yes, I had replaced the sump gasket when the engine was out. I purchased a new nice cork gasket from Rimmers, and when fitted, it split in one corner almost straight away (with the bolts gently nipped up by hand), and overnight had split in a further 3 or 4 places.
I ordered a replacement gasket locally, which was supplied as a Permaseal gasket. This was slightly thicker than the unbranded Rimmers one, and had a better shape.
With the sump off you could see how the seal was spat out. Most of the seal was destroyed removing it from the sealant though, and by golly that was not a fun job, scraping sealant off the bottom of the engine, under the car.

I did check the bolt holes in the sump when it was off last time, but didn't really check the flange for straightness, which I should have. Whether this contributed to the seal failure, or it was just a rubbish seal, we will never know.
Using a straightedge, you can see how the flange dips down. It was like this the whole way around.


Using the tried and true rag and grips method (rag to protect flange surface, grips to pull flange up), I gradually tweaked the flange as straight as I could. There is still a dip in places, but it's only about a mm.

I then used Hylomar to stick the new gasket on

Which then made its way to the underside of the engine. The bolts were all nipped up by hand, with no splits in the gasket. While under there, I reinstalled the torque converter bolts, and cover plate. I also removed, cleaned and installed the oil lever sensor with a new washer and some thread sealer.
With the sump on again, I could put oil in it, which meant only one thing; priming the oil pump.
I reinstalled the SD1 distributor (the 3.9 one doesn't have the oil pump drive; I might look into if I can fit an oil pump drive to it as the ignition curve might be more suited to the engine) and connected the ground temporarily.
I turned the key, and nothing happened. Ah, I forgot to plug in the main loom. I tried again, and had the sweet sounds of the engine turning over on the starter. After a few turns the oil light went out, and I could see fresh oil coming from the rocker gear
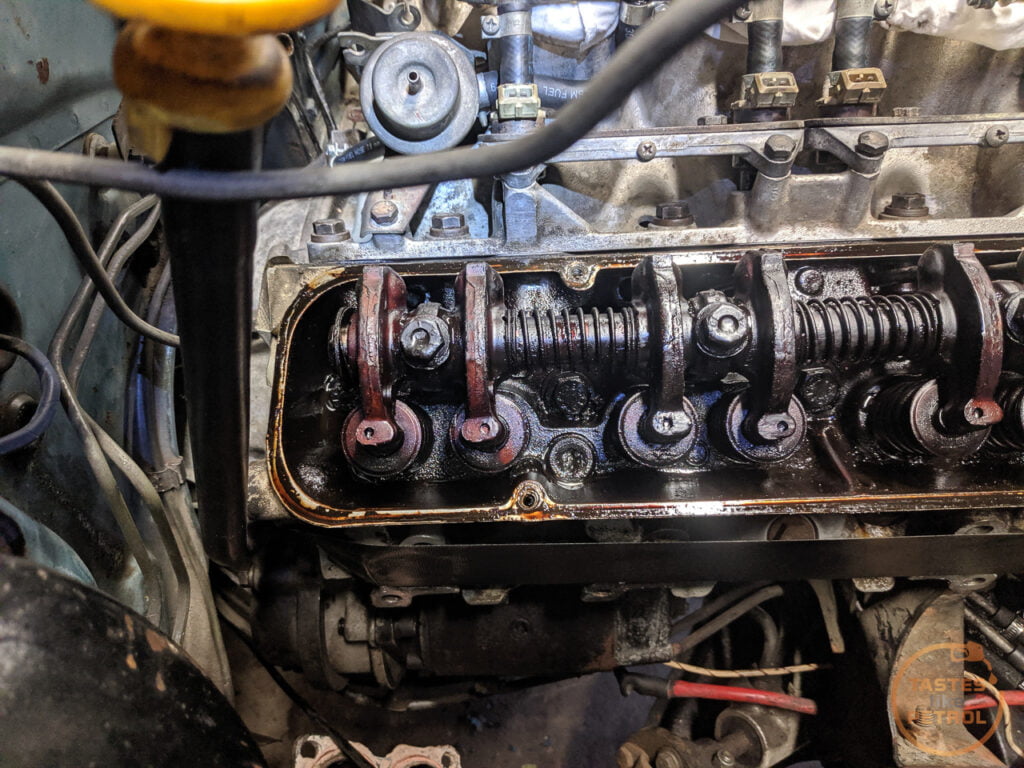
Great success!
I did have a fail though... even after doing the same thing with Effie, I forgot how much transmission fluid the trans can pump out of disconnected cooling hoses.

Knowing the oil pump worked was great. All it took was packing the pump with Vaseline so it wouldn't suck up air. Before I could drop the car down to the ground again I needed to sort the exhaust.
I dug the original EFI exhaust manifolds out of storage, only to find they were the same as the ones already on the car. Regardless, the studs were in better shape, so after running a die down the threads on the studs and cleaning the flanges, they are the ones I used.
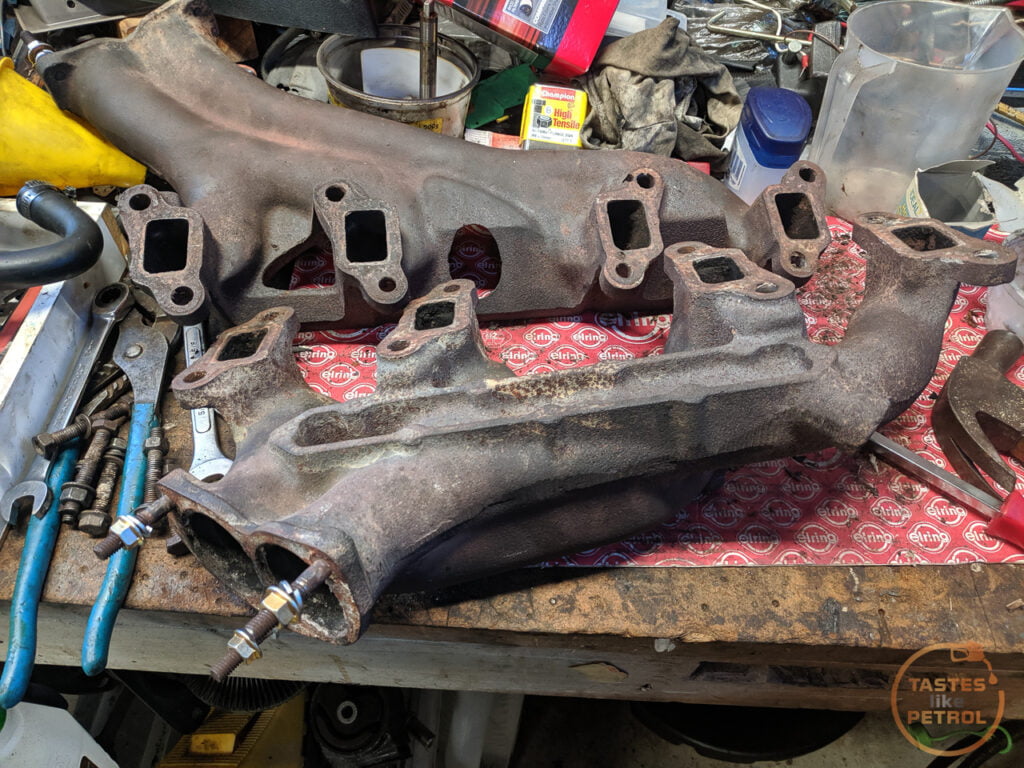
The downpipes weren't looking as good. One of them had a leak that I knew about. It was in a crack in a weld, and since I have a welder, I quickly ground it back and hit it with the welder.
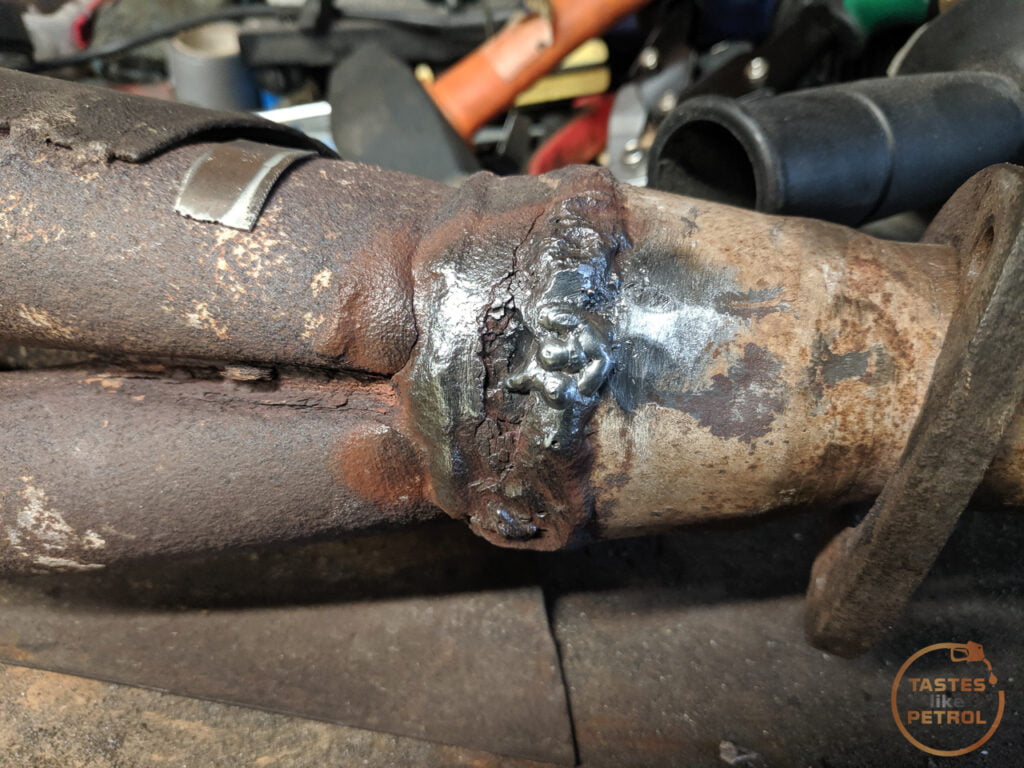
That area to the left wasn't looking happy either, so I quickly made up a plate, and hid it from sight. It's not pretty, but it'll work.

These downpipes are a bit of a mess really, and would benefit from being replaced with some nice long tube headers.
There is also a hole in the bottom of the Y joint in the main mid section, which sounded like a tractor last time the car was running, but with it installed in the car I would only blow a bunch of holes in it with the welder, so that will be fixed when the exhaust comes out to fit the wideband O2 sensor bung. In the meantime, I wrapped it in exhaust tape and put a clamp around it.
The manifolds were installed with new gaskets and sealant

The downpipes could then be wiggled into place.
For the first time in a few days, the car was lowered back onto its wheels. Sweet positive camber yo.
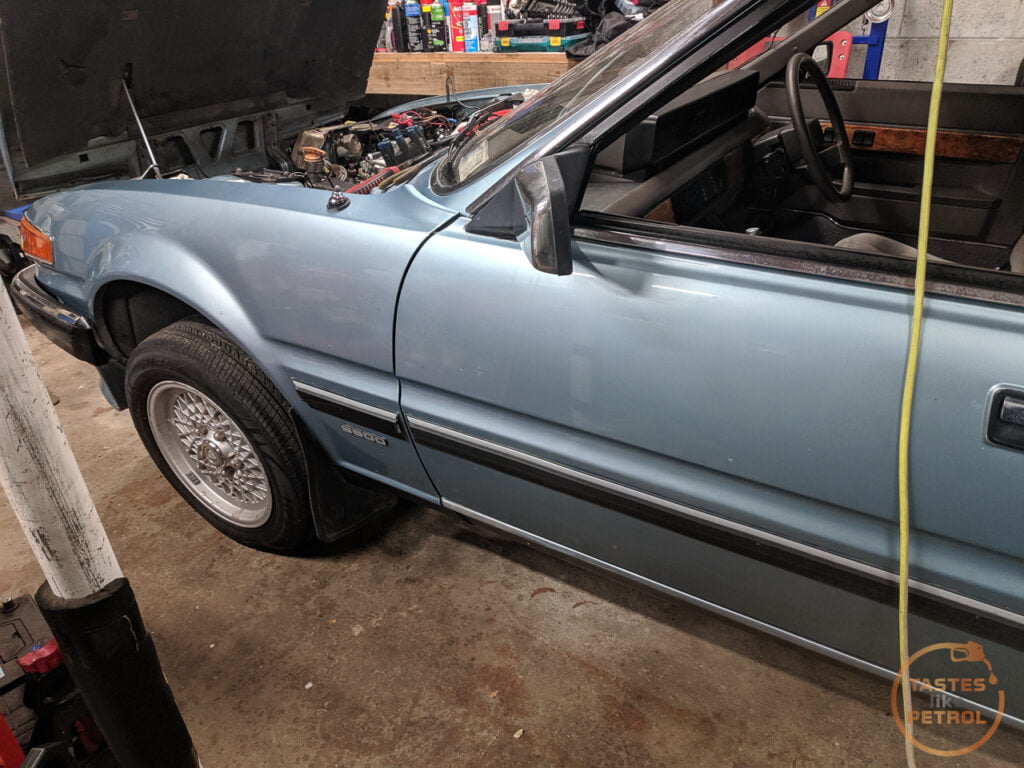
This brings us to today.
Now it was a case of putting the top of the engine back together. First was to install the new valve covers, since everything goes on top of them. These are the original EFI covers, painted in black wrinkle.

New stainless hardware to fit them
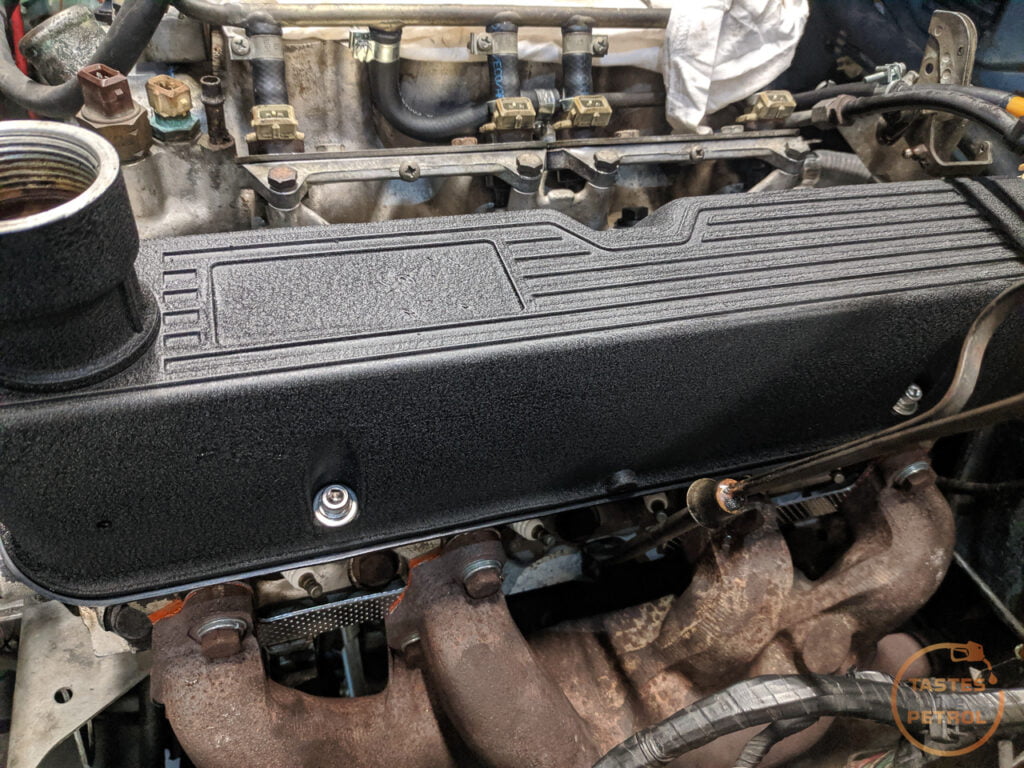
Much better than the gross old ones

The power steering pump went on next. As I had been advised, it was a lot easier to install without the pulley on the front. Just like Effie, I spaced the pump back from the bracket with one washer on each bolt; this brings the pulley into alignment with the crank again (which was pushed back due to the trigger wheel)
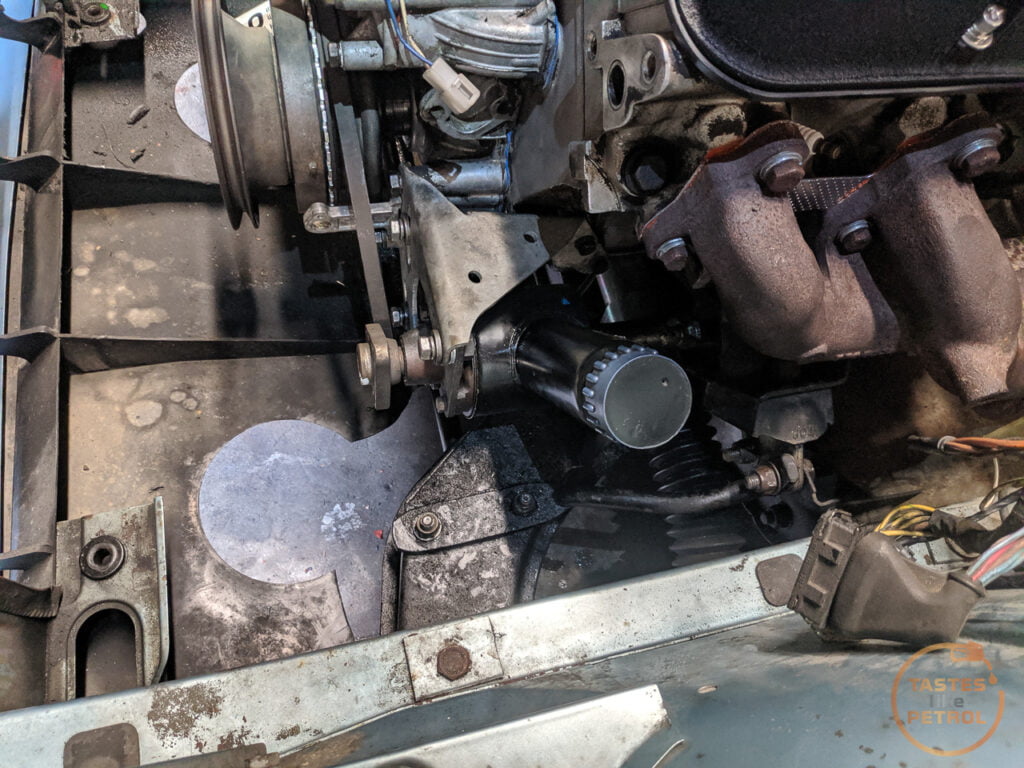
On the other side, the alternator bracket was next to be fitted. This was almost straight forward, except one of the bolt holes in the head was bigger than the old heads. I had a spare bolt that fit (new on the top, old under it)


As the new bolt had a larger diameter it no longer fit through the hole in the bracket. A 10mm drill made short work of that problem.


And bracket in place, with new coolant hose beneath it

Getting there. The power steering pump was finished off, with the pulley and belt fitted. It was refilled with ATF.

Moving up top again, the trumpet base was cleaned thoroughly, and refitted with a smear of Hylomar on the flange.

This allowed me to run the wiring that lives under the intake, and tidy everything up under there. The plenum top could be fitted

I don't know why, but it really triggers me when people run the wiring harness under the throttle mech, instead of over it, on the platform designed for it. I think all my SD1s except my first one, have had the wiring run like that. I fixed it on Lucas, so now its how it should be
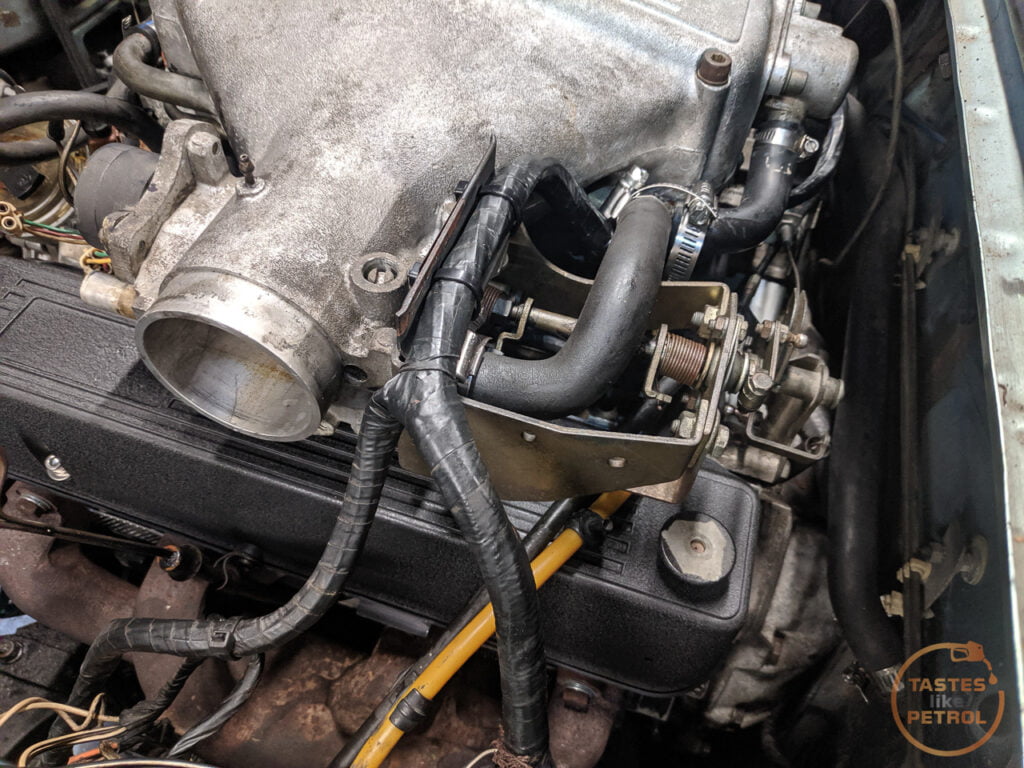
Finally, the rest of the engine bay could be assembled. I removed the transmission oil cooler, and re-routed the cooling lines into the radiator as they should be.

So, what does that mean?
IT'S STARTING TIME.
I checked everything was connected, made sure the oil level was good, and that the power steering had oil.
Then I connected the battery and turned the key.
It didn't start.
I noticed it backfired into the intake a couple of times, so suspected the distributor was 180 degrees out. I removed it, spun it around and refitted it.
And turned the key.
It's alive!
I only ran it for a short time as there was no coolant in the system, but it ran well and ran quietly.
I filled the cooling system up, and then ran the car to bleed the system.
When the engine was at operating temp, I checked and topped the transmission up, set the idle speed, and set the timing to approx 10 degrees on the timing light.
The engine runs really well, it idles nicely, and really shows how loud the old engine was at idle, this one is just so quiet. The oil pressure isn't amazing, I didn't expect it to be, but it's within the "good" range when warm, of 15psi at idle and 30psi driving. It was slow to come up when cold, but I'll see how it is tomorrow, since maybe it was only due to the first start. As long as it has pressure, and is quiet, that's enough for me.
After it burnt off a bunch of stuff and filled the garage with smoke (from the engine bay, not the exhaust; the exhaust is perfectly clear, with no signs of smoke) I took it out in the rain for a quick test.
It's hard to judge because of the rain, but acceleration seemed quite rapid, when it wasn't fighting for traction. The engine is turbine smooth, and revs well.
I'm looking forward to the weather clearing and seeing what Lucas can do now.
Job done. One week from engine out, to driving. Now to shake it down and see if it makes it to work on Wednesday (60km round trip in traffic) for the Christmas party.
Right, so we left off with the basic 3.9 in the car, but nothing attached to it.
My first goal this week was to get the crank pulley on, but before I could do that I needed to strip it down and fit the trigger wheel for the Speeduino crank sensor (just some "futureproofing").
This is the original SD1/EFI pulley. Since I converted to the original V-Belt front end I couldn't use the 3.9 Serpentine pulley.

This is what a bad crank seal can do to the pulley. The hardened, almost plastic, seal can wear into the metal.

I will keep an eye on the seal and if it leaks I will either need to source another pulley, or fit a Speedi-Sleeve, which is a thin tube of steel that goes over the damaged surface to give the seal something to seal against.
A quick zip with the rattlegun removed the three bolts

Because it worked, I am replicating the same install that Effie had, with the trigger wheel (the same 6 bolt 36-1 2.5mm thick trigger wheel from Lloyd Specialist Developments) mounted between the balancer and the PS pulley, so I slipped the rear section of the pulley off

This allows the trigger wheel to slip on. I have marked the same spot I aligned Effies pulley to

A+ reference material

Before it can be fitted, you need to hammer down the roll pin that locates the pulley

The trigger wheel should now fit flush

And the rear pulley can now be bolted back on

Compared to the Serp pulley, it's quite different. They're the same basic length in terms of pulley alignment, but the snout on the Serp one is much shorter to account for the crank driven oil pump.

The crank pulley bolt is 15/16", if anyone was wondering

Now, this is where it's interesting. I had done a lot of research and asked around, and as best I could tell I needed a crank spacer, so I paid a hefty amount to get one from Rimmers. The spacer goes on after the pulley, and allows the crank bolt to secure the pulley if the crank end is too long (otherwise if you did the bolt up without it, it would only touch the end of the crank and not the pulley).
This example image shows the spacer. It's just a thick ring of steel.

Long story short, I didn't need it. My pulley fit perfectly, and the bolt secured the pulley against the end of the crank. Oh well, I love paying lots for surplus parts.
So, yes, the pulley was then slipped into place

Where it promptly fouled on the timing pointer. I remember this from Effie, and the fix is to file the mounting area down to about where the orange line is, to clear the now slightly offset rear pulley.

I refit the modified pointer and did the main crank bolt up to about 6 ugga duggas.
Next I thought, "oh, let's install the power steering pump bracket". Nope. Should've done that BEFORE fitting the pulley.

So I undid the pulley bolt again, slid the pulley forward enough to get the bolt in and secured the bracket. The lower bolt on the front needs to be spaced away as it's used to having the TDC sensor bracket mounted on it. I tried to do this with washers, but in the end just smashed out the old sensor and mounted the bracket. I think this time I might end up modifying this bracket to work with the Speeduino crank sensor as it's quite a neat little mount, instead of making. my own bracket again

With that little segue done, it was time to get messy, swap out the valley gasket and install the intake manifold.
First I had to split the manifold from the trumpet base, so I could clean it all up. This proved to be harder than expected, and I had to use a chisel to carefully separate them.


With the trumpet base off my plan was to just replace the main feed and return hoses, and the injector seals

I removed the rail and injectors

The old hoses weren't looking too hot. They weren't leaking though.


The return to the regulator had a somewhat clever attachment, as in it almost wasn't attached


It had deformed the hose too

Regulator with new hoses. I tested the regulator and it held vacuum, so that's a win.

I removed the injector clamps, taking care to only poke my finger with a pick once. Use said finger poker to carefully lever the big rubber upper seals out of the housing as it'll be corroded in there.

I replaced the two hoses that link the pair of rails

The old seals look pretty gross

I used a sharp knife to carefully cut them off. The lower seals were stuck in the manifold, and hard as plastic. A few of them were quite deformed too.

I hadn't originally planned to replace the hoses on the injectors as they weren't leaking and didn't appear cracked (not like the ones on Effie), but upon closer inspection, there were fine cracks in the rubber

As it turns out, the inner layer of the hose had basically turned to plastic and crumbled when cut. Don't presume the hoses are OK just from a quick glance.
Thankfully I bought a kit from Mr Injector in the UK that came with new seals, hoses and the retaining ferrules (the metal cup at the base of the hose).
I set about cutting off the old hoses and ferrule. The instructions are very strict that you must not use a knife to cut the hose off, so in the end I used a combo of "aviation" snips and side cutters.

I got it down to a fine art, and took only a matter of seconds to strip the hoses off. I would use the snips held upright to cut vertically through the ferrule, which would usually take two snips do, then use the side cutters to twist the cut ferrule out. I would then use the side cutters to munch horizontally at the bottom 1/4 of the hose, until it was damaged enough that I could push sideways on the top of the hose where it would rip through the cut section and come off.

The new hose and ferrule are straightforward to fit. Slip the ferrule on, dip the end of the new hose in fresh engine oil, and push it onto the injector, using a hard surface to push against and force the hose into the cup of the ferrule. That locks the hose into place.

Injectors with fresh new hoses

Now the new upper seals can be fitted. Don't be like me, and for the second time, forget to put the upper retaining plate over the injectors first. Thankfully I remembered before the first seal dropped into its groove. You cannot fit this plate with the seal in place.

Lube the seals with some rubber grease and slip them into the groove

I cleaned the corrosion off the bases with a wire brush in the drill, and loosely fitted them, along with new lower injector seals.

Next, it was time to clean the manifold up. I removed all the old sealant and wire-brushed the under intake coolant pipe. Speaking of, I had bought a nice new, remade, stainless pipe in anticipation of this job, only to find it's not needed. I think someone has been here before as the pipe fitted is in good shape, and made of a thick-walled steel pipe.

With the intake cleaned up, I moved to the valley gasket. There aren't many photos of this because when refitting I was against the clock to get the manifold back on before the sealant went off.
I removed the old one and promptly directed it to the nearest bin. Like the heads, the valley is coated in a layer of burnt-on oil. No sludge though, and the cam appeared visually ok (some wear but had lobes and the discolouration wasn't abnormal, it'll do for now).

The new gasket and inlet manifold went on easily enough

Starting to look like an engine again, with the injector rail fitted too

The intake was promptly covered in a rag to stop anything falling down the holes, and then I used my engine brace to lift the engine for the sump gasket replacement. I recall commenting when I did the sump gasket on the Tess, how much easier it would be with an engine brace, and I can confirm, it's much easier.


Yes, I had replaced the sump gasket when the engine was out. I purchased a new nice cork gasket from Rimmers, and when fitted, it split in one corner almost straight away (with the bolts gently nipped up by hand), and overnight had split in a further 3 or 4 places.
I ordered a replacement gasket locally, which was supplied as a Permaseal gasket. This was slightly thicker than the unbranded Rimmers one, and had a better shape.
With the sump off you could see how the seal was spat out. Most of the seal was destroyed removing it from the sealant though, and by golly that was not a fun job, scraping sealant off the bottom of the engine, under the car.

I did check the bolt holes in the sump when it was off last time, but didn't really check the flange for straightness, which I should have. Whether this contributed to the seal failure, or it was just a rubbish seal, we will never know.
Using a straightedge, you can see how the flange dips down. It was like this the whole way around.


Using the tried and true rag and grips method (rag to protect flange surface, grips to pull flange up), I gradually tweaked the flange as straight as I could. There is still a dip in places, but it's only about a mm.

I then used Hylomar to stick the new gasket on

Which then made its way to the underside of the engine. The bolts were all nipped up by hand, with no splits in the gasket. While under there, I reinstalled the torque converter bolts, and cover plate. I also removed, cleaned and installed the oil lever sensor with a new washer and some thread sealer.
With the sump on again, I could put oil in it, which meant only one thing; priming the oil pump.
I reinstalled the SD1 distributor (the 3.9 one doesn't have the oil pump drive; I might look into if I can fit an oil pump drive to it as the ignition curve might be more suited to the engine) and connected the ground temporarily.
I turned the key, and nothing happened. Ah, I forgot to plug in the main loom. I tried again, and had the sweet sounds of the engine turning over on the starter. After a few turns the oil light went out, and I could see fresh oil coming from the rocker gear

Great success!
I did have a fail though... even after doing the same thing with Effie, I forgot how much transmission fluid the trans can pump out of disconnected cooling hoses.

Knowing the oil pump worked was great. All it took was packing the pump with Vaseline so it wouldn't suck up air. Before I could drop the car down to the ground again I needed to sort the exhaust.
I dug the original EFI exhaust manifolds out of storage, only to find they were the same as the ones already on the car. Regardless, the studs were in better shape, so after running a die down the threads on the studs and cleaning the flanges, they are the ones I used.

The downpipes weren't looking as good. One of them had a leak that I knew about. It was in a crack in a weld, and since I have a welder, I quickly ground it back and hit it with the welder.

That area to the left wasn't looking happy either, so I quickly made up a plate, and hid it from sight. It's not pretty, but it'll work.

These downpipes are a bit of a mess really, and would benefit from being replaced with some nice long tube headers.
There is also a hole in the bottom of the Y joint in the main mid section, which sounded like a tractor last time the car was running, but with it installed in the car I would only blow a bunch of holes in it with the welder, so that will be fixed when the exhaust comes out to fit the wideband O2 sensor bung. In the meantime, I wrapped it in exhaust tape and put a clamp around it.
The manifolds were installed with new gaskets and sealant

The downpipes could then be wiggled into place.
For the first time in a few days, the car was lowered back onto its wheels. Sweet positive camber yo.

This brings us to today.
Now it was a case of putting the top of the engine back together. First was to install the new valve covers, since everything goes on top of them. These are the original EFI covers, painted in black wrinkle.

New stainless hardware to fit them

Much better than the gross old ones

The power steering pump went on next. As I had been advised, it was a lot easier to install without the pulley on the front. Just like Effie, I spaced the pump back from the bracket with one washer on each bolt; this brings the pulley into alignment with the crank again (which was pushed back due to the trigger wheel)

On the other side, the alternator bracket was next to be fitted. This was almost straight forward, except one of the bolt holes in the head was bigger than the old heads. I had a spare bolt that fit (new on the top, old under it)


As the new bolt had a larger diameter it no longer fit through the hole in the bracket. A 10mm drill made short work of that problem.


And bracket in place, with new coolant hose beneath it

Getting there. The power steering pump was finished off, with the pulley and belt fitted. It was refilled with ATF.

Moving up top again, the trumpet base was cleaned thoroughly, and refitted with a smear of Hylomar on the flange.

This allowed me to run the wiring that lives under the intake, and tidy everything up under there. The plenum top could be fitted

I don't know why, but it really triggers me when people run the wiring harness under the throttle mech, instead of over it, on the platform designed for it. I think all my SD1s except my first one, have had the wiring run like that. I fixed it on Lucas, so now its how it should be

Finally, the rest of the engine bay could be assembled. I removed the transmission oil cooler, and re-routed the cooling lines into the radiator as they should be.

So, what does that mean?
IT'S STARTING TIME.
I checked everything was connected, made sure the oil level was good, and that the power steering had oil.
Then I connected the battery and turned the key.
It didn't start.
I noticed it backfired into the intake a couple of times, so suspected the distributor was 180 degrees out. I removed it, spun it around and refitted it.
And turned the key.
It's alive!
I only ran it for a short time as there was no coolant in the system, but it ran well and ran quietly.
I filled the cooling system up, and then ran the car to bleed the system.
When the engine was at operating temp, I checked and topped the transmission up, set the idle speed, and set the timing to approx 10 degrees on the timing light.
The engine runs really well, it idles nicely, and really shows how loud the old engine was at idle, this one is just so quiet. The oil pressure isn't amazing, I didn't expect it to be, but it's within the "good" range when warm, of 15psi at idle and 30psi driving. It was slow to come up when cold, but I'll see how it is tomorrow, since maybe it was only due to the first start. As long as it has pressure, and is quiet, that's enough for me.
After it burnt off a bunch of stuff and filled the garage with smoke (from the engine bay, not the exhaust; the exhaust is perfectly clear, with no signs of smoke) I took it out in the rain for a quick test.
It's hard to judge because of the rain, but acceleration seemed quite rapid, when it wasn't fighting for traction. The engine is turbine smooth, and revs well.
I'm looking forward to the weather clearing and seeing what Lucas can do now.
Job done. One week from engine out, to driving. Now to shake it down and see if it makes it to work on Wednesday (60km round trip in traffic) for the Christmas party.


