|
|
|
Jul 21, 2022 16:10:02 GMT
|
If you're not an Insight owner, you might not know that there's a handy deep storage bin under a hatch at the back of the boot: 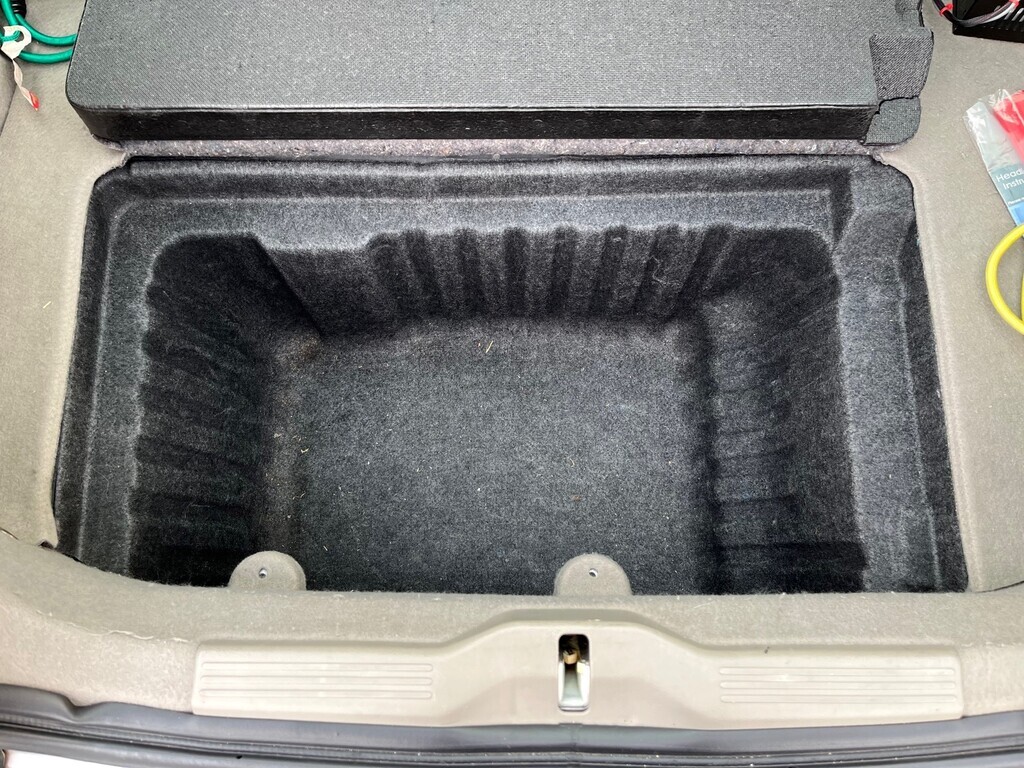 If you are an Insight owner, you might not know that there's another compartment underneath the storage bin if you pull it out. I was surprised to hear on Insightcentral that a number of owners didn't know about this: 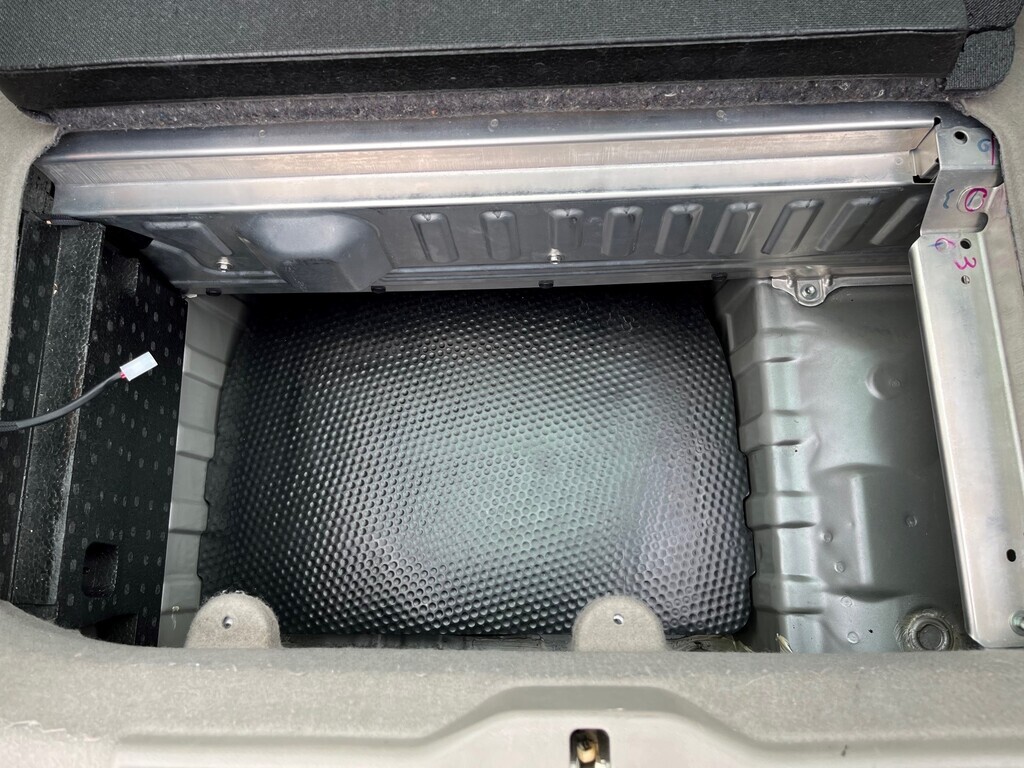 Under the black sheet is the spare wheel, a jack and a small toolkit: 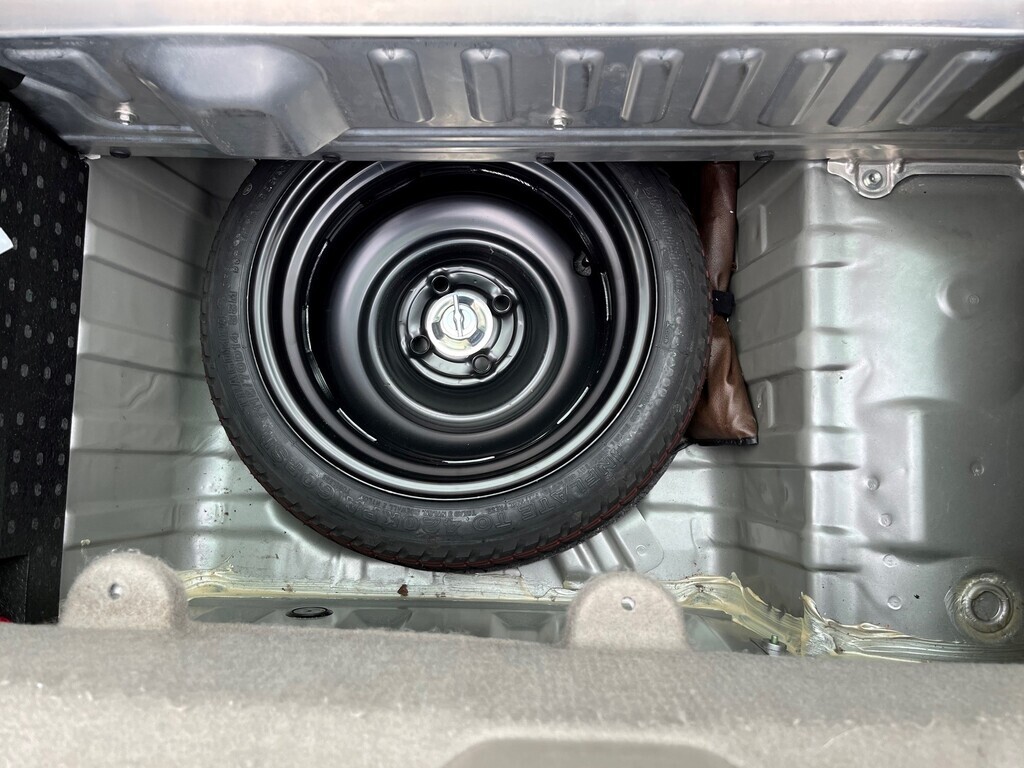 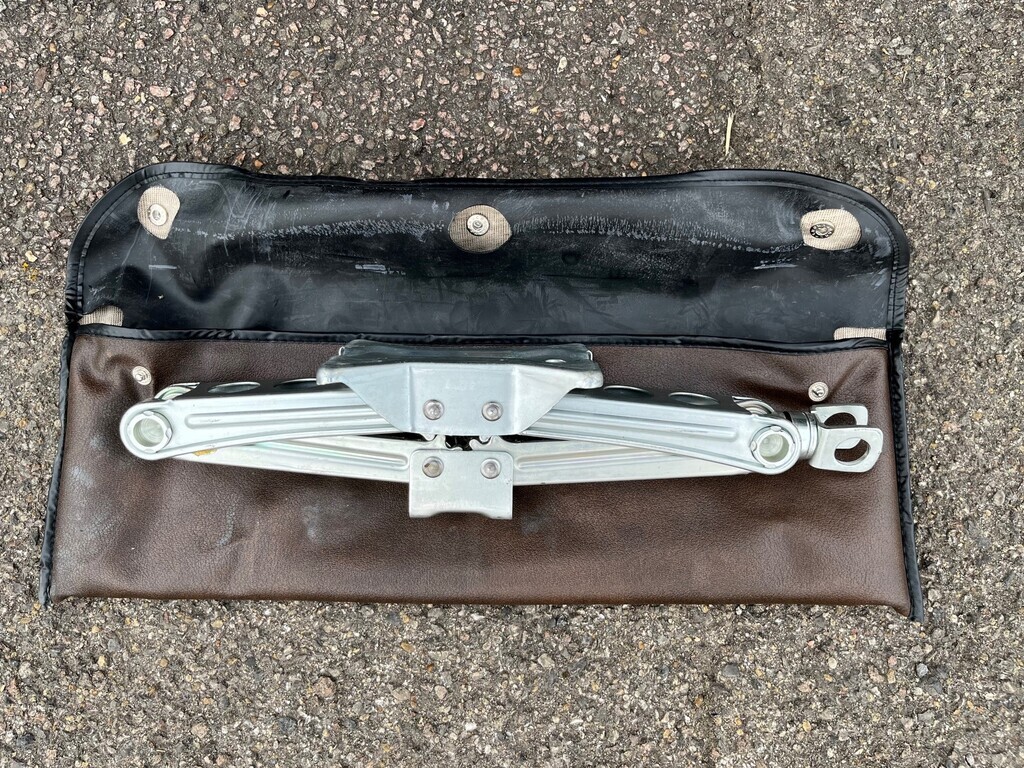 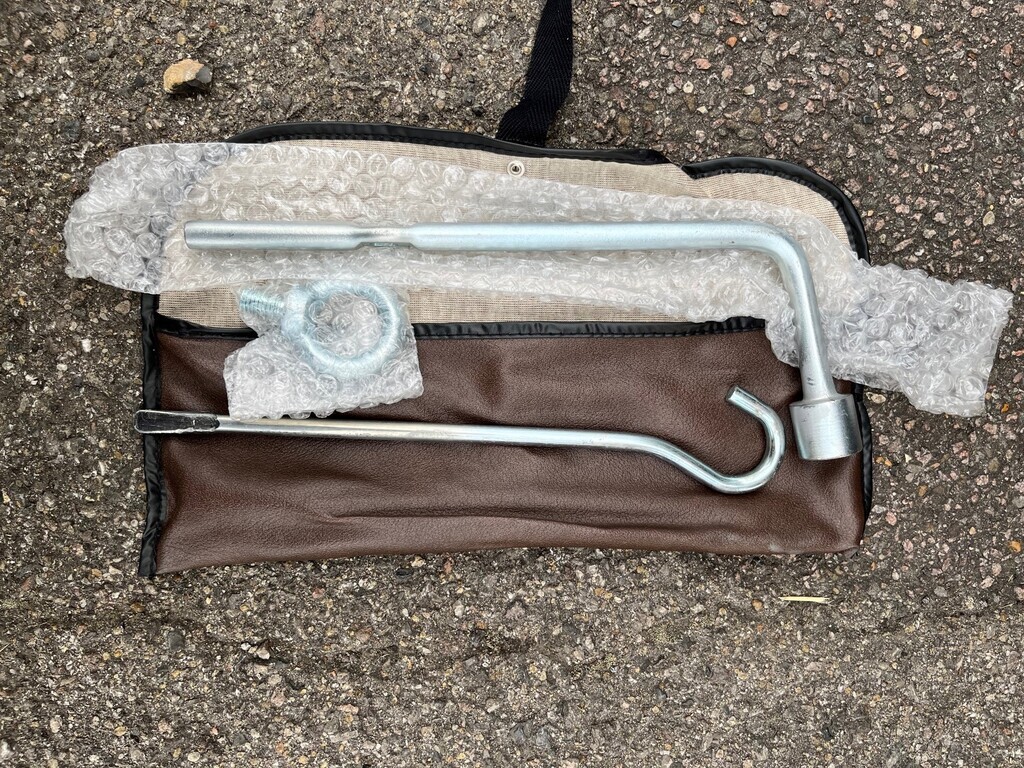 These were were the days when manufacturers hadn't worked out that to save a bit of cost weight, all they had to do was bin off the spare wheel and jack and replace it with a can of instant tyre repair. This is also a very handy space to put more batteries in if you're EV-converting an Insight... Anyway, why am I telling you this? None of the interesting reasons above. I thought I'd check the air in the spare tyre since it had been a while. Helped by my 4 year old, hence the skewiff photos. Opportunity to use my unnecessarily expensive tyre pump: 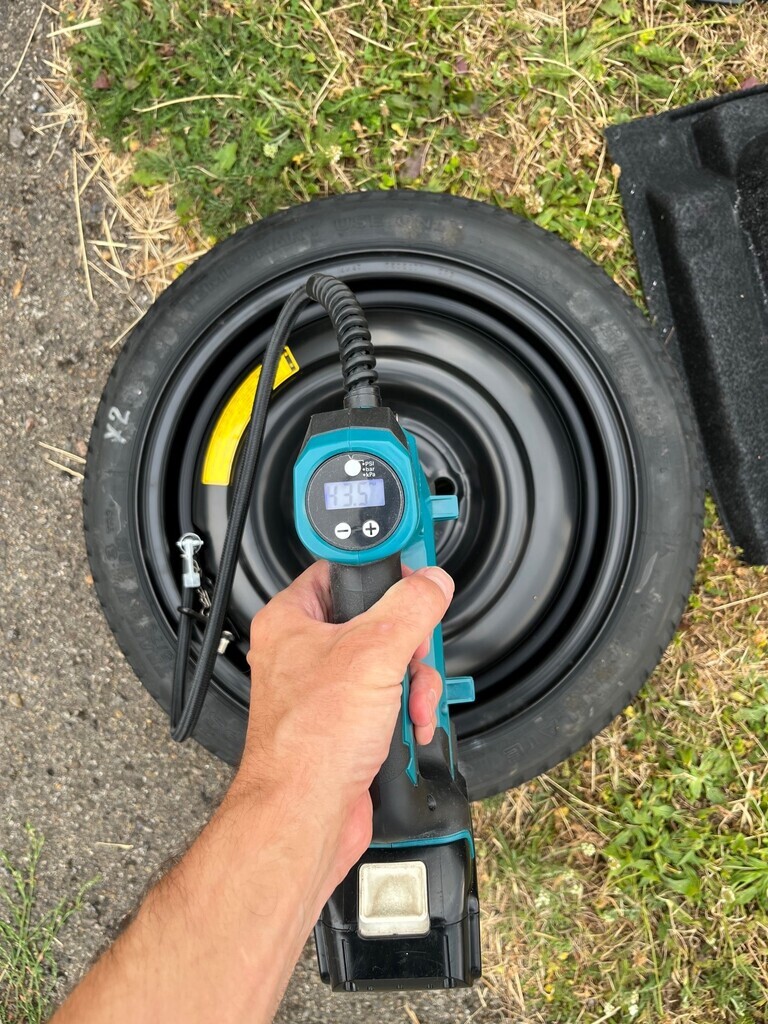 The car is still not low and I still haven't gone down for a cup of tea with bilkob who lives practically over the road from where I work. I've even seen him twice this week: he tapped on my window when he came past on his bike and then I saw him floating through town in his Citroen. I like tea as well, I should probably do something about that. |
| |
|
|
|
|
|
|
|
Oct 28, 2022 10:20:44 GMT
|
Usual tldr warning; I didn't sell it in the end and had to get a new door mirror. Here's the long version: This was going to go up for sale before I re-insured it but life got in the way and I couldn't get a replacement in time. Nor could I actually decide what I wanted to replace it with, and everything else was just going to be a bit worse for what I use the car for. So it's re-insured for another year and MOT is on Monday. Sorry for going quiet ammo as you had first dibs. Just one spanner in the works. Week before last it looks like the council smashed my mirror off when they were mowing the grass out the front. I park right up against the grass so next door can get their second car off the drive. The council mow right up to the cars and cover them in grass, not a problem, but I reckon they accidentally clipped the mirror off when turning the mower round and probably didn't notice (they use big 60" ride-on mowers). 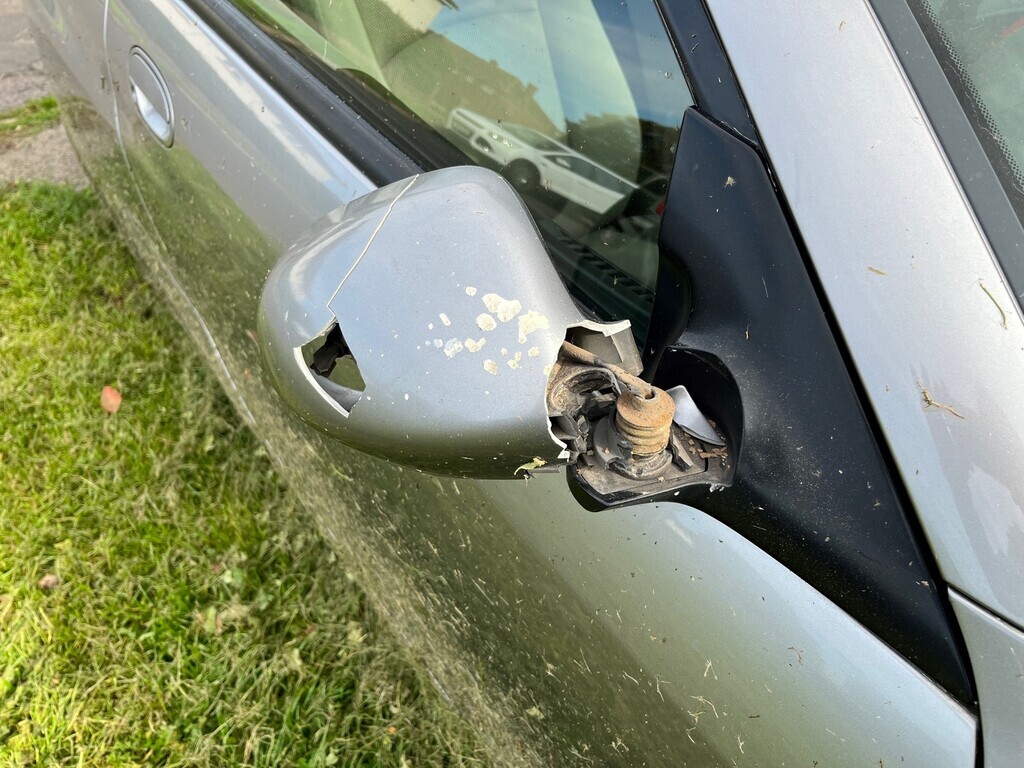 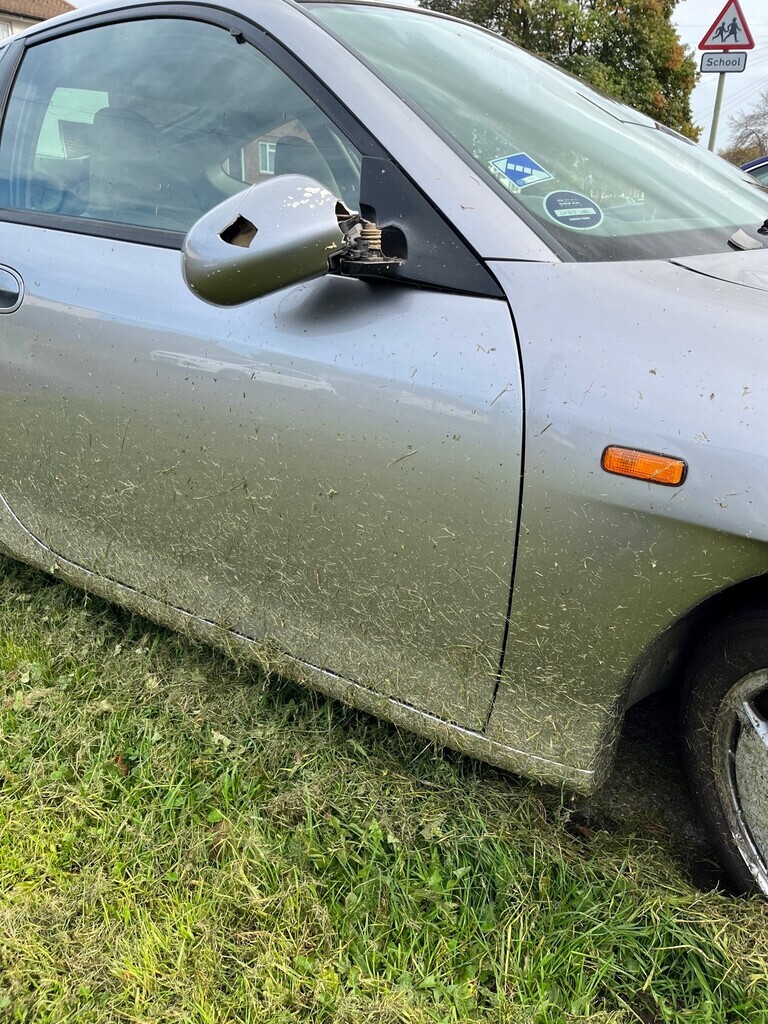 Why is that a spanner in the works? Problem is, because this is a pretty rare car, finding things like mirror assemblies can be problematic. When it last happened in ~2016, it took me about 3 months to locate another one and I had to get it sent over from the US. It was silver, though, which was pretty lucky. I seem to remember it didn't quite fit. The angle of something or other on the mount was different between LHD and RHD versions to suit the different the viewing angle from the other side of the car and from my driver's seat it didn't view down the side of the car. I couldn't remember what I did or used to make it work, or if I actually just used the shell in the end. I kind of needed a UK one to be sure. Even with the aerospace structural adhesives I have access to at work, my mirror was a bit too smashed to fix. Nothing on UK or US eBay, nothing from the usual UK users on Insightcentral and no cars that we knew of being broken in the UK. I tried to join the UK Insight Owners on Facebook, but I don't use Facebook so they kept refusing my join requests with my empty blatantly spammer's profile. That was the spanner in the works. When I took the old one off, I saw a couple of little mods I'd made which suggested I'd got the US shell and internals on the original door mount. I trawled Insightcentral for US cars being broken and as luck would have it found an ad for a silver car from a couple of months ago. 5 days and £160 later and I've got a whole silver mirror assembly sat in my lap. 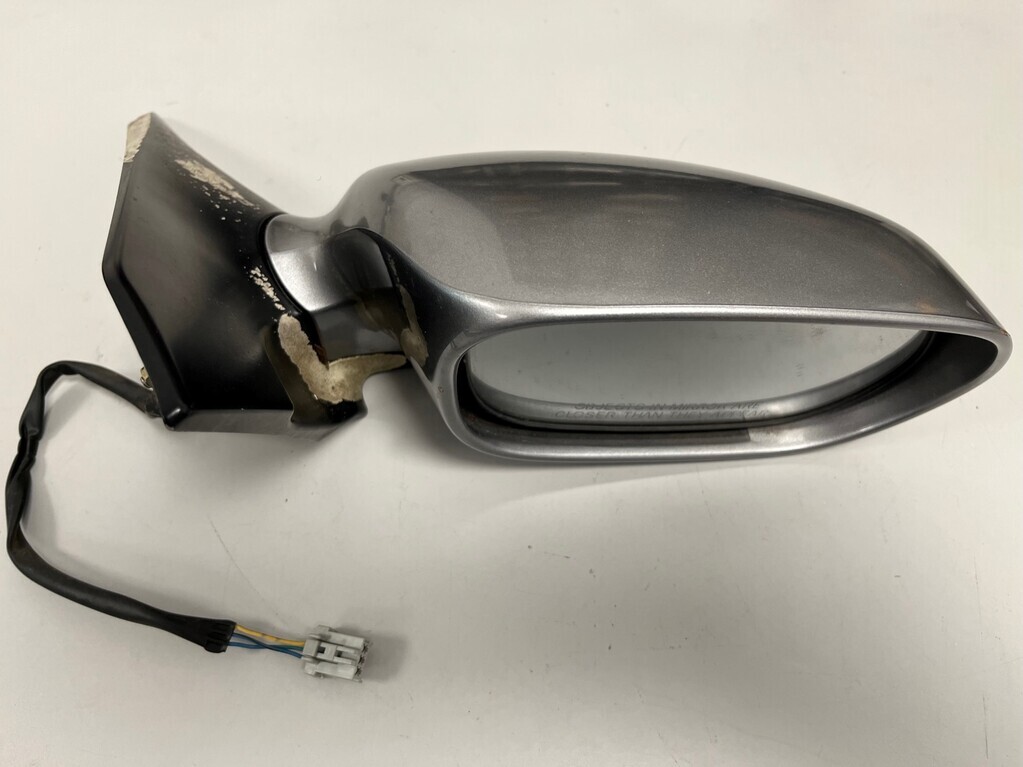 Wow, chances of that happening were pretty much zero. 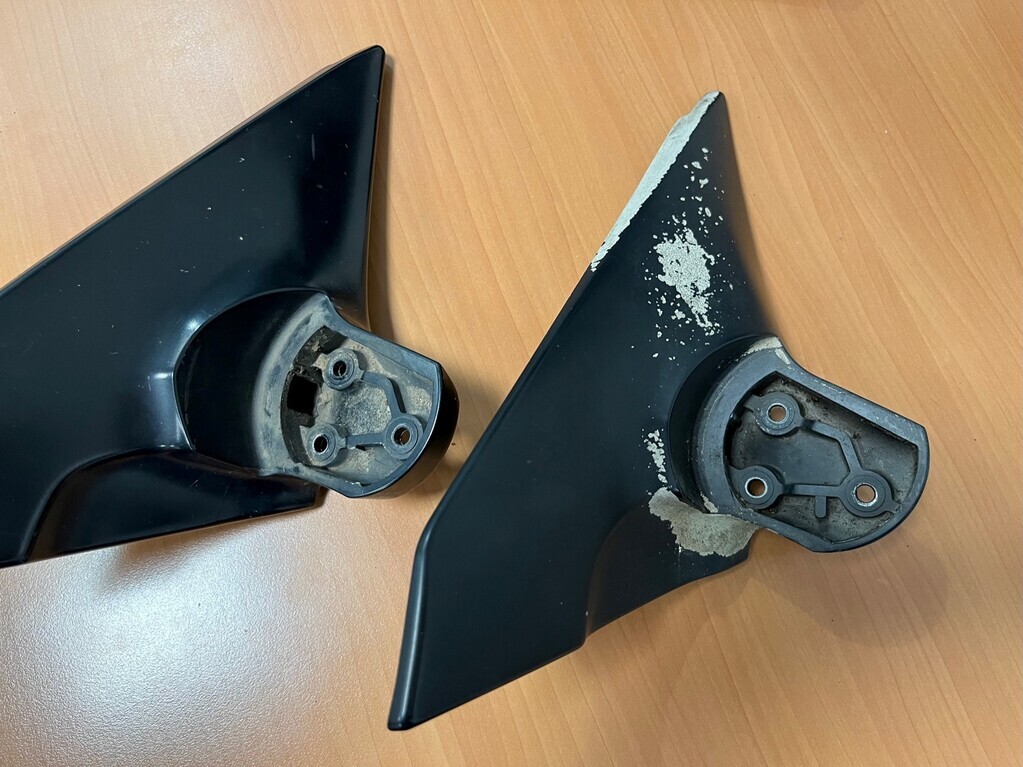 With the two mounts side-by-side it's obvious that the angles are different. US LHD door mount is the chipped-up one with leprosy on the right. The LHD mounting mechanism has an odd locating pin on the bottom which doesn't actually locate in anything but fouls a rib on the RHD door mount. I could see in the RHD door mount that I'd filed the rib back to clear it. So with a bit of luck, it'll be as simple as that. Meanwhile, I've got a bit of floorboard screwed in the hole to keep thieving little fingers out the car. 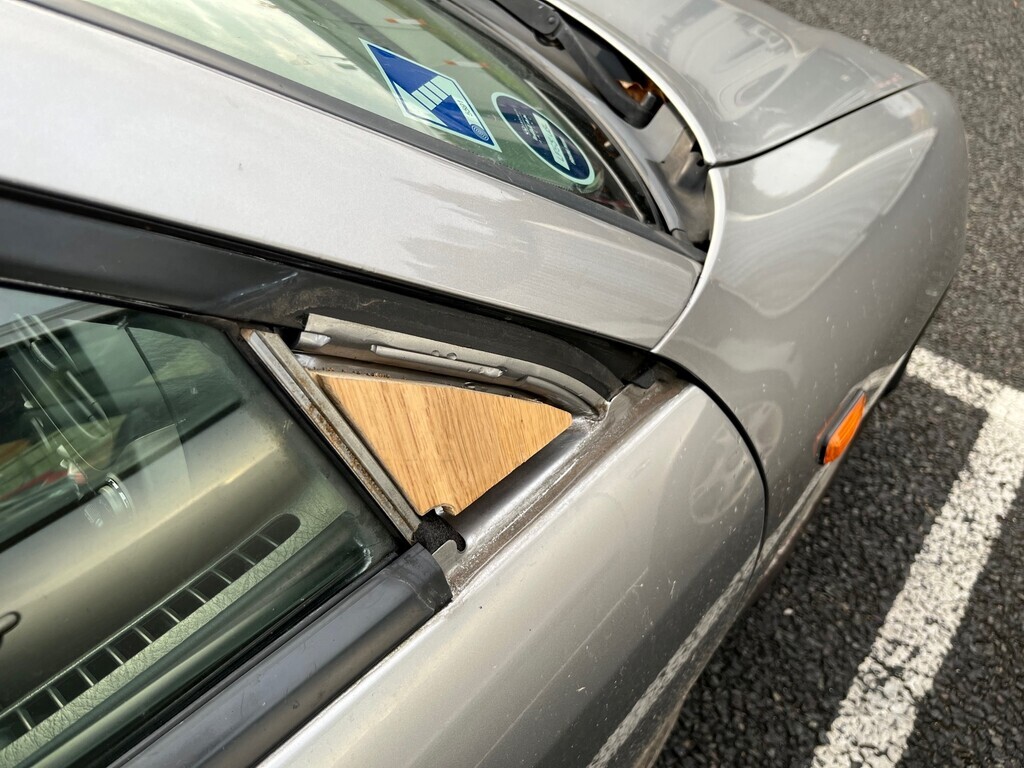 |
| |
|
|
thebaron
Europe
Over the river, heading out of town
Posts: 1,645 
|
|
Oct 28, 2022 10:31:54 GMT
|
|
I always admired these. I had the chance to have a good look around one a few weeks back and it has strongly stoked my want for one.
They really are a fantastic example of good design.
|
| |
|
|
|
|
|
Oct 28, 2022 13:55:30 GMT
|
Lunchtime fix. First, clean out the hole: 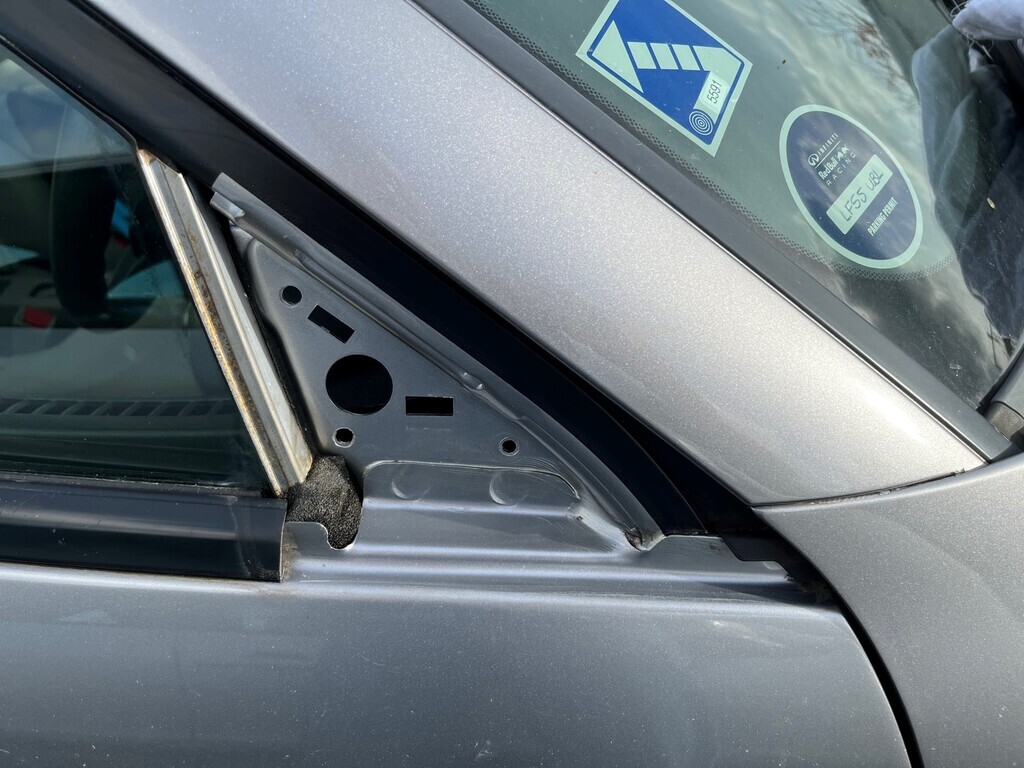 That's much better. Then, stick mirror in hole and cross fingers about angle of view: 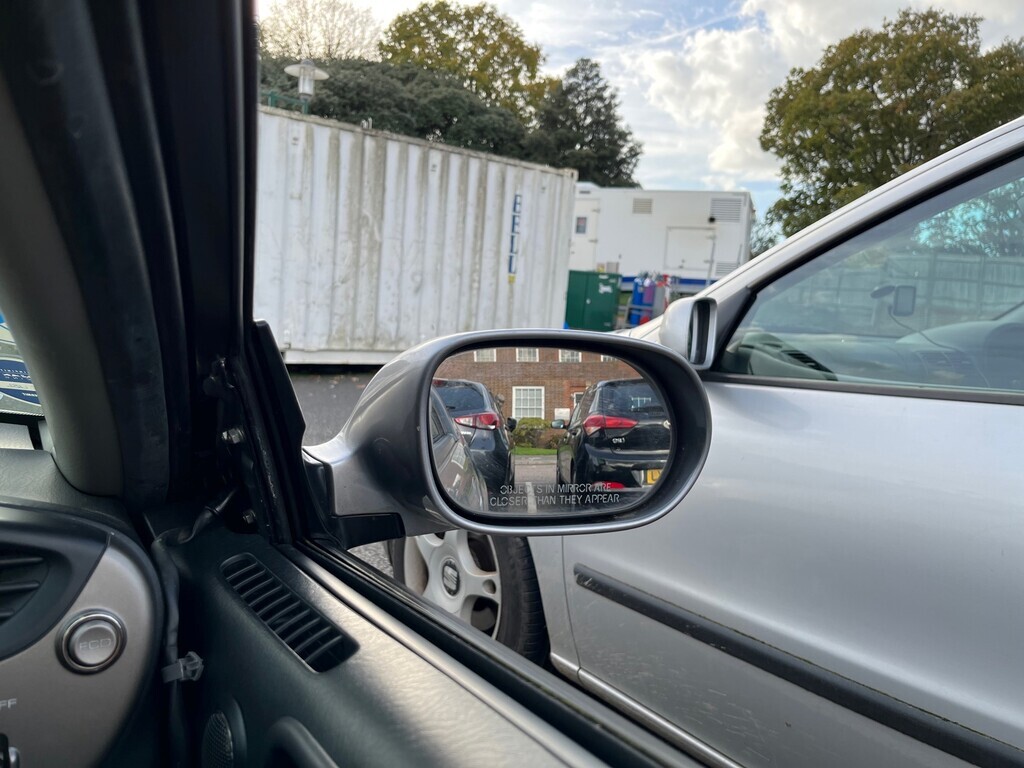 Perfect, basically. I'll be able to see properly to drive home and I can deal with the dingly dangly wire later when I take the door panel back off. Really relieved. |
| |
|
|
Davey
Posted a lot
 Resident Tyre Nerd.
Posts: 2,190
|
|
Oct 28, 2022 15:54:22 GMT
|
Great post but all I can focus on in how much effort you put into the finish on the temporary wooden hole blocker. That's got more patience in it that the entirety of my daily. |
| |
K11 Micra x3 - Mk3 astra - Seat Marbella - Mk6 Escort estate - B5 Passat - Alfa 156 estate - E36 compact
Mk2 MR2 T-bar - E46 328i - Skoda Superb - Fiat seicento - 6n2 Polo - 6n polo 1.6 - Mk1 GS300
EU8 civic type S - MG ZT cdti - R56 MINI Cooper S - Audi A3 8p - Jaguar XF (X250) - FN2 Civic Type R - Mk2 2.0i Ford Focus
|
|
|
|
|
Oct 28, 2022 17:26:39 GMT
|
Great post but all I can focus on in how much effort you put into the finish on the temporary wooden hole blocker. That's got more patience in it that the entirety of my daily. Haha! Well it had to cover all the holes and I wasn’t sure how long it was going to be on there for  |
| |
|
|
|
|
|
|
|
Something has worn out stroke broken on muh Hunduh uhmuhguhd! This is literally the first thing I’ve had to fix and the car has done 107k miles! Windscreen wiper sweep was starting to get a bit small. I had a look online and apparently this is a thing and you just replace the bushes on the mechanism. It’s even accessible from the outside of the car, so no need to take the entire contents of the dashboard out like I expect you would on a French car. Bushes ordered, planned to do this over Christmas. Mostly didn’t, but for once it was because I didn’t have the right tools rather than because of having to dad. I bought these to enable wiper arm removalment:  I’m slightly allergic to cheap Chinese eBay tools but I figured I’d only need these once. With the arms off, I could work my way round all the clips on this panel… 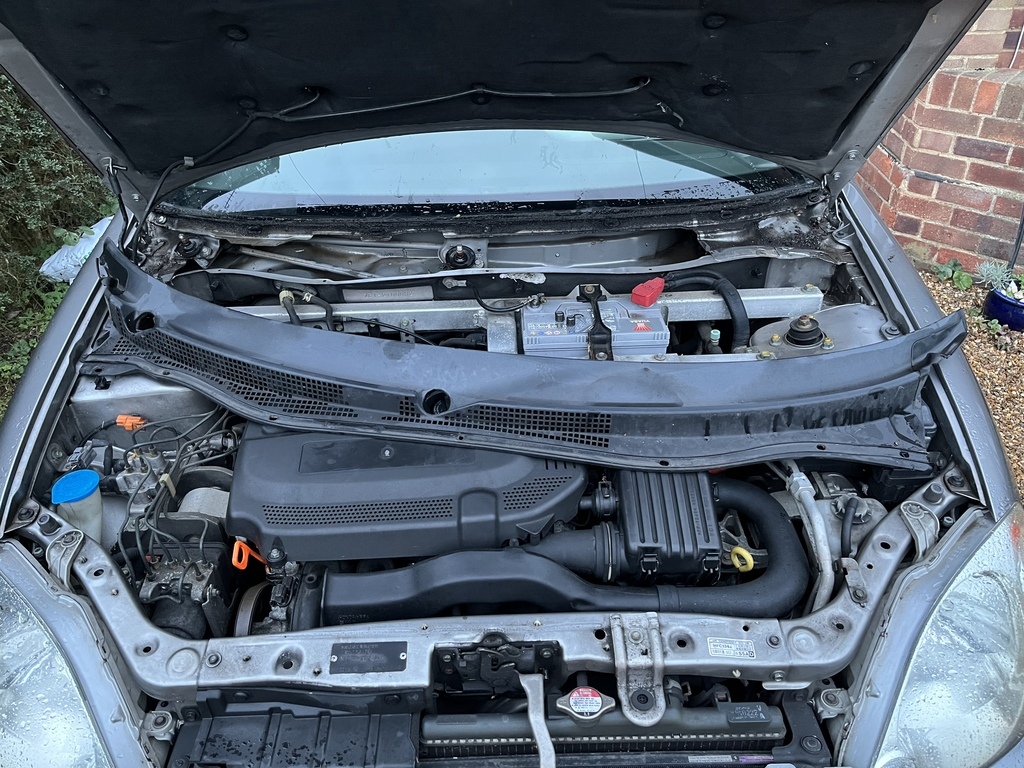 …and wriggle it free. None of the clips broke. Most odd. It was at this point, I discovered Honda has won the muck trap competition. I have never seen muck, slime and crud caked in like this before. If this was a steel car it would have some serious rot issues by now. I’m my case, however, it will simply wipe clean. 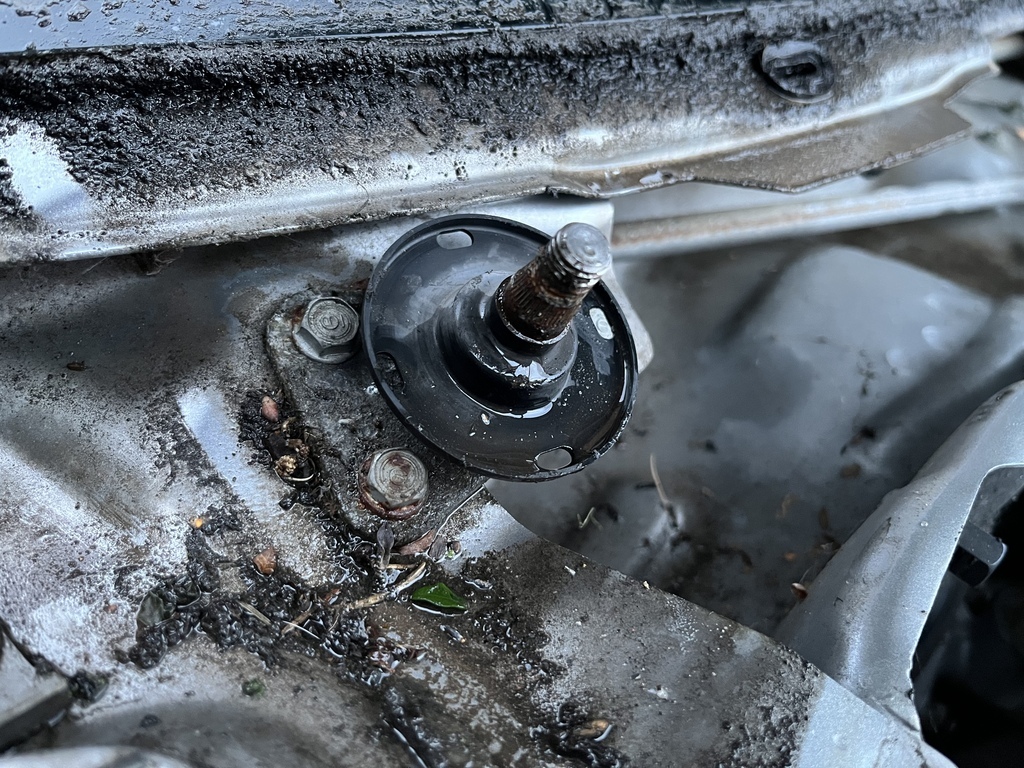 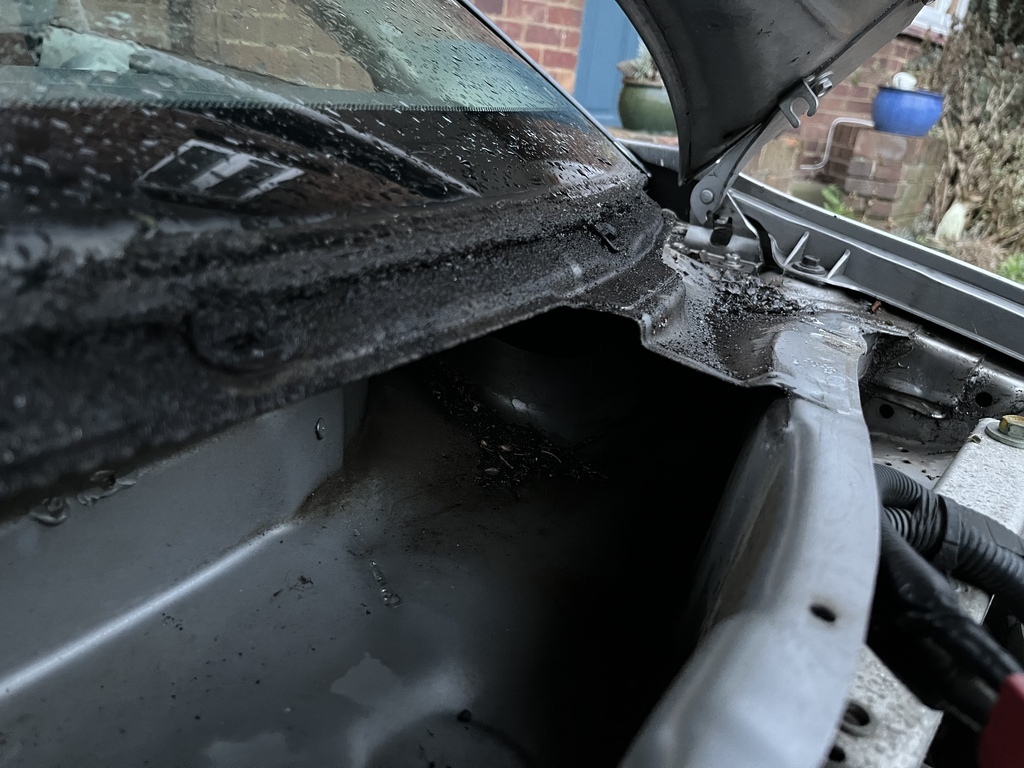 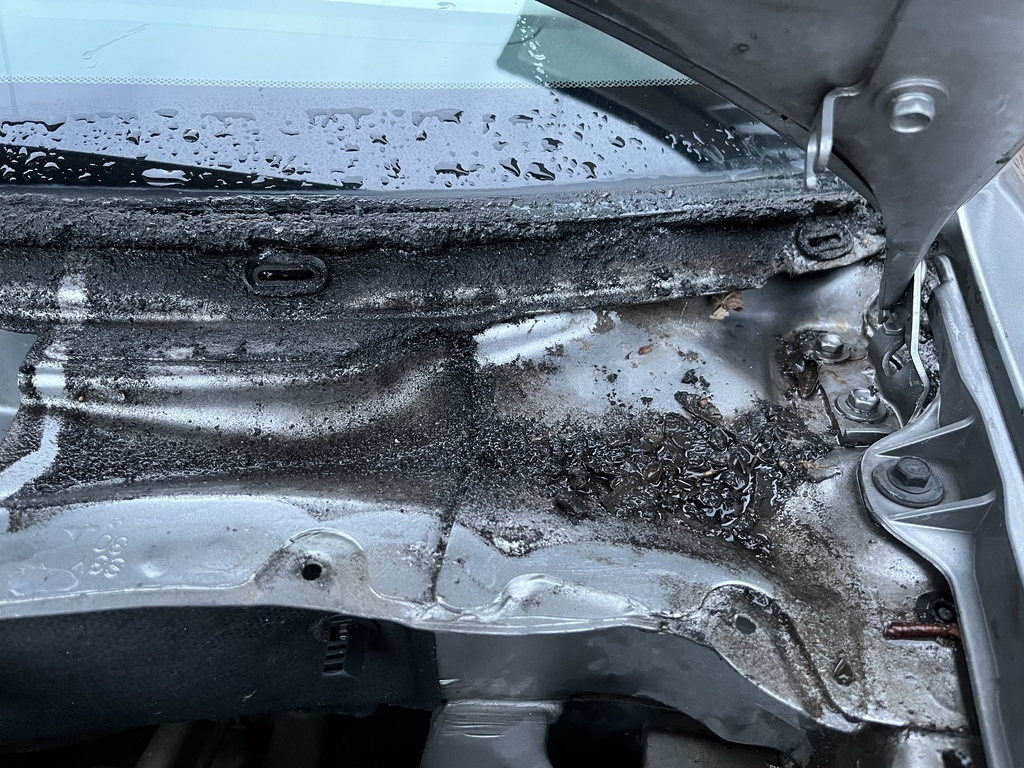 Anyway, the bush causing the problem was quite obvious: 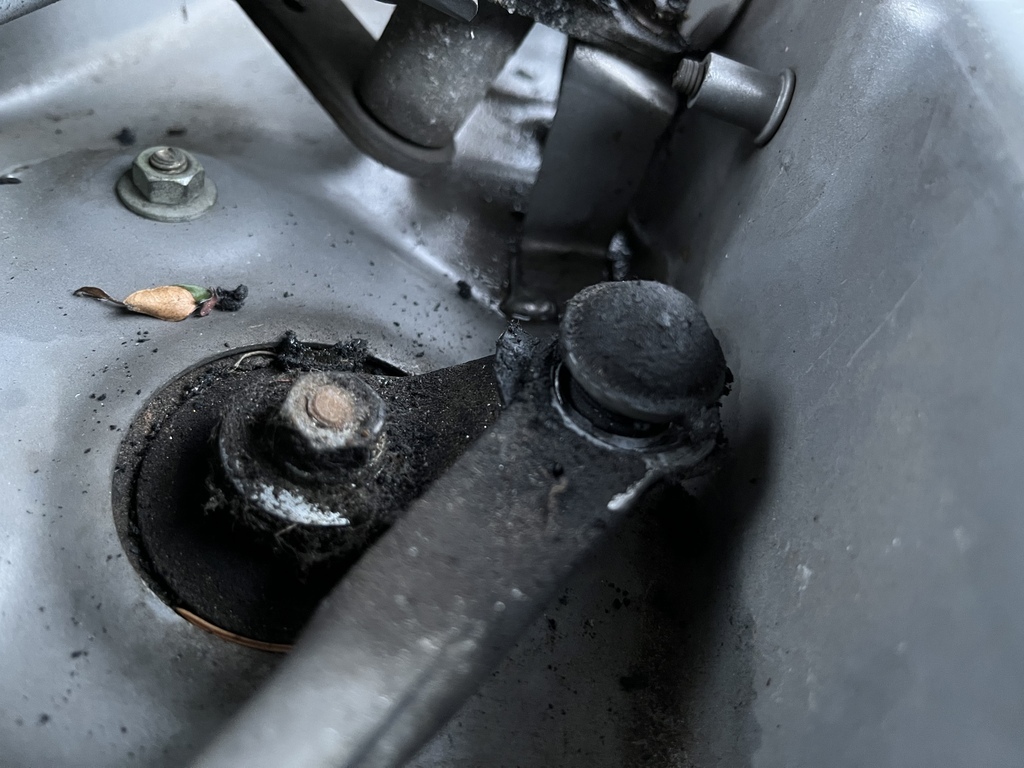 It has completely disintegrated. It started raining again and I had to run for cover at this point. Maybe another exciting instalment tomorrow or am I driving to work on Monday with no wipers? Prace bets!   |
| |
Last Edit: Jan 8, 2023 11:48:06 GMT by Jonny69
|
|
|
|
|
|
|
Well it’s still raining. Worse than yesterday so that means I’m getting wet. Interim update while I wait for it to ease up a bit. I took some pics to remind myself what way up everything went and brought the mechanism inside so I could work in the dry: 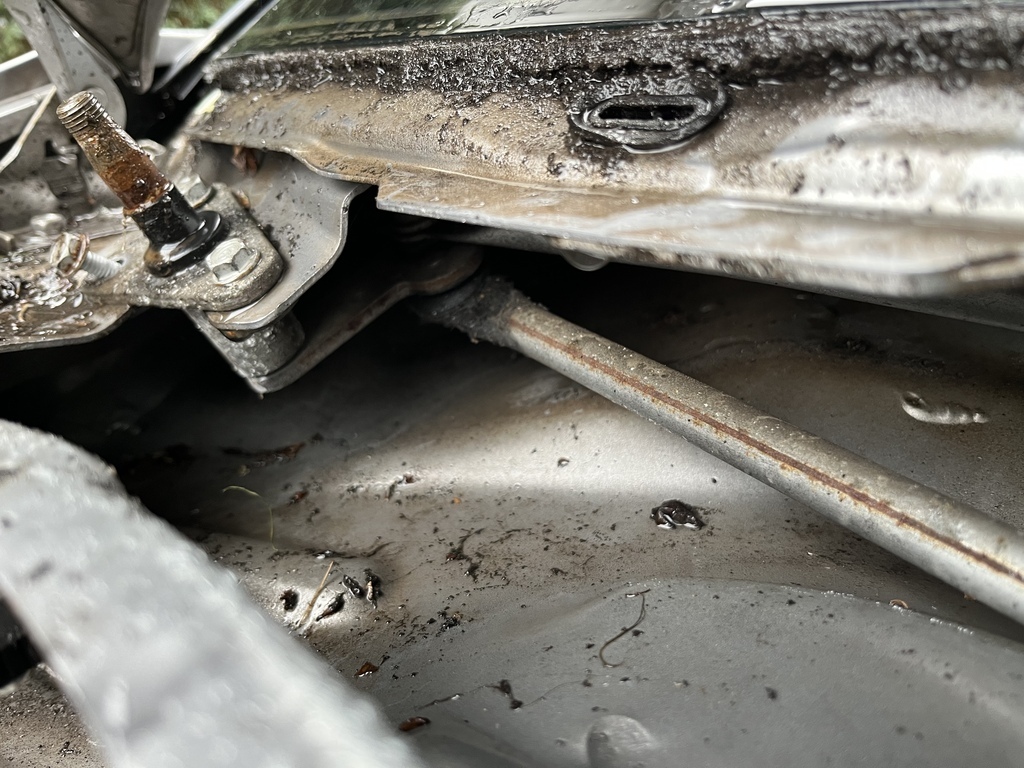 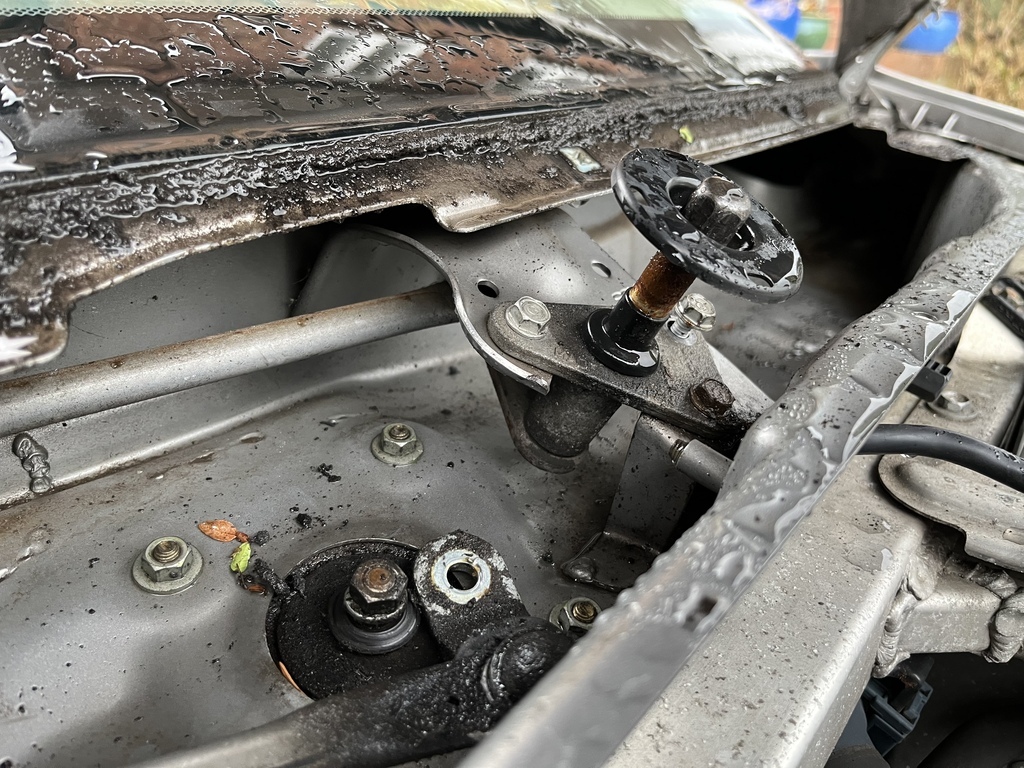 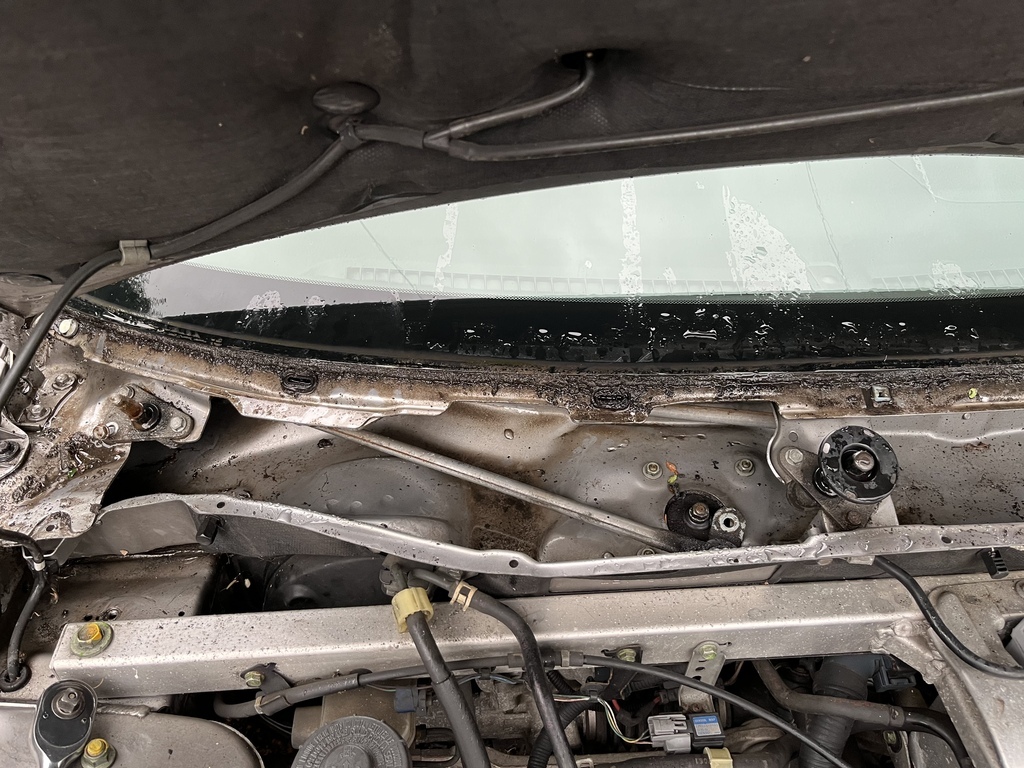 I got a tablecloth out to protect the table. This one will do because it’s not ironed: 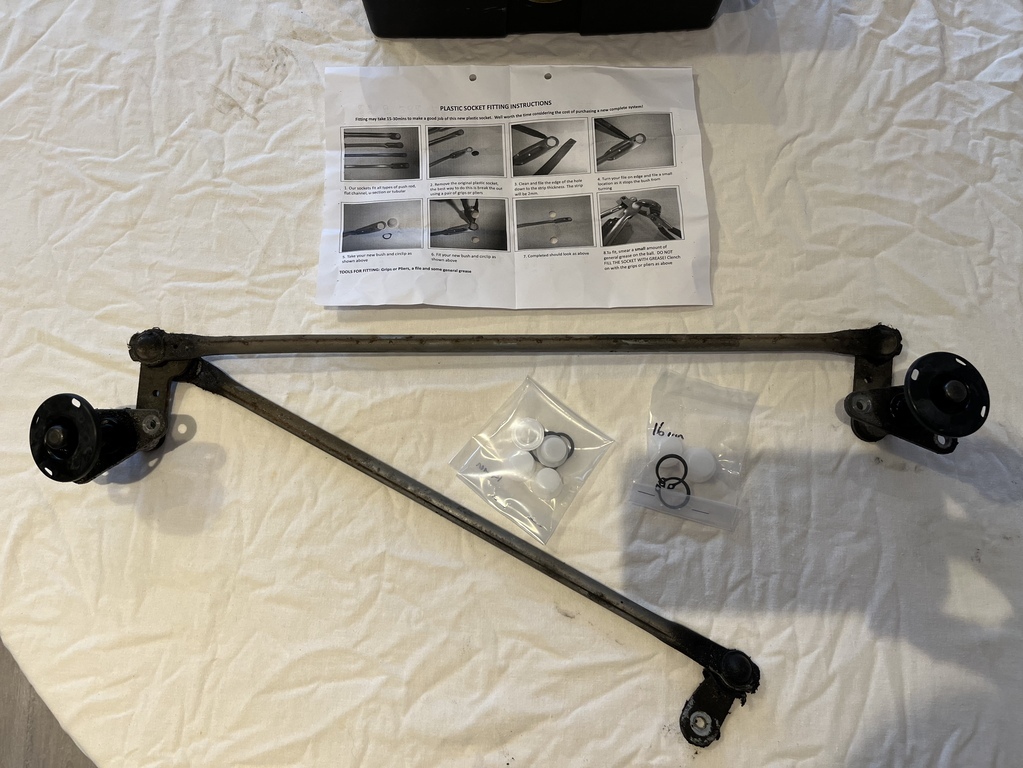 The damage to the bush was immediately obvious so I started with that one: 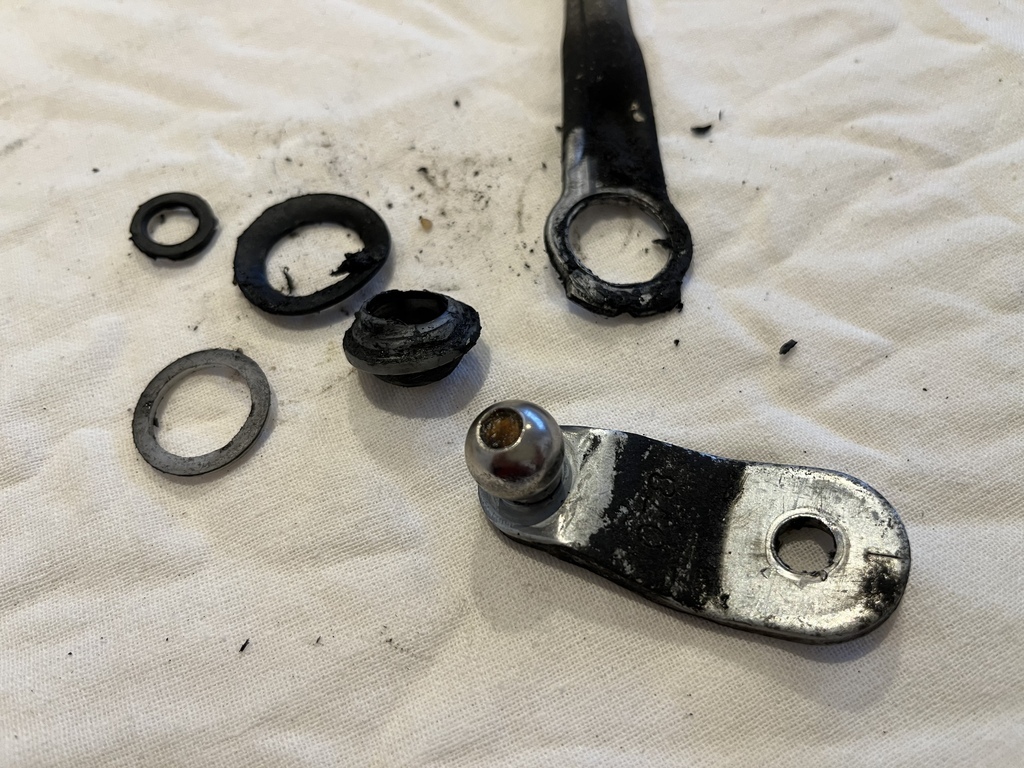 It’s basically snipped itself through the bottom of the bush. The new one needed a small slot to be filed so that the bush did not turn. Dab of grease and fitted with circlip: 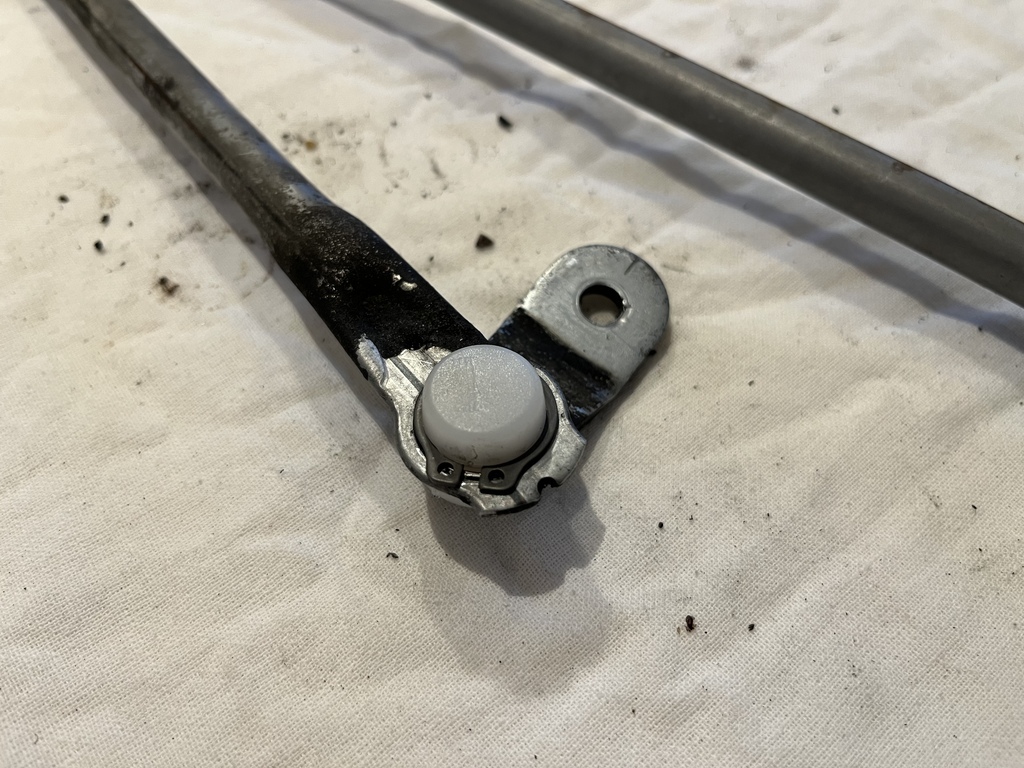 The other three are in perfectly good condition: 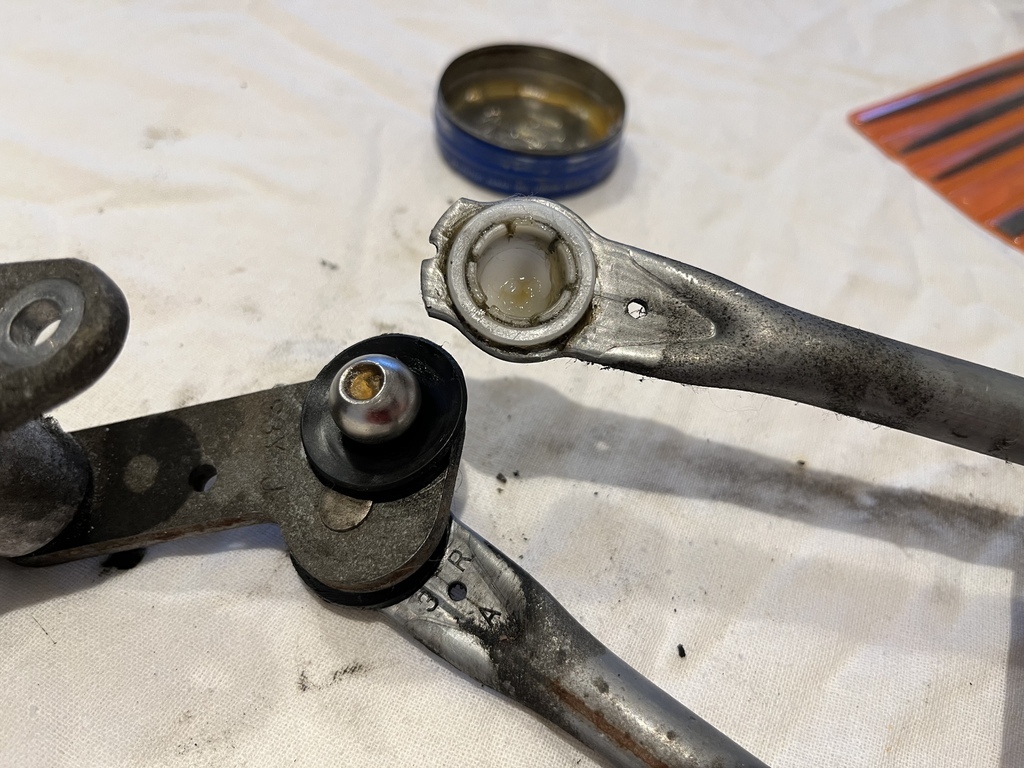 I’m much of the opinion that if it ain’t broke etc, and these definitely don’t need fixin. So I just cleaned them up, re-greased them and popped them back together. That bit all went ok. It’s only now I realise I’ve made a massive bungle. None of these tapers are keyed and I didn’t have the wipers in the park position when I took the mechanism off. That means I’ve got no idea which way the rockers need to be facing when I put it back on. I’m going to have to make an educated guess based on the motor rotation, do a bit of trial and error and probably run the car without the plastic cover panel on until I’ve run the wipers a couple of times. Bah. |
| |
|
|
|
|
|
|
|
  Look at that, I got it right first time! Skills. Raining again though, so I’ve run inside. Let’s see if I can do it again when the panel is back on… |
| |
|
|
|
|
|
|
|
 Yup, nailed it. I’m happy with that. Only issue is I managed to crack the plastic vanity panel putting it back on. Luckily you don’t seem to be able to see it with the bonnet down and the clips hold it all in place. Probably regret saying that once it’s dried out. Speaking of which - thunder outside now, so I got finished just in the nick of time. So I’m just finishing a hybrid battery discharge cycle and we’re back on the road.  |
| |
|
|
|
|
|
|
|
|
|
Not much to report other than I appeared to be parked in the import & obscure section of the carpark today.  The green car is an imported Honda Fit. This thing is excellent. It’s nothing like the Jazz which is parked on the other side. It’s an IMA hybrid like mine but with a 4-cylinder engine and a slightly updated IMA motor. I think it had a lot of boxes ticked because it’s covered in JDM accessories and Japanese toys. Everything is in Japanese, however, so we’ve got no idea what the car is going on about when it’s telling us stuff. Inside it’s brilliantly thought out, Honda at its best, and I can’t work out why Honda put so little into the Euro-zone cars compared to the JDM ones. The best bit might be the back seats. They’re hollow underneath so you can shove stuff under them. As well as folding down flat, the bases will also flip up and the rear passenger compartment becomes a gaping hole that you could probably get a small chest of drawers or a bike in. And ULEZ compliant. The Jazz is just completely poverty-stricken in comparison. No toys, no Japanese quirks, just a baron, grey interior with all the useful holes blocked up so you can’t use them. |
| |
|
|
bstardchild
Club Retro Rides Member
Posts: 14,886
Club RR Member Number: 71
|
|
|
|
It’s only now I realise I’ve made a massive bungle. None of these tapers are keyed and I didn’t have the wipers in the park position when I took the mechanism off. That means I’ve got no idea which way the rockers need to be facing when I put it back on. I’m going to have to make an educated guess based on the motor rotation, do a bit of trial and error and probably run the car without the plastic cover panel on until I’ve run the wipers a couple of times. Bah. Slghtly late with the advice but whenever I've done the same I've connected up the wiper motor and then switched on the ignition and given the wipers a flick so the motor parks after the wipe - can then put the wiper arms back on with confidence  |
| |
|
|
|
|
|
|
|
|
A friend's wife has a UK spec Jazz. The rear seat base flips up on that, so perhaps the model there is a very low spec one? Can't remember much else, as I was busy doing the brake pads on it. Btw, if it has a condensation problem, it is probably due to the factory body sealant at the back of the roof seams (visible in the top corners of the rear hatch aperture) having dried out & split. This then allows water to drain into and fill the spare wheel well. This was the other issue that I fixed on it, and researching online suggests that it is a common problem.
|
| |
|
|
|
|
|
|
|
|
I believe all Jazz/Fit models should have the "magic" seats that can flip up and down like that. I'm not sure about the 1st gen like the Jazz above, but my 2nd gen Fit RS has the hidden compartment under the seat too.
Those Fit Hybrids have the same series hybrid system as the 2nd gen Insight.
My sister in law has a hybrid Fit, to replace her written off 1st gen Jazz (t-boned at a junction and walked away). She likes it, but loved the Jazz more.
|
| |
|
|
|
|
|
Sept 6, 2023 16:25:19 GMT
|
autoshite readers might have spotted I posted on there that in June, when the hot weather hit, the IMA battery decided to give up. It stopped responding to discharge cycling, which I was doing a couple of times a year, and I narrowed it down to one of the sticks in the pack with what looked like a dead cell or two. I tried to revive it in situ with various targeted charge-discharges but eventually I had to accept that it wasn't going to have it. This was all really annoying because I was about to put the car up for sale due to the upcoming ULEZ in London. This car is a Japanese import and because it's pre-2006 cannot be registered as exempt. I looked into a new pack, which are available for about £2k from Peter Perkins in Hull and he fits it for you on the day, but I couldn't justify the cost because I am selling the car. The other option is to take a risk with a whole second-hand pack or take the bad sticks out and replace them with good ones. Insight packs are pretty rare, but I discovered the pack in mine had the yellow Civic Hybrid (HCH) sticks in it. This made things a lot easier because those packs are easy to come by. I found a huge vehicle dismantler in Oxford with 4 packs on the shelf (ASM Auto Recycling, £60 each) and they just brought them down on a pallet truck for me to check over. I picked one and took it home. Slowly charged and discharged it a couple of times to revive the cells and prepared to swap the sticks from the HCH pack into mine: 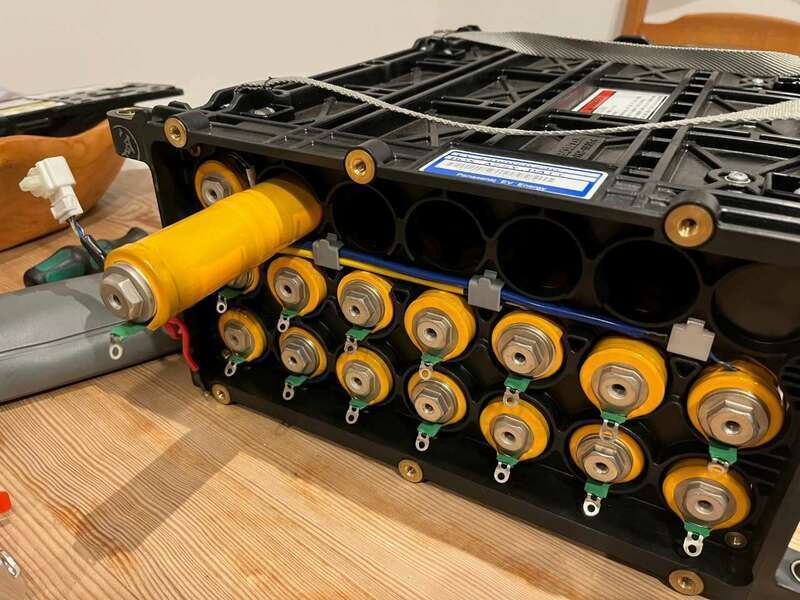 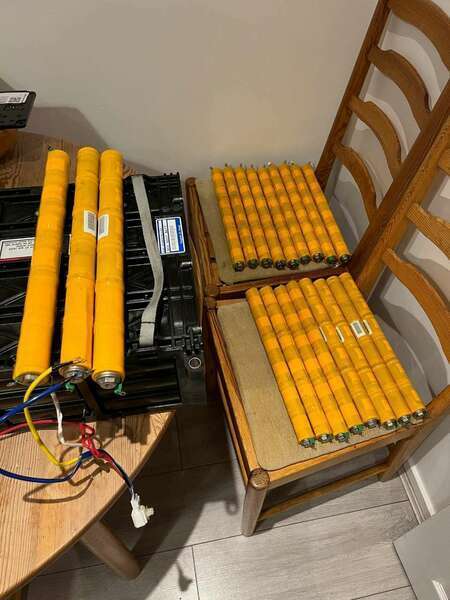 Everything looked fine. The discharge curves for the stick pairs and the pack as a whole looked pretty good so I simply switched the sticks and put it back in the car. Unfortunately the car wasn't happy with it and put the IMA light on fairly quickly, signalling a fault. Looking at the tap voltages, it was clear that one or two of the sticks were dropping too many volts during cranking. That meant that during hybrid assist they were doing the same and were too weak to supply the current for hybrid assist. I could have kicked myself at this point, because all I had to do was to put a big load on the pack to check this and I could have swapped the weak sticks for some better ones before I put it all back in the car. So we are where we are and I was back to driving the car with the hybrid system switched off. I ran some numbers about selling which would leave the new owner a couple of options: 1. Take the pack back out and choose the 20 best sticks from the two packs by loading them up individually and checking the voltage on them. The car will be off the road for a few weeks while you do this. You'll need to cycle the pack a couple of times a year with my cycler to keep it healthy. This will be the cheapest option and you get a very cheap working Insight at the end, you just need to put the time into it. 2. Go and get another HCH pack (or all of them) from ASM and do the same. Best chance of getting 20 really good sticks if you've got multiple packs to choose them from and you'll be able to use the car at the same time with the hybrid system switched off. 3. Buy a new pack from Peter Perkins. Zero work required from yourself and you end up with a really good Insight at the going rate but with a brand new battery with a 3 year warranty that you won't have to cycle or anything. Just have it fitted and forget about it. I think the battery thing scares people off though. |
| |
|
|
|
|
|
Sept 6, 2023 16:29:59 GMT
|
So. ULEZ hit and now I can't use this to commute, because work is just inside the zone. Annoying. However, another Civic battery entered the building. Let stick matching commence. 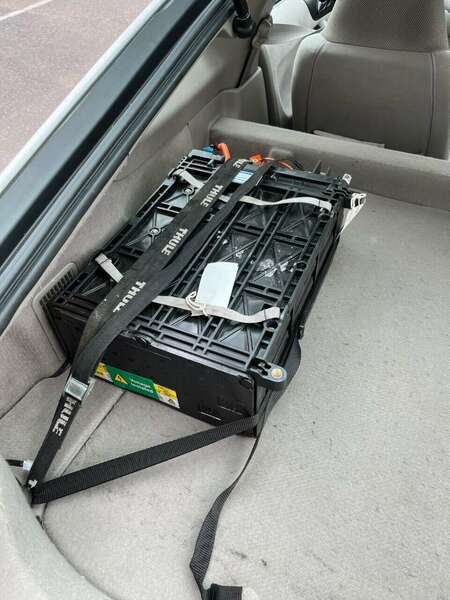 Rough plan of action was to get an idea of the capacity of the sticks and to see what they do under load. I had a root through my resistors in the loft and I’ve got these, which will do me a selection of loads from almost nothing up to a couple of amps: 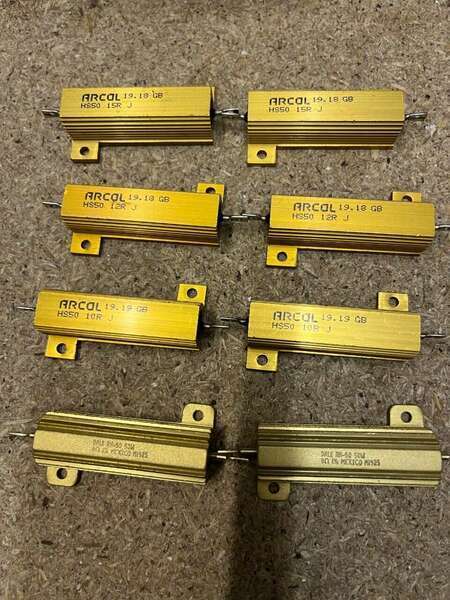 They’ll be fine for voltage readings and light discharge. Then to pull some serious current out of them to highlight any bad cells, I’ve bought five 1 Ohm 100W resistors. The stick voltage is around 8V when charged, so each of these will pull 8A. That’s about 64W going through the resistor. With all of them in parallel, I’ll be able to pull 40A out of a stick for a couple of seconds and basically see what the stick does under heavy load. That’s a lot of current, so I’ll be switching it with a spare solenoid I found in my shed stash: 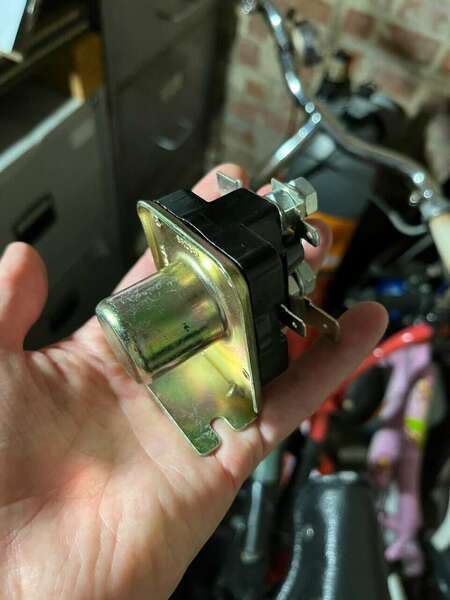 Handy. I’ve also got some heavy gauge wire and M8 ring terminals that can handle that sort of current. I should be able to sort all the sticks and pick the best ones and make a good pack. I’m stressing a little less about this now because I’ve sorted out a tiny car replacement. That means I don’t have to worry too much about timescales or insurance, I’ll just sort that out ad-hoc for test drives, MOT etc if I have to. |
| |
|
|
|
|
|
|
|
Tuesday: took some things to work and found some other handy (?) stuff in the lab. Essentially, what I was planning to do was just take a voltage reading, manually trigger the solenoid and take another voltage reading after 5-6 seconds. This would be perfectly adequate, but I decided to complicate things a little by adding some Arduino control. I can get the Arduino to automatically trigger the solenoid and read/log the voltage for 5-6 seconds, then disconnect it again. So below I’ve got: 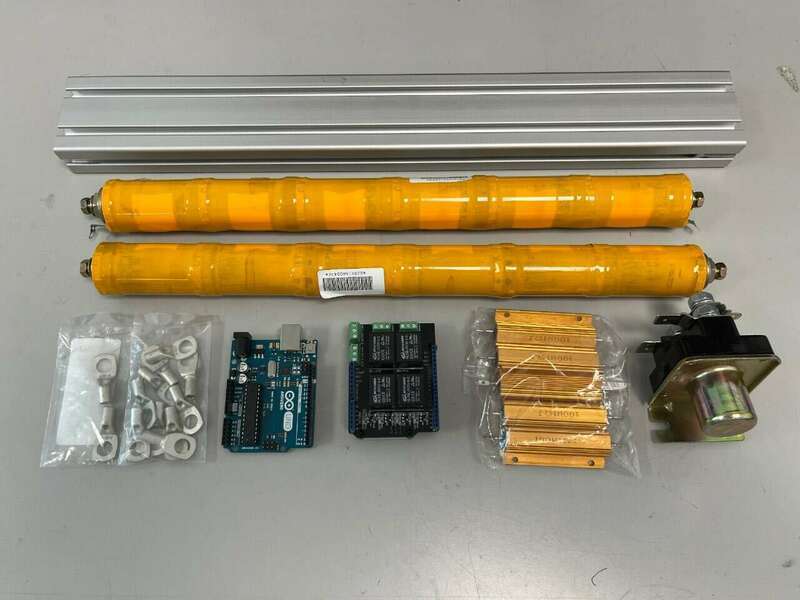 Spare bit of aluminium extrusion construction kit stuff, two Insight sticks, bag of high current M8 ring terminals, Arduino UNO, 4x relay board for the Arduino, bag of 100W 1R resistors, and a 1970s Triumph starter solenoid. Quick mock-up with some bolts and washers and T-slot nuts for the extrusion stuff and it’s going to look something like this:  Rough plan. The Arduino will be controlling the board with 4x relays. Will get one of those relays to switch on the starter solenoid from a 12V supply. It pulls about 3A at 12V DC so it’s probably going to need a flywheel diode across the solenoid coil to protect the relay. Relay is rated to 10A at 30V DC but my experience is switching DC tends to make those sorts of relays stick. I found some 1N5401 diodes in my stash at work which are pretty big. They ought to handle anything the coil spits back out. So then the Arduino reads the voltage. It only reads up to 5V and the stick voltage is 8-9V depending on state of charge, so I’ll put it on a 10k potential divider with a 50/50 split. My pal also suggested I put a 5V Zener diode across the Arduino to protect it from getting fried when the solenoid disconnects the batteries. I had another root in my stash and found some 1N5338B Zeners which are 5.1V. Voltage reading range will be up to around 4.2V so they’re ideal. I am of course wondering if I’m over-complicating things. It’s not too late to back out of this and just do it manually… |
| |
Last Edit: Sept 7, 2023 9:14:12 GMT by Jonny69
|
|
|
|
|
|
|
And then some lunchtime shenanigans yesterday. I soldered up the resistors and connected the solenoid up to my 12V supply so I could trigger it manually and have a look at what the battery sticks do. Started with an 8 Ohm resistor because not much can go wrong there and then added in the 1 Ohm ones one by one as I got braver. So with all five 1 Ohm resistors in parallel, that's 0.2 Ohms, which is about 40A at 8V and 35A at 7V depending on the state of charge. Just for reference, the car would command about 10A for cranking and 35-40A relates to around 50% hybrid assist when driving. This stick was sitting around 7.7V resting voltage, and pulled down to 7V with the full load attached: 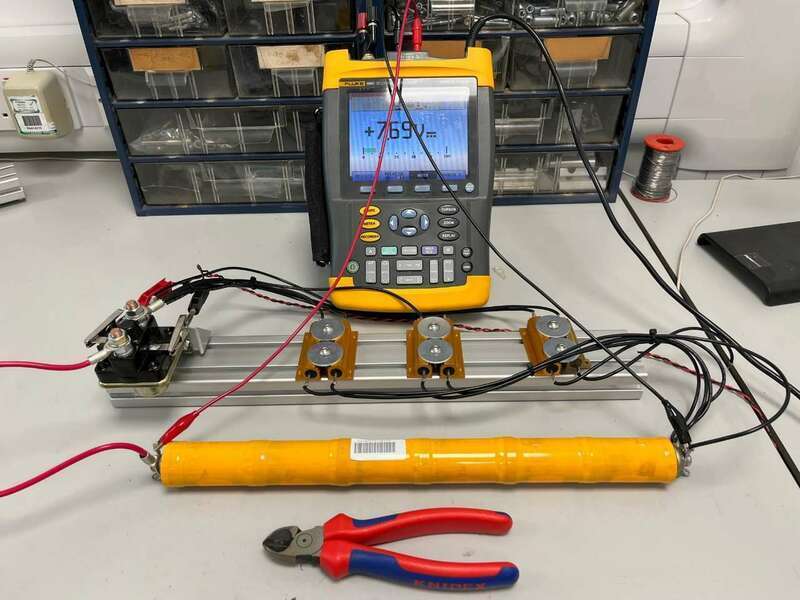 Emergency snips on hand in case anything bad happens. Snip through that thick red wire on the left. The voltage actually settled after a few seconds so I don’t think I’ll need to bother with the Arduino. I think I'm just interested to see what it drops to under heavy load, to see if there are any weak cells and I'm pretty sure this will tell me what I need to know. It’ll be pretty obvious which sticks have a weak or bad cell in them because the voltage will drop further. I actually brought two sticks in to play with and, based on the above, it looks like I might have one good one and one bad one on the bench. MUCH EXCITE. 'Bad' stick was 7.3V resting and 5.2V under load - a much bigger drop. However, I do need to repeat this after a full charge because these Insight sticks haven’t been charged since July and are probably a bit self-discharged. Then I can rattle through these of a lunchtime. Takes very little time per stick, but there are 60 of them to do! |
| |
|
|
ovimor
North East
...It'll be ME!
Posts: 810
|
|
Sept 15, 2023 10:03:40 GMT
|
|
I'm in Absolute AWE 😮
... BITD, I recall contemplating a head off/valve lapping session = your tweaks are Much Less Messy 😉
🤣🤣
OVIMOR
|
| |
Knowledge is to know a Tomato is a 'fruit' - Wisdom, on the other hand, is knowing not to put it in a 'fruit salad'!
|
|
|
|
|
Sept 15, 2023 11:59:54 GMT
|
I had a look with the scope attached but it didn't actually tell me anything extra that was useful. Good stick followed by 'bad' stick: 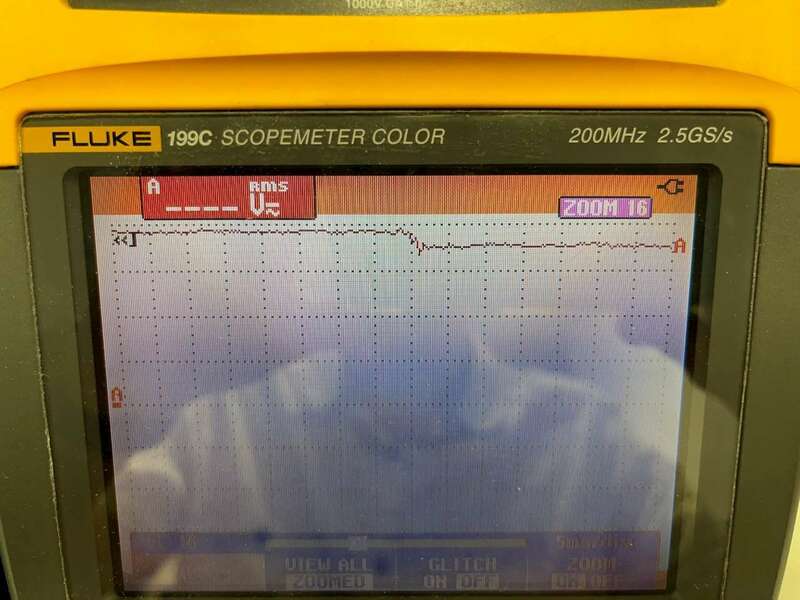 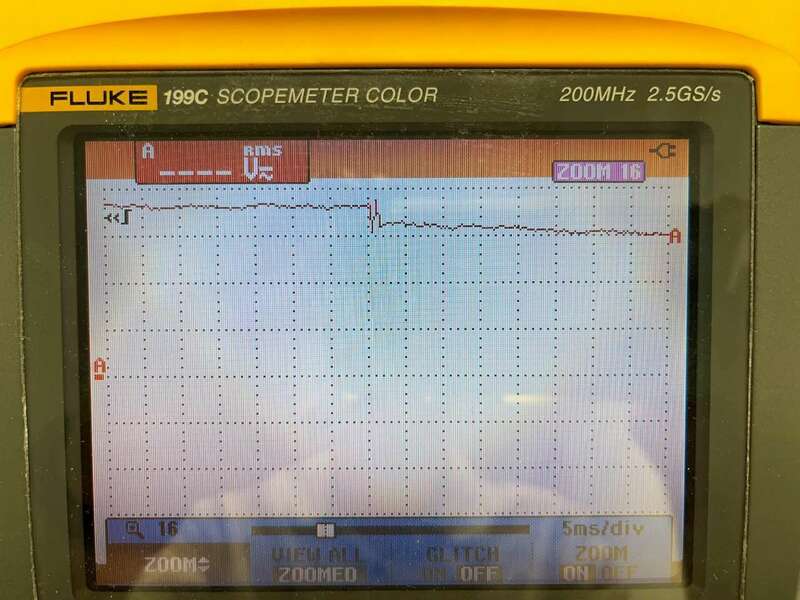 I guess what it has told me is that the voltage drop when the load is connected is almost instantaneous, as it happens in about 5ms. I was expecting it to be slower than that. So having cleared that up, I tested all the sticks using the basic voltmeter method, making a note of the resting voltage and the voltage after 5 seconds with the load connected. That resulted in 17 sticks which were almost identical and 3 outliers which dropped more voltage. So what I did on the outliers was got a leather punch and made some small holes in the heatshrink so I could measure the voltage across the individual cells while they had a load attached. I did the same on a good stick so I had something to compare it to. It basically showed that the bad sticks had a single weak cell in them that was dropping a lot more voltage under load: Good one, voltages written above the holes, all about the same: 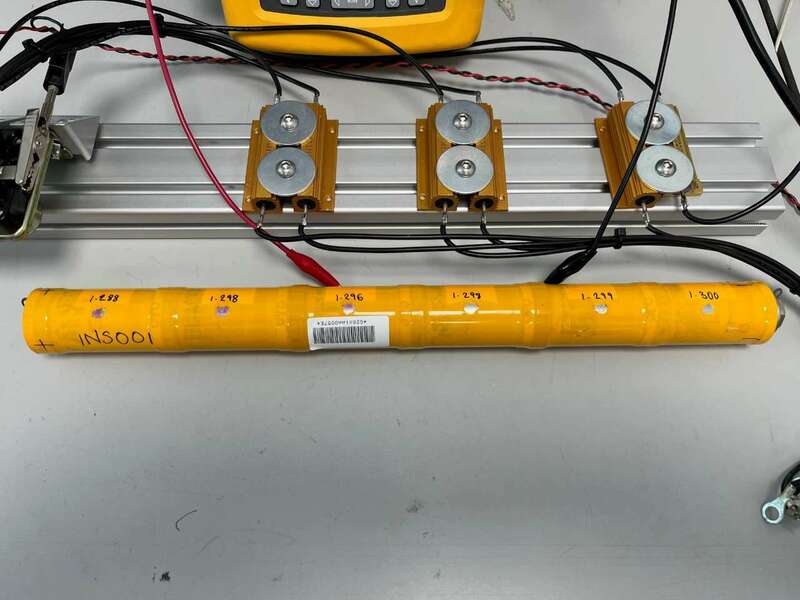 Bad one, with one weak cell showing about 0.3V instead of 1.3V:  The other two bad sticks looked exactly the same. So that leaves me with what look like 17 good sticks and 3 bad ones:  What I really need to do now, is get the other pack out the car and do the same on those sticks, and get the third pack charged and cycled a few times so I can do the same on that one. In the meantime, I've also rigged up a capacity checker with a cheap Chinese eBay current and voltmeter. It's got a shunt so it can measure current and will log battery capacity. I've got it wired up on a good stick with an 8 Ohm resistor doing the discharging (about 1A when the stick is charged) to have a look at what it does: 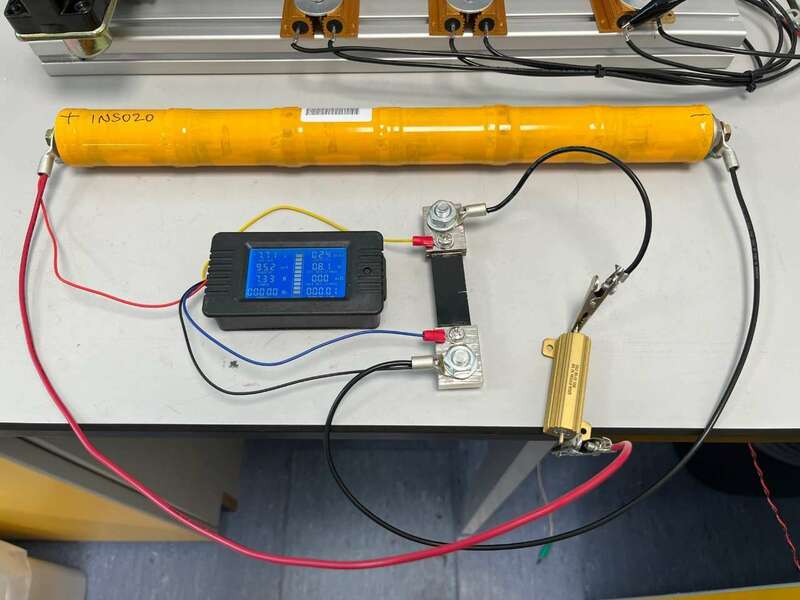 |
| |
|
|
|
|