|
|
|
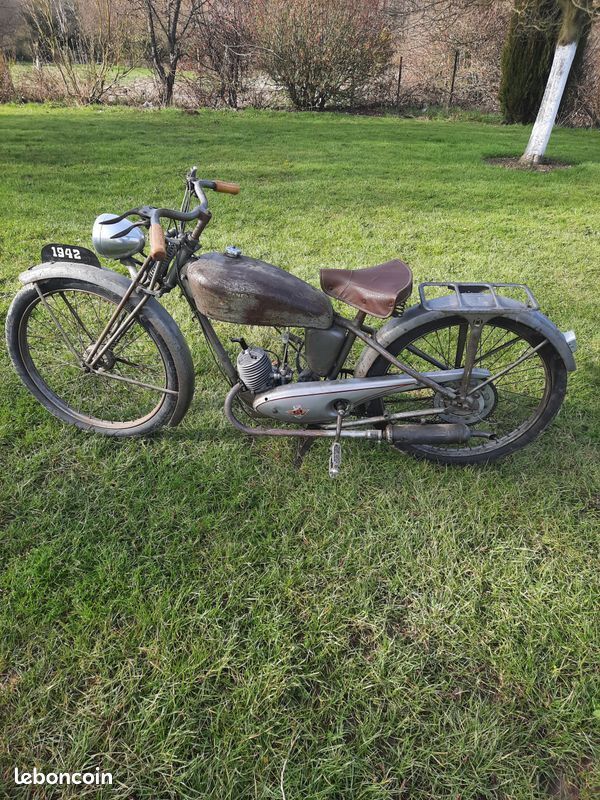
Mar 28, 2021 10:41:09 GMT
|
|
|
| |
Last Edit: May 2, 2021 23:50:55 GMT by nomad
|
|
|
|
|
|
|
|
|
Bit of a "lack of progress" update. I had got as far as making a bracket for the pulley and duct taping it to the seat tube, to check for fit. I also got myself a big bottle of argon and had a go at reviving my old MIG welder. I bought this from a "friend", probably 20 years ago and I remember not having a lot of joy with it when I tried it back then. However, i didn´t really need it and years went by without it being used. Until last week. Well it seems like it´s just junk that I was sold. Can´t get any kind of clean weld out of it whatsoever - just a sooty, porous mess - and the adjustment settings make no odds at all. Probably too late to ask for my money back. Better get another one then. I did a bit of research and found the best selling one on Taxdodgeazon with lots of good reviews, that had also won some consumer tests too. And then bought it from the firm directly. Only arrived today, so we`ll see how that works out. I had previously sort of made peace with where the exhaust had ended up sitting, until the "boite a kick" (add on extra kick starter) that I´d ordered turned up. This is a rather tarty looking chromed ally unit, whereas the original MBK ones are thick black plastic. Not nice. I guess you can bump start these mopeds, but it´s a bit embarrassing, especially if it won´t start. Unfortunately, it turns out that this unit wants to occupy some of the same space as the exhaust, which then ended up pointing downwards towards the floor. It looked awful. Since I'm all about the aesthetics, this wasn´t going to fly. 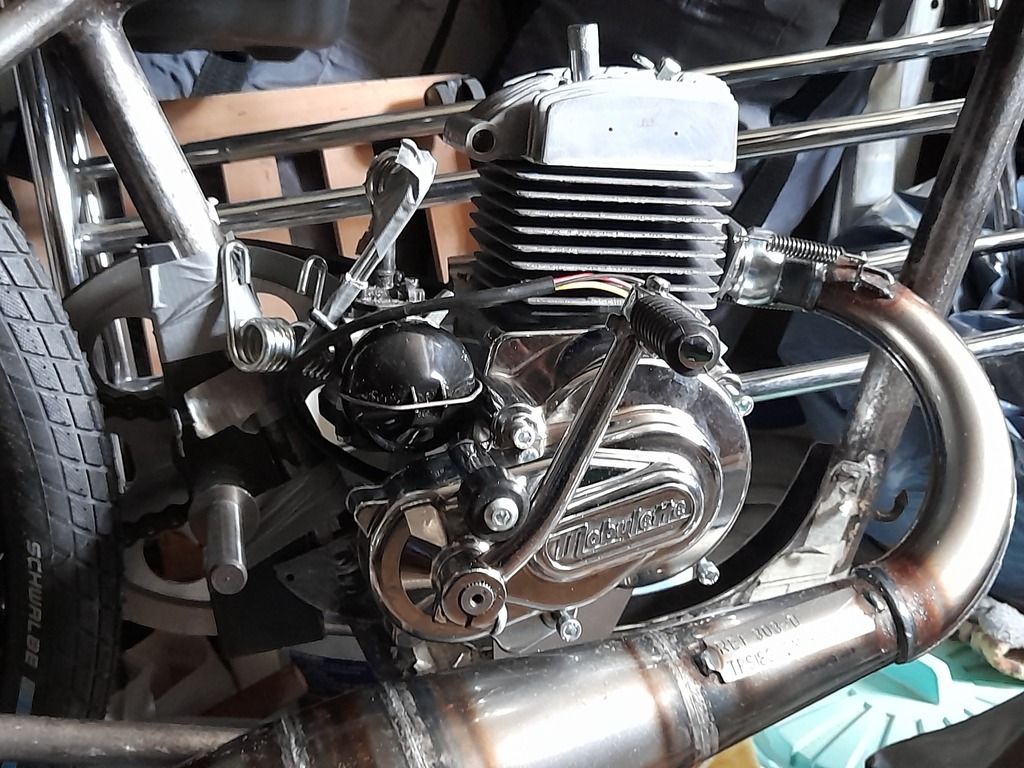 But what to do? I need to get the whole pipe lower, so it´ll go under the frame at the chainstay. I can lower the motor, but then I start to run out of front/back pivot room and the pipe hits the frame at the downtube. I don´t really want to cut the exhaust, as its all tuned length and I´m afraid I´d ruin it. Also means that if I need to replace it at some point, then I can´t just put another one on there, I´d have to do any mods over again. The upshot of this is all pointing to me having to do nasty things to the downtube with the angle grinder, so I can pass the exhaust straight through it. I can´t see any other way out of this. I´ll need to make up some sort of driveshaft hoop type affair I suppose. Maybe tubular, or perhaps just bent steel strap. Suggestions are very welcome. Also, in order to get the motor further forwards, i´m going to put another link back in the chain, in order to get the pulley forwards, in order to get the motor forwards, while still using the stock drive belt. What a faff. Appears that it´s time I got ruthless with the grinder and welder. |
| |
Last Edit: Apr 3, 2021 19:30:05 GMT by horrido
|
|
jpsmit
Posted a lot

Posts: 1,254
|
|
|
|
|
Can you not just run the exhaust along the other side of the frame? It would involve cutting and rewelding by the flange but wouldn’t shange the overall length.
|
| |
|
|
|
|
|
|
|
Can you not just run the exhaust along the other side of the frame? It would involve cutting and rewelding by the flange but wouldn’t shange the overall length. The motor is centred in the frame, give or take about 5mm. I can put the exhaust out of either side, as it´s on a swivel joint, but it makes no odds as far as fitment goes, unfortunately. It is also designed to come out on the RHS. It´s a bit curved to work that way. |
| |
Last Edit: Apr 5, 2021 15:13:46 GMT by horrido
|
|
|
|
|
|
|
Apr 24, 2021 17:49:41 GMT
|
So I was needing to get the motor forwards and down. I added some links back to the chain, to get the motor forwards a little. This meant chopping my pulley bracket about a bit too, as it really needs to hug the seat tube now. I also thought I´d have a go at rounding the ends off, so it looked less like some rank amateur had just welded box section on to the frame. Came out ok, for my first go at welding with the new machine. Which is pretty awesome btw. 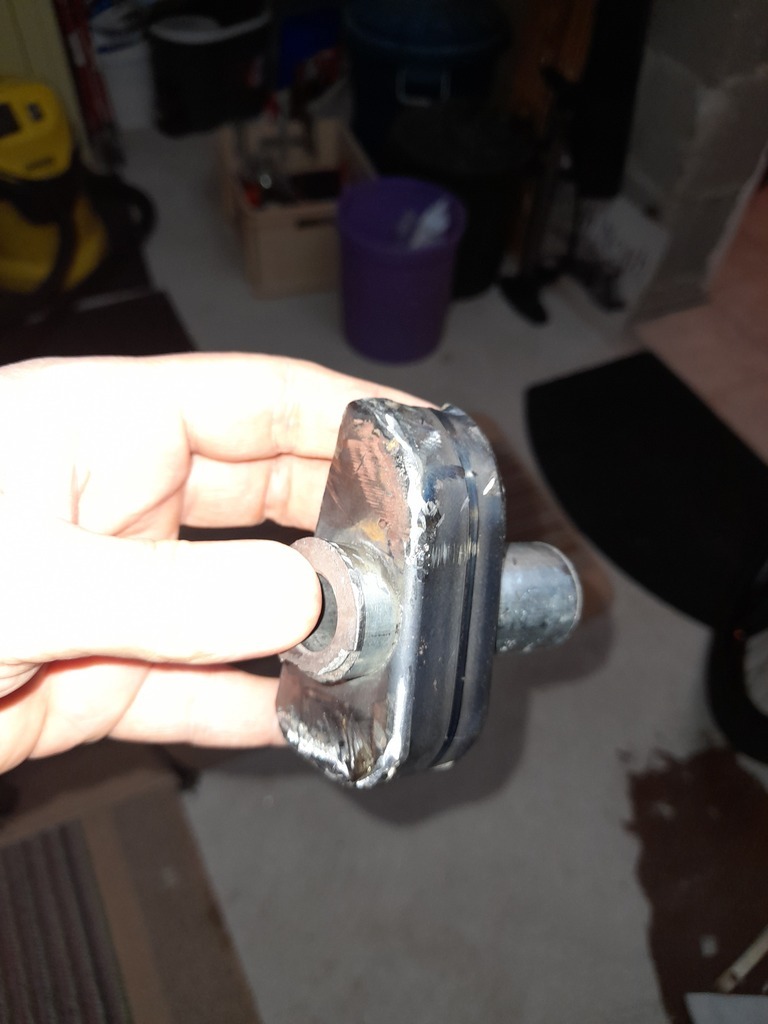 I had to get ruthless and cut a lump out of the frame, to finally get the exhaust where it needed to be. The question was, how was I going to replace the bit of down tube that had to go? Thinking that it ought to be something appropriate to the rest of the frame, I thought that 20mm tube would be the thing, as that´s what the rear frame triangle is made of, so it would match. Seems to be quite difficult to find anyone prepared to bend up that tube on a one off basis, but I found a guy on ebay, based in Essex, ( www.vpengineering.net/ ) who was able to do the job for me. I figured two C shaped tubes going around either side of the exhaust should easily be strong enough. 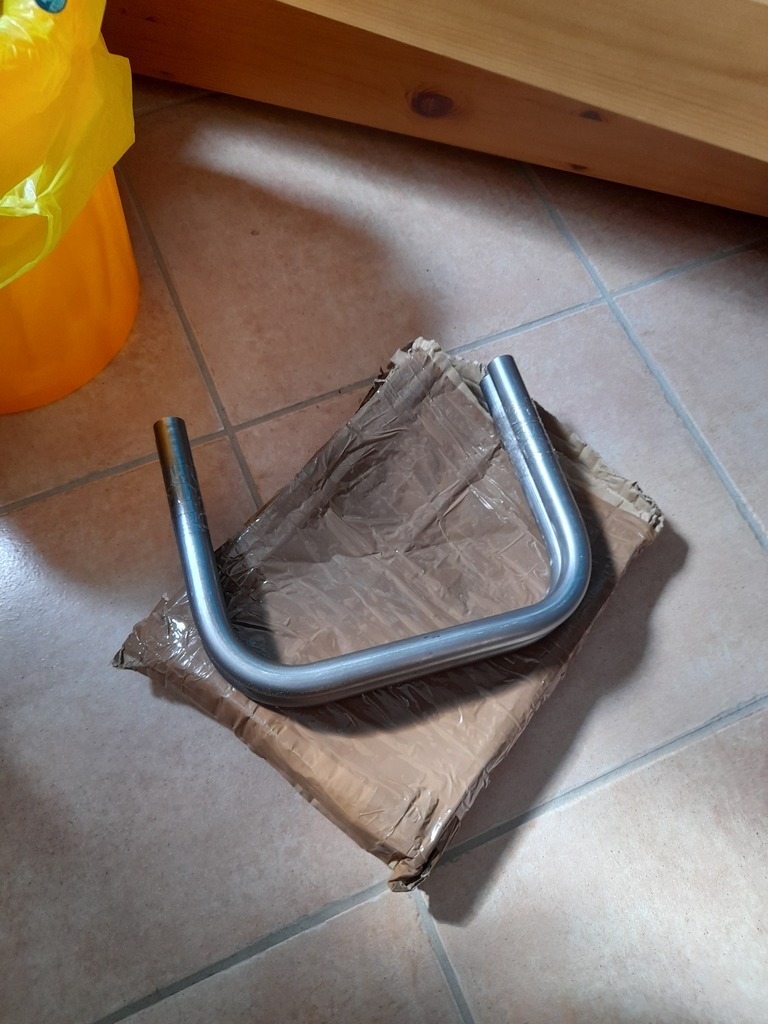 He left plenty of material on either end, so I could muck about with the width. I don´t think these will look too silly as they have something of the look of leg protectors (at least in my head), though they´ll be much smaller. So I´d better stop dithering about and try and fit these things. I used a pillar drill, in some sort of pitiful attempt to keep things straight. 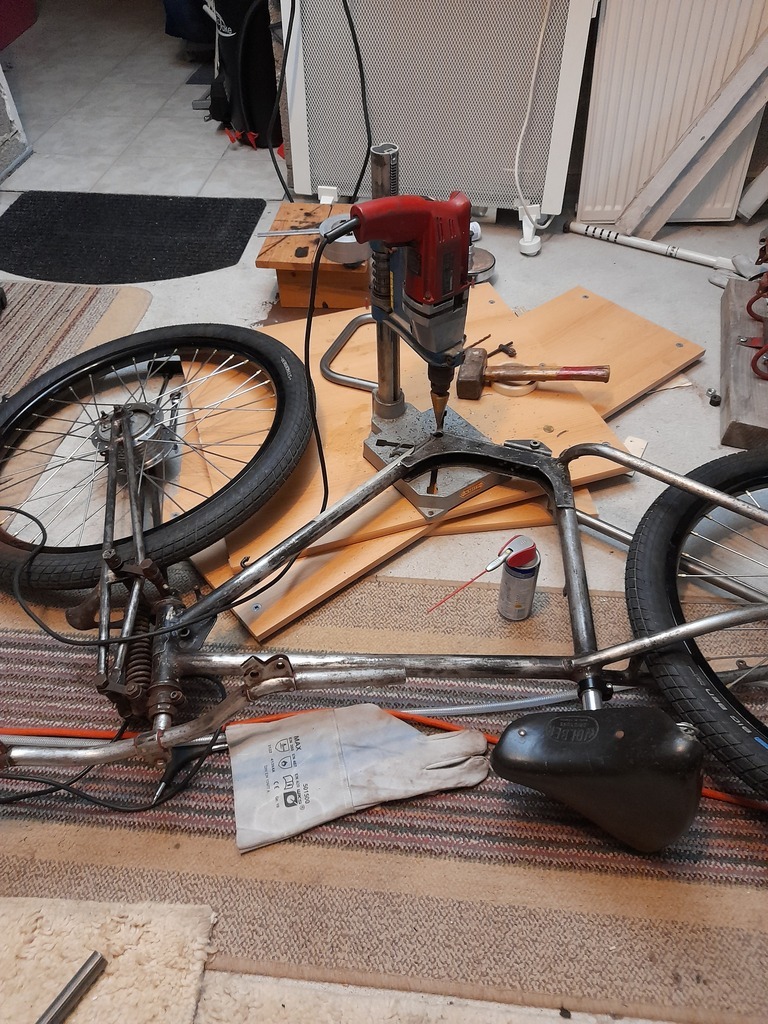 One down... 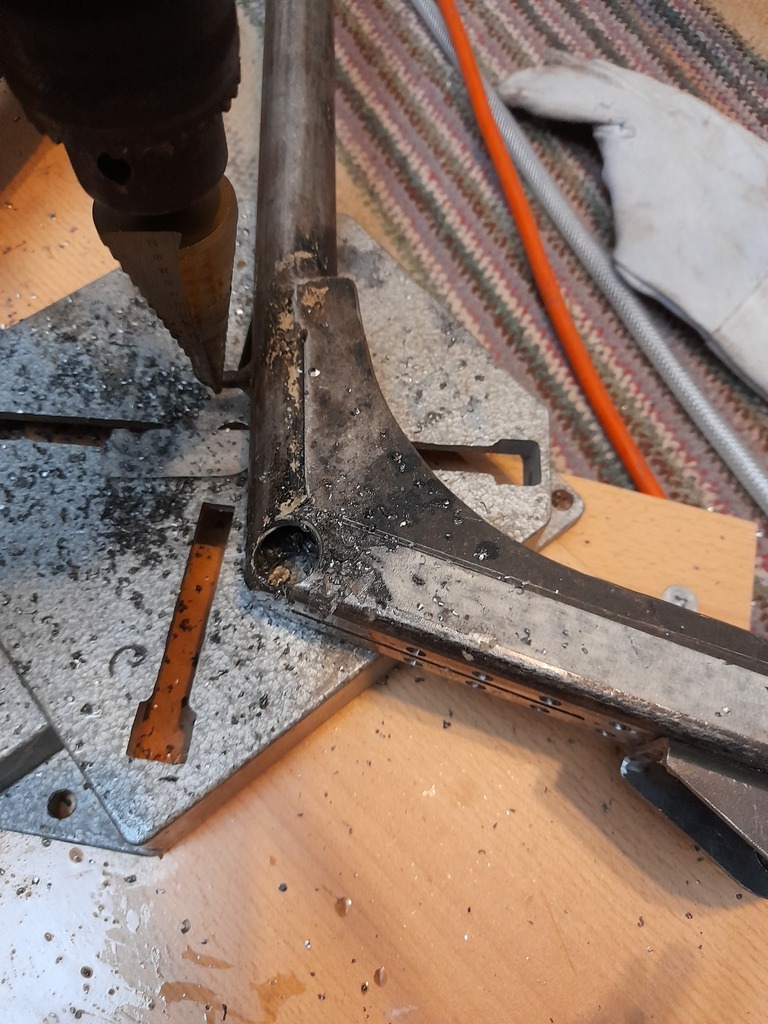 It fits! Don´t want them this wide though. 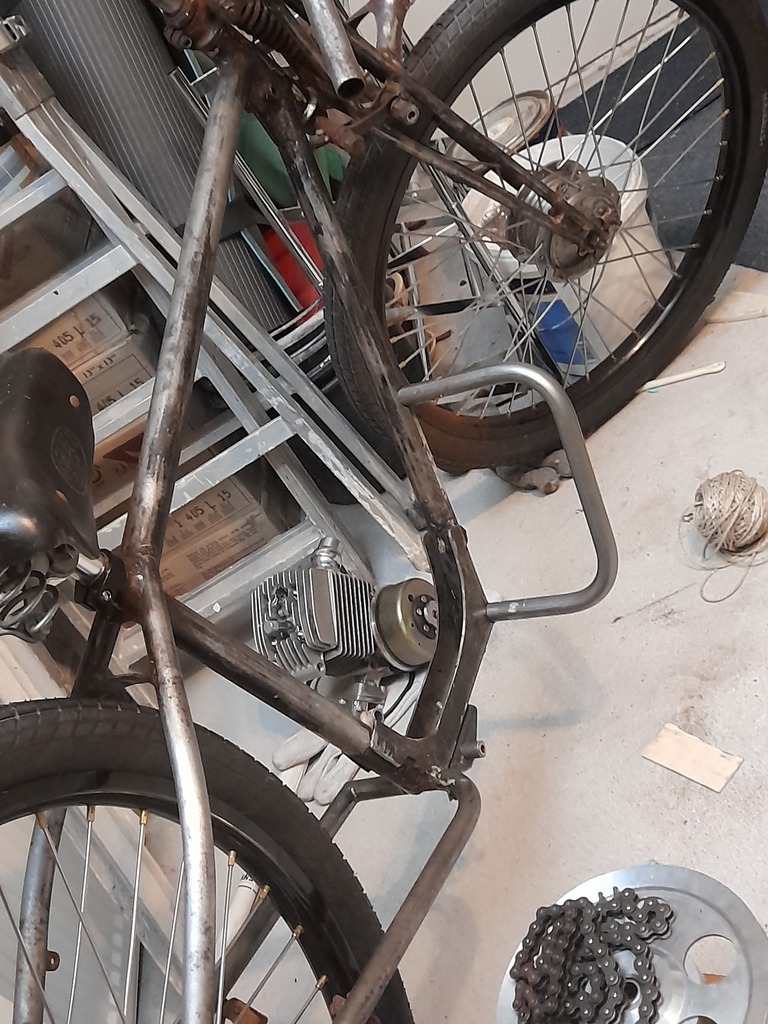 Break out the sawzall and chop though the bottom of the down tube. It went twang and jumped sideways a fair bit. Not sure what might have caused this. Stress in the frame from when it was made, or some prehistoric accident damage or just old age, but some not too gentle pushing with my foot got it back to position. 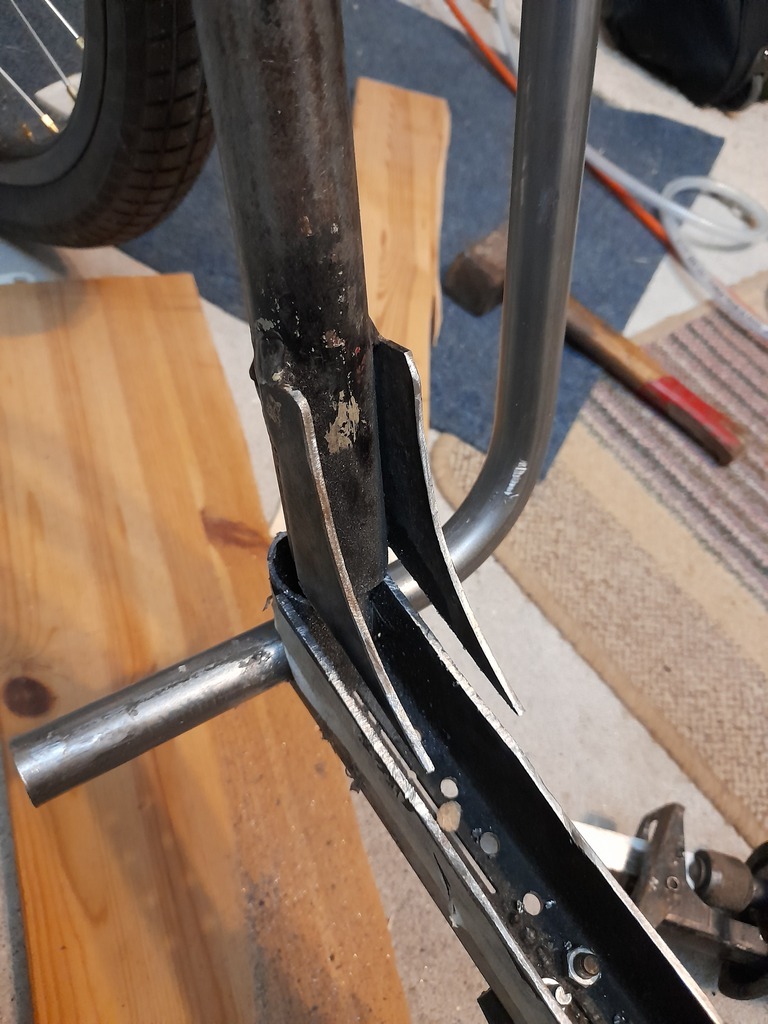 Before I went any further, I had realised that the kick start mounting plate was trying to occupy the same space as my lovely laser cut motor plate on one side. I had no choice but to cut both of them up and weld them together. Worked out ok, as I´d bolted them together, so it couldn´t really go anywhere. Also I don´t know who designed the kick start mount, but to fit it, you´d have had to take the entire ignition side off the motor. I stared it it for a while and then cut away two slivers of metal and it slipped right on. 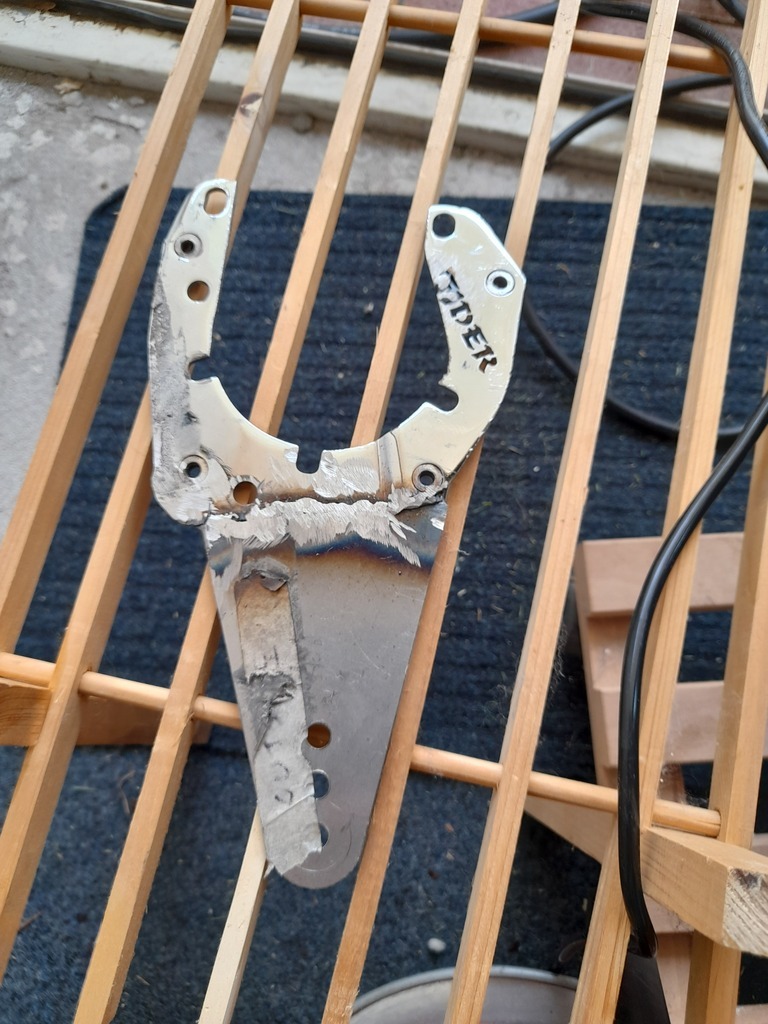 This meant I could finally cut out the last bit of the down tube, mount the motor and see what was going to end up where... 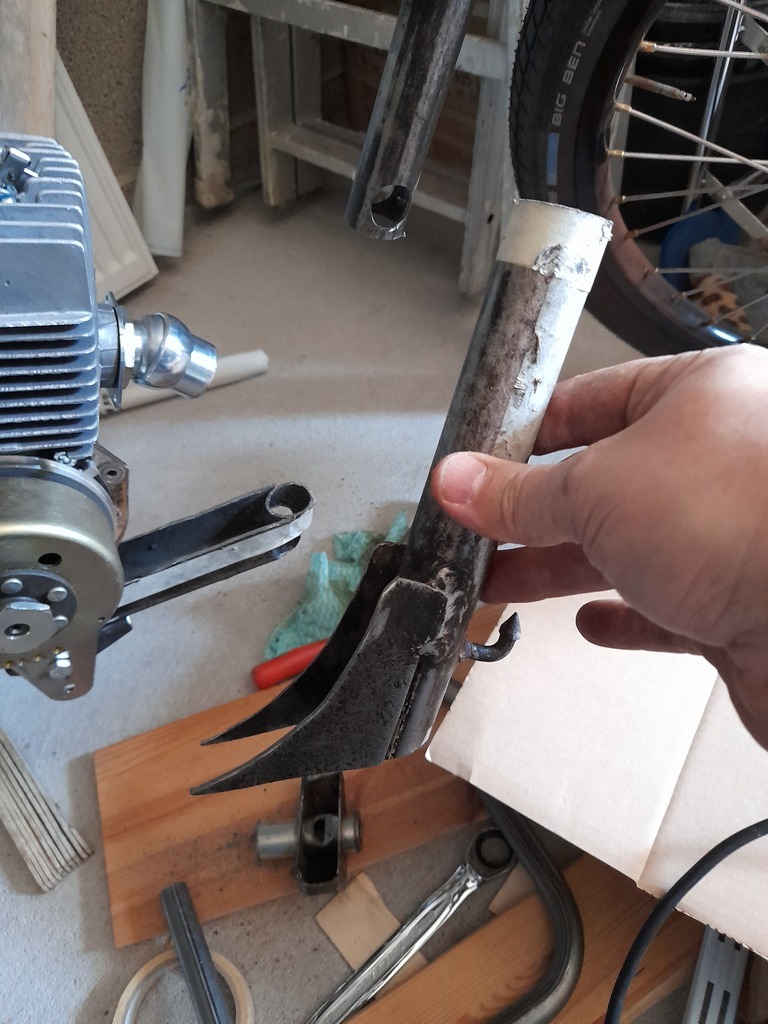 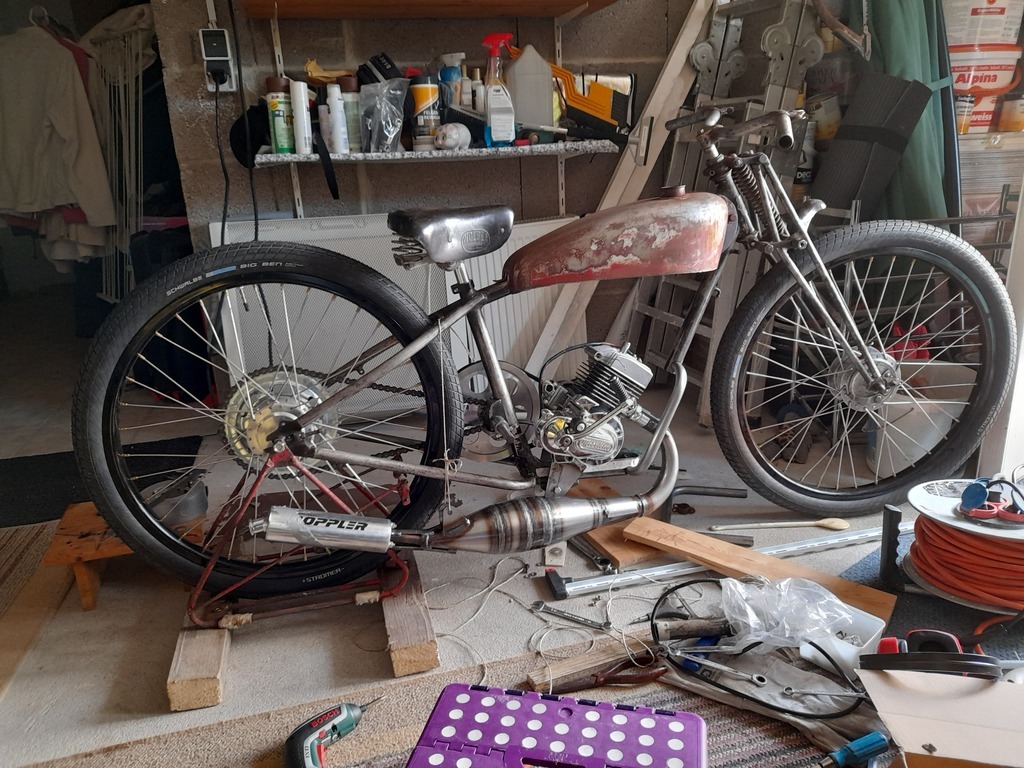  So that´s where I am now. The exhaust has ended up where I hoped and as far as I can tell, the motor should pivot and leave enough room. The only close bit is the top of the exhaust on the chain stay, which means the pipe will be pretty low, but I think it´ll be ok. Oh and I found a decent saddle too, which is way harder than you´d think as they´re not really the same as bicycle saddles. French ebay is full of rotten ones, needing new covers (not cheap), but I lucked out with an old caoutchouk Wolber. |
| |
Last Edit: Apr 25, 2021 18:02:41 GMT by horrido
|
|
|
|
|
|
|
|
Great thread, I like to imagine that you're carrying out this build in your utility room too!
|
| |
|
|
TessierAshpool
Club Retro Rides Member
Posts: 507
Club RR Member Number: 168
|
|
|
|
|
This thing is amazing, loving the work so far!
|
| |
|
|
|
|
|
Apr 27, 2021 13:17:56 GMT
|
Great thread, I like to imagine that you're carrying out this build in your utility room too! I am! Had to do something, even if I haven´t much room. Chopped my two loops down to get a look at the fit of it. I could go an inch narrower, but I think it´s ok as is. I´ll cap off the ends of the tubes neatly later. 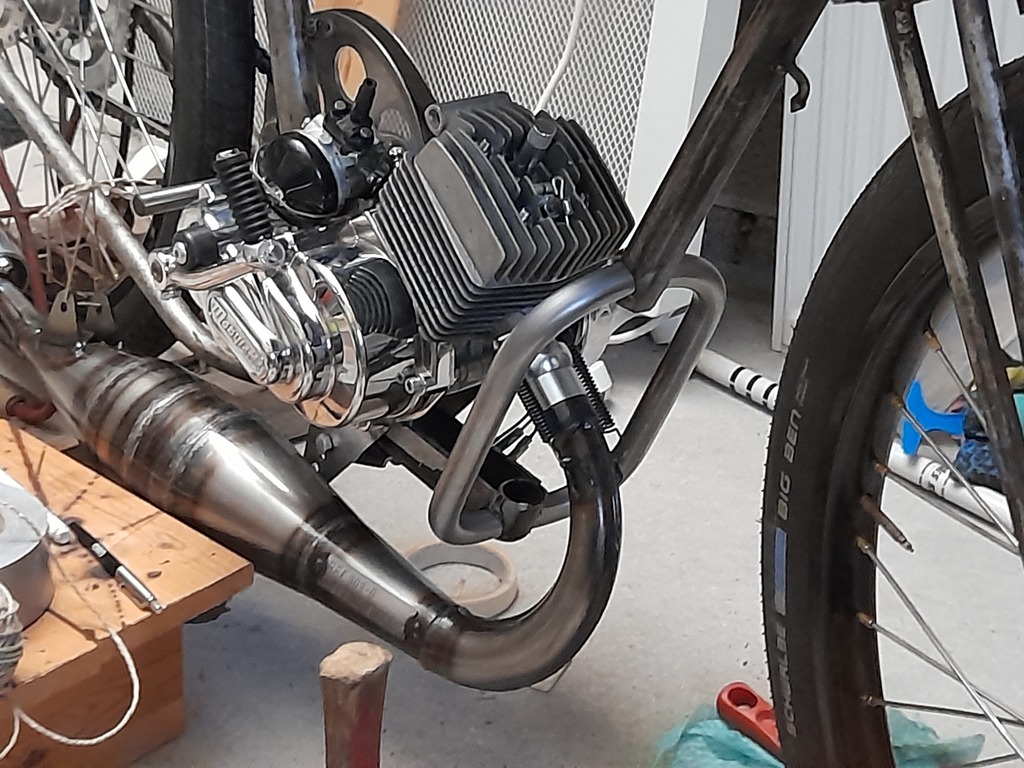 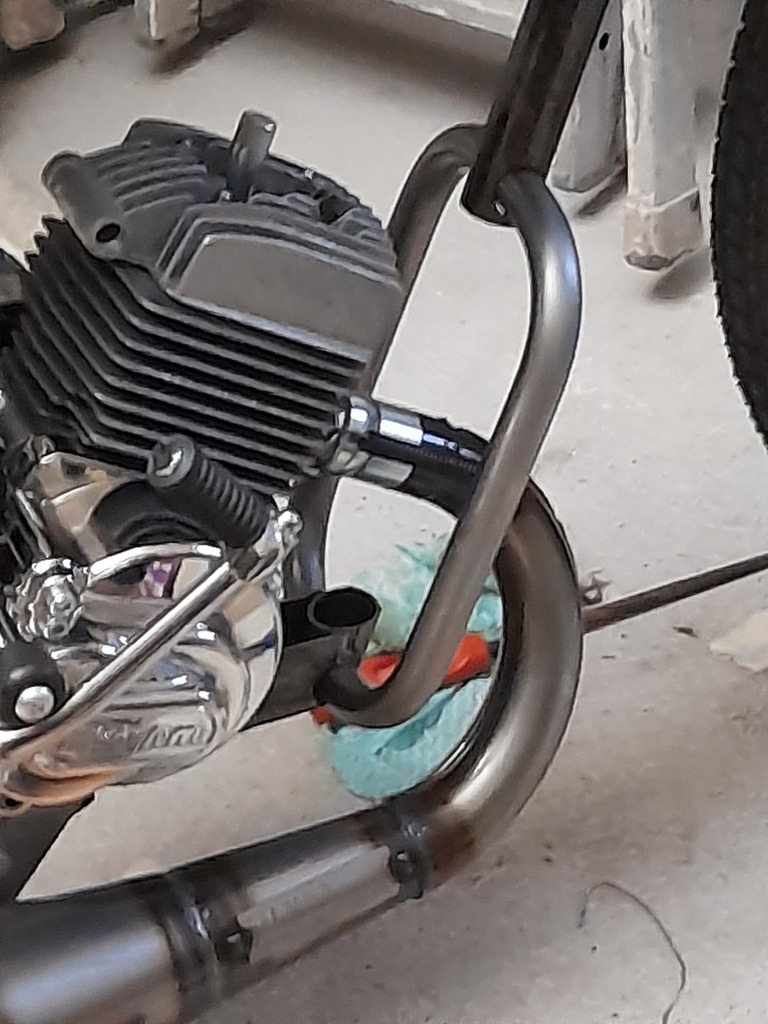 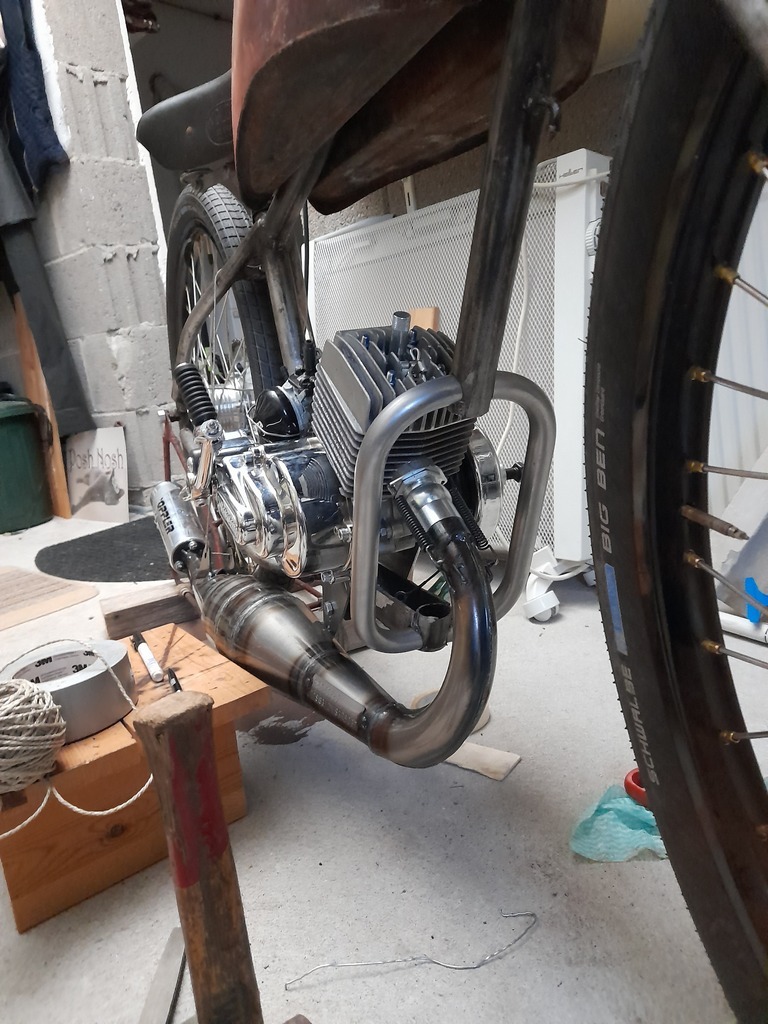 |
| |
Last Edit: Apr 27, 2021 13:18:37 GMT by horrido
|
|
|
|
|
Apr 27, 2021 14:25:50 GMT
|
|
It's looking great in those last couple of pics.
Work harder!
|
| |
|
|
|
|
|
|
|
Apr 29, 2021 19:55:58 GMT
|
Have a couple of days off and miraculously, it was sunny, so I was outside, tacking bits together and grinding. It´s sure nice not to have bits of mocked up metalwork falling off every time you look at it. More tomorrow, unless it´s chucking it down. 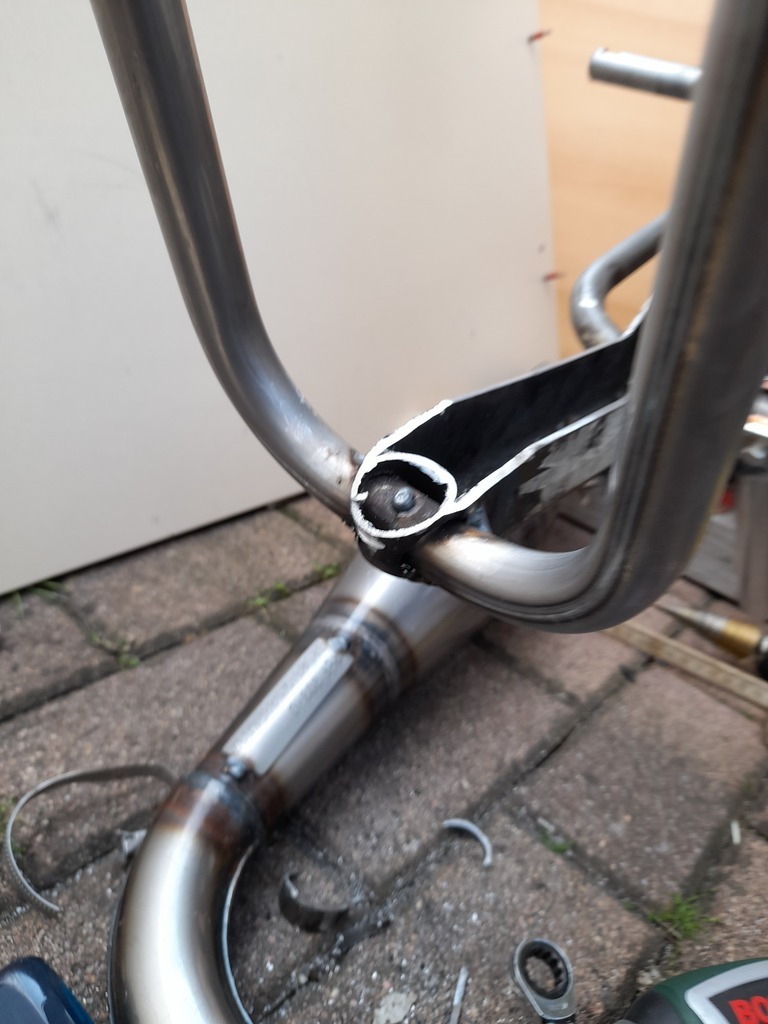 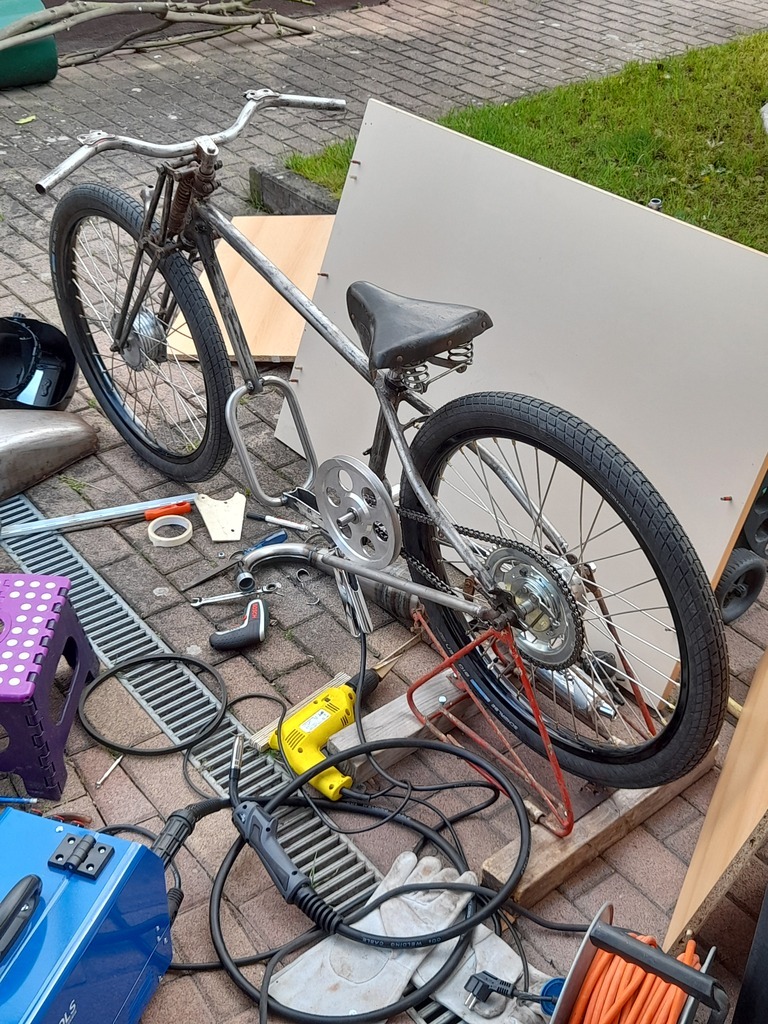 |
| |
|
|
|
|
|
|
|
Bit more mock-uppery as my mudguards turned up. I know, everyone likes the board tracker look with no guards, but I´m keen to avoid any unnecessary interactions with the Polizei, so it needs to look somewhat original. The guards are some silly long cruiser bike items, that I´ll cut down. Thought it would be better to have too much than not enough. The stays are a bit flimsy looking, but I can always beef them up If I have to. I also redrilled the motor plates to lower and tilt the motor a little more. I jubilee clipped the exhaust pivot on and miraculously it all moves without clobbering anything on the frame. 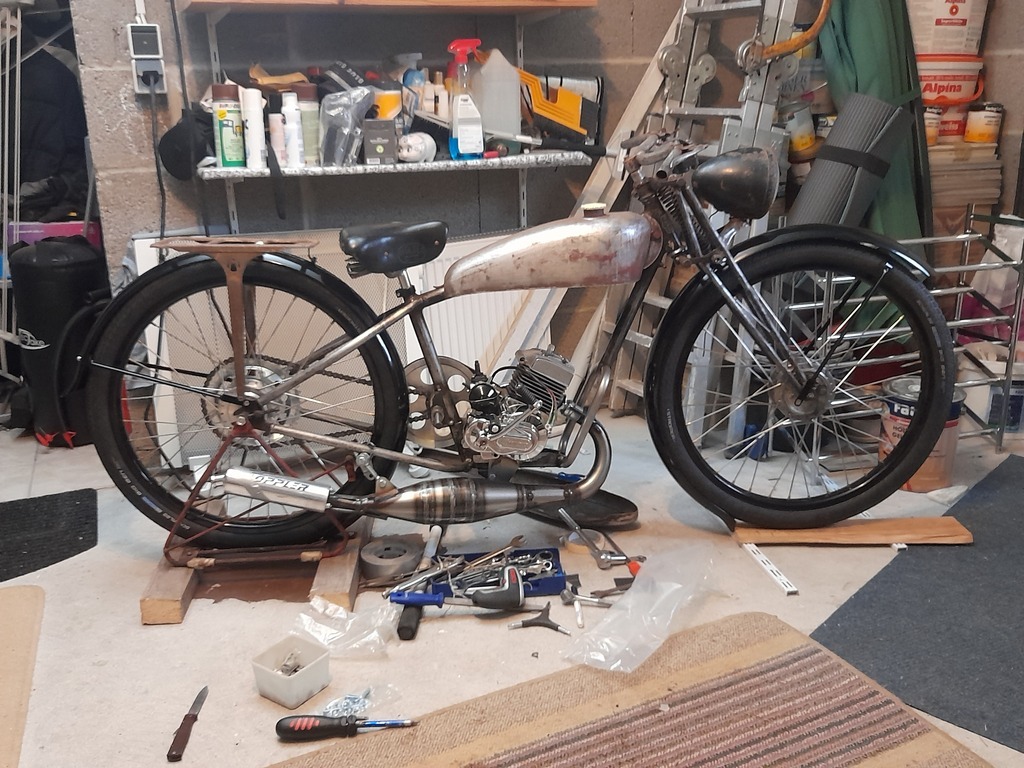 |
| |
|
|
|
|
|
|
|
|
I like the long mudgaurds.
|
| |
|
|
mylittletony
Posted a lot
Posts: 2,338
Club RR Member Number: 84
|
|
|
|
|
Might be a bit controversial, but I like it with the big guards, kinda restomod vibe going on (especially with the big light and rear rack too)
Maybe you could have removable guards, lights and rack so you can change between them?
|
| |
|
|
|
|
|
|
|
|
Glad you all like the guards, just slightly surprised. It´s all removable. Maybe I´ll get some shorty guards at some point in future.
When I say I need to cut these ones down, they really are silly long right now. The back one is disappearing under the tyre and the front will be dragging on the ground if I don´t chop it off a bit. The front of the front guard and the rear of the rear guard are where I want them though.
Also check out my perfectly aligned - to the chain stay and the chain - mudguard support on the back there. And you thought I just throw this stuff together?
|
| |
|
|
|
|
|
May 21, 2021 17:42:00 GMT
|
Bit of an update. It´s not that I haven't been doing anything, it´s just that it hasn´t been particularly worth writing about. Mostly it goes weld-grind-weld-grind-weld-grind. I wish i could lay perfect welds down every time, but that´s a way off. I've spent some time trying to hide the scars of my butc...surgery on the downtube. I think it looks ok. Better than a sawn off tube at any rate. 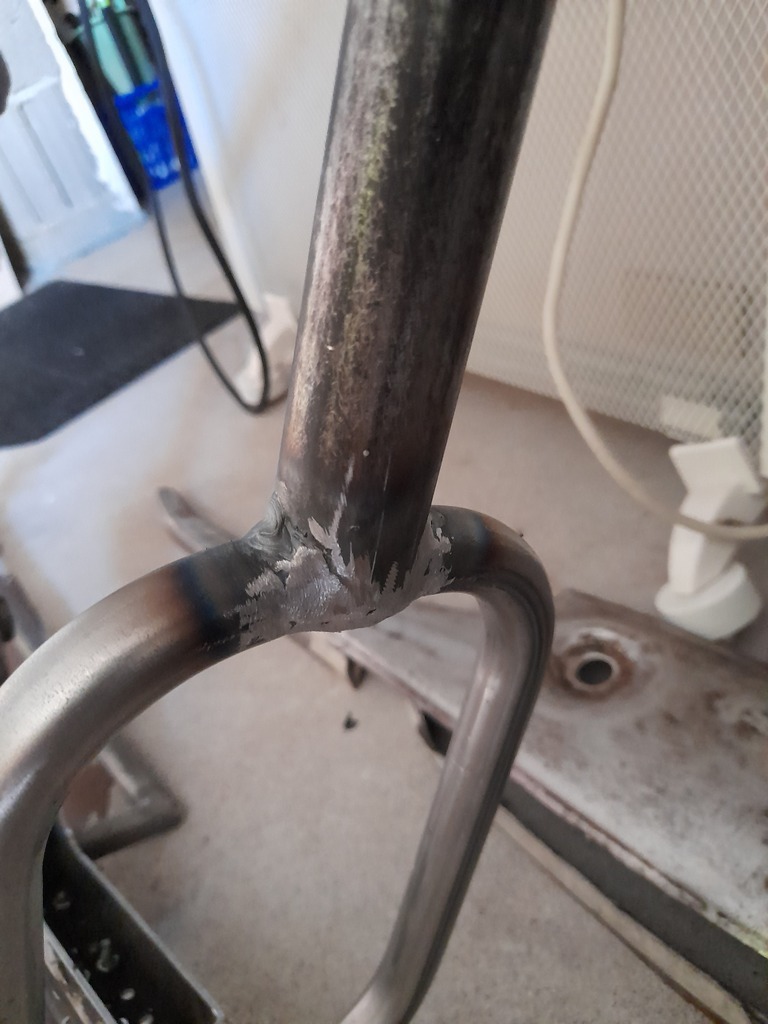 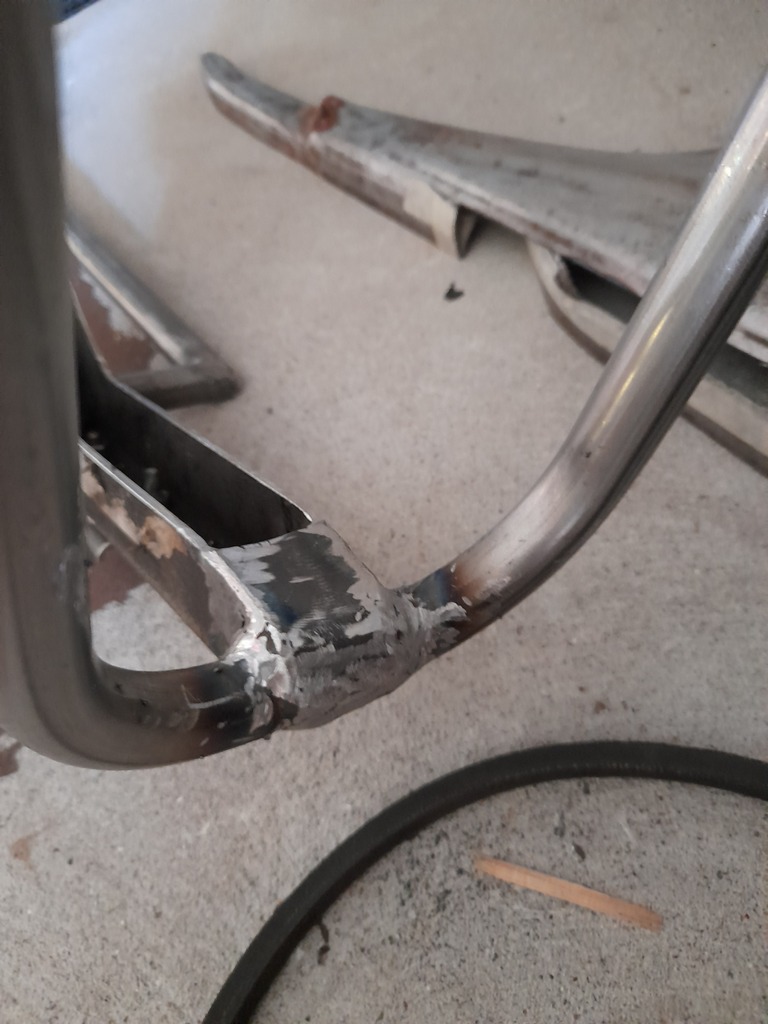 I bought the final bunch of parts that I´d need from France. Cables, a kick stand, a twist throttle (as it had a lever originally, like all the finest agricultural implements do) and lots of other nick nacks that you end up needing. Then two days later, I bought another 83 euros worth of stuff, after I realised that my standard engine spring wasn´t going to work out, as there´s nowhere left to put it. Had to fork out for the fancy racing version, which is a 20cm long, bright yellow spring, that I´m going to have right on top of the motor. Not ideal, but I´m out of space. I did however come up with a plan to partially hide it. There´s a small toolbox that goes under the seat and I was wondering what to do with it, as the carb now hits it, so I was initially just going to leave it off. What I've decided is to use it to hide various stuff. I can run the motor spring right through it, which should hide half of that and I can also use it to keep water off the ignition coil and condenser. I had to cut a hole in the bottom of it already, so i can clear the carb and I´ll route the throttle cable through it as well. 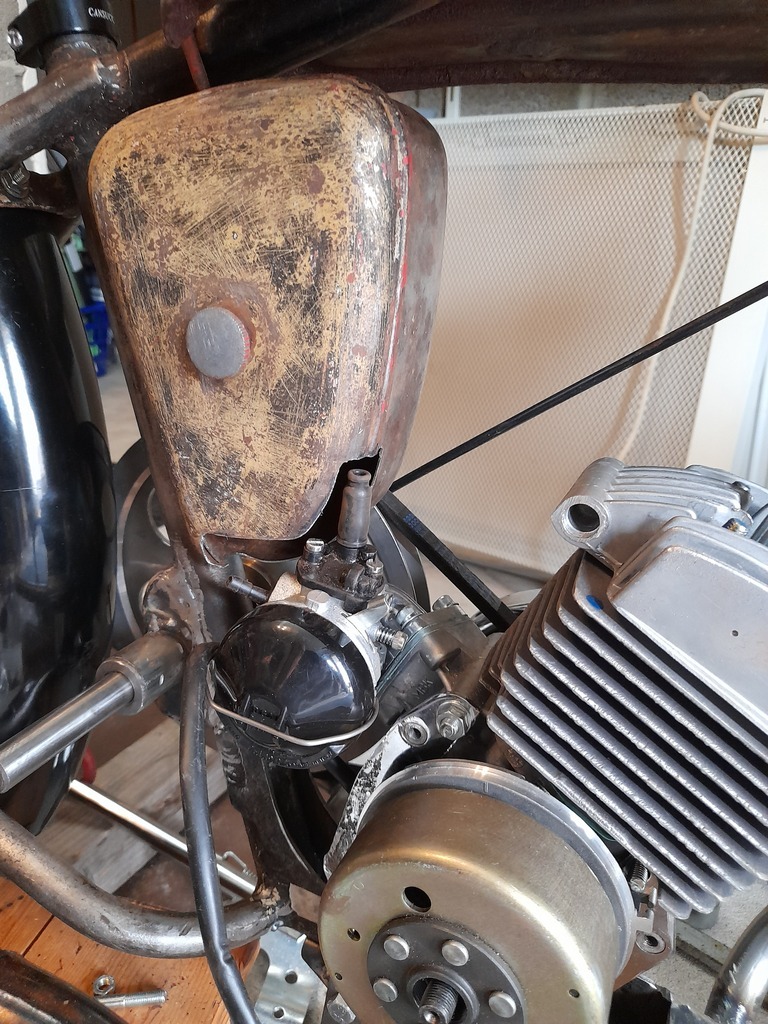 Other than that, I´ve been trying to fit the mudguards up properly. The luggage rack is used to support the guard, but the legs on it are now too short, because of the bigger wheels and guards, so that was two more little brackets to make. The back light is an old German bike rear lamp. I have three of these, so an easy replacement if anything happens. Really like the look of it too. 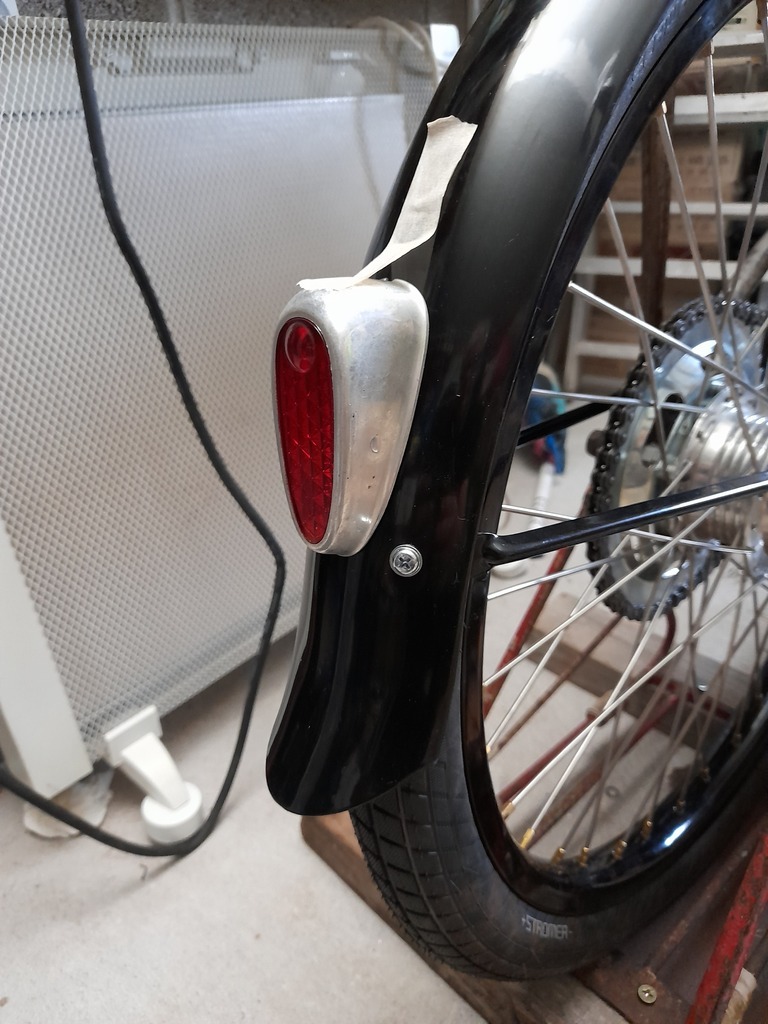 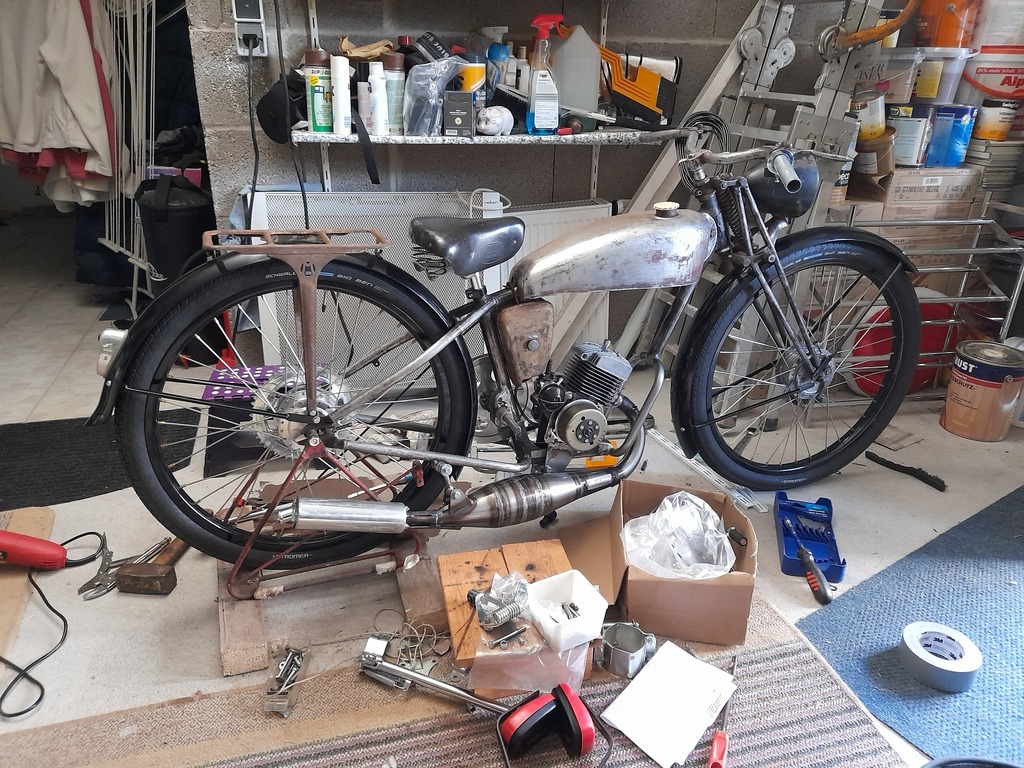 |
| |
Last Edit: May 21, 2021 17:43:20 GMT by horrido
|
|
|
|
|
|
|
|
That's looking right smart now!
|
| |
|
|
|
|
|
May 29, 2021 19:40:38 GMT
|
Bit more done/half done. Managed to figure out and make up a not too ugly top mounted engine spring. These usually go right underneath the motor on a normal MBK 51, but as I´m pivoting the motor from below instead, it really needs to go up top. I´m getting really good at taking brand new parts out of the packet, beating them into a different shape with my faithful persuader hammer and then chopping bits off until they fit. It used to really bother me, but not so much any more. I bolted it to the place on the head that the engine usually pivots from, as it should be strong enough and I put it on the pulley side, as that's where it needs to resist the force of the drive belt. Hopefully it´ll stop the motor twisting so much. You could charitably say the spring looks slightly steampunk, and I think it´ll look ok when it´s sprayed a colour other than bright yellow. Or I suppose I could just embrace it and put some neons on the thing. As I mentioned, I wanted to retain and use the old toolbox to hide the electrics. Lucky for me, I can hide the huge ugly bracket that the spring needs inside it too, though I had to hack even more of the box away and make a slot for the spring too. I might yet make a cover to hide a bit more of the spring. 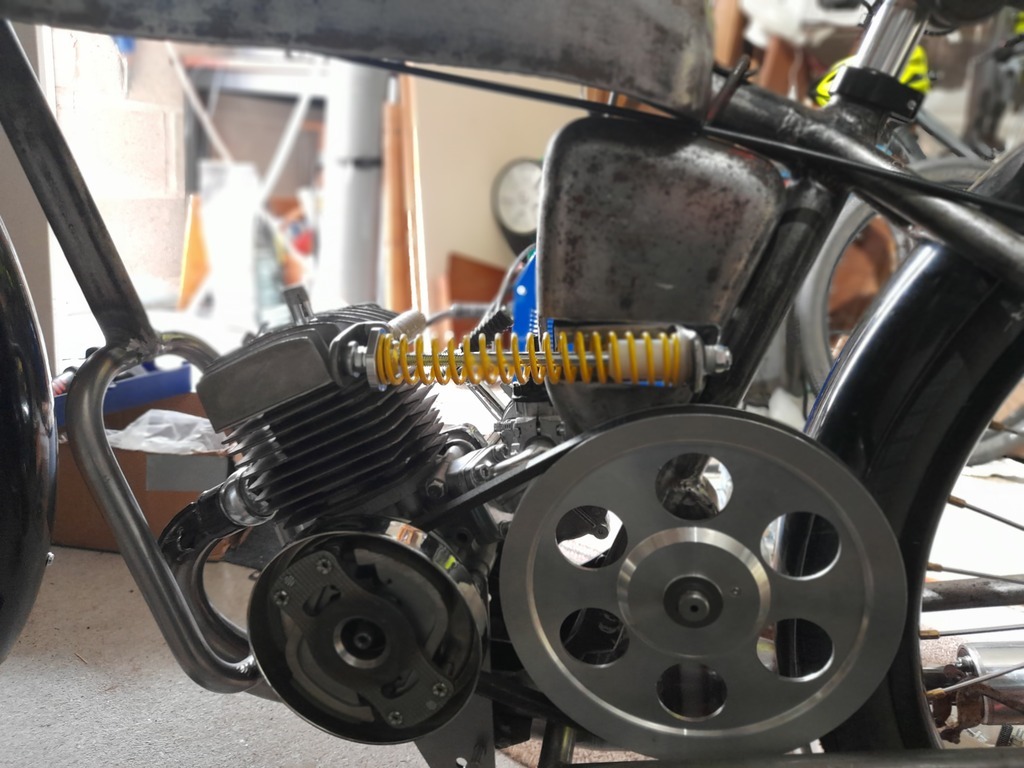 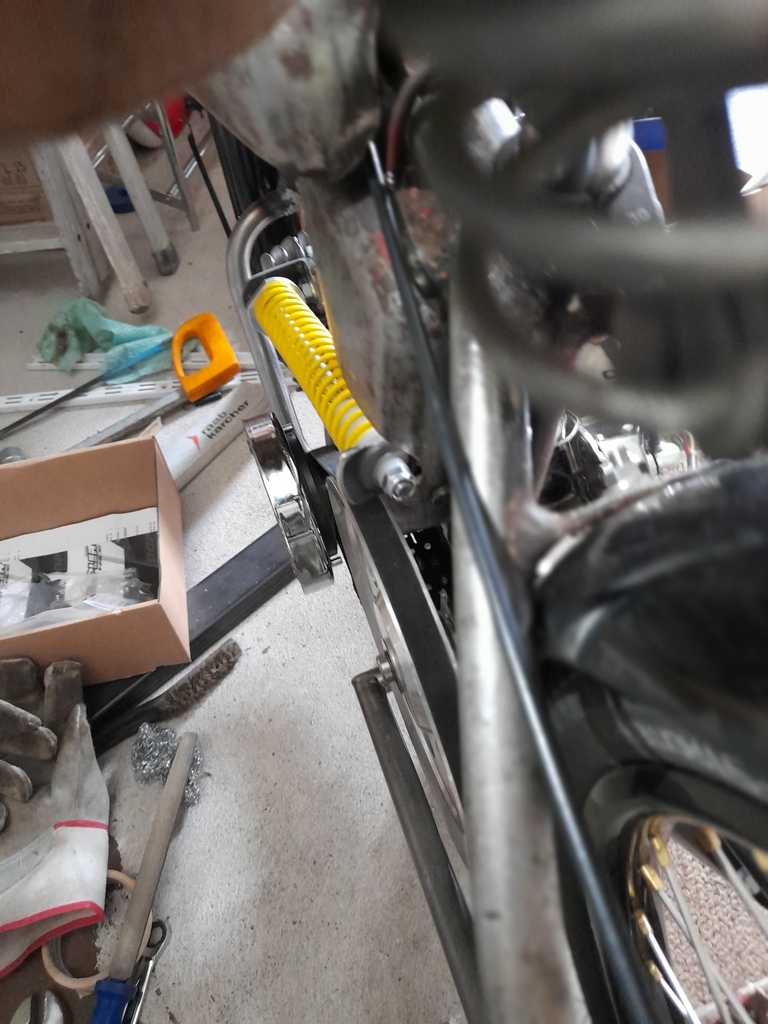 It all fits inside the box. I had to engineer some adjustment into it too, as I don´t know if it needs to be preloaded. 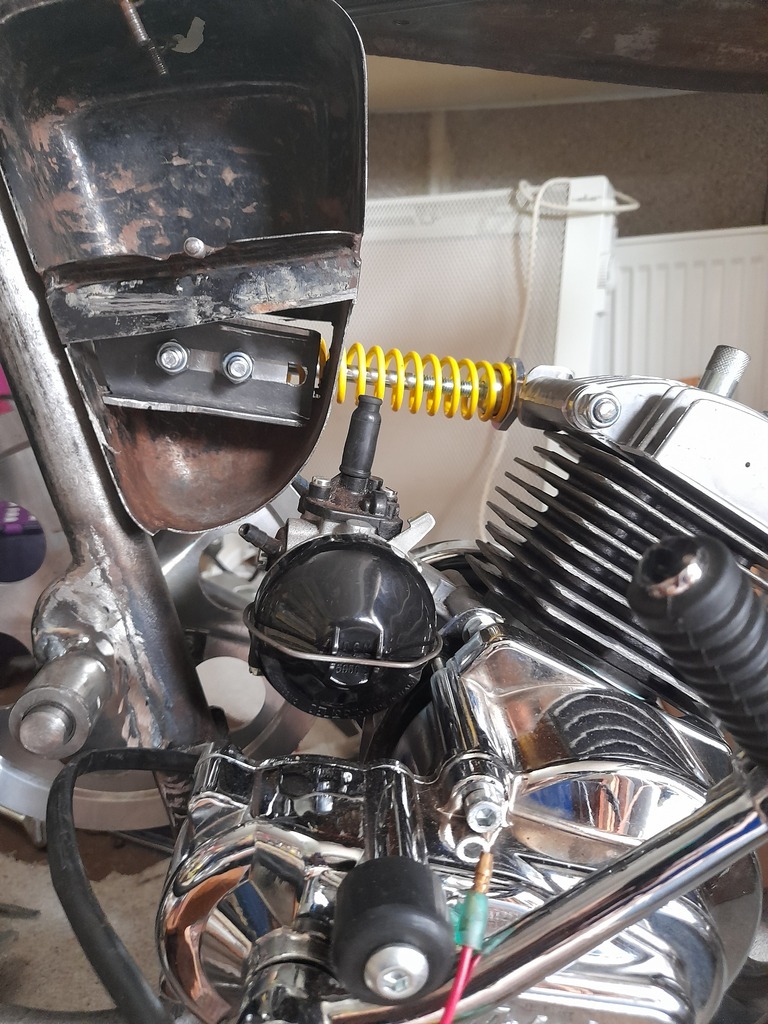 Tacked in place. The toolbox slides on over it, before you bolt the bracket on. 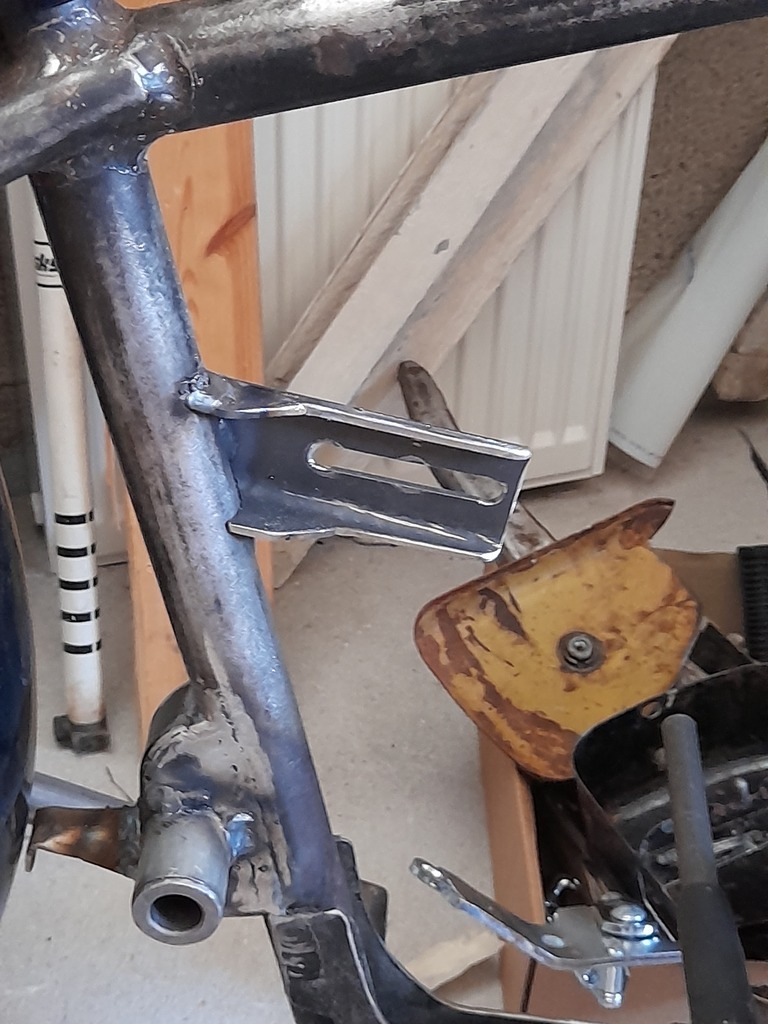 No more pedals. Now it´s a no-ped, or as the Germans call them, a Mokick.  Made a start on the foot rests. It was hard to find anywhere to even put this and it´s still too wide. I´ll cut it down to size when the motor goes back in. 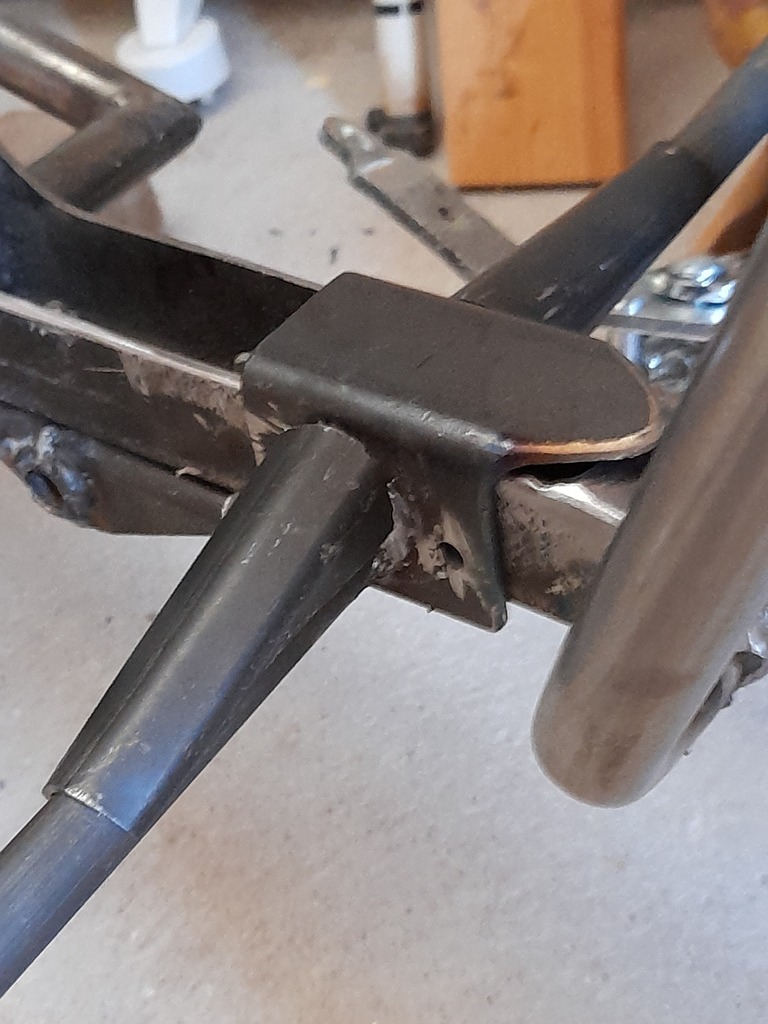  Also chopped up the chain guard. As much as I didn´t want to, this needed to be shortened about 8-10", as the new motor is much wider and there´s no way it will clear it. I´ll have it covering the pulley at least and try and retain the shape of it. If you never see this thing again and I never speak of it, it´ll be because I´ve distorted it into the sixth dimension with my dire welding skills. 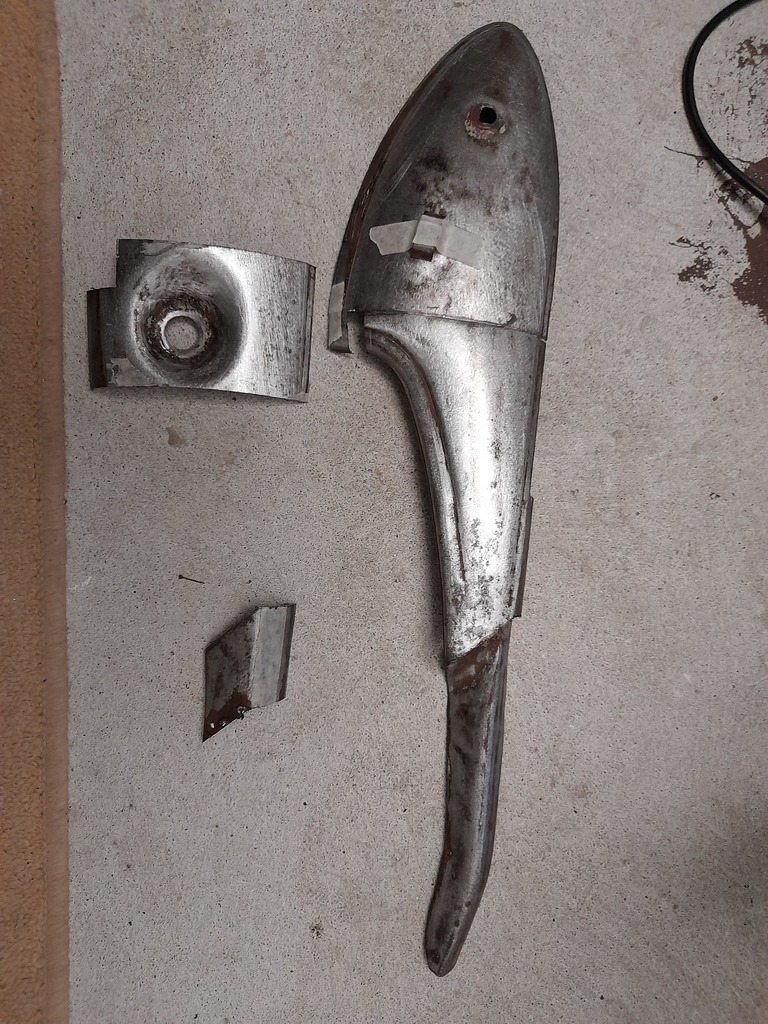 I only have to add the bracket for the side stand and a couple of brake cable stops and that should be it. |
| |
Last Edit: May 29, 2021 19:45:41 GMT by horrido
|
|
|
|
|
|
|
|
This is lovely - and a lot of thought going into it! Cracking.
|
| |
1968 Mini MkII, 1968 VW T1, 1967 VW T1, 1974 VW T1, 1974 VW T1 1303, 1975 Mini 1000 auto, 1979 Chevette, 1981 Cortina, 1978 Mini 1000 1981 Mini City, 1981 Mini van, 1974 Mini Clubman, 1982 Metro City, 1987 Escort, 1989 Lancia Y10, 1989 Cavalier, 1990 Sierra, 1990 Renault 19, 1993 Nova, 1990 Citroen BX, 1994 Ford Scorpio, 1990 Renault Clio, 2004 Citroen C3, 2006 Citroen C2, 2004 Citroen C4, 2013 Citroen DS5. 2017 DS3 130 Plenty of other scrappers!
|
|
|
|
|
Jun 20, 2021 16:13:02 GMT
|
Been plugging away, welding brackets and grinding my crappy welds smooth. I bought an accessory side stand, which is supposed to bolt on, beat the bracket flat and welded it on, after having chopped about 3" out of it. I think I'm finally done with welding now. My pal came over for a look and so I put it back together, just to check the fit of various bits, before it comes apart again for paint. Found some sort of German equivalent black gloss smoothrite type stuff in rattle cans, so I´ll use that on the frame, forks...well, actually more or less every last part that isn't the fuel tank, toolbox or chain guard. In a post war austerity stylee. There really wasn't any chrome or even nickel plating on these as far as I can tell. They did have some gold striping on the frame tubes at least. 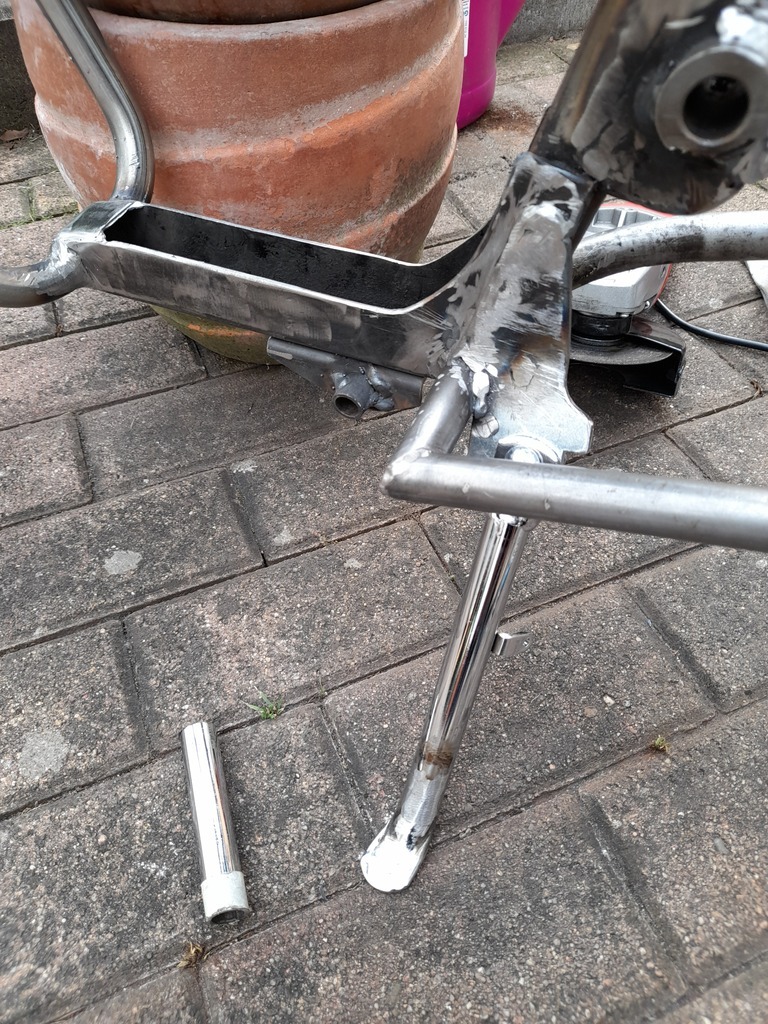 Last dry build....  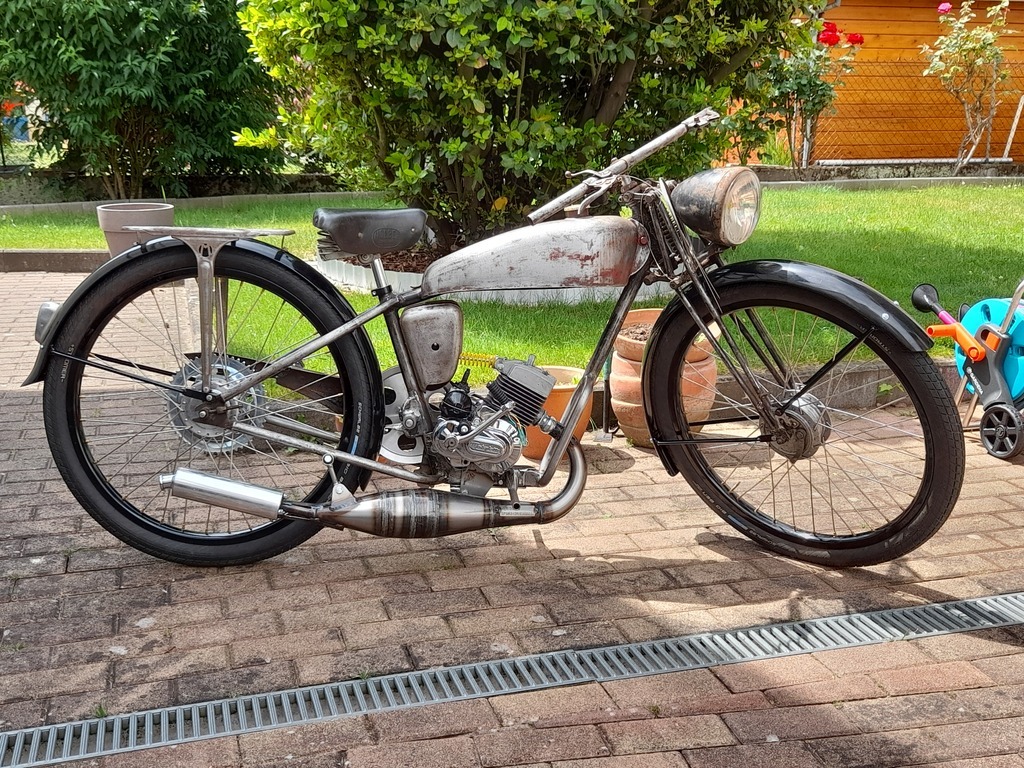 |
| |
|
|
|
|


 www.olx.pt/anuncio/ciclomotor-sachs-colecao-IDGiftm.html#1609f1cbbc
 www.olx.pt/anuncio/ciclomotor-sachs-colecao-IDGiftm.html#1609f1cbbc