luckyseven
Posted a lot
   Owning sneering dismissive pedantry since 1970
Posts: 3,839
Club RR Member Number: 45
|
|
|
|
BTW, got a bit distracted with 'googling' Stacia. The cushions are a greta idea might need to borrow that although I'd probably go for just a single album cover (DSOFTM, Boston, Crime of the Century, Machine Head, Led Zeppelin [all of them], I guess that shows my musical tastes or lack of depending on your point of view)... Errrr... nothing wrong with a bit of Led Zep. Or DSOTM, obviously. Ada's already stolen the cushion idea and started planning his own, though I have a worrying feeling that may involve Smashing Pumpkins, which is hardly to be admired  Maybe this album cushion malarkey will become a Thing and I'll wish I'd patented it  I was a little worried about trademark infringement and copyright and all that (I don't generally hold with thieving other people's intellectual property) but I figured as I was doing it by taking a photo of stuff then it became an original "artwork" in its own right and therefore owned by me. I may be wrong, but I don't suppose Andrew Eldritch's lawyer is going to be chasing down some random off the internet who's making cushions out of records that were mostly bootlegs in the first place anyway. And finally, if you like Led Zep and haven't already, give Greta van Fleet a listen. Weird name, but basically sound exactly like a lost Zeppelin demo tape unearthed in someone's basement. I mean that in a good way... |
| |
|
|
|
|
luckyseven
Posted a lot
   Owning sneering dismissive pedantry since 1970
Posts: 3,839
Club RR Member Number: 45
|
|
|
|
The next day I didn't have a chance to do much more than faff about with speakers. I'd totally missed the fact that to get the speaker wire from the defunct ventilation duct through the door down to where the actual speaker was mounted near the step would require a hole to be drilled. And I wished I had twigged, because to drill the hole with the door in place was really awkward and would have been much easier to do if it'd still been on the bench. However, obstinacy prevailed and then it was the Chinese puzzle of threading the wire through, which was basically achieved by going in from underneath (oooer, missus) with some scrap wire and then taping it to the speaker cable and pulling it back through  cable threading cable threading by Nick Liassides, on Flickr and unlike the original door setup, I even pushed the boat out and put on a grommet to stop the wire chafing through. Because why wouldn't you? I don't know the answer, I'm genuinely asking. Why didn't they?  Grommet luxury Grommet luxury by Nick Liassides, on Flickr Anyway, I got to thinking... always a dangerous activity. I'd had the stereo (head unit, I believe they're called) replaced with a spanky new one by Huets Car Audio (whose weapons-grade ICE builds used to be A Thing back in the M*x P*wer days and are now living hand-to-mouth adding Dynamat to work vans and stereos to crusty old T25s). I'd had to punch the old stereo to death when it went rogue, remember? The new one was cool, all bluetooth gzimotronic USB everything. And it sounded great. But the doorspeakers were a bit... well, small. And feeble. So I got to tihniking... size matters. So if I took the substantially larger speakers out of the base of the rock'n'roll bed and put them in the door then my chooons would sound that much more epic. So that's what I did. Only, this meant there wasn't enough hole in the door to hold the speaker. And so I had to cut back perfectly good freshly painted steel  size matters size matters by Nick Liassides, on Flickr Good plan, I hear you cry, but what about these chooons of which you speak in the back? Haven't you just robbed off the rear speakers out of the van? Aha, yes, well spotted. And you're right. But because I never throw anything away, ever, I just happened to have some speakers in a box in the garage that I'd bought secondhand to replace the knackered ones in the back of my old RX-7 about ten years ago. Turns out, being Mazda and thus famous for their sense of humour, the rear speakers in an FD RX-7 aren't the ubiquitous 6"x9" size but the rather less used 4"x7" that literally no-one has ever used, ever, and no-one even manufactures. So, short version, I had some extraneous 6x9s on a shelf just waiting for a home. And like I say, if you keep something long enough, it'll find it's own use.  robbing peter to pay robbing peter to pay by Nick Liassides, on Flickr so that was the rear sorted then. They didn't have any grilles to protect them from kicking kid's feets, but I ordered up some generic steel ones from a caravan fittings shop on eBay which seemed to fit OK  yep size matters yep size matters by Nick Liassides, on Flickr So back to the front, and with the steel trimmed back and re-painted to stop rust getting in, I drilled out some mounting holes and rivnutted some threaded inserts in, rather than using self-tappers like had been done previously.  new speaker mounts new speaker mounts by Nick Liassides, on Flickr and then all that remained was to summon up some BRAVE and cut a massive hole into a perfectly good brand new doorcard 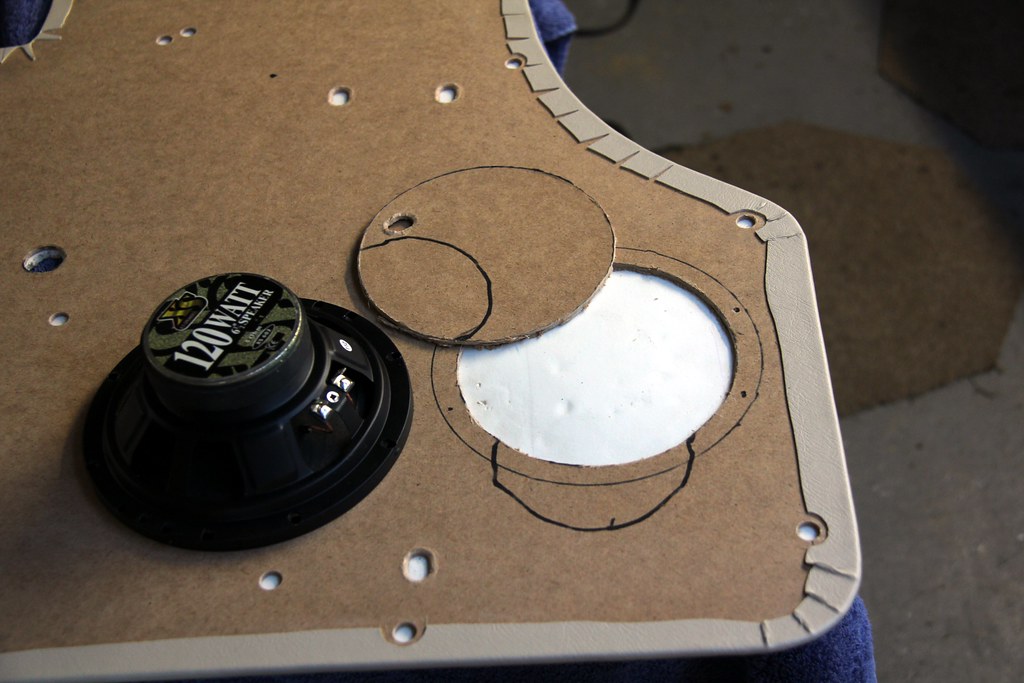 doorcard marked out doorcard marked out by Nick Liassides, on Flickr This was a bottle or man up moment, but I raised up my mighty Holy Sword Of Exacto * and once the first cut (which is always the deepest) was over, it was easy after that * Lego Movie joke. If you haven't seen it, why not? It's bloody brilliant cutting up new things cutting up new things by Nick Liassides, on Flickr There followed a right old faff trying to get the vinyl to sit right in the reverse of the card; my proper staplegun was more than man enough to fire a staple right into the hardboard, but unfortunately it was a bit too lusty and the staples came right through the vinyl side with their prongs. So I had to do it with a normal desk stapler and about four out of every five staples just bent out of shape (rather like my temper) instead of penetrating the card. And then the stapler snapped in half and that made it even more awkward. I was particularly upset by that; it was a proper old Ofrex one that had belonged to my old man so was probably some kind of antique  many staples later many staples later by Nick Liassides, on Flickr But the main thing was, it looked OK from the correct side, and in a years' time no-one will remember how frustrating a job it was to do. Except I just reminded myself of it.  speaker holed speaker holed by Nick Liassides, on Flickr On a household stereo... which I'm guessing most people don't have nowadays... you just wind the speaker wire round a terminal on the back of the speaker cabinet and screw down a little thumbwheel to crimp it in place. Automotive speakers of course use normal automotive spade crimps and even have one small and one large one so you can't get the + and the - wires on the wrong terminals... that is, assuming they're correctly wired into the back of the head unit, of course. I assumed mine were as Huets had just wired it in, so took their word for it. Of course, I had insulating boots for the normal 1/4 spades, but not for the tiny ones so had to make do with a bit of heatshrink. At least I insulated them, the PO hadn't. Unsurprisingly...  more luxury more luxury by Nick Liassides, on Flickr All that was left was to pop the doorcard on and add the door furniture. VW had really moved into the 20th century with T25 doorcards; gone were the rusty metal prongs and torn rubber grommets of the Beetle setup and instead, a nice plastic conical prong with a flange (ooooh flange) to grip the inside of the card just popped neatly into a hole cut directly into the door webbing. Simples. Except for the fact they grip a bit too well to the doorcard and I spent ages levering them out of the old one to transfer them. Literally months later, when I took the last trim panel out of the massive Newton Commercial box, I found a huge bag of a couple of hundred trim clips, enough to do the entire van and more. And all those times I'd spent re-using the cruddy old ones  . There's a lesson; always unpack your toys before you start playing with them...  door furniture on door furniture on by Nick Liassides, on Flickr But, it looks OK, doesn't it? Certainly a lot better than the old manky dark dingy cruddy nasty one. Other adjectives are available. I fiddled about a bit with the hinge bolts and got the door sitting a little better and even the colour seemed to match a little better than it had as the door got dirty and blended in with the rest of the van. I suspect a good mop now, months later, would blend the two together pretty well  the morning after the morning after by Nick Liassides, on Flickr Good. Done. On to the next one. All that's left is everything else. Tune in to the next thrilling installment for... errrm. Stuff. Seats. T'other door. Carpet. Rust. Welding. Ooooh, just loads of, well... stuff |
| |
|
|
luckyseven
Posted a lot
   Owning sneering dismissive pedantry since 1970
Posts: 3,839
Club RR Member Number: 45
|
|
|
|
Nick - For rattle cans - that's no bad finish at all bit of a flat & polish (or not) once the door is hung and it will look the business PS I reckon that your used door has been resprayed at least once - no car manufacture puts that amount of paint on a production line motor sorry, I missed that reply while I was talking curse word about music and cushions with MiataMark  High praise indeed, thankyou! Aha, I did think it seemed an awful lot of layers even for VW. The mop and polish is still on my "to do" list but the weather's getting nearer to the point where I can face the idea at least  |
| |
|
|
MiataMark
Club Retro Rides Member
Posts: 2,971
Club RR Member Number: 29
|
|
|
|
And finally, if you like Led Zep and haven't already, give Greta van Fleet a listen. Weird name, but basically sound exactly like a lost Zeppelin demo tape unearthed in someone's basement. I mean that in a good way... Dragging it off topic again, that sounded good some definite Robert Plant influences there will have to listen to more. and now back to VW's (which I don't actually like although I can see the attraction). |
| |
1990 Mazda MX-52012 BMW 118i (170bhp) - white appliance 2011 Land Rover Freelander 2 TD4 2003 Land Rover Discovery II TD52007 Alfa Romeo 159 Sportwagon JTDm
|
|
|
|
|
|
|
|
Just read the whole thread up to here - always a pleasure! Not laughing at your misfortune, obviously, but you do make even the biggest catastrophe entertaining!
Love the Mary Whitehouse Experience reference too!
Fun fact, you can tell yours is a really early bus by the pressed air vents at the back - later ones had plastic jobbies screwed in with rusty self tappers made of cheese...
Looking forward to seeing how you deal with the cab step - I replaced the one in my wife's '81 T25 with a cut-out from an '86 we broke for spares. Still got most of it in the garage too...
|
| |
1968 Cal Look Beetle - 2007cc motor - 14.45@93mph in full street trim
1970-ish Karmann Beetle cabriolet - project soon to be re-started.
1986 Scirocco - big plans, one day!
|
|
luckyseven
Posted a lot
   Owning sneering dismissive pedantry since 1970
Posts: 3,839
Club RR Member Number: 45
|
|
|
|
Happy to hear I amuse you [/Joe Pesci voice]. Yeah. the cab step (shudders). I dealt with it by not dealing with it... But first, I had a matching doorcard to errrmmm... match. I made a much neater job of cutting the speaker hole this time round, mainly by the simple expedient of not slicing the little fillets all the way to the edge of the hole before stretching and stapling them to the reverse side. This meant it actually made a round hole rather than an almost round hole with lots of little flat edges  Neater second time Neater second time by Nick Liassides, on Flickr So then it was time to strip of all the dark, nasty old door card and furniture  tother door tother door by Nick Liassides, on Flickr The drivers' side had even less zombieskin liner left than the passenger one had, and what there was left had been simply painted over   completely different completely different by Nick Liassides, on Flickr It's almost as if whoever did the respray on poor old Beryl worked for the same RestoChimp Garage as the clowns who'd done the Beetle. They certainly didn't give a four-X about masking off or anything as tedious as that. Anyway, once that curse word was all stripped off and the door cleaned down with thinners to get rid of all the crud and residue  shed skin shed skin by Nick Liassides, on Flickr I could stick on my butyl tape stuff, a new plastic waterproof liner, and then on with the doorcard  drivers door done drivers door done by Nick Liassides, on Flickr Lovely? welll...........not exactly. We'll get on to why in a moment. But first, an oddity that's worth pointing out. Did you notice anything weird about that photo of the door with the doorcard removed? No? well, you weren't looking very closely then, were you? Try again, and this time do try to pay attention  completely different completely different by Nick Liassides, on Flickr Yep. It's internal structure is markedly different not only to the new passenger door (which I'm willing to forgive/understand as that came off a different, much later bus. But it's different also to the passenger door that came off Beryl!  insane membrane insane membrane by Nick Liassides, on Flickr See that big triangular hole next to the winder mechanism? See the small, oblong hole on the other door? Now, is it me, or is that a little weird, even for VW? Nothing significant about it, just mentioning it. Mostly because the other way in which it was different is those two really large depressions that merge into the hole where the speaker goes and made it a truly humongous PITA getting the speaker mounting bolts to sit in the right place  Anyway, why isn't my new doorcard lovely? *sigh* you haven't been paying attention again, have you? Go on, go back and look at the picture of the new doorcard fitted. No, I'm not putting it up again because you're too lazy to scroll up and look at it. It's only two photos back. Go on, we'll wait for you here, those of us who were paying attention. You back? See it? What do you mean, no?  OK, OK, I'll explain for the terminally unobservant in the audience. See that big shiny screwhead sticking out of the outside end of the pull-handle? That's not meant to be like that. It's supposed to be within the body of the handle, neatly covered by a little plastic err... cover that clips into the handle and hides the fixings. The reason it doesn't is because the mounting points to screw the handle into are in the wrong place, which is presumably why an previous owner had screwed the handles themselves in the wrong place and just drilled it into the door steel with self tappers  Jesus, what is it with the self-tappers‽ Yay, got to use my interrobang again So look, right. The handle ought to screw into two little nylon inserts that pop into a purpose-made square hole in the steel of the door. You can see them circled here  the wrong pegs Grommit the wrong pegs Grommit by Nick Liassides, on Flickr There are also two others (painted over, of course :  in that pic so if you want you can mount the handle at a 45° angle. But the odd thing is, they are flat and the mounting hole is dead central in the nylon bung. And the holes in the door obviously can't be moved around, so there is no leeway at all in where the hole in the centre of each bung ends up. And they're out They're out by a lot, at least half an inch... far too much to explain by tolerances or slight distortion of the door metal or any reason I could easily conceive of. And what's even weirder is that the Caravelle door that I painted to fit to the passenger door has the same holes in the same places, but it has completely different nylon bungs that are offset from their mounting peg and so come closer to each other by the extra half inch that the handle needs for its mounting holes to line up with the bungs  offset pegs offset pegs by Nick Liassides, on Flickr Now, unless VW went to all the trouble (for some mysterious, arcane reason no-one can possibly fathom) of making two almost-identical doorhandles that differ only by being a half-inch shorter in length, I'm at a loss with that one. If they did, I haven't found any. There are two other handles in the van; grabhandles on the widescreen pillar but they're identical to the doorhandles. So it left me with a choice of basically having a handle barely held on at one end, with a gurt ugly screwhead sticking out, or... well, something else. I needed a solution. While I cogitated, I got on with an easy one, changing the tailgate doorcard for one of the new Newton Commercial ones  Dark boot Dark boot by Nick Liassides, on Flickr Cos with the old scratchy dark blue panels, the boot sure was a dingy gloomy place to be. I used the very last bit of waterproof liner and the last of the butyl tape (which had to stretch very thin to make it all the way round the aperture) 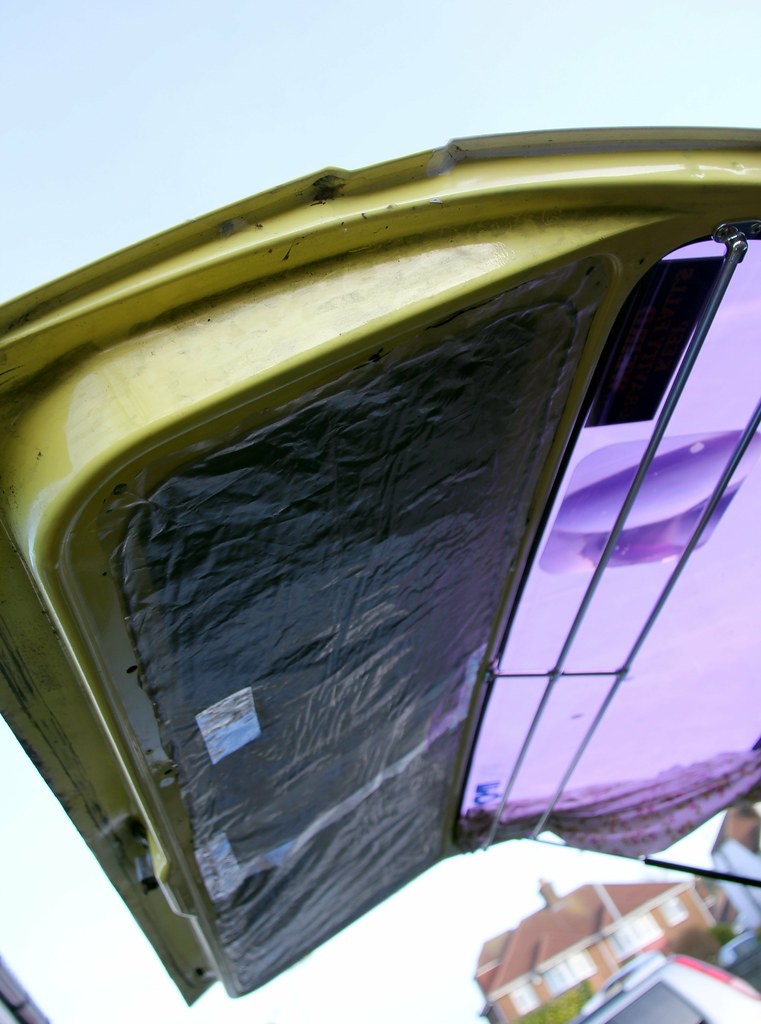 Jailbars and more membrane Jailbars and more membrane by Nick Liassides, on Flickr and while I had the thing stripped down (again) fitted some jailbars that were an eBay find for about £25 posted. Bargain. Jailbars are basically flimsy alloy tubes that go around the bottom edge of the rear windows of a bus and stop any luggage or camping tables, whatever, from sliding around and banging into the windows with possibly disastrous consequences. And when they're so cheap and add a little bit of bling, why not?  Bright boot Bright boot by Nick Liassides, on Flickr Made the rear of the bus a much brighter, more pleasant place. Next job was to take out the "short wall" (the sliding door side) trim panels, which oddly were self-tappered to the metal of the van. I couldn't really work out why, when the steel has holes punched out to accept the little plastic trim clip things just like the doors. However, it was pleasing and perhaps a bit surprising to find that at least the internal structure of the van was rust-free and in really good shape 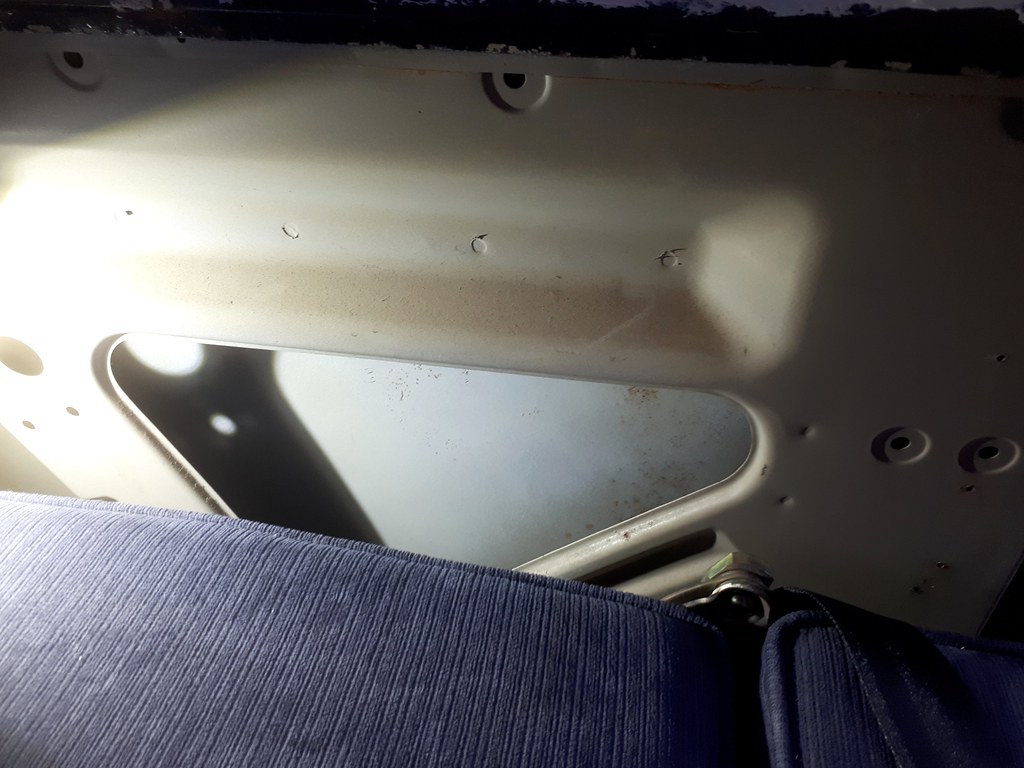 rustfree side structure rustfree side structure by Nick Liassides, on Flickr I waxoyled the living bejaysus out of it anyway because why not? and got on with swapping the trim panels. The one that came out was a huge, floppy hardbooard thing, with the bespoke nasty scratchy dark blue smegma material  Massive sidepanel Massive sidepanel by Nick Liassides, on Flickr the Newton Commercial replacements came in two pieces, which went together to make up the same shape 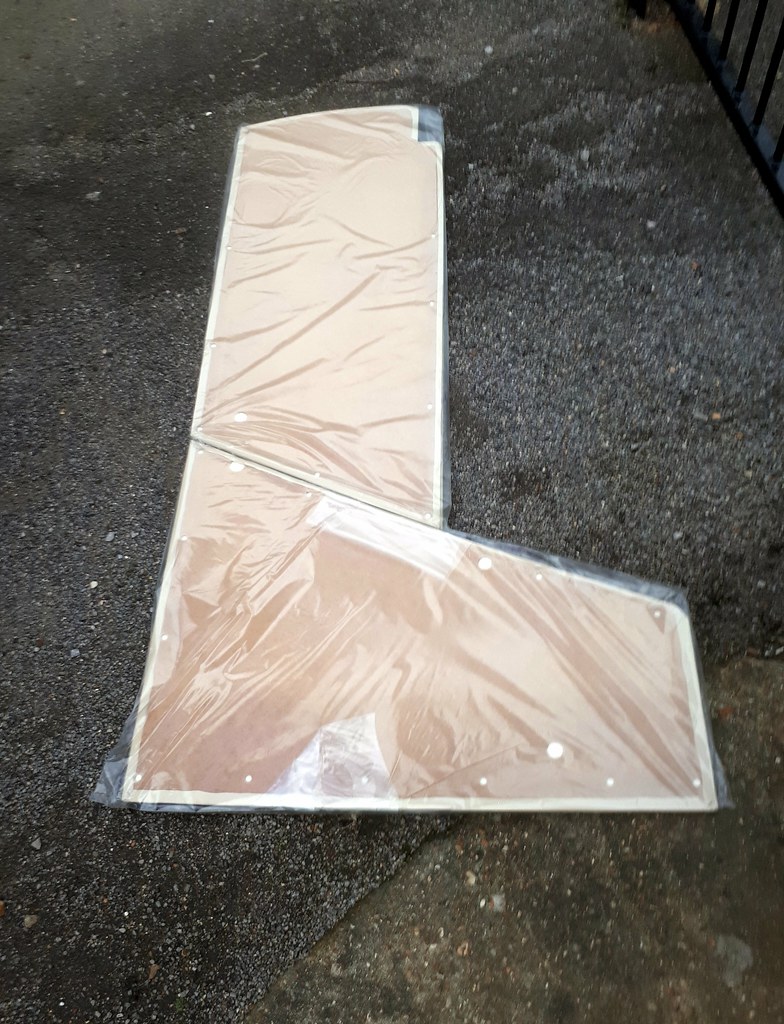 split sidepanels split sidepanels by Nick Liassides, on Flickr ...and now I discovered why the original was self-tappered on. None of the trim clip holes matched up to any of the holes in the van side! More weirdness. You can only really fit the panels in one location due to the shape of the wall/floor join and the holes, like the doorhandle, were well out, not an amount that could be gained by a bit of adjustment here and there. I was really left with no choice but to self-tapper the new ones on, even though it stuck in the throat a little. Sometime, a screw is the only solution. If only Mrs L7 saw it that way. Anyhoo, at least I got to throw away the original, non-matching and often rusty screws in favour of nice new stainless ones with big shiny washers. Meanwhile, the kids "helped"  Niah-cat non-help Niah-cat non-help by Nick Liassides, on Flickr usually with mockery and by treating the van as a climbing frame, but sometimes lowered themselves to hold panels for me so I could line up with the "original" screw holes and at least avoid turning the wall of the bus into a Swiss cheese. Well, one of them did. The other just sat on its phone and ignored everything around it. And it's not even a teenager yet, quite  tweenage help tweenage help by Nick Liassides, on Flickr so what's the solution to my doorhandle problem? Aha. You'll have to wait and find out in the next thrilling installment. I've literally only been typing this waiting for paint to dry and it's time for another coat. I'll be back in a bit to extol the virtues of baconwood  |
| |
Last Edit: Jun 7, 2019 11:29:59 GMT by luckyseven: putting the right photos in the right place, spelnilg, grammer, stuff....
|
|
ada7
Part of things
 
Posts: 108 
|
|
|
|
|
Loving all of this so far. It’s about time The Beryl got a bit of exposure.
Baconwood, greatest name ever for a none existent band
Adam
|
| |
Rotaries help make the world go around... And around and around and...
|
|
luckyseven
Posted a lot
   Owning sneering dismissive pedantry since 1970
Posts: 3,839
Club RR Member Number: 45
|
|
|
|
For the full indie band random name generator effect, you'd need at least one more word, preferably totally unrelated. Like Baconwood Shuriken or something. And then a suffix to indicate fellowship. Like Collective. Hmmm. Baconwood Shuriken Collective. There ya go  Now the doorcards were all bright and cream, the doorfurniture looked terrible; 80s VW de rigeur black plastic and not even very nice-to-touch plastic.  drivers door done drivers door done by Nick Liassides, on Flickr I thought it needed a bit of fluffing up to match. Window winders were easy, as Beetle ones fit and there are eleventy hundred different styles available off the shelf  New winders New winders by Nick Liassides, on Flickr I also got some matching wood-capped door lock pins, but of course, Beetle ones are a different thread size to T25 ones. Why? Because they just a re, that's why  Anyway, all I managed to achieve was to shear off the tip of my M3 tap in one of them, so I gave that up as a bad idea and lived with the black plastic ones. But what about the doorhandles? I mean, they were the real problem anyway due to the weird not-fitting-between-the-holes problem. And there was a solution, but it seemed a lot of faffing around. When my dear silver-haired old ma had her kitchen re-done, I snaffled some of the old worktops the builders tore out, because they were damned great big chunks of thick wood and ...well, y'know, wood's always useful for stuff. One of them I'd used as a table to do stuff on in the garage, where the distinctive aroma it had acquired from being used in a kitchen for decades had attracted comment from Ada. Mostly because it smelt of bacon. Yeah, I explained. It's cos it comes from a bacon tree. And ever after, baconwood it has been. So all it needed was to draw round one of the original handles...  Baconwood slab Baconwood slab by Nick Liassides, on Flickr ...add a bit to allow for the holes in the door being in wrong place, cut it out...  Handleish Handleish by Nick Liassides, on Flickr ...spend absolutely ages roughing it out with eveything from hand files to finger grinder to angle grinder with a flap disc...  Getting the idea Getting the idea by Nick Liassides, on Flickr ....measure really carefully, twice, the distance between the holes in the door. Then measure again. Then drill, which wasn't that easy given the bit hit the wood on a 45° slope and wanted to skate off, even in the pillar drill. This was needed so that the screw head had a step to do up to inside the hole; basically a dual-diameter hole. So the narrow diameter hole came through from the other side, the wider one from the slopey side. Clear as mud?...  drilling a slope drilling a slope by Nick Liassides, on Flickr ...and then much more filing, to make the holes look like they were supposed to be there... 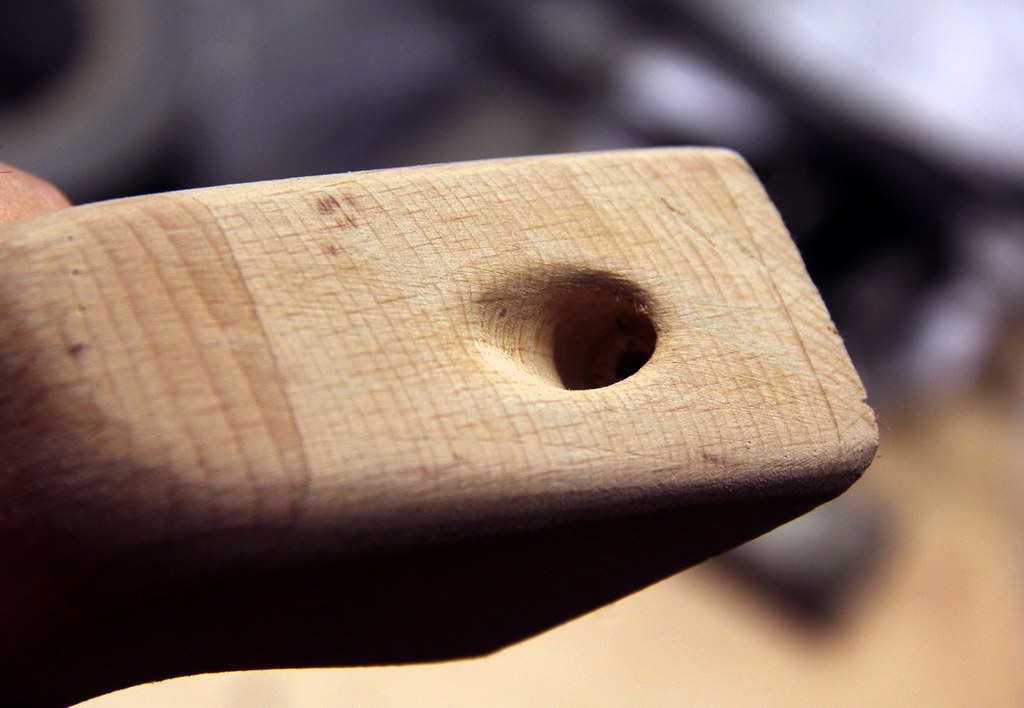 hole shaped hole shaped by Nick Liassides, on Flickr ...then sanding, with successively finer grades of paper, all the way down to 1500 to get the baconwood lovely and smooth...  shaped shaped by Nick Liassides, on Flickr ...then a couple of coats of varnish, a pair of alloy tubes inserted so that the screws aren't crushing directly into the wood when it's mounted, and we'll call that a handle  on to the next one on to the next one by Nick Liassides, on Flickr ...and on to the next one. Having cut slightly too far on the first version and not been able to sand deep enough to lose the nick, I used a hole saw chisel bit this time...  baconwood whittling baconwood whittling by Nick Liassides, on Flickr ...and still managed to cock it up slightly...  embryo v adult embryo v adult by Nick Liassides, on Flickr ...but after much more of the same, I had a pair of almost matched, bespoke, one-off baconwood doorhandles 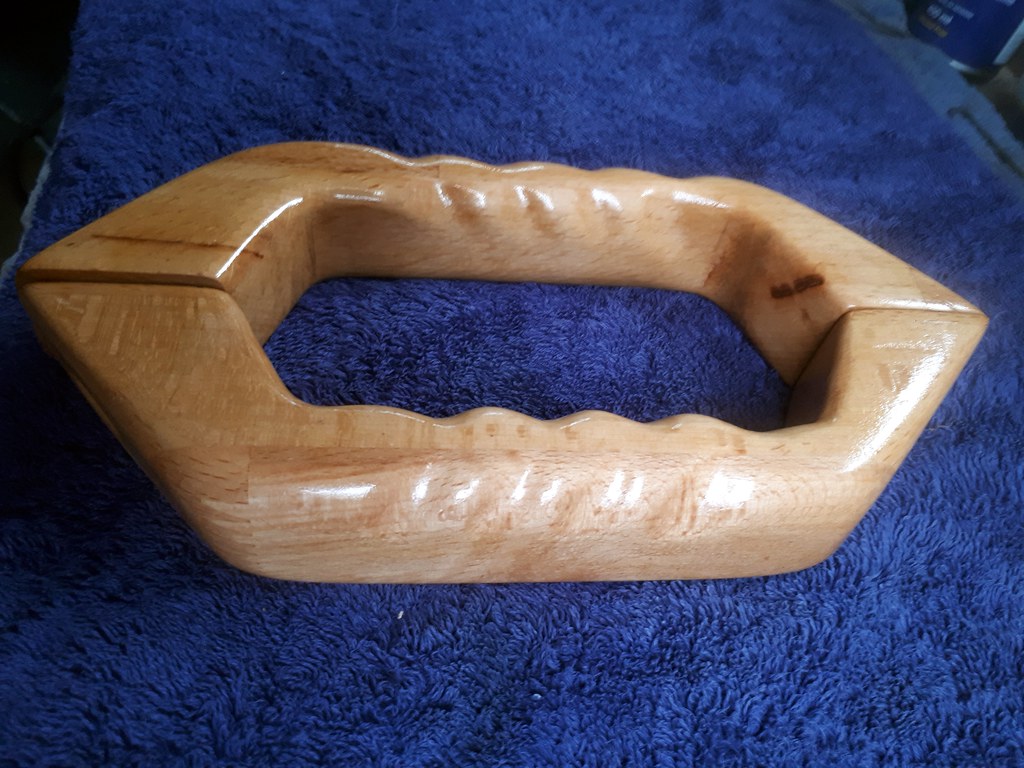 matching pair matching pair by Nick Liassides, on Flickr And what do you know? They only actually fitted, didn't they?  Norwegian baconwood Norwegian baconwood by Nick Liassides, on Flickr I was rather pleased with that, and though I still think they look distinctly home-made (I mean, it's hardly @johnnybravo levels of engineering , is it?) they're one of the things that everyone who gets in The Beryl comments on how nice they are, so I must've done something right  |
| |
Last Edit: Jun 8, 2019 8:30:53 GMT by luckyseven: the usual
|
|
|
|
|
|
|
|
Do they still smell of bacon though?
Mmmmmmmmmmmm bacon!!!
|
| |
|
|
luckyseven
Posted a lot
   Owning sneering dismissive pedantry since 1970
Posts: 3,839
Club RR Member Number: 45
|
|
|
|
Sadly they don't  . I guess the varnish has sealed the bacony goodness in  |
| |
|
|
|
|
luckyseven
Posted a lot
   Owning sneering dismissive pedantry since 1970
Posts: 3,839
Club RR Member Number: 45
|
|
|
|
Those baconwood handles are several days' worth of odd spare moments condensed into a single post. I even took them to work with me in a sandwich bag with some sandpaper so I could get some sanding done in my breaks and stuff. That got some funny looks in the messrooms... In the meanwhile, there were Other Things to be getting on with. Picture, for example, the scene; you've gone off in your Beryl for a lovely camping weekend. It's bliss... dappled light dancing through the lime leaves as they gently float on a playful zephyr, their chiaroscuro play of light and shade matched by the kaleidoscope shards of reflected light flitting off the surface of the gurgling brook as it wanders merrily between its centuried banks searching for the way to the Ocean... in fact, just go and dig out your copy of Pink Floyd's massively underrated epic Ummagumma (as discussed in an earlier post about cushions) and listen to Grantchester Meadows. What do you mean, you haven't got one? Why the hell not, especially after everything I said about the cushions and that. In fact, screw it, here's a handy YouTube of it which someone's taken the time to add pretty picktchers to already so you don't have to waste imagination on it Got the vibe now? Yeah, good. Thought so... and as the sun begins to set washing everything like thick gold and the kids doze off in the roof of the Beryl you turn to your wife/partner/significantother and say "would you like a beer, dear?"
AND THEN YOU REALISE YOU'VE FORGOTTEN THE BOTTLE OPENER  The horror... the horror... And the idyllic scene of idle beauty disappears from view with an audible *pop* as you try to open the beer bottle with a belt buckle, or smash it off on the edge of a worktop or even break it with a rock and try not to get too many shards of glass in your drink. Awful, right? But, what if you'd pre-envisaged this very scenario, and were ready for it? What you'd need is something like this;  prehistoric paint prehistoric paint by Nick Liassides, on Flickr Yep, a £12 Coke opener from eBay. Cheaper ones are available (and more expensive should you want to pay scene tax for the privilege of having the word "vintage" included in the title description) but I liked this one because it came from a small company who run a foundry and do blacksmithing stuff. But it needed colour, and it just so happened I had an extremely ancient tin of red caliper paint in the garage. Surprisingly, once I'd spent ages trying to lever the lid off, the paint inside was still a bit like paint rather than the expect solid lump of matter. Still like painting with tar, as caliper paint tends to be, but once set it will withstand direct nuclear assault so it was ideal for this application  Drink Drink by Nick Liassides, on Flickr when it was nearly dry I cleaned up the messy edges with a blade. Then it was a simple matter of screwing it to the wall of the Beryl. As most surfaces are like the aforementioned Swiss cheese (the PO loved a self-tapper. Loved one) I used one pre-existing hole and drilled another for the top mounting. Because this is the inside of the engine air intake, I could access both sides and so put a big stainless washer and a rubber grommit to stop water being let in.  bottleopener essentials bottleopener essentials by Nick Liassides, on Flickr and that's a nice, easy job jobbed. I can get on with listening to Grantchester Meadows without fear of my daydream being punctured   shortsided shortsided by Nick Liassides, on Flickr NEXT! That'll be the sliding door then. The old doorcard suffered from all the attributes of the previous trim panels; dark, tatty, nasty, scratchy and generally unpleasant but added new features into the mix such as; water-damaged, broken-cornered and held together with gaffer tape  manky old panel manky old panel by Nick Liassides, on Flickr And the door was in OK condition with some rust starting along its lower edge. You can at least get skins for the sliding doors new, but they're prohibitively expensive and obviously come with all the annoyance of getting welded on and painted, so I'd prefer to keep this one if possible. In fact, "prohibitively expensive" is a consistent feature of T25 sliding doors; the upper pivoting hinge/runner part is £345 on it's own!  Anyway, mine was still serviceable with mostly surface rust so I got to with the thinners and Bilt Hamber (good job I bought a massive bottle) cleaning it up and treating the rust  celly thinners and kurust celly thinners and kurust by Nick Liassides, on Flickr And by the end of another very long day waiting for chemicals to go off, I could finish up sound-deadening the panel, which is basically a lovely drumskin of a thing if left un-damped  Slider deadened Slider deadened by Nick Liassides, on Flickr In accordance with VWs policy of evolving and improving every component over time (some might see this as "changing stuff just for the bloody sake of it"), there are two different sliding door handles on T25s, changing with the facelift model in 1985/6. The early ones are a lot longer, and from my experience of the Beryl I believe they were shortened because the extra length makes them go floppy prematurely. Oh, come on it's something we all suffer from eventually isn't it guys?  Now I've noticed it, every early T25 I've seen has the same thing where the doorhandle droops on the sliding door. All the parts to service it are available new through Heritage, so I gave it a try  slider handle refurb slider handle refurb by Nick Liassides, on Flickr and as it turned out, the Beryl didn't even have the seal anyway. But I added a couple of the little square shims and it made quite a difference, although still not exactly perfect. But at least the handle wasn't actually flapping about like the prick-in-a-shirtsleeve metaphor that upset georgeb so badly. And I could bung the unfeasibly huge new slider doorcard on. Which, pleasingly, actually lined up the plasitc mounting prongs perfectly with the holes in the door webs  one side done one side done by Nick Liassides, on Flickr Yay. One side of the bus completely done. Because of the cabinets built down the long side, there was only one bit of wall that needed panelling and it was the little bit at the end of the boot. Taking off the old one revealed simple plywood, unvarnished or painted or anything.  the final panel the final panel by Nick Liassides, on Flickr Needless to say, it was held on with really rusty self-tappers (it looks like damp's got in there at some point, maybe through the plethora of holes someone's inexplicably drilled into the wall of the engine intake vent). Some of the screws were so rusted and the heads so rounded off I couldn't even get them out with the impact driver. A couple yielded their heads to the hacksaw. One, in the bottom corner, was so inaccessible that I had no choice but to just rip the board off around it and then get the remnants out with pliers. Annoyingly the second sheet of ply is a massive long one that goes behind the cabinets so I couldn't remove that to get behind and see what state the metalwork is in. This is a problem because that's exactly the spot where T25s (and Beryl is no exception) suffer from "seam rash". This happens because there's a strengthening spar of the structure behind this wall that two of the body panels share as a support. Obviously, water gets in down the seam and rots the panels out from there, hence the "seam rash" being the first sign. Beryl's doesn't look to be too bad ...yet... but it'll need doing at some point. Anyway, the trim panel. Because of where the cabinets are, the panel was too long so I had to adjust it. This was done by scoring through the reverse of the hardboard until I could snap it off but leave the vinyl intact. Then I could fold the vinyl over and staple it down behind so it looked like the panel was always supposed to be that shape rather than it had just randomly been cut in half by a fool  Sidepanel shortening Sidepanel shortening by Nick Liassides, on Flickr and so that was that done, the final piece of trim panel affixed  the final panel finally the final panel finally by Nick Liassides, on Flickr so... what's next? Well, those seats aren't too clever   Saggy old bumperch Saggy old bumperch by Nick Liassides, on Flickr |
| |
|
|
bstardchild
Club Retro Rides Member
Posts: 14,975
Club RR Member Number: 71
|
|
|
|
Hi Beryl I do love an "L7" thread - Nick you have such a way with words I can almost imagine myself there for you childhood experiences  |
| |
|
|
luckyseven
Posted a lot
   Owning sneering dismissive pedantry since 1970
Posts: 3,839
Club RR Member Number: 45
|
|
|
|
Hi Beryl I do love an "L7" thread - Nick you have such a way with words I can almost imagine myself there for you childhood experiences  Uncle Ernie.... is... is that you?  |
| |
|
|
|
|
|
|
|
|
Love it. We’ve got a 1980 t25 aircooled 2.0cu auto
|
| |
|
|
|
|
bstardchild
Club Retro Rides Member
Posts: 14,975
Club RR Member Number: 71
|
|
|
|
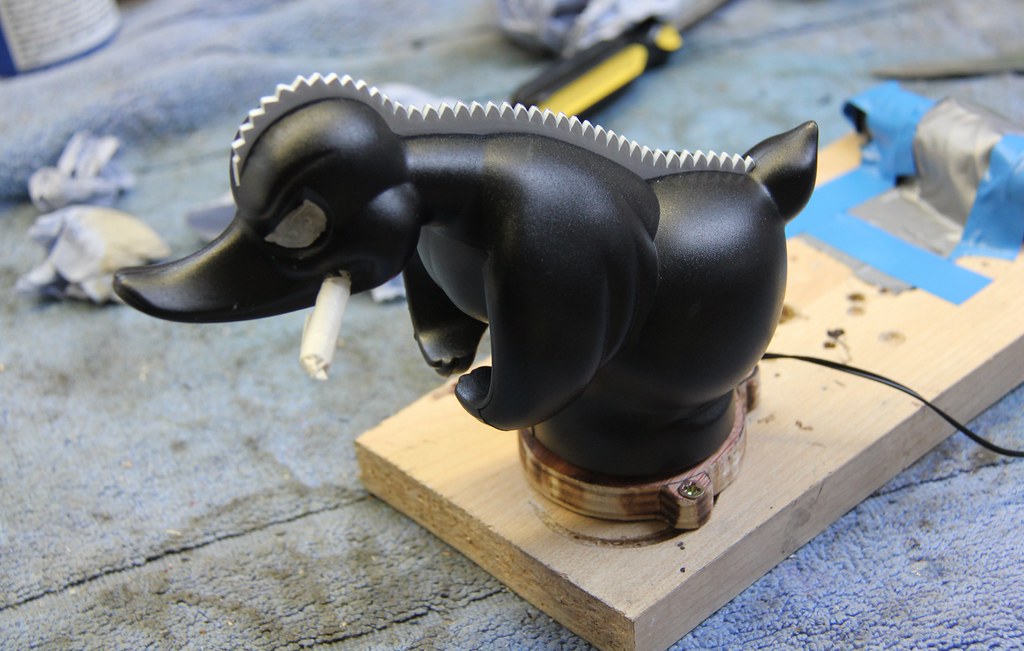
Just how much time can someone spend on a "duck" thank you for that - very cool |
| |
|
|
luckyseven
Posted a lot
   Owning sneering dismissive pedantry since 1970
Posts: 3,839
Club RR Member Number: 45
|
|
|
|
When we won it on eBay it was running on 3 cylinders because one of the rocker shaft bolts had snapped in the head. We then ripped the interior out and made a new one. Yeah, I commented on your thread I believe. Top work, that Y'see, that's exactly what I need, a sliding window to replace our stupid vent slat thing. I hate it. It rattles all the time you're driving, it's incredibly draughty and it leaks water in the rain. Hate the damn thing! Funnily enough, they seem to have massive scene points attached to them... even the guy who did my welding said if I ever got rid of it to give him first refusal so he can put it in his Bay. Don't get it myself  |
| |
|
|
luckyseven
Posted a lot
   Owning sneering dismissive pedantry since 1970
Posts: 3,839
Club RR Member Number: 45
|
|
|
|
Just how much time can someone spend on a "duck" thank you for that - very cool As long. AS IT TAKES  |
| |
|
|
|
|
|
|
|
|
Auto paints in hove last time I used them in 2011 before moving. One of the garages I worked in the late 90’s used Huets in Worthing.
A few of my mates had they bmw e30 systems done by them as well
|
| |
|
|
|
|
|
|
|
It’s on a Facebook 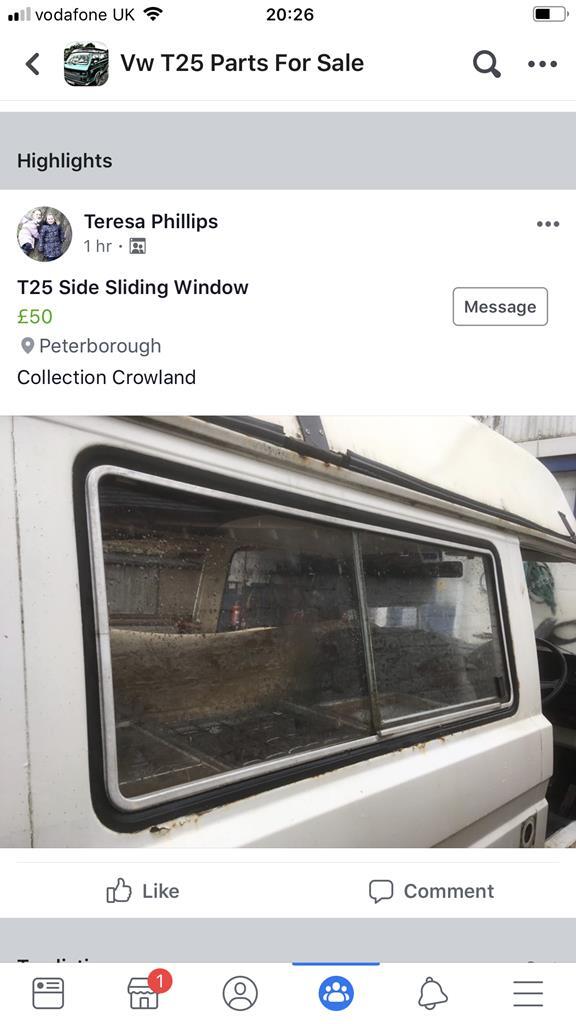 |
| |
|
|
|
|

 Maybe this album cushion malarkey will become a Thing and I'll wish I'd patented it


 . There's a lesson; always unpack your toys before you start playing with them...


 Jesus, what is it with the self-tappers‽ Yay, got to use my interrobang again
 in that pic so if you want you can mount the handle at a 45° angle. But the odd thing is, they are flat and the mounting hole is dead central in the nylon bung. And the holes in the door obviously can't be moved around, so there is no leeway at all in where the hole in the centre of each bung ends up. And they're out


 . I guess the varnish has sealed the bacony goodness in


