jonomisfit
Club Retro Rides Member
Posts: 1,788
Club RR Member Number: 49
|
|
|
|
I decided I fancied a change this afternoon. If anyone has driven a sierra / escort thats got some age behind it will know the gear shift gets sloppy. Ford put a lot of rubber where they could in the gearstick, i'm asusming to reduce noise/vibration. I'm surte it was fine when new, but its all gone soft so i need to do something. It turns out i have 4 gear sticks, some better than others, but all seem a bit sloppy to me. Think i'll make a new gear stick. Original  P1070721 P1070721 by jono_misfit, on Flickr I've already ordered a nylon gear nob (at £20 its not worth the effort of making one!) but need to make the stick itself. Make a drawing of waht I want.  P1070722 P1070722 by jono_misfit, on Flickr I've got a length of 20mm EN24T lying about, so am makling from this. Considerably stronger than normal bright mild so if it bends, i've likely bent a selector fork as well. Cut to length and put in the lathe  P1070723 P1070723 by jono_misfit, on Flickr cut a step and doing a light pass with the thread tool to check pitch correct  P1070724 P1070724 by jono_misfit, on Flickr  P1070725 P1070725 by jono_misfit, on Flickr threads cut  P1070726 P1070726 by jono_misfit, on Flickr reducing centre section  P1070727 P1070727 by jono_misfit, on Flickr part made, couple of flats added to bottom  P1070728 P1070728 by jono_misfit, on Flickr  P1070729 P1070729 by jono_misfit, on Flickr pretty much finished, but may need a few light tweaks when the gear knob turns up drilled for a sping pin  P1070730 P1070730 by jono_misfit, on Flickr and fitted  P1070731 P1070731 by jono_misfit, on Flickr  P1070732 P1070732 by jono_misfit, on Flickr Its come out quite nicely and feels rock solid. I've got a metal blacking kit coming, so will be taking it off, cleaning, and doing a chemical black to protect it a bit. Hopefully the gear knob will fit..... |
| |
|
|
|
|
mk2cossie
Club Retro Rides Member
Posts: 3,060  Club RR Member Number: 77
|
|
|
|
The BOA definitely had cats in the downpipe section as standard. Can't remember if they had a third shared one further back tho 🤔 Either way, I'd make new downpipes from 2inch pipe, and make it where you want to go and clear things  If the Escort is registered after 1994, it only needs 1 cat anyway  |
| |
|
|
jonomisfit
Club Retro Rides Member
Posts: 1,788
Club RR Member Number: 49
|
|
|
|
|
Its interesting, when I was doing a search for Granada Cosworth catalytic converter it doesnt return anything. The only ones listed are the scorpio cosworth ones for the BOB.
I've been looking at exhaust tube / bends kits and will make something :-)
|
| |
|
|
|
|
|
|
|
Originally it would have had 4 catalysts. 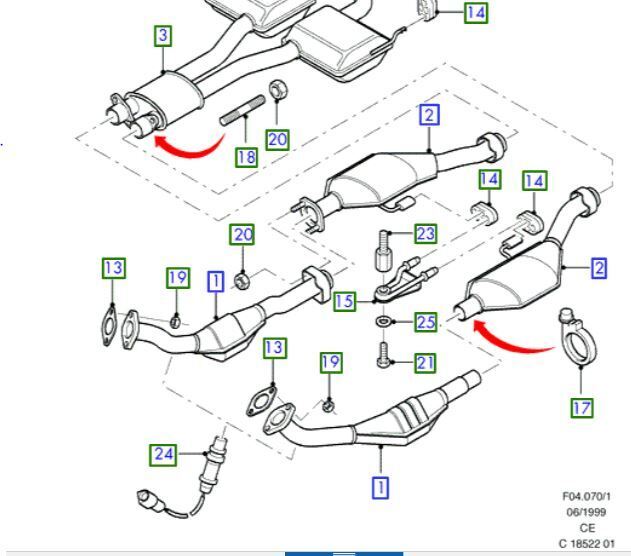 |
| |
|
|
jonomisfit
Club Retro Rides Member
Posts: 1,788
Club RR Member Number: 49
|
|
|
|
|
Those are the bits I have (1 and 2) but none of them have cats in them. They are empty boxes.....
Unless the cats have failed and been blown out, or someone has pulled the internals out.
|
| |
|
|
mk2cossie
Club Retro Rides Member
Posts: 3,060  Club RR Member Number: 77
|
|
|
|
Those are the bits I have (1 and 2) but none of them have cats in them. They are empty boxes..... Unless the cats have failed and been blown out, or someone has pulled the internals out. I think we all know what happened to the innards  Also means the exhaust would drone too, as the hollow chambers cause all kinds of reverberation noises when cruising |
| |
|
|
jonomisfit
Club Retro Rides Member
Posts: 1,788
Club RR Member Number: 49
|
|
|
|
Those are the bits I have (1 and 2) but none of them have cats in them. They are empty boxes..... Unless the cats have failed and been blown out, or someone has pulled the internals out. I think we all know what happened to the innards  Also means the exhaust would drone too, as the hollow chambers cause all kinds of reverberation noises when cruising 😆😆😆 |
| |
|
|
|
|
|
|
|
|
yep there is supposed to be a small light off cat in the front ones and larger bricks in the ones further back.
|
| |
|
|
jonomisfit
Club Retro Rides Member
Posts: 1,788
Club RR Member Number: 49
|
|
|
|
My M10x1.5 die turned up so used it to finalise the thread profile. It took a very small amount out and left a good fit on a nut  P1070736 P1070736 by jono_misfit, on Flickr  P1070737 P1070737 by jono_misfit, on Flickr I took out the last couple of threads to prevent a stress raiser  P1070738 P1070738 by jono_misfit, on Flickr then test fitted the internal from the gear knob  P1070739 P1070739 by jono_misfit, on Flickr goes on like so  P1070740 P1070740 by jono_misfit, on Flickr But a raw steel shaft is going to go rrange very quickly. Time for some alchemy  P1070741 P1070741 by jono_misfit, on Flickr some detailed instructions..  P1070742 P1070742 by jono_misfit, on Flickr Basically clean for 10 mins, in the blue solution (copper selenide) for 10, and oil for 10. clean  P1070743 P1070743 by jono_misfit, on Flickr dried  P1070745 P1070745 by jono_misfit, on Flickr Just into the blue  P1070746 P1070746 by jono_misfit, on Flickr 10 mins in the blue 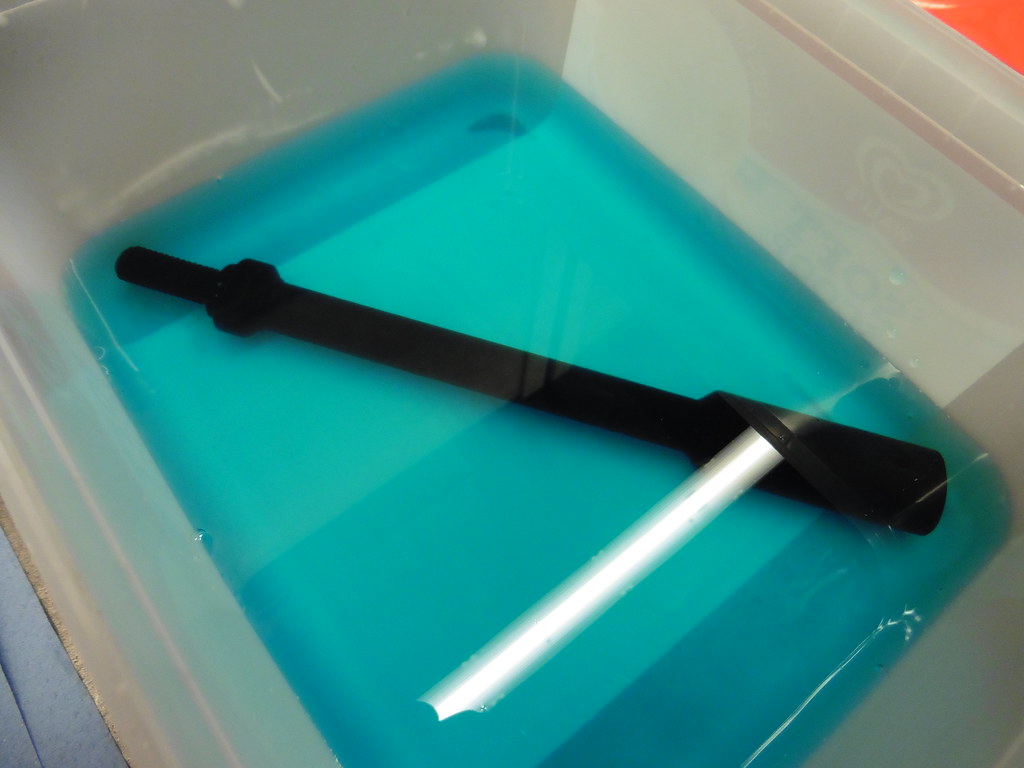 P1070747 P1070747 by jono_misfit, on Flickr rinsed  P1070749 P1070749 by jono_misfit, on Flickr de-watering oil  P1070750 P1070750 by jono_misfit, on Flickr cleaned part  P1070751 P1070751 by jono_misfit, on Flickr its come out OK. Goes well with the gear knob  P1070752 P1070752 by jono_misfit, on Flickr I'm going to give it a coat of matt laquer to protect it, as I think it'll corrode with time still otherwise. I need to deal with this hole as will let in fumes.  P1070744 P1070744 by jono_misfit, on Flickr I have this bit, which has a plastic insert, but doesnt fit my car, but is close enough to use  P1070748 P1070748 by jono_misfit, on Flickr I need to make a bracket  P1070753 P1070753 by jono_misfit, on Flickr mark out some 3mm ali  P1070754 P1070754 by jono_misfit, on Flickr roughly trimmed 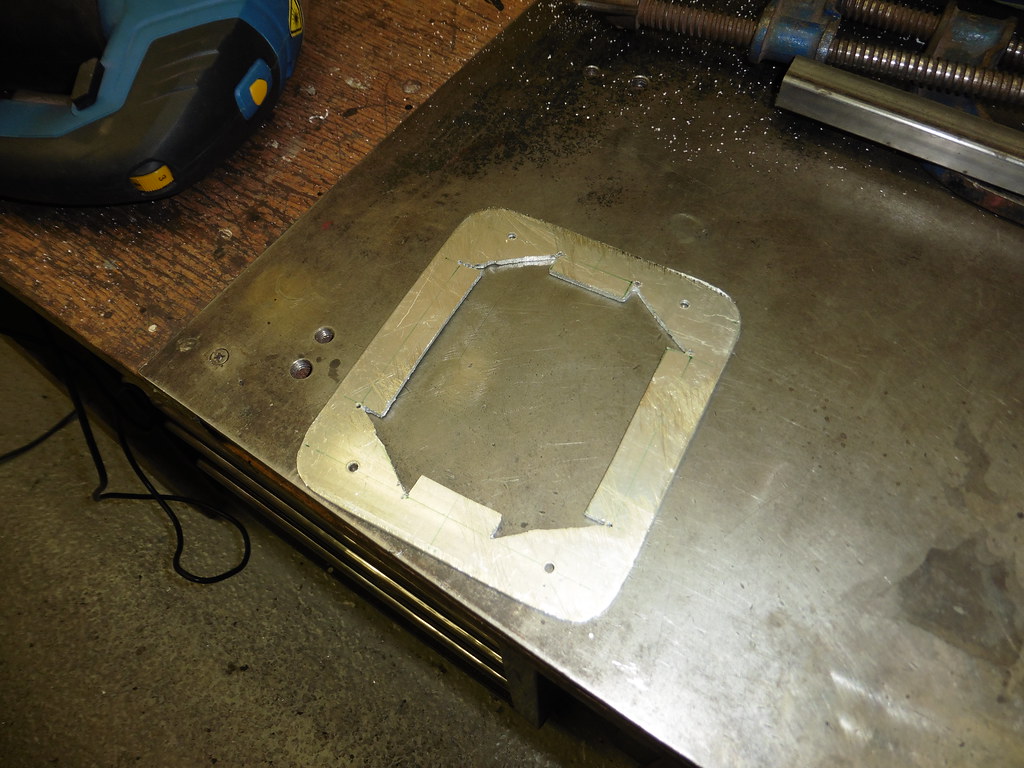 P1070755 P1070755 by jono_misfit, on Flickr bent some alignment tabs  P1070756 P1070756 by jono_misfit, on Flickr and in situ  P1070757 P1070757 by jono_misfit, on Flickr and gearstick in  P1070758 P1070758 by jono_misfit, on Flickr I think its come out quite well  P1070759 P1070759 by jono_misfit, on Flickr  P1070760 P1070760 by jono_misfit, on Flickr Doing some brum brum noises the gearstick is a massive improvement over the original. No flex, very positive shifting, and just the right length for me. |
| |
|
|
jonomisfit
Club Retro Rides Member
Posts: 1,788
Club RR Member Number: 49
|
|
|
|
Then it was on to the sump guard whilst it accessible. I need to do this so I can make sure I position a few other things and I need to make sure they don't hit the sump guard. Club sump guards are usually made from 6mm duralluminium for wear resistance, or laminated from kevlar, but i'm making mine from a couple of pieces of regular 3mm Ali welded together. Its just there to offer a bit of protection for the lows. Going to be something like this  P1070762 P1070762 by jono_misfit, on Flickr mark out some Ali sheet 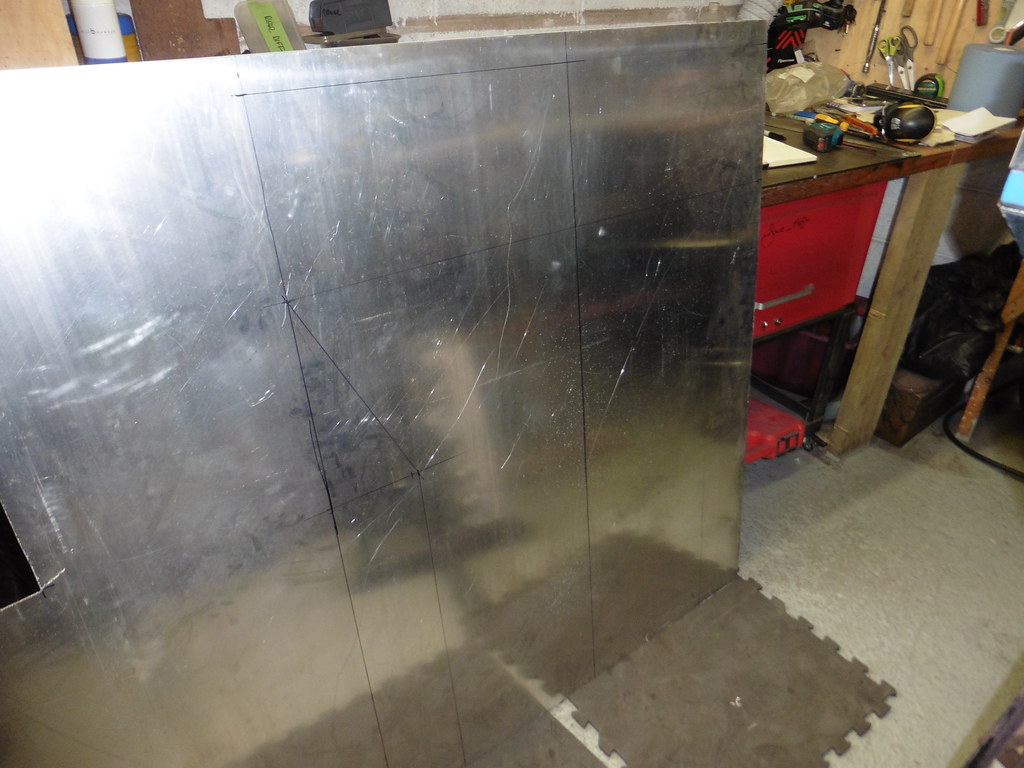 P1070761 P1070761 by jono_misfit, on Flickr trimmed to shape with the jigsaw  P1070763 P1070763 by jono_misfit, on Flickr got out the old sheet metal folder I made as it was big /sturdy enough 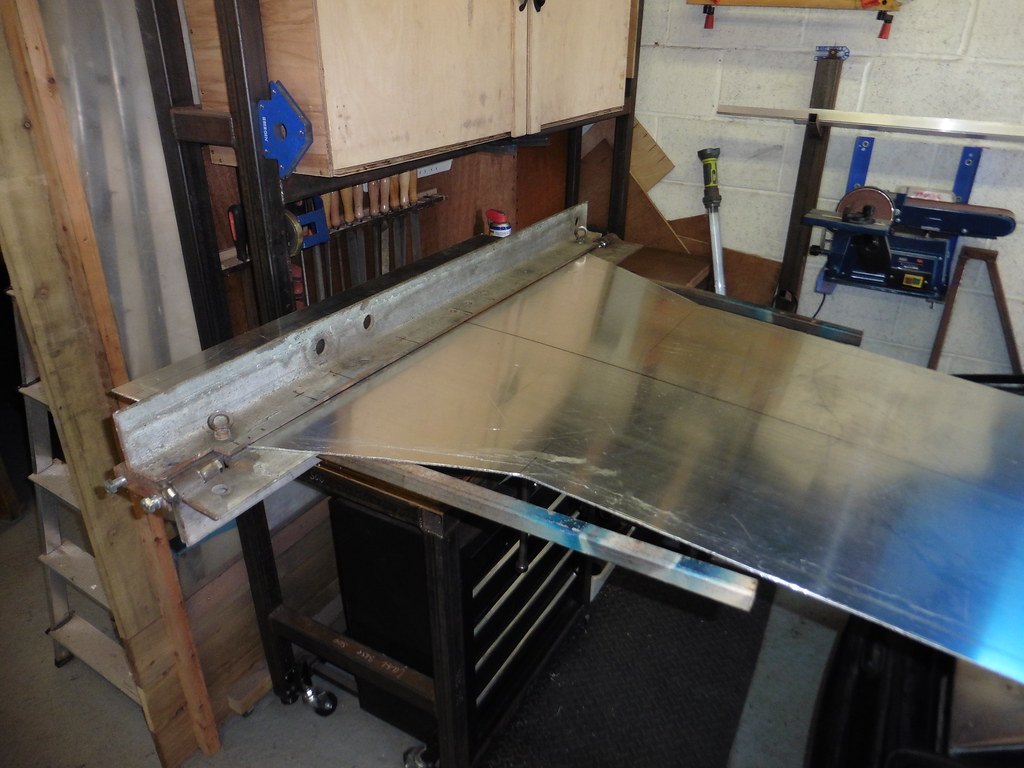 P1070764 P1070764 by jono_misfit, on Flickr first slilght bend in and in position  P1070765 P1070765 by jono_misfit, on Flickr  P1070766 P1070766 by jono_misfit, on Flickr the front curved bit was more of a challenge to make, but I did 5 off circa 8 degree bends to make the curve  P1070767 P1070767 by jono_misfit, on Flickr and then dressed it 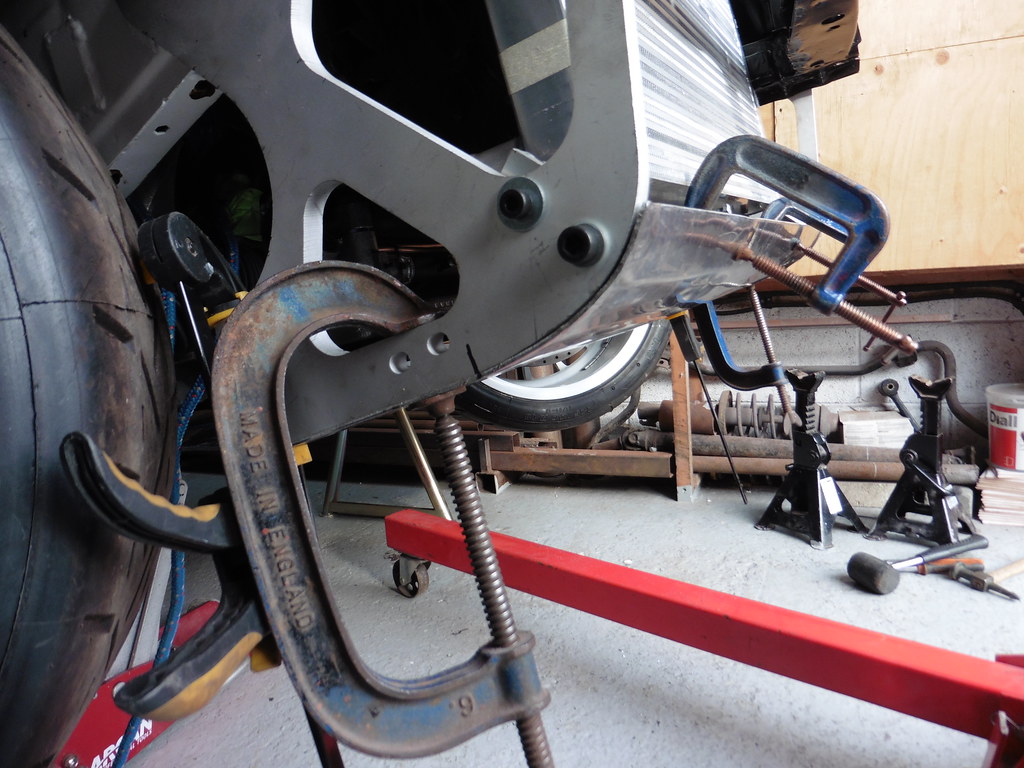 P1070768 P1070768 by jono_misfit, on Flickr A bit more shaping needed, then i'll do the fixings  P1070768 P1070768 by jono_misfit, on Flickr |
| |
|
|
jonomisfit
Club Retro Rides Member
Posts: 1,788
Club RR Member Number: 49
|
|
Apr 10, 2023 19:49:42 GMT
|
I kocked some transfer punches up and marked out and drilled mounting bolt holes.  P1070771 P1070771 by jono_misfit, on Flickr Plate back up with temp bolts  P1070769 P1070769 by jono_misfit, on Flickr gives 25mm clearance to the bottom of the subframe and about 35mm to the bottom of the sump  P1070770 P1070770 by jono_misfit, on Flickr used some more transfer punches on the rear and marked the sump guard  P1070772 P1070772 by jono_misfit, on Flickr  P1070773 P1070773 by jono_misfit, on Flickr drilled  P1070774 P1070774 by jono_misfit, on Flickr with a second skin the countersink bolt will sit flush  P1070775 P1070775 by jono_misfit, on Flickr folded up the rear corners  P1070776 P1070776 by jono_misfit, on Flickr  P1070777 P1070777 by jono_misfit, on Flickr then onto the side stiffener plates rear sections, marked  P1070778 P1070778 by jono_misfit, on Flickr trimmed  P1070779 P1070779 by jono_misfit, on Flickr transfer to the other side  P1070780 P1070780 by jono_misfit, on Flickr both trimmed 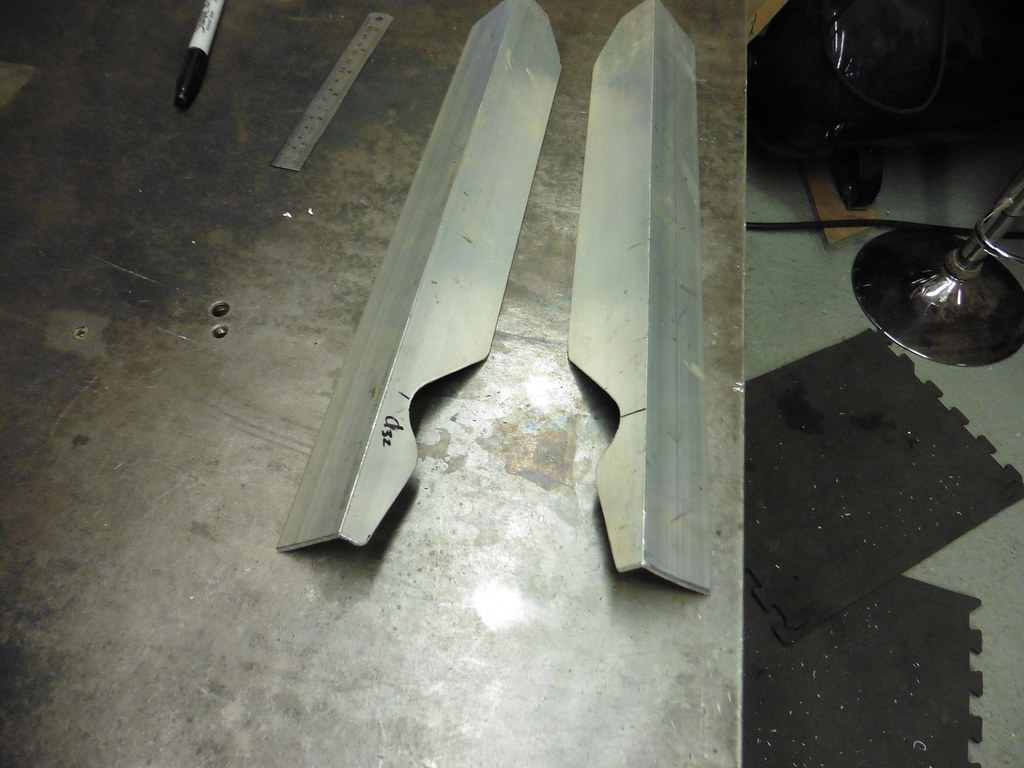 P1070781 P1070781 by jono_misfit, on Flickr stitch welded on  P1070782 P1070782 by jono_misfit, on Flickr I was struggling to get nice clean welds, and after much tweaking got it running OK but not amazingly.  P1070783 P1070783 by jono_misfit, on Flickr in situ  P1070784 P1070784 by jono_misfit, on Flickr  P1070785 P1070785 by jono_misfit, on Flickr I may need to add slightly more clearance around the compression strut rode end from underneath  P1070786 P1070786 by jono_misfit, on Flickr starting to shape the next section  P1070787 P1070787 by jono_misfit, on Flickr  P1070788 P1070788 by jono_misfit, on Flickr getting the front curve set  P1070789 P1070789 by jono_misfit, on Flickr  P1070790 P1070790 by jono_misfit, on Flickr more fettling  P1070791 P1070791 by jono_misfit, on Flickr  P1070792 P1070792 by jono_misfit, on Flickr welded up and tweaking fit  P1070793 P1070793 by jono_misfit, on Flickr 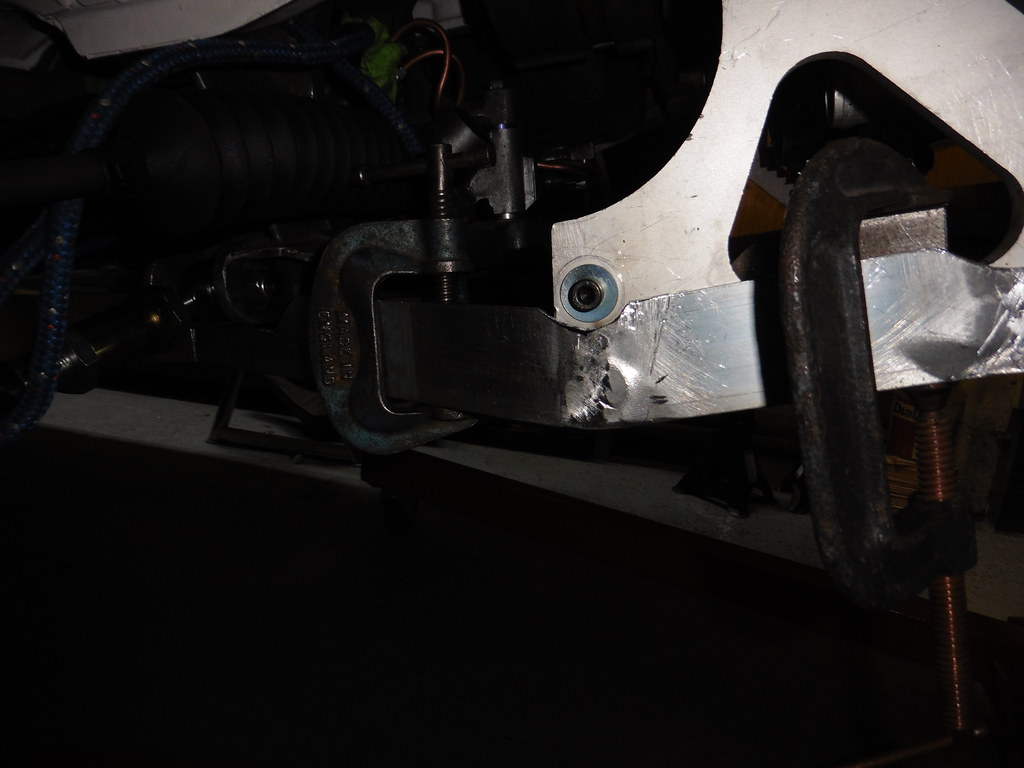 P1070794 P1070794 by jono_misfit, on Flickr front needs trimmed to shape  P1070795 P1070795 by jono_misfit, on Flickr We'll see how I get on next sesuion. |
| |
|
|
|
|
|
Apr 12, 2023 11:31:34 GMT
|
|
did you buy or make the sump guard brackets the thick aluminium ones?
|
| |
|
|
jonomisfit
Club Retro Rides Member
Posts: 1,788
Club RR Member Number: 49
|
|
Apr 12, 2023 11:45:46 GMT
|
|
I bought them.
I got them from a rally page on Facebook, but I think ATM / Prestige motorsport do them.
|
| |
|
|
jonomisfit
Club Retro Rides Member
Posts: 1,788
Club RR Member Number: 49
|
|
Apr 12, 2023 21:42:10 GMT
|
Dropped the sump guard back down again and set up on the bench for welding  P1070796 P1070796 by jono_misfit, on Flickr started welding the side onto the sump guard  P1070797 P1070797 by jono_misfit, on Flickr start cutting out the other side reinforcing  P1070798 P1070798 by jono_misfit, on Flickr many cuts  P1070799 P1070799 by jono_misfit, on Flickr tacked together and clamped into position  P1070800 P1070800 by jono_misfit, on Flickr  P1070801 P1070801 by jono_misfit, on Flickr clamped ready for welding on  P1070802 P1070802 by jono_misfit, on Flickr adding additional welds  P1070803 P1070803 by jono_misfit, on Flickr back in to check what tweeks are needed  P1070804 P1070804 by jono_misfit, on Flickr back on the bench and stitch weld the reinforcing edge  P1070805 P1070805 by jono_misfit, on Flickr  P1070806 P1070806 by jono_misfit, on Flickr  P1070807 P1070807 by jono_misfit, on Flickr aaaaaaand ran out of gas just as I got the last welds done. Will need to get more as I have additional strips to fit on the sump still Sump guard back on  P1070808 P1070808 by jono_misfit, on Flickr 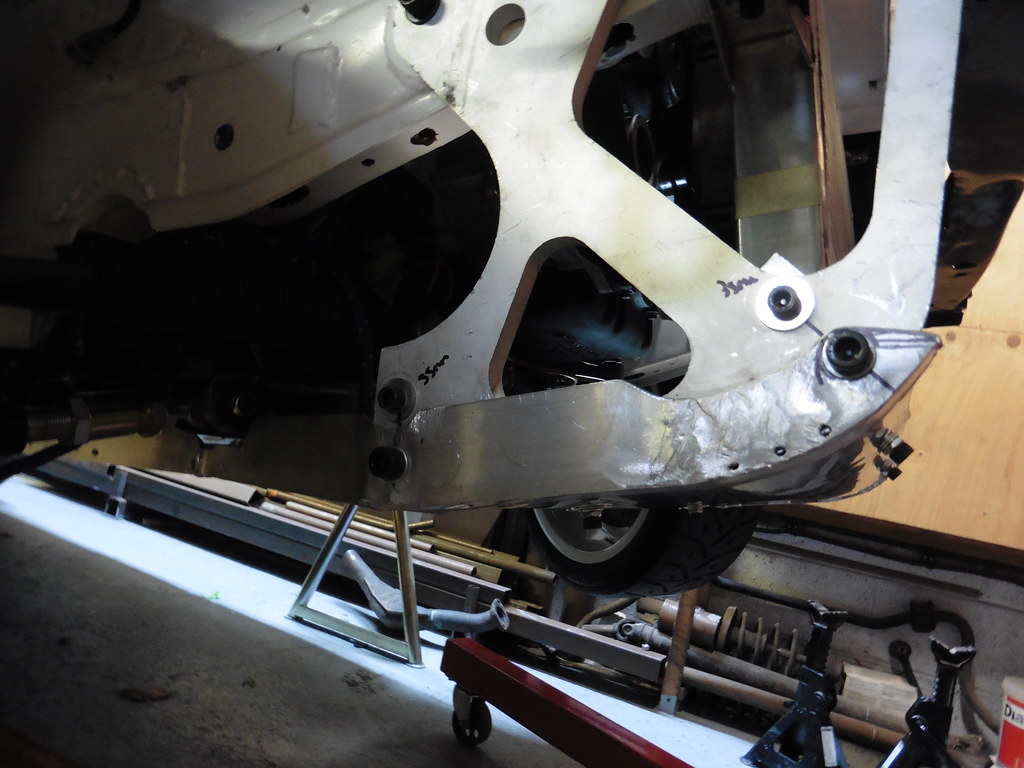 P1070809 P1070809 by jono_misfit, on Flickr  P1070810 P1070810 by jono_misfit, on Flickr  P1070811 P1070811 by jono_misfit, on Flickr Its coming on OK. Still pretty light in weight. |
| |
|
|
|
|
|
Apr 13, 2023 13:15:03 GMT
|
|
great thread this some great fabrication , not sure 3mm sump guard would be any use on the rallies i have done!
|
| |
|
|
jonomisfit
Club Retro Rides Member
Posts: 1,788
Club RR Member Number: 49
|
|
Apr 13, 2023 21:27:26 GMT
|
|
Agreed, 3mm wont stand up to much. Its going to have a second 3mm skin added in key places, plus some 6mm skids / ribs applied as well. I am however now stuck waiting for material to turn up and also more gas.
|
| |
|
|
jonomisfit
Club Retro Rides Member
Posts: 1,788
Club RR Member Number: 49
|
|
Apr 13, 2023 21:56:46 GMT
|
Today was a fill in day as I'm waiting for more gas to turn up. my box of exhaust bits arrived  P1070812 P1070812 by jono_misfit, on Flickr I fitted the bar I used to position the rear sump guard mounts, as this is sets the plane for the sump guard that the exhasut has to clear.  P1070813 P1070813 by jono_misfit, on Flickr it doesnt fit as is so needs a trim  P1070814 P1070814 by jono_misfit, on Flickr Oh, and this is why there is no cat present in it 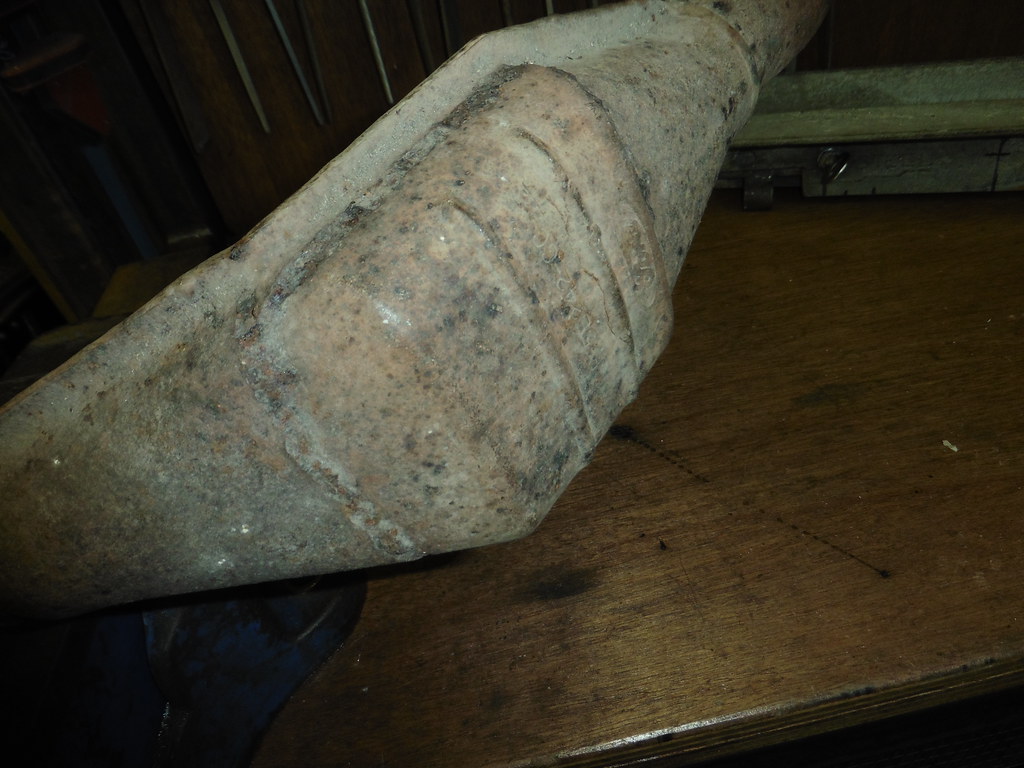 P1070815 P1070815 by jono_misfit, on Flickr cut and cleaned  P1070816 P1070816 by jono_misfit, on Flickr cut a 45deg bend in two  P1070817 P1070817 by jono_misfit, on Flickr And added a wedge to change the angle of the pipe in two direction, and used tape to temporarily hold in place. This side has loads of space.  P1070819 P1070819 by jono_misfit, on Flickr This side does not....  P1070820 P1070820 by jono_misfit, on Flickr not quite as bad as it looks here, but still pretty tight round the prop and tunnel  P1070821 P1070821 by jono_misfit, on Flickr I bought a couple of weld in silencers, however they are too big for my original intention  P1070822 P1070822 by jono_misfit, on Flickr nicely sized to allow the pipe to slot into it for welding  P1070823 P1070823 by jono_misfit, on Flickr Because its so tight round the gearbox / tunnel this side I need to make it turn in two directions  P1070823 P1070823 by jono_misfit, on Flickr  P1070825 P1070825 by jono_misfit, on Flickr I was trying to work out what I need to aim the pipe at, so put the silencer in positon where I wanted it to be  P1070826 P1070826 by jono_misfit, on Flickr its all very tight  P1070827 P1070827 by jono_misfit, on Flickr  P1070828 P1070828 by jono_misfit, on Flickr  P1070829 P1070829 by jono_misfit, on Flickr I'm not sure I want it hanging down as low as it is. I need to find some oval silencers, however they don't seem to be that easy to get hold of. I'll do some searching to see what I can find. I need to get past the edge of the gearbox so need to make a bubble. Using tape to work out centre points  P1070830 P1070830 by jono_misfit, on Flickr cut on lines intersecting with this and taped together  P1070831 P1070831 by jono_misfit, on Flickr and tacked  P1070832 P1070832 by jono_misfit, on Flickr goes in like so  P1070833 P1070833 by jono_misfit, on Flickr tight, but clears with some room to move  P1070834 P1070834 by jono_misfit, on Flickr I got fed up with the tapering wedge under the car, so put in the rear stands  P1070835 P1070835 by jono_misfit, on Flickr  P1070836 P1070836 by jono_misfit, on Flickr Will see how I get on next time I'm in the workshop. |
| |
|
|
jonomisfit
Club Retro Rides Member
Posts: 1,788
Club RR Member Number: 49
|
|
Apr 21, 2023 19:46:08 GMT
|
It been a busy week or so, but managed to get an hour in the workshop. I need a cross over pipe, but cant find anything that works for me. I have these though  P1070837 P1070837 by jono_misfit, on Flickr and a saw  P1070838 P1070838 by jono_misfit, on Flickr I need two of these  P1070839 P1070839 by jono_misfit, on Flickr the bends arent especially accurate so one needed a slight tweak to get them parallell  P1070840 P1070840 by jono_misfit, on Flickr Marking out for cutting  P1070841 P1070841 by jono_misfit, on Flickr cut and cleaned up  P1070842 P1070842 by jono_misfit, on Flickr  P1070843 P1070843 by jono_misfit, on Flickr second side cut  P1070844 P1070844 by jono_misfit, on Flickr cleaned up, tweaked, then welded the joint  P1070845 P1070845 by jono_misfit, on Flickr I need to tweak it a bit further , but that was all I had time for today. |
| |
|
|
Darkspeed
Club Retro Rides Member
Posts: 4,880
Club RR Member Number: 39
|
|
Apr 21, 2023 21:09:14 GMT
|
Nice bit of design assembly work going on there - as usual I may add - Anther reason I like mid engine and rear engine cars - no room for that sort of faffing about creative fabrication needed  |
| |
|
|
jonomisfit
Club Retro Rides Member
Posts: 1,788
Club RR Member Number: 49
|
|
|
|
|
Haha, it's the journey not the destination for me.
Inventing side projects is what keeps it fun.
|
| |
|
|
 P1070721 by jono_misfit, on Flickr
 P1070722 by jono_misfit, on Flickr
 P1070723 by jono_misfit, on Flickr
 P1070724 by jono_misfit, on Flickr
 P1070725 by jono_misfit, on Flickr
 P1070726 by jono_misfit, on Flickr
 P1070727 by jono_misfit, on Flickr
 P1070728 by jono_misfit, on Flickr
 P1070729 by jono_misfit, on Flickr
 P1070730 by jono_misfit, on Flickr
 P1070731 by jono_misfit, on Flickr
 P1070732 by jono_misfit, on Flickr
 P1070721 by jono_misfit, on Flickr
 P1070722 by jono_misfit, on Flickr
 P1070723 by jono_misfit, on Flickr
 P1070724 by jono_misfit, on Flickr
 P1070725 by jono_misfit, on Flickr
 P1070726 by jono_misfit, on Flickr
 P1070727 by jono_misfit, on Flickr
 P1070728 by jono_misfit, on Flickr
 P1070729 by jono_misfit, on Flickr
 P1070730 by jono_misfit, on Flickr
 P1070731 by jono_misfit, on Flickr
 P1070732 by jono_misfit, on Flickr


