|
|
|
|
|
|
When they punch a fill point through a window for rally cars, do they not brace it back to the shell somehow so the weight of the filler and pipework and thrashing about doesn't fatigue something?
Also, out of curiosity, how does lexan fair with fuel being splashed on it?
Looking good, although there's not enough swagey-ness going on...
|
| |
Last Edit: Feb 15, 2022 1:33:07 GMT by varelse
|
|
|
|
jonomisfit
Club Retro Rides Member
Posts: 1,788
Club RR Member Number: 49
|
|
Feb 15, 2022 19:15:16 GMT
|
|
Not that I've seen. Although I'm not sure if it's permitted practice on rally cars any more.
Most of the ones I've seen on track cars don't even have the vapour hose I'm putting on. Just a fuel hose open to everything.
Mine will have a little stay coming off the cage to hold the tube / vapour hose in place, and take up the weight.
Leans reasonably OK with the odd splash, but I'm sure will yellow and degrade from it.
I know. Need to find more opportunities for them 😁
|
| |
Last Edit: Feb 15, 2022 19:16:29 GMT by jonomisfit
|
|
jonomisfit
Club Retro Rides Member
Posts: 1,788
Club RR Member Number: 49
|
|
Feb 20, 2022 21:31:03 GMT
|
Well...... I got some of those dimensions wrong.  P1060184 P1060184 by jono_misfit, on Flickr angle of the push rod now is too steep to allow the full actuation of the cylinder. On the plus side it wonderfully clears the steering column. A look over suggests if I drop the column down about 20mm at the mount, and remake the pedal with the balance bar point in between the original and positon here, then it should work. That said. I will be stripping the pedal box, taking a full set of dimensions and modelling it all up properly first. And if that doesnt work.... I will be re-designing the pedalbox to work with what I have. .... I could solve the issue by raising the master cylinders up in the body by about 15mm.... but I really don't want to do that if I don't have to. I could always make a compound mechanism......... where you push the pedal, and it pushes a linkage with the balance bar in a place that clears everything....... |
| |
|
|
75swb
Beta Tester
Posts: 1,052
Club RR Member Number: 181
|
|
Feb 20, 2022 23:58:08 GMT
|
|
Ah irritating to say the least. Sure you'll have it sussed quick smart though.
|
| |
|
|
jonomisfit
Club Retro Rides Member
Posts: 1,788
Club RR Member Number: 49
|
|
Feb 22, 2022 21:04:54 GMT
|
|
I took a little walk round video of the escort, same as the others just showing some of the details.
I modelled up the pedals in CAD and had a few thinks on how to solve the problem. I need to do some more playing to get it all sorted.
|
| |
|
|
jonomisfit
Club Retro Rides Member
Posts: 1,788
Club RR Member Number: 49
|
|
Feb 22, 2022 21:51:57 GMT
|
This model shows the issue 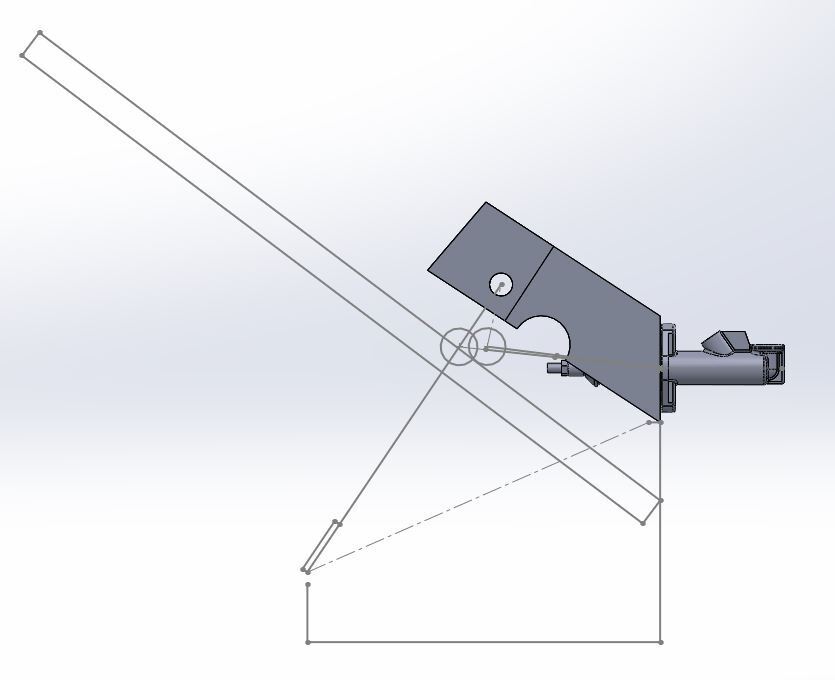 the column (black box) goes through where the balance bars are the master cylinder is actually pointing under the centre line of the balance bar in neutral position. This is ok for the standard position as it still stays within the cone of action for the master cylinder. 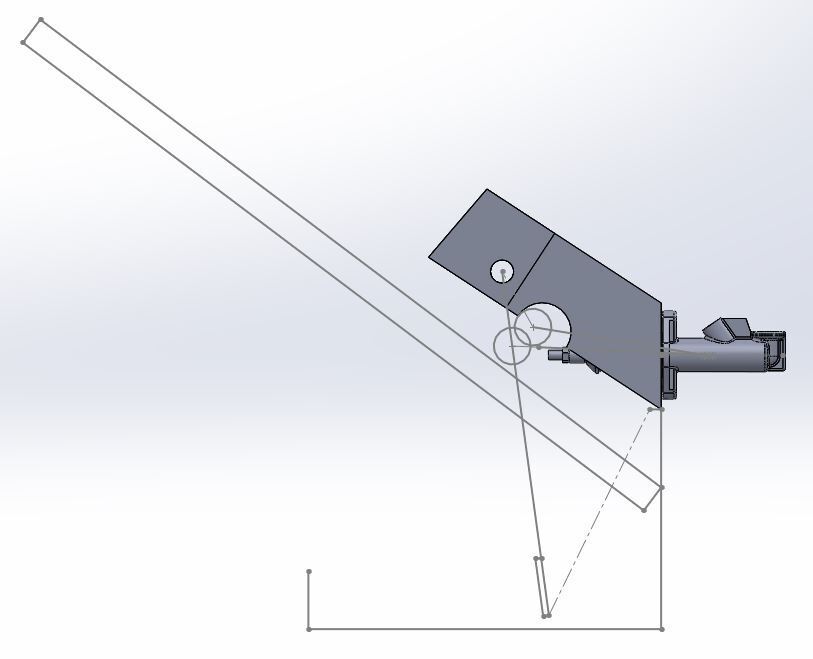 The new position however has put too much angle on the push rod and locks. |
| |
|
|
jonomisfit
Club Retro Rides Member
Posts: 1,788
Club RR Member Number: 49
|
|
Feb 26, 2022 17:37:56 GMT
|
The saga comntinues I fitted the other steering column to see how it fits  P1060225 P1060225 by jono_misfit, on Flickr  P1060227 P1060227 by jono_misfit, on Flickr clearance is actually much better  P1060226 P1060226 by jono_misfit, on Flickr But I seem to remember its a bit low for comfort. So i'm at a quandary. Do I make a new steering column Do I make a new pedal box Do I buy a floor mounted pedal box and modify the floor to mount this (this seems to be a common way of doing escort pedal boxes) Hmmm. |
| |
|
|
|
|
|
Feb 27, 2022 19:49:18 GMT
|
|
Could you move the bulkhead bearing down to get enough clearance?
|
| |
|
|
jonomisfit
Club Retro Rides Member
Posts: 1,788
Club RR Member Number: 49
|
|
Feb 27, 2022 20:07:34 GMT
|
|
Potentially. There's enough movement in the lower link to move the joint down.
It does mean that the column angle will change a bit though, meaning the upper mount will have a slight angle on it.
If I change to the other type of column (the rake adjust one) then that won't be a problem as it has a pivot type mount.
May well be the solution.
|
| |
|
|
jonomisfit
Club Retro Rides Member
Posts: 1,788
Club RR Member Number: 49
|
|
|
|
So i took some dimensions and mocked things up in CAD. Current design with clash of column on balance bar 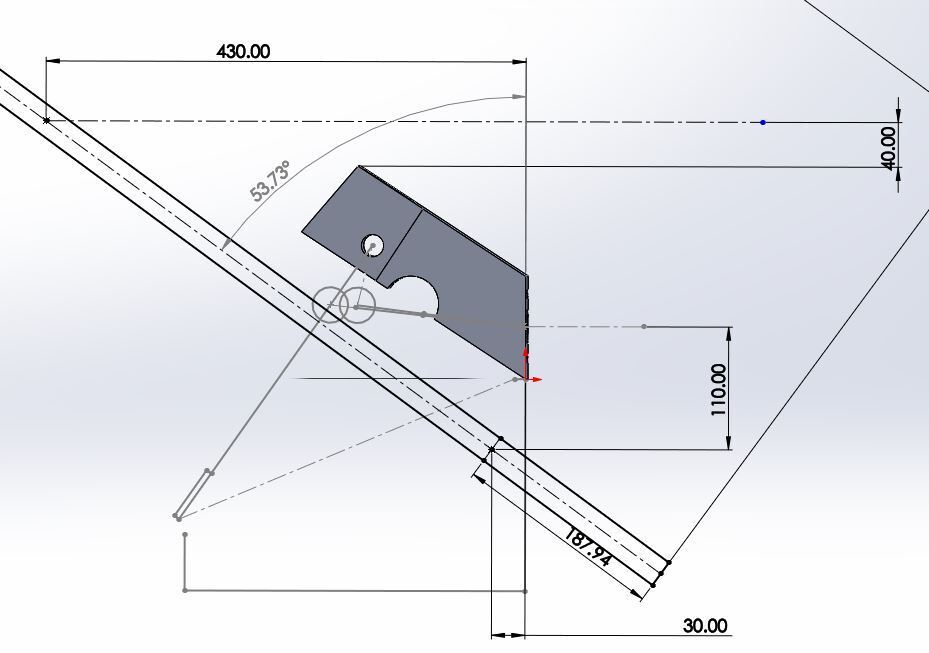 I then tried lowering the upper mount 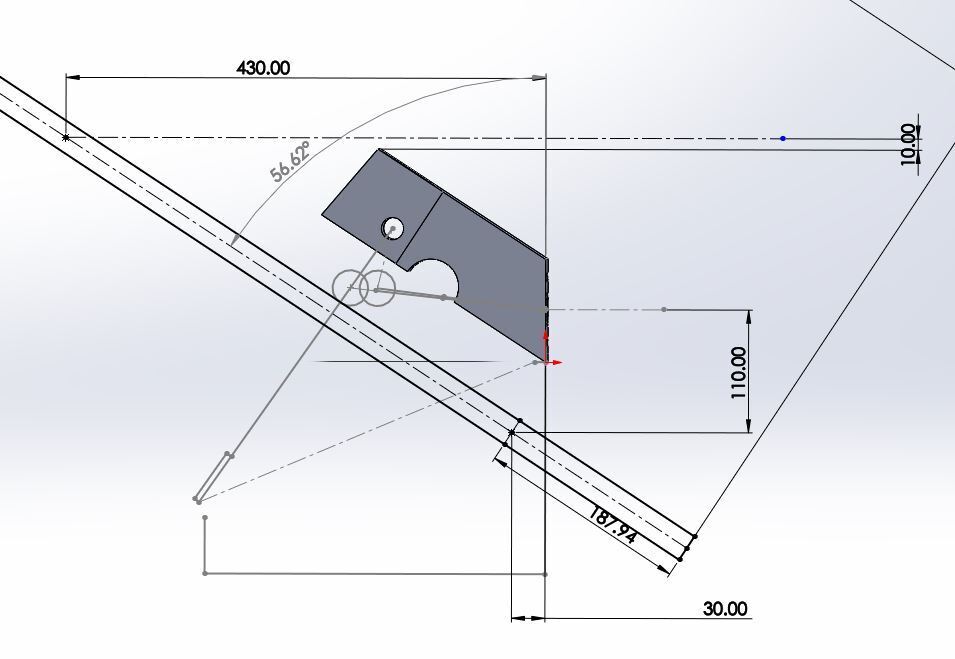 you can see there is a reasonable change in angle and will result in the steering wheel sitting a fair bit lower. Calc shows the angle change drops the wheel centre by about 50 - 70mm if I drop the bottom about 25mm i get this 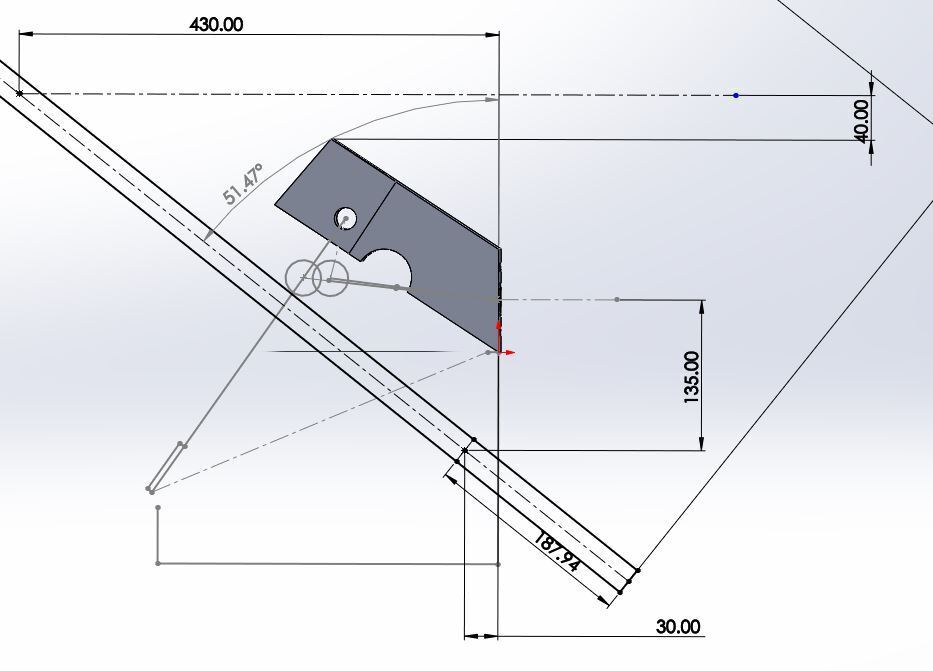 surprise, the steering wheel will go up. so i need to drop both to get back to the original angle back 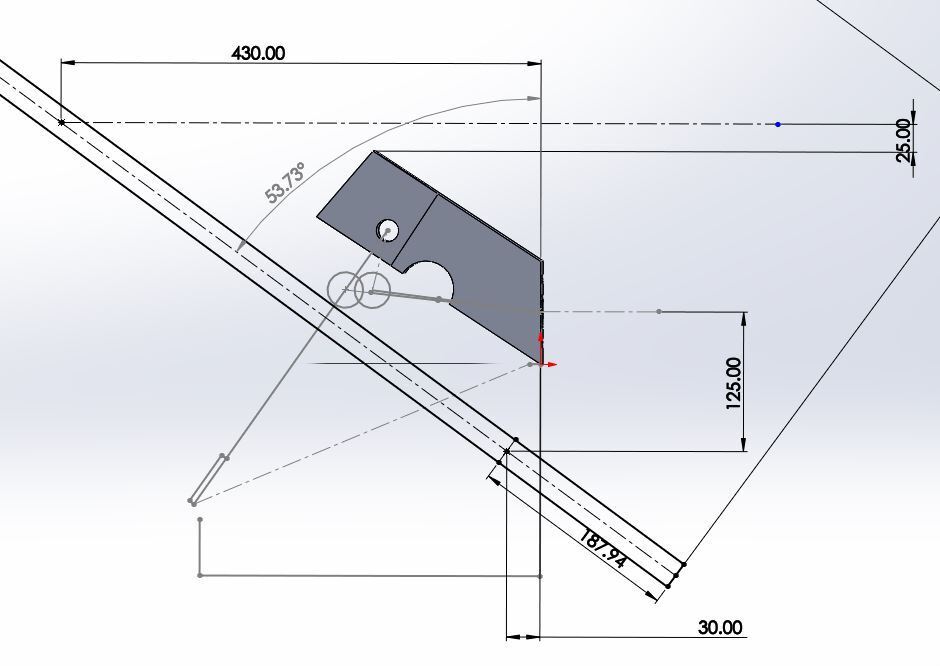 Certainly looks like an option to resolve it. A drop of about 15 - 20mm at the bottom hole should be fairly doable and there is already about 10mm room to drop within the existing bulkhead cut out. |
| |
|
|
jonomisfit
Club Retro Rides Member
Posts: 1,788
Club RR Member Number: 49
|
|
Apr 15, 2022 15:38:43 GMT
|
|
This is still on the back burner whilst I do the paint on the postman pat van, and some work on the house.
I've ordered a rally steering column which will hopefully aid resolving the clash.
|
| |
|
|
jonomisfit
Club Retro Rides Member
Posts: 1,788
Club RR Member Number: 49
|
|
|
|
Boom. Sorted it. Clearance, and it only took spending money and redoing the whole steering column  P1060351 P1060351 by jono_misfit, on Flickr looks tighter than it really is, but clears. I'm going to get some 20mm plastic tube and sleave the triangular section to ensure there's no opportunity for the balance bar to snag on it.  P1060352 P1060352 by jono_misfit, on Flickr how did I get the clearance... by doing this to the bearing  P1060353 P1060353 by jono_misfit, on Flickr which drops the column right to the bottom of the bulkhead hole  P1060354 P1060354 by jono_misfit, on Flickr  P1060355 P1060355 by jono_misfit, on Flickr it looks like its resting on the lip, but there are a few mm's clearance. bottom sorted, now to sort the upper column. my housing is from a Granada rather than an escort, and the top section is different. At least I assume it is as otherwise the column doesnt fit! There's a casting that goes on the end I wont be using,  P1060357 P1060357 by jono_misfit, on Flickr and this tube needs shortening.  P1060356 P1060356 by jono_misfit, on Flickr there's a bearing in the casting to ensure the column sits in the right place, and has minised friction (the sierra colum i've been using just has a large lump of nylon to do this which feels quite draggy.  P1060358 P1060358 by jono_misfit, on Flickr worked out what I needed to make  P1060359 P1060359 by jono_misfit, on Flickr dulled my arms a bit  P1060360 P1060360 by jono_misfit, on Flickr turn turn and turn some more  P1060361 P1060361 by jono_misfit, on Flickr end result  P1060362 P1060362 by jono_misfit, on Flickr added some bolts to fix the aluminium part into the steel tube and bolted back into the car  P1060363 P1060363 by jono_misfit, on Flickr Everything still clears and steering feels good with no slop. However now I can feel the rack bushes moving a bit, so will be turning up or buying some aluminium inserts to resolve. The other thing I noticed was how much flex there is in the convoluted tube section. Its fairly thin and a pull on the steering makes it deflect. I appreciate this is for column collapse, but I can see me remaking it at another point to eliminate the flex. redid the bearing mounting hole  P1060364 P1060364 by jono_misfit, on Flickr I just need to do something to seal the gap and prevent water ingress around the bearing.  P1060365 P1060365 by jono_misfit, on Flickr My shuffle round of things on the mezzanine meant i think I've foudn the missing air duct feed for the windscreen. Hopefully. Will see if its the right part i've found next time I pull the dash. Escort will be back on stop now until I get the postman pat van finished.... unless the compressor doesnt turn up.... then I may end up oni the escort again next time. |
| |
|
|
jonomisfit
Club Retro Rides Member
Posts: 1,788
Club RR Member Number: 49
|
|
May 20, 2022 16:28:12 GMT
|
|
|
| |
|
|
|
|
|
|
|
|
coming along again, i saw your comment on Tobys thread on passion ford the pug 205 4X4 cosworth i bought his old gearbox and other parts off him ages ago.
|
| |
|
|
jonomisfit
Club Retro Rides Member
Posts: 1,788
Club RR Member Number: 49
|
|
|
|
|
I only really go on passionford to see his thread. Shame how badly he has been messed about on it, but good to see it going again.
|
| |
|
|
|
|
|
Jul 10, 2022 11:02:34 GMT
|
|
any updates on your car?
|
| |
|
|
jonomisfit
Club Retro Rides Member
Posts: 1,788
Club RR Member Number: 49
|
|
Jul 10, 2022 17:25:57 GMT
|
|
Not yet. I've been finishing off the pat van. Hopefully back onto it in a couple of weeks.
|
| |
|
|
|
|
|
Jul 14, 2022 13:13:05 GMT
|
|
i have finally got the 2 pallets of parts that i have had in the UK for the last few years, they are being couriered to a depot and then shipped out to me should get them in about 12 weeks
|
| |
|
|
jonomisfit
Club Retro Rides Member
Posts: 1,788
Club RR Member Number: 49
|
|
Jul 30, 2022 10:10:39 GMT
|
I had half an hour spare yesterday, so drilled the rear screen for rivets (no Pics) and had a think how I was going to hold the bonet vents on. I have fiberglass repo vents that don't have the sides to them that allow the clips to hold them onto the bonnet.  P1060573 P1060573 by jono_misfit, on Flickr I have the proper clips and can vaguelly remember what they look like. So started bending some Ali to think how I will do it.  P1060571 P1060571 by jono_misfit, on Flickr go on these little tangs like so  P1060572 P1060572 by jono_misfit, on Flickr so if I bond them onto the vent it'll sit like so  P1060574 P1060574 by jono_misfit, on Flickr they need a few tweaks to work better but this may work. |
| |
|
|
jonomisfit
Club Retro Rides Member
Posts: 1,788
Club RR Member Number: 49
|
|
|
|
I made the rest of the mounting tabs  P1060575 P1060575 by jono_misfit, on Flickr then started adjusting to work with the bonnet vent clips  P1060576 P1060576 by jono_misfit, on Flickr hole drilled to allow panel bond to go through not just onto the surface  P1060577 P1060577 by jono_misfit, on Flickr clips fit like so  P1060578 P1060578 by jono_misfit, on Flickr I then bonded on the vent but forgot to take a picture. then moved onto making the proper steering column mount template  P1060579 P1060579 by jono_misfit, on Flickr cut some steel  P1060580 P1060580 by jono_misfit, on Flickr mark out and start drilling some holes  P1060581 P1060581 by jono_misfit, on Flickr trimmed  P1060582 P1060582 by jono_misfit, on Flickr bent up a vertical fence, which was tough as its a tight radius for 3mm  P1060583 P1060583 by jono_misfit, on Flickr go together like so  P1060584 P1060584 by jono_misfit, on Flickr tiged together  P1060585 P1060585 by jono_misfit, on Flickr  P1060586 P1060586 by jono_misfit, on Flickr marked out holes  P1060587 P1060587 by jono_misfit, on Flickr drilled and trimmed  P1060589 P1060589 by jono_misfit, on Flickr in situ  P1060590 P1060590 by jono_misfit, on Flickr spacers to aligne colum to bracket.  P1060591 P1060591 by jono_misfit, on Flickr Why spacers and not just make the bracket the same width as the column mount..... because the column mount face is narrower than the ribbs on the same casting. mounted.  P1060592 P1060592 by jono_misfit, on Flickr  P1060593 P1060593 by jono_misfit, on Flickr  P1060594 P1060594 by jono_misfit, on Flickr couple of little bits to trim and tidy up, but the mount is now rock solid. Much happier with it. Once its tweaked I'll strip it and paint it. |
| |
|
|


